#crafting tutorial
Explore tagged Tumblr posts
Visit Tumblr Blog
Explore Tumblr blogs with no restrictions, modern design and the best experience.
Last Seen Tumblr Blogs


Fun Fact
Tumblr has 411 employees.
Text
Here is a slightly re-edited video I made five years ago on my Longtransfurby accounts about how to customize an 05' or 06' furbys eyes! Apologies for the double text because i cant find the original footage anywhere for some reason, so it's just a slightly re-edited version of the old video.
#furby#2005 furby#2006 furby#funky furby#custom furby#customized furby#furby customization tutorial#crafting tutorial#art tutorial#furbies of tumblr#tiktok#long furby#haunted furby#longtransfurby
18 notes
·
View notes
Text
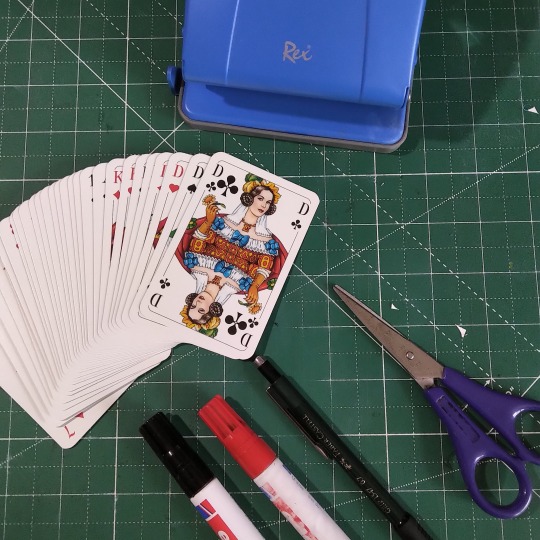
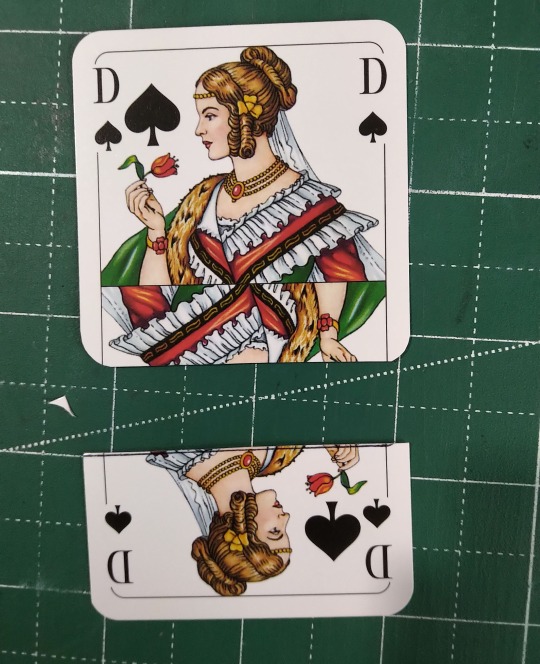
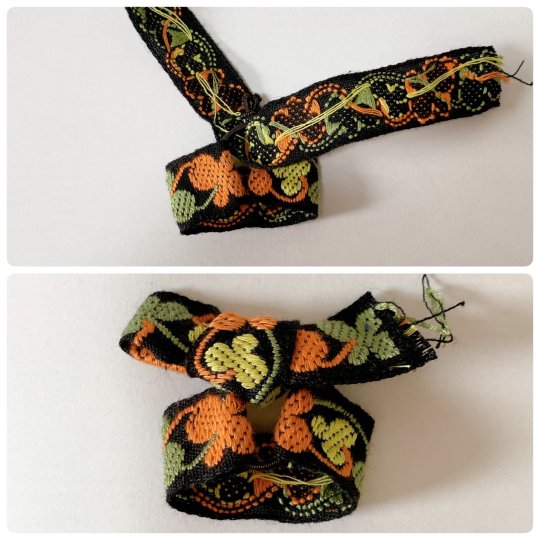
How to make tablets for tablet weaving
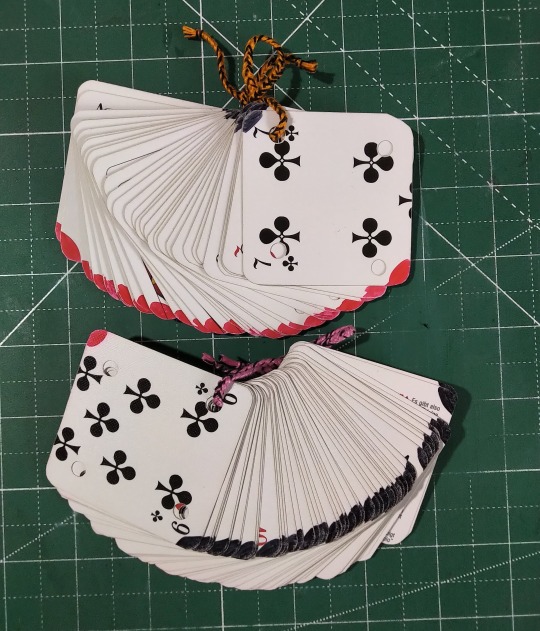
You'll need: Playing cards, scissors, punch, pencil, permanent marker in 2 different colours.
Why playing cards specifically? Because they are made to be handled. Their edges don't fray, even the cheapest ones. These were like 2€ for 32, the rest was stuff I already had lying around, making it a very cheap project. Also they make it very easy to divide a pattern into groups of 4.
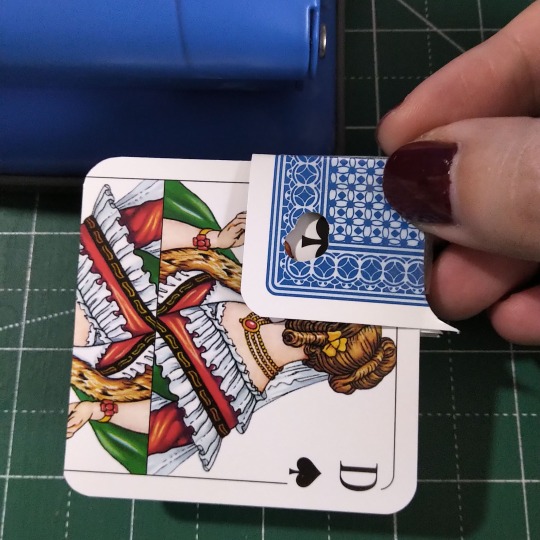
Step 1: Square your cards by laying another one on top perpendicularly and mark with a pencil (pen used for visibiliy).
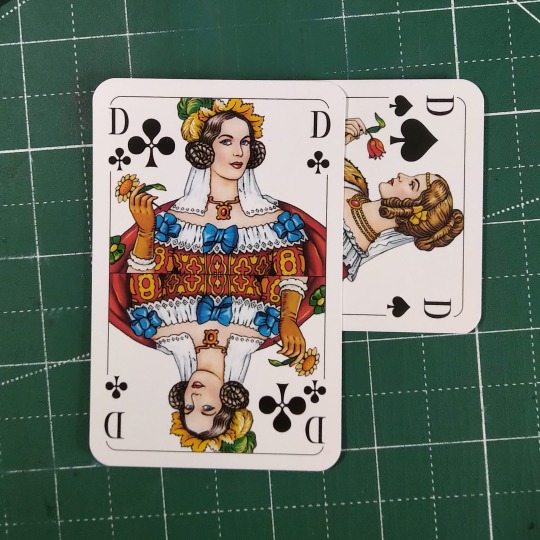
Step 2: Cut and round the edges (it's fine, these people are royalty). I cut a little inside the line here because the pen drew a smidge to the side.
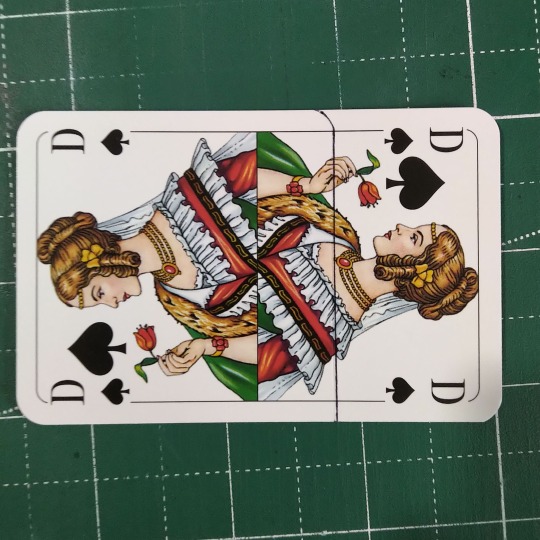
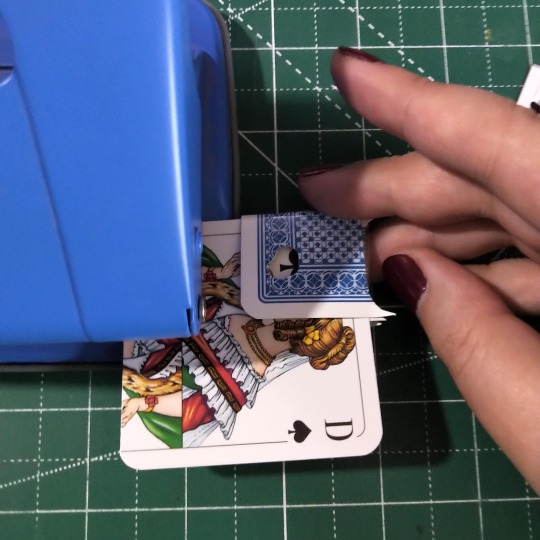
Step 3: Punch holes in the corners. First try on a spare piece of paper to figure out how far you have to hold it in to get the hole where you need it to be. It doesn't have to be 100% accurate, but close enough. I built myself a little jig to hold the card out of the cut off bit. When the thingy touches the punch I know the hole is gonna be where I want it.
Step 4: Mark two opposite corners with permanent marker on both sides. This is technically not necessary, but very useful. Also mark the same corners on all the cards for aesthetic.
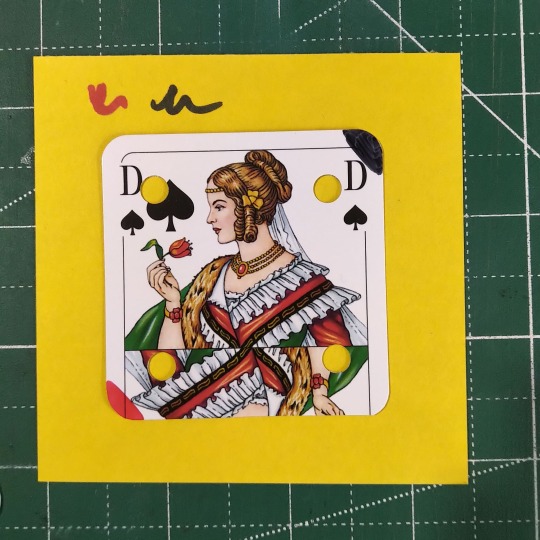
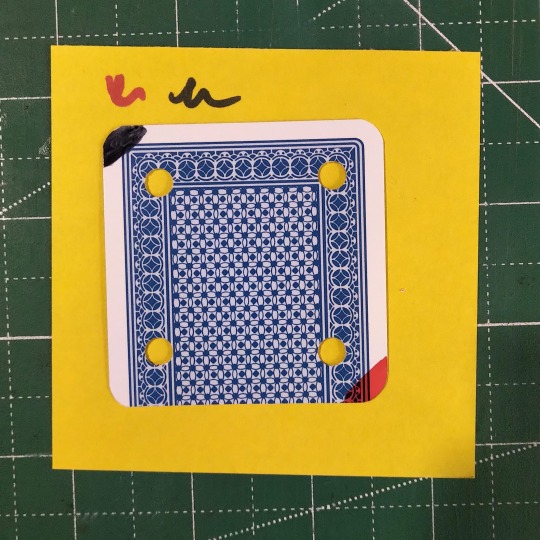
Congratulations, you have tablets now! How many do you need? 32 is enough for most patterns you'll find on pinterest, but there are patterns with over 90. So make a couple more!
#tablet weaving#hand weaving#hand crafted#tutorial#tutorial with pictures#weaving tools#crafting#historical crafting#crafting tutorial
11 notes
·
View notes
Text
Needle Felt Siffrin Build Log: (oct 6 - nov 20, 2024)


Credits goes wholely to @insertdisc5 for creating ISAT and siffrin's design! I am just here to attempt to make cool fanart (and get more people to play isat.. my devious plans are going great so far :3) As always, this isn't a tutorial- it is just a log about how i go about approaching a sculpture and I hope this collection of resources can help others make their own sifs!!
PSA: this has some spoilers for endgame CGs/sprites on my references image board ( also might see it in the backgrounds of my process pics). And bc this is needle felting, you will see some sharp needles! beware!
my inspiration was the intro cutscene where Sif eats the star, so my main goal was to adhere to the style of ISAT as closely as possible while transfering it to 3D space. And I knew i also wanted to try making the cloak for stopmotion purposes, so my process was tailored towards having control over the fabric with wire inlaid within the cloak (more on that later).
I ended up not sticking eyebrows on top of siffrin's bangs lol but anyways, first order of business is Gather Reference! v important. pureref is free and an awesome program. I also do some sketches to visualize the pose and important details i wanted to include in the sculpt.
behold the isat wiki gallery page! tawnysoup wrote an awesome ISAT style guide that absolutely rings true in 3d space too!! adrienne made a sif hair guide here!! (sorry i couldnt find the original link, but it's on the wiki). It says ref komaeda hair so that's what i looked at, along with other adjacent hairstyles! I also like doing drawovers on in progress photos to previs shapes n stuff to get a better idea of the end result.
Also if you're like me and struggle with translating stuff into 3D space, take a look at how people make 3d models and figurines! sketchfab is also a great resource! I looked at the link botw model by Christoph Schoch here for hair ref. (I used Maya, but there's a blender version too ! you can pose characters too if your model has been rigged!)


Face:
Started off blocking out the main shapes of eyelids and iris, and then filling in the colour details in the iris and the star highlights before moving onto adding thin black outlines and eyelashes. I didn't take many in-progress photos cause i kept ripping stuff out to redo them many many times, sorry!! This eye took about 3 hrs bc i just wasn't happy with it!! Sometimes it do be the vibe to give up, go to bed and see how it looks in the morning (more often than naught, it looks fine and it was the "dont trust yourself after 9pm" speaking)

The Mouth:
Couldn't decide if i even wanted to add a mouth as per usual with all my humanoid sculptures.. but i did some drawover tests first to see what expression i liked and to try to visualize it from multiple angles. (I was also testing the placement of stars on the hat brim here)

And then I redid the mouth like 3 times cause the angle just wasn't right (this went on for about the course of a week yay!)
Hair: woe baldfrin be upon ye


I made the hair strands individually first, and then since Sif has some of the hair at the back dyed black, i covered some of the tips with black wool (manually) (I think it would go much faster if i just took a marker to it, but hahaha i love pain and detailing!! )
And then the rest of it was positioning strands with sewing pins layer by layer, always looking at it from different multiple angles- sometimes tailoring the angle or swoop of individual hair flippies. At one point I thought the back looked too cluttered, but the hat covers a lot of it anyways!! yay for hiding mistakes! (imo this is a similar process to how cosplayers style wigs, but on a smaller scale and the same level of time consuming)
As always, look to your reference for guides, and I always do a whole bunch of drawovers over in progress photos to ascertain what was working and what wasn't.
Hat:
A trick to get a super pointy tip, make another tip seperately while keeping the connection point unfelted, and then combine the two to make super pointy hat!! (this also helps if you made the hat too short and need it to be taller. ask me how i know)

The embroidery on the hat brim was done in a hoop and then invisible stitched to the felted top portion. Technically you don't need a hoop but it helps keep the fabric tension, so you avoid puckers in your embroidery. You can also use iron-on stabilizer if your fabric is loose weave or particularly thin. this is the tutorial i used for the stars embroidery! particularly the fly stitch one, french knots, and the criss-cross stitches. highly recommend needlenthread for embroidery stitches and techniques! i learned all my embroidery from this single site alone.

For fabric, I think I used a polycotton i had in my stash,, unsure of the actual fiber content bc i bought it a long time ago. I used DMC Satin floss which was nice and subtle shiny but frayed a lot so it was kind of a pain to stitch with... but keep a short thread length and perservere through it!! After the embroidery was done, I folded up the raw edges and invisible sewed it to the top portion of the hat.
General shape:
Ok general structure of the body is this: wire armature body covered with black wool -> cloak lining & wire cage -> edge of lining is invisibly sewn to the main cloak at the hem -> head

Don't be afraid to mess around with the pattern, it's essentially a pizza with a slice taken out of it to form a steep cone shape!! Use draft paper before cutting into felt to save material! (i think i made like 3 cloaks before i was happy with the shape lol).
You can also hide the seam of the cloak and collars by gently messing up the fibers of the felt with your fingers or a felting needle btw! you can also sandpaper the seams according to Sarah Spaceman in this vid (highly recommend them for their in depth cosplay/crafting builds holy smokes), though since sif cloak is at such a smol scale, I just blended the seam with my felting needle.
For the lining wire cage section, I sewed in wire around the cloak, so the main rotation point is at the top neck area under the collar. These paddles are used to keep whatever pose I need the cloak to be in for stopmotion purposes. Then after the wire is done, I invisibly sewed the lining to the cloak at the hem (same technique as the hat brim to the lining there).
In hindsight, I should've used a thinner fabric for the lining, but i only had sheer white in my stash so had to go with double felt, thus resulting in a really bulky lining but oh well!

Heels:
started with the general boot shape, then tacking on the diamond shape heel stack and also diamond shape sole bc we're committed to the bit here. I skewer the boot onto the armature which also conveniently hides the connection point into the base to keep the whole thing upright and also I can rotate the boot to tweak the angle if needed.

Pins:
I kinda just trial and error'd jewellery wire with pliers into the pin shapes. They're itty bitty!! had a whole bunch of fails before i got two nice ones. A hot tip is to use needle nose pliers and wrap the wire around the tip to get a smooth circle shape!

Base:
I smoothed out the edge of a circular wood base with a dremel, and then used wood stainer to get the black colour. It ended up kinda looking like I took a sharpie to it, but whatever.... now i have a whole ass can of black wood stainer........ I then made a rough mountain of black wool and stuck the feet armature in. And now he's standing!!

Normally at this point when I'm done felting everything, to get a smooth finish, I'd take a small pair of scissors and carefully snip away any flyaway fibers, but this time, I just left them fluffy cause i think that's what sif would do :3c
Photoshoot:
Normally I do shoots using daylight but it was winter so the sun was nonexistent. So I broke out the home lighting setup aka dollarstore posterboard for a nice smooth background, and then hit it with the overhead Fill, side Fill 2, and Rim light, and use white paper/posterboard for bounce light if one side feels too dark. But if things are overexposed, you can move the light sources away until the harshness dims down. I'm using a Olympus mirrorless camera (handed down to me by my sibling so i dont remember the model exactly), which can connect to my phone as a remote so I can avoid shaking the camera when i take photos. Pretty nifty for stopmotion purposes! (yes my camera stand is a stack of notebooks, a tissuebox and some eva foam under the lens, don't judge me)


Stopmotion animation:
I'm still figuring stopmo out on my part, but my process was straight ahead animation ... move the cloak a cm, take a pic.... move another cm, click.... and repeat until i get a version I was happy with. My ref was the cloak animation from Gris (beautiful game btw). The 2d star animation was also done straight ahead using procreate, exported in png with a transparent background, and finally stitched together with the stopmotion footage in photoshop.

My turnarounds are also stopmotion! also secret hack, the turntable is a fidget spinner sticky tacked to a cake platter.
And i think that's all! i mainly wanted to share how I go about thinking about taking a 2d concept and moving it to 3D. I also didn't go in depth into how to actually do the needle felting bc I don't think I''d be very helpful I'm a very good teacher by telling yall to just keep stabbing until it looks right (i'm self taught for this hobby),,, if anyone wants it though, i can share a bunch of tutorials and other felters' process that helped me learn more needle felting!
Hopefully this was helpful to someone! Feel free to send asks if ya got any questions or if anything needs clarification! Or show me your works! I love seeing other people's crafts :3
here have a cookie for making it this far 🥐
#in stars and time#siffrin#isat#isat siffrin#isat fanart#needle felt#soft sculpture#know that i am devouring all the nice words yall leave in the tags/comments of my posts :holding back tears:#I hesitate to call this a tutorial bc this is just how i fumble my way through crafting anything lmao#the only reason I know how long I worked on a project are timestamps on wip photos and however long the day's video essay or letsplay is#sorry time is immaterial when i get into crafting mode#reason why this log is so late is bc after i finish a project i'm perpetually hit with the ray of 'i dont ever want to look at this again'#hence why photos never get edited#AND THIS POST SAT IN MY DRAFTS FOR 2 MONTHS DUE TO BLOODBORNE BRAINROT SORRY#done is better than perfect!!!#sorry i dont control the braincell#sorry for using a million exclaimation points! i am not good at this.. conveying my anxiety in written form!!! my toxic trait
1K notes
·
View notes
Text
Since I’ve posted this elsewhere to better explain the mechanics for those that didn’t fully understand the tutorial I posted, I thought I’d post here as well. I also go over the ear mechanics on this.
Basically play around and see what works, but I hope this helps if you’re still struggling.
#art#animal art#mask#wolf#wip#cardboard art#cardboard mask#cardboard sculpture#cardboard#cardboard craft#werewolf#snarling werewolf#werewolf snarl#wolf snarl#snarling wolf#werewolf mask#wolf mask#tutorial#explanation
628 notes
·
View notes
Text


WE DON’T GATEKEEP WEAVING TECHNIQUES IN THIS HOUSEHOLD!
So to start this is double cloth (meaning I have two different warps, they’re threaded on 4 frames and each slot in the reed has two strings, one from each warp)

Step one: lift up the entirety of one warp (for me, pedals 2 and 4), then select the design with a pickup stick/sword/the fiber only thingy

Step 2: Go to your OTHER warp (1 and 3 for me) with the stick still in and do a back and forth of plain weave, take the stick out to beat

Step 3: Pick up the background with the stick (aka anything you didn’t pick up before, 1 and 3 for me)

Step four: Plain weave with the other warp AND a different weft (2 and 4 for me) take out the stick and beat

Step 5: Repeat! You can do this with any pixel designs, provided you have enough warp strings to have 2 per square
Fair warning, be EXTREMELY careful with your selvages (edges of the warp), they pull in the sides a lot more than regular plain weave. Happy weaving!
#shoutout to the tour that dropped by the studio while I was working#I was wearing a merch shirt that belongs to an entirely different school#free advertising?#artwork#artists on tumblr#art#fiber art#fiber crafts#dragon art#hand weaving#loom weaving#weaving#tutorial
529 notes
·
View notes
Text

little gift🩷
I thought it would've been cute if ivan tried to make something himself since I'm sure till would've appreciated this type of gift. and ivan gives till something he would've never expected. a little crocheted sprout accessory for till's headphones since he wears them a lot><
#alnst#alien stage#alnst ivan#ivan alien stage#alnst till#till alien stage#ivantill#에이스테#ivan doing his best to learn craft by youtibe tutorials#he is whipped#till is also whipped#they should be tupid and in love#because i said so
671 notes
·
View notes
Text

From Davis Ray: It took me 55 years to make this quilt! At 10 years old, in 1968, I told my mom I wanted to make a quilt for my bed. She gave me fabric and suggested I trace a postcard. Smart woman…I wouldn’t have to match corners! Well, time flies and here I am in 2023, aged 65. I retired and finally finished it. Mom is 99 years old and I am thrilled to have a photo of both of us with the quilt. I hand sewed a pocket on the back to hold the postcard, photos and the story of this quilt.
#crafts#decor#sewing#quilting#briar rose quilts#bedding#gifts#shopping#quilters of tumblr#holiday#postcard quilt#quiltblr#quilt pattern#quilt tutorial#quilting as art#fabric art#embroidery#textile art#art quilt#fiber arts#quilt#quilts#textiles#davis ray
496 notes
·
View notes
Text
DIY lace bobbins from dollar store supplies 🥳
#fiber art#artists on tumblr#bobbin lace#lace making#craft tutorial#diy#arts n crafts#tutorial#crafts
846 notes
·
View notes
Text
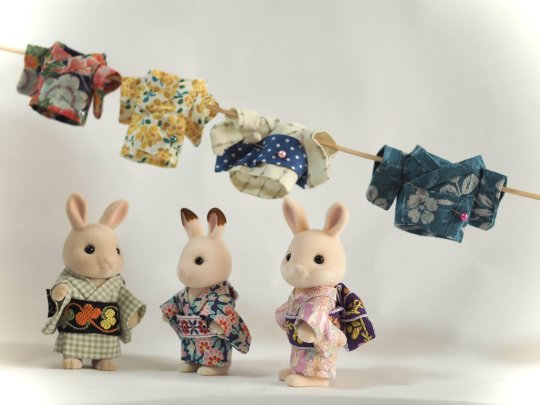
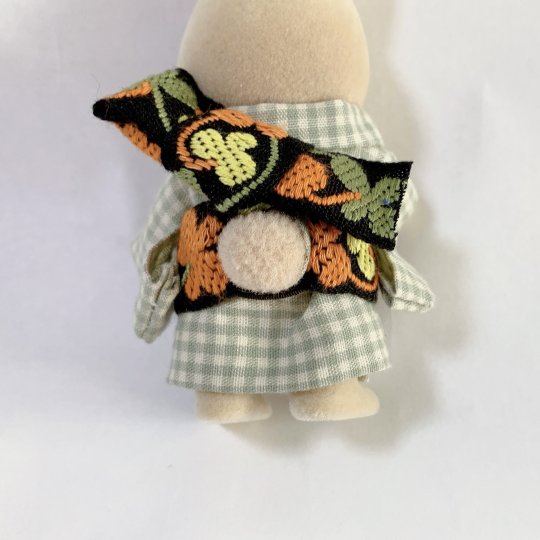
To complete past diy kimono dressing for Sylvanians Families/Calico Critters I shared before (see 1 / 2), here is a new step by step by @haluchobin to create cute easy to put on obi :
Tie a thin elastic into a loose loop around the tail
Slip both ends of a ribbon through the loop and sew into place
Tie another ribbon around the elastic covering the knot. Style it into a bow, you can try to mimic real musubi if you want
Put on the finished obi and enjoy!
#japan#art#craft#sylvanian families#doll#figurine#doll clothes#sylvanian family clothes#diy#step by step#tutorial#kimono#obi#着物#帯
1K notes
·
View notes
Text
hey punkz here's a tut for wrist cuffs/bracelets since some of u are new 2 tha scene

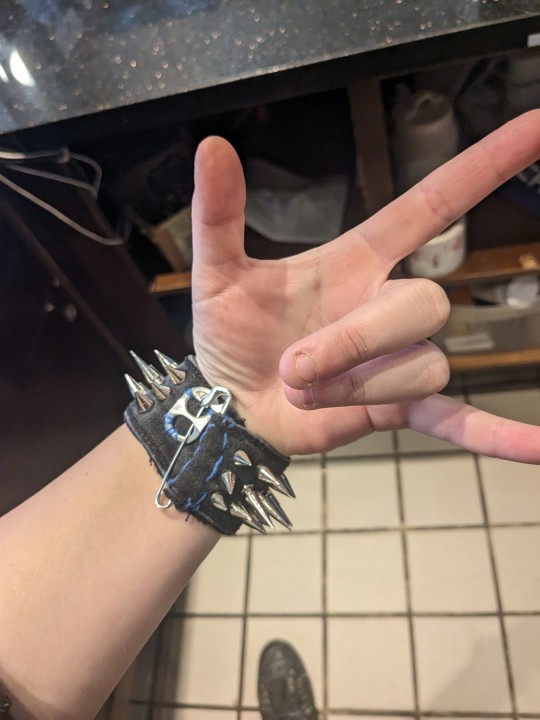
written out 4 ease of access
HOW TO: WRIST CUFFS DIY
Step 1: Old Jeans Waistband
- Cut off waistband from rest of pants
Step 2: Cut to Wrist Size (X2)
- measure around your wrist and cut
Step 3: Add Closure
-button + buttonhole or safety pin + soda tab works best imo
- Sew down soda tab to one side, safety pin to other
Step 4: Add Hardware
- good options are spikes, more safety pins, more soda tabs, staples, chains, and whatever else you can find
Step 5: SHOW OFF!!!!
feel free 2 add any other tuts on this thread or tag #punk tutorials
2K notes
·
View notes
Text
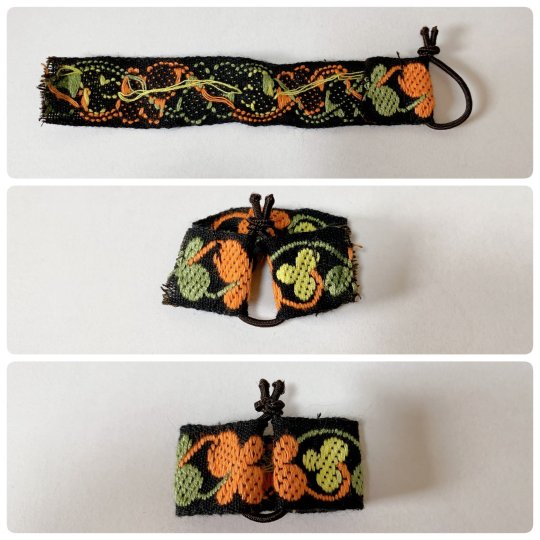
Soda tab flower tutorial post! 🌻🌼🌸 lots of pictures included. ****This is part one, check the reblogs for the other half!! *****
****also this is not my idea. It's been done before and I got inspired by pinterest where I saw really similar diys****
What you'll need: scissors, yarn or string (any color) and soda tabs. 6 tabs for one flower (or 7, but I use 6 personally)
Step 1: take 2 tabs and lay them over each other so that the hole on the bottom of one lines up with the hole on the top of the other, like this-


And tie them together. Then cut the short end of the string sticking up to get rid of the excess. You'll want to tie it with the back of he tabs facing up so the knot will be on the back side. Make sure to tie it tightly so the knot doesn't slip around when you're wrapping the tabs with the yarn
Step 2: wrap the side edges of the 2 tabs 3 times. You'll want to do it relatively tightly, but not as tight as possible. The tension is a little tricky to figure out because you want the flower to keep its shape well but also be loose enough to bend into a flower shape with ease. This takes practice.


Step 3: On the 3rd wrap, add another tab under the 2nd tab, like this-


And pull the string through the back of the new tab you put under the 2nd tab. And wrap 3 times to attach it to your other tabs. Pulling the string over the edges to the back, through the lined up holes, and pulling it out towards you. On every 3rd wrap, add another tab the same way until you have 6 tabs wrapped together like this-

#solarpunk#punk#solarpunk diy#punk diy#solarpunk fashion#solarpunk aesthetic#punk fashion#diy#fashion#tabistry#soda tabs#upcycled jewelry#goth jewelry#jewelry making#jewelry#punk jewelry#goth diy#goth#goth fashion#hatchet makes stuff#tutorial#long post#crafting#art#recycling#recycled jewelry#hopepunk#ecopunk
419 notes
·
View notes
Text


Running a little promo: free tutorial on how to knit hedgehog's clothes with every Hedgehog DIY Kit between 19 and 31 of May 25.
#diy tutorial#ferntales#australia#grandma vibes#etsy#grandmacore#diy#felt#diy craft#diy projects#diy or die#crafts#handmade#sewing#arts and crafts#fibre art#fibre arts#needlework#textile art#fiber arts#embroidery
258 notes
·
View notes
Text
Hello! I’m a maker of the once popular 3D wire mandala trinket from the 90’s era. During those “ancient” times, people would often enjoy this as a nifty hair piece, or fashionable bracelet. Nowadays it is more commonly used as a fidget toy and/or desk ornament. What makes this special is its hyper-versatility and the freedom of being able to use this however you can imagine.
I invite you to discover my handmade Fidget Blooms, and browse my hundreds of styles and colours favourited & reviewed by thousands of happy customers. Very demurely, use code TUMBLR at checkout for a special discount. Thank you for discovering my art, I do hope you enjoy it! :)
“The entire point of life is to take chances on dreams that seem crazy to most but feel like destiny to you.” -Timothy Shriver
I wanted to share this quote as it relates to my journey as an artisan specializing in wire art. It is a statement about pursuing one’s passion, even when others might find it unconventional or risky, as long as it feels personally meaningful and aligned with one’s purpose. <3
PS: 90s kids, don’t forget to take that Ipuprofen today for that back pain. XD
#artists on tumblr#90s nostalgia#tickle my brain#dopamine decor#random cool#de stigmatize fidgets#visual stim#crafts#video tutorial#witchcraft they say#handmade on Etsy#stress relief art#rainbow horizon x dark grey wire x standard size
667 notes
·
View notes
Text
Hello, cuties! ໒꒰ྀི๑ᵔ ᵕ ᵔ๑꒱ྀིა Here is the long awaited decoden boxcutter tutorial, I hope this helps! I'm not super great with words, so my apologies in advance. I go over every step and product I did in the video. Feel free to ask any questions!
#jirai#jirai girl#jirai onna#jirai kei#地雷系#landmine type#landmineblr#jiraiblr#地雷系コーデ#menhera#yamikawaii#dark girly#diy craft#diy#diy projects#landmineblogging#landmineposting#lifestyle landmine#landmine jirai#landmine kei#landmine girl#tw blade#do it yourself#tutorial#diy tutorial#decoden#pienblr#pien kei
354 notes
·
View notes
Text


Got the ear area done on the head, so I don’t have to worry as much about screwing up the mechanism now. I can finally finish the face and be done with it and get the tutorial pieced together and posted
#art#animal art#wip#sculpting#cardboard#cardboard art#cardboard mask#cardboard craft#mask#werewolf#coywolf#wolf#kinetics#test#tutorial wip#snarling#snarl#snarl mask#snarling werewolf#werewolf snarl#snarling wolf#wolf snarl
274 notes
·
View notes
Text
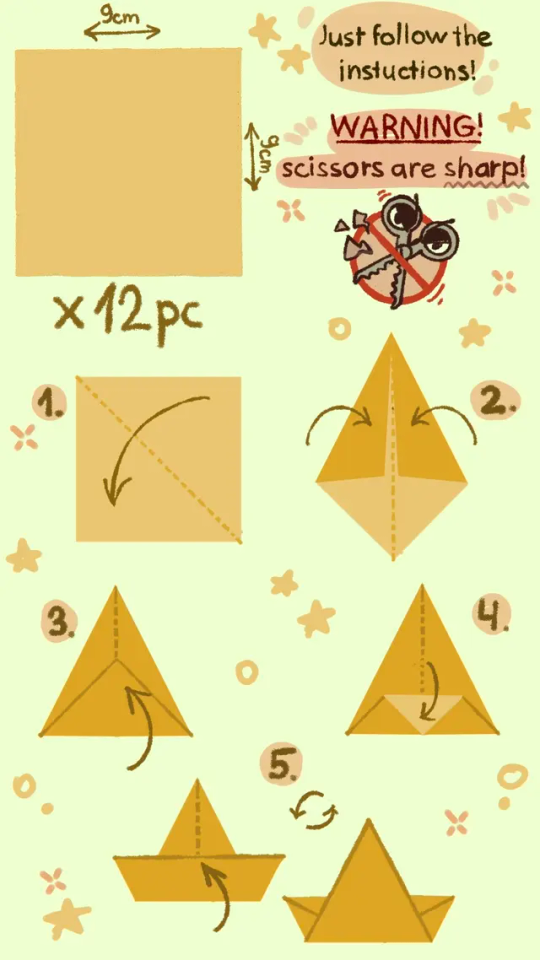
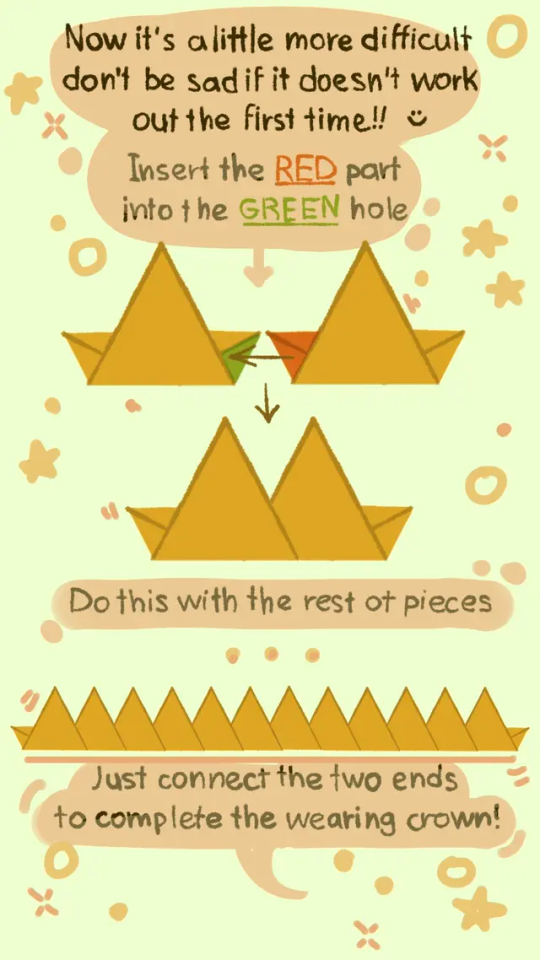
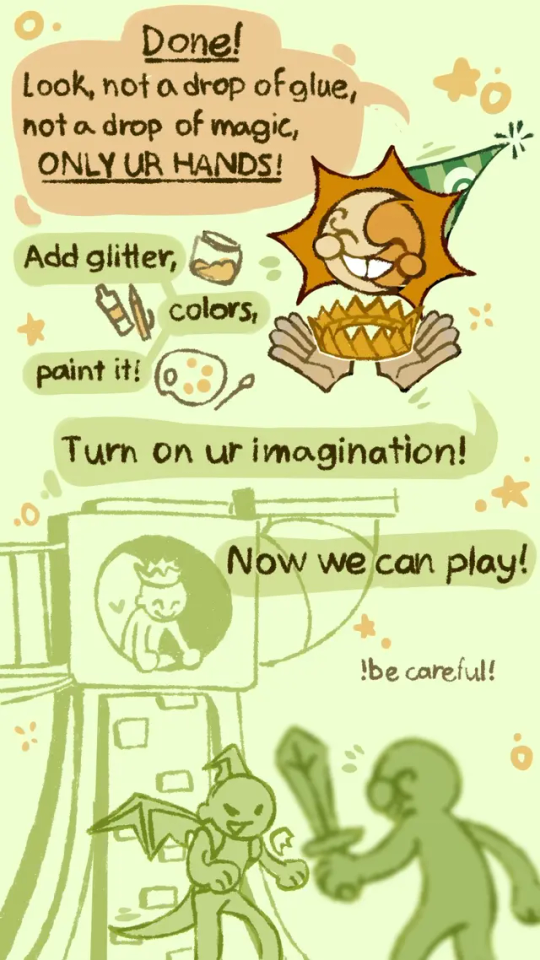
Some old childish shit (I love that and I love Sun so much, someone please treat me like this)
Paper crown tutorial 👑:P
#please treat me like this I'm begging u#hur hur hur hur hur#sundrop#sun#fnaf 9#fnaf 9 security breach#sun fnaf#sun fanart#fanart#tutorial#origami#origami tutorial#crown#paper craft#paper crown#so much tags
2K notes
·
View notes