#creating keyframes and animating between them)
Explore tagged Tumblr posts
Visit Tumblr Blog
Explore Tumblr blogs with no restrictions, modern design and the best experience.
Last Seen Tumblr Blogs


Fun Fact
Tumblr is available in 18 languages.
Note
Coloring anon here, yes, I would definitely like to know more about how you color frame by frame and the other techniques you mentioned! It would be much appreciated, thank you!
Hi anon! I'd be happy to go over my preferred methods for colouring!

First resort (ideal):
Painting over shots with little movement (the first method in this tutorial)
Colour manipulation using selective colours (the second method in this tutorial; alternate tutorial -> i also sometimes add a hue/saturation layer on top to manipulate the cyans/blues as well)
Second resort:
Keyframes for shots with consistent movement where it's easy to hide "imperfections" (tutorial 1, tutorial 2)
Last resort:
Frame by frame colouring -> DISCLAIMER: the way I do this method is the easiest way I've gotten it to work for me but that also means that it's very inflexible when it comes to editing any of the colouring afterwards. Once you start colouring in frame animation mode you're basically locked in so you need your gifs to be exactly the way you want them prior to adding your colour
So in this tutorial I'll go over how I do my frame by frame colouring as well as how I create actions to automate the repetitive parts of this process! (Some resources that explain how to create actions are here: 1 2)
To use the select subject feature you will need Photoshop CC 2018 or later
Step 1: Preparing your gif with base colouring
So first you want to do your base colouring for your gif in timeline mode, which I've explained here. I keep my gifs short (ideally 40 frames or less) since this colouring process is tedious!
I make sure that in my hue/saturation layer, I turn the saturation in the yellow, green, cyan, and blue tabs all down to -100 (and for the yellows I usually add around +20 to +60 in lightness)
Here's my gif with the base colouring that I'll be starting with:

Note: turning down the saturation in almost all the colours gives you that nice silver/grey neutral background to paint on top of. It's a lot less noticeable when your painted layers aren't perfect
Step 2: Converting to Frame Animation Mode
I use the save action from this action pack to convert my gif from timeline mode to frame animation mode.
You cannot edit your base colouring from this point onwards!
Step 3: Using Select Subject
If you're recording an action this is the step you would *start recording*
This is what your window should look like:

Making sure your first frame and first layer are selected, go to Select at the top of your window and click Subject

You should then see the marching ants outline around the person in your gif

You then want to create a new solid colour fill layer (which can be found when you click that little circle icon at the bottom of your layers panel), and set the layer blending mode to colour.
The layer mask will automatically be created since you had the marching ants outline.

Since my person is in colour and not the background, I want to invert the layer mask by clicking on it and using command + i (or ctrl + i), and now this is what it looks like:

Note: Select subject isn't always perfect!!!, depending on how cluttered the scene is and how much contrast there is between your person and the background, select subject could either do a really good job like it did here, or screw up a little like it did here:

That's okay though because it still gives us a good base to start from! We can fix any issues by painting with black and white brushes on the layer mask.
Step 3.5: Create clipping mask
Thanks to @wolfchans for telling me about this because it gives us back a little bit of flexibility when colouring frame by frame! Instead of merging down, we can make a clipping mask instead. Right click the solid colour fill layer and select create clipping mask.


If you're recording an action, it's at this point where I would *stop recording*
Step 4: Fixing the layer mask if needed
So now I want his jacket and t-shirt to also be purple, and to show his fingers behind the glass. I make sure the layer mask is selected, and paint with a brush at 60-70% hardness (painting with black erases the colour, painting with white shows the colour). User smaller brush sizes to paint smaller details!
This is what my canvas and layer mask look like now.

Step 5: Repeat
Now I click on my second frame and second layer, and repeat steps 3-4. As you can see, using the clipping mask allows you to still see and edit the colouring of the previous frame, just make sure you click on the right frame and it's corresponding layer when you're doing further editing.

This is where an action is super helpful in cutting down all the repetitive steps and clicks you need to do. So at this point I'd just play the action I created and paint on the layer mask as needed.
Repeat for all your frames and then you're done! After this I convert it back to timeline mode again so that I can add my text and do any other effects such as blending or transitions. Hope this helped!!
#answered#Anonymous#*tutorial#userbeanie#userwintersoldado#userishh#userfaiths#usercats#usertj#tuserhol#userahri#usereus#usershreyu#userchibi#userbunneis#usermibbles#uservivaldi#carolook#userbuckleys#usertenacious#tuserheidi#userholtz
251 notes
·
View notes
Note
How do you animate 💔 I see your stuff and i'm reminded that people are COOL and SKILLED. My 34 saved pngs of my art shoved into inshot isn't working anymore
AWWW THANK YOU. Here’s… like… a progress if that makes sense!:
I decided that I wanted to animate your Ranboo sighing! So, first, I sketched out the keyframes


With these in mind, I know the line of movement i need, so now I clean up the sketches. With those three key frames, I duplicate each of them and shift them slightly to create in betweens, adding two more “blend” frames between them as well

I animate with my finger on ibis paint! And import the frames into flipaclip :D
so, here it is!


Hope this helped? Even a little !
#ram-bee-ling#dream smp#dsmp#boodles#cranboo#It does kinda look more like he’s yawning though. Whoops.
25 notes
·
View notes
Note
Hello, I want to ask you a stupid question? I want to know if I can ask tutorial on how to make multiple gifs in one? Here example: periodedits/tumblr/com/post/673464243167920128/15k-celebration-make-us-choose
hi there! that's not a stupid question at all (and even if it were, i'd still be happy to help) 💙 below the cut, i'll walk you through how to make something like you linked, with multiple shots in one gif:

We're putting two (or more) shots or scenes together in sequence into one gif, so that's how we'll start. I'm assuming a basic understanding on how to make gifs (if not, check the beginner tutorials tag on @gifmakerresource, the resource blog I run), so we begin by making each gif separately.
When putting multiple gifs together like this, it's important to be mindful of the number of frames you'll end up with. I tend to think it looks best if each scene is the same amount of frames, probably somewhere between 25-40 per gif, though it depends on the dimensions you're using as well. Don't sweat if they're not identical, but the closer they are, the better it'll look -- as opposed to one gif only being 10 frames and the other being 40.
So, create each gif separately. You may choose to sharpen and then color (which I believe is the more popular way, but you can always do it vice versa as well. You also might want to color once both gifs are together, but when I do something like this, I prefer to have everything completely finished before I put them both together. Here are my two sharpened and colored gifs:


Each gif needs to be the same dimensions as well. These are 540px x 500 px.
Assuming your gifs are complete, I find it easiest to convert them both to a smart object. To do this, highlight all the layers in your layers panel (shown below) and right click on one of them and select "convert to smart object." For this to work, you do already need to be using timeline animation, not frame animation. You can learn more about that in the beginner tutorials I linked above.
Once both gifs are smart objects, they'll be comprised of only one layer each, thus making them easier to work with and transfer. Now we want to bring gif #2 onto gif #1's canvas. As long as you're working with smart objects, it's as simple as copy (ctrl+c) and pasting (ctrl+p). Copy gif #2, click on gif #1's tab and then paste. This should also properly align the layers. If it doesn't for some reason, you can either use the move tool (v) or the transform tool (ctrl+t) and click and drag until they're aligned properly. This is what you should see now:
Gif #2 is currently on top of gif #1 in both the timeline and layers panel. If we were to save this gif, they're not going to play sequentially, but rather at the same time and only the top layer will be visible. To make one play after the other, we're going to drag gif #2 AFTER gif #1 in the timeline like so:
We're just clicking and dragging on that top layer and bringing it down to the same line as gif #1 and after it. What I'm doing at the end gets a little cut off, so this is what I'm showing in order to make the timeline smaller so we can see the whole gif. I don't like having to scroll to see it all, but this is just personal preference.
Dragging that slider to the left makes the timeline smaller and dragging it to the right makes it larger, which is great when you're working with detailed stuff like keyframes.
And that's literally all there is to it! You can now save your gif! Here are my save settings that I use for literally every single gif I make:

The size limit for uploading a gif to tumblr is 10mb, so at a total of 80 frames (40 each), my gif is too large. In this case, I'm okay with deleting some layers from each, but a tool I use a lot if I don't want to lose frames is ezgif's optimizer. when i tell you this website is a literal lifesaver! you select your gif, wait for it to upload, and then i always choose the first option, lossy gif. You may have to play around with the compression level to get the desired size and quality, though. At compression level 100, my gif is only 5.8mb, but it's pretty noisy. I don't always mind noise (in fact, I add it to my gifs fairly often), but in this case, we have a lot of wiggle room. I played around a bit and found that at compression level 35, my gif still looks nice and comes in at 9.4mb. Right-click and save your gif from here and then upload it to tumblr just like normal!
First gif is using ezgif compression and second is the original gif, just with frames deleted. I ended up having to take off 14 frames in total, 7 from each gif, to come in at 9.5mb. You can decide which method you think looks better!

In this case, I like the 2nd one better as it's less noisy, but it all comes down to personal preference! From here, you can learn cool stuff like transition effects!
I hope this was helpful, but if you have any additional questions, feel free to ask!
#answered#Anonymous#my tutorials#gif tutorial#gifmakerresource#dailyresources#completeresources#chaoticresources
18 notes
·
View notes
Text
Blog Post #04- Storytelling Through Stray
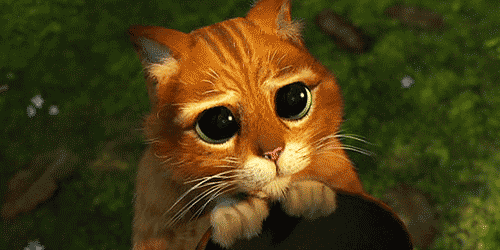
In this blog post, I will explore how Stray, a third-person cat adventure game evokes deep emotions within players through its unique storytelling, innovative design, and non-human protagonist. Stray demonstrates just how deeply immersive video game narratives can be. Further I will examine the visual style of the game, its apocalyptic setting, and minimalist storytelling techniques.

Developed by BlueTwelve Studio, Stray is a 2022 video game where a stray cat explores a post-apocalyptic cyberpunk city. Drawing inspiration from the stray cats of Montpellier, France, the developers tried to capture the feline experience authentically.
The game’s standout feature is its realistic portrayal of cat behaviour. Rather than using motion capture, the team relied entirely on traditional keyframe animation techniques. Animator Miko observed real cats, studying their movements to replicate them in the game. This method gave the team the freedom to imagine how a cat might behave in specific scenarios, even extrapolating from real-world knowledge when faced with situations no cat would naturally encounter. Thus, it resulted in a deeply immersive experience making it feel lifelike and believable, and more emotionally connected to the players.
I find it fascinating as an environment artist how visual storytelling can portray complex emotions. Stray caught my attention because it tells a relatable story with a non-human protagonist. Through this game, I was able to look into how immersive worlds can be created in which the environment and visuals say much more than words. Stray pushes me to go out of the box in my projects and explore unconventional ways to connect with players
------------------------------------------------------------------------------
The Look, Feel, and Style of the Game


Stray is visually stunning, with its cyberpunk city blending vibrant neon lights and decaying architecture. The atmosphere evokes a sense of nostalgia and loss, as remnants of human life—graffiti, posters, and abandoned technology—tell silent stories of a vanished civilization. The vertical design of the city reflects societal hierarchies, with affluent areas closer to the sky and impoverished robots living below. The game’s art style balances realism and stylization. The cat’s animations are lifelike, while the robot characters have a charming, human-like quality. Lighting plays a crucial role, with warm, flickering hues contrasting against cold blues to create a hauntingly beautiful world. This combination of design elements draws players into the narrative, making the world feel alive despite its desolation.
------------------------------------------------------------------------------
Environmental Storytelling in a Cyberpunk Dystopia
The environment in Stray is more than just a backdrop; it's an active storyteller. The game takes place in a post-apocalyptic world where humans have vanished, and left behind is a society of robots. Every little detail, from books lying abandoned to graffiti made by robots, adds layer upon layer to the narrative. The city's design encourages exploration, with every corner offering clues about the world's history. The companion robot, B-12, acts as a guide and translator, giving just enough exposition to keep the story coherent without spelling out much for the player. The minimalist approach of the game, allow players to piece together the story through observation, and making it feel deeply personal.


At its core, Stray is a tale of survival, affection, and hope. Playing as a stray cat creates a feeling of vulnerability and resilience. Companionship seems to play a role in a world full of loneliness between the protagonist and B-12, adding to that depth. The lack of traditional dialogue places greater emphasis on the visual and audio storytelling. Subtle animations, detailed environments, and a haunting score combine to evoke powerful emotions. This game is one example of how to tell a powerful story without words, making Stray a leader in narrative design.
------------------------------------------------------------------------------
Stray is widely praised for its emotional depth and its ability to whisk gamers away into its world. For many players, the game really had something new to say about storytelling, mainly using a cat as the protagonist. The thinking here is that such a non-human perspective creates a very fresh, vulnerable way for the player to go through a narrative and makes emotional connections with the character and its world even more resonant. Critics, in their reviews have highlighted the game’s seamless blend of gameplay and narrative.
It is a brilliant example of how far video games can push the limits of narrative. It delivers a unique experience through its realistic animations, rich environments, and emotional depth, leaving a lasting impact that will linger long after the game is over. To game artists and designers, Stray stands as a testament to visual storytelling and an inspiration toward the discovery of new ways to engage players.
Sources:
The Verbal Thing, 2022. Stray Game Thoughts. Available at: https://theverbalthing.com/news/stray-game-thoughts [Accessed 15 Dec. 2024].
Blogging with Dragons, 2022. You Need to Play Stray. Available at: https://bloggingwithdragons.com/you-need-to-play-stray/ [Accessed 15 Dec. 2024].
Abby’s Blog, 2022. Stray. Available at: https://abbysblog.net/blog/stray [Accessed 15 Dec. 2024].
Yellow Brick Road, 2022. How Stray Became a Masterpiece in Storytelling. YouTube. Available at: https://youtu.be/YnjZy4l4xR4?si=i96BzrLu8nMJ2Kov [Accessed 15 Dec. 2024].
Game Makers’ Insights, 2022. Creating the World of Stray. YouTube. Available at: https://youtu.be/nujjCmABO7Y?si=EKVeaLzaqiU9YRaO [Accessed 15 Dec. 2024].
7 notes
·
View notes
Note
Hi can I ask? What app or software do you use to draw? Most specifically to animate and make GIFs? :D
Hiya! First off: Of course you can ask! I am always open to share my knowledge~ So if there's anything else you wanna know in future don't hesitate to reach out~ :3
The program I use?

I use Clip Studio Paint Ver. 4 (latest version) for the iPad.
My iPad is a rather old one (6th generation, 10 Inch). I got it second-hand in 2019 but it holds up well!
Payment? Plans or One-Time?
Keep in mind, that CSP for iPad is a subscription-system! You can choose between the Pro-Version ( 4,39 € / Month ) or the EX-Version ( 8,59 € / Month ). I use the Pro-Version, but it limits your animation to 24 panels / 2 seconds, so you can't do much with it, while EX-Version gives you limitless frames.
If you use your PC to draw, you can purchase CSP with a One-Time Payment, so you won't have the subscribtion payments. There will be occasional updates, that you'll have to pay extra for but I honestly feel like CSP is worth it, since they're listening to their userbase and the updates are starting to give Adobe a run for their money.
All in all for Animation, I recommend working at the PC because a horizontally wide Screen is SUCH a blessing for working on timelines - I just can't afford a new screentablet for my PC so I am stuck with the iPad for now xD the iPad screen feels very cramped when I work on my animations.
They also have a 3-Month trial-version so you can test it out first!
What does animating look like in there?
You can animate with Keyframes, meaning you can animate the rotation, expansion, position and opacity. Depending on the curves of the animation, you can make more cut animations or smooth ones.
(FYI you can customise your layout within the program, like I had to make a custom layout for being a left-handed one, so my hand won't rest on any controls xD )
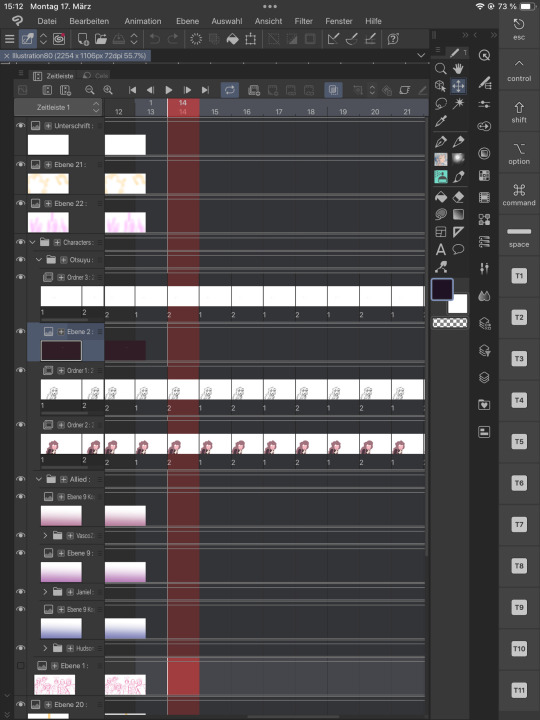
Here are two examples in which I animated using keyframes in CSP.


You can see that the keyframes for the first picture are rounded, while the keyframes for the second one has hard edges. There's still so much more I can tell about keyframes, but I guess this would go too deep right now haha~
Then for frame by frame animation like the one below you can work draw each panel by yourself and CSP's got the functionality to lightboard the panels before and after your current so you can have a good idea of what you're doing. You can also combine these two techniques if needed.
Like for Vascos head I used Keyframes to move it up and down.

What about my more Complex animations?
Like those? Or my latest Otsuyu-Vtuber-Project?


Well, for these "motion graphics" I prepare the entire pictures with CSP but I drag them into another program:

Which is the "industry-standard" for creating Vtuber haha~ but the Pro-Version also requires a yearly subscribtion, because the free version of it just doesn't cut it. The limitations are too heavy to really make use of it.
Everythings so expensive! Isn't there any alternative?
Yes, but I can't speak of experience when I recommend: Procreate, which is a one time and fairly cheap ( 6,99 € ) purchase. It is such a strong program and I've seen different artist pull out so much of it, but I honestly did not get to try it out, because the layout is vastly different to the one I am used to from CSP (which I am using for over a decade) I've even seen people animate with FlipaClip, but again I can't talk about my own recommendation about that.
And while I always LOVED "Adobe After Effects" because of my career-choice and studies, I can't recommend Adobe these days, since they're the MOST expensive option ( ~80 € / Month, if not even more) out there, while still being held as industry standard AND they're monitoring your work, so they can feed them into their AI programs. One - like many others - you can't really opt out of.
In that regards, I want to give you guys: Animating as become super accessible these days. There WILL be a program and even a free class / tutorial for you out there, so you can get into it!
Everyone starts small! Here's some examples from when I was barely a teen and I reaaaally wanted to animate:


I remember that I exported each image as PNG to then use another program and make a gif outta it. I wasn't really able to onion-skin most of this so things looked off xD
#veilody#veilodys thoughts#not me just infodumping on y'all#I hope I don't overwhelm you guys with that xD#and I hope this helps y'all!#more questions are encouraged#if ya want me to keep myself short then please add that in your ask#I won't take offense xD#program recommendation#art programs#clip studio paint#fuck adobe#anon ask#yeeee another ask got in ✨
3 notes
·
View notes
Text
TF2 Blender Guide: Adding Merc Pupil Controls

In real life, the human pupil (the black dot of the eye) will dilate when a person is looking at something they like, and shrink when they are scared. Pupils will also adjust to dim and bright lighting.
In animation, animating the pupils' size can help elevate your animation acting, especially in extreme close-up shots that are emotionally-charged.
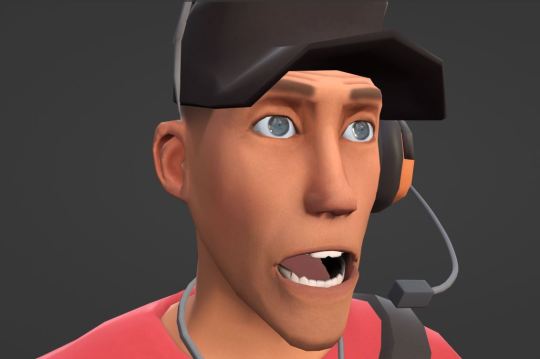
Example of pupils shrinking:
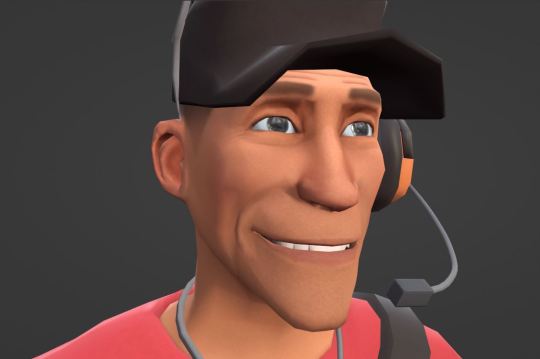
Example of pupils dilating:
Here is a guide by Katy133 on how to edit the mercs' eye shaders to allow you to control and keyframe the size of the pupils.
Making the pupils grow or shrink requires a different shader node setup for each. This guide will explain both, using Scout's SFM rig as an example.
Pupils Shrinking Control
Select the merc head model (the mesh) of the merc you want. In the Materials Property tab, select the material slot for the merc's eye material (example: Scout left eye).
Go to the Shader Editor. Select the New Material button (to the right of the material's name) to create a duplicate of the eye material. Rename this new material to something clear (example: Scout left eye pupil_small).
For this new material, add the following new nodes:
Two Mix nodes set to Point.
Two Color Ramp nodes set to Constant. Add a frame around one of them, and rename it Pupil Shrink Control to make it easy to find when you're animating.
A Gradient Texture node set to Spherical.
Two additional Mapping nodes.
A copy/paste of the Image Texture node iris_blue_l.png (for Demoman, the texture is named iris_brown_r.png)
Arrange these nodes to look like the screenshot provided below:
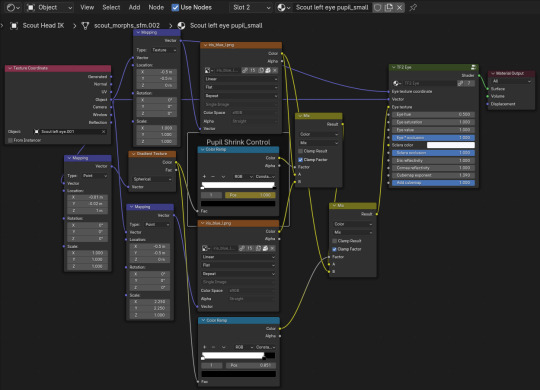
Depending on which merc you are working with, you will need to adjust the values of the two new Mapping nodes. Holding shift while adjusting the values will slow down the value shifting, which may help you get exact positioning you want. You're basically "eye-balling it" here.
The mapping node to the left sets the centre of the gradient mask's centre (so adjust that one's XYZ Locations if the mask circle isn't centred right, and the XYZ Scale if the mask isn't big enough and is creating a "double-pupil" effect when the eye moves around),
while the right Mapping node sets the position of the scaled up iris (so adjust that one's XYZ Locations if the shrunk pupil isn't centred right).
You have now created a material shader that basically adds two versions of the iris (the default one and a scaled up version) with a mask that lets you switch between the two. The mask is shaped like a circle, giving the illusion of just the pupil shrinking.
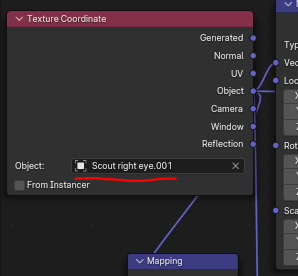
For the other eye:
Follow the same steps for the other eye (example: Scout right eye).
If you copy/paste nodes from the left eye to the right eye, make sure the Texture Coordinate's assigned Object and the Mapping node's values are correct (as these are different between the left and right eyes).
Note that you should NOT reuse the exact same pupil control shaders for each merc, as each merc uses custom adjustments to their respective eye shaders (for example, Sniper's TF2 Eye shader node has different values for Sclera occlusion than Scout. So giving Sniper Scout's eye shaders would make Sniper's eyes look off-model).
Also note that, due to the low poly style of merc models, the circle shape of the mask may be slightly angular. This is caused by a spherical gradient being applied to an angular shape (a low poly eye).
Pupils Dilating (Making Bigger) Control
Follow the same steps for creating the Pupil Shrinking Controls, but name the material appropriately (example: Scout right eye pupil_big), and make the following changes to the nodes:
For the top Mix node, swap the inputs for the A and B values.
Rename the frame around the Color Ramp node to Pupil Grow Control.
For the two new Mapping nodes, change the values to look like the screenshot below:

Again, note that depending on the merc you are working with, you may need to adjust the values of the two Mapping nodes.
For the other eye, again:
Follow the same steps for the other eye (example: Scout right eye).
If you copy/paste nodes from the left eye to the right eye, make sure the Texture Coordinate's assigned Object and the Mapping node's values are correct (as these are different between the left and right eyes).
Animating the Pupil
The Color Ramp node (the one directly connected to the Gradient Texture) is what you will use to animate the pupil's size.
To do so, select the black control and move it along the slider until the pupil is the size you want it.
To keyframe the pupil, right-click on the Pos value of the node and select Insert Keyframe. The value should turn yellow now. Yellow means the value has a keyframe on the frame you are currently on, green means the value contains keyframes on another frame in the timeline. You can also add a keyframe by hovering your cursor over the value and pressing the add keyframe hotkey.
To make both the left and right pupils move the same amount at the same time, switch to the other eye's material (by selecting its material slot in the Materials properties tab) and inputting the same Pos value as a keyframe on the same frame.
3 notes
·
View notes
Text

Day 4 - 100 Days CSS Challenge
CSS ANIMATIONS
Hey everyone!
Today, we’re working with three circles and our goal is to create a smooth animation where the circles scale up and down in a staggered sequence.
Step 1: The Basics
First, let’s talk about the structure. The design is made up of three circles:
Circle 1: The largest circle.
Circle 2: Medium-sized, nested inside Circle 1.
Circle 3: The smallest, nested inside Circle 2.
All three circles are white, and they animate against that reddish background. The animation involves scaling the circles up and down in a staggered sequence.
Step 2: The Animation Struggle
The main challenge here was getting the circles to animate one after the other instead of all at the same time. At first, I thought, "Easy, just add some delays!" But it wasn’t that straightforward. Here’s what I learned:
animation-delay
To create the staggered effect, I used the animation-delay property. This property allows you to delay the start of an animation for a specific amount of time. For example:
Circle 1: No delay (0s).
Circle 2: Delayed by 0.2s.
Circle 3: Delayed by 0.4s.
This way, each circle starts its animation slightly after the previous one, creating that beautiful cascading effect.
Step 3: Understanding animation-fill-mode
One of the biggest "aha!" moments for me was understanding the animation-fill-mode property. This property determines how an element is styled before and after the animation runs.
animation-fill-mode: both: ensures that the element retains the styles defined in the first and last keyframes of the animation. Without this, the circles would snap back to their default state (scale 0) after the animation ends, which would ruin the smooth transition.
What happens if we don’t use it? Without animation-fill-mode: both, the circles would abruptly disappear or reset at the end of the animation, making the whole thing look janky.
Step 4: The Magic of alternate
The alternate value in the animation property is what makes the animation reverse direction after each cycle. Here’s how it works:
Without alternate, the animation would play forward and then jump back to the start.
With alternate, the animation plays forward, then reverses, creating a smooth back-and-forth effect.
This is perfect for our circles because it makes them scale up and then scale down seamlessly, without any awkward jumps.
Step 5: reverse vs. alternate
You might be wondering, "What’s the difference between reverse and alternate?" Great question!
reverse: The animation plays backwards from 100% to 0%. It doesn’t alternate; it just runs in reverse.
alternate: The animation plays forward (0% to 100%) and then backwards (100% to 0%) in a continuous loop.
So alternate is NOT reverse + infinite
For our circles, alternate is the way to go because we want them to scale up and down repeatedly.
What I Learned :
animation-delay is your best friend when you want staggered animations.
animation-fill-mode: both is crucial for smooth transitions.
alternate creates a seamless back-and-forth effect.
cubic-bezier gives you fine control over the animation’s timing.
I’m so excited to keep going with this challenge, and I can’t wait to see what Day 5 has in store.
Keep coding and keep learning.
#100dayscssChallenge#codeblr#code#css#html#javascript#java development company#python#studyblr#progblr#programming#comp sci#web design#web developers#web development#website design#webdev#website#tech#html css#learn to code
1 note
·
View note
Text
Creating a game over screen
Now that my player can die, I need to add a game over screen to flesh out the game and allow the player to retry.
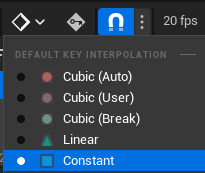
I wanted to go down the route of simple arcade cabinents and just have a flashing piece of text- I achieved this by animateing a widget using constant key interpolation- which instantly jumps between keyframes instead of tweening towards them.
This allowed me to create the effect like this:
Then I needed it to appear when the player died- which was simple enough:
The biggest issue was actually getting the game to restart when the player presses a key. At that point ingame the player actor is dead so it wouldn't recieve inputs- and I can't have a piece of code that resets the game when any key is pressed running during gameplay.
My solution to this problem was to create a new actor that spawns when the player dies, and resets the game when the player presses any key.
This didn't actually work at first as the actor wasn't recieving any input. After some research I found this forum post https://forums.unrealengine.com/t/keyboard-event-not-working/484194/7 which had a similar issue. Turns out the fix was a box that's disabled by default:

After changing that it works fine- and I'm happy with how it turned out. It's simple, but blunt and aggrevating enough to encourage the player to try again.
3 notes
·
View notes
Text
The Future of 3D Animation is Here — And It’s Powered by AI

3D animation has long been an evolving field, pushing the boundaries of creativity, technology, and storytelling. But today, that evolution is accelerating at a pace we've never seen before—thanks to artificial intelligence. From automating character rigging to generating realistic physics simulations, AI is transforming the way 3D animation is created, delivered, and experienced.
For students aspiring to enter this dynamic industry, understanding the role of AI is no longer optional—it’s essential. The skillsets, workflows, and tools used by professionals are undergoing a massive shift, and being aware of these changes is key to staying relevant in this AI-powered creative era.
From Frame-by-Frame to Machine Learning: A New Era Begins
Traditionally, 3D animation has required meticulous, frame-by-frame work. Animators would manually manipulate models to create movement, emotion, and expression. It’s time-consuming, complex, and demands both artistic intuition and technical precision.
Enter artificial intelligence.
AI-powered tools now analyze large datasets to learn movement, facial expressions, and environmental interactions. Machine learning models can simulate lifelike motion, automatically sync lip movements to audio, and even suggest pose adjustments—all in a fraction of the time it once took.
For example, NVIDIA’s Omniverse Audio2Face is a tool that allows creators to generate facial animations directly from audio input. With minimal manual effort, AI handles what would have otherwise been painstaking keyframe work.
AI in Character Animation: More Expression, Less Effort
One of the most promising use-cases of AI in 3D animation is in character performance. Motion capture (MoCap) used to require expensive setups, suits, and studio environments. Now, with AI, animators can generate motion data using regular cameras or even smartphones. Tools like DeepMotion and RADiCAL AI analyze human movement and translate it into 3D animation—making motion capture more accessible than ever before.
Moreover, AI can detect subtle emotional cues in voice and body language, enabling characters to show more nuanced performances. These tools are especially helpful for indie studios and freelance animators who want to create high-quality work without massive budgets.
Smart Automation, Not Artistic Replacement
It’s important to address a common misconception: AI isn’t here to replace animators—it’s here to amplify them. AI handles repetitive or technical tasks, giving artists more time to focus on the creative aspects of storytelling, composition, and visual emotion.
Consider scene generation or environmental effects. AI can automate tasks like:
Simulating water, fire, or crowd behavior
Generating realistic textures from text prompts
Filling in in-between frames for smoother motion
These capabilities free up animators to work on mood, lighting, and storytelling—elements that machines can’t fully grasp.
The Rise of Generative Tools in Animation Pipelines
Generative AI tools are particularly influential in pre-production stages. Concept design, mood boarding, and visualization are faster with AI-generated assets. Tools like Runway, Pika, and Kaiber are being used to test animation ideas quickly, generate storyboards, and even create short animated sequences.
Students can benefit immensely from learning how to use these platforms. Knowing how to prompt AI effectively, combine it with traditional techniques, and maintain artistic integrity is becoming a core part of a modern animator’s toolkit.
Industry Examples and Recent Developments
Recent industry news highlights just how deeply AI is being integrated:
Pixar has been experimenting with AI to optimize their rendering workflows and automate certain simulation tasks, like clothing and hair movement.
DreamWorks is leveraging machine learning to streamline pipeline management and reduce rendering times for large projects.
Epic Games recently integrated AI-driven tools into Unreal Engine to improve real-time animation and crowd behavior simulations.
Additionally, Adobe has begun integrating generative AI into its 3D design toolset, expanding the creative possibilities for designers and animators alike.
These updates aren't just industry headlines—they're signals of where the profession is headed. Students aiming for careers in animation need to pay attention and start adapting early.
Why Students Must Upskill for the AI Era
AI in 3D animation is creating a clear divide between those who evolve and those who don’t. Today’s students must not only grasp foundational principles of animation but also understand how AI fits into the pipeline.
Here's what students should focus on:
Hybrid Skillsets: Combine traditional animation knowledge with familiarity in AI tools and data-driven workflows.
Coding Basics: While you don’t need to be a developer, understanding scripting (Python, for instance) helps you customize AI tools to suit your needs.
Critical Thinking: Learn to judge when automation is helpful and when human touch is irreplaceable.
Ethics and Authenticity: Maintain originality in an era of AI-generated content. Always cite and credit, even when working with datasets or AI-generated material.
These capabilities are in high demand. Studios are now hiring animators who can think creatively and work efficiently with AI-integrated platforms.
Blending AI with Traditional Art: Keeping the Human Element Alive
The fear that AI might "kill creativity" is largely unfounded—at least for now. AI may mimic movement or generate content, but it lacks the human intuition to create compelling narratives or emotionally impactful moments. The best animations still come from creators who understand human emotion, design theory, and visual storytelling.
Artists who embrace AI as a collaborator rather than a competitor are the ones who will thrive. Think of it as a powerful assistant that handles your tedious work, not as a tool replacing your creativity.
Students looking to develop these dual capabilities—traditional artistry and AI fluency—are well-positioned for a successful career. Programs across India are beginning to introduce these integrated approaches into their curriculums, especially in cities where digital and creative industries are booming.
As one such example, an Animation course in Hyderabad is increasingly incorporating AI, real-time rendering, and virtual production into its syllabus—reflecting both local demand and global trends.
Conclusion: Preparing for the Future of AI-Enhanced Animation
The future of 3D animation isn’t about choosing between AI and artistry—it’s about combining both to tell better stories, faster and smarter. As the technology matures, students who stay curious, keep learning, and adopt AI as part of their creative toolbox will find themselves with a clear advantage.
Cities across India are witnessing a surge in demand for animation professionals trained in both foundational and futuristic skills. Enrolling in a 2D visualization course in Hyderabad, for example, now often includes exposure to AI-assisted design workflows, ensuring students are ready for real-world challenges the moment they step into the industry.
In this new age of creative technology, those who understand both the art and the algorithm will lead the storytelling revolution.
0 notes
Text
Scene 13 - The Process
Scene 13 has genuinely given me a run for my money on what I consider personally achievable by myself at this moment in time. When I initially planned the scene, I anticipated animating in a more detailed style to be of course challenging, but a welcomed break from the simplicity of every other character design I had created thus far. In many, many, many ways, I was sorely mistaken.
Whilst I appreciate how this scene has turned out thus far, I have to say I am not wholly pleased with it, but I honestly do not have the time to go back and make improvements where I would like them to be. I am also missing a lot of clips from the process of making this scene, mostly because I was just begging the universe for it to be over and trying my best not to just move on with a half completed product. Let me start from the top and work my way down with the clips I do have.
Extras
I began by animating the extras worrying that I would be likely to half bake them if I animated them after the main attraction. In a lot of ways, this was a good call, as the animation really doesn't look awful here. However, it certainly drove me into a bit of a pit, realising after spending countless hours animating and colouring and positioning, 'I haven't even begun animating the main character yet!' Pushing through that feeling was pretty tough.

I did the extras walk cycle, and Em's by proxy, in a loop of eight individual frames, including all of the regular positions a walk cycle should, and yet it still didn't look or move right when put into the scene. I ended up fixing this with some keyframes to help the movement along, but this had the nasty side effect of creating the dreaded 'sliding walk' that indicates a pretty cheap animation. I really tried my best to avoid this, but in the end I simply didn't have the time to troubleshoot all of my issues, so it became a regrettable stay in the scene.
Animating the officiant also took a lot of personal grit to do, since she had some movements that I wasn't quite sure on in the beginning. I had no real clue how to animate her reaching into her robe and pulling out a second scroll whilst also making it believable, so I just did what I could. It turned out okay.
Animating Em
By this point, I thought I would get some relief having moved on to the main focus of the scene, and I did in some respects. The change of pace was nice, and I was back to some familiarity with the character design. What I didn't bank on was having such immense difficulty with the colouring, which just about drove me up the wall. Why did I include so many hair shades? I'll never know.
Getting the shading to sit functionally was also a pain, though I did manage to get the light to shift as she walks which looks quite nice in practice.
To give you a better idea of how intricate this process was, here are some screenshots of my timeline and node view.
Whilst this was essentially just repeating the shading process as in every other scene, it felt far more tedious here. Another tedious thing was managing to get the scroll to effectively transfer between hands and between layers, something I am going to have to attempt to repeat in a later scene.
I really wish I could go into more detail about the issues and depth of this scene, I'm not sure what else I can say that I have evidence for. The camera movement remains the same as usual, the facial expressions don't differ out of the ordinary. I could point out that the colours are less saturated as I intended them to be, to the point that I coloured the character wholly in greyscale, but that can be seen in the image above. Essentially, I was very happy to move on from this scene. I don't think scene 14 will be nearly as trying on myself as this one has been, especially considering the decrease in movement, so in some way I am looking forward to redeeming my experience in animating in this style when I reach it, though that remains a fantasy for now. I will post the completed scene in full in the next post.
0 notes
Text
The Art of Motion: Character Animation Services for Games & Beyond

In the vibrant world of digital entertainment and interactive experiences, character animation services are the heartbeat of storytelling. Effective animations give characters in video games, movies, and virtual worlds life and make them memorable, relatable, and expressive. With cutting-edge 3D and 2D animation services catered to today's creative needs, Mas Global specializes in creating dynamic and captivating character animations for video games and other media.
Why Character Animation Matters
Character animation encompasses more than just movement; it also involves user interaction, narrative, and emotional expression. The way a character moves and engages with their surroundings greatly influences how users experience the story, whether they are a brave warrior in an action game or a likeable NPC in a mobile puzzle. Every frame conveys a story, and our animation professionals use this understanding to create captivating animations.
2D and 3D Animation Services for All Platforms
Mas Global offers a comprehensive suite of 3D and 2D animation services, supporting multiple platforms including console, mobile, VR, and AR. With careful attention to detail, our talented animators produce everything from fluid walk cycles to dramatic cutscenes. Whether you require realistic 3D rigs or stylized 2D sprites, we offer solutions that will make your game or digital product stand out.
Character Animations for Games That Resonate
Our character animation services for games include rigging, keyframe animation, motion capture integration, and facial expressions. To improve gameplay realism and emotional depth, we work closely with game designers to make sure every character moves and responds naturally within the game's universe. Mas Global is dedicated to matching the technical specifications and creative vision of your project with our animations.
Beyond Games: Expanding Animation Horizons
While gaming is a major focus, Mas Global also extends its animation expertise to marketing, educational tools, simulations, and virtual experiences. Our animations help businesses tell compelling stories, demonstrate products, and engage customers in new and immersive ways.
Why Choose Mas Global?
Mas Global is a reputable partner in character animation and game development, known for its passion for creativity and technical prowess. We create animations that are impactful, expressive, and fluid by fusing state-of-the-art technology with artistic talent. Our staff collaborates closely with customers worldwide to make sure their characters are realized precisely as they have been envisioned.
Conclusion
Effective animation can make the difference between a game that is played and one that is remembered in a world where images speak louder than words. Whether you're creating the next big independent hit or animating characters for a cross-media experience, Mas Global's professional character animation services give you a creative edge. Join forces with us to realize your vision and your characters.
Visit: https://masglobalservices.com/services/character-animation/
0 notes
Text


Animation Practice – Weeks 1-6: Audio Project
During the first six weeks of this course, I was tasked with creating initial ideas for a 40-50 second contemporary audio animation based on an existing portrait.
The first week involved visiting the Fitzwilliam Museum to choose a portrait which I would use as inspiration for my final animation. I took photos of various portraits I liked and created sketches of two that I wanted to choose between, those being ‘Joan of Arc’ painted by Dante Gabriel Rossetti in 1882, and ‘Portrait of Ben and Jake Nicholson’ painted by Winifred Nicholson 1927. For a while, I considered basing my animation on the former portrait, as I wanted to try and make an interesting contemporary character design based on the woman in the painting. However, I ultimately decided that it would be more suitable to base it on the latter portrait, as it would allow me to tell a much simpler and more personal story within the 40-50 second timeframe.
During the following week, I began conceptualising the synopsis as well as experimenting with the style I wanted my animation to be in using various materials such as coloured pencil and watercolour. The original portrait by Winifred Nicholson uses a muted colour scheme that evokes a dreamlike, nostalgic mood, and I figured the best way to replicate that feeling was to combine watercolour and pen/pencil to make it appear as if you are viewing the animation as a memory in one’s mind. I feel as if I could have done a better job with the physical experimentation by utilising more materials and techniques. However, considering that I wanted to produce the animation digitally, I feel as if creating digital experiments using tools that replicate those materials was a good call.
The next phase of the project was, of course, the animation. The film is titled ‘Reminisce’, and the story follows a married man moving out of his old home, who uncovers a scrapbook of family memories after his wedding ring slips from his finger. He is taken back to a time when he was young, sitting at a breakfast table and being fed by an ambiguous parental figure. He is transported back to the present when the hand of his father touches his shoulder. He shows his father a photo of the moment he was taken back to, and the two embrace for a hug. The final shot is a zoom-in of the photo the man was looking at, revealing the parental figure to be his father.
I wanted to tell this story because not only did I want to pay tribute to the portrait, but I feel as if I am at a point in my life where I seriously appreciate my parents and everything they did for me growing up. I wanted to properly portray the emotions that come with looking back at my childhood memories featuring them, and I would say I did that well. However, I feel as though I could have had more time to polish up the animation and add additional keyframes to make it a lot smoother. Another thing I could have done is record my own sound effects and make my own music for the film, rather than using royalty free music and sound effects from the internet.
Animatic: https://www.tumblr.com/alexmartinuniblog-y2-tri2/780458095087403008/animation-practice-audio-project-animatic?source=share
Final Animation: https://www.tumblr.com/alexmartinuniblog-y2-tri2/780613476086382592/animatio-practice-audio-project-final-animation?source=share
0 notes
Text
Blender donut
I've picked up a lot of useful tasks from this tutorial I watched. Here's a breakdown of what I've learned so far:
Navigating the Interface: I got comfortable with Blender’s interface, figuring out how to move around in the 3D viewport, select and manipulate objects, and use the toolbar. It took a little time, but I feel pretty confident now.
Creating Basic Shapes: I learned how to add primitive shapes like cubes, spheres, and cones to my scene. From there, I practiced scaling, rotating, and moving these objects to position them just right.
Mesh Editing: One big thing I picked up was using tools like extrude and loop cuts to add detail to my models. I also started using the Subdivision Surface modifier to smooth things out and make them look cleaner.
Modifiers and Sculpting: I played around with modifiers like Mirror, Subdivision Surface, and Boolean to make the process more efficient. I even dove into sculpting a bit, learning how to use different brushes and dynamic topology for more detailed work.
Texturing and Shading: I practiced UV mapping to unwrap my models and apply textures. Also, I got into the Shader Editor to make materials and shaders. The node system took a little time to get used to, but it’s a really powerful tool for creating cool effects.
Lighting and Rendering: I learned how to set up different lights in the scene to make it look more realistic. I also played with the rendering settings, switching between Eevee and Cycles, and tweaking them for the best results.
Animation Basics: I started animating by setting keyframes for objects. I even explored the Graph Editor to get the timing and movements just right.
Finalizing the Scene: I figured out how to set up the camera to get the perfect shot of my scene. Finally, I learned how to export my models in formats like .FBX, .OBJ, and .STL.

To add icing to my donut model in Blender, I started by selecting the top face of the donut where I wanted the icing to go. I switched to edit mode and used face select to pick the top face of the donut. Then, I pressed E to extrude and started pulling the icing up from the donut's surface. As I extruded, I moved the new geometry slightly upwards and outwards, making sure the icing flowed over the edges. I used S to scale the icing and give it a nice, smooth, flowing look around the donut. After extruding, I smoothed out the icing shape by tweaking the vertices and adding some small adjustments, making it look like the icing was naturally draped over the donut. Finally, I exited edit mode to see the whole result, and it looked just like a donut with a perfect layer of icing on top
I also learnt how to make object smooth. As you can see the icing of tis donut was very pointy and not realistic. Therefore, I learnt from this to do that I have to be on edit mode to click on each dots then play around to see what looks best.


I managed to make the icing and I am proud of how well I did this for first time.
However after making the icing drip I realized the top bit got messed up. probably because the dots were pulled down too much.
0 notes
Text
Premiere Pro Effects: Enhancing Creativity and Productivity
Adobe After Effects is a powerful tool used by motion graphic artists, video editors, and visual effects professionals. Known for its versatility and endless creative possibilities, it allows users to bring their ideas to life in the most visually stunning way. This article highlights the key features of Adobe After Effects and how they contribute to creating amazing visual content.
1. Motion Graphics Creation
Adobe After Effects shines in the world of motion graphics. With an intuitive interface and a range of tools, it allows users to create dynamic animations and compelling visual effects. From simple logo animations to complex motion design sequences, After Effects provides the flexibility and creativity needed to produce eye-catching content.
2. Visual Effects Mastery
One of the standout features of After Effects is its ability to integrate advanced visual effects. Whether you're working with green-screen footage, creating 3D camera movements, or adding special effects like explosions premiere pro plugins, After Effects makes it easy to create stunning visual elements. The powerful built-in effects library can transform your footage, making it look more cinematic and polished.
3. Compositing Capabilities
After Effects excels in compositing, allowing users to combine different layers of video, images, and special effects into one seamless visual. The software’s powerful masking and tracking tools help create flawless composites by blending elements together with precision. This makes it the go-to choice for professionals working on high-quality video production projects.
4. Keyframe Animation
Keyframe animation is at the heart of After Effects. By adjusting keyframes at different points in time, users can create smooth and realistic animations. The software offers precise control over each frame, making it easier to craft intricate animations with speed and accuracy. This feature gives users full control over their creative vision, enabling them to bring every detail to life.
5. 3D Capabilities
Adobe After Effects offers extensive 3D features, allowing users to work with 3D objects, cameras, and lighting. Whether you're creating 3D text animations or integrating 3D models into your scene, the software enables a realistic sense of depth and perspective. The addition of 3D layers gives creators the freedom to work with more dynamic visuals and effects, making it possible to elevate any project.
6. Integration with Adobe Creative Cloud
After Effects seamlessly integrates with other Adobe Creative Cloud apps like Adobe Premiere Pro, Illustrator, and Photoshop. This integration makes it easier to transfer files between applications and create a smoother workflow. For instance, you can bring Photoshop compositions into After Effects for animation or edit your After Effects animations in Premiere Pro for a final polish.
7. Expression Controls
Expressions are a powerful feature in After Effects that allow users to automate animation tasks. By writing simple code or using preset expressions, you can control parameters like position, scale, and rotation with incredible precision. This feature allows for more complex animations without needing to manually adjust every keyframe, saving time and effort.
8. Rotoscoping Tool
After Effects comes equipped with an advanced rotoscoping tool, known as the "Roto Brush." This tool automatically detects the edges of moving objects and isolates them from the background. It simplifies the process of creating complex masks for compositing and makes tasks like green-screen editing much more efficient.
9. Audio Synchronization
In addition to visual features, After Effects also supports advanced audio synchronization. You can easily sync animations to music or sound effects, creating a more cohesive and engaging experience. Whether you are working on a music video or a promotional ad, After Effects helps bring your audio-visual content together seamlessly.
10. Wide Range of Plugins and Scripts
Adobe After Effects offers an extensive selection of plugins and scripts that enhance its functionality. Whether you need advanced particle effects, motion blur options, or specialized transitions, there’s a plugin that will fit your needs. This versatility gives creators the flexibility to explore new creative avenues and push the boundaries of their projects.
0 notes
Text
Understanding the Animation Production Process from Start to Finish

Animation is a fascinating blend of creativity and technology that brings characters, environments, and stories to life. Whether it's a short advertisement, an animated movie, or a promotional video, every animation project follows a structured production process. Understanding each stage helps ensure a smooth workflow and a successful final product. Here’s a step-by-step guide to the animation production process from start to finish.
1. Concept Development and Pre-Production
Before an animator begins creating stunning visuals, the first step is concept development. This stage involves brainstorming ideas, defining the story, and establishing the style of the animation.
Idea Generation: Every animation starts with an idea. Whether it’s a brand commercial or an animated feature film, defining the concept is crucial.
Scriptwriting: Once the idea is solidified, a script is written to outline the narrative, dialogues, and action sequences.
Storyboarding: A storyboard is a visual representation of the script, showcasing key scenes, character movements, and transitions. This acts as a blueprint for animators and directors.
Character and Environment Design: At this stage, artists design characters and backgrounds to match the project’s style. The designs should align with the animation's tone and target audience.
2. Asset Creation and Production
Once pre-production is complete, the actual animation process begins. This involves creating all visual elements required for the animation.
Modeling (For 3D Animation): If it’s a 3D animation project, artists create digital models of characters, objects, and backgrounds using specialized software.
Rigging: Rigging involves creating a digital skeleton for 3D characters, allowing them to move naturally.
Texturing and Lighting: This step involves adding colors, textures, and lighting to enhance the realism of 3D models.
Animatics: A rough animation version of the storyboard, known as an animatic, is created to test how scenes flow together.
3. Animation Process
This is where the real magic happens! Animators bring characters and environments to life using movement, timing, and expressions.
Keyframe Animation: Animators create essential poses or “keyframes” that define the movement of characters.
In-betweening: Also known as “tweening,” this step involves filling in the frames between key poses to create smooth transitions.
Physics and Effects: Animators add realistic effects like gravity, wind, and object interactions to enhance realism.
Voice Syncing: For animations with dialogue, lip-syncing is done to match character mouth movements with recorded voiceovers.
4. Post-Production and Editing
After animation is completed, post-production ensures the final product is polished and visually appealing.
Compositing: Different visual elements (characters, backgrounds, effects) are combined into a single frame.
Sound Design: Background music, sound effects, and dialogue are added to enhance the overall experience.
Color Correction: Adjusting brightness, contrast, and colors to create a visually cohesive look.
Final Rendering: The animation is rendered into high-quality video format, making it ready for distribution.
5. Review and Final Delivery
The last step involves reviewing the animation to ensure it meets the client’s or studio’s expectations.
Feedback and Revisions: The animation is reviewed, and necessary changes are made to refine the final output.
Exporting for Different Platforms: Depending on where the animation will be used (TV, web, social media), it is exported in appropriate formats and resolutions.
The Role of Professional Animation Studios
A well-established animation studio in New York follows these production steps meticulously to deliver high-quality animations for various industries. Whether it’s entertainment, marketing, or education, animation plays a crucial role in engaging audiences and conveying messages effectively.
Why 3D Animation Services Are in High Demand
With the rise of digital content, 3D animation services have become increasingly popular in industries like advertising, gaming, and film. The ability to create realistic and immersive visuals has made 3D animation a preferred choice for businesses looking to captivate their audiences.
Final Thoughts
Understanding the animation production process helps businesses and creators appreciate the effort that goes into making high-quality animations. From concept to final delivery, every stage requires collaboration, creativity, and technical expertise. Whether you’re working on a short promotional video or a full-length animated film, following these steps ensures a smooth workflow and an impactful final product.
So, the next time you watch an animation, take a moment to appreciate the magic behind the scenes!
#animation#3d animation#2d animation#motion graphic#graphic design#web graphics#animated#character animation#animation production#post production#concept development
0 notes
Text
Creating Realistic 3D Characters: Breathing Life into Digital Forms
The art of creating realistic 3D characters is a captivating blend of technical skill and artistic vision. It involves a meticulous process of sculpting, modeling, texturing, rigging, and animating digital forms to breathe life into virtual beings that resonate with audiences. This intricate process is often taught in specialized courses at animation academy in Pune and other cities, equipping aspiring artists with the skills to create lifelike digital characters. From hyperrealistic humans in video games and films to stylized characters in animated features, the pursuit of realism in 3D character creation continues to push the boundaries of digital artistry.
The Foundation: Modeling and Sculpting
The journey to a realistic 3D character begins with building its foundation. Digital artists employ specialized software like ZBrush, Mudbox, or Blender to sculpt and model the character's form.2 This involves:
Anatomy and Proportions: Understanding human (or creature) anatomy is crucial for creating believable characters.3 Artists meticulously sculpt muscles, bones, and fat, ensuring accurate proportions and realistic body mechanics.4
Facial Features: The face is the window to the soul, and creating expressive facial features is paramount.5 Artists pay close attention to the nuances of eyes, nose, mouth, and ears, capturing subtle details that convey emotion and personality.
Hair and Fur: Creating realistic hair and fur involves simulating individual strands, their flow, and how they interact with light and movement.6 This often requires specialized tools and techniques to achieve a natural look.
Bringing Characters to Life: Texturing and Shading
Once the 3D model is complete, it's time to give it the appearance of life through texturing and shading:
Skin: Realistic skin requires intricate details like pores, wrinkles, blemishes, and subsurface scattering (the way light penetrates and scatters beneath the skin).7 Artists use high-resolution textures and advanced shading techniques to achieve lifelike skin.8
Clothing and Accessories: Characters are adorned with clothing, accessories, and props that add to their personality and story.9 Artists create realistic textures for fabrics, leather, metal, and other materials, paying attention to details like wrinkles, seams, and wear and tear.
Hair and Fur: Adding color, texture, and shine to hair and fur enhances realism. Artists use techniques like anisotropic shading to simulate the way light interacts with individual strands, creating a sense of depth and volume.10
The Skeleton Within: Rigging
Rigging is like giving a character a skeleton and muscles, enabling it to move and be animated:11
Bone Structure: A digital skeleton is created, mirroring the bone structure of the character.12 This defines the range of motion and how different body parts connect and move.13
Joints and Controls: Joints are added to the skeleton, allowing for realistic articulation and movement.14 Controls are created to manipulate the character's pose and expressions.15
Muscle Simulation: Advanced rigging techniques involve simulating muscle deformation and skin sliding, adding another layer of realism to character movement.16
The Illusion of Life: Animation
Animation breathes life into the character, giving it personality and purpose:
Motion Capture: Motion capture technology records the movements of real actors, providing a basis for realistic character animation.17
Keyframe Animation: Artists manually set key poses and interpolate the movement between them, creating nuanced and expressive animations.18
Facial Animation: Bringing the face to life involves animating facial expressions, lip-syncing dialogue, and conveying emotions through subtle eye movements and muscle contractions.19
The Pursuit of Realism: Advanced Techniques
The quest for realism in 3D character creation is an ongoing journey, with new techniques and technologies constantly emerging:
Photogrammetry: Creating 3D models from real-world photographs, capturing intricate details and textures.20
3D Scanning: Using lasers or structured light to capture the shape and form of real people or objects, creating highly accurate 3D models.21
Advanced Shading and Rendering: Utilizing physically based rendering (PBR) techniques to simulate the way light interacts with different materials, creating photorealistic results.22
Beyond Realism: Stylization
While realism is a captivating pursuit, 3D character creation also embraces stylization, where artistic interpretation and exaggeration are used to create unique and expressive characters:
Cartoon Style: Exaggerated features, simplified shapes, and vibrant colors create a playful and whimsical aesthetic.
Anime Style: Large eyes, stylized hair, and dynamic poses evoke the energy and emotion of Japanese animation.
Hyperrealism: Pushing the boundaries of realism, capturing every minute detail with meticulous precision.23
Conclusion
Creating realistic 3D characters is a testament to the artistry and technical prowess of digital artists. It's a captivating process that combines artistic vision with scientific understanding, pushing the boundaries of what's possible in the digital realm. Aspiring artists seeking to master this craft often turn to specialized training at animation institutes in Pune and around the world. As technology continues to evolve, we can expect even more breathtakingly realistic and expressive 3D characters to grace our screens, blurring the lines between the virtual and the real.
0 notes