#ctrl+shift+t
Explore tagged Tumblr posts
Visit Tumblr Blog
Explore Tumblr blogs with no restrictions, modern design and the best experience.
Last Seen Tumblr Blogs


Fun Fact
Tumblr’s website traffic is steadily declining.
Text
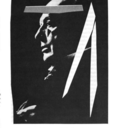
birds, to the point of formlessness
ctrl+shift+T #11 created in ms paint and paint.net, picture taken earlier today
23 notes
·
View notes
Text
#sabaku no gaara#gaara#neros art tag#i havent drawn in so long#missing my left ctrl key so ive changed all my keybinds to shift+ like shift+z/ shift+y/ shift+t/ etc. Pain In Ass#gaara my lovely<3
63 notes
·
View notes
Text
FILE ACCESS DENIED.
Jesus Christ, it can’t be that difficult!
Where is it, where is it, where is it…
32 notes
·
View notes
Text
Omg computer tip:
If you click in on the mouse wheel on a link it automatically opens it in a new tab. And if you mouse wheel click on a tab, it closes it
my beautiful wife "open link in new tab"
#ctrl+shift+t reopens last closed tab#ctrl+w closes current tab#ctrl+tab/ctrl+shift+tab to cycle forwards/backwards through tabs#ctrl+[num] to jump to that tab in your browser (9 always jumps to the last if you have more than 9)#so many fun keyboard shortcuts
20K notes
·
View notes
Text
discovered the keyboard shortcut for opening the command line Oh its over for you cunts. and you can run a bunch of programs just by typing their name into the command line. awesome
#(keyboard shortcut on linux is ctrl alt T. might have to manually activate it)#some programs (esp custom games) dont work if u just get em off the internet and access them thru shortcuts to the shell files#and u gotta know the precise program name and not shorthand (firefox esr instead of just firefox for example)#but like! this is so cool#once saw a guy say like the more you can do with your keyboard the better bcos moving your hand to your mouse interrupts your flow#and honestly he was so right. this is faster plus i feel like a wizard plus it has happened to me that my mouse has stopped working#in which case being able to navigate your computer by keyboard is a fucking godsend#ok the handiest shortcuts for navigation are:#alt+tab to cycle thru open windows by most recent#ctrl+tab to cycle thru tabs like in your internet browser. ctrl+shift+tab to go the other direction#not as necessary but i use ctrl+up and ctrl+down to go to the top and bottom of web pages a lot#and its not handy for general use a lot of the time but u can tab over to different sections of a website#and in the case that your mouse stops working you can use that to still proceed mostly as normal
1 note
·
View note
Text
me when I close a tab on accident: babygirl you cannot do this to me
ym ctrl, L shift, and T keys:
1 note
·
View note
Text
‼️TIP! If you closer a browser tab and realize you didn't actually want to close it, you can hit Ctrl+Shift+T to reopen your most recently closed tab.
1K notes
·
View notes
Text
Ctrl + Shift + Hee


Synopsis: When Heeseung finds your Sims game, curiosity turns into chaos…
Word count: 0.8k
Warnings: fluff fluff fluff, crack (?), no smut, skinship, established relationship
Pairing: enhypen Heeseung x reader
a/n: just a little quick heeseung fluff before bed bc i cant get enough of him
Taglist: @heestoleurgirl @stariekis @jaehoodies @morganaawriterr @luvashli@kireistrawberryjayla @annovaz @bambieheeseunglee @firstclassjaylee @flowerwinds @veilstqr(comment if you want me to add / remove you from the list <3)
⌯⌯⌯⌯⌯⌯⌯⌯⌯⌯⌯⌯⌯⌯⌯⌯⌯⌯⌯⌯⌯⌯⌯⌯⌯⌯⌯⌯⌯⌯⌯⌯⌯⌯⌯⌯⌯⌯⌯⌯⌯⌯⌯⌯⌯
You lay on your shared bed, completely immersed in your laptop as you moved your Sims character around the house you created. This had been your secret guilty pleasure for weeks now—creating an alternate life with a Sims version of your boyfriend. It partially answered your ‘what if?’ questions. What if you lived in an apartment? You tested it out—hated it. What if your home had a specific theme? You tried many, never really making up your mind on just one, so you kept changing the furniture and wallpaper more often than you’d like to admit.
The urge to grab a snack hit you, your rumbling stomach demanding attention. Reluctantly, you left your laptop on the bed and disappeared into the kitchen. You were gone for maybe 10 minutes at most.
When you returned, you found Heeseung hunched over your laptop, his eyes filled with amusement and shock. Then it dawned on you—you left The Sims running in the background.
“I’m no genius… but that man looks suspiciously similar to me,” he teased, his eyes flickering up at you from the screen. You stood there, frozen, debating whether to deflect, deny, or accept the accusation. “My Sims looks just as handsome as me,” he mused, smiling from ear to ear, clearly enjoying the moment.
“I can explain…” you started, slowly making your way toward the bed.
“Oh yes, an explanation is definitely needed for why there are… one, two…” Heeseung started counting, brows furrowed in concentration. “Five,” he finished, “five children running around our house.” He turned to you expectantly. On the screen, you could see a toddler waddling through the kitchen, another child doing homework, and Sims-Heeseung standing in the living room, looking oddly proud of himself.
Heeseung was too absorbed in the game to press you for an answer, the urge to mess around overwhelming his curiosity. He clicked around, watching in fascination—and you in horror—as the Sims version of himself autonomously picked up a toddler and started bottle-feeding them, a little green diamond hovering above his head. “See? I’m already such a good dad,” he grinned.
That’s when his confidence with the controls got the better of him. He started clicking random buttons. “Wait, babe, what does this do?”
“Hee… be careful—”
A loud whoosh echoed from your laptop. Suddenly, flames engulfed the kitchen.
“Oh, fuck—” Heeseung’s eyes widened. The toddler was still there. The kids were screaming. The Sims version of you and him were frantically running in circles. Panic. Absolute panic.
“WHAT DID YOU DO?!” you shrieked, climbing onto the bed beside him to assess the situation.
“NO, NO, NO—” Heeseung clicked around desperately, but instead of fixing the fire, he accidentally deleted the fridge. His forehead was practically glistening with stress. “WHERE’S THE EXTINGUISHER? DO I HAVE TO BUY ONE? Y/N, HELP—”
As you tried to calm him down and give instructions, his hands had a mind of their own, clicking at random. A second later, the children’s screaming in the game came to a halt—but the sound of the fire was still going.
You squinted at the screen in confusion. “…YOU DELETED OUR CHILD?!”
“WHAT? NO, I SWEAR IT WASN’T ON PURPOSE.”
You smacked your forehead, groaning, while Heeseung burst into laughter, completely losing it. He fell back on the bed, wiping tears from his eyes as he looked at you with the biggest grin. “We are not ready to be parents yet, that’s for sure,” you said, giggling at the sheer ridiculousness of the situation.
“So,” he started, still chuckling, “you wanna explain why you made us get married and have five kids?”
You felt your cheeks and ears heat up. “It was just for fun…” you mumbled.
“Five kids is fun?” He smirked, raising an eyebrow. “You trying to tell me something, babe?”
“Oh, you’re impossible. Get away from me.” You grabbed a pillow and chucked it at him.
Catching it mid-air, he was still laughing. “Relax, I think it’s cute,” he reassured you, pulling you into his lap. “I just didn’t know you wanted to marry me that bad.” His voice dropped slightly, his breath warm against your neck before he placed a soft kiss there. His hands slipped under your sweater, resting on your bare back—like he just wanted to feel you closer.
“Mmm,” you hummed absentmindedly, “well, first step would be to not kill our Sims children.”
Heeseung smiled, looking down at you before pressing a kiss to your cheek. “As long as you keep making the Sims version of me handsome.”
#enhypen#enhypen x reader#enhypen imagines#enhypen drabbles#enhypen reactions#enhypen scenarios#enhypen fanfiction#heeseung#jay#jongseong#jake#jaeyun#sunghoon#sunoo#jungwon#riki#ni-ki enhypen#jake enhypen#jongseong enhypen#sunoo enhypen#sunghoon enhypen#jaeyun enhypen#heeseung enhypen#fanfic#fanfiction#writer
294 notes
·
View notes
Text

Rags to Riches Challenge (Revised) - Sims 3
Created by HedvigsUnicorn & Revised by Simphora

Hey guys! A while ago, I told myself that I wouldn’t attempt to do another challenge until I completed the Sweet & Sour Legacy Challenge, but I lied. As of lately, I have been in the mood to do the Sims 3 Rags to Riches Challenge, but I noticed that it was a lil’ outdated. Sooo, I decided to add and change some of the rules to the Rags to Riches Challenge because I wanted to enhance and toughen the gameplay.
Disclaimer: I did not create the Rags to Riches Challenge. It was created by HedvigsUnicorn. I only revised it.
If you’re interested in doing this challenge, please feel free to tag me: @simphoraa or #ragstorichesrevised. I would love to see your progress and gameplay!
S T O R Y L I N E:
You’ll start with a blank slate—a single Sim with zero Simoleons. Your Sim has been dealt a rough hand in life and is now starting from the absolute bottom of society. They have nothing, but a will to survive and succeed. Will your Sim rise to the challenge? Or, will the weight of their past keep them from reaching the heights they dream of?
The choice is yours—but one thing is certain: success will come at a cost.
T H E U L T I M A T E G O A L:
In this challenge, you struggle your way from homelessness to a rich life! The goal of this challenge is to earn §100,000 in household funds, and fulfill your Sims Lifetime Wish.
R U L E S:
Create a Sim or select a Sim from a household. The Sim can be female or male, but they must be a Young Adult.
Style your Sim in a worn-out look to reflect a more rugged, carefree style.
Give your Sim the traits of your own choice, but you need to give them the ‘Living in the Lap of Luxury’ Lifetime Wish.
Have your Sim move into an EMPTY LOT of any size, and then build/upgrade your Sims house as you progress in earning Simoleons (Remember: your Sim has to live on the same lot the entire time, they cannot move until their Lifetime Wish is completed).
Feeling extreme? You are not allowed to buy a bed, toilet, shower, and a fridge until you have enough Simoleons to build a house. (OPTIONAL)
Change the household funds to §0. (Open the cheat window (CTRL, Shift, C), and type in "familyfunds ________ 0". Replace the lines with the last name of your Sim).
Visit friends'/partner houses or community lots for your Sims needs, if needed.
Relationships and marriages are allowed, but your Sims partner or spouse must be unemployed. And if they move in, deduct ALL of the Simoleons that your partner or spouse brings in.
Lifetime points can be used, but you cannot use inheritance or the Dusty Old Lamp.
No public transportation (ex: taxis and subways).
No stealing objects.
No engaging in real estate or growing money trees.
No purchasing any lottery tickets or traveling to the future to cheat the lottery.
Once your Sim has earned at least §10,000 in household funds, they are allowed to travel to other worlds.
Do NOT get a part-time/full-time job or profession. It will defeat the purpose of the challenge.
Do NOT use any money cheat codes (ex: motherload, kaching, or rosebud).
U S E F U L W A Y S O N E A R N I N G S I M O L E O N S:
Collecting (ex: flowers, gemstones, rocks, seeds, insects, etc)
Crafting
Creating potions
Experimental Subject
Dumpster diving
Fishing
Gambling
Gardening
Inventing
Moonlighting
Martial Arts
Nectar Making
Painting
Photography
Playing an instrument for tips
Sculpting
Search the galaxy
Social Networking
Training a pet to hunt
Treasure hunting
Writing
If you have made it to the end of this challenge, I would like to thank you for participating. And, let me know what you think!
#sims 3#ts3#sims 3 challenges#ts3 challenges#sims 3 legacy challenges#ts3 legacy challenges#ragstorichesrevised#simphoraa
132 notes
·
View notes
Text
if you ever accidentally close out of a tab and don’t have enough spoons to navigate all the way to History and revive it? Fear not
CTRL + Shift + T
71 notes
·
View notes
Text
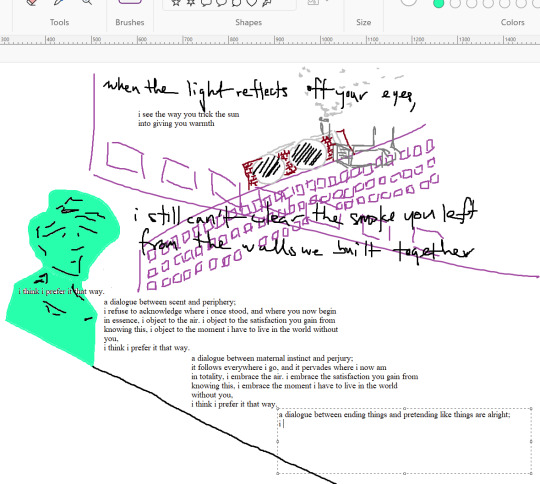
i think i prefer it that way.
ctrl+shift+T #10 (don’t think i’ve posted this here before. basically poetry/random art stuff/sometimes shitposts)
10 notes
·
View notes
Text
being the only young person in an office of like 60-70somethings is so awesome I just blew this dude's fucking mind with ctrl+shift+T
81 notes
·
View notes
Text
Here we are. Finally, I'm in.
Let's get to the bottom of this. Once and for fucking all.
...what the fuck?!
21 notes
·
View notes
Note
Hey! Do you think you could please make a tutorial on how to add image over a gif? as demonstrated, for example, here: galindaelphaba/post/749133493751169024/insp
Sure! It is pretty simple so should be easy to follow tutorial is below the cut :)
First start with your getting your gif ready and coloured
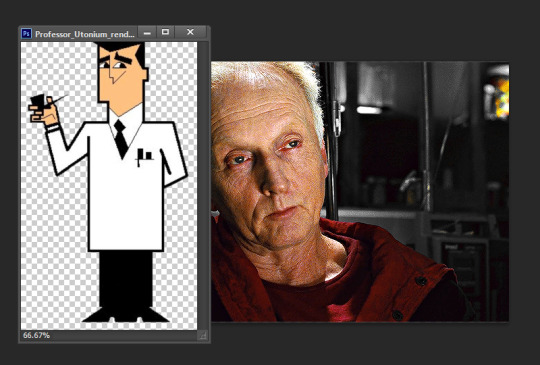
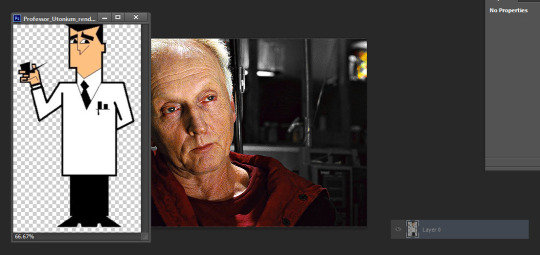
search for the image/shape you would like to appear on your gif. in this case i searched for professor utonium
make sure the image has no background and save it. You can usually tell if an image has no background if it has a white and grey check background.
if needed go to https://www.remove.bg/ and remove the background from the image then save it. You could also just copy the image in and remove the background yourself in photoshop but i find that to be more of a hassle.
once you have your image ready open it in photoshop and drag it out so it is in a separate window.
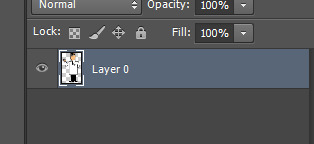
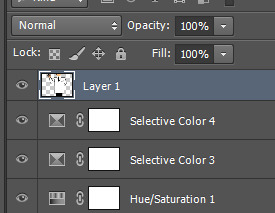
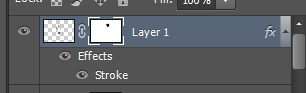
you should see a layer for your image
drag this layer onto the window with your gif. try to drag this onto the gray area off your gif as this will place your image in the centre.
make sure this new layer is on top of all your gif + colouring layers. make sure the length of this layer is the same as your gif layer.

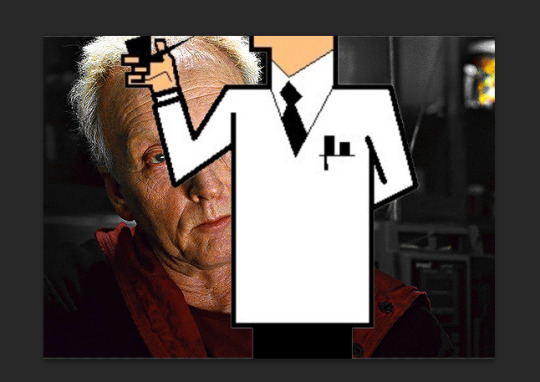
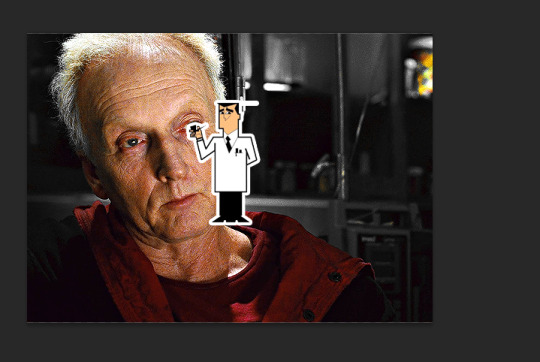
this is the result of what my image on top. as we can see this is too big and will need to be resized.
to resize your image use the transform function (ctrl + t). I always resize from the corner of the image while holding shift to maintain the correct proportions of the image.
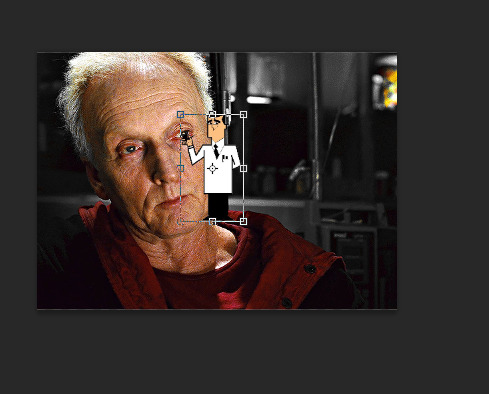
once resized press enter to save the changes on your image.
for the gifset you linked i wanted the images to look like stickers so i went into the blending options of the layer and added a thick white outline to the image.
to do this right click the image layer and go to "Blending Options" (you can also do this by double clicking the layer (but not on the layer name as this will prompt renaming the layer)

go to stroke and make the colour white and the thickness about 3-4
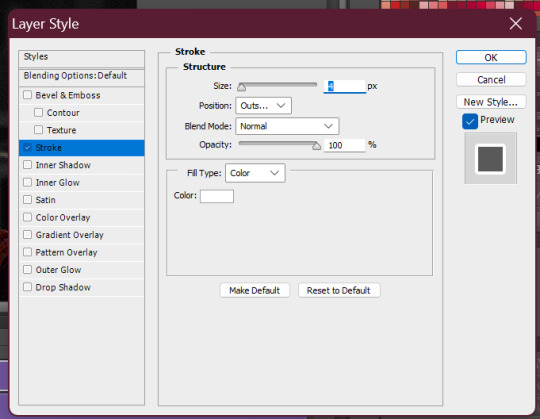
click ok to save your changes.
this is our current result and there is a bit of extra outline we will have to fix
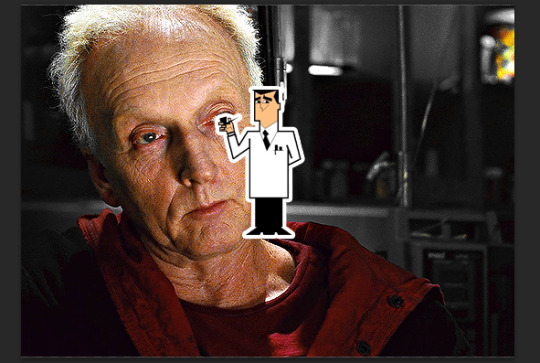
the easiest way to do this is by adding a layer mask and masking the area which has the extra outline. the reason i prefer using a layer mask is it is easier to go restore part of the image if you accidentally erase it by painting the part of the mask you need back white (idk if this makes sense or not).
now the image part of the gif is complete and all we need to do is add any text and tweaks we may like to finish the gif :)
this is the final result:
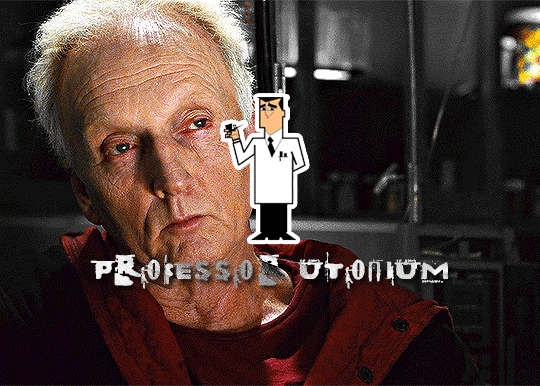
hope this makes sense and that it has been helpful to you <3
#asks#resources#ps help#usergif#allresources#yeahps#completeresources#resourcemarket#dailyresources#tutorials#photoshop tutorial#*mine
61 notes
·
View notes
Note
Hel!o, again! I meant ur Van Helsing poster 😊 Happy Holidays if you celebrate 😊

i'd be more than happy to! happy holidays to you as well! here's the kind of poster i'll walk you through how to make:

the most important thing you need to think about with this type of poster is which shots will blend best with each other. i recently made a blending tutorial for another anon and you can find it here. in it, i go a bit more in depth on what types of shots will blend best, and you can also check out the blending tutorial tag on my resource blog, @gifmakerresource.
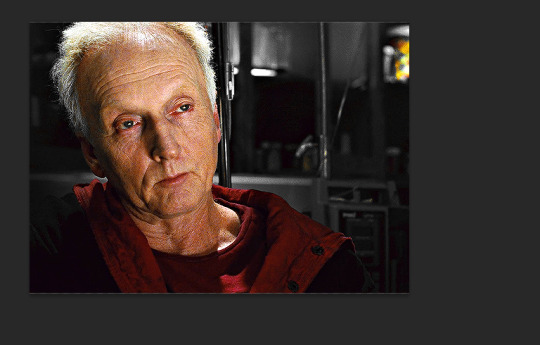
overall, dark on dark blends the best. the lighter your scene(s), the harder it's going to be to see. when making this poster, i went in knowing i wanted to use this silhouetted shot of van helsing. silhouetted shots are one of the best kinds of shots you can blend with because the silhouette itself will be much darker than the surrounding area.

this is what i started with (after cropping and sharpening). the dimensions i used are 540px x 700px but the height can be whatever you want. next, i wanted to focus on lightening the background and further darkening his silhouette.
here are my coloring layers (which will, of course, vary with every shot and every movie):

and here are the specifics for each layer in order from bottom (first) to top (last)*:


*note: the blue selective color layer also makes the same adjustments to cyan
i created a new layer (ctrl+shift+n) and painted over the extra-bright parts around his head for later blending. this is a layer i added after the fact once i found all the shots i wanted to use and blend together.

this is the second shot i used:

once cropped, sharpened, and converted to a smart object, i bring it over to the existing canvas, making sure it's properly aligned with ctrl+t, and set the blending mode to screen.
here are my coloring layers:

and the details for each (and if you're wondering, to color code your layers, right click in the box where the eye is and select your color):

and this is what the gif looks like prior to using a layer mask:

it's not terrible, but i wasn't happy with how much of the second gif could be seen outside of the silhouette. this is also a good illustration of how dark blends with dark best, compared to dark and light or light and light. i grouped together the second gif and the coloring layers (select the appropriate layers and ctrl+g) and then added a layer mask to the group by clicking this at the bottom of the layers panel:

when using a layer mask, you're only working with 2 colors: black and white. using a soft circular brush (0% hardness), as you can see in the selected thumbnail titled Group 3, i used black to color all around van helsing's silhouette. if you make a mistake when coloring, simply press x to switch to white and brush over the desired area and your gif will reappear. it's a way to "erase" a layer without permanently deleting it and is something i use frequently!
i used another layer mask so the gif was only visible right around the top of his hat:

and the coloring layers (note the gradient map is applied to the gif using a clipping mask [right click on the gradient map layer and choose 'create clipping mask'] so it only is applied the the layer immediately below it [the third gif] and not everything below it):

details:


this is the final gif before all the typography:

for the typography, i don't really remember why i didn't just use a transparent png of the movie logo other than knowing i had the actual font they use on the poster already installed. you can find it here (dafont). at the top of this screenshot, you can see my font settings and at the bottom, you can see the blending modes i added:

and here are those details (click to enlarge):


using the same font, i added these two layers and positioned them where i wanted:

the names layer is 24pt and adventure is 36pt. to create/position the typography, i was referencing one of the movie posters btw!
for the final two layers, i used the font sf movie poster, which you can download here (dafont) and decreased the opacity of both to 30%:

ignore the warning symbols - i had to replace the font files and ps is mad at me

the "larger" letters are just capitals while the smaller ones are lowercase. i'm pretty sure this is the typical font used at the bottom of movie posters. i believe i either typed all this out referencing one of the posters or i went through the imdb page for the movie and went through the cast and crew sections.
and that's it! we have our finished gif! making a poster like this can result in a large file size, so keep in mind that tumblr's upload limit per gif is 10mb. i believe this gif is 45 frames, which is probably pushing it with these dimensions. if you finish your gif and find that it's over the limit, i HIGHLY recommend using ezgif's optimizer. you upload your file and then adjust the lossy slider and you'll be surprised just how much it drops the file size down without a noticeable difference. i also use this site to convert webp files to gifs/pngs when necessary.
if you have any further questions or didn't understand something, please let me know! i'm always happy to help :) and lmk if you ever want a tutorial on any of my other gifs! happy holidays!
#answered#Anonymous#gif tutorial#my tutorials#flashing gif#gifmakerresource#completeresources#dailyresources#chaoticresources
56 notes
·
View notes
Note
hi alie! can i request on how to do this grey-white text? /post/721285784354865152/ thanks!

hiii, sure! it's quite simple actually, here are the steps for the text effect on this gifset (and settings/screenshots under the cut):
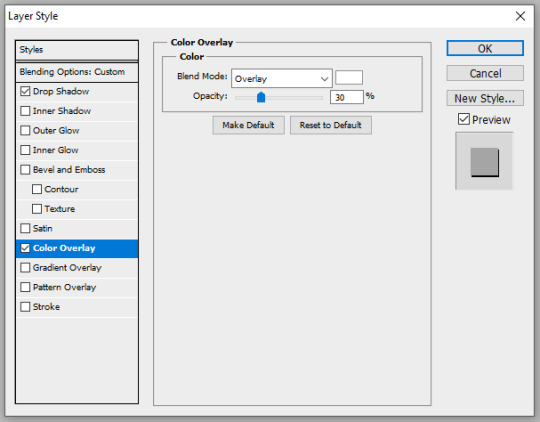
type out you text and select white for the color, then set this text layer's blending mode to Difference
double click on the layer to get to the layer style options and add a Color Overlay. choose the color white (black also works) and set the blending mode to Overlay. play with the opacity slider as you wish, this will brighten your text and it helps for gifs that have a high contrast behind the text.
if you don't need to brighten the text, put the color overlay's blending mode to Hue, you're actually done right here, easy!
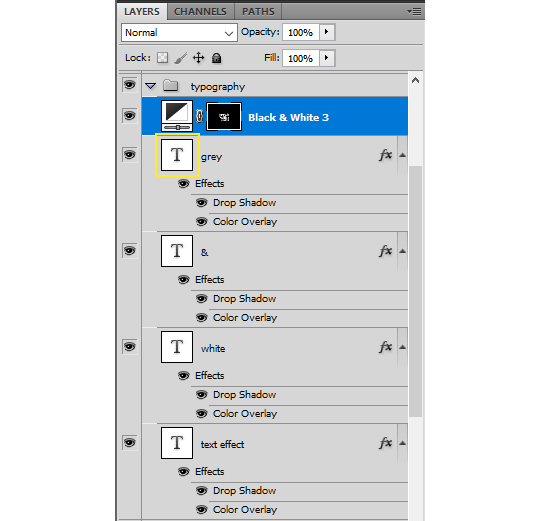
optional: if you're using the color overlay as an overlay like i have for that particular gifset, you need to create a mask of your typography. to do that hold the ctrl key and click on the text layer's icon (the "T", the yellow box on one of my screenshots). this will make a selection of your typography. if you have multiple text layers, hold CTRL + SHIFT to select multiple layers. once your selection is done, go to the top menu and Layer > New Layer > New Adjustment Layer > Black & White > Ok. make sure that layer is on top of the text layers.
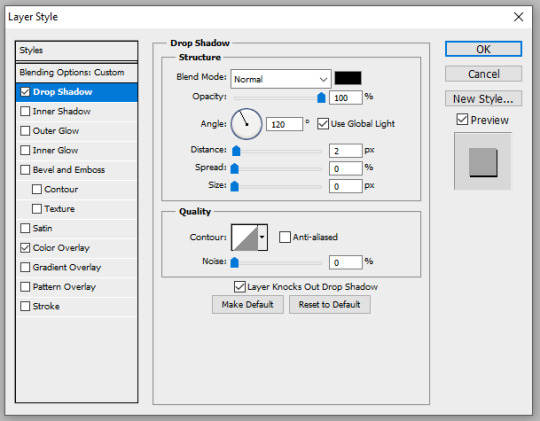
add a Drop Shadow if you want, and that's it, the effect is done :)
#alie replies#Anonymous#*ps help#photoshop#resource#tutorial#resources#allresources#typography#completeresources#resourcemarket#userabs#userdahlias#usercats#usersmia
361 notes
·
View notes