#currently taking notes in my notebook while reading a pdf and it's NOT the same
Explore tagged Tumblr posts
Visit Tumblr Blog
Explore Tumblr blogs with no restrictions, modern design and the best experience.
Last Seen Tumblr Blogs


Fun Fact
Tumblr has 4 main sources of revenue.
Text
i so badly want a physical copy of this i can mark up
#cloudy rambles#jekyll and hyde dramatized#j&h dramatized#(i don't remember which tag I've used for it)#currently taking notes in my notebook while reading a pdf and it's NOT the same#it's out of print and seemingly not available anywhere
1 note
·
View note
Text
How I Use Microsoft OneNote as a Student
Long-time readers of my blog will know that OneNote is one of my favorite applications and is an integral part of my college (and life) organization system. For those unfamiliar with OneNote, it is a note-taking application developed by Microsoft. I’ve been using OneNote since my sophomore year in high school and am excited to share why I love it and a bit about how I use it as a student. Before diving in, I will note that I’ve accepted a return offer to Microsoft as a software engineering intern on the OneNote team!
OneNote is an easy tool to recommend because it is free and has cross-platform support. I personally have it installed on my laptop (Windows 11), tablet (iPadOS 15), and phone (Android 12). Additionally, OneNote is accessible directly through your internet browser. For more about the specific devices I use, check out my slightly outdated post about what’s in my backpack. While I use my personal Microsoft account, I will also point out that Smith students have free access to the entire Office 365 suite which you can learn more about here. In general, Smith students use Google Workspace (Drive, Docs, Slides, etc.) for collaboration because our email accounts are through Google.
What I love about OneNote is that it enables me to organize my notes through a strong hierarchical system (explained below) while at the same time providing a very flexible canvas for taking my notes. Specifically, the page supports typed text, handwritten notes, pictures, pdfs, and more. Unlike other notetaking applications, you aren’t limited to a set page size or format, rather each page is an infinite canvas that can extend in either direction and elements can be added anywhere on the page. One downside here is exporting the page is made a bit more difficult.

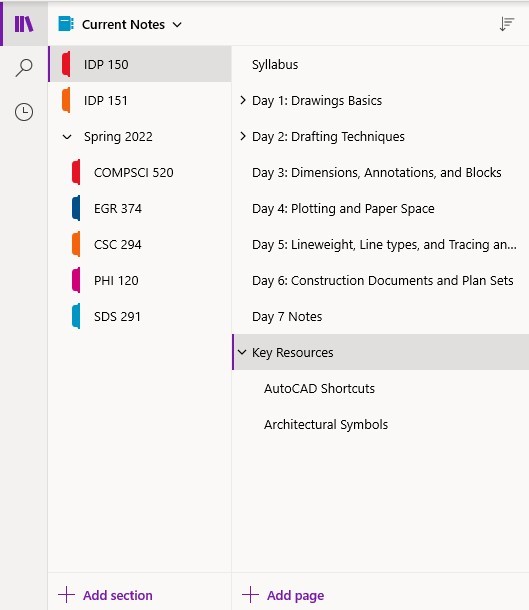
As for OneNote organization, the basic hierarchy is notebooks, section groups, sections, and pages. Additionally, section groups support multiple levels of sub-section groups and pages support two levels deep of sub-pages. My OneNote has 3 notebooks, Addie’s notebook, current notes, and old notes. In this post, I’ll be focusing on the organization of my current and old notes notebooks as they are the ones I use for school notes. I also have some other college-related notes in my personal notebook for work, extracurriculars, and course planning. For quick notes with a relatively short life span, I use Microsoft Sticky Notes which is built into Windows and the OneNote application.
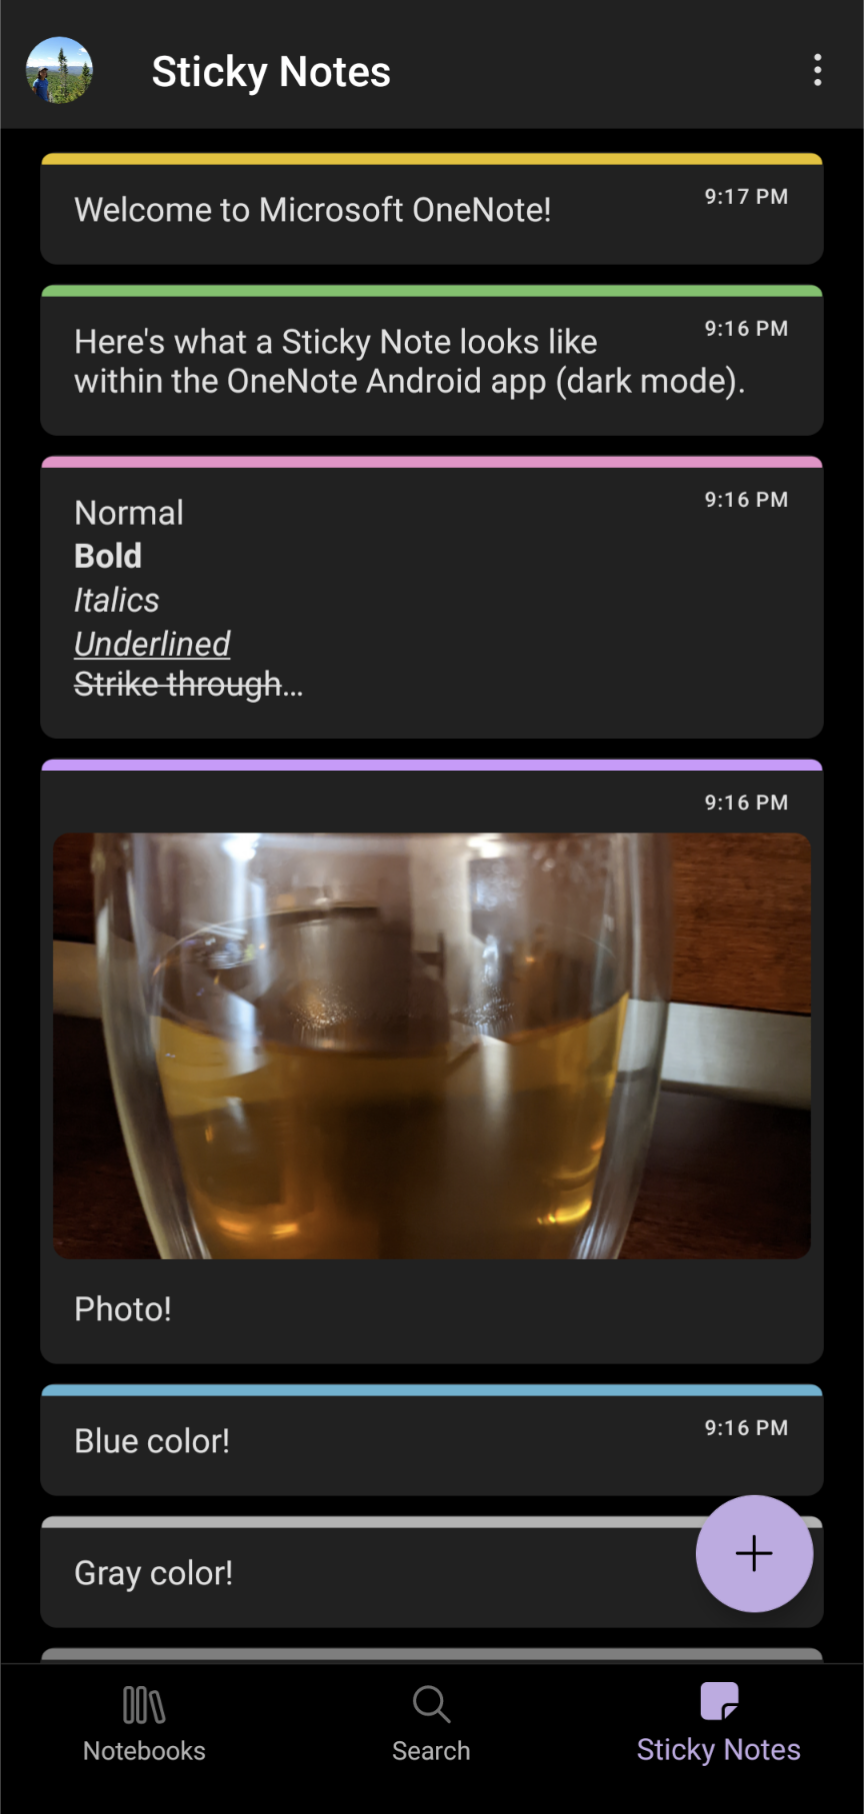
Within my current notes notebook, I create a color-coded section for each class titled with the course number. My color-coding is used across OneNote, Google Drive, Google Calendar, and Microsoft To Do. The first page is almost always the syllabus (an imported pdf). If the class has other course administration-type documents, for instance, a schedule, I make it a sub-page of the syllabus page. Next, I typically have a page called lecture notes and another called textbook notes under which are subpages with my actual notes.
If the professor has given the lecture a descriptive title, I will use it, otherwise, I just name the page “Lecture MM/DD.” I handwrite my lecture notes on my iPad using my Apple Pencil. To make my notes more fun and easier to read I use color. Specifically, I use purple, dark blue, and light blue digital inks. I also have some magentas on hand for further indentation and the occasional underline or star. When necessary for a given diagram, I can choose from a vast array of additional colors.

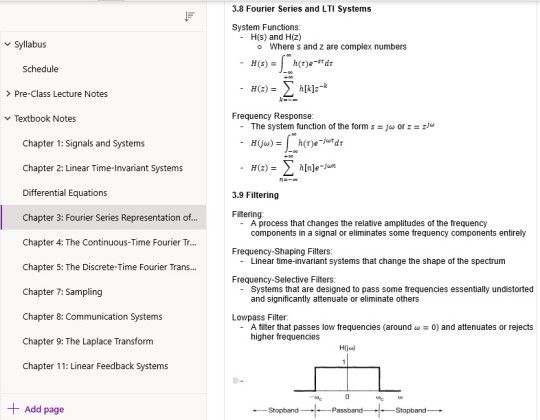
As for the textbook notes, each chapter gets a page of typed notes with bolded section names. The typed textbook notes are supplemented with figures taken as screenshots from my iPad (where my eTexts typically reside) and formulas added with the equation editor. I also sometimes have a page called handouts or resources with subpages containing those relevant pdf documents.
At the end of the semester, I move all of the sections to the old notes notebook and give them descriptive titles (not just the course number). It’s worth noting that my old notes notebook contains notes from college, high school, and independent learning. (You can read more about my past Smith courses and independent learning endeavors at the respective links). As for my college notes, I have recently started combining the lecture and textbook notes sections (only in the old notes notebook). Specifically, the textbook notes serve as parent pages for the associated lecture notes. In the case of some of my math classes, this is how I organized my notes during the actual semester. I also consolidate some of my related course sections into a single section. For instance, I have a single calculus section rather than one for each of the three courses. This consolidation is particularly important for some of my independent learning notes as each course doesn’t have a full semester of notes. To further organize these old notes, the first page of the class has some course information (course number, title, term, professor, GitHub, and textbook) and links to all of the other pages. The syllabus thus lives as a sub-page to this new first page. The overarching goal is to make accessing my many old notes as easy as possible. (OneNote has useful search tools as well).

Within my old notes notebook, I use sections to divide notes by general subject. Currently, I have section groups for computer science, engineering, math, science, and non-STEM. The computer science section group is further organized with sub-section groups of programming languages and web development. The idea here is to combine thematically related notes from separate sources/courses. For instance, the web development section draws from CS 008 (a website development course I took in high school), the web track of CS50x (Harvard’s introductory computer science course) CSC 220 (advanced programming techniques), CSC 223 (software engineering).

#college#Smith College#Microsoft OneNote#organization#note taking#college organization#digital notebook#studyblr
43 notes
·
View notes
Text
Korean Fast Track 1
This is meant to be challenging. I’ll be posting more resources over time while I do this myself, keep that in mind.The goal is to be around B1, kind of in the sweet spot between A2-B1 or approaching B1 by the end of this. But don’t beat yourself up if you aren’t by the end!
NOTE: The quizzes currently have a response limit because of the site used but I am currently working on replacing them with different links & printouts <3 If you run into an issue and need me to send you the quiz questions, just let me know.
Make sure you read all the additional text here carefully as there’s a whole lot of resources coming!
Things you’ll need:
A language learning app that includes Korean. I don’t care what app you use but it needs to have grammar and vocabulary. Like duolingo, lingodeer etc! You choose. You’ll be doing the light workload on this app.
Flashcard app! Anki and quizlet are the top two.
Basic supplies for taking notes & learning like a notebook and a pen. If you want to do these digitally, go for it.
Hinative or Hellotalk! These are apps/sites to speak with native speakers, ask questions, and get help with pronunciation.
If you do not know how to read the Korean alphabet, learn that before you start this fast track. It can be done in less than three hours.
Talk to me in korean (TTMIK) account
How to study korean (HTSK)
Daily tasks:
One small lesson on your language app, best done in the morning right after you’ve woken up and started your day.
Listen to a short audio in Korean 1-5 times per day. This can be a song or you can watch a whole ass k-drama episode. I don’t care what it is lol!
Vocab vocab vocab! Go through your vocabulary flashcards ONCE OR TWICE every day! use the “learn” option on quizlet for easier learning. (You should be reviewing the vocabulary for that day twice per day, not ALL of your collective vocab.)
Week One Assignments:
Do this in whatever order you’d like, but leave the quiz & end of week assignment for the end. ABBREVIATIONS: HN/HT = hinative/hellotalk
TTMIK Level 1 : All 26 Lessons ! I personally don’t listen to them, I just read the lesson. This is up to you, I recommend taking light notes
HTSK Unit 1 Lessons 1-8 Vocabulary; Put all of the given vocabulary words into your flashcard app / make flashcards and run through them. Use this site to help explain things that you might not completely understand from TTMIK as HTSK is more in depth.
6 pronunciation posts on HN/HT for critique, provide a dialogue typed out so they’re aware of what you’re trying to say.
Watch Test your Korean Listening Level 1 and evaluate.
End of week assignment: Review all of your vocabulary once and take the Week One Quiz !
Week Two Assignments:
Refer back to week one’s assignments if you have issues figuring out how you’re supposed to use certain sites. For this week we are going to be doing the same thing we did last week with TTMIK and HTSK!
TTMIK Level 2 : All 30 Lessons ! Vocab & Notes
HTSK Unit 1 Lesson 9; Vocabulary & Refresh
3 pronunciation posts on HN/HT for critique; provide dialogue.
2 text posts on HN/HTto be corrected by natives; must be at least 4 sentences.
Reply to 5 native Korean’ speakers on HN/HT
Watch Test your Korean Listening Level 1 and evaluate again.
Listen to your favorite Disney song in Korean
Watch 12 Grammar Points In One Sentence and take a few notes.
Read This Post ; Take notes & Create a flashcard set (learn them)
End of week assignment: Review all of your vocabulary, refresh on any grammar you’re uncomfy with Week Two Quiz! (this one is tiny)
Week Three Assignments:
Get ready to cram some phrases and such in this week. This week is all about progress with speaking. You’ll be focusing on learning how to create sentences that make sense & gathering the necessary vocabulary and grammar to do that is a train wreck. Buckle up.
TTMIK Level 3 : All 30 Lessons! Vocab & Notes
HTSK : Only used to clarify what you don’t understand with TTMIK
Korean Slang Post : Make flashcards and learn
Korean Ordering Post : Make flashcards and learn
Write down everything you do one day (e.g. watch tv, go to the bathroom, cook) you need at LEAST 10 things. Now write it in Korean. Learn these phrases and words.
Post 5 pronunciation posts to HN/HT for critique
Reply to 15 natives in Korean on HN/HT
Post 7 text posts on HN/HT that must be 4 sentences or more. Try to use the vocabulary you’ve learned this week. If you don’t know how to say it/write it, look it up and add it to your notes and flashcards
Make a flashcard deck for the food you commonly eat.
Watch Test Your Korean Listening Level 2 and evaluate
Watch 30 Fun and Useful Korean Phrases and learn what you can.
End of week assignment: Review all of your vocabulary, refresh on your grammar. No quiz yet! It’s on the way!
Week Four Assignments:
Home stretch for this damned thing. It might be a little intense but it’s necessary for progression. Be prepared to do a LOT of practice. We’re once again heading towards sentence building.
TTMIK Level 4 : All 30 lessons. Vocabulary & Notes.
TTMIK Level 5: Lessons 1-5. Notes.
HTSK is used for clarification on stuff you don’t understand & vocab if you need it.
Post at least one text post to HN/HT per day in Korean with at least 3 sentences. Adding a picture gives it extra flavor keke
Reply to at least 3 people per DAY on HN/HT in Korean.
One pronunciation post per DAY on HN/HT with dialogue for critique
Watch an episode of something or a korean youtuber in korean without subtitles, you don’t need to pay attention but it needs to be in the background. Do this once per day.
Review vocabulary and brush up on any grammar you’re having trouble with.
Watch 30 Advanced Korean Words and learn them.
Try to “test unlock” levels on duolingo/lingodeer/whatever app you use to see how far you’ve advanced.
No quiz yet! It’s on the way!
ADDITIONAL RESOURCES:
They’re not super aesthetically pleasing, sorry! I don’t have time to spend an hour per worksheet right now OTL. I’ll make more and keep updating this post! <3
Week One Korean “Write in the blank” Worksheet
Week One Korean Vocabulary Worksheet (KEY)
Week One Korean Worksheet 2
Week Two Anagram Game! (Scroll down! The other two have some glitches because of the Korean uwu)
I also recommend This Study App ! I'll be uploading all of the notes, PDFs, etc here :D This way even if you can't print it out you CAN annotate the PDF, have my flashcards, notes, summaries etc!
Here’s the Study Group Link to the App mentioned above! All notes, flashcards, etc will be there as resources for everyone. I recommend making your own flashcards on quizlet/anki/here too but if you don’t have time to make all of them, I will be making resources available
QUIZLET FLASHCARD SETS (in progress, will update over time)
I found THIS PDF of TTMIK levels 1-9 :D If you can't study online daily, download this so you don't have to download ALL of them individually
If this is too difficult don’t push yourself too hard. Don’t be afraid to search tumblr for fun stuff too! This is supposed to be a fun challenge !!!
Make sure you come back to my blog for all the post updates for more material like games, worksheets, flashcards, etc !
#korean language#korean#koreanlangua#langblr#languages#langlearning.challenge#juvisthings#juvistuff#korean vocabulary#korean grammar#language challenge#studyblr#polygl#studying#studytip#KORFASTTRACK#Korean fast track
122 notes
·
View notes
Text
Problem One: The Screen(s) and Digital Workspace
Part one of my multi-part doc about what I learned from doing online college at a non-online institution. This chapter: my Desktop as a Desk
Highlighted points: learning styles, work type/function in relation to the computer
My biggest problem with being pushed online after being at an in-person institution was, and still is, my forced reliance on the computer. I have to sit in front of it for hours: attending classes on Zoom; checking email every three hours; accessing Moodle pages for class and out-of-class work (Moodle is what my institution uses, other web management/e-learning software platforms include PowerLearning, Blackboard, and OU Campus, among others). And the work itself can be watching documentaries, watching seminars, accessing ebook/PDF documents, annotating documents in online portals… it's a lot. People have talked at length about "zoom fatigue," as well as the eyestrain headaches that can come with staring at said screens for hours at a time. I'll talk about my own lessons learned about that later.
The assumption among the administrators and (some) people of older generations than those currently in school seems to be that working online with computers and smartphones is more efficient. That isn't necessarily true; it all depends on the type of task and the person being expected to complete it. In my case, I cannot, for the life of me, focus on dense sections of text presented on a backlit screen. Thus, reading and answering emails is okay, but downloading scanned textbook pages to be read on a laptop screen (along with trying to highlight and annotate them) is hell on earth.
Why is this? Different reasons for different people, but in my case it's because reading/"writing" on a screen interferes with my learning style(s), which are visual/spatial, audio, and kinetic. Audio doesn't come into play for reading on a screen, but seeing words physically in a certain location relative to other words on a page is very important to my memory of the material. Computer screens can display pretty much anything at any given time; book pages can only display whatever was permanently printed onto them. That is, the content of a book page in physical space will always be the same unless you, the reader, manipulate it; a computer screen can have any type of content displayed as long as its pixels can light up and process the information. And for me, that's a problem because I don't have any physical space to relate the information to, plus I don't get a sense of how long the document is. Recalling a passage in a printout, for me, goes like this: "I remember it was on the top-left of a page towards the beginning, the shape of the paragraph was funny too… ah, there it is." Recalling a passage on a digital scan of the same document is much harder for me by contrast: literally any of the paragraphs could have made its way to the top-left of my computer screen, if I moved the window around or zoomed in to better read the text; documents are an endless scroll upward or downwards, with (maybe) a sidebar to tell me what page I've landed on. All of my "landmarks" are functions of the program I am using to access the document. They're static and contained to a window... that can show up anywhere on my computer screen. Not conducive to the way I learn at all.
My kinetic learning style comes into play with the computer, too. Annotating a document? In the physical world, a pen on the document itself does the trick; going through the physical movement of circling a word or making a note are things that solidify the information in my mind. Annotating a PDF document? First of all, it's difficult to do with a mouse (and God help you if you have a trackpad), and it's highly dependent on the program that the user selects to open the PDF. I could connect a drawing tablet, if I have one, but they're very expensive and their use is, again, dependent on the compatibility with whatever reader program the user selects. All this to say: annotating on the computer doesn't work for me, either. My kinetic and visual learning styles come together with note-taking. My memory is highly dependent on seeing words as they are formed by my own hand, processing them, and connecting meaning to them as they sit in a specific place on the page (am I over-explaining this? Basically, writing notes by hand and seeing where those notes are on a piece of paper help me remember them). Typing notes isn't a replacement for hand-writing notes for me; while I'm busy fixing my typos (on words I would never misspell on paper, usually, since my fingers are just moving weirdly over the keys), the professor moves on, and I'm not listening well enough to catch the fact that I've missed new information.
The takeaway here is figure out your individual types of work relate to being on the computer. As I said, the computer hinders many aspects of my learning when it comes to memory and efficiency. As a creative tool, however, it has almost the opposite effect; writing assignments for fiction, poetry, and screenwriting classes are much more efficient on the computer. From creative thought to keystroke, I have less time to second-guess or forget my ideas, and both the immediacy and changeability of word processing programs actually works in my favor for those sorts of things.
What I did differently from first online semester to second:
1) I figured out which materials helped me remember my notes the best. Honestly, I wasn't even doing this when I was at in-person college, and to my detriment, but I couldn't get away with it at all once I went fully remote. Think back to when you were in lower levels of school: were there certain types of materials you gravitated towards in the classroom? Did you like basic composition notebooks with faint blue lines? Wide-ruled or college-ruled paper? Did you discover that graph paper just worked really nicely with all notes besides math, or that blank pages were less busy for your eyes? When you used pens, did you prefer blue or black ink, or did colored ink help certain things stick? If you can control what materials you use to take notes with, consider using ones akin to those from a class you either a) remembered the most fondly or b) remembered the most information from. Scour your memories of class experiences for anything, no matter how small, that may have made your life easier. Equally, take note of what tasks actually worked well digitally. Adjust accordingly.
(Personally, I found my magic formula was a 1-subject memorandum notebook — marginless, with very narrow line rulings; while I hesitate to direct you to Amazon, they are hard to find at a decent price otherwise, and you can get a 12 pack for just over $40 from them — with black ink from a 0.38-size gel pen (I used a basic Pilot G2 pen until it ran out, then bought ink refills in the smaller size). To "highlight" my notes, I circled or underlined information with a blue gel pen of the same variety. Keep in mind again that I'm learning to be a translator; this is just what works for me.)
2) If I needed to print something out, I printed it out. Environmental guilt is something I struggled with a lot, and there was always something about staying on the computer that convinced me I was being "less wasteful" by staying digital. But with how much time and energy I ultimately saved reading a printed document that can be recycled vs the electricity I ate up spinning my wheels in front of the ebook… to me, it was worth it. If you find that helps you, too, don't be ashamed to print certain things out.
(If conserving ink and paper is a concern to you, it is possible in some viewing/editing apps to remove or cover images, either with white squares or by taking the images out completely. I have an old MacBook Pro and on current versions of Preview, one can draw shapes and fill them in white to cover parts of the scan that would eat up ink, such as blurred black borders and scanned images. For documents in a word processing program like Microsoft Word or Pages, it may also be possible to print the documents out at a smaller size, allowing more text or even multiple pages to show up on a single sheet of paper.)
| In the coming days/weeks I hope to be posting more content about how I tried to adapt to fully remote learning and the things I’ve learned along the way! Follow for updates ♥︎ |
#college#university#online#online learning#school#online school#online university#online college#covid#covid 19#studyblr#student#students#blog#writing#my writing#narrative nonfiction#nonfiction#narrative#advice#language#language major#liberal arts#liberal arts college#creative writing#computer#computers#screen#screens#screentime
58 notes
·
View notes
Text
Studying/Planner Apps
Essential apps for studying, planning, health, etc. Who says everything has to be analog?
These are all the ones I’ve tried and downloaded (unless said otherwise). The ones with the * next to it are the ones I don’t use or have gotten rid of for personal reasons, but still highly recommend all of them.
I go through apps like a child goes through toys. I try them out, get rid of the ones I don’t like. Apps are toys.
There’s tons more, but these ones are the ones that I recommend to people with similar needs and schedules like mine. The ones I haven’t or don’t use anymore are ones I could definitely see being helpful to others or that I’d maybe use in the future if my needs change.
Note: these are things from the App Store, but I’m pretty sure most are available on the Play Store too.
Podomoro Time Trackers
Forrest* - Haven’t tried this because you have to pay for it on the App Store, but I’ve seen everyone go bonkers over this app and how they plant trees for studying, etc. etc.
Plantie - Best and only Podomoro app I still use. Gamified, but not TOO gamified. You just grow fruit, collect, coins, buy more fruit trees. It’s super simple, while still providing really good graphs and charts. Also, it allows you to turn off the feature where it stops your task as soon as you leave the app. Sometimes I need to use my phone for assignments, and I still want to track my time. It’s completely FREE, with GREAT charts as a visual. Other apps need a premium subscription to access the graphs and charts, which is why I love this app because even though the chart is quite simple, it does its job. Although, it doesn’t tell you when to take the longer break and it has to be adjusted manually. That’s fine for me, because I always get disturbed by something before I even get to 4 blocks, and if I waited until I had a big chunk, I’d never get anything done.
Block & Flow: Stay focused* - Podomoro but visualised with stacks of blocks for each day or week. And you can list out what tasks you have for that day and sort out sections for work, reading, school, etc. I didn’t need that feature, which is why I used Plantie instead.
Workflow Timer* - Another good option with options to make multiple tasks lists. One of the simpler and more user-friendly ones. It also looks really good!
Hours Time Tracking* - App for timeblocking, scheduling, and tracking the time while you’re working. It’s not helpful for me, because it’s practically impossible for me to strictly schedule something in my day after school, but could be useful for others. Really easy to makes tasks and separate by color.
Stay Focused* - Simplest Podomoro timer out there. No distractions, no graphs, no gamification, just pure focus.
Planners/Calendars/Tasks
Wunderlist - Great reminder system, intuitive (type in “essay next mon” and it will schedule the task to be due next Monday), syncs everywhere, attach documents, etc. I used this for my assignment list, books to read list, schedule etc. for a long time, until recently where things got hectic and I wanted to make a daily to do list rather than only a master list. I use a bullet journal for school stuff now, but still keep Wunderlist for that shopping/movies/books/apps/websites to check out list.
24me* - Personal assistant, lots and lots of features, with scheduling, to-do lists, notes, journaling, etc. Tracks weather and traffic to and from work/school. All in one.
Google Calendar - I don’t schedule on this, but use it to sync my school calendar with personal calendar. Easy scheduling and you can SHARE your calendar with a friend! All Google apps are made for collaboration basically.
Habitify* - Habit tracker on your phone and tracks progress every day, showing when you skip and reminding you of it. Don’t quite remember why I got rid of it because checking back it seems really good. Might redownload.
Trello* - Kanban boards, “cards” and lists, great reviews. I’ve heard people use it as a bullet journal sort of and project planner though that wasn’t it’s original purpose. I downloaded it for a club thing, but never really used it personally.
Notetaking/Planning/Journaling
OneNote - I use this ALL the time, even though I don’t use my Microsoft account much anymore. My notes are organized and have a hierarchy. Very customizable with headers, notebook sections, pages, subpages, etc. Easy to share with group mates and an okay collaboration space if you want to see each other’s progress on research or something during a group project. MUCH better than having tons of Google or Word docs of notes. Completely FREE for the full experience.
Notion* - One in all workspace for journaling, notes, scheduling, planning projects basically a mini-website for your life and work. Great guide for bullet journaling on Notion from studyblr Eintsein here. Another Notion bullet journaling guide on YouTube here and here. I highly recommend it, but don’t use it since I use an analog bujo, prefer OneNote for class notes, and don’t have much use for it other than that currently. You do have to pay for unlimited notes, but there’s a pretty good amount to start out, and if you really don’t want to pay, there are workarounds to it.
Milanote* - Like Notion, but more restrictions on the free version. I don’t use it anymore because I’ve realized I didn’t really have a good purpose for it and it cluttered up my phone. In a way, it’s more ~aesthetic~ than Notion, but there are less things you can do. It does have a better learning curve though.
Evernote - I don’t use it often, but I have it to take quick notes or other stuff. Evernote is like a god in the notetaking world, because it’s user friendly, quick, and syncs up really easily with everything.
Health
7 Minute Fitness - There’s a lot of these out there. Go find one or two. Don’t be sedentary.
30 Day Fitness Challenge - Same concept as above.
Simple Habit - FULL of free mostly 5 minute guided meditations (though there’s premium access). There’s no excuse now. Also, I used to try 10 minute meditations on Headspace which made me really sleepy. 5 minutes work best, because they’re quick, and if you want more time, just move on to the next part in the series or find another one. Lots of free series for basically any subject (school, women, mothers, grade anxiety, sleep) and SOS mode. Unfortunately, you can’t download any of them in the free version.
AloeBud* - Self-care pocket companion. Make reminders on your phone for every self-care thing you can think of. Schedule notifications multiple times a day with personalized messages.
TaoMix2 - Mixer for relaxing nature/white noise sounds. It’s pretty restricted in the free, but it’s enough for me.
Cove* - If you’re a music person, this app let’s you make quick music and tunes matching your mood. A sort of an easy music therapy if you’re not good with instruments or composition.
Reflecty* - Little journal buddy asking you fun/reflective questions about your day and tracking your mood. It’s short and sweet. Each entry is a “story”.
Oak* - Great for breathing and very simple guided meditations. Breathing practices for anxiety, freshening up, and calming nerves before a big performance. It just takes 15 seconds to breathe.
Grid Diary* - Journal prompts in grid fromat. Customizable daily prompts.
DayOne Journal* - Again, RAVING reviews. Everyone loves it. I haven’t used it because I prefer analog journals, but it’s a pretty good for travel journals with pictures, audio, video, etc.
UVLens - Reminds you to put sunscreen on throughout the day depending on your skin, activities that day, and type of sunscreen.
Flo - Period tracker. Need I say more?
Tasty - FOOOD (by Buzzfeed). New recipe ideas, includes shopping list, make your own cookbook.
KitchenStories - MORE FOOOOD. Includes Asian and international cuisine since it’s crowd-sourced.
Miscellaneous
Audiobooks - Audiobooks from the Gutenberg Project, but in app form. You can download classics for free, etc. There are some paid audiobooks, but they’re usually for better narrators/text corrections, so absolutely not necessary to get lost in an old book. Jane Austen, Charlotte Brönte, L. Frank Baum, all the good stuff.
Daylio - Tracks mood, activities, with intuitive charts. You can edit moods and activities shown per day. Free version is pretty good, and it replaces the need for making a habit tracker in my journal, because I don’t like making those.
Scannable - Very intuitive scanning app. I’ve used this for many legal/important documents and nobody had a clue it was “scanned” on a phone. It makes regular photos of documents easier to read and look like it came from a scanner. It can share as a PDF or jpg. Granted, you need good lighting for the best quality.
Google Docs, Spreadsheets, Slides - Everyone’s probably used this before, but to reiterate, this is the best collaboration app/website. Super easy to share with real-time tracking and updates.
BEAKER by THIX* - For chemistry people. Mix compounds/elements together, make new compounds, see their reactions. Don’t have much use for it since my chemistry class is moving at a glacial pace but I could see this being useful for others.
Chemtriz - Same as above, but gamified. You take elements and put them together in the right configuration to make compounds.
PictureThis - Plant Identifier - Weird addition to list, but it’s a cool app to get back in with nature. Now I know what a boxwood plant looks like.
IFTTT* - Hard to explain, but it enables different apps that don’t usually work together to work together. So if you input something in an email, you can make it go into a Google Spreadsheet(?). Just go check it out. It’s cool. Many shortcuts, track stuff in the Health App, get emails showing cool NASA pictures.
Canva - AMAZING graphic design app/website for those who can’t use Photoshop (ie. me). It’s better online, but there are hundreds of templates for magazines, book covers, planners, posters, flyers, and basically any graphic design needs. Many free graphics and photos ready to use. Premium version is NOT necessary to get full benefits from this program. I used it to create this calendar for my room.
#productivity#being productive#apps#productivity apps#self care#mental health#studyblr#studying#high school student#student#bujo#studyspo#studyinspo#og posts#google#study tips#study hacks#school#strategies & tips#fitness apps#note taking#notion#journaling#journal#planning#planner#schedule#block schedule#podomoro#time tracking
26 notes
·
View notes
Text
Rocketbook Orbit Review: A Real Solution to Paperless Notetaking?
Rocketbook Orbit
8.00 / 10
Read Reviews
Read More Reviews
Read More Reviews
Read More Reviews
Read More Reviews
Read More Reviews
Read More Reviews
Read More Reviews
Read More Reviews
Read More Reviews
Read More Reviews
Read More Reviews
Read More Reviews
Read More Reviews


Shop Now
With a Rocketbook Orbit in your pocket, a Pilot FriXion pen, and your Android or iPhone device, you have all you need to take and save notes without ever losing them again.
Key Features
Efficient note taking
Minimises paper waste
Mobile app for cloud and email uploading
Pros
Wipe-clean paper
Useful mobile app
Cons
Pen scratches wipe-clean paper
App doesn't always detect QR code
Buy This Product
Rocketbook Orbit other
Shop
// Bottom var galleryThumbs1 = new Swiper('.gallery-thumbs-1', { spaceBetween: 10, slidesPerView: 10, freeMode: true, watchSlidesVisibility: true, watchSlidesProgress: true, centerInsufficientSlides: true, allowTouchMove: false, preventClicks: false, breakpoints: { 1024: { slidesPerView: 6, } }, }); // Top var galleryTop1 = new Swiper('.gallery-top-1', { spaceBetween: 10, allowTouchMove: false, loop: true, preventClicks: false, breakpoints: { 1024: { allowTouchMove: true, } }, navigation: { nextEl: '.swiper-button-next', prevEl: '.swiper-button-prev', }, thumbs: { swiper: galleryThumbs1 } });
Rocketbook is a modular notepad that is reusable. Each page features a QR code that instructs the companion app to scan the page. Rather than throw away the notepaper, you can wipe it clean and start again. The concept is clearly summarized with the phrase: write, scan, reuse.
Well, that's the idea. But how does taking notes with the Rocketbook work out in practice?
The 3 Stages of Notetaking With Rocketbook Orbit
I'm a big notetaker. Maintaining a paper-and-pen Moleskin journal, I express ideas, thoughts, and recollections daily. Incredibly, despite my techy credentials, I also rely on paper to-do lists to ensure my daily aims are met.
Sure, there is some digital notetaking. Currently, Google Keep is my note app of choice, but I also rely occasionally on a Samsung tablet with stylus. These notes can be synced to the cloud, but generally I end up with notes in four or more locations. Not ideal.
When you take notes, it usually goes something like this.
With pen and paper, you jot it down, keep it safe for a few hours, lose it.
On a phone or PC, you use a notetaking app, then forget about it. When it resurfaces it's either meaningless, or something has been lost between brain and keyboard.
Notes tend to "stick" in our minds better when written compared with typing. Consequently, taking notes with a pen or pencil is a better option. You just need to remember where your notes are.
Rocketbook Orbit overcomes this issue by emailing or storing your notes in the cloud. It's a three-stage process that lets you specify a file name for each note, easily scan it with a mobile app, and then reuse the paper. Meanwhile, the note is ready to read in your favorite cloud provider or mailbox.
What You Get With a Rocketbook Orbit
Unpacking the compact Rocketbook Orbit packaging, you'll find a collection of, on the face of things, low-tech tools.
There's a magnetic clipboard with a slot for a pen and a mounting area for the various Rocketbook Orbit reusable paper notepad. Your preferred notepad type is also included (everything from lined to journal to music staff is available) as a Page Pack.
A Pilot FriXion Ball erasable pen is also included, which fits easily into the provided slot on the clipboard. Finally, there's a soft cloth for wiping the reusable paper. A handy user guide is also included.
There is, of course, something else that you get with the Rocketbook Orbit: the mobile app. This is, to all intents and purposes, the key to everything. Wipe-clean paper technology is one thing, but it's useless without some method of easily archiving your notes.
That's where the Rocketbook app comes in.
Taking Notes With Rocketbook Orbit
The review kit was acquired after backing the Rocketbook Orbit crowdfunding campaign. Rocketbook is an established company with various successful product releases and crowdfunders for unique, hybrid notebook solutions.
Across Kickstarter and Indiegogo, the Rocketbook Orbit raised over $1.2 million when crowdfunding ended in mid-2020. At the time of writing, only crowdfunded units have been fulfilled and the Rocketbook Orbit is yet to be added to the list of products at getrocketbook.com.
Here's a look at the campaign video:
youtube
Consequently, I'm reviewing the 9x13-inch Letter-sized version with the standard 8.5x11-inch Page Pack. This has lined paper on one side, dot grid squares on the other. Other Page Packs are planned, as noted above, although at the time of writing these are not yet available. Bound with two metal rings, the Page Packs easily snap to the Rocketbook Orbit clipboard and are easy to detach and flip over to swap between the two types of paper.
Rocketbook Orbit is also available in "Executive" size, with a 6.75x10.71-inch clipboard suitable for 6x8.8-inch Page Packs.
Using Rocketbook Orbit for notetaking and subsequent syncing or sharing of notes is straightforward and usually swift.
Take and Sync a Note With Rocketbook Orbit
Start by installing the mobile app and creating a Rocketbook account. Here, assign the app the permissions it needs when prompted. Seven default sharing locations can be set up, based on the symbols at the bottom of each sheet.
Next, choose your paper. Using only the Pilot FriXion pen, make your notes, doodle, whatever. Ink bonds in 15 seconds, after which point you won't be able to smudge it. Putting a line through the preferred destination will automatically upload or send to the preset destination when scanned.
In the mobile app, press the camera icon and wait for the QR code on the page to be detected. The Rocketbook app should then snap the page. At this point it is instantly converted into a PDF ready to be shared as needed. Decent lighting is needed here---I found the QR code is oddly elusive.
Image Gallery (3 Images)
Expand
Expand
Expand
Close
Image 1 of 3
Image 2 of 3
Image 3 of 3
window['gallery_1'] = new Swiper('#swipper-1', { direction: 'horizontal', spaceBetween: 20, slidesPerView: 1, centeredSlides: true, preventClicks: false, observer: true, observeParents: true, loop: false, keyboard: { enabled: true }, // If we need pagination pagination: { el: '.swiper-pagination', }, navigation: { nextEl: '.swiper-button-next', prevEl: '.swiper-button-prev', }, }); var images = document.getElementsByClassName("gallery-1-images"); for (var i = 0; i < images.length; i++) { images[i].addEventListener('click', function (event) { var swiperDiv = document.getElementById('gallery-modal-1'); var imagesArray = document.getElementsByClassName("gallery-1-images"); index = Array.prototype.indexOf.call(imagesArray, this); window['gallery_1'].slideTo(index, false, false) swiperDiv.style.display = 'block'; document.body.style.overflow = 'hidden' }); } function closeGallery(element){ element.parentNode.style.display = 'none'; document.body.style.overflow = "initial"; }
With the scan in the app, it's ready to be shared to any of the preferred destinations if none were marked. Beyond the seven preset destinations, any other apps with sharing integration can also be selected.
Once the page is scanned it can be wiped clean. This works well; the packaged cloth needs to be slightly damp, with the page cleaned in seconds. The FriXion pen can be used on standard paper if necessary and has a built-in eraser.
It's Basically an App With a QR Code on Wipe-Clean Paper
By now you've probably noticed the obvious: the Rocketbook Orbit relies heavily on the app.
The balance is probably weighted heavily towards the app. Can it handle the responsibility of making wipe-clean paper seem practical, rather than slightly sordid?
Fortunately, yes it can. The Rocketbook app features everything you'll need to use the Rocketbook Orbit system. Email and cloud sharing destinations can be configured in the Destinations, while the Settings cover everything you'll need. Scan Settings let you set resolution, default destinations, and more, while the File Naming Template lets you specify a file name format. Email Subject Template can be used in the same way if you're sending scans as emails.
Image Gallery (3 Images)
Expand
Expand
Expand
Close
Image 1 of 3
Image 2 of 3
Image 3 of 3
window['gallery_2'] = new Swiper('#swipper-2', { direction: 'horizontal', spaceBetween: 20, slidesPerView: 1, centeredSlides: true, preventClicks: false, observer: true, observeParents: true, loop: false, keyboard: { enabled: true }, // If we need pagination pagination: { el: '.swiper-pagination', }, navigation: { nextEl: '.swiper-button-next', prevEl: '.swiper-button-prev', }, }); var images = document.getElementsByClassName("gallery-2-images"); for (var i = 0; i < images.length; i++) { images[i].addEventListener('click', function (event) { var swiperDiv = document.getElementById('gallery-modal-2'); var imagesArray = document.getElementsByClassName("gallery-2-images"); index = Array.prototype.indexOf.call(imagesArray, this); window['gallery_2'].slideTo(index, false, false) swiperDiv.style.display = 'block'; document.body.style.overflow = 'hidden' }); } function closeGallery(element){ element.parentNode.style.display = 'none'; document.body.style.overflow = "initial"; }
For the QR code detection encountered in the test scans, the Object Detection Settings can be used to fix this.
Meanwhile, the ap includes a Help Center, as well as an App Onboarding Guide which offers a gamified "tutorial."
Various OCR settings can be set in the app. Handwriting recognition offers three options for improved usability of the digitized note. Smart Titles, for example, lets you specify a title while writing your note by including a title between a pair of hashtags (##Like This##). Meanwhile, Smart Search makes handwritten text searchable once scanned. That's useful for anyone making regular notes.
The Green Aspect of Rocketbook Orbit
If you find yourself racing through paper notebooks, the Rocketbook Orbit represents an opportunity to cut down your paper use. Less concern for storing notes, easier to browse their contents, no need to buy new notebooks, and less overall paper-based wastage.
That's the promise, at least. While wiping clean ludic thoughts, accidents, and moments of inspirational insight alike is hugely valuable, the Page Packs are prone to pressure marks. So, while the ink can be wiped, often the strokes can still be seen after wiping clean.
This isn't specifically an issue, but it does raise questions over the longevity of the Paper Packs.
Reusable, Scannable, Green: But Is Rocketbook Just a Gimmick?
Readers of a certain vintage might well be stifling laughter whenever the term "wipe-clean paper" is used in this review. Those with a knack for spotting vaporware might be equally bemused.
Ultimately, it boils down to this: is Rocketbook Orbit hamstrung by its own gimmicky irrelevance? Do we really need searchable OCR conversions of written notes?
Well, in most cases, the answer is undoubtedly "no." But there are several key situations in which it is useful. Rocketbook Orbit is a handy approach to a system that elsewhere uses four "beacons" to allow the easy scanning of classroom whiteboards.
Furthermore, having a system that you can jot ideas on that can be easily scanned and retained for further development later is useful. Rocketbook Orbit probably isn't going to change the world, but it remains handy for specific purposes.
Need to Scrawl and Scan in a Pinch? Rocketbook Orbit Is the Answer
Essentially, Rocketbook Orbit is a wipe-clean notepad and mobile app. Wipe-clean paper technology has various... applications, but it's likely the internet age has killed the most profitable verticals.
But with a Rocketbook Orbit in your pocket, a Pilot FriXion pen, and your Android or iPhone device, you have all you need to take and save notes without ever losing them again. OCR technology enhances search, lets you set a file name, and is arguably the secret sauce that holds this whole thing together.
Suitable for doodles, lists, reminders, homework notes, and even screenplays, the Rocketbook Orbit might seem unwieldy---a compact pocketable version is also available---but the results are as good as promised.
Rocketbook Orbit Review: A Real Solution to Paperless Notetaking? published first on http://droneseco.tumblr.com/
0 notes
Text

Seeing as the new year is just around the corner, what better a time then to put out my first how-to post!
I write all my notes on my iPad and laptop, so this is the method I find best. Please note, this works best with university lectures, or teachers who provide slides/pre-made notes beforehand.
Step 1: Download all the slides/notes your profs upload so that you have a copy
There are generally 3 styles of notes professors upload:
Complete notes
Guided notes
Blank notes
Complete notes are where the slides have all the information the professor is showing during their lecture.
Guided notes are where the slides have full in the blanks or half the slide is filled.
Blank notes are where all or most of the slides simply consist of the title and maybe a diagram.
Step 2: Focus in lecture and take notes down
Rather than attempt to copy both the professor’s words and their slides, write your notes onto the slides themselves. This way you miss as little as possible during the lecture. With the three styles of notes, there are then different styles of note-taking required!
For completed notes, I focus on trying to write down notes while the prof breathes or switches slides. I know a lot of people tend to write as much of what the professor says word-for-word, but there’s no way you can write everything, and since half the words are on the slides already, you don’t need to. So listen, be aware of the important points they make, highlight the words they emphasize already on your slides and then write a brief summary.
For guided notes, you need to write the missing words and focus, so it can get difficult, though usually professors are nice enough to give students a break and wait a little before switching slides. My biggest suggestion is to look at the slides ahead of time so that you know which have the most blanks so you can prepare yourself ahead of time. Less blanks means write more from their speech, more blanks means do your best to write what they say but ultimately the fill-in-the-blanks are the most essential at that moment.
Finally for blank notes, these are the ones I hate the most. Often times these slides are so heavy with words that attempting to listen is nearly impossible. So if your professor doesn’t mind, take photos of the completed slides, and focus on what they’re saying for now. With so much information, it’s impossible to do both copying and processing audio.
Step 3: Go over the notes again and re-write
This to me is the most crucial step. Not all people recommend rewriting notes, however I find it extremely useful.
I personally prefer to handwrite these notes if I have the time. I’m a half-visual and half-kinesthetic learner. So as much as typing helps, the act of writing my notes out by hand is even more useful. Sometimes I’ve gone into tests and remembered the exact words I wrote out for a question.
DO NOT COPY YOUR NOTES.
You need to summarize. If your lecture covered 3 topics over 50 slides, try to condense that. A lot of lectures go over the same material 4-5 times to help you understand, but writing that out again is just a waste of time. Cut out things you wrote that are no longer helpful.
An important point though is that often you’ll cut out facts that feel useless now. Be aware that you might be using these in a few months time to study for exams. Be kind to yourself and go step by step even if it kills you to do so at the moment.
My process for writing my notes is pretty simple:
I have an Ipad Pro 9.7” on which I have two main apps for handwriting my notes: goodnotes 4 and procreate.
Currently, goodnotes 4 app is only available for apple devices (~$8) and the procreate app – also only on apple devices (~$14)
I draw all my titles on the procreate app first before copying them. This is not necessary but I enjoy aesthetically pleasing notes. For many of my classes, but especially human anatomy I draw my diagrams on procreate as well.
After writing out the title (usually in a specific colour corresponding to my theme for the course) I paste it into the goodnotes 4 notebook I have for the class. I use the A4 sized Medium and Quad Ruled Paper to write my notes before converting it to a blank paper for a cleaner look as well as reducing the distraction.
To make my writing the cleanest and easy to read, I use the zoom-in window on the app so that my writing remains the same size.
I have 3 levels of headers after the title, each becoming a subheader under the previous one. I also move my diagrams around so that they’re on opposite sides of the page – once again for aesthetic and is not required.
For the actual process: title, first main header (often with some kind of box and ribbon design as well as coloration), second header/first subheader (general box plus coloration), third header/second subheader (straight highlight line).
Per slide, depending on the importance, I attempt to summarize it in one or two lines if there are no diagrams. With diagrams, sometimes i have to explain them alongside the information on the slide. Processes, or long explanations are summarized as much as possible. If something is copied exactly, I write it in a different colour (often red) so as to indicate that it was important enough to leave the same.
New terms are written in blue, and terms previously defined in my notes are written in red.
Step 4: Textbook readings
Pay attention to the professors because sometimes they’ll have a textbook section on their slides to read, but then say it’s not important. You definitely don’t want to waste your time! If and when possible skim the section before the lecture, just so you are prepared to ask/answer questions.
Note: I attempt to get all my textbooks as pdfs if and when possible, even if I personally prefer physical copies for the convenience.
If they do require you to read it, I suggest two methods.
Read the textbook section completely, highlight any sections you felt were important. Then go back over it and write down a summary of your highlighted points, using the textbook summary at the end of the chapter to help you focus as well as the slides. Often professors will not require you to know information not from the lectures at all.
Another option, and the one I end up leaning towards is adding notes from the textbook straight into your lecture notes/rewritten notes. This is another reason I enjoy using my ipad for notes - I can simply move the notes around and don’t have to write in the margin.
I hoped this helped!!! Good luck with the new year everyone, I’m sure you’ll ace your courses :)
#studyblr#note taking#studyspo#notespo#handwriting#education#university#uni advice#advice#hs advice#studyquill#elkstudies#emmastudies#problematicprocrastinator#studywithinspo#medkip
5 notes
·
View notes
Text
5 Surprising Ways Creative Minds Use Evernote
What’s your biggest goal for 2018? Finally writing that book you’ve had inside you for years? Launching a podcast? Performing stand-up comedy in front of an adoring crowd? Whatever your aspiration, this can be the year you take positive steps toward making it a reality.
As scary as it might be to think about what lies ahead, big goals don’t always demand big actions. Often, all you need to achieve your dreams is a series of small, incremental steps, a firm belief that you can do it—and the right tool to capture moments of inspiration.
Henry Ford famously said, “Whether you think you can or whether you think you can’t, you’re right.” One way to ‘fail-proof’ your dreams is by identifying and removing some of the familiar excuses that have held you back for so long. Self-defeating words like “I’m too busy,” or “I can never remember my good ideas” do nothing but rob you of your power and place obstacles in your path. Making Evernote your place to stay on track and keep yourself accountable can help.
Special offer: 40% off Evernote Premium* »
To inspire you to make your 2018 happen, here are some unexpected ways that creative minds use Evernote Premium to help them capture brilliant ideas, no matter where they are in the world.
Superfeel finds inspiration in the everyday
Musicians Androu Boudreau and Jordan Bradley, the two halves of up-and-coming New York-based pop/R&B duo Superfeel, use Evernote as an integral part of their creative process. As Androu says, “Evernote is critical to our creative brainstorming process. It helps us capture ideas at all times, no matter where we are. We capture ideas through voice recordings, notes, pictures, and more, and can come back and bring them all together to make music.”
The magic of Superfeel is the way they can find inspiration in the most unlikely of places. An image, a sound, a thought—any snippet of an idea can later form the basis of a work of art, so being able to capture it all in Evernote is vital to the duo. “Every song we have ever recorded, Evernote has had a hand in the process,” Androu explains. “This app has literally changed the way we make music.”
Pro Tip: Record audio interviews ‘on the street’ for your podcast.
Nisha Harish conquered the desert and captured her journey in Evernote
Author Nisha Harish
In 2015, Nisha Harish completed the grueling six-day, 156-mile (251 km) annual race across the Moroccan desert known as the Marathon des Sables. Competitors must carry everything they need with them, so there’s no room for luxuries. Despite this, Nisha made sure to pack her iPhone so that she could take notes in Evernote at the end of each day. Upon completing the race, she turned those notes into a successful book, Big Steps, Long Strides, about her experience.
Nisha explains, “I wanted to write a book, but it needed to fit into my lifestyle. Evernote gave me that flexibility.” And considering that she had to carry her note-taking device across the burning desert with her, it’s fair to say that, without Evernote in her pack, Nisha might not have realized her goal. “It would be too simplistic to say that Evernote allows people to make notes because it has allowed me to achieve a major life ambition.”
Pro Tip: Jot down story ideas for your novel while you’re commuting to and from work.
Chris Hardwick connects ideas while on the road
Photo Credit: Joe Pugliese/AMC
Chris Hardwick is everywhere at the moment. He has a media empire (The Nerdist), a TV show on AMC (Talking Dead), and a festival-headlining stand-up act. He clearly doesn’t stay in one place for very long.
As a busy, successful performer, one of Chris’s biggest challenges is not coming up with new material, but keeping the inevitable flood of ideas organized. Joan Rivers, the legendary comedian, and mentor to Chris, had a multitude of note cards which she organized in little drawers. “Some people use notebooks; other people use cocktail napkins,” Chris says. “I will mostly write big ideas and work my stuff out in Evernote.”
Chris organizes his ideas into notebooks, adding tags as he goes. This allows him to spot connections between different thoughts that were not apparent before. “I realize there’s a through-line that I didn’t consciously intend, but my subconscious brain was trying to express. All these ideas are actually weirdly connected, as disparate as they might seem.” Sometimes Chris even uses Evernote when he’s performing: “I have gone on stage when I’m trying new stuff, and I just have Evernote open in presentation mode and I have the phone down on the stool.”
As Chris readily admits, though, the key to making it all work is capturing your ideas in the first place. “In the same way that you would organize a closet,” he says, “it allows you to do that emotionally with your life in all the intangible things that you can’t see, but you experience. But you can’t do that unless you really start tracking all that stuff.”
Pro Tip: Scan the business card of a contact you meet at an open-mic night or writing seminar.
Aaron Mahnke turns research into creative inspiration
Lore author and star Aaron Mahnke
Aaron Mahnke is a best-selling author and the host and producer of Lore, the critically-acclaimed series which began as a podcast and has now expanded into television, a book series, and a national live tour. Aaron’s many creative projects take up an enormous amount of his time; that’s why the ability to capture ideas in Evernote is vital to his success.
“Writing is creative, yes, but it’s also work. It’s just a task,” Aaron says. And to complete any task, you need the right tools. For a long time, Evernote was the place where Aaron stored links, images, notes, scraps, and ideas in clearly-labeled notebooks. It was what he called a “someday box.” Now, however, it fuels his ongoing creative process.
To produce Lore, Aaron uses a gamut of Evernote features, from Web Clipper, marking up PDFs, and tagging, to multi-layered, interconnected notebook stacks that tie together all the elements of his research and writing.
“It’s a process that sounds simple on paper,” Aaron says. “I pick a topic I find interesting, and then research every aspect of it that I can. I read for hours, taking notes and highlighting pieces of story or information. And when I’ve filled my head with everything, I find a quiet place and think through the outline. A lot of that happens in Evernote.”
Pro Tip: Save a PDF or doc in Evernote, annotate it, and search the text inside it later.
Forrest Dylan Bryant is always ready to write with Evernote
Forrest Dylan Bryant
Full disclosure: Forrest is more than just an Evernote Premium customer, he’s also our Director of Marketing Content. So, if anyone understands the true creative potential of Evernote, it’s Forrest.
In his spare time (what little of it he has), Forrest is an accomplished author and an avid participant in the National Novel Writing Month, or NaNoWriMo, held every November. NaNoWriMo challenges participants to write a 50,000-word novel in 30 days—a difficult goal, certainly, but not an impossible one, although it demands a disciplined and highly organized creative approach from writers.
Forrest muses that over the years he has experimented with many different writing tools. “Word, Scrivener, Google Docs, Ulysses…I’ve used them all. Each has its strengths, but I couldn’t find a system that suited me.” So, when he was preparing for NaNoWriMo in 2015 (and again in 2016), Forrest made the decision to create his novel entirely in Evernote.
While you may not want to make it your sole writing tool, you can still take advantage of Evernote’s many templates and shortcuts to make the planning process considerably easier.
The work of preparing to write, including creating character histories and story timelines, can stymie even the most seasoned writer. Templates simplify this process by giving you a convenient home for all the material you collect while researching your story. Then, when the time comes to create your ‘magnum opus’—using whatever tool you choose—you’ll find it easier to stay on track when you refer back to the research you’ve stored handily in Evernote.
If writing a novel is one of your 2018 goals, NaNoWriMo could be the perfect place to start—to ‘dip your toe in the water’ and see if the writer’s life is really for you.
Pro Tip: See Forrest’s advice for using templates to write your novel here.
So, what will you achieve this year? As you can see, there’s no stopping a great idea—at least not when you have the right tools to help you.
Special offer: 40% off Evernote Premium* »
*Evernote Premium offer good only with Evernote Premium purchase. New or Evernote Basic users only; offer expires January 31st, 2018 at 11:59 PM PST. This offer has no cash value and cannot be combined with any other offer. This offer can only be redeemed with Evernote direct payments. Offer not able to be applied to third-party payment services such as iTunes, Google Play, and Amazon or to extend current subscriptions.
from Evernote Blog http://ift.tt/2DK77Fu via IFTTT
0 notes
Text
6 Reasons Why an iPad Makes a Good Photography Companion
I’ve an iPad Atmosphere 2 and it is merely loved by me. It’s my electronic workhouse that is portable. Many bars can be popped into by me wherever free wifi may be the tradition. I will have a tasty mug of java, pencil a draft, or while examining my mailbox.
iPad Oxygen 2
For buying the iPad our major reason was that I returned to university lately. About purchasing a notebook I thought. Following a little bit of study, I determined an iPad, combined having a keyboard situation, basically switched it into a-mini notebook of types. And it also was much more lightweight and more affordable. the iPad has turn into an excellent friend for my photography, although I’ve finished the program.
I had been lately in a restaurant waiting to meet up a customer, when a concept started initially to consider form concerning the benefits of having an iPad like a photographer. Following on from the prior post I published on “May an iPad be properly used like a softbox or custom history?“, I recognized that I’m utilizing my iPad increasingly more in my own photography function than previously.
iPad Oxygen 2 combined having a Logitech keyboard
I possibly could continue at duration, extolling of getting an iPad shooter, the numerous benefits. Alternatively, my checklist for the time being is limited by I’ll to simply six.
Listed here are my best six reasons an iPad makes a great photography friend
Mobility makes it useful to consider everywhere
Exhibiting your work or profile enables you to seem great
Modifying and discussing pictures is simple
Reading and understanding
Ruined for option with a lot of Applications
Bing Push
1. Mobility of the iPad
The Atmosphere 2 along with other pills are simply much more lightweight, and so gentle than many notebooks. The Atmosphere for me personally may be the supreme Electronic Briefcase! The scale are 9.4 x 6.6 x 0.24 ins (240 x 169.5 x 6.1 mm). It weighs simply 0.96 lbs (436 grams). I’m like Bond! (sorry Jane Bond)
My case is fit comfortably into by the iPad.
2. To show your projects
For itself, your projects must talk like a shooter. Like a shooter that is professional, it’s what gets you-your show that is next. Today as part of your, you will find a lot of methods for getting your projects online.
The very first choice would be to possess a site that is private. But this does imply hosting and spending money on a website name. What exactly should you don’t wish to buy site? If you you’re an enthusiastic enthusiast or are simply getting started inside your photography profession? There are lots of methods in many instances at no cost as well as to display your profile online. For instance there’s 500px, Flickr, Behance Show and Morpholio to mention just a couple.
The show about the iPad causes it to be super easy for that audience to check out the facts by in” by grabbing the display, and enables optimum quality of one’s pictures. Additionally, moving during photos or your pictures having a swipe of the hand, makes the knowledge a lot more responsive and hands on. Much like pages of the guide.
Lately, a customer and I satisfied and that I had a need to provide an electronic portfolio. I don’t have my full-range of work online. I depend on a wifi link that is good. And so I stored it out like a PDF, set together a, and synced it to iBooks about the iPad. A common page-layout plan, such as for example InDesign. Nevertheless, should you simply have Photoshop, then this is a good way to produce your personal profile PDF for your iPad.
Developing a PDF portfolio from numerous websites in Photoshop
Available Photoshop and produce all of your websites 2048 1536 pixels, exactly the same dimension. Location wording and each picture on the separate site. You are able to decide just how many websites you want inside your profile. There is a broad manual 15-20 pages.
Increase to gt Document&; gt & Automate Presentation. Examine “Add Available Files” this container, and press Save. Name-your document and Conserve it to some area on your PC.
This really is in developing a PDF-file from numerous websites or pictures in Photoshop useful tip.
Ensure that you examine the Open Records container that is Include.
While another dialogue box seems, make certain Enhance for Quick Internet Survey is examined.
Ensure that the Enhance for Quick Internet survey container is ticked.
Click Retention under Standard (about the left-side, notice below screenshot). At the very top, alter the PDF Predetermined then, and to Highquality Printing to Image-Quality, alter the environment to Method from Maximum. Then click the PDF switch.
Pick the Highquality Printing in the PDF Predetermined at the very top. Subsequently alter Optimum beside Retention to Method.
Suggestion: Try To maintain the quality below 5mb in order you are able to e-mail it to possible companies or customers. Subsequently produce another profile with less websites should you can’t enhance the quality to significantly less than 5mb. PDF documents can be seen on Computer or a Mac.
Subsequently continue reading to number-six below should you don’t have Photoshop, and I’ll demonstrate just how to produce Slides being used by a PDF portfolio.
3. Modifying and discussing pictures is simple
I haven’t completed lots of editing. I favor to complete my article-processing at my pc, where I stylus and have the large check. Nevertheless, I believe my brain might alter.
Snapseed did attempt. It’s free and remarkable. Additional editing applications that are free are Adobe Show VSCO, and Instagram. What additionally makes these applications effective may be the simplicity with that you add them, or may reveal your pictures online for your social networking balances.
4. Reading and understanding
I’m coming to PDFs and ebooks on my iPad rather than guide. Though, you can’t beat on a guide that is physical inside your palm. Having said that, from the useful perspective when going, transporting only one guide takes so much space up!
I are in possession of my Nikon D750 consumer guide saved about the iPad. This guide alone, though fairly small in dimensions, nevertheless has 507 websites and weighs 310g (11oz).
Tip: if you should be utilizing the Chrome visitor and start a PDF file, you are able to conserve it right to iBooks.
5. Choice of Applications for that iPad
Provided apps’ variety currently within the appstore, it’s simply not feasible to all operate the gauntlet in it. Listed here are.
LightTrac ($8.99): LightTrac figures and plots the position of Sunlight and Moon along with a chart, for almost any area.
The Photographer’s Ephemeris ($8.99): TPE shows you which path sunlight is glowing at any given period throughout the day, no real matter what area you select.
Pocket Light Meter (FREE): A light meter that’s usually inside your wallet. It’s essential for movie photography having a camera. Steps enables reciprocity measurements, and reflected lighting.
Easy DoF Calculator ($1.99): Easy DoF Calculator enables you to determine the depth-of-field and hyperfocal length for almost any given configurations.
Take records to some new degree with , the efficiency application that retains work, suggestions, and motivation useful across all of your electronic products.
Photography Releases – 500px includes a free one. should you take Share photography, a-model/home launch is crucial have.
also offers a totally free design/home launch. I discovered it surely helpful and saved this application, particularly because it shops the info that was photographer’s. You should not maintain filling out this data for each launch. And it also has got the themes the major stock sites for all.
6. Bing Push
What’s to not like about Push? Bing Push is just a total office collection with Slides and Google Documents. Plus you receive 15 online that is free. In Pictures, movies smaller than fifteen minutes, and pictures not exceeding 2048 2048 pixels,additionally don’t depend towards this restriction. It’s hard when free to find problem with this specific startup!
It’s a really Digital Image Helper. E-mail can be accessed by you, submit and create blogs, keep an eye on connections and your routine. Share-out collaborate and files with customers online. I likewise adore as you are able to use documents offline that is Google. In case your web connection is bad it’s confirmed like an excellent time saver, or you merely don’t if you want it have use of a web connection.
Slides that are Bing is edition of Powerpoint. Here’s an animated gif to demonstrate how simple it’s to produce your PDF profile. It’s really worth presenting a chance to it.
An animated gif showing how simple it’s to make use of a PDF profile to be created by Slides for that iPad.
To sum everything up
It had been challenging to maintain this checklist to simply six issues. I understand when I proceed to make use of the iPad this may change-over the following couple of months.
I didn’t note importing your pictures onto the iPad straight from your own camera. You are able to, however, you require the Turbo to Sdcard Camera Audience – $29.00 or even the Turbo to Hardware Camera Adaptor – .00. I just described only smidgen of accessible applications, & most of these were free. This really is merely a suggestion of the application-iceberg-shop. A few of the applications that are compensated appear fascinating also.
It’s mind-boggling simply checking up on developments. Using the current start of the Expert that is iPad. It won’t be well before the iPad has morphed in to a genuine competitor, for that shooter out within the area, in the place of a notebook.
Have you got pill or an iPad? What applications would you utilize? Please discuss within the remarks below.
The article 6 Explanations Why an iPad Makes a Great Photography Friend by Debbie Hipwell seemed first on Photography Institution.
The post 6 Reasons Why an iPad Makes a Good Photography Companion appeared first on Studio 77 Photography Gwent Wedding Photographers.
from Studio 77 Photography Gwent Wedding Photographers http://www.studio77photography.co.uk/6-reasons-why-an-ipad-makes-a-good-photography-companion/
0 notes