#dialogue and sketches and line art and flat colors
Explore tagged Tumblr posts
Visit Tumblr Blog
Explore Tumblr blogs with no restrictions, modern design and the best experience.
Last Seen Tumblr Blogs


Fun Fact
In 2020, 27% of US Tumblr users had an annual household income of over $100,000.
Text
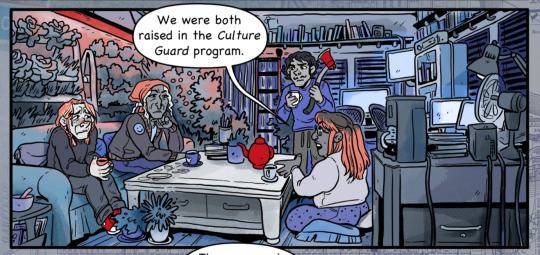
The ~Spores and Petals~ work ethic be like

Aka Ari's two moods during the making of the comic
(I mean it. 2 minutes after i drew this pic they went "i am no artist ;;")
PART 3 BTW. IS COMING SOON. I (Rai) have been put to shading duty, and i am pretty sure i can have this done by the end of the week!
Psst, don’t forget to check out the masterpost for HCSPAU if u haven’t already 👁️
-🍂🐾
#hcspau#hcspau progress#tags by ari#again#this is part of my job here at hcspau HQ#dialogue and sketches and line art and flat colors#and the god forsaken tags#also can we get a wahoo#for part 3's almost release#it's got some juicy panels i (ari) am very proud of#so you should totally like#follow us and stay tuned#ring the bell or whatever else youtubers these days say at the end of videos
7 notes
·
View notes
Note
hey, nell! can I ask about your art process? does the composition appear in your head all at once when inspiration strikes? is the idea typically in colour? always a story or context? What's it look like going from idea to finished composition? how many thoughts and ideas end up as something you'd considered "finished"?
cheers! hope you're well <3
Sure thing! I haven't thought about this too much before tbh, so oop- my bad.
First of all, it depends on the kind of drawing I'm working on. A comic? A single piece? That influences it a lot. I'm going with a short comic one using an old drawing as example ^^
Dialogue or scene playing out
I start by thinking of some interactions and writing down dialogue as I go. Like this, for example:
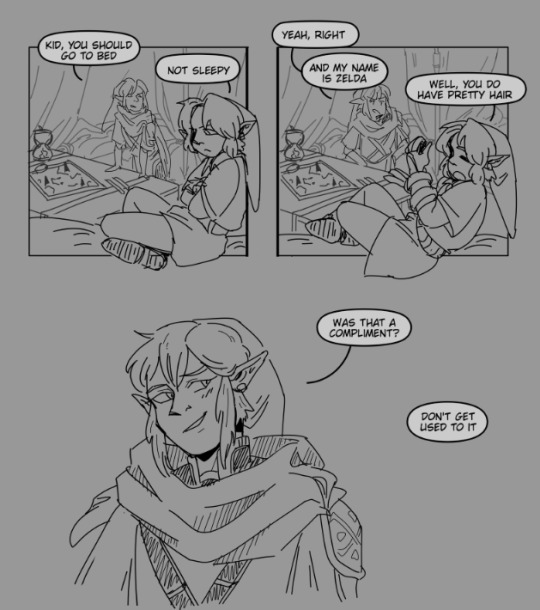
Warriors "Kid, you should go to bed" Mask "Not sleepy" Warriors "Yeah, right. And my name is Zelda." Mask [slowly lying down] "Well, you do have pretty hair" Warriors [smiling] "Was that a compliment?" Mask "Don't get used to it"
2. Sketch
Once the dialogue is ready, I start thinking about the emotions involved and, as such, the body language and poses. Just sketching to get a general idea:

3. Lineart + panels
Once that's done, I adjust and add or erase stuff for the panels to look how I want them to (or bc I got tired at some point and ain't feeling like adding another panel just bc)
I try to respect the original placement of the dialogue bubbles, tho

4. Format (aka dialogue bubbles and other adjustments if needed)
Then just put the sketch layer on invisible and add the bubbles + dialogue:
Then crop the image so it looks neater with the lines matching the edge of the lineart

5. Coloring
That was it for this one, but if I wanted to continue until I got a "finished" comic, this is where I would start coloring. First the flats (different areas like hair, scarf, etc... on different layers) and then add layers on top (clipped, I think? English ain't my first language, I've got no clue, my settings are on my mother tongue) and start messing around with the colors, shadows, lights and complimentary colors to add depth here and there in low opacity.
Hope this sufficed! ^^
About how many thoughts and ideas progress to drawings or finished pieces... Not many tbh, not when compared to the amount of wips or first stage ideas/dialogue
#asks#talk tag#my art#old art but still#I've been well but a bit too tired to draw these past days#hopefully that changes tomorrow#since I've been resting all day today
34 notes
·
View notes
Text

My Summer commissions are open! Venmo only, or cash if I know you irl XD
Info under cut, with examples ;D
Support a small artist who loves drawing!
-10$ sketch headshots
(+5$ for lineart, + 4$ for flat color, + 4$ for clean shading)
-12$ half body shots
(+5$ for lineart, + 4$ for flat color, + 4$ for clean shading)
-15$ full body shots
(+10$ for lineart, + another 8$ for flat colors + 8$ for clean shading)
-Each additional character is 5$ (Previous perks already apply for them, don't worry about paying extra for lineart, shading, etc.), and you can't have more than 3. (SOME exceptions)
-Dialogue is 2$ PER character speaking
-No explicit N̈Ṣ̌FŴ (weirdly typed to bypass the text filter) But I will do suggestive content, and artistic nudity
-No ultra detailed subjects (Mechs, heavy filigree, etc.)
-No heavy gore (Will do creepy shit tho... blood, bones, eyes, teeth, whatever. Just no like, gutspills)
Both are available as a digital drawing, and as a high quality picture of a traditional pencil drawing.
If it's your original character, please provide me with as much reference as possible for the best product :]]
You should get in between 2-10 days of payment depending on the amount of comms I have lined up, and the amount of perks you buy :]
Shoot me an email @[email protected]
OR
My tumblr dm's
OR
My Bsky 🦋🔞: in bio
EXAMPLE COMMISSION:
Traditional Head Shot: 10$ (Cheapest Comm. Pencil OR Digital)


Total: 10$ (Will be sent to you as a photo, refined with neater lines than this)
----------
Digital Headshot (minus sketch shading): 10$
Lineart: 5$
Flat colors: 4$
Small Animal: 1$
Picture Background: Free

Total: 20$
Digital Full Body (minus sketch shading): 15$
Lineart: 10$
Flat Colors: 8$
Small Animal: 1$

Total: 34$
Digital Half Body: 12$
Lineart: 5$
Flat colors: 4$
Clean Shading: 4$
Drawn Background: FREE (this one was easy)

Total: 25$
All of this art is from 2024-2025, and easily recreatable if you like a more simple style compared to my more complicated one.
☆HELP UR BOI PRODUCE FUNDS FOR HIS GOOFY CAT WITH FIP☆
9 notes
·
View notes
Text


Happy #WebcomicDay!! :D
This year we're celebrating the process of making pages... so below the cut I've got a bunch of pictures sharing how I go about making pages of my evil post-apocalyptic workplace sitcom, Cargo!! :D
So! My process!!
Writing-> I think sometimes there's pressure to "write" your comic a certain way, I see people talking about script format and stuff a lot. That really doesn't work for me, though! I write my "first draft" script in short scenes on scrap paper, in whatever order they come to me. Sometimes a scene will just be one or two lines, and then a little description of what I want to happen in the rest of the scene.
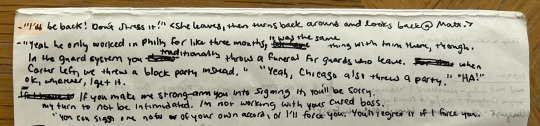
Later I type the scene up, and write the "connective tissue" that fits between the disjointed scenes so they all flow together like they ought. I don't do page breaks or even character tag or action notes hahahaha I like it to be as BASIC as POSSIBLE so it's easy to edit. And since I'm the person drawing it I can almost always remember who's supposed to be saying what lmao

I edit a lot, but the most major editing is also probably the last bit... when I letter my pages usually I realize "they would never say that" and so I end up rephrasing everything. My art brain is sometimes waaaaay better at phrasing hahaha. Like you can see in the finished page for this script I rewrote like basically all of it, and actually went back to the original "sketch" script in a lot of places.
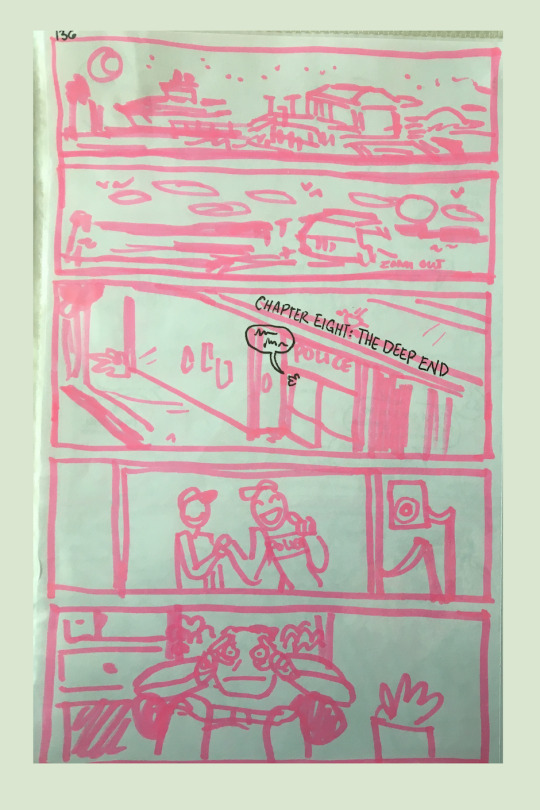
Thumbnailing-> my thumbs are really big, I draw them with markers on printer paper and keep them in a binder!! I like to thumb scenes in batches and I also usually write my dialogue on them, just so I can read through them before (and while) I draw to get a feel for how the pacing works. :)
youtube
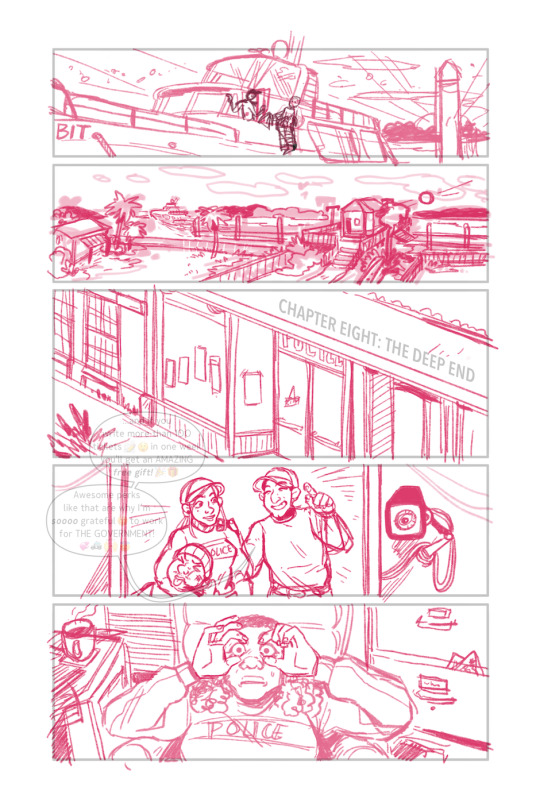
Sketching-> OH sketching is also really hard for me! I don't have a good visual imagination so it's really important for me to make sure I have good references. Last year I was especially focusing on setting.
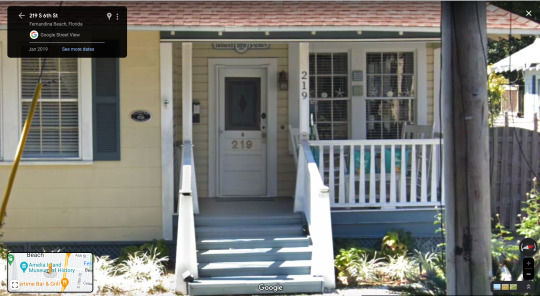
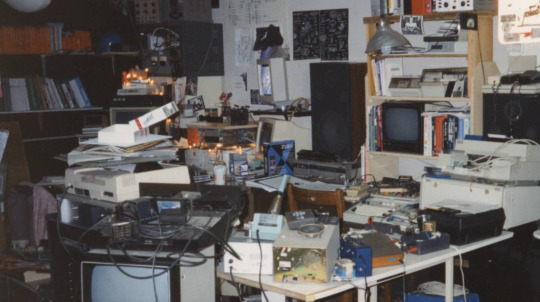
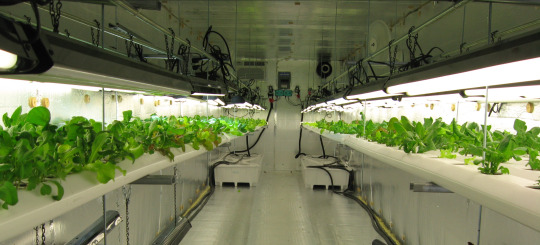
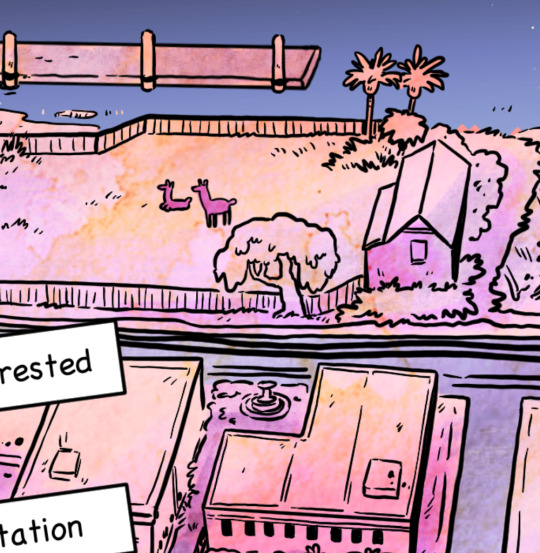
My comic is set in Florida. I'm lucky in that I used to live there and still go back to visit sometimes, so sometimes I can gather my own reference images! But more often I start on Google Maps or Zillow, trying to find buildings that have interesting features or the right kind of "look" for what I want. I'll also look up other interesting elements, my comic is set in a post-apocalypse and I'll research home gardening and things like that which people would probably have.
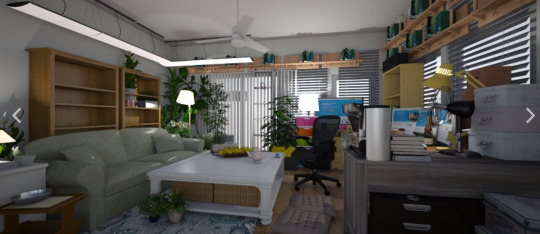
For example, in this set in chapter 7, I used Google Maps images, photo references of indoor hydroponic gardening, and like, 90's-00's hacker computer setups haha. Also my BFF Roomstyler.com, where you can make 3d house interiors haha!!
Lineart-> I LOVE lineart it is my favorite!!!! I sketch and ink two pages at a time, and it usually takes somewhere between 10-12 hours to do both steps.
I actually think my art looks best when it's just lineart... but I think my STORY is better with color, like it makes it clearer and easier to read and it has a better atmosphere HAHA.
Colors-> I think it usually takes me 4-6 hours to do 2 pages (I haven't timed myself as consistently as I time my lineart and sketching). I have a big file with small copies of my previous pages that I color drop from, and my characters are all flats only. The limited palette that I use is also really handy, it streamlines coloring a LOT.
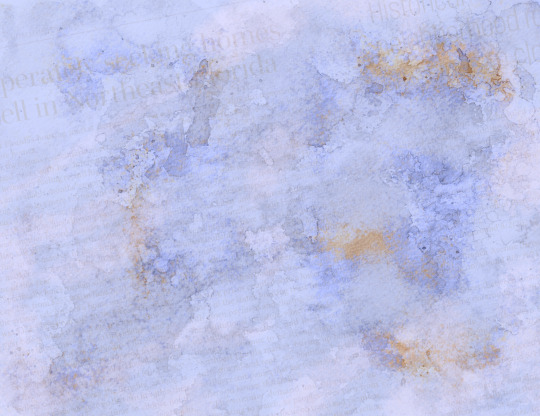
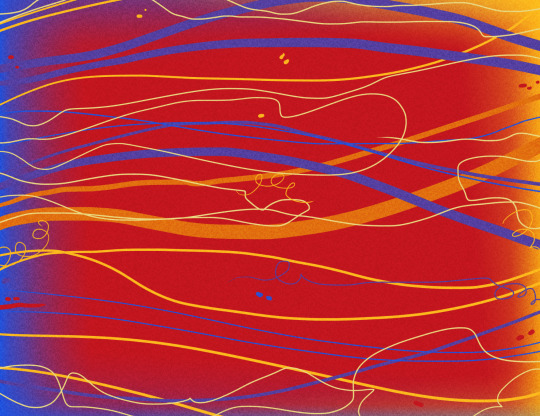
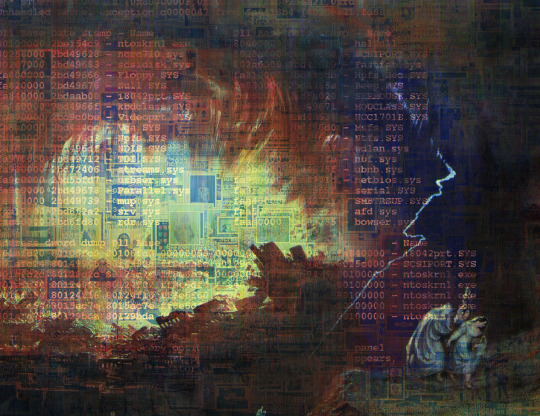
Finishing Touches-> aka I steal mercilessly from my one true love, my internet home, the beautiful and blessed Wikimedia Commons
I put lots of overlay layers on my art! I like textures so having some strange little textures or pictures on things makes my art feel a lot more finished to me.
And finally my very most favorite ✨finishing touch✨ is the bright colored/patterned gutters that I use. Here are some of my favorites that I've made and used in the past!

And that's all!! I hope you guys have a very happy Webcomics Day and find lots and lots of wonderful new things to read!!!
40 notes
·
View notes
Text
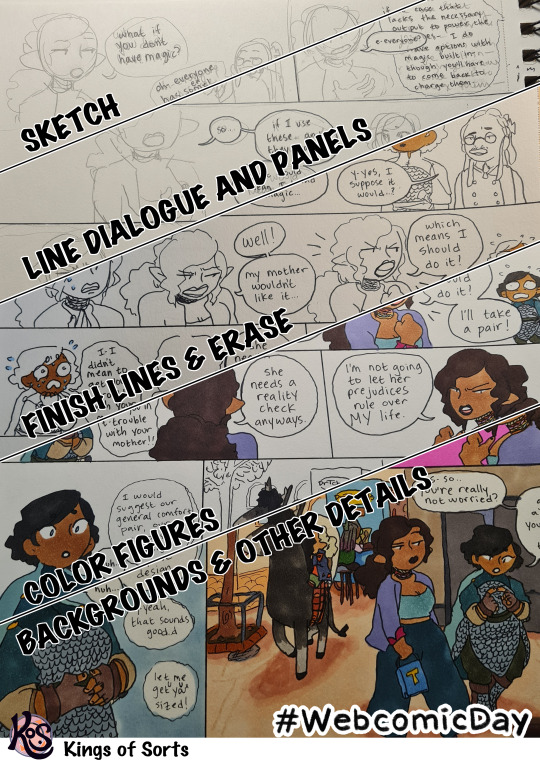
i actually got some in process shots for this #WebcomicDay ! they are of an episode 12 page, so this doubles as a sneak peek 🤣 you can see i forgot to take a pic of the finished lines before i started on coloring (whoops)
there are a few secret steps after finishing up backgrounds etc. (scanning, cleaning up) but since this is a sneak peek, i didn't want to put the Final Product out there.
I guess I'll ramble a little bit about The Process below the cut.
SKETCH: I don't plan out my pages as much as I should other artists do. I think about the next couple shots I want, what I can probably fit on the page, and then decide how tall the panel should be. after that I draw a big line across the page 🤣 sometimes the panel gets bisected, usually not trisected. I love it when people consider the whole of the page and make the paneling choices that elevate the art. I just don't do it lmao
luckily for me, I don't have a requirement to make every piece of my comic pages The Best. So, I focus on what I enjoy: expressions and conversations.
LINE DIALOGUE AND PANELS: For inking/lining, I ABSOLUTELY have to put in my dialogue/dialogue balloons first. Since I'm doing everything on the same page of physical paper, I can't really shift things around partway through to make the dialogue and art fit better together. I also have to make sure it all fits within the panel lines I have planned. I've gotten into situations where the WORDS fit in, but in order to make a word balloon with decent space around the words, I cross over a line. Sometimes it works, but for me.. it doesn't work most of the time. So, gotta plan ahead.
You can also see down in the final section, I handwrite my dialogue! So, if I mess up, I sometimes have to add in a few letter that I can substitute in during editing.
FINISH LINES & ERASING: All I have to say about finishing lines/erasing, is that erasing can be such a challenge lmao. JUST YESTERDAY... when I was erasing.. I tore a page a little bit. And I often accidentally crinkle a corner while erasing. The obvious solution, and what I know people do, is to sketch on one page, and then use a light table (or equivalent) to do a cleaner, lighter sketch on a new page, and then do lining on that. Which is a good idea, maybe someday I'll try it lol.
COLOR FIGURES: There's really no good reason I start with the figures, besides that I like watching them come to life with the colors. It feels weird when they're blank on the page. They're also generally the most important part of the page for me, and seeing them colored helps me decide on which panels I want to do flat color backgrounds for.
But! This means I can't go back and edit skin tones etc. to be in different lighting after the fact, unless it's to make them darker! So that's something I have to be cognizant of and plan for in advance.
I use Copics for most part of the figures, except when I know there's going to be several large areas to color, like Aoife's hair or her sweater and pants. I have character's hair planned in Copics, but I have several browns from other brands (Prismacolor, Blick, Winsor and Newton, Artist's Loft) that get pretty close to her hair color. Clothing that has large areas that need to be colored are planned as being from one of those other brands from the start. I don't want to use up all my Copic juice on them!!
Also don't you just love seeing the texture of the paper through the marker? I love it. I love the natural variation you get.
BACKGROUNDS & OTHER DETAILS: Color everything else! Backgrounds and shadows generally. For backgrounds I'm once again using my alternative brands. I've got a lot of space to cover, and those markers, along with being cheaper, are generally larger than my Copics. So it works out.
Sometimes I tend to go a bit wild with the single color backgrounds, to the point where I think it can get distracting. So I have to rein it in and leave some panels with white backgrounds, so the reader isn't just blasted with colors from every angle. My rule of thumb is to try and only have color on one panel in each of my lines of panels, and to alternate sides, if possible. I feel like that guides the eye easier.
Doing things traditionally means I don't really get any shortcuts when it comes to backgrounds, including just flat color backgrounds. Every square millimeter has gotta be colored purposefully by me. And maybe that seems like a pointless use of time and effort! But man, I love the end result. I'm all for shortcuts, it's just a lot of the ones I see floating around don't apply to me 🤣
I'll talk about my other steps here too, might as well.
SCANNING: After colors and everything, I scan the pages. They're too big to fit in my scanner, so I scan the top and bottom halves separately, and stitch them together (I use PhotoStitcher).
From there, I rotate it to (more or less) make it straight on my canvas, make a .clip version, and send it off to my iPad!
I got my iPad in a workplace raffle, and though there's a lot about the UI I don't love, it's been really convenient!
EDITING: Editing consists of: cleaning up things that should be white (like eyes, teeth, and word balloons), and then cleaning up marker that's bled over into areas it doesn't belong, and is distracting. I try not to overdo it on marker cleanup, because 1) it takes a while, 2) it can stress me out if I decide I need it all to be PERFECT, and 3) it feels slightly disingenuous, just TO ME, about my OWN work. I don't think 3) is valid, so I try to ignore that part, but sometimes in my head I'm like 'mm but Jacki can you say its traditional if you have to do so much work in post to make it presentable??' (said in a very snobby voice). I went from not really caring -> REALLY caring -> hopefully I'll get to caring a reasonable amount.
FINISHING: Last steps are to send it BACK to my computer, where I have two auto actions to size the page and to export it as a .png in a large and a small size. I should be rightfully criticized for how I size the pages lmao, it's 2647x3560 pixels. Why that number specifically? That's 1) how I've done it since the beginning, so they are all this very strange size, and 2) it's about the maximum area of scanned page I can consistently get.
I think that's it? I don't know why you would, but if you have any questions, feel free to hit me up and I'll answer them to the best of my ability. Hope someone finds this interesting or helpful LOL
bye 💕 happy webcomic day!
27 notes
·
View notes
Text

Hihi everyone!! Opening commissions bc I just graduated and can't find a job yippiee!! More details after the read more if you're interested!
Reblogs are appreciated i will giv u a kjss and/or a cool hi-five!! :]
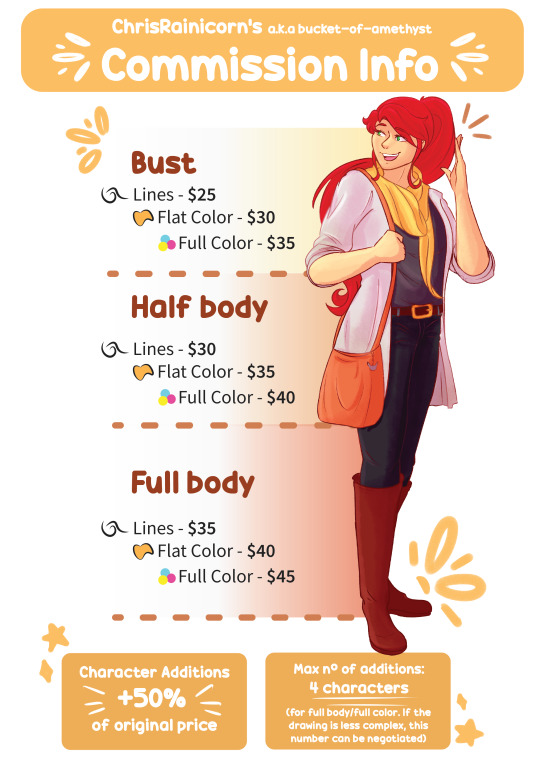
The Art Styles:
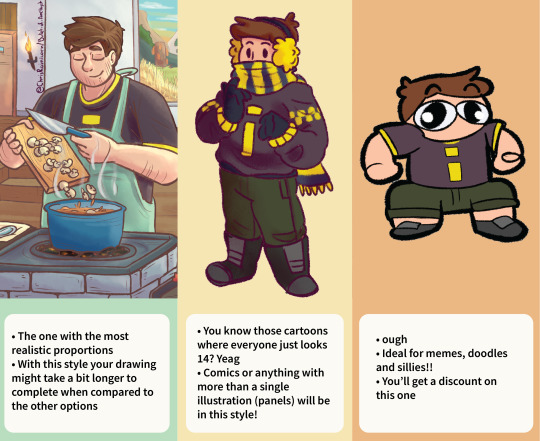
(obs.: for art style n°2 it does not mean it can only be used in comics, you can pick that one for regular illustrations too!)
The commission:
If you’re interested, contacting me at [email protected] is the most reliable method. But feel free just simply dm me here too!
Here are some of the stuff I will probably ask you, feel free to include those in your first message if you want, if I need any extra info I'll ask :]
Your Tumblr URL (if you're emailing)
Commission attributes (Art Style, Bust/Half/Full Body, Line/Flat/Full Color)
Extra additions if any (animals, accessories, background, dialogue bubbles, etc)
Character References (especially if OC or if you want a specific accessory/clothing/setting) the more refs the better!
Pose of Preference
Expression of Preference
Full Description of what you have in mind!
After we discuss the details I'll send you a Paypal invoice for payment! You will receive sketch and linework updates before the final result.
IMPORTANT:
FOR MCYT DRAWINGS: I will keep the requests in the fandoms I'm in (HC/Empires/LifeSeries and adjacents) for now!
My specialty is light-hearted stuff, the fluff and funnies! Although asking for something darker/angsty won't mean I will automatically reject your order, I ask you to keep that in mind.
I forgot to add "Gore" in my don'ts section. My bad. Light injuries or a bit of blood is fine though!
FOR COMICS: the usual limit is around 1 (one) full A4 sized page/8 panels
Check my art tag for more examples! There is some cool stuff on my main too in case you want to see some examples of my past commissions!
While do draw OC's, I AM NOT OFFERING A SERVICE TO DESIGN THEM FROM SCRATCH! OC's with character reference only please, even if it's a simple picrew. A Minecraft skin also counts as a reference!
First come first served! No limits on slots for now.
And last but not least any questions you have feel free to message me! Free of compromises :]
#bucket of commissions#bucket of art#art commisions#did i forget anything i hope not eairhpdfklfç#good lird i needed to update my commission stuff for years now#reblog pls i will be eternally grateful and ull look so sexy n cool doing so ahah
145 notes
·
View notes
Text
Inkwell’s Commission Information
An updated commission page now that I’ve gotten my art degree!!
All Prices are in USD. Payments can be made through Pay Pal (my paypal.me link), or Square through my Website InkwellArtist.com and in the Commission Me! tab! Make sure to check with me before paying.
I ask that payments be made before Lineart is drawn, or if you’ve chosen a sketch work, before the art is started. Price ranges subject to complexity of expressions/pose.
If you’re interested in commissioning me, please email me at [email protected], or send me a direct message through Tumblr!
Basic Digital Drawing Commission Details:
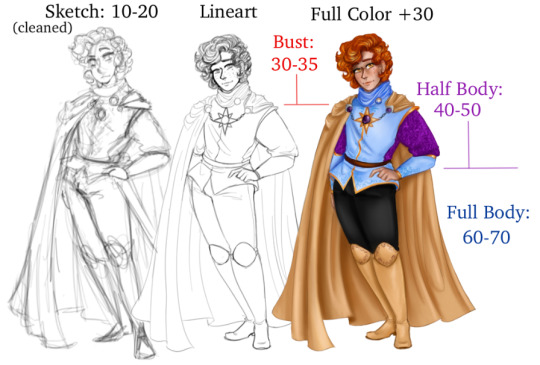
Sketch (cleaned): 10-20, Lineart- Bust: 30-35, Half Body: 40-50, Full Body: 60-70, Full Color +30 added to Lineart price
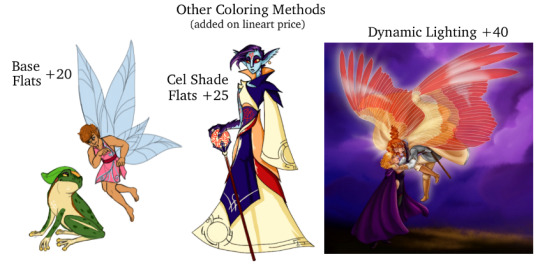
Other Coloring Methods (added on lineart price): Base Flats +20, Cel Shade Flats +25, Dynamic Lighting +40
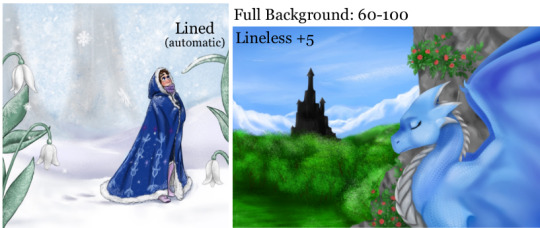
Full Background: 60-100, Lined (automatic), Lineless +5 to “Lineart” base price

Other Background Styles: Lineart: 20-30, Gradient/Simple: 10-15, Flats: 40-50, Pattern: 10-40
More examples, art styles, comic pricing, animation pricing, and further explanations of the process under the cut

Realism: +50 to base price, Chibi & Toon styles: +10, Detailed Linework: +5, Other artstyles can be developed with discussion
Pixel Art: 20+ (increases with number of pixels) Pixel Animation: Base Pixel Art price + 10 per frame (ie: a small, 12 frame animation would cost $140)
Hand-drawn key frame Animations: Base Art Pricing per keyframe + 20 per frame (ie: a 12 frame animation with 3 keyframes (each $40 as individual works) would cost $300)
Comics: Use Base Pricing per panel, + 5-10 (for paneling and dialogue organization) Background Pricing per Setting, not panel
Edits after the relevant stage (ie: if a pose is being changed after drawing lineart, or a color is changed after shading) are an additional 5 to 10 per edit.
Feel free to ask about things such as physical/traditional media, prints, sculpture, maps, logo designs, prop design, photo manipulation and more!
-
How it Works:
After I get your message I’ll respond as soon as possible asking you to describe your commission to the best of your ability- make sure you note if you’d like bust/half/full body lineart, your color preference, and the other important details about what you’d like.
After that I’ll be able to lead you through any additional questions I need in order to get an idea of how complex it is and I’ll be able to do the math to get a preliminary price out there!
After that’s discussed, I’ll be able to provide you with a series of sketches to choose from and work out adjustments if needed! After a sketch is selected and worked with to get a better concept of what you need, I’ll get started on line art! This usually takes me about a day or two for most pieces. Please note you will need to pay for the commission before I get started on the first stage! I will not begin drawing line art until I have received the payment for the artwork.
After that, it’s mostly a matter of sending you my progress and asking if anything needs adjustment. Feel free to add anything you want! If you find this would change the price of the artwork, I will be very open to discuss it further with you. I’m always hoping to make something *you* want, so never feel bad for asking me to change something.
Everything’s first come- first serve. I’ll try to inform you of how many people are ahead of you and an estimated time-frame of how long it may take me to get to you and/or complete your project.
Thank you! Feel free to ask any and all questions that come to mind, and I’ll do my best to answer them! There are no bad questions!
- Further Notes/Disclaimers
I may raise the prices upon further discussion should the piece be particularly complex or challenging enough to increase estimated time spent on the project. It is very unlikely I will increase prices above the high-end bracket stated here for any particular project. It’s why I included the ranges in the first place. I want to make this something that is fair to both your budget and my time, energy, and supplies, I’m very willing to help you figure out how I can make something you want within your budget! Low-end bracket non-negotiable. Any price increase above the high-end bracket would be due to a general pricing increase overall.
If you would like to pull out of any projects you must do so before completion. I will provide you with the initial sketch(es) as soon as I complete it. Please inform me then or beforehand if you no longer wish to commission me! For both your own and my sake!
If you wish to pull out of a colored project, and I’ve already completed line art, I ask that you pay for the line art (same with a project with backgrounds or additional characters)
I ask that you only use these commissions for Personal Use unless you talk to me first! If you would like to use my art/designs for Commercial Purposes, you must get my explicit permission. I sign all artwork! If you don’t wish for it to be signed, or would like it to be signed in a particular place/way, please discuss that with me. It is very likely I will post the complete commission to one of tumblr blogs (and/or possibly other social media accounts/website/portfolio). If you would prefer I didn’t, or did so in a particular way, please discuss that with me!
That’s it! If you got though this all, I applaud your determination and appreciate your interest! If you still have questions, again, please ask!
#commision info#digital art#art#artists on tumblr#animation#gifs#animation commission#commissions#art commisions#commission info 2023#inkwell art
43 notes
·
View notes
Photo


hey y’all! i’m gonna open commissions! i’ll have five slots to start, first come first serve, more if i end up having more time. you can contact me via tumblr DMs or at [email protected] to claim a slot!
will do: Fan art, OCs, D&D characters, real people, G/t, ships/shippy situations, blood/light injury
won’t do: Explicit ns/fw, g0re, complicated mechanical things, v0re, f3tish art, hateful things (racist/sexist/homophobic/etc.)
i reserve the right to refuse a commission for any reason, including if i believe it is out of my range of ability.
pricing and payment details under the cut!
lines full body - $25 USD half body - $20 USD bust - $15 USD monochrome full body - $40 USD half body - $30 USD bust - $20 USD flat colors full body - $50 USD half body - $40 USD bust - $25 USD comics lines - $25 USD per panel monochrome - $30 USD per panel flat colors - $40 USD per panel G/t pricing if one of your characters is so big that they are just a body part or so small that they are just a stick figure, they are 50% off!
simple backgrounds (flat colors, gradients, a few lines) no extra cost, complicated backgrounds are price-negotiable.
payment will be via paypal. i ask half up front and half upon completion. if for any reason i am unable to complete your commission, i will refund what you have paid. you will receive work in progress shots at the sketch, line, and color stages (if applicable). i will only continue work once you have approved each stage. you may ask for adjustments on the stage in progress at no extra cost.
if there is dialogue or other writing involved in your commission and you would prefer it typed rather than handwritten, i can make that change at any time and with no hard feelings <3
63 notes
·
View notes
Text
YEEAAAHHH

im doin commisions now!!! more info under read more
SKETCH
- just a simple sketch. no extra costs if you want colors. will have thin lines
- you can pay once i finish the drawing!
- costs 5 dollars USD
- takes at least 5 minutes
SIMPLE DRAWING
- drawing with cleaner lines (unless you want messy ones) and colors. flat color backgrounds and barely any shading
- takes at least 30 minutes
- payment before final product. however, i will send you the sketch first so you can let me know if you’d like any changes
- costs 10 dollars USD
- i can do either thick or thin lines
DETAILED DRAWING
- like a simple drawing, but with shadows and lighting
- i can only do simple shape backgrounds sorry (im not very good at them lol)
- takes at least 3 hours
- payment before final product. however, i will send a sketch first
- costs 15 dollars USD
- i can do thin or thick lines
COMIC PAGES
- grayscale comic pages with thin lines
- i need you to be as specific as you can with what you want!! especially with dialogue!
- one page costs 20 dollars USD
- extra pages cost an extra 5 dollars USD
- i will send you sketches of the pages first. then we can discuss how many pages you want and the price. you will still need to pay before i can give you the final product.
- i can put backgrounds, but they would be edited versions of materials from ibis paint x (the art program I use) or photos i have taken
- takes at least 7 hours. can take days, especially if there are multiple pages. please be patient!!! especially now that at the time of posting this (9-23-2021) i have school!!!
WHAT I WILL DO:
- fanart
- furry/anthro
- OCs
- icons
WHAT I WONT DO:
- NSFW/suggestive art
- religious themes
- hate art
- mecha
i can and will decline if it is something that is not listed here that im uncomfortable with or if you yourself make me uncomfortable
dm if ur interested!
4 notes
·
View notes
Note
Idk if this has been asked already, but how long does it take you to create a comic/art piece? And what is the order of the steps you go through? (Btw I love your art)
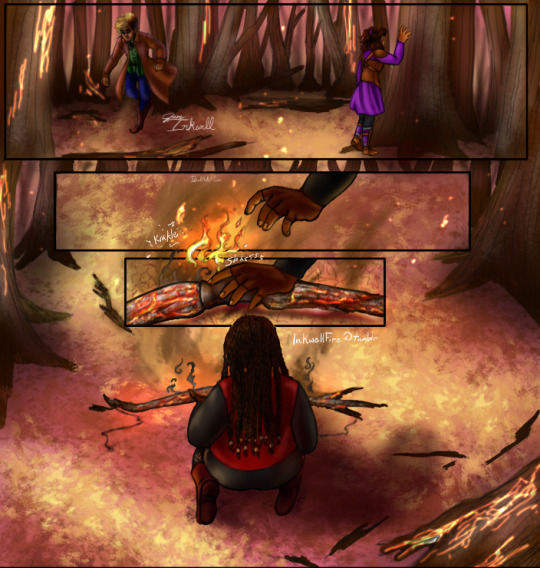
That’s a good question! I’m gonna use the most recent page as the example. I’ve talked a little bit about how long it takes, but I haven’t really explained my process. Heads up, this is pretty long! I could have just put in one panel’s process, but it’s more fun to show the whole page
1. The Sketch ~ 1-2 Hours

This can take a while for a number of reasons. A few factors could be business, tiredness, a lack of inspiration, creating too many options for myself, etc. But generally this part goes at a decent pace. I have a script that I follow loosely, where I’ve written dialogue and actions that seem good for what’s going on. I will spend more time on panels that I have a specific image in my head for. Those last two panels are much cleaner/more fleshed out than the previous four because I had a much better idea for how I wanted them to look.
2. The Lineart ~ 2-4 Hours
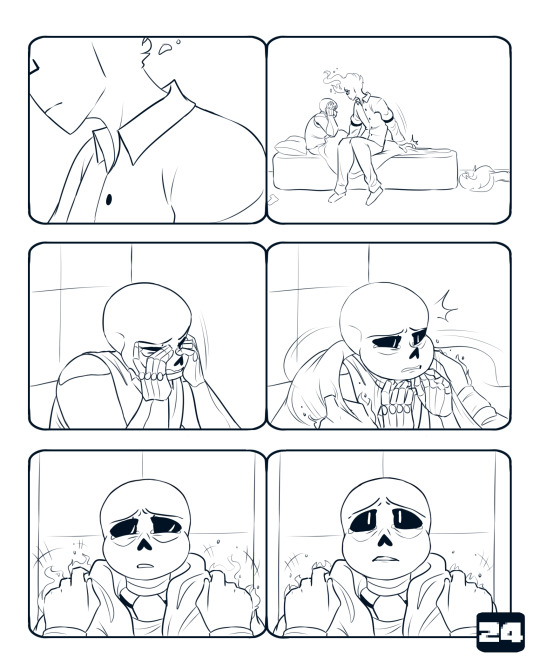
The lineart takes the longest, hands down. It’s the clean up, final changes/additions, and just making everything look all nice for the rest of the piece. This is where I spend like 5 minutes comparing facial expressions to see which one I like better, drawing another one, and then choosing the first one I drew.
3. The Background ~ 30 minutes
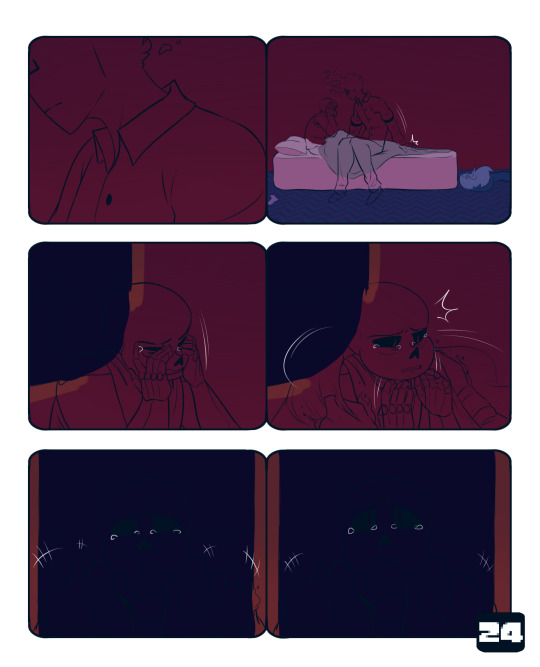
The coloring is so much faster than the lineart. I will usually go slower here on purpose because I enjoy it, and it’s a relaxing break from the lineart. I just color right underneath the lineart, I don’t worry about anything looking messy under the character linearts because I know they’ll just be covered up. Typically, if I start the lineart in the afternoon, I’ll get to this point and stop for the evening.
4. Flat Colors ~ 5 Minutes
This goes relatively fast as well. I take my time for the most part. It’s just tedious to select the lineart. I kind of color them differently. Sans gets his darkest colors first, and then I add light layers on top. With Grillby, I put on the lightest color for his shirt and the middle color for his flames (I use 3-4 colors for them). Doing that kinda helps me establish that Grillby is a light source and Sans is not.The color schemes are almost direct complements, and I do eventually add yellow to Grillby’s flames. It makes them contrast with each other, and is generally satisfying to look at imo. It also makes Sans’ colors somewhat analygous to his surroundings, because of the deep blues and reds. The purple does stand out, but not nearly as much as the bright orange.
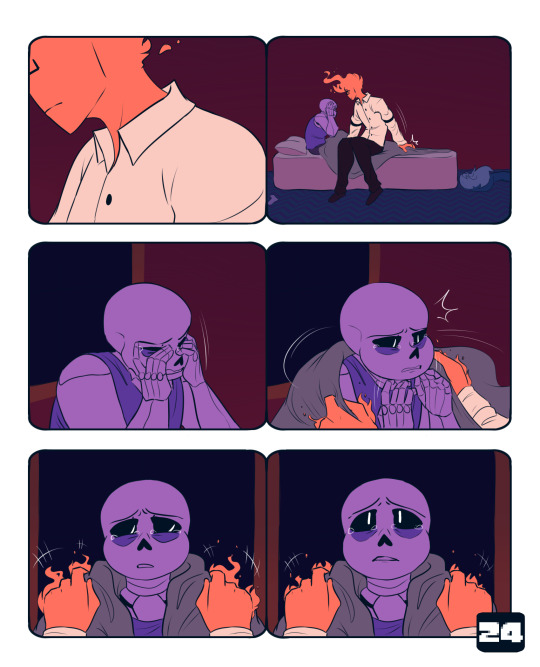
5. Finishing Grillby ~ 45 Minutes - 1 Hour

I have a general routine for adding Grillby’s details, which is why it goes quick. ((There will be a separate post on that process later)) It only takes that long because I have to do it for multiple panels per page. I’m sure this page was even shorter because it mostly featured incomplete shots of him. To finish his flames, I use an airbrush to add the reds, then I do the same with the yellows. I take the brightest yellow on the palette and use that for his freckles, eyes, and mouth ((if it’s open)). The last thing I do is color his lineart a dark red. His eyes are lined with a darker red to compensate for the glow I put over them, which makes the lines look faint and hard to see. For his shirt, I shade it with the lighter pink color, and then airbrush the darker pink on the areas that are further away from his flames.
6. Finishing Sans ~ 1 hour

Sans definitely has a more drastic change than Grillby. Almost none of the original purple survives the overlay layers. I have two or three light layers on top of the flat colors. I use one of the colors that is from grillby’s color palette, it’s a slightly altered version of his flat orange. First I do hard lights, that don’t have their edges blurred. The top of his skull and those half circle shapes under his eye sockets are some of the most noticeable examples. Then I go over that layer with another overlay, but this time with an airbrush. I put it in the same areas, but it makes everything look softer. There’s one more overlay, which uses the dark purple of Sans’ shirt. It helps me to not make everything too light. On top of all three of those is a a Luminosity + Shade layer in the orange color to make the brightest spots pop.
7. Finishing Background Details ~ 15-20 Minutes

This is basically doing the same thing I did to Sans on the background. I use the same orange from Grillby’s color scheme and add light where it needs to go. I can be more lenient on details because it’s not the main focus of the page.
8. Adding the Glow ~ 5-10 Minutes
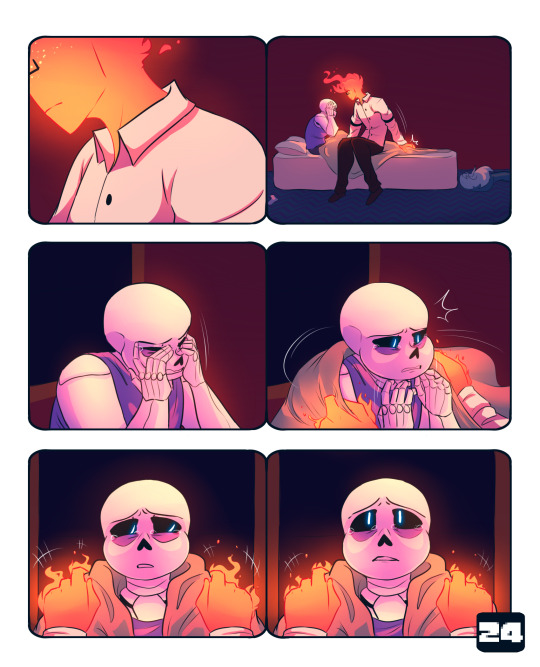
This is just me taking the orange light color and airbrushing it just above the background on a Lum + Shade layer. This goes under the layers that Sans and Grillby are lined and colored on. The next layer is the same as the last and goes over both figures. It acts as a final highlight to the lightest points of the two. Usually it’s the top of Sans’ skull, the tips of Grillby’s fingers, and the area around his mouth. Then I airbrush Sans and Grillby’s eyes in blue and orange respectively on a Lum + Shade Layer.
9. Text and Final Details ~ 20 - 30 Minutes

This is where I figure out where I want to place the dialogue, and add in anything I might have missed. In this case, I forgot to fully draw and shade Sans’ tears at the beginning. I slap my signature on and boom! All done!
I hope this was helpful! And sorry it’s super long 0v0;; If you need clarification on anything, feel free to ask!
333 notes
·
View notes
Note
I want to do my own AU story but I can only do traditional/ pencil and paper art. Do you think a good comic storyline can be made through that method or does it have to be digital? I'm nervous to post something pen and paper style because of how lack luster it seems in comparison to digital art.. What do you think?
Comics don’t have to be digital!
Many artists do traditional comics, and it’s a blast! Your readers aren’t going to care about what you’re using to make the comics - they’re only going to care about the content!
Simple styles might seem ‘lackluster’ but they are actually, in many ways, easier to read. My comics are almost completely black and white. Does that make them less interesting than color comics? Ideally… no. Maybe someone will disagree with me though. :)
I will say this though - like with any comics, the thing that will stay with your readers is EFFORT and PRESENTATION. And despite the fact that it’s annoying and time-consuming, the thing you have to worry about right after you finish worrying about drawing is actually:
1) Do your comics look like a final product? Are there still under-sketch lines visible? Do you have eraser shavings visible in the photo of your comic? FIX IT.
2) Is the photo/scan of your comics high-resolution, or is it blurry? Are some of the words hard to read because the shadow of your hand is over it? Are some drawings distorted, because the page got bent? FIX IT.
3) Is your handwriting clear? Are the words more or less on the same line? Is your lettering large enough for readers to be able to follow? Or are there things that break the comic box boundary, are there cursive, scribbly lines of dialogue piled on top of each other? FIX IT.
I, as a comic reader, have absolutely no problem reading traditional comics. I’ll read stuff drawn on a coffee-stained napkin!
But I gotta be able to read it!
Just because YOU know what it’s supposed to say doesn’t mean your readers will. Go the extra mile for them and make your scans/photos/lettering as clear as you can.
It doesn’t take anything except time, either, because you don’t need fancy programs, you don’t need fancy tools - you just need a well-lit, flat area to take a photo and your average, run-of-the-mill photo editing app. Literally that’s it.
It’s the difference between forcing your audience to read this:

Or allowing them to enjoy this:

916 notes
·
View notes
Photo
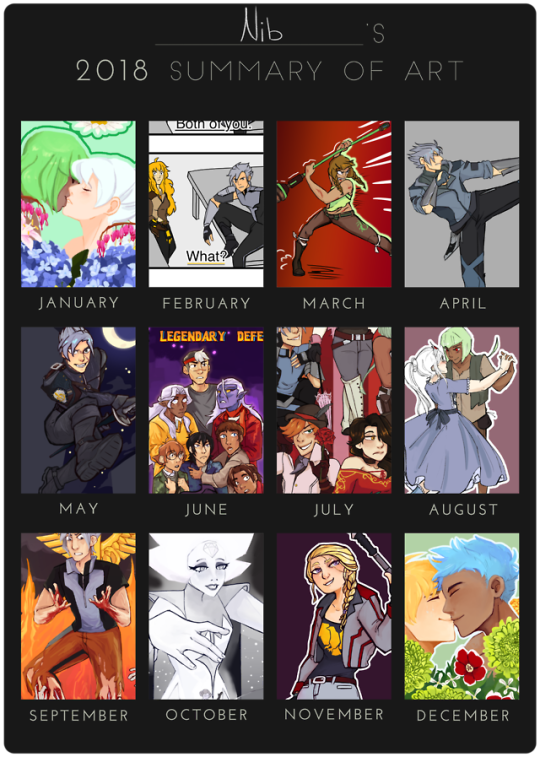
So uhhhh I drew a lot of RWBY this year... only two of these are non RWBY and tbh I could have just as easily put something RWBY for June Template
Retrospective under the cut bc it’s LONG
RETROSPECTIVE January: First piece of the year! I still like this piece and I think it shows how much I improved from the original version of it. Also I just like looking at it bc it's soft content of my rare pair. I do think I made the rose look photorealistic which looks... bad esp with all the other more stylized flowers, and I got lazy with the bleeding hearts by just drawing one set and flipping them. Emerald's hair also could look better. February: I made this around GNG week, which was a fun, good time, long before the server imploded on itself. I got really lazy with the backgrounds, obviously, but I do like the poses in this one, tho it helped that I based it off of screenshots from Young Justice. I also just really like how Merc looks in this one. March: March wasn't a very prolific month for art, I don't think I produced much besides this and one comic piece for GNG week. I'm not sure why exactly, I can't find any specific reason why I would be unproductive that month. I'm gonna just assume I was drained from work all the time and didn't have the energy to put out good art, and also I was getting into a slump bc all my art was starting to look same-y. This piece isn't very good, but I chose it because I did it without a reference, and at this point that was going out of my comfort zone. It's obviously not super dynamic, but at the very least you can tell I intended there to be motion to it. April: This also wasn't a very prolific month for art, not as bad as March, but for the same reasons. I was also really starting to feel burnout from the RWBY fandom, specifically wasps and conflict within the GNG server. This was also when the Art vs the Artist meme was popular, and I realized I didn't want to do that meme because my art was too similar and boring, which also brought me down a peg. Though I put out a few good chibis in April, I chose my Mercury redesign bc I was really proud of it. I could never get the Emerald redesign to mesh quite right, but I can say I'm really proud of how Mercury's came out. May: May had me bounce out of my art slump and in full force trying to expand my skills! Specifically exploring painting. Although May was about as prolific as April, what I did create I put a lot into. It was difficult to pick between this and my app of Edison, because I'm really proud of both, but in the end I went with this commission of Mercury because I pushed myself to try and use an interesting perspective for the piece instead of my usual stand still and face the camera pose. Because I pushed myself out of my comfort zone, this was one of the best things I made all year, and may be my favorite piece of the year. June: TIME TO STRESS OUT ABOUT CONNECTICON! So if you follow me on twitter, you might have noticed I made a lot of posts at the beginning of the year low key throwing shade at myself for drawing my oc's instead of more "important" art. Well, that important art that I was procrastinating was con merch, and con was the second week of July, so I really had to get my ass in gear to finish merch on time (spoiler, I didn't finish a lot of it on time). This piece and July's piece are both posters I made for Connecticon, and while I like July's much better, that doesn't mean I find this piece bad. I really should have known that no one at con would realize it was a goonies reference tho -_-; I also lost a lot of love for this piece after season 6 of Voltron, which I watched while I was about 60% of the way through this piece, so I had to force myself to finish it. July: I love this piece!!!! Don't get me wrong, I know it has flaws, but look at it! The lines are so crisp, the colors look good, Roman and Merc's expressions are mwuah chefs kiss, and I just love all of them!!! ... except for Neo. I really didn't do her justice in this piece, her hair is too fluffy, her head is way to oversized to the point that she looks like a bobblehead, and her eyes are too close together. Really if you take out Neo's head that whole problem goes away. I also love all the tiny details I put in this one, from emerald's chaps to roman's rose to Neo's lace parasol. You can tell I was way more passionate about this piece than I was about the Voltron piece. August: pretty sure this is when I quit my job cashiering, and thank god bc customers suck. If I was going off of sheer popularity, Chibi Pyrrha would have taken this slot no contest, and while I love chibi Pyrrha, I don't think it was the best of the month. I chose this little princess and the pauper au doodle because I tried a year ago to draw these two dancing, and it looked like dog shit. It was flat and ugly. But this has motion to it, and even looking at it now makes me feel warm and happy inside. It's just a good cute drawing of my otp. September: My piece for the RWBY tarot project! I have a lot of mixed emotions about this one. on the one hand, I love how mercury looks, his expression, the lighting, the visceral gore from his legs (ESPECIALLY THE VISCERAL GORE ON HIS LEGS) and the hands of the undead, all look stunning and I don't think I could be more happy with how they turned out. And then we get to the background. The caduceus isn't the worst thing ever, but it's severely lacking in quality compared to the rendering on mercury in front of it, and a lot of it is clearly pixellated from me trying to stretch and squash it just right. And the fire is a hot (no pun intended) mess. It's flat, incoherent, and doesn't lead the eye anywhere. It's a shame too because I wanted to do more with it, but I a) didn't have enough time or patience to figure out what I needed to do to fix it and b) didn't want to go outside of my comfort level, so I gave up and decided to be satisfied with what I had. October: October was another good month for art, I made a turnaround sheet for Moss, painted a full body (and slightly lewd) Rudy, and made a decent attempt at inktober. Ok, so I got like 2 days in, but I improved a lot on inking from last year! Fun fact! this piece was originally going to be fan art of Lindsay Jones, but after I did some thumbnails to figure out a pose, I thought it would suit White Diamond better, and I could also sell it as merch. I love this piece. I think I captured the sinister mood well, and conveyed the story I wanted to without any dialogue (at least the notes on Tumblr make me assume I did a decent job, lotta people really wigged out lol) I really worked hard to get the lighting right on this one, and I think it shows. My absolutely favorite thing about this piece funnily enough, is Amethyst. I think I just did a great job drawing her and I'm proud of myself ok. Stevens bubble and my trouble figuring out how to get WD's leg just right are the only things that I dislike about this piece, but I might go back and fix those. November: IM SO PROUD OF THIS COMMISSION!!!!!! I worked so god damn hard on this chef's kiss poifect, and it really shows. I started using a new brush at this point, the Ojing series on Clip Studio Paint, which I recommend and have been using a lot since. I've also been using this shading technique since drawing this. I love how it sort of fades out but it's still really crisp. I also love all the little details that give this piece character, like her shoes and the stripes on her jacket. This piece really takes a lot of the stuff I learned over the year and combines it into one piece, and I could not be prouder of it. I have absolutely no problems with this one, though I do find the weapon a bit plain, but it's what the client described. December: AND NOW IT'S CHRISTMAS!!!!! I had been working on this piece since August, going back to it every now and then and getting frustrated. I'm really glad I came back to it and finally finished it, since I love this pair and I put a lot of effort into it back in August. However, I'm also really glad I completely overhauled a lot of it, specifically the flowers. Though I'm not 100% happy with the mums in this one, they look a thousand times better than the mums I had originally sketched back in August, and were part of the reason I had such a hard time finishing this for months. I also thought it would be nice to end the year on the same note it started; with a flower couple. I've definitely learned a lot since January, and I hope to continue growing in 2019! 2019 GOALS!
Work on backgrounds for the love of god
Draw more stuff that isn't RWBY
Perspective
Make more speed paints and post more to youtube in general
14 notes
·
View notes
Text
Camp Pep: You Are an Artist

Camp NaNoWriMo is nothing without you, our incredible participants. Today, Camp NaNoWriMo participant Ashley Jean Granillo offers you some advice for this week of Camp:
Dear Writer,
Your story is worth telling, even if the writing hasn’t caught up to the ingenious idea that you’ve been working out on in your mind as you shower away the filth of your day job.
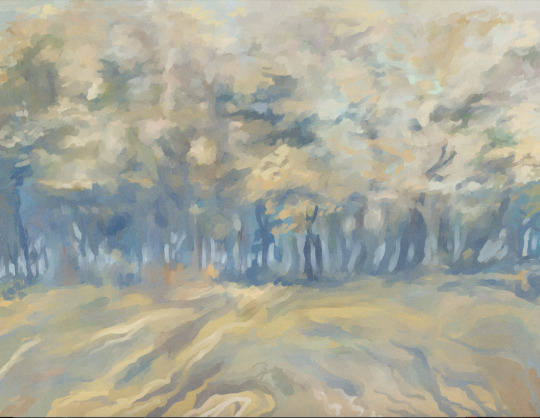
If you’ve forgotten: writing is a process. Currently, you're probably in the drafting stage. And drafts, especially first drafts, aren’t perfect. They are messy––riddled with grammatical errors and sentences that appear to be in the language of your choosing but sound foreign. This is exactly where your writing is supposed to be. Yes, you are supposed to be writing cliches and flat lines of dialogue because you are only in the beginning stages of unveiling your story’s true potential. Think of yourself as an artist, sketching out the shapes of a landscape. The detail and color will come with patience.
As a college composition professor and author, I’ve seen and experienced failure, and it’s usually as a result of the self-doubt that occurs during the drafting stage. Too often my students, and occasionally my own brain, tell me that the inconsistencies and poorly structured sentences deem us unfit to continue writing––that we are a disgrace to the art of composition. Remember that artist: just because they sketched a mitten in place of hand doesn’t mean they can’t draw fingers. They’re waiting for the right moment.
“You must to be willing to be imperfect to be a writer. As an artist, you must accept that the first line you draw won’t be your straightest.”
Love from the Barricade, my debut novel, was written during NaNoWriMo, and its first draft would give you secondhand embarrassment. It had ten identical characters, and a main character who didn’t know what she wanted, and neither did I at the time. But that first draft, however horrible it was, served as a reminder that: having the draft of a novel is a lot better than having an idea for a novel. You can revise a draft, but you cannot revise an idea, because it does not physically exist for you to rework. I couldn’t discover Aijae without sifting through her confusion. You must to be willing to be imperfect to be a writer. As an artist, you must accept that the first line you draw won’t be your straightest. Luckily, there are tools to help you reshape the work, but later.
You’re a writer and an artist even though your novel is not finished. What separates you from so many other people is that they have ideas for stories, but they fail to do what we do everyday, what you do everyday: write.
Writing is not a competition, albeit this challenge may make it appear that way. Art is practice. You are only here because you have one goal, and that’s to complete what you haven’t had the courage or time to do in the past. You aren’t here to outdo someone else, or make your partners, friends, and family members proud. Let them cheer you on, but don’t allow yourself to think that if your word count slips away that you’re letting them down. By being here, getting in those 500, sometimes only even 100 words a day, you are doing the right thing for yourself. You are taking part of something much greater than you could ever imagine. Revel in the journey of discovery.
I had a student who came in every class with the same defeated look, and the same exhausted sentence, “I completed the essay, professor. But it isn’t any good.” My response wasn’t that they’d better get their sh*t together before I failed their work for its disorganization and comma splices. Instead, I told them this:
I am proud of you. You’re just about to surprise yourself with how incredible your story can actually be.
Take care, Ashley Jean

Ashley Jean Granillo is an English instructor at College of the Canyons. She has her BA and MA in Creative Writing from California State University Northridge. For a time, she was a freelance music journalist, which serves as the inspiration for her debut novel. Her first novel (a NaNoWriMo Winner 2015), Love from the Barricade, debuts in September from Black Rose Writing. Currently, she is on a mini tour along the west coast, following the music of her favorite band.
Top image licensed under Creative Commons from César Astudillo on Flickr.
#nanowrimo#camp nanowrimo#drafting#writing#amwriting#community#writing advice#pep talk#participant pep talk#by nano guest#ashley jean granillo
98 notes
·
View notes
Text
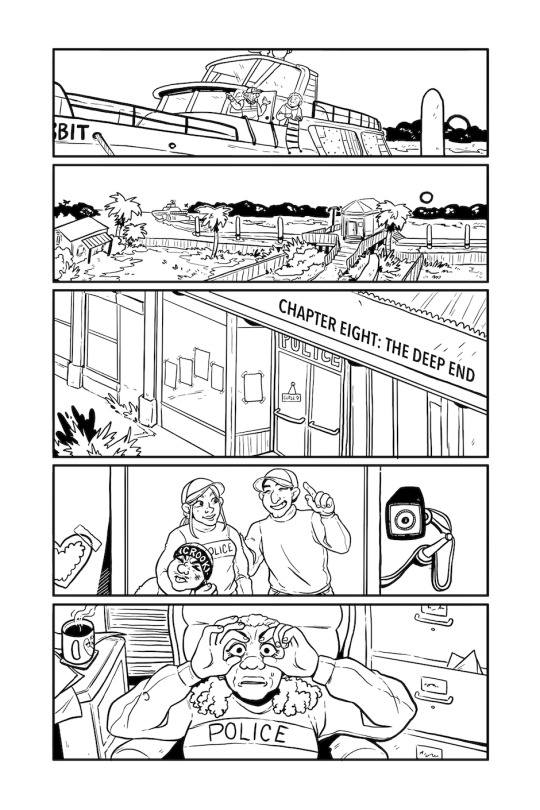
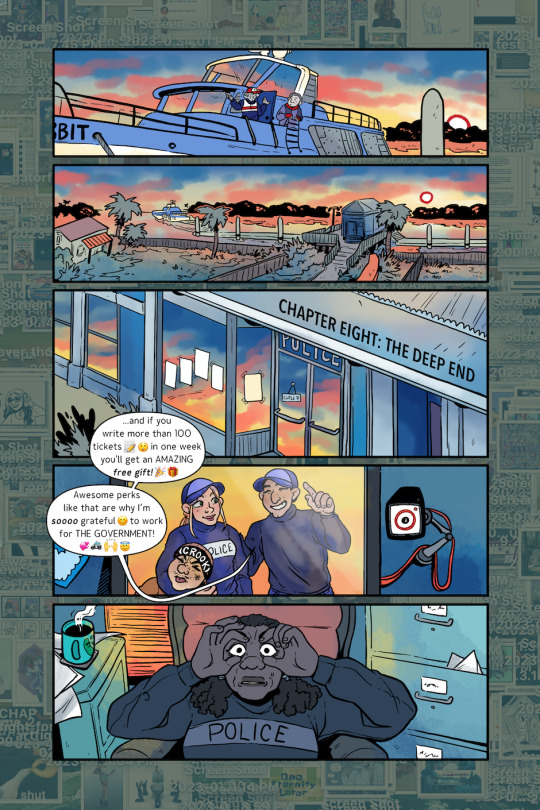
Pages 1-4 ish
Description of art and panel layout of the first few comic pages:
Page 1-2 ish:
A date at the top of the page indicates that it is December and the drawings and panels of this graphic story are functioning as a diary of sorts. To open the narrative, a series of panels showing a post office box (mail boxes in an apartment building), in progressing levels of morning sunlight. These panels and the ones following will be mostly black and white and drawing with pen, with loose crosshatching to show value and detail. A hand reaches out and opens the box. A hallmark letter sized envelope waits inside. The rand removes it, and there is a pause as the protagonist (Audrey) holds the envelope and examines the return address. It’s from an old coworker of her mother’s and Audrey’s old 2nd grade teacher, which is confusing because Audrey hasn’t really heard from any of her teachers in the past, and although this woman was close with her mom, she hasn’t ever gotten mail from her in the past. This won’t necessarily be obvious on the page just yet. The panel will show Audrey’s face examining the envelope, giving the reader the first real glimpse at the “narrator” so the drawing will be somewhat more precise than the previous panels to make it stand out and indicate her role as the protagonist. This will also be an important portrait of Audrey because it will be the only time the reader views her before she discovers the death of her mother.
A series of panels shows Audrey opening the envelope while still downstairs because of her curiosity. The corner of a card peeking out of the simple drawing of the envelope shows detailed and vibrantly rendered colored flowers on the front of the card. Audrey’s hand pulls it from the envelope. A cliché note about loss and grief is written in three different cursive fonts. By all accounts the design on the card is intricate and ugly. Audrey, confused, her hands shaking a little, (shown by drawing two panels that show the briefest lapse in time of just her hand working up the courage to open the card), opens the card and reads the message from her mother’s coworker. “Very sorry to hear of your loss. Please give a call if you need anything (anything underlines and written in swooping cursive). God bless, Ms. Molly”
A panel shows Audrey looking up. A man sits at the lobby desk but there’s no indication he is meant to work there or is just lounging. His expression is bored, and he stares at Audrey as if she is paint drying and he is trying not to fall asleep. Audrey checks the time on her phone. Every moment is now being rendered in its own panel to slow the pacing of the narrative and distort the flow of time. These eventually grow darker in value and the reader then suddenly see a message typed hastily on a phone cancelling what the reader can assume was a date.
A rather thick black line cuts the above panels off from a panel that is the width of the page. From the reader’s POV, Audrey has transported to the train station. This transitional panel depicts a lowering (or raising, since the panel that would reveal which way it moves is not present) guard rail and commuter legs crossing in front of the “camera.” This is an above ground train, with only two tracks, indicating Audrey’s location somewhat outside of the denser parts of the city. Audrey stands on the platform with her arms crossed and one hand raised to her ear, holding her phone.
Page 3-ish
A detailed drawing of Audrey in profile is lit by the phone screen pressed to her ear, indicating that she just checked the screen to ensure the call was going through before returning the phone to her ear. This light does the work of an onomatopoeia for the reader, the Samsung dialing tone is evident. For a few panels Audrey waits for an answer, the wind blowing her hair to indicate the movement of time. Audrey’s sister answers. Audrey closes her eyes, and the page becomes black and a dialogue in white lettering transcribes the conversation.
Audrey: Hannah? Hello?
Hannah: Audrey? A baby cries in the background. Yeah hi! What do you need, what’s up?
Audrey: I got a weird card. Wait, what do you mean what’s up? You know what’s up.
Hannah: Oh Audrey. Oh…
Audrey: I got a card from one of Mom’s old friends. Hannah, when did she die? What… I?
Hannah: I really did mean to call you. It was only a few days ago. Just hold on. She whispers harshly to a child to drop something. Audrey, you there? Try not to worry, I was going to call once the arrangements had all been made; Dad didn’t want to worry you with all this.
Audrey: You’re talking to Dad? No. Wait. How did she die? Hannah this is a huge shock, I don’t understand what’s going on. A kid shouts on the line. Are you listening to me?
The black background begins to lighten, and a silhouette of Audrey is visible under the still-white and fading words.
Hannah: Oh crap, what, yes, I’m here. Look, I have to go. The baby just threw up and Peggy’s screaming at her sister. I’ll call you later OK?
The black fades completely and the reader sees Audrey in profile again, but from her other side. She hangs up the phone and static starts to overtake the page. She looks down into the train tracks, but the reader doesn’t see what she’s seeing, just her face, blank, which is unsettling or unexpected considering how she’d discovered her mother’s death. The camera pans out and the static surrounds her more. Then Audrey’s figure is replaced by a detailed and colorful drawing of a cup of green tea.
Page 4 ish
The same cup of green tea is held by a familiar hand. It’s the first panel on the new page. The lighting is colorful and golden, and no black values exist in most of this page. The exception is a drawing of Audrey sitting on the floor of her apartment and looking out a window. She holds a mug in her hand, but it isn’t the same mug as the cup in the top of this page. The tea from the cup bubbles up and then spills over the page, swirling into a waterfall, going from warm yellows and greens to cooler but still calm waters.
At the bottom of the page, kid feet dash past. A rope guardrail merges from one panel into the next. Two young girls appear hooking their arms over the rope and swinging on it. Behind them walk the torsos of a young couple, not a new couple, but not yet in their 40s. Their faces are hidden by the panel gutter. Remarks on time and memory can be made here, on how kids don’t remember their parents’ faces and just their smells, voices, and hugs. The woman kneels between the girls. They look out at the small waterfalls, large in a child’s memory, but really just a creek pouring over a small cliff, just barely eight feet high.
<The thumbnail sketches of these pages are in a separate post>
And for some context, here is the written scene that became the opening scene of the graphic story (so you can see how this has developed):
I awoke early that morning by some accident, maybe knowing what the day held, if you believe in that sort of thing. I slipped on a sweater and went downstairs to check my mail. The man behind the front desk greeted me with a smile as I unlocked my box.
The pale blue envelope tucked inside was stamped with the army seal, and as I withdrew it, I thought it felt too small and too light in my hands. I knew what it was, and I suddenly realized I needed to choose a place to open it. My apartment? No, I needed to live there. And I couldn’t do it here, in the lobby.
I hid the letter away and took the stairs back up to my place. I sat in front of the window and lifted back the curtain just enough to see outside. Nothing had changed. The city glistened with cold, but the sun warmed me through the glass. I could taste sleep in my mouth.
I knew that breaking the seal wouldn’t be what killed my mother, but I put it off. I sat for a while, maybe an hour. I took note of the room, of the way the sunlight fell behind me onto the floor, of what I was wearing, of the movement of the cars below, the pattern of the trains coming into the station. I counted the seconds between the guardrails dropping and the trains bisecting the road. Trying to commit to memory the last moments I had before my mother was dead.
Finally, I pushed myself up and forced my boots on, grabbed my jacket and keys and went out into the street. The sun’s rays made it feel deceptively warm at first but then I ducked my face into my scarf against the breeze. The guardrail bells began to ring, and I headed for the station. I bought a platform ticket and the gate ate it and spit it out as the limited rushed through the station. As it passed, I reached the edge and could look down into the tracks. The cold had set in permanently over the rails, untouched by the sun. I slipped my hand into my pocket and touched the envelope there. I didn’t know what compelled me to need to open it at the station. The trains had become a vein connecting me to the city, my commute familiar, so that I couldn’t feel like an outsider while I rode to and from the hospital.
But whatever the reason, I figured it was time. I opened the notice, and my mother was dead. As express train after express train shot past, the tracks disappeared and reappeared in a blur. I imagined watching myself getting caught underneath the platform, in the hidey-holes carved into the concrete in case you fell in. Or just lying down and waiting. If I fell in, could I make myself flat enough to avoid having my body smeared away? The letter didn’t say how she died. I didn’t know if it mattered to me; people only want to know how others died so that they can get a hint about their own end. Would my death creep up on me like a dream, allowing me enough time to realize what was happening?
As the bells began to ring again, I stepped closer and peered down into the tracks. I thought maybe I’d start crying.
“Hey you, stand back behind the line!”
I jumped and backed away as the local train slowed into the station, whistling. The conductor in the front car turned his head to look at the weirdo (me) as he passed. I hadn’t been leaning over the edge, so decapitation wouldn’t have been possible, but I stopped zoning at the idea of suddenly becoming just a head. I folded up the letter and tucked it back inside the envelope.
2 notes
·
View notes
Text
A Conversation with TURN Gallery Artist Mason Saltarrelli

TURN Gallery’s Mason Saltarrelli is an abstract artist, illustrator and painter born and bred in the city of New Orleans. His work is imbued by the improvisation of jazz, abstract animal silhouettes and color, the last being what Mason calls a “co-author” in his work. Mason will be Ace Hotel New York’s gallery artist for November and has a series of curtain paintings hanging in the lobby of Ace Hotel New Orleans. Here he chats with artist and friend, Joseph Hart of Deep Color, about to-do lists, Black Jaw the alligator and how abstraction can be a “beginning of seeing.”
Joseph Hart: Bridging in and out of painting and jazz music is the notion of improvisation. Can you talk a little bit about how improvising and intuition act as creative tools in here while you're working? When I say “in here,” we're sitting in your studio.
Mason Saltarrelli: I seldom arrive with a plan. More, I have a cast of characters. I'll call on one of the characters to come into the scene, but I don't know what their lines are and I’m not sure what costume they are wearing. Often the plan or story is only fully clear to me after the work is done. A work’s construction is realized through calling on a player and seeing where it wants to go in order to explore. Chance of shape and colors’ influence assist in determining the voyage.

JH: I see a figure here that almost looks like a doll. The image of an alligator pops up quite a bit. Is there anything else in your memory bank that you pull from?
MS: Yes. There’s a dog and a hairdo.
JH: What's the hairdo?
MS: It's a way of making a portrait without being literal. That's where there is a crossover with jazz and my work. In traditional jazz, there is a melody for each song and then the band members improvise solos. My characters offer me the function of melody and adjusting their forms and colors is my solo allowing me to create.
When a musician plays “Sweet Lorraine” or “Tiger Rag,” they know which melody to play. But when it’s time for the solo, they are free to forge a new idea based off of a set construct. The improvisation is where the real fun comes in.
JH: Yeah, that's where the surprise happens during those solos perhaps. When do surprises happen in your studio? When you collide these characters together, or put down a color or a gesture in relation to them and something happens that you didn't expect —what type of surprises happen?
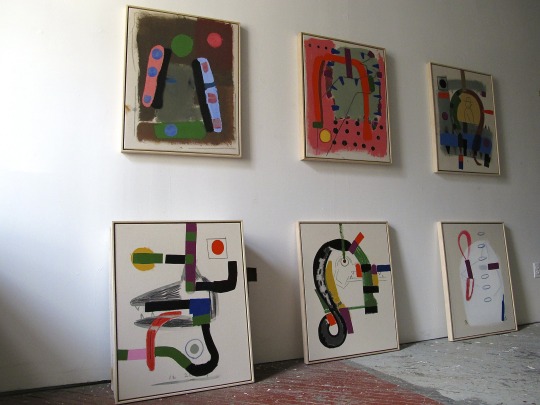
MS: Color definitely plays a big role in surprises. The paper and canvas piece that will be in the show at the Ace New York has gone through many adjustments. By changing the green from blue next to the gray, it starts to push and pull and layers begin to appear. Structures move to the surface and in turn other colors recede based on placement. This creates layers within the piece. Color is a co-author in my work. The importance of the parts that make up the whole of the figures is greatly determined by coloring.
JH: You get a little depth in there. One thing that I've always observed about your work is an extraordinary flatness in how you're applying the paint and you're getting a nice graphic shape often that's opaque. Some of your paint is washed out, but at the same time with some of the tinted canvases and overlapping you really achieve a sense of depth.
MS: Depth is important to me. Each layer, whether it's a work on wood, paper or canvas, is like writing a sentence and those sentences stack on top of one another. Eventually as the sentences build up they create a paragraph. The paintings are paragraphs that are building up to relay a story.
JH: Another consistency in your work as I've known it over the years is a love for drawing. There's a lot of drawing in your painting. I know you have a history with works on paper and making drawings on hand tinted paper. Can you talk about how drawing is important in your studio practice and in your art making?
MS: I often paint through drawing. It’s a method of placing ideas. The ideas then pose questions. Without trying to fully render a figure and utilizing the idea of what something is I define what it becomes.
JH: The stakes are often lower with drawing too. I mean it's historically a preliminary action. I know you don't do sketches for these, but when we think of drawing, we think of small sketches. We think of a preparatory drawing for something larger. When your drawing is part of how you move your arm through the canvas and with a brush with paint on it, I think we carry that low pressure, emotional, psychological space with us. For me, I'll argue that it makes painting more fun, more interesting, more engaging.
MS: Yeah, I do try and keep things fun and then I start working and then I start taking it very seriously. Problem solving becomes important. Using drawing to open things up to see where they can go poses many questions with an infinite number of answers. If I start creating a form that is part of the alligator, for instance, the back of the head, and then all of I sudden decide, okay, it's time to switch into a hairdo or a doll or a dog, I have initiated a story that should be resolved if I want to share it.
Things just open up through drawing, there's no forced intention.

JH: As an exercise, I like to ask myself, if my paintings were to make a to do list, what would be on it. So I want to pose the question to you. If these paintings were to make a to-do list for the viewer, for yourself, what are a few things that would be on that list?
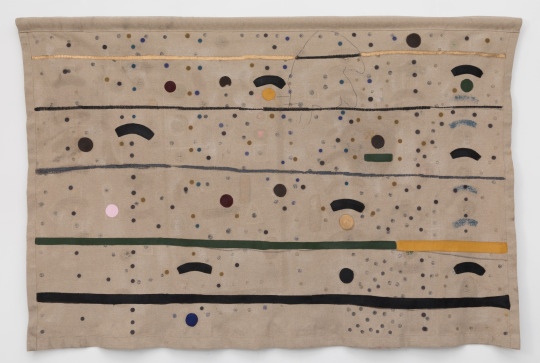
MS: The three paintings that hang in the Ace Hotel in New Orleans for Doc Cheatham, Lionel Ferbos and Percy Humphrey are on hemp. They're curtain paintings in that they're not stretched, but hang freely. The to-do list for the New Orleans paintings was to reflect both personal and musical aspects of each of the three traditional jazz trumpet players through abstraction.
My show at Ace New York this November will include two pieces. In the New York hemp painting, my goal was to successfully combine separate aspects of how I depicted Doc, Lionel and Percy. My intention was simple, revisit three paintings two years later in one new piece.
In the other work, my goal was to fuse my paper and canvas practices and see if I could get them to function uniformly. This piece includes canvas that has gone through a similar patina process as my paper. For this work the to-do list was basically to get the canvas and paper to have a cohesive conversation, to get them to enhance each other simultaneously.
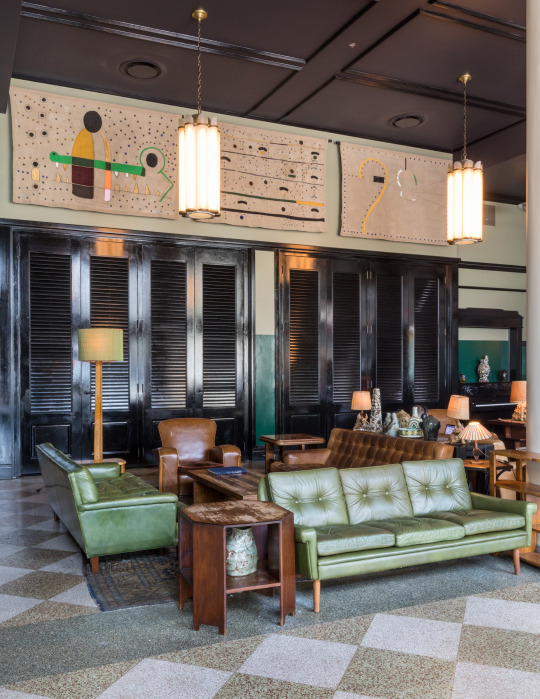
JH: Yeah, it's working. It's a nice little installation. It reminds me of a gift. Maybe this was the wrap for the painting on top of it unfolded. There are all sorts of surprises in there.
MS: I think that paper could actually fold over and hide it.
JH: Yeah, the aspect ratio. It looks like you could wrap it right up. Let's talk about audience. When we're in our studios, there's an audience of one unless you have a friend or visitor over. But when the work leaves the studio, then there's an audience. I'm curious if you feel differently about your work when it's in front of an audience? Is your relationship to it here in your studio different than when these paintings are going to be in the Ace Hotel?
MS: I definitely consider audience. At the same time I don't have control over how they're going to perceive my work. Especially when viewing abstraction, people put their own life experiences into what they see.

JH: Yeah, that's their job.
MS: It is. Deborah Buck, an artist, came over the other day and pointed out that in the smaller canvas piece she sees a person hugging another person. I keep seeing it now because I never noticed that and I've never visualized that idea in my work before. She said it looks like a male figure protecting a child.
To me it's a doll inside of a woman's hairdo. That's one of the amazing things about abstraction, it's not over when the last mark is made. When somebody else starts looking at it it's just beginning for them, and sometimes can actually be a beginning of seeing for me.
JH: Yeah, it's great. I think the audience, when it's in a public space, like you said, brings their own experience and finds their own meaning. It's nice to hear when a viewer shares that meaning with the artist. When you describe Deborah coming in and seeing something that you didn't see, that's a new layer for you and compounds whatever you had going for it on your own. I think that's a great thing. It's a dialogue. That's the dialogue you're looking for with a viewer.
MS: Right. It becomes a type of gift in a way if you allow it to be. When you let someone else take the reins and tell you what you’ve done, and you get to hear their vision. It's nice. It's a way of sharing, it's very personal.
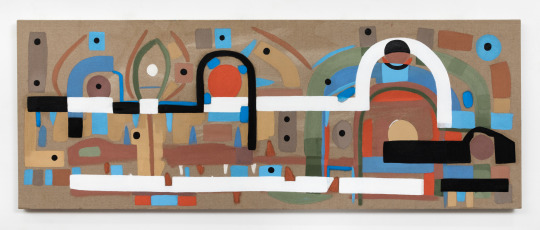
JH: I want to talk a little bit more about the alligator motif that pops up a lot in your work. At first glance when I came in here, looking at this long horizontal painting that's going to be here in New York, I saw architecture, I saw landscape, I saw a street scene, I saw buildings. But then I quickly shed that as soon as I recognized the contours of this alligator head. Am I seeing the same thing?
MS: Yes.
JH: Is this the profile of one of your alligators?
MS: This time it’s the profile of multiple alligators, possibly the same particular one in different incarnations.
JH: It's abstracted, it's not overt, but that sort of elongated alligator. I know you’ve talked about alligators being outside of New Orleans in the swamps. It seems like an important character from your image bank. I imagine it's a fun shape to draw too.
MS: Yeah, that's part of the reason why I use it over and over. It can be a way of loosening up. I remember when I saw a specific alligator in Honey Island Swamp in Louisiana. Its name is Black Jaw. It’s obviously in the present but also you see and feel another time. Certain areas of New Orleans are the same way. It touches on looking and experiencing a different era, a different life, but within this one.
In this particular painting, I started layering alligators and maybe it became not just Black Jaw. Or if it is Black Jaw, it's him being reincarnated a few times and going through a few different swamps rather than just Honey Island.
JH: Right. It's abbreviated too. I mean I think your forms are rounded off and simplified in a way typically. It's not like a rendered alligator head, it's an elongated rectangle with a bulbous end. Then the tell, the show, is usually the teeth, which are triangles throughout.
You're using these geometric shapes to describe this head often. Again, it's going back to the flatness, you're painting in a flat way.
MS: Yes. By simplifying the forms I’m giving color more influence in the work.
JH: The alligator is a starting point, as a form, as a shape, as an idea and you just unfold it from there. It turns into a few other things, sort of holds on to its identity as an alligator. I love that. Is this an alligator too? This one is a front view maybe.
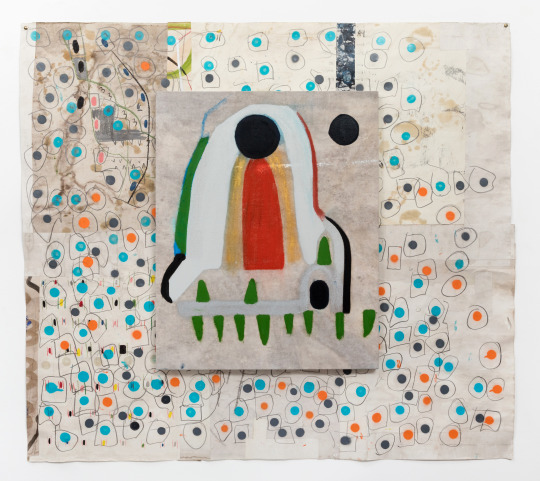
MS: That's a doll with a hairdo above a profiled alligator whose teeth have left its mouth and even become a little hat. The paper behind it is space. There’s a foot behind the canvas drawn on the paper. It’s a hidden self-portrait.

JH: Do you remember the last piece of culture that you experienced? Maybe it was a book you read or a film you saw or an artwork or a piece of music that shook your bones?
MS: Definitely. This past August I was in residency at the Macedonia Institute in upstate New York. That’s where I painted the hemp painting for the Ace New York show. During that time I read Chief of Chiefs: Robert Nathaniel Lee and the Mardi Gras Indians of New Orleans, 1915-2001 by Al Kennedy. Chief Robbe was the first and only person to be named "chief of chiefs" by the Mardi Gras Indian Council. I would read and then paint. I enjoyed the book so much I read it in small increments so it would take longer to finish.
MS: I remember being a kid and seeing Mardi Gras Indians for the first time. I was in the car with my dad. We were leaving the St. Charles Mardi Gras parades driving back through neighborhoods to get home, and then all of a sudden we saw Mardi Gras Indians masking. They resembled human fireworks. It was amazing. Reading Al’s book was inspiring because it’s such a wonderful story of being called to an art form and how tough yet rewarding it is to be dedicated to a practice that you love. Chief Robbe’s story reminded me of how fortunate I am to have grown up in New Orleans and experienced such a unique culture.
#mason salterrelli#joseph hart#abstract art#interview#ace hotel new york#turn gallery#yes#ace new york#new york
2 notes
·
View notes
Photo


Trying Human Chapter 20 Page 764 Walkthrough
The first step in the visual art process for Trying Human, is creating the rough thumbnails for each page. They're super scribbly and I do them in pen. The numbers correspond to lines in my printed script. Sometimes I'll pen in incidental dialogue or filler words that aren't in the original script.
Sketching! This is the longest part of the process and is done entirely in Photoshop with a Wacom Intous Pro Small. The sets are built in SketchUp with stand-ins for the characters so I can gauge their height differences and 'camera' angles. The sets are later painted over near the end of the process. I also layout the text and draw each panel away from the page so they feel like separate snapshots. For some more difficult poses I'll use DesignDoll for reference but everything on this particular page was done without it. There's a lot of that goes into it and I could probably do a whole other walkthrough on just this step.
Inks! Not a lot to say about this other than I do it in MangaStudio EX 4 and port it back into Photoshop. After it's back in Photoshop I color some of the lines to give it more depth.
Flats are next and usually go pretty quickly. I paint bucket in a copy of the line layer with anti-aliased unchecked. Gotta keep those lines SHARP.
Backgrounds are super important for directional lighting and what colors my shadows will be. Luckily I've done a lot of scenes in and around Rose's apartment so this when pretty quickly. More complicated backgrounds can take me up to a day or more.
Shading is probably the third longest step but again, I'm pretty familiar with this location in comic so I could reference earlier pages to speed it along. For this page I used white for the highlight, a murky blue for the shadows, and an orange for the reflected light. This is generally how I shade all of TH (3 colors with shadows and reflected light opposing). I limit soft shading on the characters as I feel it doesn't look as bold in my style. I definitely break this rule for promo art, posters, prints, etc. ;3
EFFECTS. LASER BEAMS AND LENS FLARES. No, mostly just shines and motion lines. Boooring~ Though it's fun to draw Rose fresh out of the shower with little water droplets! <3
127 notes
·
View notes