#docker volume backup
Explore tagged Tumblr posts
Visit Tumblr Blog
Explore Tumblr blogs with no restrictions, modern design and the best experience.
Last Seen Tumblr Blogs


Fun Fact
US Tumblr user growth rate is estimated to slow down to 4.1%.
Text
Backup Docker Volumes with Duplicati and Docker Compose
Backup Docker Volumes with Duplicati and Docker Compose #duplicati #dockervolumebackup #dockerbackup #dockercompose #dockervolumes #dockerpersistentdata #containerbackup #containerbackuptocloud #backupdockertothecloud #virtualizationhowto
Backing up your Docker persistent volumes is a crucial part of disaster recovery for container filesystem resources that exist on your Docker hosts. This guide looks into installing Duplicati with Docker Compose. We will focus on backing up container data and volume data. Table of contentsWhat is Duplicati?Duplicati featuresDuplicati Docker Compose installPreparing the Duplicati Docker…
View On WordPress
0 notes
Text
DogCat - Exploiting LFI and Docker Privilege Escalation -TryHackMe Walkthrough
In this walkthrough, we’ll explore the Dogcat room on TryHackMe, a box that features a Local File Inclusion (LFI) vulnerability and Docker privilege escalation. LFI allows us to read sensitive files from the system and eventually gain access to the server.There are a total of 4 flags in this machine which we need to find. Let’s Dive in! Step 1: Scanning the Target Start by scanning the target…
#Backup Script Exploit#Bash Reverse Shell#Crontab Exploit#Cybersecurity in Docker#Docker Container Security#Docker Exploit Tutorial#docker privilege escalation#Docker Security#Docker Vulnerabilities#Linux Privilege Escalation#Netcat Listener Setup#Reverse Shell Exploit#Shell Injection Attack#Tar Archive Exploit#Volume Mount Vulnerability
1 note
·
View note
Note
Thoughts on storing a bunch of docker-compse files in a git repo for a home-server
It's a good idea, if something shits the bed you at least have your config files. If you want to backup the data as well what I do is bind the volume to somewhere I choose on my drive and just backup the dir... After shutting down the container obviously
8 notes
·
View notes
Text
Staging on a VPS: Safely Preview Changes Before Going Live
🧪 How to Build a Staging Environment Using Your VPS
Safely test changes before going live — the smart way.
If you're running a website, web app, or SaaS project, you know the pain of broken layouts, buggy features, or downtime after updates. That’s where a staging environment comes in — a replica of your live website where you can test everything before going public.
In this guide, you’ll learn how to set up a reliable staging environment using your VPS hosting (ideal if you're hosted with VCCLHOSTING).
🧠 What Is a Staging Environment?
A staging environment is a testing ground — separate from your production (live) server — that simulates the real-world environment of your website or app. You can use it to:
Test design updates, new features, or plugin installs
Preview major code or content changes
Troubleshoot performance and security
Collaborate with your dev or QA team
Avoid downtime or user experience issues
🛠️ Why Use a VPS for Staging?
Using a VPS (Virtual Private Server) gives you:
Root access for full control
Dedicated resources (RAM, CPU)
Ability to isolate staging from live environment
Freedom to run multiple domains/subdomains or even container-based staging setups
💡 Tip: If you're using VCCLHOSTING, you can easily configure multiple environments on a single VPS or request an additional one at discounted rates for dev/testing purposes.
🧰 Tools You’ll Need
A VPS with Linux (Ubuntu/Debian/CentOS)
Web server: Apache or NGINX
PHP, MySQL/MariaDB stack (or your app’s language/runtime)
Optional: Git, Docker, cPanel, or phpMyAdmin
Domain/subdomain for staging (e.g., staging.yoursite.com)
🔧 Steps to Build a Staging Environment
1. Create a Subdomain or Separate Directory
Subdomain method: Set up staging.yourdomain.com in your DNS settings Point it to a new virtual host directory on your VPS
Folder method: Use a separate folder like /var/www/html/staging
✅ If you use cPanel or DirectAdmin (available on VCCLHOSTING), this can be done with a few clicks.
2. Clone Your Production Site
Manually copy your website files (via SFTP, rsync, or Git)
Export your live database and import it to a new one (e.g., staging_db)
Update configuration files:
Database credentials
Site URL paths (e.g., in WordPress: update wp-config.php and wp_options table)
3. Add Security
You don’t want Google indexing your staging site or hackers testing exploits.
Use .htpasswd to password-protect the staging directory
Block indexing via robots.txt
Restrict IP addresses if needed
Use HTTPS (let's Encrypt SSL or clone your live certificate)
4. Use Version Control (Recommended)
Set up Git to manage your staging deployments:
bashCopy
Edit
git clone https://github.com/yourrepo/project.git
This allows your devs to push to staging for testing before merging to live.
5. Test Your Changes in Staging First
Always use staging to:
Apply plugin/theme updates
Run database migrations
Test performance under simulated load
QA user flows, logins, carts, or contact forms
Once everything works in staging, deploy to live using:
Git-based CI/CD
Manual sync
Hosting control panel tools (e.g., Softaculous staging)
🤖 Bonus: Automate Staging with Docker or Containers
If you manage multiple apps, use Docker Compose or Kubernetes to quickly spin up isolated environments on your VPS.
Example with Docker Compose:
yamlCopy
Edit
version: '3' services: app: image: php:8.1-apache volumes: - ./code:/var/www/html ports: - "8081:80"
🛡️ Staging Environments with VCCLHOSTING
With VCCLHOSTING VPS, you get:
Full root access to configure staging as needed
Support for Linux or Windows environments
Optional cPanel/DirectAdmin for GUI-based staging
Local data center in Kolhapur for low-latency testing
Backup & restore tools to sync between live and staging
🧠 Final Thoughts
A staging environment isn’t just for big companies — it’s for anyone who cares about uptime, stability, and professionalism. Whether you're running a SaaS project or an eCommerce store, setting up staging on your VPS saves time, avoids downtime, and helps you launch with confidence.
🚀 Need Help Setting It Up?
Talk to the team at VCCLHOSTING — we’ll help you set up a staging-ready VPS with backup, SSH, and everything pre-configured.
🔗 www.vcclhosting.com 📞 Call us: 9096664246
0 notes
Text
I was thinking about my docker setup and how I don't have a good way to backup my volumes. It led me to a PowerShell script (of course it did).
0 notes
Text
Operational Priorities of Container Orchestration in Docker Swarm: Application Essentials
As the demand for scalable, distributed applications grows, container orchestration platforms like Docker Swarm become critical in managing containerized workloads efficiently. Docker Swarm provides a native clustering and orchestration solution for Docker, offering simplicity, speed, and tight integration with the Docker ecosystem.
In this blog, we'll explore the operational priorities that are essential when managing applications using Docker Swarm. These priorities ensure your containerized services remain reliable, secure, and scalable.
1. Service Availability & High Availability (HA)
High availability is a core objective in any container orchestration strategy.
Docker Swarm Capabilities:
Replicated services ensure that multiple instances (replicas) of a container are running.
Automatic failover re-creates a failed container on another node.
The --replicas flag in service creation allows administrators to define how many instances should be maintained at all times.
Operational Priority: Maintain application uptime even in the event of node failure or container crashes.
2. Scalability and Load Balancing
As workloads grow, it’s essential to scale services efficiently.
Docker Swarm Features:
Use docker service scale to increase or decrease replicas easily.
Built-in load balancing distributes traffic evenly across container instances.
Services are automatically registered and load-balanced across nodes.
Operational Priority: Ensure the system can grow or shrink on demand without downtime or manual intervention.
3. Security and Access Control
Security is critical when orchestrating containers in a distributed environment.
Security in Docker Swarm:
TLS encryption by default for node communication.
Role-based access control using Docker client authentication.
Secret management to securely store sensitive information like API keys and passwords.
Operational Priority: Protect data, communications, and access to resources throughout the cluster.
4. State Management and Desired State Reconciliation
The orchestrator ensures the declared desired state of the application is maintained.
How Swarm Handles It:
If a container or node goes down, Docker Swarm automatically recreates the container to match the desired state.
Swarm continuously monitors and self-heals to restore expected configurations.
Operational Priority: Maintain consistency and self-healing by keeping services aligned with the declared state.
5. Rolling Updates and Rollbacks
Swarm allows seamless updates to services with minimal disruption.
Key Features:
docker service update supports rolling updates with control over update delay and parallelism.
Ability to roll back to a previous version in case of failure.
Operational Priority: Minimize risk during deployments and ensure quick recovery from errors.
6. Resource Optimization and Scheduling
Efficient utilization of CPU and memory resources is vital for performance and cost savings.
Docker Swarm Approach:
Schedulers assign containers to nodes based on resource availability.
Constraints and affinities guide placement of containers (e.g., run only on nodes with SSDs).
Operational Priority: Optimize resource usage and control placement of workloads.
7. Monitoring and Logging
Visibility into operations is necessary for diagnosing issues and maintaining reliability.
Swarm Tooling:
Docker stats and logs provide per-container visibility.
Integration with tools like Prometheus, Grafana, and ELK stack enhances observability.
Operational Priority: Monitor health and performance metrics proactively to prevent downtime.
8. Disaster Recovery and Backup
Planning for the worst is a key part of operations.
Best Practices:
Back up Docker volumes and configurations regularly.
Store secrets and certificates in secure, redundant locations.
Design stateless services where possible for easy recovery.
Operational Priority: Ensure minimal data loss and fast recovery during system failures.
Conclusion
Docker Swarm may not be as feature-rich as Kubernetes, but its simplicity and native Docker integration make it an excellent choice for many production environments. Understanding and prioritizing key operational areas—such as availability, scalability, security, and observability—is essential to successfully managing containerized applications in Swarm.
By aligning your orchestration strategy with these priorities, you can build a robust, reliable, and secure container infrastructure.
For more info, Kindly follow: Hawkstack Technologies
#DockerSwarm #ContainerOrchestration #DevOps #CloudNative #Microservices #DockerEssentials #SwarmCluster #ApplicationDeployment #InfrastructureAutomation
0 notes
Text

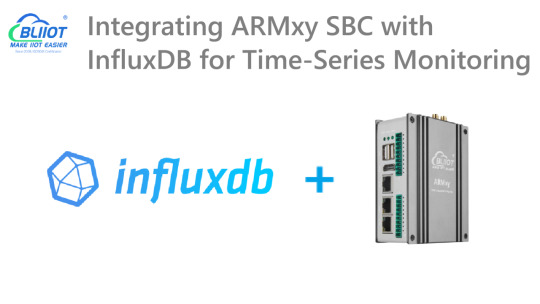
Integrating ARMxy SBC with InfluxDB for Time-Series Monitoring
In the world of Industrial IoT (IIoT), the ability to efficiently monitor, store, and analyze large volumes of time-stamped data is essential. From environmental sensors in smart factories to energy meters in power systems, time-series data forms the backbone of real-time insight and historical analysis.
InfluxDB, an open-source time-series database, is designed specifically for these use cases. Combined with the industrial-grade ARMxy Edge Gateway, it creates a robust edge solution for reliable data acquisition, storage, and visualization—all without depending on cloud availability.
🧠 Why InfluxDB on ARMxy?
InfluxDB is lightweight, high-performance, and optimized for time-series workloads. It supports powerful query languages, retention policies, and integrations with monitoring tools such as Grafana. When deployed directly on an ARMxy (RK3568J/RK3568B2) gateway, it becomes a local data engine with key advantages:
Minimal latency: Store and query data at the edge
Offline reliability: Operate without cloud or internet connection
Flexible integration: Compatible with Modbus, OPC UA, MQTT, and more
🏭 Real-World Use Case Example
Imagine a factory floor with multiple PLCs controlling machinery. Each PLC sends temperature, vibration, and power consumption data every few seconds. Instead of sending that data to a remote server, it can be ingested directly into InfluxDB running on the ARMxy device.
You can then use:
Telegraf for parsing and collecting metrics
Grafana for local visualization dashboards
Node-RED to add logic and alarms
The result? A self-contained edge monitoring system capable of showing trends, detecting anomalies, and buffering data even during connectivity drops.
🔗 Integration Workflow Overview
Install InfluxDB on ARMxy via Docker or native ARM64 package
Connect data sources: Modbus devices, MQTT brokers, etc.
Configure retention policies to manage local storage
Use Grafana (also installable on ARMxy) to build dashboards
(Optional) Forward selected metrics to cloud or central server for backup
✅ Benefits of Edge Time-Series Monitoring
Faster Insights: No need to wait for data to hit the cloud
Bandwidth Optimization: Only send essential data upstream
Improved System Resilience: Data remains accessible during downtime
Security & Compliance: Sensitive data can stay on-premises
🔚 Conclusion
Deploying InfluxDB on ARMxy Edge Gateways transforms traditional data loggers into intelligent local data hubs. With flexible integration options, support for real-time applications, and a compact industrial design, ARMxy with InfluxDB is a perfect fit for smart manufacturing, energy monitoring, and any IIoT scenario that demands fast, local decision-making.
Let the data stay close—and smart.
0 notes
Text
How to Choose the Right Managed IT Service Provider for Your Fintech Company
In today's fast-paced digital world, Fintech companies operate on the backbone of advanced technology, security, and uninterrupted data flows. Choosing the right Managed IT Service Provider (MSP) isn't just a tech decision — it's a strategic one that impacts compliance, scalability, innovation, and customer experience.
If you're looking for MSP Services in Texas or evaluating the best MSP for Fintech Company growth, this detailed guide by Technokraft Serve will help you make an informed, risk-free, and ROI-focused decision.
Why Fintech Companies Need Specialized MSP Services
The Fintech sector handles sensitive financial data, real-time transaction systems, and must comply with stringent regulations like PCI-DSS, GDPR, and SOC 2. Unlike generic IT setups, you need an MSP for Fintech Company that understands the complexity of:
High-volume data processing
24/7 system uptime
Cybersecurity best practices
Compliance reporting
Disaster recovery and backups
Choosing a standard provider just won’t cut it. You need a Managed IT Service Provider with deep industry knowledge.
28 Things to Consider When Choosing an MSP for Fintech Company
To help you thoroughly evaluate your options, here's a comprehensive checklist broken into critical categories:
1. Fintech Industry Expertise
The MSP should have experience serving Fintech clients. Ask for case studies or references. MSP for Fintech Company isn’t just a label — it's about understanding financial technology workflows, payment gateways, KYC systems, and core banking APIs.
Technokraft Serve brings domain-specific experience, offering tailored MSP Services in Texas designed especially for Fintech startups, payment processors, and digital banks.
2. Security-First Approach
Cyberattacks are constantly evolving. A reliable Managed IT Service Provider must offer:
Multi-layered cybersecurity
Endpoint protection
Real-time monitoring
Incident response
Penetration testing
Technokraft Serve’s MSP Services in Texas are built with cybersecurity at the core, ensuring your systems are compliant, protected, and resilient.
3. Compliance Readiness
Your MSP for Fintech Company should help you meet compliance standards effortlessly. Look for providers who offer:
PCI-DSS guidance
GDPR/Data Privacy solutions
Regular compliance audits
Secure logging and documentation
At Technokraft Serve, our compliance-centric Managed IT Service Provider frameworks support ongoing audits and industry-specific certifications.
4. 24/7 Monitoring and Support
Downtime = Lost Money. A true MSP for Fintech Company provides 24/7/365 monitoring and support with proactive alerts, live engineers, and clear escalation paths.
Technokraft Serve ensures guaranteed SLA-based response times under all our MSP Services in Texas, giving you total peace of mind.
5. Scalable Infrastructure & Cloud Expertise
The fintech sector evolves quickly. You need an MSP for Fintech Company that:
Builds scalable cloud environments (AWS, Azure, GCP)
Manages hybrid IT systems
Supports containerization (Docker/Kubernetes)
Enables DevOps and automation
Technokraft Serve is a cloud-first Managed IT Service Provider, enabling fintechs to scale without overhauling their infrastructure.
6. Disaster Recovery & Business Continuity
How fast can you recover from a data breach or system crash? A dependable MSP for Fintech Company must offer:
Daily backups
Geo-redundancy
RTO/RPO-based planning
Regular DR testing
With Technokraft Serve, we design ironclad DR plans under our MSP Services in Texas to minimize downtime and maintain operations no matter what.
7. Customization & Flexibility
Every Fintech firm has unique architecture. A reliable Managed IT Service Provider must offer flexible support options like:
Per device/per user pricing
Tiered service models
On-demand project support
Modular security or DevOps layers
Technokraft Serve doesn’t believe in one-size-fits-all. Our MSP solutions are fully customizable based on your stage, size, and future roadmap.
8. Transparent Pricing Models
Surprise IT bills are the last thing you need. Choose an MSP for Fintech Company that offers clear, transparent pricing and documented deliverables.
We at Technokraft Serve pride ourselves on upfront pricing with detailed SLAs for our MSP Services in Texas, with no hidden costs or technical ambiguity.
9. Technology Partnerships
An ideal Managed IT Service Provider should be a certified partner with industry leaders like:
Microsoft
Google Cloud
Cisco
Fortinet
VMware
Technokraft Serve brings strong partnerships and certified engineers, ensuring that your tech stack is optimized and future-ready.
10. Proven Track Record & Reviews
Before you sign, ask the MSP for:
Success metrics
Testimonials
Uptime statistics
Client retention rate
With 150+ clients and 97% retention, Technokraft Serve stands out as a top-tier MSP for Fintech Company across Texas and beyond.
Benefits of Choosing Technokraft Serve as Your Managed IT Service Provider
Let’s break down how Technokraft Serve can specifically support your Fintech growth:
End-to-End MSP Services in Texas including infrastructure, security, support, and compliance.
Fast Onboarding to minimize disruption.
AI-Powered Monitoring for real-time threat detection.
DevOps & Automation Tools for faster app deployments.
User Management + Remote Access Solutions tailored to hybrid teams.
Monthly Reporting with clear KPIs and insights.
With Technokraft Serve, you're not just hiring an IT vendor — you're partnering with a strategic growth enabler.
Red Flags to Watch Out For in an MSP for Fintech Company
Even with dozens of providers available, not all are built for the rigor of Fintech. Avoid MSPs that:
Offer generic packages with no fintech-specific planning
Lack cybersecurity or compliance expertise
Don’t provide round-the-clock support
Can’t scale with your business
Don’t have client reviews or industry recognition
Technokraft Serve solves all these problems with proven, agile, and secure MSP Services in Texas designed to support growth, security, and innovation.
Conclusion: Partner with the Right MSP for Fintech Company Growth
Choosing the right Managed IT Service Provider isn’t just about fixing tech issues — it’s about aligning your Fintech company with a partner who understands scale, compliance, and the urgency of innovation.
Whether you’re a startup launching your first product or a growing fintech firm expanding across markets, your MSP should be your growth catalyst.
With Technokraft Serve, you're backed by a team that delivers enterprise-grade MSP Services in Texas, engineered specifically for Fintech scalability, security, and performance.
0 notes
Text
Assess Application and Cluster Readiness
Review Application Dependencies:
Analyze libraries, JDK versions, frameworks (e.g., Spring Boot, Jakarta EE), and external services (databases, APIs).
Identify any Kubernetes-specific configurations (e.g., ConfigMaps, Secrets, environment variables).
Containerization:
Ensure your Java app is containerized using tools like Docker.
Update the Dockerfile if necessary (e.g., for JDK/JRE updates or changes in base image).
2. Prepare Kubernetes Environment
Target Cluster Validation:
Ensure the target Kubernetes cluster is set up and ready.
Check for compatibility with the current cluster’s API version and resources.
Namespace Setup:
Create equivalent namespaces, RBAC roles, and policies in the target cluster.
Storage:
Verify Persistent Volume Claims (PVCs) and ensure similar storage classes are available.
3. Backup and Export Resources
Kubernetes Resources:
Export all application-related resources using kubectl:bashCopy codekubectl get all -n <namespace> -o yaml > resources.yaml
Persistent Data:
Back up database data or persistent volumes using tools like Velero or rsync.
4. Migrate Application Configurations
ConfigMaps and Secrets:
Export existing configurations:bashCopy codekubectl get configmap -n <namespace> -o yaml > configmap.yaml kubectl get secret -n <namespace> -o yaml > secret.yaml
Reapply them in the new cluster:bashCopy codekubectl apply -f configmap.yaml kubectl apply -f secret.yaml
5. Deploy to Target Cluster
Deploy Application:
Use Helm charts, Kubernetes manifests, or CI/CD pipelines to deploy the Java application to the new cluster.
Update the kubeconfig for the target cluster:bashCopy codekubectl config use-context <target-cluster-context> kubectl apply -f resources.yaml
Persistent Volumes:
Ensure data is restored to the persistent volumes if needed.
6. Test the Migration
Validation:
Ensure the application is running as expected (pods, services, and networking).
Run integration and regression tests.
Connectivity:
Validate external service integrations (e.g., databases, APIs).
Check ingress configurations for public access.
7. Cutover and Cleanup
Switch Traffic:
Update DNS or external load balancer to direct traffic to the new cluster.
Monitor:
Use tools like Prometheus, Grafana, or ELK Stack to monitor application health.
Clean Up Old Environment:
After verifying stability, clean up resources in the old cluster.
Tools to Assist in Migration
Velero: For backup and restore of Kubernetes resources and persistent volumes.
Helm: To manage application deployments and upgrades.
Kubernetes Dashboard: For real-time cluster monitoring.
Kubectl Plugins: To enhance CLI functionality.
If you provide more details about the migration (e.g., specific cloud providers or Kubernetes environments), I can offer more tailored advice!
4o
You said:
Migration of 5000 files per hr fix
ChatGPT said:
ChatGPT
If you're migrating a large number of files (e.g., 5000 files per hour) and encountering performance bottlenecks, you can improve the speed and reliability of your file migration by addressing several key areas. Here's a step-by-step guide to optimize file transfer:
1. Identify and Analyze Bottlenecks
File System Bottlenecks:
Check the source and destination disk I/O performance.
Ensure the files are not locked or being used during migration.
Network Bandwidth:
Measure your available network bandwidth using tools like iperf and ensure it can handle the expected load.
File Metadata Overhead:
Small files can add significant overhead due to metadata operations (e.g., file creation, permissions).
2. Optimize Transfer Mechanisms
Use Parallel Processing:
Transfer multiple files concurrently using multithreaded or parallel tools like:
rsync with --max-size and --parallel options.
GNU Parallel for concurrent file transfers.
bashCopy codefind /source/directory -type f | parallel -j8 rsync -a {} /destination/directory
Use a custom script or a library like Python's concurrent.futures for more control.
Batch File Transfers:
Group files into batches (e.g., tar archives) to reduce the overhead of transferring many small files individually.bashCopy codetar -cvf files.tar /source/files && rsync files.tar /destination Extract the files on the destination:bashCopy codetar -xvf files.tar
3. Ensure Network Optimization
Compression:
Compress files during transfer to reduce data volume:bashCopy codersync -az /source/directory /destination/directory
Increase TCP Window Size:
Tweak TCP settings for large transfers using tools like scp or rsync with buffer options:bashCopy codersync --bwlimit=0 --whole-file /source /destination
Use Faster Protocols:
Use optimized file transfer protocols like Rclone, Aspera, or SFTP for high-speed transfer.
4. Improve Source and Destination Performance
Disk Performance:
Optimize disk reads and writes using SSDs for temporary storage or caches.
Ensure the file system supports efficient file handling (e.g., ext4, XFS).
File System Tuning:
For very large numbers of files, tune parameters like inode_cache to handle metadata efficiently.
5. Error Handling and Retry Logic
Retry Failed Transfers:
Use tools like rsync to retry failed files automatically:bashCopy codersync -avz --partial --progress /source /destination
Logging and Monitoring:
Log all transferred files and
4o
You said:
File trsnsfer to s3 improve
ChatGPT said:
ChatGPT
Improving file transfer to Amazon S3 requires addressing both performance and reliability. Below are strategies and tools to optimize large-scale or high-volume file transfers:
1. Use AWS-Specific Tools
AWS CLI with Parallelism:
Use the --multipart-chunk-size-mb and --parallel flags to upload files in parallel and in chunks:bashCopy codeaws s3 cp /local/path s3://your-bucket-name --recursive --storage-class STANDARD_IA --region <region>
Enable parallel transfers: Update your AWS CLI configuration file (~/.aws/config) to increase concurrency:plaintextCopy code[default] s3 = max_concurrent_requests = 10 max_queue_size = 1000 multipart_threshold = 64MB multipart_chunksize = 64MB
AWS DataSync:
Use AWS DataSync for automated, high-performance, large-scale transfers with minimal manual intervention. DataSync can also manage retry and error handling.
2. Optimize S3 Uploads
Multipart Upload:
Use multipart uploads for files larger than 100 MB to improve transfer speed and reliability.
Example using AWS CLI:bashCopy codeaws s3api create-multipart-upload --bucket your-bucket-name --key file_key
Automate multipart uploads with the AWS SDK or tools like boto3 for Python.
Use the Correct Storage Class:
Choose the appropriate storage class to save costs and improve upload speeds:
STANDARD (default): High performance for frequently accessed data.
INTELLIGENT_TIERING: Automatically optimizes storage costs for infrequently accessed files.
3. Improve Network Performance
Enable Transfer Acceleration:
Use S3 Transfer Acceleration for faster uploads over long distances by leveraging AWS edge locations:bashCopy codeaws s3 cp /local/path s3://your-bucket-name --region <region> --endpoint-url https://<bucket-name>.s3-accelerate.amazonaws.com
Compression:
Compress files before transferring to reduce data size:bashCopy codetar -czvf archive.tar.gz /local/path && aws s3 cp archive.tar.gz s3://your-bucket-name
Optimize Network:
Use AWS Direct Connect or a high-bandwidth internet connection for large-scale transfers.
Monitor latency and bandwidth with tools like iperf.
4. Automate and Parallelize Transfers
Rclone:
Use rclone for high-speed S3-compatible transfers with parallelism and retry capabilities:bashCopy coderclone copy /local/path s3:your-bucket-name --transfers 16 --s3-upload-concurrency 16
GNU Parallel:
Transfer files concurrently by splitting file lists:bashCopy codefind /local/path -type f | parallel -j10 aws s3 cp {} s3://your-bucket-name
5. Error Handling and Retry
Retry Mechanisms:
Use tools or scripts that automatically retry failed uploads.
AWS CLI has built-in retry logic; increase retries if necessary:bashCopy codeaws s3 cp --cli-read-timeout 600 --cli-connect-timeout 600 /local/path s3://your-bucket-name
Chunked Retry:
Break large transfers into smaller, manageable chunks and retry failed chunks only.
6. Monitor and Optimize Transfers
AWS CloudWatch Metrics:
Monitor transfer performance and error rates in real-time.
S3 Inventory:
Use S3 inventory reports to validate uploaded files.
AWS SDKs or Custom Scripts:
Build custom monitoring and retry logic with SDKs like boto3 (Python).
Example Optimized Upload Command
bash
Copy code
aws s3 cp /local/path s3://your-bucket-name --recursive --storage-class STANDARD --region us-east-1 --cli-read-timeout 600 --cli-connect-timeout 600
When to Use Snowball or Snowmobile
For extremely large datasets (terabytes or petabytes), use AWS Snowball or AWS Snowmobile for offline data transfer to S3.
These steps can dramatically improve the efficiency and reliability of your file transfer process to S3. Let me know if you need help implementing any of these!
4o
You said:
Improve fole transfers
ChatGPT said:
ChatGPT
Improving file transfer performance and reliability, whether between servers, local systems, or to cloud storage like Amazon S3, involves a combination of strategies. Here are some best practices for improving file transfers:
1. Optimize the File Transfer Process
Parallelize Transfers
Transfer multiple files concurrently to improve throughput:
Use tools like rsync, scp, or cloud-specific SDKs with multi-threading capabilities.
Example with rsync:bashCopy codersync -azP --info=progress2 --max-size=100M --exclude="*.tmp" /source/ /destination/
Batch Small Files
Small files cause metadata overhead during transfer. Bundle them into archives:bashCopy codetar -czvf archive.tar.gz /source/ Transfer the archive, then extract on the destination:bashCopy codetar -xzvf archive.tar.gz
2. Use High-Performance Transfer Tools
Rclone
Ideal for cloud storage and large-scale transfers with parallelism:bashCopy coderclone copy /source/ remote:bucket-name --transfers=16 --checkers=8
GNU Parallel
Parallelize file uploads/downloads:bashCopy codefind /source/ -type f | parallel -j8 scp {} user@destination:/target/
Multithreaded Tools
Use tools with built-in multithreading, such as bbcp, Aspera, or scp (with parallel scripts).
3. Network Optimization
Compression
Compress files before transfer to reduce the amount of data transmitted:bashCopy codegzip largefile.txt Or combine with the transfer:bashCopy codetar czf - /source/ | ssh user@destination "tar xzf - -C /target/"
Bandwidth Management
Limit bandwidth usage to prevent throttling:
With rsync:bashCopy codersync --bwlimit=1000 -az /source/ /destination/
Use TCP tuning options to optimize network transfer rates:bashCopy codesysctl -w net.ipv4.tcp_window_scaling=1
Use Faster Protocols
Use optimized transfer protocols:
SFTP: Secure but slower for high-volume transfers.
Rsync/SSH: Efficient for incremental and large transfers.
Aspera: High-speed UDP-based protocol.
Enable Transfer Acceleration (Cloud)
For Amazon S3:bashCopy codeaws s3 cp /source/ s3://your-bucket/ --region <region> --endpoint-url https://<bucket-name>.s3-accelerate.amazonaws.com
4. Error Handling and Resilience
Resume Transfers
Use tools that support resuming failed transfers:
Rsync:bashCopy codersync -az --partial /source/ /destination/
AWS CLI:bashCopy codeaws s3 cp --continue /source/ s3://bucket-name/
Retry Logic
Implement retry logic for failed transfers using scripts or tools.
Example using bash:bashCopy codefor i in {1..5}; do scp file user@destination:/target/ && break || sleep 5 done
5. Monitor and Analyze Performance
Real-Time Monitoring
Monitor progress with tools:
Rsync: --progress flag.
SCP: Wrap in pv for progress visualization:bashCopy codetar cf - /source/ | pv | ssh user@destination "tar xf - -C /target/"
Analyze Bottlenecks
Use tools like iperf or nload to check network performance.
Use iotop or dstat to monitor disk I/O on both source and destination.
6. Scale with Advanced Solutions
Distributed File Transfer
Use tools like Globus for efficient distributed data transfers.
Data Transfer Appliances
For extremely large datasets, consider appliances like AWS Snowball or offline methods to ship data physically.
Content Delivery Networks (CDNs)
Use CDNs for faster file distribution to end users.
By combining these strategies—parallelism, compression, protocol optimization, and monitoring—you can significantly enhance file transfer speed and reliability. Let me know if you'd like further customization for a specific use case!
4o
You said:
Threadpool
ChatGPT said:
ChatGPT
A thread pool is a collection of pre-initialized worker threads that stand ready to perform tasks. Instead of creating and destroying threads for each task, a thread pool manages a set of reusable threads, improving performance and resource utilization in multi-threaded applications.
Here’s how to effectively use and optimize thread pools in your application.
Why Use a Thread Pool?
Performance: Reduces the overhead of creating and destroying threads repeatedly.
Resource Management: Controls the number of concurrent threads, preventing system overload.
Scalability: Allows a controlled environment for task execution, making it easier to scale applications.
Key Concepts of Thread Pools
Core Threads: Minimum number of threads that are always kept alive.
**Max Threads
4o
You said:
Improve java spring file transfer
ChatGPT said:
ChatGPT
Improving file transfer in a Java Spring application involves optimizing both the code and the underlying infrastructure. Below are strategies to enhance file transfer performance and reliability.
1. Optimize File Transfer Code
Use Streaming for Large Files
Avoid loading the entire file into memory; instead, use streaming:javaCopy code@PostMapping("/upload") public ResponseEntity<String> uploadFile(@RequestParam("file") MultipartFile file) throws IOException { try (InputStream inputStream = file.getInputStream()) { // Process the input stream directly // Example: Save the file Files.copy(inputStream, Paths.get("target-directory/" + file.getOriginalFilename()), StandardCopyOption.REPLACE_EXISTING); } return ResponseEntity.ok("File uploaded successfully!"); }
Enable Asynchronous File Transfers
Use Spring's @Async annotation for non-blocking file uploads/downloads:javaCopy code@Async public CompletableFuture<String> uploadFileAsync(MultipartFile file) { // File processing logic return CompletableFuture.completedFuture("Upload Complete"); }
Use Chunked Uploads for Large Files
Break large files into smaller chunks for efficient transfer and to handle interruptions gracefully:javaCopy code@PostMapping("/uploadChunk") public ResponseEntity<String> uploadChunk(@RequestParam("chunk") MultipartFile chunk, @RequestParam("fileId") String fileId) { // Append chunk data to the file return ResponseEntity.ok("Chunk uploaded successfully!"); }
2. Optimize for Cloud Storage (e.g., AWS S3, Azure Blob)
Use SDKs for Direct Uploads
Use cloud-specific SDKs (e.g., AWS SDK for S3) to upload files directly to cloud storage instead of saving locally first:javaCopy code@PostMapping("/uploadToS3") public ResponseEntity<String> uploadToS3(@RequestParam("file") MultipartFile file) throws IOException { AmazonS3 s3Client = AmazonS3ClientBuilder.defaultClient(); String bucketName = "your-bucket-name"; s3Client.putObject(bucketName, file.getOriginalFilename(), file.getInputStream(), new ObjectMetadata()); return ResponseEntity.ok("File uploaded to S3!"); }
Enable S3 Transfer Acceleration
Use Transfer Acceleration for faster uploads to Amazon S3:javaCopy codeAmazonS3 s3Client = AmazonS3ClientBuilder.standard() .withAccelerateModeEnabled(true) .build();
3. Optimize File Transfer in REST APIs
Enable Compression
Compress file responses to reduce data size:yamlCopy codespring: servlet: multipart: enabled: true max-file-size: 50MB max-request-size: 50MB gzip: enabled: true min-size: 1024
Use HTTP/2
Switch to HTTP/2 for better concurrency and reduced latency:yamlCopy codeserver: http2: enabled: true
Resume Interrupted Uploads
Use ETag or file metadata to allow resumable file uploads:javaCopy code@PostMapping("/resumeUpload") public ResponseEntity<String> resumeUpload(@RequestParam("file") MultipartFile file, @RequestParam("offset") Long offset) { // Resume logic based on offset return ResponseEntity.ok("Upload resumed!"); }
4. Parallelize File Transfers
Multithreaded File Upload
Use a ThreadPoolExecutor or Spring's TaskExecutor:Copy code
In addition to using @Async, there are other strategies and tools to improve file transfer performance and reliability in a Java Spring application. Here are some approaches:
1. Reactive Programming with Spring WebFlux
For truly non-blocking and asynchronous file transfers, use Spring WebFlux:
Streaming File Upload:javaCopy code@PostMapping(value = "/upload", consumes = MediaType.MULTIPART_FORM_DATA_VALUE) public Mono<Void> uploadFile(Flux<FilePart> filePartFlux) { return filePartFlux.flatMap(filePart -> { Path path = Paths.get("target-directory/" + filePart.filename()); return filePart.transferTo(path); }).then(); }
Streaming File Download:javaCopy code@GetMapping(value = "/download", produces = MediaType.APPLICATION_OCTET_STREAM_VALUE) public Mono<ResponseEntity<Resource>> downloadFile() { Path path = Paths.get("target-directory/large-file.txt"); return Mono.just(ResponseEntity.ok() .header(HttpHeaders.CONTENT_DISPOSITION, "attachment; filename=large-file.txt") .body(new FileSystemResource(path))); }
2. Use CompletableFuture and ExecutorService
Combine CompletableFuture with a custom ExecutorService for better control:javaCopy code@PostMapping("/upload") public CompletableFuture<String> uploadFile(@RequestParam("file") MultipartFile file) { ExecutorService executor = Executors.newFixedThreadPool(4); return CompletableFuture.supplyAsync(() -> { try { // File processing logic Files.copy(file.getInputStream(), Paths.get("target/" + file.getOriginalFilename()), StandardCopyOption.REPLACE_EXISTING); return "File uploaded successfully!"; } catch (IOException e) { throw new RuntimeException("File upload failed!", e); } }, executor); }
3. Apache Kafka for Asynchronous Processing
Use Apache Kafka to decouple file upload from processing:
Producer sends file metadata to Kafka after upload:javaCopy code@PostMapping("/upload") public ResponseEntity<String> uploadFile(@RequestParam("file") MultipartFile file) throws IOException { // Save the file Files.copy(file.getInputStream(), Paths.get("target/" + file.getOriginalFilename())); // Send metadata to Kafka kafkaTemplate.send("file-topic", file.getOriginalFilename()); return ResponseEntity.ok("File uploaded and queued for processing!"); }
Consumer processes files asynchronously:javaCopy code@KafkaListener(topics = "file-topic", groupId = "file-group") public void processFile(String fileName) { // Process the file Path path = Paths.get("target/" + fileName); System.out.println("Processing file: " + path); }
4. Chunked File Transfers
Handle large files by uploading them in chunks:
Frontend sends file chunks with an identifier.
Backend reconstructs the file:javaCopy code@PostMapping("/uploadChunk") public ResponseEntity<String> uploadChunk(@RequestParam("chunk") MultipartFile chunk, @RequestParam("fileId") String fileId, @RequestParam("chunkNumber") int chunkNumber) { Path path = Paths.get("target/" + fileId + "_" + chunkNumber); try { Files.copy(chunk.getInputStream(), path, StandardCopyOption.REPLACE_EXISTING); } catch (IOException e) { return ResponseEntity.status(HttpStatus.INTERNAL_SERVER_ERROR).body("Failed to upload chunk"); } return ResponseEntity.ok("Chunk uploaded successfully!"); }
Reassemble chunks when all are uploaded.
5. WebSockets for Real-Time Progress
Use WebSockets to provide real-time feedback on file transfer progress:javaCopy code@Controller public class WebSocketController { @MessageMapping("/uploadStatus") @SendTo("/topic/progress") public String sendProgress(String status) { return status; } }
Send progress updates from the server while uploading:javaCopy codesimpMessagingTemplate.convertAndSend("/topic/progress", "50% completed");
6. Redis or Database Queues
Use a Redis queue or a database to handle file metadata asynchronously.
Enqueue metadata after upload:javaCopy coderedisTemplate.opsForList().leftPush("fileQueue", fileMetadata);
Process the queue in the background:javaCopy codeString metadata = redisTemplate.opsForList().rightPop("fileQueue");
7. Use MultipartConfig for Large Files
Configure multipart file handling for large files in application.properties:propertiesCopy codespring.servlet.multipart.max-file-size=1GB spring.servlet.multipart.max-request-size=2GB
Custom bean for fine-tuning:javaCopy code@Bean public MultipartConfigElement multipartConfigElement() { MultipartConfigFactory factory = new MultipartConfigFactory(); factory.setMaxFileSize("1GB"); factory.setMaxRequestSize("2GB"); return factory.createMultipartConfig(); }
8. Use AWS S3 for Direct Uploads
Use pre-signed URLs to offload upload work to the client:javaCopy code@GetMapping("/generatePresignedUrl") public ResponseEntity<String> generatePresignedUrl(@RequestParam String fileName) { AmazonS3 s3Client = AmazonS3ClientBuilder.defaultClient(); GeneratePresignedUrlRequest generatePresignedUrlRequest = new GeneratePresignedUrlRequest("bucket-name", fileName) .withMethod(HttpMethod.PUT) .withExpiration(new Date(System.currentTimeMillis() + 3600 * 1000)); URL url = s3Client.generatePresignedUrl(generatePresignedUrlRequest); return ResponseEntity.ok(url.toString()); }
The client uploads directly to S3 using the URL.
9. Optimize File Transfer for High Performance
Compression
Compress files before upload to reduce transfer size:javaCopy codebyte[] compressedData = compress(file.getBytes()); Files.write(Paths.get("compressed-file.gz"), compressedData);
Load Balancing
Use a load balancer (e.g., AWS ALB or NGINX) for scalable upload endpoints.
Retry Logic
Implement retries for failed transfers to improve reliability:javaCopy codeint maxRetries = 3; while (retries < maxRetries) { try { // Attempt file upload break; } catch (IOException e) { retries++; if (retries == maxRetries) { throw e; } } }
These strategies can enhance file transfer performance, scalability, and reliability in Java Spring applications. Let me know if you need code examples for specific use cases!
4o
You said:
S3 relaibility
ChatGPT said:
ChatGPT
Ensuring reliability when transferring files to Amazon S3 involves minimizing failures, handling errors effectively, and ensuring data integrity. Below are best practices and techniques to achieve reliable file transfers to S3:
1. Use Multipart Upload for Large Files
Multipart uploads split large files into smaller parts, upload them in parallel, and reassemble them in S3. This improves reliability and speeds up transfers.
Example Using AWS SDK (Java)
java
Copy code
AmazonS3 s3Client = AmazonS3ClientBuilder.defaultClient(); String bucketName = "your-bucket-name"; String fileName = "large-file.zip"; String keyName = "uploads/" + fileName; File file = new File(fileName); TransferManager tm = TransferManagerBuilder.standard().withS3Client(s3Client).build(); Upload upload = tm.upload(bucketName, keyName, file); try { upload.waitForCompletion(); System.out.println("File uploaded successfully!"); } catch (AmazonClientException e) { System.err.println("Upload failed: " + e.getMessage()); }
2. Use Retry Logic
Add retry mechanisms to handle intermittent network issues or service interruptions.
AWS SDK Retry Settings
The AWS SDK retries failed requests automatically, but you can customize it:
java
Copy code
ClientConfiguration config = new ClientConfiguration(); config.setRetryPolicy(PredefinedRetryPolicies.getDefaultRetryPolicyWithCustomMaxRetries(5)); AmazonS3 s3Client = AmazonS3ClientBuilder.standard() .withClientConfiguration(config) .build();
3. Enable Transfer Acceleration
Transfer Acceleration uses AWS edge locations to improve upload speeds over long distances.
Enable Transfer Acceleration in S3
Enable it in the S3 bucket settings.
Update your client code to use the accelerated endpoint:
java
Copy code
AmazonS3 s3Client = AmazonS3ClientBuilder.standard() .withAccelerateModeEnabled(true) .build();
4. Validate Data Integrity
Use MD5 checksums to ensure the uploaded file matches the original file.
AWS CLI Example
bash
Copy code
aws s3 cp file.txt s3://your-bucket/ --content-md5 <calculated-md5>
Java Example
java
Copy code
String md5 = Base64.getEncoder().encodeToString(DigestUtils.md5(new FileInputStream(file))); ObjectMetadata metadata = new ObjectMetadata(); metadata.setContentMD5(md5); PutObjectRequest request = new PutObjectRequest(bucketName, keyName, new FileInputStream(file), metadata); s3Client.putObject(request);
5. Monitor File Transfers
Use CloudWatch Metrics to monitor S3 request success, failures, and latencies.
Monitor transfer progress with TransferManager in the AWS SDK:
java
Copy code
TransferManager tm = TransferManagerBuilder.standard().withS3Client(s3Client).build(); Upload upload = tm.upload(bucketName, keyName, file); upload.addProgressListener(progressEvent -> { System.out.println("Transferred bytes: " + progressEvent.getBytesTransferred()); }); upload.waitForCompletion();
6. Handle Failures Gracefully
Use Resumable Transfers for interrupted uploads with TransferManager:
java
Copy code
TransferManager tm = TransferManagerBuilder.standard().build(); Upload upload = tm.upload(bucketName, keyName, file); // Add a progress listener upload.addProgressListener((ProgressListener) progressEvent -> { System.out.println("Transferred: " + progressEvent.getBytesTransferred()); }); // Graceful failure handling try { upload.waitForCompletion(); } catch (AmazonClientException e) { System.err.println("Error occurred: " + e.getMessage()); }
7. Use Pre-Signed URLs
Generate pre-signed URLs for reliable, time-limited uploads directly from the client, reducing the load on your server.
Generate Pre-Signed URL
java
Copy code
GeneratePresignedUrlRequest generatePresignedUrlRequest = new GeneratePresignedUrlRequest(bucketName, keyName) .withMethod(HttpMethod.PUT) .withExpiration(new Date(System.currentTimeMillis() + 3600 * 1000)); URL url = s3Client.generatePresignedUrl(generatePresignedUrlRequest); System.out.println("Pre-Signed URL: " + url);
8. Use S3 Event Notifications
Configure S3 Event Notifications to trigger AWS Lambda or SNS for post-upload validation, processing, or alerting on failures.
Example: Notification for Upload Completion
Configure your S3 bucket to send an event to an SQS queue or Lambda function upon successful upload.
9. Leverage Data Replication
Use S3 Cross-Region Replication (CRR) or Same-Region Replication (SRR) for redundancy.
Automatically replicate files to another bucket for disaster recovery.
10. Automate with AWS DataSync
Use AWS DataSync for automated and highly reliable file transfers between on-premises storage and S3. It includes built-in retry and integrity checks.
11. Optimize Network Performance
Compress files before uploading:javaCopy codeFiles.write(Paths.get("compressed-file.gz"), gzipCompress(fileContent));
Use efficient transfer protocols (e.g., HTTP/2 if supported by your client).
12. Secure Transfers
Always use HTTPS for secure communication.
Use S3 Bucket Policies and IAM Roles to restrict access to authorized users.
Example: Complete Reliable Upload Function
java
Copy code
public void reliableUpload(File file, String bucketName, String keyName) { AmazonS3 s3Client = AmazonS3ClientBuilder.defaultClient(); TransferManager tm = TransferManagerBuilder.standard().withS3Client(s3Client).build(); try { // Multipart upload Upload upload = tm.upload(bucketName, keyName, file); upload.addProgressListener((ProgressListener) progressEvent -> { System.out.println("Transferred bytes: " + progressEvent.getBytesTransferred()); }); upload.waitForCompletion(); System.out.println("File uploaded successfully!"); } catch (AmazonClientException e) { System.err.println("Upload failed: " + e.getMessage()); } finally { tm.shutdownNow(); } }
0 notes
Text
What Is AWS Lambda? & Advantages Of Lambda, Its Use Cases

What is AWS Lambda
Execute code without the need to manage runtimes, create workload-aware cluster scaling logic, provision or manage servers, or maintain event integrations.
Execute code for almost any kind of backend service or application. Simply upload your code as a container image or ZIP file, and Lambda will automatically distribute compute execution power and execute your code for any volume of traffic based on incoming requests or events.
Create Lambda functions in your preferred language (Node.js, Python, Go, Java, and more) then create, test, and deploy them using serverless and container tools like AWS SAM or Docker CLI.
Why Lambda on AWS?
The quickest method to transform an idea into a contemporary, production serverless application is with AWS Lambda, a compute service that automatically maintains the computing resources and executes your code in response to events.
Use Cases
Web Applications
Developers can create robust web applications that automatically scale up and down and operate in a highly available configuration across multiple data centers by integrating AWS Lambda with other AWS services. This eliminates the need for administrative work related to scalability, backups, or multi-data center redundancy.
Learning Machines
Before supplying data to your machine learning model, you can preprocess it using AWS Lambda. You may also serve your model for prediction at scale with Lambda access to EFS, eliminating the need to provision or maintain any infrastructure.
Processing Data
Run code in reaction to triggers, such as user activities, system status changes, or data changes. Lambda may connect to pre-existing EFS file systems or integrate with workflows using AWS Step Functions. It can be activated by AWS services like S3, DynamoDB, Kinesis, or SNS. This enables you to construct a range of serverless real-time data processing systems.
Advantages of Lambda
Server management is not necessary
Execute code without managing or allocating resources. Just create the code and upload it as a container image or.zip file.
Scaling automatically
Regardless of the scale from a dozen events per day to hundreds of thousands per secondautomatically react to requests for code execution.
Pay-per-use pricing
Instead of allocating infrastructure in advance for peak capacity, save money by just paying for the milliseconds of compute time that you really utilize.
Optimization of performance
Use the appropriate function memory size to maximize code execution time and performance. With Provisioned Concurrency, you can react to strong demand in double-digit milliseconds.
Features of AWS Lambda
AWS Lambda executes code in response to events to manage compute resources. Discover how AWS’s comprehensive infrastructure offerings and capabilities enable fast, affordable application development.
Other features of AWS Lambda include the following:
Multiple language support
Back-end code can be executed in Node.js, Python, Java, Kotlin, and C#.
Pictures of containers
To deploy heavier workloads or utilize pre-existing container tooling, you can make a container image for a Lambda function.
You can use instrumentation tools such as AWS X-Ray and Gatling to track the performance of your Lambda function. Additionally, you can leverage third-party log management solutions like CloudWatch to measure concurrency, performance, and invocation.
Serverless compute service on AWS Lambda
Serverless compute service AWS Lambda lets developers run code without server management:
Event-driven: When a user adds an item to their shopping cart, for example, Lambda executes code in reaction to that event.
Pay as you go: When your code is not executing, there is no fee; you just pay for the compute time you utilize.
Automatic administration: Lambda takes care of the computer resources your code needs on its own.
High availability: Your code is scaled with high availability via Lambda.
Integration: You can call your code directly from a web or mobile application, or you can configure it to run automatically from other AWS services.
Security: Lambda guards against unwanted access to client data.
FAQs
Q: What kind of code can run on AWS Lambda?
AWS Lambda provides a simple method for completing a variety of cloud-based tasks. For instance, AWS Lambda can be used to create mobile back-ends that retrieve and modify data from Amazon DynamoDB, handlers that compress or modify objects as they are uploaded to Amazon S3, auditing and reporting of API calls to any Amazon Web Service, and Amazon Kinesis for server-less streaming data processing.
Read more on Govindhtech.com
#machinelearning#AWSLambda#Lambda#API#AWSservices#Serverlesscompute#News#Technews#Technology#Technologynews#Technologytrends#Govindhtech
0 notes
Text
#ばばさん通信ダイジェスト : Docker Desktop 4.32: Beta Releases of Compose File Viewer, Terminal Shell Integration, and Volume Backups to Cloud Providers
賛否関わらず話題になった/なりそうなものを共有しています。
Docker Desktop 4.32: Beta Releases of Compose File Viewer, Terminal Shell Integration, and Volume Backups to Cloud Providers
https://www.docker.com/blog/docker-desktop-4-32/
0 notes
Text
Disaster unrecovery
Cosa succede se il filesystem della tua macchina virtuale si corrompe nella parte del boot, non c’è modo di fare repair neanche da live cd attaccato a quella VM, il file di backup del disco virtuale è corrotto anch’esso (per un altro motivo)? Nulla si reinstalla una VM da zero e si rimette in piedi il faticoso lavoro di mesi. Fortuna vuole che almeno la cartella di Docker con container e volumes fosse ancora leggibile, così almeno quel travaso è stato possibile senza data loss. Sì ma che smaltita!!!
Verificate i vostri backup!
[[ image generated by | copilot ai || title | prompt un disastro catastrofico in un villaggio di puffi ]]
Post creato da La Tana del Gigante
0 notes
Text
Leveraging Cloud Technologies in Legacy Systems Decommissioning

In the ever-evolving landscape of information technology, organizations are increasingly confronted with the challenge of decommissioning legacy systems. These outdated systems, often the backbone of past operations, can become a hindrance to innovation and efficiency. Leveraging cloud technologies in the process of legacy systems decommissioning offers a transformative solution, enabling organizations to modernize their IT infrastructure, reduce costs, and enhance agility. This blog explores how cloud technologies can be effectively utilized to streamline the decommissioning process and ensure a smooth transition to modern IT environments.
The Role of Cloud Technologies in Legacy Systems Decommissioning
Cloud technologies provide a robust framework for handling the complexities associated with legacy systems decommissioning. Here are some key ways in which the cloud can facilitate this transition:
1 . Data Migration and Storage:
Scalable Storage Solutions: Cloud platforms offer virtually unlimited storage capacity, making it easier to migrate large volumes of data from legacy systems. Services like Amazon S3, Google Cloud Storage, and Azure Blob Storage provide scalable and cost-effective solutions.
Automated Data Migration Tools: Tools such as AWS Data Migration Service, Azure Migrate, and Google Cloud's Transfer Service simplify the data migration process, ensuring data integrity and minimizing downtime.
2. Application Modernization:
Containerization and Microservices: By leveraging containerization technologies like Docker and orchestration tools like Kubernetes, organizations can re-architect legacy applications into microservices. This not only enhances scalability but also improves maintenance and deployment efficiency.
Serverless Computing: Services like AWS Lambda, Azure Functions, and Google Cloud Functions enable organizations to run application code without managing servers. This approach reduces operational overhead and accelerates the decommissioning of legacy systems.
3. Disaster Recovery and Business Continuity:
Robust Backup Solutions: Cloud platforms offer advanced backup and disaster recovery services, ensuring that data and applications are protected during the decommissioning process. Tools like AWS Backup, Azure Site Recovery, and Google Cloud Backup and DR provide comprehensive solutions for business continuity.
Geo-Redundancy: Cloud providers offer geo-redundant storage options, ensuring that data is replicated across multiple regions for enhanced reliability and availability.
4. Security and Compliance:
Advanced Security Features: Cloud platforms come with built-in security features such as encryption, identity and access management, and threat detection. These features help safeguard sensitive data during migration and decommissioning.
Compliance Certifications: Major cloud providers adhere to stringent compliance standards, ensuring that the decommissioning process meets regulatory requirements.
Best Practices for Leveraging Cloud Technologies in Legacy Systems Decommissioning
Comprehensive Assessment and Planning:Conduct a thorough assessment of the legacy systems to identify dependencies, data volume, and application requirements. Develop a detailed migration and decommissioning plan that outlines timelines, responsibilities, and milestones.
Pilot Testing: Before full-scale migration, conduct pilot tests to identify potential issues and fine-tune the migration process. This helps mitigate risks and ensures a smoother transition.
Data Governance: Implement robust data governance policies to manage data integrity, security, and compliance. Ensure that data is categorized, encrypted, and protected throughout the migration process.
Continuous Monitoring and Optimization: Utilize cloud-native monitoring tools to track the performance and health of migrated applications and data. Continuously optimize resources to enhance efficiency and reduce costs.
Training and Change Management: Provide training and support to IT staff and end-users to facilitate the adoption of new cloud-based systems. Implement change management strategies to ensure a seamless transition and minimize disruptions.
Conclusion
Leveraging cloud technologies in legacy systems decommissioning offers a pathway to modernize IT infrastructure, enhance operational efficiency, and drive innovation. By embracing scalable storage solutions, automated migration tools, application modernization techniques, and advanced security features, organizations can effectively retire outdated systems and transition to a more agile and resilient IT environment. The key to success lies in meticulous planning, comprehensive testing, robust data governance, continuous optimization, and effective change management. As organizations navigate the complexities of legacy systems decommissioning, cloud technologies provide the tools and capabilities needed to unlock new opportunities and achieve long-term success.
0 notes
Text
Mastering Data Mobility: Unveiling the Power of Docker Volumes

Docker volume is a storage mechanism that is used for persistent data storage generated by Docker containers.
All volumes are managed by Docker and stored in a dedicated directory on your host, usually /var/lib/docker/volumes for Linux systems.
These are the uses of Volume:
Decoupling containers from storage
Attach Volume to a container
Share volume (storage/data) among different containers
On Deleting container volume do not delete
Commands of Docker Volume
create: it is used to create new volumes.
ls: It is used to list all the volumes in a namespace.
inspect: It is used to know more about any of the volumes.
rm: It is used to remove any volume if it is no longer required.
prune: It is used to remove all unused volumes.
Examples to Implement Docker Volume
You can start a container with a volume by setting the -v flag when you call docker run.
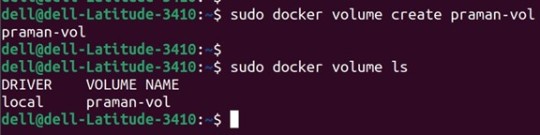
1. Create a new volume named ‘praman-vol’ and list it as below.
docker volume create praman-vol
docker volume ls
Output:
2. Check all details of this volume using the ‘inspect’ command as below:
Command:
docker volume inspect my-vol Output:

3. Now, mount this volume to a container using the ‘-v’ flag and connect to the container using the ‘docker exec’ command, create a new test file ‘test.txt’. Stop and delete this container and create a new container and connect the same volume to this container. Again, execute this new container and check if the file is available or not in this newly created container as below
Commands:
docker run -itd -v praman-vol:/root --name wilsh-harvi alpine sleep 2000
docker exec -it wilsh-harvi sh
/ # cd /root
~ # echo “Welcome to praman” > test.txt
~ # cat test.txt
~ # exit
docker container stop wilsh-harvi
docker container rm wilsh-harvi
docker run -itd --mount source=praman-vol,target=/etc/ --name wilsh-harvi2 alpine sleep 2000
docker exec -it wilsh-harvi2 sh
/ # cat /etc/test.txt
/ # exit
Output:

Explanation: In the above snapshot, we can see that the file is available even after the first container got destroyed.
4. If we want to see the above file without mounting it to any container then we have to browse the ‘Mountpoint’ of the volume as below:
Command:
sudo cat /var/lib/docker/volumes/praman-vol/_data/test.txt
Output:

5. If this volume is no longer required and can be deleted; we can do so using the ‘rm’ command as below:
Command:
docker volume rm praman-vol
Output:

6. If there are multiple volumes that need to be deleted, we use the ‘prune’ command to delete all unused volumes at once as below:
Command:
docker volume prune
Output:

Explanation: In the above example, we have created 4 new volumes and did not attach any container to them it so we can use the ‘prune’ command to delete all the three volumes at once.
Advantages of Docker Volume
We can share volumes among multiple containers safely; backup and migration of volumes are also easy.
Allows sharing data among multiple containers.
We can attach volumes on both types of containers, whether it is a Linux and Windows container.
Conclusion
To conclude, in this article, we discussed how to create and inspect a Volume and mount it to multiple Docker Containers. This proves to be very helpful when you want shared access to files and directories among multiple Docker Containers.
Credit – Sachin Auti
MetricsViews Pvt. Ltd.
MetricsViews specializes in building a solid DevOps strategy with cloud-native including AWS, GCP, Azure, Salesforce, and many more. We excel in microservice adoption, CI/CD, Orchestration, and Provisioning of Infrastructure - with Smart DevOps tools like Terraform, and CloudFormation on the cloud.
www.metricsviews.com
#DockerVolumes#VolumeManagement#ContainerData#PersistentStorage#DockerStorage#DataContainers#VolumeMounting#ContainerVolumes#StorageSolutions#DockerPersistence
0 notes
Text
In the world of Industrial IoT (IIoT), the ability to efficiently monitor, store, and analyze large volumes of time-stamped data is essential. From environmental sensors in smart factories to energy meters in power systems, time-series data forms the backbone of real-time insight and historical analysis.
InfluxDB, an open-source time-series database, is designed specifically for these use cases. Combined with the industrial-grade ARMxy Edge Gateway, it creates a robust edge solution for reliable data acquisition, storage, and visualization—all without depending on cloud availability.
🧠 Why InfluxDB on ARMxy?
InfluxDB is lightweight, high-performance, and optimized for time-series workloads. It supports powerful query languages, retention policies, and integrations with monitoring tools such as Grafana. When deployed directly on an ARMxy (RK3568J/RK3568B2) gateway, it becomes a local data engine with key advantages:
Minimal latency: Store and query data at the edge
Offline reliability: Operate without cloud or internet connection
Flexible integration: Compatible with Modbus, OPC UA, MQTT, and more
🏭 Real-World Use Case Example
Imagine a factory floor with multiple PLCs controlling machinery. Each PLC sends temperature, vibration, and power consumption data every few seconds. Instead of sending that data to a remote server, it can be ingested directly into InfluxDB running on the ARMxy device.
You can then use:
Telegraf for parsing and collecting metrics
Grafana for local visualization dashboards
Node-RED to add logic and alarms
The result? A self-contained edge monitoring system capable of showing trends, detecting anomalies, and buffering data even during connectivity drops.
🔗 Integration Workflow Overview
Install InfluxDB on ARMxy via Docker or native ARM64 package
Connect data sources: Modbus devices, MQTT brokers, etc.
Configure retention policies to manage local storage
Use Grafana (also installable on ARMxy) to build dashboards
(Optional) Forward selected metrics to cloud or central server for backup
✅ Benefits of Edge Time-Series Monitoring
Faster Insights: No need to wait for data to hit the cloud
Bandwidth Optimization: Only send essential data upstream
Improved System Resilience: Data remains accessible during downtime
Security & Compliance: Sensitive data can stay on-premises
🔚 Conclusion
Deploying InfluxDB on ARMxy Edge Gateways transforms traditional data loggers into intelligent local data hubs. With flexible integration options, support for real-time applications, and a compact industrial design, ARMxy with InfluxDB is a perfect fit for smart manufacturing, energy monitoring, and any IIoT scenario that demands fast, local decision-making.
Let the data stay close—and smart.
0 notes
Text
Deploying Hyperledger Fabric Nodes on Kubernetes: A Containerized Approach
In the world of blockchain technology, Hyperledger Fabric stands out as a powerful and versatile platform for building distributed ledger networks. To harness its full potential, deploying Hyperledger Fabric nodes on Kubernetes has become a preferred approach for many developers and organizations. This containerized deployment strategy combines the strengths of Hyperledger Fabric with the flexibility and scalability of Kubernetes, making it an ideal choice for those looking to streamline their blockchain operations.
The Benefits of Containerization
Before delving into the specifics of deploy Hyperledger Fabric node on Kubernetes, let's briefly touch on the concept of containerization. Containers are lightweight, standalone executable packages that encapsulate an application and all its dependencies, ensuring consistency across different environments. Kubernetes, on the other hand, is an open-source container orchestration platform that automates the deployment, scaling, and management of containerized applications.
The marriage of Hyperledger Fabric and Kubernetes offers several compelling benefits:
1. Scalability:
Kubernetes allows you to easily scale your Hyperledger Fabric network up or down based on demand. This ensures that your blockchain network can handle increased workloads without compromising performance.
2. Portability:
Containers are platform-agnostic, meaning you can run them on any infrastructure that supports Kubernetes. This portability makes it simpler to migrate your blockchain network across cloud providers or on-premises data centers.
3. Resource Efficiency:
Containers are resource-efficient, consuming fewer system resources compared to traditional virtual machines. This efficiency translates to cost savings and improved overall performance.
4. Automation:
Kubernetes automates various aspects of container management, such as load balancing, self-healing, and rolling updates. This automation reduces the operational overhead of managing a Hyperledger Fabric network.
Deploying Hyperledger Fabric on Kubernetes
To get started with deploying Hyperledger Fabric nodes on Kubernetes, follow these essential steps:
1. Set Up Your Kubernetes Cluster:
Ensure you have a Kubernetes cluster ready for deployment. You can choose from managed Kubernetes services provided by cloud providers or set up your cluster using tools like Minikube or kubeadm.
2. Create Kubernetes Configurations:
Define Kubernetes deployment and service configurations for your Hyperledger Fabric nodes. These configurations specify the container images, network settings, and resource requirements for each node.
3. Containerize Your Hyperledger Fabric Nodes:
Build Docker containers for your Hyperledger Fabric nodes, including peer nodes, orderer nodes, and certificate authorities (CAs). These containers encapsulate the necessary software and configurations.
4. Deploy Hyperledger Fabric Components:
Use Kubernetes commands or declarative YAML files to deploy your containerized Hyperledger Fabric nodes to the Kubernetes cluster. Ensure that you configure volumes for persistent data storage.
5. Configure Networking and Peering:
Set up the network communication between Hyperledger Fabric nodes using Kubernetes services and ingress controllers. Establish peer-to-peer connections and define the orderer consensus mechanism.
6. Monitor and Manage:
Implement monitoring and management tools like Prometheus and Grafana to keep an eye on the health and performance of your Hyperledger Fabric network. Use Kubernetes features for scaling and updates.
7. Implement Security Measures:
Secure your containerized Hyperledger Fabric nodes by configuring network policies, using secrets for sensitive data, and following best practices for container security.
8. Back Up and Disaster Recovery:
Implement backup and disaster recovery procedures to ensure data integrity and availability in case of unexpected events.
Conclusion
Deploying Hyperledger Fabric nodes on Kubernetes offers a containerized approach that brings together the advantages of both technologies. It enables scalability, portability, resource efficiency, and automation, making it a compelling choice for blockchain developers and organizations.
As the adoption of blockchain technology continues to grow, mastering the art of containerized deployment on Kubernetes is becoming increasingly valuable. By following the steps outlined in this article, you can create a resilient and efficient Hyperledger Fabric network that is ready to meet the demands of your business or project.
1 note
·
View note