#download cricut software
Explore tagged Tumblr posts
Visit Tumblr Blog
Explore Tumblr blogs with no restrictions, modern design and the best experience.
Last Seen Tumblr Blogs


Fun Fact
Mobile US users spent an average of 115.8 minutes on Tumblr app monthly.
Text
How Do I Download Cricut Design Space: All Devices Covered!
How do I download Cricut Design Space? Does that sound like you? You’re in the right place. This blog outlines the basic steps to download Cricut software on various devices, such as Windows, MacBooks, iPhones/iPad, and Android. If you have been looking for this, read this write-up until the end.
While writing this post, I was pretty sure about your needs. Beginner crafters like you who’ve just started crafting might be intimidated initially. Although Cricut is an amazing machine, its setup process can slightly confuse you. Since I have experienced it already, I know what you want. Therefore, I have written this blog to keep your needs in demand. Besides, I am covering all the compatible devices on which you can use the Cricut app.
So, shall we start? Let’s get ready with your computer or mobile device where you want to download the app.
How Do I Download Cricut Design Space on My Computer?
I got my first Cricut machine in 2018. Then, I installed the Cricut Design app for the first time on my PC. At that time, I had an HP laptop with Windows 10 and an Intel Dual Core or equivalent AMD. In addition, 4 GB RAM is the minimum needed for using Cricut software on a PC. So, ensure you meet all the basic needs to run this software on your PC.
Here are the steps to download and install the Cricut application on a PC:
Step 1: Download the Cricut Software
Start by turning on your Windows PC.
Then, plug in your Cricut machine.
After you have turned on the devices, click on the Start menu from the taskbar.
Now, type any browser’s name that you use. Here, I use Google Chrome, but you can try any other alternatives.
You have to use your internet browser’s search bar.
Next, paste this URL design.cricut.com.
Then, press the Enter button on your keyboard.
You will go to a page with a checkbox. Click on it to enable the Download button.

Once you have enabled the button, click it to download Cricut software on your PC.
When the download begins, wait for a while and let it finish.
Step 2: Install the Cricut Design Space app
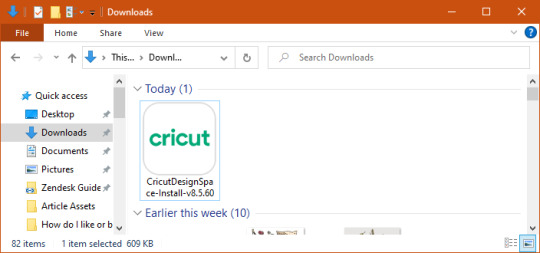
When downloading is finished, you must go to the Downloads folder or file where you downloaded and saved the file.
Once you have found the downloaded file, click on it twice to open it.
Then, you will see a pop-up that asks, “Whether you trust the application to make changes to your PC.”
Here, you need to select Yes to allow.

How Do I Download Cricut Design Space on Mac?
MacBook is an Apple computer with its own exceptional MacOS, which is more advanced than other OSs like Windows. However, you should have a MacBook with macOS 11 or later and 4 GB RAM. Besides, make sure you have free 2 GB disk space available.
Here are the steps to download and install the Cricut software on MacBook:
Step 1: Download the Cricut App
The first and second steps are the same as those for your Windows PC.
Then, paste this URL design.cricut.com into your browser’s search bar.
Next, you have to tick the checkbox to accept Cricut’s terms & conditions.
Now, you will notice that your Download button is activated.
Click on this enabled Download button and begin downloading the app.

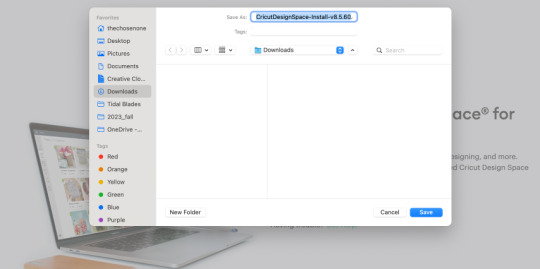
After that, you will reach a page where you will have to select the folder to save the file that you are downloading.
Once you have selected the desired location, hit on the Save tab to start downloading.
Step 2: Install the Cricut Design Space app
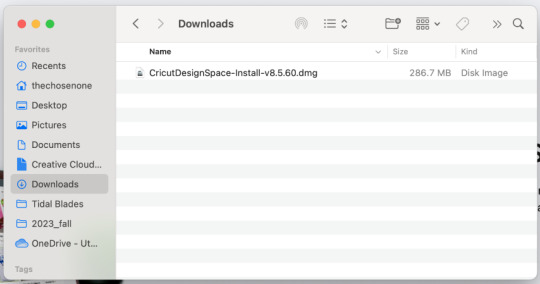
When you have downloaded the Cricut software, you have to head to the Downloads folder.
Now, click on the .dmg file twice in the Downloads folder.
On the next window screen, drag the Design Space icon to the Applications folder icon to start installing the app.

How Do I Download Cricut Design Space on Smartphones?
Thanks to Cricut, you can now use your Cricut app on your smartphone. Yes, that’s true! Whether you use Android or iOS, you can use this software hassle-free. Make sure that if you’re an Android user, you have an Android 10.0 or higher OS. While for iOS users, they must have at least iOS 15 or later. Here’s how to download and install the app on Android/iOS:
For Android
Use any Android phone that you use. (You can check the eligible list of devices on Cricut’s official site).
In order to download the app, you must find the Google Play Store icon on your device.
Then, you should type Cricut Design Space software in the search bar.
After that, you will have to look for the apps displayed in the provided result below.
You will need to select it and click on the Install button to begin the installation.

For iOS
You have to head to the App Store on your iOS device (iPhone/iOS)
After that, you need to type Cricut Design Space in the search bar.
Now, you have to look for the app.
Then, you should select the app based on the visible results.
Click on the Get tab to install the app.
Conclusion
This blog focuses on how do I download Cricut Design Space for macOS, Windows, Android, and iOS devices. I have written the steps simply so that every beginner user can understand them hassle-free. Downloading the Cricut software is a must, as it allows you to create intricate designs smoothly and then send them to your Cricut machine for further cutting. Start your crafting journey with Cricut Design Space today!
FAQs
Question 1: Which Device is the best for Cricut Design Space?
Answer: Although the Cricut software is compatible with both computer and mobile, Windows and macOS are the most suitable options for the Cricut app. They run the Cricut app easily and offer more features than Android and iOS. In a nutshell, try Windows and macOS to use the software.
Question 2: Do I always need to use Cricut Design Space online?
Answer: Not necessarily. In order to use some features of Cricut Design Space, you have to stay connected to the internet. However, Cricut allows users to edit and make changes to their design even when they are offline. Besides, you will only need the internet when you want to download some new images, fonts, or projects.
Question 3: Can I use Cricut Design Space without a Cricut machine?
Answer: Yes, you can! Users can use the Cricut Design app without using their Cricut machine. Cricut is a simple software used to create designs where you can access thousands of images, projects, and more. Use the app without any cutting machine, and when you are done with your design, you can connect Cricut to cut.
Read more: cricut.com/setup mac
install cricut design space app
Cricut Design Space
Source: how do i download cricut design space
#how do i download cricut design space#Cricut Design Space#cricut.com/setup mac#cricut.com/setup#cricut explore air 2#cricut design space app#cricut new machine setup#download cricut software
0 notes
Text
Cricut Explore Software Download: Quick and Easy Guide
Hey, Cricut users! Are you here to learn about the Cricut Explore software download? If so, I’ve got your back! Downloading and installing the Cricut Design Space software on various computers and operating systems is a difficult task. But I think this is only the case for beginners. Hence, they need a simple guide to understand so that they can download the app on their compatible devices. I am here to teach the same method to beginner Cricut users.
However, users need to remember one thing before downloading the Cricut software on their devices. These are the system requirements, which I have explained briefly. As an experienced crater, I will teach you how to download the Cricut app on Windows, Mac, Android, and iOS. Let’s get started!
Cricut Explore Software Download on a Windows Computer
You can download the Cricut software hassle-free on Windows. The compatible computer to run the Cricut Design app on your Windows computer is Windows 10 or later. You will also need an Intel Dual Core or equivalent AMD CPU with 4 GB of RAM. If your system meets these requirements, you are ready to download the app.
Here is how to download the Cricut app on your Windows PC:
Power on the computer device.
Then, you need to launch an internet browser.
Now, you have to copy & paste the URL design.cricut.com on the search bar.

4. After that, you need to click on the checkbox to agree to Cricut’s Terms of Use and Privacy Policy.
5. Then, hit on the Download tab.
6. When it is downloading your software, you might notice some changes to your screen. These changes may vary for every browser.
7. Once your file has been downloaded, move it to the Downloads folder from the File Explorer.
9. Next, select Yes to allow your app to make some changes to your PC.

11. Finally, your Cricut Design Space software is downloaded.
Cricut Explore Software Download on Your Mac Computer
To download Cricut software on a Mac, you need to know the system requirements, such as macOS 11 or later. Make sure you have a 1.83 GHz CPU and 2 GB of free disk space. When these requirements are met, it will be easier to run the Cricut Design app smoothly.
Here is how to download the Cricut software on Mac:
In the beginning, start your MacBook.
Launch an internet browser you use on it (I am using Google Chrome here).
After that, you have to go to the browsers.
Navigate to the browser’s search bar and type design.cricut.com.
Then, check the checkbox to accept Cricut’s Terms of Use and Privacy Policy.
Next, you should select the Download button.
Move to a page where you need to choose the file location. This is where you will download your file.
Finally, your downloading starts from here.

9. Once the download is complete, move to the Downloads folder.
10. After that, you will see a .dmg file in your Downloads folder.
11. Then, you will notice the .dmg file; double-click on it to start the installation.

Cricut Explore Software Download on Your Android Mobile
Android users need to have Android 10.0 or higher. The Cricut software is also compatible with mobile devices and tablets. Despite this, you can easily download the app if you have a 2 to 3 Mbps download and upload speed.
Here is how to download the Cricut app on Android phones:
11. On your Android phone, go to your home screen.

13. Then, you have to type Cricut Design Space on the search bar.
11. Next, in the below result, you will find a Cricut software icon.
12. Click on the app icon.

14. Once you have installed it, you can find this app on your home screen.
Cricut Explore Software Download on an iOS Device
Being an iOS user, I always use my Cricut app on the latest device. However, according to Cricut, iOS 15 or later is recommended. If you have 2–3 Mbps download and upload internet speed, you are good to go!
Here is how to download the Cricut software on iOS smartphones.
On iPhone or iPad devices, launch the App Store.

2. Then, head to the search bar and type Cricut Design Space.
3. Now, you will see a Cricut Design app.

6. Finally, you can start setting it up smoothly.
FAQs
Question 1: What is Cricut software for desktops?
Answer: The Cricut software is editing or designing software for Cricut users that supports Windows and Mac hassle-free. It is a companion app that runs the Cricut machine. This software is initially required to set up the Cricut. The software is also a platform for creating amazing craft designs easily and quickly. It offers free resources, including images, ready-made resources, and much more.
Question 2: How can I use Cricut Design Space without the internet?
Answer: Except for downloading software, you can use the Cricut machine to work offline anytime. While being offline, the internet is not required, and hence, you can create any designs easily and quickly. However, you might need the internet when you want to save your project or access some online resources.
Question 3: Can you use Cricut without a computer?
Answer: No, you cannot! Actually, without a computer or mobile device, you can’t use a Cricut machine. However, the machine is run with the help of companion software, which is downloaded to your computer and mobile app. To run this app, you need either a computer or a phone. In short, you can’t use a Cricut machine without a computer.
Source: cricut explore software download
Visit here For More Information: Cricut.com/setup
You tube
#cricut explore software download#download cricut software#cricut design space software#Cricut Explore Air 2#Cricut.com/setup
0 notes
Text
How to Calibrate Cricut Explore Air 2? (Full Guide!)
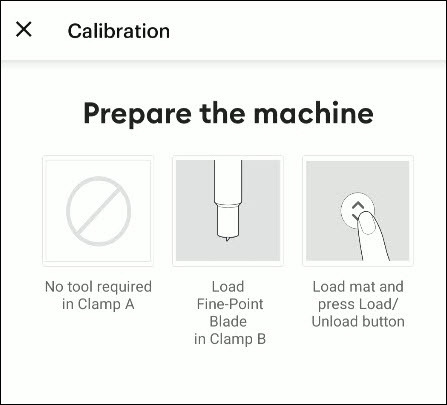
Cricut Explore Air 2 is a worthwhile machine for crafters who want to make pro-level crafting projects. The machine offers precise cuts for more than 100 different types of materials, including Cricut Smart Material, leather, wood, glass, metal, etc. With its easy-to-use interface, the machine allows users to work on DIY projects even if they are novices. Moreover, sometimes crafters may need to perform Cricut Explore Air 2 calibration before a cut.
Calibration is a process that helps set the machine’s blade to cut the design accurately without any flaws. Many users don’t know the procedure and struggle to get the perfect cut. If you have the same problem, then the follow-up blog will provide you with all the information about calibrating your machine.
Cricut Explore Air 2 Calibration on Windows/Mac
If you are using your Cricut Explore Air 2 machine on a computer, then the following is the extensive guide that will help you perform the calibration process.
Step 1: Selecting the Printer
Open the ‘Cricut Design Space app‘, sign in to your account, and then click on the Settings option.
Then, follow the path Machines > Machine Calibration, and select Cricut Explore Air 2.
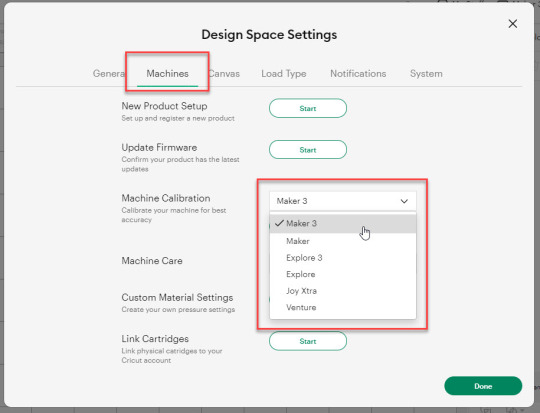
After selecting your crafting machine, click on the Start option.
Depending on the machine you choose, you will be asked to complete the calibration; select the Print Then Cut option.
In the next step, choose what you like to use with your printer machine for the process.
After that, click on the Continue option.
Step 2: Starting the Calibration Cut
Now, you should place the printed calibration sheet on the mat, position it perfectly, and select the Continue option.
For the next step, ensure that your machine is ON and connected to your computer using USB or Bluetooth. Select the machine from the drop-down menu, insert the cutting mat into your crafting machine, and click Go.
Furthermore, the device will start scanning the markings for the calibration.
After the cutting is complete, check if the cut-makings are touched without unloading the mat from the machine. (If the markings are touched, then choose the Yes option in the app and select Continue to move to the next step.)
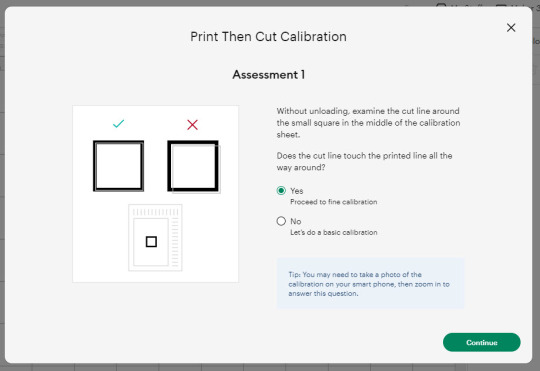
Note: If you choose the No option, then the machine will perform a cut for the next time for the accurate cut.
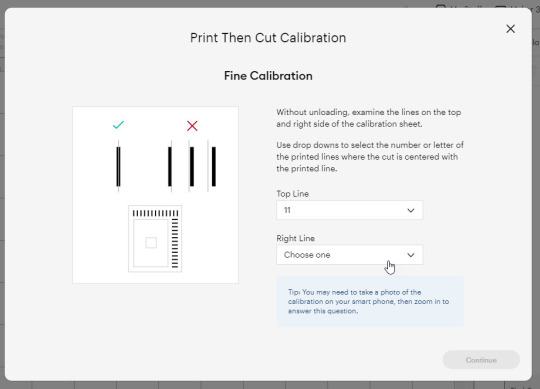
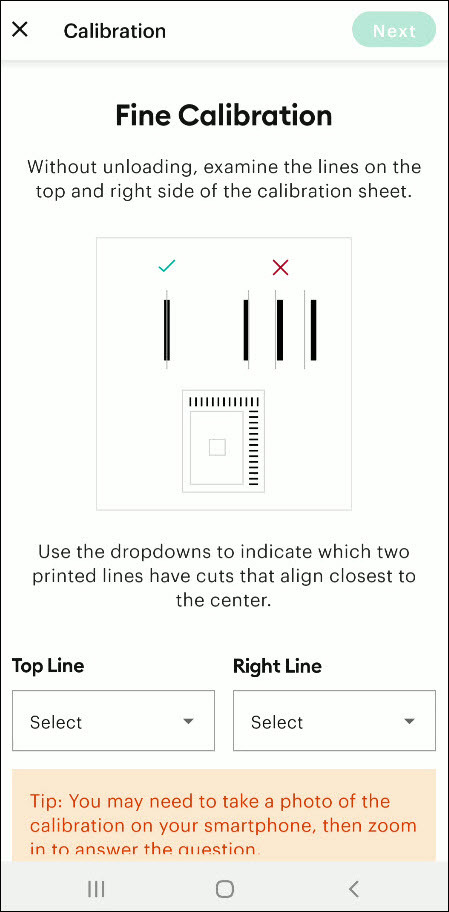
Also, the machine will start the calibration cut at the top and side of the page.
Now, check if the markings are correct without unloading the mat from the device. (The cut should be on or before line 1 and on or before line 21.)
If your cut meets all the conditions, choose the line closest to the center of the printed lines, the same as the following image; when you are done, select the Continue option.
In the next step, the Cricut Explore Air 2 machine will perform a confirmation cut around the large sheet. When this step is complete, unload the mat from the machine and remove the calibration sheet; now, you need to answer the final question on the app.
You need to choose Yes, cut is close enough to the center if you are happy with the cut. (Select no and follow the further process if you are not happy with the cut.)
Cricut Explore Air 2 Calibration On iOS/Android
The follow-up method will allow you to Calibrate your Explore Air 2 machine without any hassle. So, let’s begin the process.
Step 1: Connecting the Printer to Your Machine
Start by signing into your Cricut account on the app and selecting the menu option from the upper right corner.
After that, tap on Settings and then select Print Then Cut Settings.
Also, tap on the Calibration.
Next, you have to choose the Send to Printer, or I have a calibration sheet option.
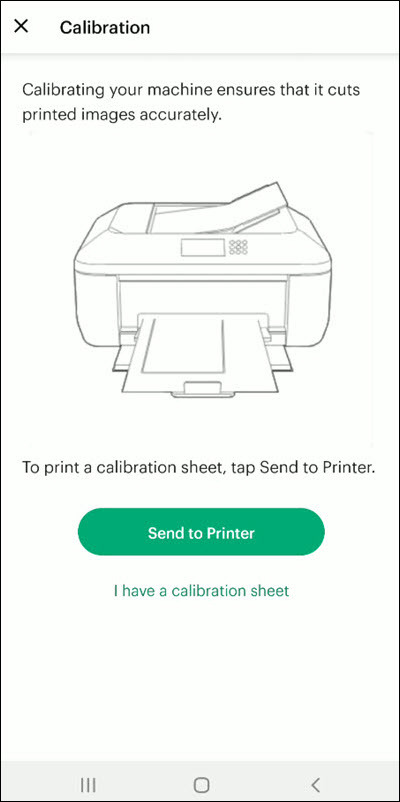
Now, the preview of the calibration sheet will appear on the screen (it can be a little different depending on the device you are using.)
Afterward, tap “Select a printer” and select the printer device you are using. Then, choose Next.
Step 2: Perform Sheet Calibration Process
After that, take the printed calibration sheet, place it onto the machine mat perfectly, and select Next.
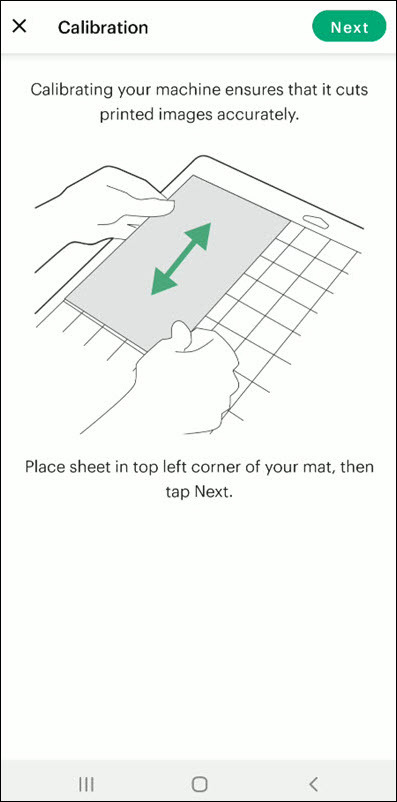
Specify the appropriate material setting for your machine.
Then, after loading the mat into the machine, press the Go button on it.
Also, the machine will look for the marking for the calibration and then start the cutting process near the small square.
Afterward, without unloading the mat from the machine, check for the cut to ensure the cut touches the marked lines all the way around. (If the lines touch the cut, then tap Yes in the app, then select Next to proceed with the next step.)
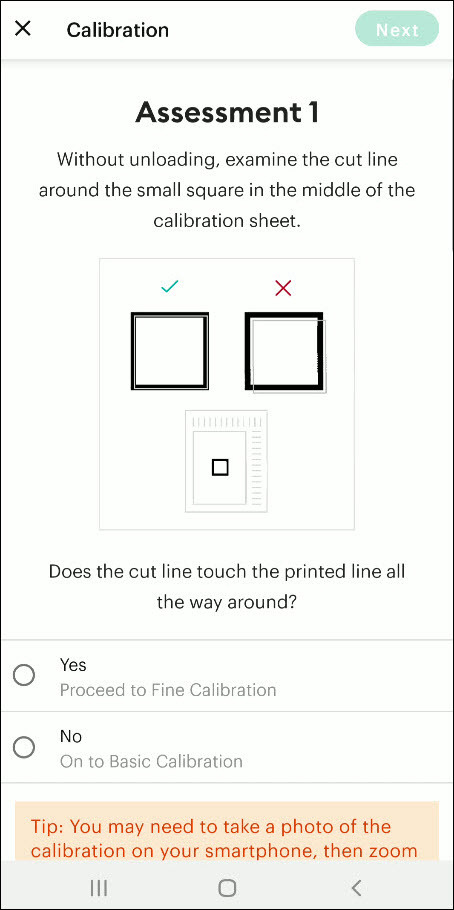
However, if you select the No option, then the machine will try to cut close to the top and sides of the page. (Once done, look closely without unloading the mat; there should be a cut before line 1 and on or after line 21.)
If the cut meets these lines, you need to specify which cut is closest to the center of the printed lines and the right side of the calibration sheet.
Once you are done, select Next to move forward.
After that, keep following the instructions on the screen to complete the procedure.
Once the process is complete, you can start cutting materials on your machine.
Final Words
Cricut Explore Air 2 calibration is the best way to get the pin-point cuts. These methods will help you to perform the calibration process on computer and smartphone devices. With these methods, you cannot only calibrate your Explore Air 2 but also any other cutting machine of the brand. Furthermore, if you have any doubts regarding the procedure or have any issues, then it would be good to ask for more assistance and guidance.
Frequently Asked Questions
Why Is My Cricut Explore 2 Not Cutting Properly?
Cricut Explore machines are known for their flawless and fast-cutting results. Sometimes, it is due to the material you are trying to cut on your device. Also, in some cases, the machine faces technical issues. To get your machine out of this problem and start cutting properly, you can use the calibration procedure. The process to calibrate your machine is simple.
Why Should I Calibrate My Cricut Machine?
However, the cuts can sometimes be misaligned due to various reasons. Crafters can calibrate their devices to get the blades and cuts aligned to their initial position. After the calibration, the machine starts to provide flawless cuts once again. However, the calibration process is a little complex and differs from device to device. So, you must know the whole process before performing it.
What Is the Thickest Setting on Cricut Explore Air 2?
We all know that Cricut cutting machines are known for their fast and flawless cuts, even for intricate designs. Thus, the Cricut Explore machine can cut a wide range of materials of a certain thickness. If you want to cut the wood, metal, leather, etc., then your machine can cut up to 2mm. However, different materials need to use specific blades to get the desired results.
Source: How to Calibrate Cricut Explore Air 2
#how to calibrate cricut explore air 2#cricut design space app#cricut design space download#cricut design space software#cricut machine setup#cricut explore air 2 setup
2 notes
·
View notes
Text
How to Connect Cricut Joy to Computer? (Full Guide)
Wants to Learn ‘how to connect Cricut machine and you want to connect it to a computer‘? You can do it effortlessly with the help of this article. This machine is more compact than other Cricut cutting machines. With a sleek appearance and amazing results, Cricut Joy is the choice for many crafters. As a Cricut user and a professional crafter, I’m here to guide you with it. Let’s learn how to connect Cricut Joy to computer.
When it comes to connecting Cricut Joy to a computer, this machine doesn’t support a USB connection. Therefore, you have only one option for connection – Bluetooth. So, I’ll tell you about the Bluetooth connection on your Windows and Mac computers. Let’s get ready with the process.
Minimum System Requirements for Cricut Joy
Before you connect a machine to your computer, check whether your computer and machine are compatible. Why does this matter? You might know that Cricut runs a software called Design Space. This software has some minimum system requirements for a device that is added to it. So, let’s check out those requirements.
For Windows
For a Windows system, Design Space needs Windows 10 or 11 or the latest versions with an AMD processor or an equivalent one. It should also have a minimum of 2GB RAM, good free storage, and compatibility with Firefox, Microsoft Edge, and Google Chrome.
For Mac
For a Mac computer, Cricut Design Space needs a 14.x or newer operating system. Also, an Intel or equivalent processor. It should also have 2GB RAM and 300 MB storage. When you know the most important requirements, let’s dive into the steps involved in connecting your machine to a computer.
How to Connect Cricut Joy to Computer (Windows and Mac)
To connect your machine to your computer, you need to follow the steps given below. Here, you’ll see the steps for Windows and Mac computers.
For Windows
To connect your machine to a Windows computer, check out the given steps. As you already know, Cricut Joy doesn’t support USB, so we’ll stick to the Bluetooth connection.
To start, unpack your machine and collect all the accessories from the machine’s box.
Then, install your machine at least 10-15 feet away from the computer.
Now, connect the machine to a power source and turn it on.
After that, go to the Start menu and hit the Settings option.
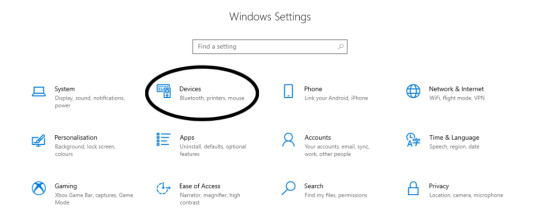
Next, you should click on the Devices option.
In the next step, ensure that Bluetooth is ON.
Moving forward, hit the “Add Bluetooth or other device” option.
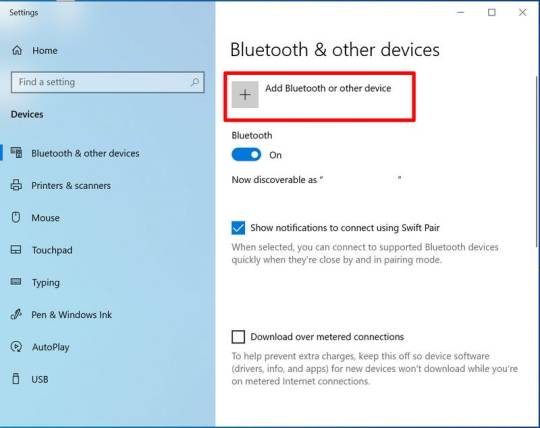
Also, tap on the Bluetooth and let the computer search for your machine model.
When the machine appears on the screen, select it and let it connect.
Lastly, your devices are paired with Bluetooth connection.
That’s how to connect Cricut Joy to computer. When you know everything, it’s time to try the connection for your devices.
For Mac
If you’re a Mactonish, below are the steps for connecting your crafting machine to your Mac.
To get started, connect your Mac to a power cord.
Then, install your machine on a flat surface and keep it at least 10-15 feet away from your Mac.
Now, go to your Apple menu and select System Preferences.
After that, locate the Bluetooth option on the Mac.
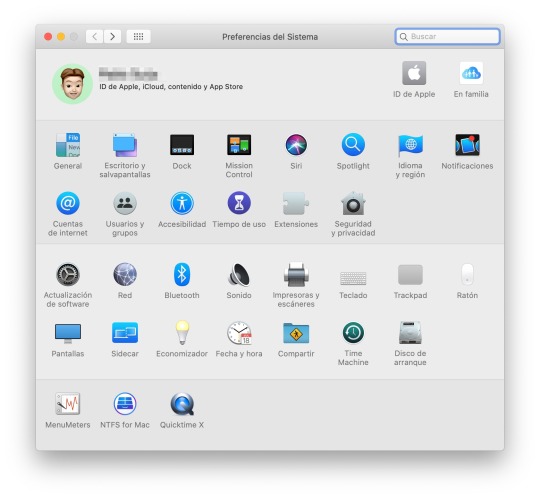
Also, check whether Bluetooth is ON.
In the next step, choose your machine from the list of available devices.
Finally, your machine is paired with your Mac.
That’s how to connect your machine to a Mac computer. Finally, you can start creating projects with your brand-new machine. Now, let’s take a look at the steps for a Mac computer.
Conclusion
Finally, you know how to connect Cricut Joy to computer. Start creating your DIY projects quickly. This machine is excellent for beginners and for DIY pros. The only thing you need to care about is the minimum system requirements for the Design Space software. Besides that, this tiny tool is travel-friendly and works well for you. The crafting machine can become your companion when you need it.
FAQs
How to Download Cricut Design Space on Computer?
To get the Design Space software on a computer, follow these steps:
To start, launch a browser and navigate to https://cricut.com/setup.
Then, accept the Terms of Use and its Privacy Policy.
Now, hit the Download button on the screen.
After that, let the file download under the Downloads folder.
Next, visit the Downloads folder and find the app file.
Double-click on the folder to open it.
In the next step, run the installation and continue with the on-screen directions.
Finally, sign in to your account.
Can I Connect My Cricut Joy to Computer via USB?
No, you can’t use a USB to connect your machine to your computer. It doesn’t support USB. However, you can use a Bluetooth connection to set up a connection between your machine and your computer.
How to Connect Cricut Joy to Windows 11?
You can connect a machine to Windows 11 via a Bluetooth connection. Go to your laptop and search for Bluetooth and other devices. Then, turn on the Bluetooth option. Now, let your laptop locate your machine. Then, choose your machine’s name from the list of devices and let the pairing happen.
Source: How to Connect Cricut Joy to Computer
#how to connect Cricut Joy to computer#cricut design space download#cricut design space app#cricut design space software#cricut joy setup
2 notes
·
View notes
Text
10 Easy and Fun 4th of July Cricut Shirts for Everyone
The 4th of July inspires us to decorate everything in red, white, and blue. It’s not just fireworks and barbecues; it’s a celebration of freedom and unity. If you’re like me, you’re planning to make 4th of July Cricut shirts, even if you’re new to crafting. Don’t worry; this guide is here to help.
Whether you’re new to Cricut or already cutting vinyl, this blog will guide you with some unique T-shirt project ideas. I can assure you that by the end of this blog, you’ll be a pro at creating custom shirts with Cricut.
This guide offers 10 super fun, creative, and easy-to-follow projects that will make your 4th of July outfit stand out and make your day unforgettable.
1. American Flag Shirt

Start a new project in Cricut Design Space. Choose a classic T-shirt template and write whatever you want to write. Adjust the size of your design. Place the shiny side down on a cutting mat. Mirror your design, choose ‘Everyday Iron-On,’ load the mat into your Cricut, and press Go.
Carefully remove the unwanted vinyl with a weeding tool. Place the iron-on vinyl on your shirt and use an Easy Press to adhere it.
2. Unicorn Shirt

To create your unicorn, you will need a Cricut cutting machine, Cricut Design Space software, a StandardGrip mat, an EasyPress machine, a blank white T-shirt, an iron-on protective sheet, and a fine-point blade.
However, you can download the unicorn SVG file from any other platform or find it in Design Space’s Image library. Don’t forget to add glitter vinyl to the horn for some serious sparkle.
Note: Be sure to mirror your mats before you start to cut.
3. Let’s Get Lit

Prewash your shirt to remove wrinkles and ensure better vinyl adhesion. Use your desired font to write. Let’s Get Lit using a bold, playful font. Cut it out, weed it, and press it on. This will definitely add a funny touch to the party. You can gift such T-shirts to your friends and family for a themed Independence Day party.
4. Star Spangled Stud

If you want to do something cool, you can try this design, which says Star Spangled Stud. Simply choose your desired T-shirt template and write this on it. Once you’re done with designing, click on Make It to get it cut. Load your design, mirror it, and cut it with iron-on vinyl.
Preheat the area where you want your design to be adhered to. Place the vinyl design in the desired area. Use the EasyPress to adhere the design to your T-shirt at the correct time, as guided by the Heat Guide. Leave it for at least 10 minutes and let it cool down.
5. Red, White & Blue Love

If you want to keep it sweet and simple, you can try the love-themed design. Cut down the essential letter as shown in the picture above, and add a star to add some uniqueness using layered vinyl colors (red, white, and blue, of course). This can be a great option to serve a couple of goals or for kids’ shirts!
6. Made In America

This shirt screams patriotic pride as it is simple, bold, and timeless. It uses bold fonts and metallic vinyl for that wow factor, with a centered chest placement. You can have it with your favorite jeans or shorts to get a casual yet classy look.
7. 4th of July Tongue

Find a Rolling Stones-inspired tongue SVG with an American flag pattern, or create your own. Use red, white, and blue iron-on vinyl. Mirror and cut each layer separately. Weed each layer, paying attention to the tongue’s intricate details. Layer the vinyl on the shirt. Press each layer individually and then allow it to cool before adding the next.
Let the shirt cool, and remove all backings.
8. American Flag Heart

Choose or draw a heart shape on the canvas of Cricut Design Space. Divide the heart shape into two parts and insert the American Flag design within those two parts. Once done, cut out the heart-shaped design with your Cricut machine. Weed out the unwanted vinyl and use any press machine to adhere the vinyl to your T-shirt.
Your sparkling heart shirt is complete!
9. Running in the USA

This design might look super cool on athletes like you while walking on the streets of the USA. Mirror your design and proceed to cut. You can use sporty fonts to get the pop-out look on your T-shirt. Wear it with shoes and joggers and enjoy.
10. Red, White & Brew

Open Cricut Design Space, select the Text option from the left-hand menu and type Red, White & Brew. Go for something playful yet bold, mixing and matching fonts. You can add extra touches by adding beer mugs, fireworks, or stars around the text.
Look for something in Cricut’s Image Library or import SVGs that match your personality. Use patriotic colors and ensure that the design is mirrored before cutting. Use the Cricut Heat Guide to set the correct temperature and use the Easy Press machine accordingly.
Pair it with denim shorts and sunglasses.
Conclusion
You don’t need to be an expert to create 4th of July Cricut shirts. With simple steps and guidance, anyone can craft festive designs. With easy steps, create festive designs for yourself or family reunions. These personalized creations will proudly display your American pride and make the holiday unforgettable.
Source: 4th of July Cricut Shirts
#4th of July Cricut shirts#cricut setup#cricut design space download#cricut design space app#cricut design space software
1 note
·
View note
Text
How to Use Cricut Infusible Ink for Smooth & Vibrant Projects

Do you love crafting shirts and other fabric materials? Then, you can learn how to use Cricut infusible ink. Cricut has released a new material called infusible ink that bonds with fabric, unlike iron-on vinyl that sits on top.
Infusible ink is a transfer process where the colors from a transfer sheet are directly applied to the blank surface. Unlike heat-transfer vinyl, the ink does not sit on top of the surface. It is directly applied to and absorbed by the fibers. Read the blog to explore everything about infusible ink.
What Is Cricut Infusible Ink?
Infusible ink is a special kind of material that is super easy to use. However, the important thing you need to remember is the supplies needed to make these projects. You can make t-shirts and tote bags that are safe for machine washing, drying, ironing, and steaming. Wash them with mild detergent and cold water to preserve the design.
How to Use Cricut Infusible Ink: 5 Easy Steps
Here are the steps to begin your project. First, let’s list the materials you will need.
Step 1: Supplies and Tools Needed
Before you learn how to use Cricut infusible ink, you will need some art supplies and materials to start your project. Check the list of materials below and gather them.
You can choose a Cricut Maker, Explore Air 2, Explore 3, and Joy.
Cricut EasyPress 2
EasyPress mat
Infusible ink transfer
Lint roller
Butcher paper
Cardstock
SVG text
Design Space
After gathering all the materials, you need to start creating your project. Let’s get started with the step-by-step instructions:
Step 1: Create a Design for Your Project
First, open the Design Space and click on New Project. Once the file is open, upload the SVG text file, select all the letters, hit the Weld option, and weld them together. Then, size it and place it on the background design. Select both layers, slice them, and delete the unneeded pieces. Make sure to mirror your design. You are ready to send it to your machine for cutting.
Important Note: You need to mirror your design before you send it to the cutting machine.
Step 2: Load the Sheet on Mat
Place the infusible ink transfer sheet on the StandardGrip mat with the liner side down. Under the materials section, go to Browse All Materials and search for the infusible ink transfer sheet from the list of materials. To cut with the machine, you need to load the mat and blade into a machine and hit the Go button.
Step 3: Weed Out the Design
After cutting the design, flip the mat over and remove the extra part with the weeding tool. To separate the cutout design, roll it, use your fingers or tweezers to remove the negative pieces around it, and leave the design. Cut the clear liner so it does not extend beyond the edge of your heat press heat plate.
Step 4: Prep the Tote Bag
Once you place a blank on top of the EasyPress mat, position the sheet of cardstock inside the blank to protect your mat and project. Before applying your design to the tote bag, use a lint roller to remove lint and debris from the entire surface. Cover the blank with butcher paper, which must be larger than the heat plate. Preheat the tote bag to remove any moisture and wrinkles that cause unwanted effects.
Step 5: Apply the Infusible Ink
Place the cut design on the material and use the heat press to transfer it. Then, put the design on a tote bag and apply pressure with the machine to transfer it to the material. Finally, allow the tote bag to cool completely before removing the transfer paper.
Tips to Know Before Starting Your Project
Now, you know the process of using infusible ink, but there are some tips you should remember while working with infusible ink.
When you handle an infusible ink material, make sure that your hands are dry and free of oil; otherwise, it will stick to the sheet.
If you are preparing your base material for the design application, it is recommended that you set up your press machine with the right temperature and pressure.
Do not reuse butcher paper for multiple projects. This is because it protects your design from transferring to another blank material.
Summary
This blog covers everything you need to know about infusible ink and how to use Cricut infusible ink. This material allows you to easily create a permanent and seamless design that becomes part of the fabric, and you can craft many projects with it.
You can use ink on various materials, including apparel, bags, pillows, covers, hats, and ceramics. Follow the above guide, and you can simply start crafting with Infusible ink.
FAQs
Which Is Better Infusible Ink or Iron-on Vinyl?
Infusible ink is often preferred over iron-on vinyl for its seamless, permanent designs. It can create a more permanent and vibrant result, especially light-colored materials. Iron-on material is better suited for dark fabrics or when you need more texture and layers for different materials stacked on top of each other.
How Long Does Cricut Ink Sheet Last?
The infusible ink is supposed to last a lifetime. The heat press machine permanently transfers the ink to the blank material and does not flake, peel off, or wrinkle. However, the ink has a shelf life, so using it within the time limit is important. If you want it to last a lifetime, you can protect it from moisture by using the carrier sheet and washing the material with a mild detergent.
Can I Use Infusible Ink Sheets on Regular Paper?
No, you should not use Infusible Ink sheets on regular paper. If you want to use paper with Infusibe ink, you need to use laser copy paper, which is designed to withstand high heat and has a special coating to prevent it from transferring to another part of the project. The ink is designed in such a way that it can absorb the heat, and the design will get transferred to the material.
Visit: Cricut.com/setup Cricut setup www.cricut/setup
Source: how to use cricut infusible ink
#how to use cricut infusible ink#cricut design space download#cricut design space app#cricut design space software#Cricut setup
1 note
·
View note
Text
How to Set up Cricut Explore Air 2 on Laptop: Easy Guide

When you want to set up a Cricut machine, the first thing that comes to mind is what device you can use with the machine. If you are in a similar dilemma, I am going to help you out. You can use a phone or computer to access your machine. A computer or laptop will work fine with the machine and the Design Space software. Here, I am going to help with how to set up Cricut Explore Air 2 on laptop. You have to read the blog till the end, and by the end of it, all your problems regarding the setup will be solved.
Cricut Explore Air 2 comes in multiple colors, so you can choose the color you like. It is a medium-sized, lightweight machine. With this, you can cut light materials like paper, cards, and foil, as well as heavier materials like plastic, leather, and wood.
Unboxing and Preparation for Setup
Before you start learning how to set up Cricut Explore Air 2 on laptop or computer, you need to prepare your machine for the setup. The first thing you have to do is unbox your newly bought machine and look for the items that were included with it. You also have to make sure nothing in the box is missing.
When you open the box, these are the items you will get.
Explore cutting machine
USB Cord
Power Cord
Fine-Point blade
LightGrip mat
Quick Start Guide
Pen and Accessory adapter
Welcome Book
Some Materials for your test cut
Now that you have unboxed the machine and checked for the items inside, you can proceed to prepare it for the setup. To set it up, you must follow the steps below:
You need to find a good place for the machine and put it there. Keep one thing in mind: the machine should be close to an electric wall socket to connect it properly.
Then, add the machine to an electric source using the power cord you received inside the box.
After that, press the power button and hold it for a while. A light will lit up on the machine, and it will mean that you have turned the machine on.
Now, the machine is prepared for the setup. You need to connect it to your laptop. You can add your devices by using Bluetooth or USB. However, you will only read about Bluetooth here.
Finally, you will need to download the Cricut Design Space app on your laptop and log in with your account.
How to Download Cricut Design Space on a Laptop?
After the setup procedure, you have to download the app on your device. You can use a Windows or Mac for this. Here is the process for getting an app on a Mac laptop.
First, open your computer and visit cricut.com/setup.
Next, agree to the Terms of Use & Privacy Policy. Then, click on Download.
After that, go to the Downloads folder on your computer and click on the file twice.
You will have two icons on the laptop’s screen. One is an app icon, and the other is the Applications folder icon. You need to drag the app icon and put it inside the application.
Then, open the application file and click on the Design Space software.
Now, you will see a new window where you need to click on Open.
Finally, the app is ready on your computer. You have to sign in with a Cricut ID.
How to Set up Cricut Explore Air 2 on Laptop?
Now, you have to connect your Explore machine to your laptop or computer. To connect them, you have to follow these steps in the section below:
First, you have to make sure the machine is ready and is within the range of connection.
Then, go to the Apple menu, the System Preferences, and finally to Bluetooth.
Now, turn on the Bluetooth and start looking for your machine.
When you find the machine, you need to click on it.
After that, it will be paired to your laptop.
Finally, your Cricut machine setup is complete. You can use it for your projects.
Conclusion
Cricut Explore Air 2 is one of the leading cutting machines. To use it, you need to know how to set up Cricut Explore Air 2 on laptop. However, setting it up on a laptop is optional, and you can do it on a desktop or a smartphone as well. The machine setup consists of a few steps that you read in the blog. You have to follow all of them, and you will be able to set up the machine.
FAQs
Are Laptops Good for a Cricut Machine?
Yes, they are! A laptop is equally good for a Cricut machine as any other computer. To use a laptop on the machine, you will have to go through a procedure similar to that of any other computer or phone. In the beginning, you have to check your device’s compatibility. When you are sure your device works with the machine, you have to connect both devices and then download the Design Space on your laptop.
What Laptop Can I Use for a Cricut Machine?
If you want to use a laptop with a Cricut machine, you have both Windows and Mac options. Both laptops are good for downloading the Design Space app and working on crafting projects. However, before using the device for your crafts, you will need to make sure that they have the features required to download the software on a laptop.
What System Requirements a Laptop Needs for Cricut?
You have two options for using a laptop with a machine. You can go for either a Windows or a Mac. Both laptops have pretty much similar requirements when it comes to using them with Cricut. The difference is the operating system: a Windows laptop needs to be Windows 10 or later, while a Mac needs to be macOS 11 or later. Other than that, they both need 4GB RAM, 2GB free disk space, Bluetooth or USB connection, 1024 x 768 screen resolution, and a good internet connection.
SOURCE: How to Set up Cricut Explore Air 2 on Laptop
#how to set up Cricut Explore Air 2 on laptop#Cricut Explore Air 2 software#cricut explore air 2 setup#install cricut explore air 2#cricut machine setup#Cricut.com/setup#cricut explore air 2 download#Cricut.com setup mac
1 note
·
View note
Text
Do you take your crafts seriously? Cricut is a perfect machine that allows you to craft with your heart. So, use the machine and employ all your crafting skills to end up with a wide range of personalized and professional handmade items. Also, download and install the Design Space software to add more creativity to your project. Go to cricut.com/setup and get the software right away. Once you make a unique and attractive project, give it a professional touch and take your crafting skills to a commercial level. Cricut Design Space Login You can utilize online platforms to sell them and make some extra bucks while staying in the comfort of your home.
#Cricut Design Space#cricut design space login#cricut design space download#cricut design space for mac#cricut design space app#cricut design space setup#cricut software#cricut.com setup windows#cricut.com/setup windows#cricut.com/setup#cricut.com sign in#cricut.com/create#cricut.com design space#design cricut.com download
2 notes
·
View notes
Text
Why Won’t Cricut Design Space Open on My Computer: Fixed
Are you wondering why won’t Cricut Design Space open on my computer? Are you encountering issues when opening Cricut Design Space? Don’t worry, you are not alone. Many users face this issue when they try to open Cricut Design Space. Several reasons can cause this problem, including third-party software interference, incorrect network settings, and corrupt files.
In this guide, you will get the answer to your question – why won’t Cricut Design Space open on my computer? We are sure you will be able to open Cricut Design Space on your computer after reading this guide. So, without wasting your valuable time, let’s delve into it.
Why won’t Cricut Design Space open?
How to Fix Cricut Design Space Won’t Open Issue
In order to fix Cricut Design Space won’t open issue, follow the steps given below:
Step 1: Confirm Your Computer Meets the Minimum System Requirements
Your Windows or Mac computer should meet the minimum system requirements for using Cricut Design Space. If it doesn’t, it could be the reason why won’t Cricut Design Space open on your computer. Upgrade your device to meet those requirements.
Below are the minimum system requirements for using Cricut Design Space:
For Windows
Operating System: Windows 10 or later*
CPU: Intel™ Dual-Core or equivalent AMD® processor
RAM: 4GB
Disk Space: Minimum 2 GB of free disk space
Connection: An available USB port or Bluetooth connection
Display: Minimum 1024px x 768px screen resolution
Internet connection: Minimum 2-3 Mbps Download and 1-2 Mbps Upload
For Mac
Operating System: macOS 12 or later*
CPU: 1.83 GHz
RAM: 4GB
Disk Space: Minimum 2 GB of free disk space
Connection: An available USB port or Bluetooth connection
Display: Minimum 1024px x 768px screen resolution
Internet connection: Minimum 2-3 Mbps Download and 1-2 Mbps Upload
Step 2: Restart Your Device
A simple restart can fix lots of problems. When you restart your device, it clears out temporary files and frees up memory. In order to restart your device, follow the steps given below:
For Windows
To restart your Windows device, follow these steps:
Firstly, click the Start button.
Then, select the Power icon.
Choose Restart.
For Mac
To restart your Mac, follow the steps below:
Click the Apple menu in the top-left corner of the screen.
Then, choose Restart.
Step 3: Force Reload Cricut Design Space
You can also fix Cricut Design Space won’t open issue by forcing a reload. Sometimes, slow speed can cause the Cricut Design Space won’t open issue. A force reload can solve the problem.
In order to force reload Cricut Design Space, follow the steps given below:
Open the Cricut Design Space app.
Then, find the system menu in the top left corner.
After that, select the View option.
Lastly, select Force Reload from the dropdown menu.
If your Cricut Design Space still won’t open on your computer, move to the next step.
Step 4: Uninstall and Reinstall Cricut Design Space
Whether the Cricut Design Space is out of date or has had an issue, you can fix these most common errors by simply uninstalling and reinstalling it. Here are the steps on how to uninstall and reinstall Cricut Design Space.
How to Uninstall Cricut Design Space?
If you want to uninstall Cricut Design Space from your computer, follow the steps below:
For Windows
Firstly, make sure that Design Space is closed. If it is not closed, the application will not be uninstalled properly.
Select the Start icon and search for Programs.
Then, choose the option Add or remove programs. This will open the Apps & features window.
Type Cricut in the search field and choose Cricut Design Space from the list.
After that, select the Uninstall button.
A pop-up will show up on the screen asking, “Are you sure you want to uninstall Cricut Design Space?”. Select OK to uninstall Cricut Design Space.
The system will finish the uninstallation process. If prompted, restart your computer.
For Mac
Open the Finder and select Applications.
Then, drag the Cricut Design Space from the Applications to the Trash.
After that, right-click on the trash and select Empty Trash. You can also open the trash, click on the gear icon, and then select the Empty Trash option.
Next, click Empty Trash to confirm that you want to permanently delete the trash items.
Finally, the system will finish the uninstallation. If prompted, restart your Mac.
How to Reinstall Cricut Design Space?
Here are step-by-step instructions on how to reinstall Cricut Design Space.
For Windows
Go to the official Cricut Design Space website: Cricut.com/setup.
After that, type your machine model in the search field and select your device.
Select the checkbox confirming you agree to Cricut Terms of Use and Privacy Policy. Then, click on the Download button.
Once the downloading is complete, double-click the file in your browser or Downloads folder.
If a window opens asking if you trust the application, confirm that you trust the app.
Now, an installation progress window will appear.
Next, sign in with your Cricut ID and password.
Finally, you have successfully reinstalled Cricut Design Space on your computer.
For Mac
Visit the Cricut Design Space website: cricut.com/setup.
Then, enter your Cricut machine model in the search field and select your device.
Next, check the box to agree to Cricut Terms of Use and Privacy Policy. Then, click the Download button.
Select a location to save the file (By default, it will show the downloads folder). Click Save to start the download.
Now, the file download will start.
When the download is finished, go to the downloads folder. Then, double-click on the downloaded file.
A new window will appear. Drag the Cricut icon into the Applications folder icon to start the installation process. After this, Cricut Design Space for Desktop will be automatically added to your Applications folder.
Then, double-click on Cricut Design Space in your Applications folder in order to launch Design Space for Desktop.
A window will appear asking if you want to open the application downloaded from the internet. Click the Open button to continue.
Lastly, sign in with your Cricut ID and password. With this, you have successfully reinstalled Cricut Design Space on your Mac.
Conclusion
If you are wondering why won’t Cricut Design Space open on my computer. Don’t worry; you are not the only person facing this issue. Many Cricut Design Space users encounter this issue at some point. The Cricut Design Space won’t open issue can be caused by several reasons. The good thing is you can fix it easily in a few minutes.
By following the above-mentioned steps, you will be able to fix Cricut Design Space won’t open issue quickly. Make sure your Windows computer or Mac meet the minimum system requirements, restart your device, and force reload Cricut Design Space. If the issue is still there, try uninstalling and reinstalling Cricut Design Space.
Thank you for reading this post. We hope you find this guide helpful in understanding why won’t Cricut Design Space open on your computer and how to fix Cricut Design Space won’t open issue. Please stay connected with us for more tips and guides to make the most of your Cricut.
Source: why won’t Cricut Design Space open
#why won’t Cricut Design Space open#cricut design space won't open#cricut design space download#cricut design space app#cricut design space software#Cricut Setup
0 notes
Text
How to Update Cricut Design Space 2025?
Are you a Cricut machine user eager to explore the new updates in its app? If so, then you are in the right place. The new Cricut Design Space update introduces major upgrades to features and the interface, enhancing user-friendliness. In addition, many issues that users were facing previously have also been fixed.
Since the announcement of the update, many Cricut enthusiasts around the world have been looking forward to hearing about the new updates to the app. If you are also one of them, then it would be worthwhile to take a look at the new updates.
Keep reading to get detailed information about everything you need to know.
Cricut Design Space Update: What's New!
Let's take a look at the major changes and new updates in the Cricut app.
In addition, there are some other minor updates you can see in the new update.
How to Update Cricut Design Space app?
These are the methods you need to follow to update Design Space on a computer and smartphone.
Computer
These steps will help you complete the update on both Windows and Mac devices.
Smartphone
With the help of these steps, you can complete the update on Android smartphones/tablets and iPhones & iPad.
Resolved Issues and Updates for Better Crafting
With the new update, ample problems have been fixed to make the app more intuitive and user-friendly. Here are some prominent fixes.
Frequently Asked Questions
How to Download Latest Cricut Design Space?
The brand has recently launched the Design Space for Desktop Beta (v9.8) version. To download it on a Windows or Mac device, you need to update the OS version first, then visit the official website to get the latest driver. In addition, to install the app on a phone, go to the App Store, search for the product, and select Download. Ensure that you are downloading the app only from the official website.
How to Install Latest Cricut Design Space 2025?
Here are the major steps you need to follow to install the app on a Windows system.
How to Download New Cricut Design Space 2025 on iOS?
Follow the below steps if you want to download the new Cricut app on an iPhone or iPad.
Visit: cricut.com/setup www.cricut.com/setup login
Source: https://cricricutdesigncut.wordpress.com/2025/03/20/how-to-update-cricut-design-space-2025/
#design space setup#digital design#cricut setup#cricut setup for pc#cricut setup for mac#cricut setup create account#cricut setup explore air 2 setup#setup cricut design space setup#install cricut design space app#cricut design space app#cricut design space login#cricut design space download#cricut design space setup#cricut design space software#download cricut design space#cricut.com/setup#cricut.com/setup windows#cricut.com/setup explore air 2 setup#cricut.com/setup mac#www.cricut.com/setup#www.cricut.com/setup login
0 notes
Text
How to Use Cricut Heat Press: Customize Your Own T-Shirt
Do you want to create your own designer T-shirts? Are you interested in learning how to use Cricut Heat Press? If yes, you have come to the right place! The Cricut Heat Press machine offers a great way to transform plain T-shirts into stylish designer pieces. To achieve this, you will need to understand how to use it.
It is an easy-to-use tool. Cricut offers several heat press machines, with EasyPress and Easy Press 2 being among the most popular for heat transfers. To use these machines, you must know the necessary supplies and the procedure. This blog will guide you through all the required supplies and how to use the heat press.
Tools and Supplies to Start Using Cricut Heat Press
It is important to learn how to use Cricut Heat Press to design your t-shirt. But even more essential is to learn about the materials you will need to use your machine and how you will use those tools. Here are the supplies you will need for the machine.
How to Use Cricut Heat Press: 4 Simple Steps
Once you learn about all the required supplies, you can proceed to make your customized design for your t-shirt. In this process, you will have to do multiple things, like creating your design on the Design Space app, cutting the design, and applying it to your t-shirt. See all these procedures in detail and learn for yourself.
Step 1: Make a Design in Cricut Software
Step 2: Cut Your Design on Your Machine
The next step in learning how to use Cricut Heat Press is to cut your design. Once your design is ready on the app, you can proceed to cut it on the machine.
To cut the design on your machine, you have to put a mat on it and load it inside. Once the material is loaded inside the machine, you will need to open the Design Space app, select the material inside the app, and then click on Make It.
Before you start cutting, you have to mirror your mat. It is important, so don’t forget it.
Step 3: Use a Weeding Tool
Once you have finished cutting the design on your machine, you must unload the material and remove the remnants of the design. To remove the unwanted parts of the design, you should use a weeding tool. It will help you do it precisely.
Step 4: Apply Your Design
Finally, you have to apply the design to the t-shirt with the help of a press machine. To do so, you must follow these steps.
Conclusion
In short, you learned how to use Cricut Heat Press. Using any heat press machine is not very difficult if you follow the instructions well. In the early part of the blog, you learned about the tools and supplies you need to make any customized t-shirts. After that, you saw the process of using the press machine. You have to pick a design, cut it on Cricut, and finally apply it to your t-shirt with the press machine.
FAQs
What Is a Cricut Heat Press Used For?
This machine is mainly used to apply heat to iron-on material to transfer it to any fabric. For example, if you cut a design on an iron-on with any Cricut machine, put it on a t-shirt or any other cloth, and then apply heat to it with the press machine, that design will be printed on the t-shirt.
Can I Use an Iron Instead of a Cricut Heat Press?
Yes, you can! But that will depend on how often you have to use it and what kind of quality you are expecting from the machine. If you only need the press machine once or twice a year and you are not expecting good-quality results, then you can use a regular home iron. But if you need the machine frequently and you want pro results, you should go for the Heat Press machine.
For How Long Do I Have to Press a Shirt on Cricut Heat Press?
It will depend on the temperature of your machine and the fabric you are using. The higher temperature will take less time, while the lower temperature may require a few more seconds. However, depending on the situation, you may have to apply it somewhere between 15 and 30 seconds.
Visit: cricut.com/setup www.cricut.com/setup login
Source: https://cricutdesigncut0.wordpress.com/2025/03/18/how-to-use-cricut-heat-press-customize-your-own-t-shirt/
#cricut setup#cricut.com/setup#www.cricut.com/setup login#cricut design space#cricut designspace setup#cricut design space app#cricut design space login#cricut design space software#cricut design space download#cricut design space setup
1 note
·
View note
Text
How to Install Cricut Maker 3? (Full Guide)
Have you bought a Cricut Maker 3? Then, you need to install it on your device. I’m a craft expert, and in this guide, I’ll share with you ‘how to install Cricut Maker 3‘ on your operating system.

As an expert, I have been using this machine for 4 years, and now I’m guiding beginners in installing their crafting machine. Now, let’s dive into the steps for installing your ultimate DIY machine to start your creative journey.
A Little Introduction About Cricut Maker 3
Before stepping into the installation process, let’s learn a little about its features and capabilities in detail. So, as we already know, it’s a machine full of wonder and joy. This machine has an extremely impressive range of features that I admire the most. With a sleek design and appearance, it has become the most desired machine in the DIY field.
Talking about its abilities, it can cut a huge number of materials, including delicate and complex ones. For instance, it can cut paper and wood precisely and effortlessly. To install it, you must first unbox it and connect it to a power supply. Once it is connected to the power supply, connect it to your device and proceed with your machine’s installation.
How to Install Cricut Maker 3 on Your Device?
After unboxing and checking all the equipment inside the machine’s box, let’s uncover the easiest way to install your machine on a computer device. Although you can connect it to a smartphone, I’m focusing on the computer connection.
After unboxing, place your cutting machine in a cool, safe place.
Then, connect it to a power supply. Use the power cord you received inside your machine’s box.
Now, hit the power button and switch on your DIY machine.

Thenceforth, connect your machine to the computer via Bluetooth. Otherwise, use the USB cord you received with the package.
Go to your computer and open a browser of your choice.
Next, navigate to design.cricut.com.
After that, click the Download button when you see it.
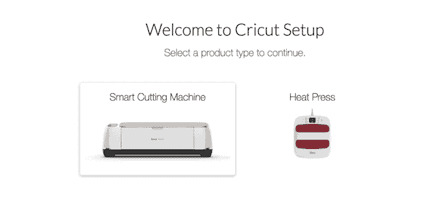
Also, head over to the Product Setup window.
On the next window, choose the Smart Cutting Machine option.
Proceed with the on-screen instructions.
At last, you can try doing a project with your machine to test its features.
That’s it for installing the crafting machine on your computer device. If you’re a little concerned about its connection to your device, let’s check it, too.
How to Connect Cricut Maker 3 to Your Device via Bluetooth?
After learning how to install Cricut Maker 3, you may have a query about connecting your both devices together. If you’re trying it for the first time, let me guide you through it.
Make your first move by turning on the machine and computer.
Then, head to the Start menu and locate the Devices option.
Now, under the Bluetooth settings, hit the Add Bluetooth or other device option.
After that, your PC will detect the devices that are available nearby.
Once your machine appears, select it and let it connect to your PC.
Finally, go to the Machine Setup option, and you’ll see your machine connected there.
You can connect your devices together using a USB connection, but a wireless connection such as Bluetooth will install your machine effortlessly. When you know everything about the installation, start with your machine and create whatever you want. There are so many projects you can try with it.
Important Note: Don’t forget to check the minimum system requirements before trying to install your machine and connect it with your computer.
FAQs
How to Install Cricut Maker 3 on Mac?
To install your machine on a Mac, follow these steps:
First, unbox your machine and connect it to a power supply.
Then, turn on your machine.
Now, get your computer and connect it to your machine.
Choose either USB or Bluetooth to connect your devices together.
Next, pair your devices together.
Visit cricut.com/setup and download the Design Space app.
Continue installing the app and sign in to it.
Finally, your machine is paired with your Mac.
Is Cricut Design Space a Good Software?
Yes, Design Space is excellent software for your DIY routine. It has several amazing features that work best for beginners—to pro-level crafters. Since this software is absolutely free, you don’t feel it is a heavy investment.
How Can I Connect My Cricut Maker 3 to My iPhone?
To connect your product to an iPhone, use these steps:
First, connect your machine and iPhone with a suitable connection.
You can select from the USB or Bluetooth connection.
Now, download the app on your iPhone using the App Store.
Then, open the app and sign in with your account details.
Finally, your crafting machine will be connected to the iPhone.
Source: How to Install Cricut Maker 3
#cricut maker setup#cricut maker 3 setup#install cricut maker 3#how to install cricut maker 3#cricut machine setup#design.cricut.com#cricut design space app#cricut design space software#cricut design space download
0 notes
Text
How to Use Cricut Explore Air 2: Create DIY Projects at Home
Are you excited to express your creativity with the Cricut Explore Air 2 machine? This flexible cutting machine can make your crafting dreams come true. It cuts over 100+ various materials, like paper, cardboard, vinyl, and even leather.
Whether you’re a pro crafter or a beginner, this machine is perfect for bringing your ideas to life. This stepwise guide will walk you through ‘how to use Cricut Explore Air 2‘, download the Design Space app, and create your first project.
So, get ready to venture on a crafting adventure and discover the joy of DIY projects. Let’s dive in and explore the world of Cricut!
Downloading Cricut Design Space on Your Computer
The first thing to use the machine is to download the Cricut Design Space software. To download it, navigate to design.cricut.com from your Windows or Mac. If you already have a Cricut account, log in to the app after downloading it.
If you want to download the software on your mobile device, either Android or iPhone, go to their Play Store/App Store and look for the app in the search bar. It will be a square icon with Cricut written at the center.
NOTE: You must have an account beforehand to use the app. If you don’t have one, you should create one on the sign-up page. Also, you don’t need a Bluetooth adapter to use the machine, as it comes with built-in Bluetooth. The earlier Explore series, such as the Explore One, required a Bluetooth adapter.
Connecting Cricut Machine to Your Computer With USB
Although you can use your machine wirelessly, let’s examine how to use it through USB.
Step 1: First, place it on a clean and flat surface with 10-15 inches of space behind and front to let the cutting machine move freely.
Step 2: After that, you must plug in your Explore cutting machine.
Step 3: And then attach the USB cable and power adapter.
Step 4: Next, you need to turn on your Explore machine and your computer.
Step 5: Open the Cricut Design Space software discussed in the previous section and log in using your credentials.
Step 6: Within the app, select the Menu icon visible at the top and choose New Machine Setup. This will guide you through the installation, the first project you will make, and a greeting card.
Now, you are almost ready to use the machine. The next section will examine how to make a project on your machine. So, let’s get into that.
How to Use Cricut Explore Air 2: Creating Your First Project
Now, let us walk through a project that can be made with the materials that came with the box of your machine. If this is your first project, don’t worry—it will be easy!
Step 1: From the “Cricut New Machine Setup,” you will see a design on your screen. If you don’t find it, head over to cricut.com/setup. Then, find the Menu on the top side and click “New Machine Setup.”
Step 2: Prepare all the materials that came with the machine, such as cardstock, mat, paper, and pen. Remove the plastic film from your machine and keep it aside for future use.
Step 3: Afterward, you need to load the cardstock on the machine mat. The textured side should be facing up and lined up on the machine mat vertically. Make sure to line it up on the upper side, right below the Cricut logo.
Step 4: In the next step, you must insert your cutting mat into your Explore machine. Ensure that you load the machine mat as per the guidelines. You also need to take care that it is pressed against the roller while you press the “load/unload” buttons, which are located at the top of your cutting machine. The icon looks like a set of double arrows.
Step 5: Now, you need to insert the pen in clamp A. To do that, you need to remove the cap and place it tip-down until the arrow on the pen disappears. After you are done with this, you can close the clamp.
Step 6: Then, check the design on your screen and tap the Go button.
Step 7: Next, you need to set the dial to cardstock on the machine.
Step 8: As soon as you are ready to make the necessary changes in the design, the preview “C” button on the machine will start flashing.
Step 9: Also, you will have to unload the machine mat. Once you complete the project, click on the load/unload button to take off the pen.
Step 10: Afterward, remember to put the machine mat face down on a flat surface and then curl the edge up toward you. It will be removed from the cutting mat, and as you take it off, keep curling it up to make it easier.
Step 11: Fold your paper card over, and then crease it in half. Place the same on your plain blue paper inside the card. You can glue this in place if you like.
Hoorah, you have finished your first project. Pat yourself on the back and know that your journey in this crafting world has begun.
Summing Up
That concludes our guide on ‘how to use Cricut Explore Air 2‘ for beginners. Reading the above blog should make you feel fairly comfortable working on a new project. Now, you know how to download the Design Space app, set up the machine, and use it properly. Plus, you can always return here for a quick refresher!
FAQs
How do I enable the fast mode in my Cricut Explore Air 2?
To enable Fast Mode on your machine, load your material onto the cutting mat and place it in the machine. Choose the proper material setting in the Cricut Design Space software, such as vinyl or cardstock. Then, seek the option to enable Fast Mode. After selecting it, click the blinking “C” button to cut. This mode allows your machine to cut and write up to two times faster, making it appropriate for certain materials.
What can I make with a Cricut Explore Air 2?
It is an amazing and versatile cutting machine that allows users to make unique designs and projects. It has the ability to cut over 100 materials, like vinyl, cardstock, and iron-on, and even thicker materials, including wood. Its additional features, like writing and scoring capabilities, enable the creation of custom cards, labels, and stickers. This machine gives users access to thousands of designs through Cricut Design Space; users can easily make personalized items suited to their tastes.
Can I use Cricut Explore Air 2 without a computer?
Yes, one can use the machine without a desktop by pairing it to a smartphone via Bluetooth. The machine has built-in Bluetooth connectivity, which allows one to use the Cricut Design Space app on iOS or Android devices to design and send projects to the machine. However, some features may be limited compared to those of a computer.
Visit: install cricut design space app cricut.com setup mac
Source: https://explorenewmachine.com/how-to-use-cricut-explore-air-2-create-diy-projects-at-home/
#cricut.com/setup#cricut.com/setup mac#cricut.com/setup windows#cricut.com/setup login#install cricut design space app#install cricut explore air 2#install cricut design space#install cricut#www.cricut.com setup login#www.cricut.com/setup#www.cricut.com/setup login#cricut explore air 2#cricut setup#cricut design space download#cricut design space app#cricut design space software#cutfiles#cricut design space setup#cricutprojects#cutfilesforcricut
0 notes
Text
Why Is My Cricut Not Connecting? (Quick Fixes)
Cricut machines are one of the most useful tools for crafters, which makes it easy for them to create complex designs and projects. However, users may become extremely frustrated as a result of connectivity problems. It is important to comprehend the causes of these issues. This will enable you to troubleshoot them more successfully. This blog will look into the query, “Why is my Cricut not connecting?” alongside the typical causes of connectivity problems for your machine.
Method 1: Check the Connection of Devices
Cricut machines can connect either via a USB cable or with the help of Bluetooth. Knowing how each connection type works is essential for troubleshooting connectivity issues.
USB Connection

The USB that you are using must be in good condition; otherwise, you will have trouble connecting it to your machine. Plus, you must ensure the wire is correctly plugged into your computer and the machine. A malfunctioning cable or port could be the cause of the connection loss. An alternative USB cable or port might help fix the problem.
Bluetooth Connection
With the Bluetooth option, you can have a wireless connection to your machine. Just ensure that you turn on Bluetooth on your device. If your machine’s name does not appear in the list of available devices, then you should try the following steps:
Restart your devices: Sometimes, a simple restart of your device can resolve the issue. So, start with that.
Forget the device: If that does not work, you can try forgetting the device. To do this on your computer or mobile device, go to Bluetooth settings, find your machine model, and select “Forget.” After that, try to reconnect again.
These steps often answer the question, Why is my Cricut not connecting?
Method 2: Update Design Space or Operating System
Another main factor in connectivity issues is software compatibility. You need to make sure that both the app and the device’s operating system are up to date. Older software often leads to connectivity problems.
Updating Design Space
To check whether the app is updated or not, follow the below steps:
On Windows
You need to open the app and then need to click on the three horizontal lines in the top left corner. Once there, go on to select “Check for updates” and click OK. Your app will be updated if you have some older versions.
On Mac
If you have a Mac, open the app and click on “Design Space” from the menu bar. Afterward, select the “Check for updates” option. If updates are available, go ahead and install them. Once installed, you must restart the application. This way, you can resolve the issue related to why is my Cricut not connecting.
Method 3: Diagnosing the Network Settings
Network settings can mainly impact wireless connectivity. You must ensure that your antivirus software does not block the firewall settings for the Cricut Design Space app. If found positive, you might need to adjust your firewall settings so that the app can communicate through the network.
Method 4: Check the Firewall Settings
Sometimes, you need to configure the firewall settings properly so that the machine can connect properly. In order to do that, follow the below steps for Windows and Mac.
Windows
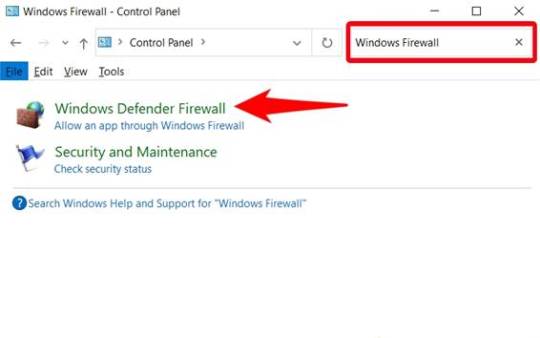
First, you need to go to the Control Panel, then to System and Security, and from there you must open Windows Defender Firewall. Once you reach there, check for the option “Allow an app through Windows Defender Firewall.” Click on it and ensure the app is allowed.
Mac
On Mac, go to System Preferences, then Security & Privacy, and then Firewall. Once there, select the Firewall option and ensure that the Design Space software is allowed. Adjusting these settings can help answer why is my Cricut not connecting.
Method 5: Ensure Your Device Is Compatible
You will have to make sure that your computer or mobile device meets these minimum system requirements for using Design Space. If your operating system has insufficient RAM or processing power, you might have difficulty connecting or might not connect altogether.
Method 6: Checking System Requirements
The minimum system specs for the application include:
Windows: Windows 10 or later, and at least 4 GB RAM or more.
Mac: macOS 10.12 or later, and at least 4 GB RAM or more.
Mobile: iOS 12 or later or Android 5.0 or later.
If your device does not fulfill these requirements, you should consider upgrading your hardware or changing the device that connects your machine.
Troubleshooting Steps
If you still face trouble with the connectivity, then follow these quick and simple steps:
Restart your machine: Turn off your machine and wait a few seconds. Then, turn it on again. This will surely solve the issue.
Reset Bluetooth settings: If you are using Bluetooth, reset your device’s Bluetooth settings and try to reconnect. It should fix the problem.
Reinstall Design Space: Uninstall the app and reinstall it. Reinstalling will ensure a fresh start, and hopefully, you will be able to reconnect again.
Conclusion
In short, connectivity issues with your Cricut machine can arise from various factors, including connection type, software compatibility, network settings, and device compatibility. Following the tips and suggestions mentioned above, one can address the question, “Why is my Cricut not connecting?”
Just remember to check your connections, and ensure that the software is updated, also make sure your device meets the necessary requirements. With these methods, one can enjoy a seamless crafting experience with their machine.
FAQs
1. What should I do if my Cricut machine doesn’t turn on?
Ensure that your power cord is securely connected to both the machine and the electric outlet. If using a power strip, try plugging directly into a wall outlet. You should also check the power cord for any visible damage.
2. How can I improve Bluetooth connectivity with my Cricut?
Make sure that your machine is within range of your device and that Bluetooth is enabled. Restart both devices and try forgetting the machine in the Bluetooth settings before reconnecting.
3. What are the minimum system requirements for Cricut Design Space?
For Windows, you need Windows 10 or later with at least 4 GB RAM. For Mac, macOS 10.12 or later with 4 GB RAM is required. Mobile devices should run iOS 12 or Android 5.0 or later.
4. How do I check for updates in Cricut Design Space?
On Windows, open the app and click the three horizontal lines in the top left corner to select “Check for Updates.” On Mac, click “Design Space” in the menu bar and select “Check for Updates.“
5. What should I do if my Cricut App is crashing?
Try reinstalling the app to ensure a fresh start. Also, check for software updates and clear your device’s cache to improve performance.
Source: Why Is My Cricut Not Connecting
#why is my cricut not connecting#cricut design space#cricut design space app#cricut design space software#cricut design space download#cricut machine setup
4 notes
·
View notes
Text
How to Use a Cricut Maker to Create a DIY Project? (Easy Guide)
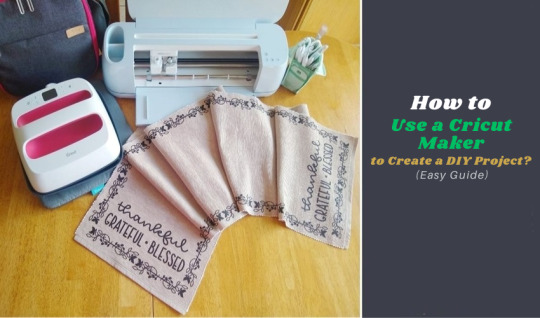
Are you thinking of buying a Cricut Maker? Or you have just got one and are not sure where to start? This guide will walk you through all the different ways to learn how to use a Cricut Maker without any previous experience.
This cutting machine is advanced and unique from other models, like Explore Air 2 and Joy machine. It delivers a wide range of features, tools, and accessories for crafting projects. With this machine, you can cut fabric, vinyl, cardstock, chipboard, and more precisely.
So, if you are a beginner and don’t know how to use this machine—don’t worry; we are here to help! Read this blog, and you will learn how to use it easily.
How to Use a Cricut Maker: Unboxing and Initial Setup
Once you have got your machine in your hands, it is time to check if you have all the necessary supplies and tools that come with the machine or not. So, in order to do that, you must follow these steps:
Step 1: Unbox Your Machine
Carefully remove the machine from the box, ensuring that all packaging materials are removed. Inside the box, you will find the machine, a power cable, a USB cable, a cutting mat, a fine-point blade, and a welcome guide.
Step 2: Positioning Your Machine
Place the machine on a flat surface, ensuring at least 10 inches of space in front and behind the machine. This space allows the cutting machine to move freely during operation.
Step 3: Connecting to Power
Now that you have unboxed your machine, it’s time to take the most important step: giving it life support. To do that, you must insert the power cable into the back of the machine and plug it into an electrical outlet. Once you finish the connection part, let us look into how to activate your machine.
How to Activate a Cricut Maker: Quick and Easy Steps
The first thing to do is activate the machine. To do so, from your Windows/Mac, you must head over to cricut.com/setup from any browser of your choice. Activating the machine is even easier if you have already used the Design Space app. To set up the machine from the app, go to the Menu icon and then select ‘Cricut New Product Setup.’ After that, follow the prompts that let you choose your machine.
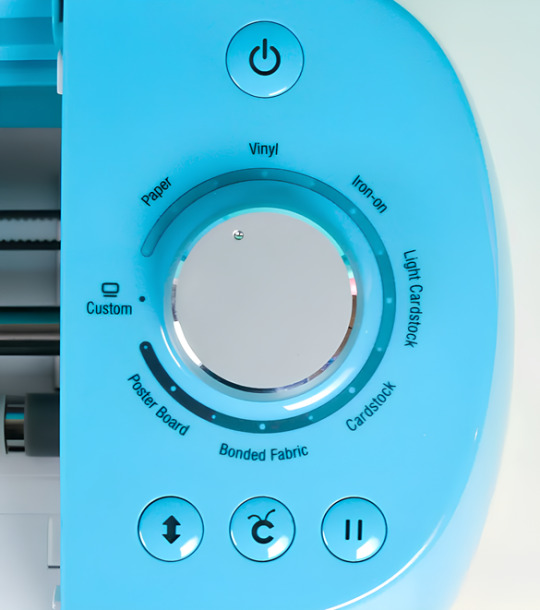
To open the machine, you must lift its lid. This will open the cover of the machine automatically.
Power button: With this button, you can turn the machine on and off.

Feeding switch: This button lets you feed your mat into the machine.

Cricut switch: This is the button with the initial C. Press it when you want to start cutting (it is also called the confirm button).

Pause button: This button gives you the flexibility to pause your machine in between. It’s extremely handy if you’re in the middle of a cut and want to change something or for any other reason.

That’s all in terms of design. In the next section, we’ll look at the steps to create a project.
How to Use a Cricut Maker: 5 Easy-To-Follow Steps
To use a machine, follow these detailed steps from setup to your first project. As the Cricut Maker Setup is a versatile cutting machine, it can handle various materials, making it ideal for crafting projects.
Step 1: Connecting to Your Device
In order to get a hold of the machine, you must connect it to your desktop or computer. This is crucial because, without the connection, the machine cannot communicate with your device. Even though the Design Space app can work offline, you still need a connection at least once to save it on the app.
You can connect your machine to your device via a USB cable or Bluetooth. Connect the square end to the machine and the USB end to your PC via USB. To pair your device with the machine using Bluetooth, turn on the machine and then go to the Bluetooth settings.
Visit the official website or surf design.cricut.com and download the Design Space application. It is essential for project creation and supports various platforms, like Mac, iPad, and iPhone.
Step 2: Setting Up Design Space
This is the most important step after connecting the machine and your device (Mac/Windows). Once you have downloaded the app, you must do these things for a smooth experience:
Open the software and fill out the required fields to create an account. The account allows one to save their projects and access various design features.
In the software, select “New Machine Setup” from your profile. Finish the on-screen steps to choose your machine model and perform the setup process. The app will guide you in connecting your device to the machine.
Step 3: Designing Your DIY Project
Now that you have done all this, let’s start creating your first project. To do so, let’s look at these steps:
Start a New Project: Once your machine is connected, you can start a new project using the software. Select the type of project you want to create, such as a card, decal, or label.
Choose Your Materials: Design Space allows you to select the material. If you use cardstock, set the material type accordingly.
Prepare Your Cutting Mat: Place your chosen material onto the mat. Ensure it is aligned correctly and adheres well to avoid shifting during cutting.
Step 4: Start the Cutting Process
Now that you are familiar with downloading the app and activating the machine, let us look at its main purpose: the cutting process. It happens as described below; follow the steps carefully for a seamless cutting.
Load the Mat: Insert the mat into your crafting machine until it clicks into place. This will automatically feed the mat in for cutting.
Start Cutting: Press the “C” button on the machine to begin cutting. Your device will display a percentage of the cut completion and allow you to monitor the progress.
Completion: Once the cutting is finished, the machine will signal it is done. Carefully remove the mat and peel off your cut material.
Step 5: Post-Cutting Steps
It is equally important to know what to do after you are done with your cutting process.
Removing Your Cut Material: Gently lift the material from the machine mat. If you use delicate materials, such as intricate designs, use a spatula tool to help lift them without curling.
Assemble Your Project: Depending on your project, you may also need to assemble various pieces. Follow any additional steps to add embellishments or complete your design.
Conclusion
Don’t be discouraged if your first project isn’t perfect. The more you use your cutting machine, the more comfortable you will become with the process. Take time to explore the features of Design Space, like templates, images, and fonts. This exploration can inspire new project ideas. Using a crafting machine opens up a world of creative possibilities. Following these steps, you can confidently set up your machine, design your projects, and bring your creative ideas to life. Happy crafting!
FAQs
How do you use a Cricut for beginners?
To use a crafting machine as a beginner, unbox your machine and follow the setup steps. Download the Design Space software on your computer or mobile device for project creation. Familiarize yourself with basic operations like uploading images, selecting materials, and changing settings. Start with modest projects, such as stickers or paper cards, to build confidence. Use online resources and community forums to get more support and inspiration.
What do you use a Cricut Maker for?
A Cricut Maker is a versatile creative gadget that can cut materials like vinyl, paper, and fabric. It’s excellent for making unique designs for home decor, apparel, and more. The machine is capable of cutting a variety of materials, making it appropriate for both simple and intricate crafts. Beginners begin with projects such as greeting cards or decals, gradually discovering their full potential as they gain skills.
Do I need a computer to use a Cricut?
While a computer is not required to use a Cricut, it is suggested for maximum performance. The Design Space software can be accessible from a computer, tablet, or smartphone, making design management easier. Using a computer allows for a wider screen and more accurate control when making complex designs. However, several users have operated their machines using mobile apps, allowing them to create while on the road.
Source: How to Use a Cricut Maker
#how to use a cricut maker#cricut design space download#cricut design space app#cricut design space software#Cricut Maker Setup#cricut new product setup#how to setup cricut maker#cricut new machine setup
1 note
·
View note
Text
How to Connect Cricut Bluetooth to Mac and Windows?

Have trouble connecting a crafting machine? Here, I answer how to connect Cricut Bluetooth on Mac and Windows computers. During my six-year crafting journey, I faced many challenges. Be it creating a project or setting up the machine, the journey was full of ups and downs.
Nothing can be worse for crafters than setting up this machine. It takes time, and many non-tech-savvy people do not like to do it—no worries; I know your pain😉! In addition, these years of experience have taught me a lot about this exceptional machine.
Hence, believe it or not, these overall steps can be fun. To learn more, delve into this tutorial and check out the blog. I will explain the system specs first, then show you how to connect Cricut to computer via Bluetooth.
System Specifications for Using Cricut Design Space
Alright, we are heading to learn how to connect Cricut Bluetooth. But before you connect, you need to check the system specs. As I said earlier, checking the system steps can prevent your PC from crashing and many other errors. Let’s take a look at a few important points provided below:
Mac
Supported Operating System: macOS 11 or later
RAM: 4 GB
CPU: 1.83 GHz
Display Resolution: 1024px x 768px
Internet: Minimum 2 – 3 Mbps Download & 1 – 2 Mbps Upload
Hard Disk Space: 2 GB required at least
Connection Type: Bluetooth wireless or wired USB
Offline Feature: Yes, it is available for Mac
Windows
Supported Operating System: Windows 10 or later
RAM: 4 GB
CPU: Intel Dual-Core or equivalent AMD processor
Display Resolution: 1024px x 768px
Internet: Minimum 2 – 3 Mbps Download & 1 – 2 Mbps Upload
Hard Disk Space: 2 GB required at least
Connection Type: Bluetooth wireless or wired USB
Offline Feature: Yes, it is available for Windows
How to Connect Cricut Bluetooth to Your Computer?
Here, I am going to connect your machine to Bluetooth devices such as Windows and Mac. By connecting this machine to your compatible device, you will be able to start your crafting journey in one go! Let’s delve into the steps given below:
Mac
Power on your machine and MacBook.
Cutting machine should be within 10-15 feet of your Mac.
After that, you will need to go to the Apple menu given in the upper left corner.
Next, choose System Preferences or System Settings.
Now, search for the Bluetooth option.
Turn on the Bluetooth.
Wait and see if your Mac detects your nearby machine.
When detected, select it and click on the Pair button.
Once done, return to your Design Space app and Cricut New Product Setup.
Then, your machine will show that your device is connected.
Windows
Turn on the PC and place it 10 to 15 feet away from the machine.
After that, press the Start button (Windows logo-like key) on the keyboard and select a gear icon, which is your Settings.
Once the Settings opens, you need to select the Devices option.
Now, you will need to find the Bluetooth option and check if it is on.
If your Bluetooth is off, turn it on.
Then, you have to add your machine by clicking on Add Bluetooth or other device.
On the next pop-up screen, you are required to select the Bluetooth option.
Also, your PC will start looking for the machine nearby.
Once it finds your machine model, click on it to pair.
Finally, you learned how to connect Cricut to computer. Afterward, you can open your Design Space and start setting up the machine. For setup, you will need to follow the on-screen prompts displayed on the Design Space app. Once done, you are all set to craft!
Final Words
So, yeah, that’s all in this blog tutorial. By now, you might have learned how to connect Cricut Bluetooth. Afterward, you are ready to proceed and complete the machine setup. To conclude, I explained the system specs so that you can understand your system’s compatibility before setting it up. After the system specs, I explained the steps for connecting the machine to the PC and Mac separately. Good luck with your crafting journey.
FAQs
How can I connect my Cricut to Bluetooth?
To create your machine to your Bluetooth device, check out the following points:
Go to your mobile device (Android or iOS).
Ensure Bluetooth is turned on.
Also, turn on the heat press.
Then, head to Google Play Store (on Android) or App Store (on iOS).
Search for the Cricut Heat app and download it.
Open the app and select the Cricut Setup button on the screen.
After that, your device will detect your nearby device.
Tap on the Connect button.
Finally, your heat press is paired now.
Which Cricut machine is Bluetooth enabled?
Several Cricut machines are Bluetooth enabled, such as the Maker, Maker 3, Explore Air 2, Explore 3, Joy, and Joy Xtra. These latest and smart cutting machines have built-in Bluetooth and are compatible with iOS, Android, Windows, and macOS. However, they can be connected via USB cable except for the Joy model.
How to install a Bluetooth adapter in Cricut?
In order to install a Bluetooth adapter in your Explore or Explore One machine, delve into the following quick steps:
Turn on the Explore machine.
Grab the Bluetooth adapter and remove its cap.
Insert the adapter into your Explore machine.
Ensure the text on the adapter is facing up
When you notice a blue light flashing, it means you have installed the adapter.
Source: How to Connect Cricut Bluetooth
#how to connect cricut bluetooth#how to connect cricut to computer#cricut design space download#cricut design space app#cricut design space software#cricut explore air 2 setup#Cricut setup on computer#how to setup cricut explore#cricut explore air 2 software#Cricut New Machine Setup#Cricut maker setup
1 note
·
View note