#evee render engine
Explore tagged Tumblr posts
Visit Tumblr Blog
Explore Tumblr blogs with no restrictions, modern design and the best experience.
Last Seen Tumblr Blogs


Fun Fact
Mobile Tumblr US users spend an average of 4.04 minutes per session on the app.
Text
So this thing is dropping soon but-
When the fuckass 10sec animation takes 1.5hrs to render on Evee
Kqnsjalbskwjdnwlnr

Oh, and it estimated that a SINGLE FRAME in Cycles engine would've taken 13 HOURS to render like what the fuck 💀💀💀
Okay maybe i shouldnt expect more from a laptop
(But i'll try on PC when i can and see cause i love the look of raytracing)
#ninjago#lego ninjago#ninjago dragons rising#ninjago kai#ninjago legends#ninjago monstrosity#kai smith#blender#rendering
118 notes
·
View notes
Text
Development 1: Finishing the high poly model
Blog#26
December 9th
I showed my progress of the development 1 project to Professor Wayne, on my weekly tutorials. He mentioned how we should always start from the big shapes in the model and then keep adding the smaller details further I go. He stated that he could see I have applied that principle in my modelling process, by blocking out the big shapes first. He talked about lighting and making shaders in Unreal Engine for the final renders.
I have also presented my progress to Professor Neil. He suggest as it’s a very clean object with not much of a variation, I could just use the high poly mesh as Nanite and use triplaner or automotive material directly in Unreal. Also for some of the smaller details I can try decal shaders as well.
I have made significant progress in the modelling stage. I have added almost all the smaller details on the model. Now, I have started permanently applying the modifier to mesh and then optimize the topology and shading.

High poly mesh with all the cutter/boolean objects.

Final model with all the tertiary details
I’ve also given the basic materials in Blender to all different object groups with the same materials. I usually do this step to check the shading on my model during the modelling phase.

Materials view in Blender EVEE
I did get some pinching and shading issues on some of the objects. I fixed these shading issues by using the guide mesh method and shrink-wrapping the outer faces of the mesh onto the guide mesh to get the clean shading on the Boolean cut meshes as well. I learnt this technique in CG master’s, 3D cars- inside and out tutorial.

Screenshot of the Blender tab with active modifiers on the mesh


I am done with a high poly model. I’ll optimize it a bit, fix any other issues I find and then I’ll start making decal meshes for all the texts and stickers I can see on the model.
References:
Cgmasters.com. (2025). 3D Cars: Inside and Out | CG Masters. [online] Available at: https://cgmasters.com/3d-cars-inside-and-out-in-blender
0 notes
Text
Week 5 - storyboarding and environment concepts
Status: currently in my develop phase with story boarding and concept rendering.
tools/tech used: Ive been mostly using blender for concept renders and asset creations. I plan to use unity as my main program for the final project and have my project viewed in a oculus quest 2 VR head set. Though I might have my environment be prototyped in Mozilla hubs.
What I did this week:
Storyboard the initial process of user entering the VR environment
Concept images/renders of possible environments in blender but still need more work to fill them out.
more research and resource gathering on how to use unity and how to create a drawing program in unity.

Challenges I faced this week:
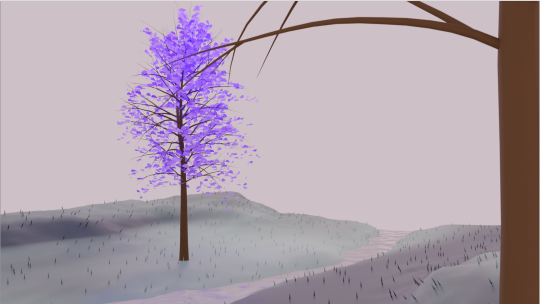
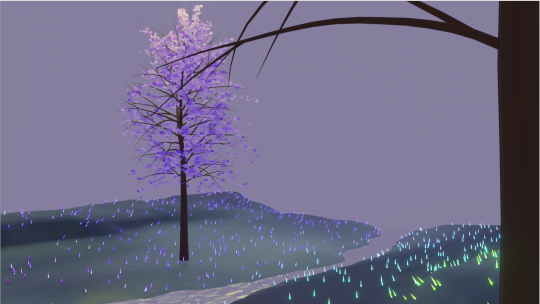
this week I struggled with issues involving rendering my concepts in blender but that was fixed by simply changing the render engines from cycles to EVEE. (examples of the two different renders below)
2. Another challenge I faced was my storyboarding, because I am still deciding between having a 2D or 3D drawing program in Unity. I am also debating on the decision of including a virtual character for the user to interact with and as a way to check in on the players well being.
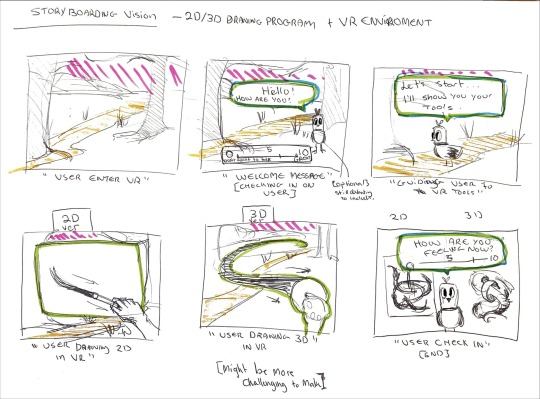
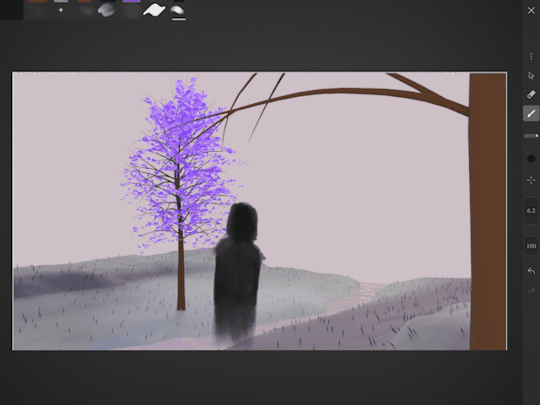
Ive also tried to make a very crude animated story board using already rendered concept image and a doodled version of a virtual character.

3. I have been gathering video resources from youtube and unity's website in hopes to prepare myself for learning to bring my vision in to reality.
What I plan for next week:
To continue storyboarding the rest of the experience and resource gathering. May be actually start to familiarise my self with unity.
0 notes
Text
Top 4 Rendering Engines Used for Multi GPU Rendering
The fast cloud rendering services provider and GPU&CPU render farm, Super Renders farm will share with you 4 rendering engines used for multi GPU rendering.
It is well known that GPU rendering can be performed using a graphics card instead of a CPU to render and can be significantly faster, as GPUs are primarily tailored for fast image rendering. GPU was created to cope with graphics-intensive applications that can burden the CPU and hinder computational performance. The principle of GPU rendering is to run across multiple cores on multiple data, putting parallel processing focused on one specific task, while freeing up the CPU to emphasize different sequential serial processing jobs.
With the reduction in GPU rendering times, there is a wide variety of rendering engines that utilize GPU rendering. In particular, simultaneous rendering using multiple GPUs can be 5 or 10 times faster than a single GPU. As a result, some of the world’s leading brands are focusing primarily on developing products that optimize multi-GPU performance. Maxon and Otoy, which bring great rendering solutions, reduce the rendering time burden for 3D artists, designers, filmmakers, etc.
The multi GPU rendering engines widely used today are Redshift, Octane, Vray, Iray, Fstorm, Eevee, Cycles, which have matured significantly and are outpacing CPU-based rendering engines in terms of both popularity and rendering speed.
Top 4 Multi-GPU Rendering Engines
1. Redshift
Redshift Rendering Technologies Inc was founded in California in early 2012 with the goal of developing production-quality, GPU-accelerated renderers that support biased global lighting technologies that have hitherto been entirely within the CPU domain. Redshift is now part of the Maxon family and is rapidly becoming the first choice of rendering engine for the motion design community. The Redshift rendering engine supports a selection of 3D programs: Autodesk Maya, Autodesk 3Ds Max, Maxon Cinema 4D, Houdini and Katana.
Recommended hardware requirements:
RAM: 16GB RAM or more
CPU: Core i7 or Xeon equivalent, 3.0GHz or higher
Graphics card: with 7.0 or higher CUDA computing power and NVIDIA GPU with 10GB or higher video memory: NVIDIA Quadro, Titan or GeForce RTX GPU for hardware-accelerated ray tracing.
Multiple GPUs
2. OctaneRender
OctaneRender® is one of the world’s first and fastest bias-free, spectrally correct GPU rendering engines, offering quality and speed unmatched by any production renderer on the market. As a product of Refractive Software, Octane was founded by Terrence Vergauwen, the lead developer of LuxRender, and in March 2012, Refractive Software was acquired by Otoy, who also received investment from Autodesk. Now as part of the Otoy family, Octane supports 3Ds Max, Maya, Cinema 4D, Houdini, Daz Studio, Unreal Engine and many other softwares.
Recommended hardware requirements:
RAM: 16GB RAM or more
Graphics: with CUDA computing power 3.0 or higher; and 10GB video memory of NVIDIA GPU: NVIDIA GeForce RTX GPU, GTX, Quadro, Titan
Multiple GPUs
3. EEVEE VS CYCLES
Eevee vs Cycles are the two main GPU rendering engines for Blender, the Blender Foundation’s open source 3D creation software that enables users to handle all aspects of 3D work. It includes modeling, animation, game creation, visual effects and much more. Blender is easy to download, customize and work on your own terms. The software also offers a large number of plugins for creating various types of models, animations, sculptures and more. Ultimately, comparing Evee with Cycles is more or less just comparing real time with ray tracing.
Recommended hardware requirements:
RAM: 16GB RAM or more
CPU: 64-bit quad-core CPU
Graphics card: At least 4GB of video memory
Multiple GPUs
Optimal hardware requirements:
RAM: 32GB RAM or more
CPU: 64-bit octa-core CPU
Graphics: 12GB VRAM or more, RTX GPU, Quadro
Multiple GPUs
4. FStormRender
FStormRender is a new GPU-driven, unbiased renderer with good performance that is quite easy to use. It uses convenient materials and light sources, it is simple, fast and realistic. Currently, FStorm GPU rendering engine is only available for 3Ds Max software. We hope that this amazing renderer will be available for major 3D software in the near future.
The FStormRender has many unique features such as improved tone mapping, glossy reflection shaders, glare effects, light sampling, improved ray tracer and optimized QMC sampling. The FStormRender is deeply integrated into the 3Ds Max environment and supports all necessary and critical features. The built-in scene converter allows easy and careful conversion of any scene from Corona, Octane and Vray renders. Fstorm is interactive, allowing the user to change the scene as it is rendered and to view these changes interactively without reloading. Any scene changes (other than geometry) are automatically reflected. Geometry changes require enabling live geometry updates or pressing the Reload Geometry button. Users can move the camera and get live updates in the frame buffer window.
Recommended hardware requirements:
RAM: 16GB RAM or more
Graphics: NVIDIA Geforce GPU: RTX and GTX series
Multiple GPUs
Source:
https://blog.superrendersfarm.com/news/top-4-rendering-engines-used-for-multi-gpu-rendering/
0 notes
Photo

Blender und BuildBox 3
Beispiel - ein simples Gebäude wird in Blender aus einem Cube mit 10 Subdivisions erzeugt. Mit der Extrudieren Funktion wurden quadratische und breite Fenster nach innen gezogen. Von beiden Flächen wurden Vertex Groups erzeugt. Damit lässt sich eine Auswahl speichern, um z.B. ein Material zu vergeben (ich verwende Diffuse BSDF).


Im nächsten Schritt erzeugt man eine UV Map (Speichername des Images in meinem Fall: Hochhaus_UV_2048.png). Damit sind zwar die alle Flächen vorbereitet, aber es fehlt noch die Farbzuordnung. Das gesamte Gebäude erhält einen Hellbraunton, mit den beiden Vertex Groups vergebe ich für die Fenster einen Blau- und Gelbton (nicht vergessen, nach der Selektion auch mit Assign die Farbe auf den lokalen Meshbereich zu übertragen).

Im Shading Editor muß ich für alle Materialbereiche die zuvor erzeugte UV Map “Hochhaus_UV_2048“ mit einem “Texture/Image Texture” zuordnen.
Zurück zum Layout bzw. UV Editor, um das finale Baking der Materialien anzulegen. Die Render Properties müssen dazu auf Cycles Render Engine umgeschaltet werden (sofern noch nicht geschehen, mit EVEE geht das nicht). Unten gibt es die Option “Bake”. als Bake Typ verwende ich (wie für die Materialien) “Diffuse” und als Contributions “Color”, Margin setze ich auf 8 Pixel.
Dann in den Objekt Mode wechseln und auf “Bake” klicken. Nun werden die Materialfarben in der UV angezeigt. Diese Imagedatei nun speichern (neben dem Wort Image* befindet sich ein kleiner Stern, der anzeigt, dass eine Änderung erfolgt ist und die Datei gespeichert werden sollte).


Export/Import für die Verwendung in BuildBox 3
Das Hochhaus-Mesh selektieren (Object Mode) und als *.OBJ exportieren; in Buildbox diese OBJ Datei ins Szenenfenster ziehen und dies als Objekt aufnehmen. Das Hochhaus taucht in der Liste ganz unten auf. Einmal drauf klicken, um den Objekt-Manager aufzurufen. Nun nur noch die UV-Map (Dateiname: “Hochhaus_UV_2048.png“) in das Texture Feld ziehen. Das Gebäude in die Szene integrieren und ggf. skalieren/drehen, fertig. Darauf achten, dass dies Objekt als “Physics” nicht auf “Dynamik” steht (Voreinstellung). Für unbewegte Objekte ist static oder none sinnvoll, wenn man selbst animieren möchte, ist Kinematic eine gute Option. (in meiner Beispielszene des Mobile Games “Street Run” habe ich einen der orangefarbenen Cubes mit einer 360° Y-Rotation im Mobile Game animiert.

In meinem Beispiel hatte ich zunächst simple Diffuse Color verwendet, der Prozess mit Image Texturen oder Verläufen ist ein wenig anders.
Eine sehr gute Beschreibung findet sich bei Grant Abbitt (Beginners Guide to Baking | part 6 | Multiple textures into 1 | Blender 2.8).
ak, 10.8.2021

0 notes
Video
Day 26 - More material testing in the Evee Engine. Testing out loops and Geo deformation. Cycles is busy rendering . . . #3d #cgi #fvx #blender #blenderrender #blender3d #aftereffects #everydayrender #everyday https://www.instagram.com/p/B_atuuqnxrP/?igshid=1x61heagvj2x8
0 notes
Video
tumblr
Sunset Animation
#sunset#sunrise#3 suns#alien world#ocean#ocean waves#calming#art#artwork#animation#artist#art on tumblr#artist on tumblr#3d#3d art#3d artwork#3d animation#3d blender#eevee render#evee render engine#blender eevee#blender 3d#blender art#blender animation#blender render#blender#blendercommunity
11 notes
·
View notes
Photo

Sci-Fi Environment
#sci-fi#scifiart#alien world#alien landscape#environment design#art#artwork#artist#artists on tumblr#art on tumblr#digital art#3d digital art#digital aritst#digital media#3d#3d art#3d artwork#3d artist#3d image#evee render engine#eevee render#blender eevee#blender render#3d blender#blender#blendercommunity
8 notes
·
View notes
Video
tumblr
Sci-Fi Animation Loop
#sci-fi#tunnel#corridor#3d animation#looping#animation loop#looping animation#3d#3d art#3d artwork#eevee render#evee render engine#blender eevee#blender render#blender#blendercommunity
11 notes
·
View notes
Video
tumblr
Sci-Fi Fluid
#sci-fi#scifiart#scififantasy#blob#blobby#slime#goo#fluid#material#tunnel#corridor#neon#animation#3d animation#looping animation#looping#animation loop#eevee render#evee render engine#blender eevee#3d#3d art#3d artwork#3d blender#blender render#blender#blendercommunity
8 notes
·
View notes
Video
tumblr
Sci-Fi Tunnel Animation
#sci-fi#scifiart#tunnel#spiral#rotate#rotating#animation#looping animation#3d#3d art#3d artwork#3d animation#blender render#eevee render#evee render engine#blender eevee#3d blender#blender#blendercommunity
3 notes
·
View notes
Video
tumblr
VJ Loop
#vj#vj loop#sci-fi#scifiart#rgb#3d#3d art#3d artwork#animation#animation loop#looping#looping animation#3d animation#3d animator#3d model#blender render#3d blender#evee render engine#eevee render#blender eevee#blender#blendercommunity#blender 3d
2 notes
·
View notes
Video
tumblr
Sci-Fi Gyro Animation
#sci-fi#scifiart#gyro#rotating#spinning#metal#hard surface#3d#3d art#3d artwork#3d animation#3d model#eevee render#evee render engine#blender eevee#blender#3d blender#blender render#blender 3d#blender community
4 notes
·
View notes
Photo

Neon Wallpaper
#wallpaper#3d wallpaper#vapourwave#theme#neon rings#neon cubes#sci-fi#scifiart#digital art#3d digital art#digital aritst#art#artwork#3d artwork#artist#artists on tumblr#art on tumblr#eevee render#evee render engine#blender eevee#blender render#3d blender#blender#blendercommunity
1 note
·
View note
Photo

Sci-Fi Environment
#sci-fi#scifiart#environment#environment design#alien#alien world#alien landscape#3d#3d art#3d artwork#3d model#blender 3d#eevee render#evee render engine#blender eevee#3d blender#blender render#blender#blendercommunity#art#new artist#artists on tumblr
2 notes
·
View notes
Photo

DNA Model
#dna#deoxyribonucleic#polynucleotide#molecules#medical visualization#art#artwork#artist#artists on tumblr#art of tumblr#3d#3d art#3d artwork#3d image#3d digital art#digital art#digital aritst#digital media#eevee render#evee render engine#3d blender#blender render#blender#blendercommunity
1 note
·
View note