#fixed neutral density filters
Explore tagged Tumblr posts
Visit Tumblr Blog
Explore Tumblr blogs with no restrictions, modern design and the best experience.
Last Seen Tumblr Blogs


Fun Fact
Forty percent of Tumblr users are between the ages of 18 to 25.
Text
Solving Polar Pro ND Filter Challenges
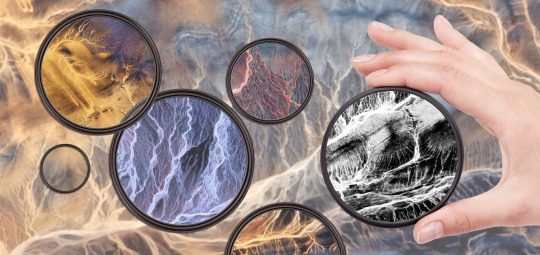
Neutral Density (ND) filters are indispensable tools for photographers and videographers, allowing for greater control over exposure, depth of field, and motion blur. At AWPRO in Dubai, we offer a wide range of ND filters, including high-quality options from renowned brands like PolarPro. However, using ND filters can come with its challenges. In this blog post, we’ll explore common problems associated with ND filters, provide practical solutions, and highlight why AWPRO is the best place to purchase your ND filters.
Common Problems with ND Filters
Cross Polarization Effects
One of the most frustrating issues with variable ND filters is the occurrence of cross polarization, which can create a noticeable black "X" pattern in your images. This typically happens when the filter is rotated to its extremes.
Solution:
To mitigate this issue, opt for variable ND filters that feature hard stops at both ends of the adjustment range. These designs help prevent reaching problematic settings that cause cross polarization. The latest models, such as the PolarPro Peter McKinnon Chroma variable ND filter, have been developed specifically to address this issue effectively.
Vignetting
Vignetting occurs when the corners of your images appear darker than the center, particularly when using wide-angle lenses with thicker variable ND filters.
Solution:
Choose low-profile ND filters designed to minimize vignetting. Additionally, avoid stacking multiple filters whenever possible, as this can exacerbate the problem. Our selection at AWPRO includes filters that are optimized for wide-angle lenses.
Size Compatibility Issues
Many variable ND filters are larger in diameter than the lens thread size, preventing the use of lens hoods or caps. This can leave your lens exposed to potential damage.
Solution:
Select ND filters that fit snugly on your lens without excessive protrusion. If you need to use a hood, consider using step-up rings to maintain compatibility while protecting your lens.
Color Casts and Image Quality Degradation
Some users report color casts or reduced image quality due to reflections within the filter glass. This can lead to inaccuracies in color reproduction and sharpness.
Solution:
Invest in high-quality ND filters with multi-coatings designed to minimize glare and enhance light transmission. Shooting in RAW format can also help correct color issues during post-processing.
Focus Issues with Drones
Drone operators often experience focusing problems when using ND filters, leading to blurred images despite correct settings.
Solution:
Before flying, test your setup without the filter under similar lighting conditions to identify if the filter is causing focus issues. If problems persist, consider switching to solid ND filters for better optical performance.
Why AWPRO is the Best Place to Buy ND Filters in Dubai
AWPRO offers a wide selection of high-quality ND filters, including fixed and variable options from top brands like PolarPro, ensuring you find the perfect fit for your photography and videography needs. Our expert staff provides personalized guidance, and we prioritize quality by sourcing from reputable manufacturers for optimal clarity and color accuracy. With competitive pricing, regular promotions, and a convenient location in Dubai alongside a user-friendly online store, AWPRO makes it easy to access the best gear. Customer satisfaction is our priority, so explore our ND filters today and grow your creative projects!
Conclusion
Using ND filters can enhance your photography and videography by providing greater control over exposure and creative effects. However, being aware of potential issues and knowing how to address them is crucial for achieving optimal results. At AWPRO Dubai, we are committed to helping you find the perfect ND filter while providing expert guidance and exceptional customer service.
Explore our extensive range of high-quality ND filters today at AWPRO and grow your creative projects! Whether you're shooting landscapes or capturing fast-moving subjects, we have the right tools to help you succeed.
0 notes
Text
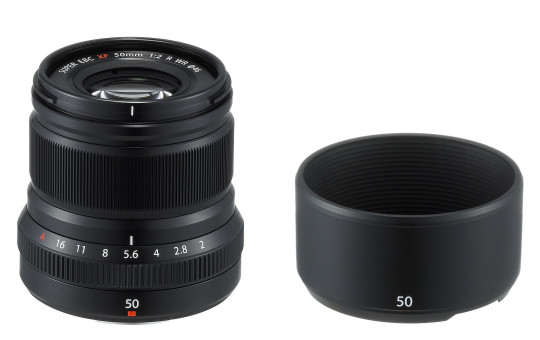
Haoge is Making Great-Looking, Bayonet-Mounted Protective Metal Lens Hoods for a Range of Fujifilm Fujinon XF Lenses
Haoge is Making Great-Looking, Bayonet-Mounted Protective Metal Lens Hoods for a Range of Fujifilm Fujinon XF Lenses
View On WordPress
#Breakthrough Photography#Breakthrough Photography X4 UV#fixed neutral density filters#Fujifilm#Fujifilm X Series#Fujinon#Haoge#lens accessories#lens hoods#lens shades#neutral density filters#protection filters#UV protection filters#variable neutral density filters#XF lenses
0 notes
Photo

Scotland Fix of the Day: Waves wash relentlessly over the ancient basalt columns of Staffa and eventually change the island, carving caves in some places (Fingal's Cave for one) and gradually tearing down the cliffs in others. In the end the waves win. This whole area was volcanically active 60 million years ago, in much the same way Iceland is today; violent and smoldering in places, already turning green and verdant in others. 📷 Tech Tip: Using a neutral density filter to get a long time exposures makes for the softly blurred water effect, but timing the exposure to the waves is critical. If you open the shutter when the wave is coming in the rocks will be totally covered. Wait for the wave to crash and begin to wash away before opening the shutter so you can still see the rock formations. #scotland #staffa #hebrides #island #hiddenscotland — view on Instagram https://ift.tt/3g9uiie
24 notes
·
View notes
Text
Modulating Devices (Research)
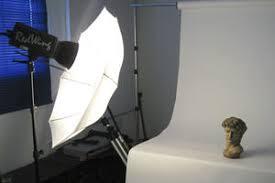
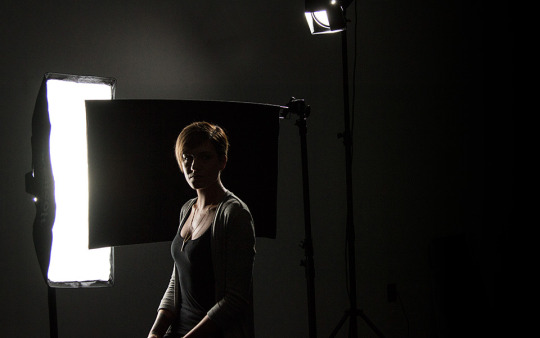
Modulating devices are an incredibly important factor to shooting a successful portrait, they are key for manipulating the direction and the quality of light both in studio and on location, even more for the latter if conditions aren’t ideal(Sunlight is too harsh/Needs to be bounced). I’ll list the modulating devices I’ve come across and some potential uses for said devices below:
Flags:
Flags are often a black, solid surface which is used to block or absorb light. It can also be used to cast shadows for dramatic effect, or create negative fill. However, some flags also occur in the natural world too, it’s basically anything that effectively blocks light such as: Windows/curtains, trees, fencing, black card, doorways and even some buildings if you consider the time of day.

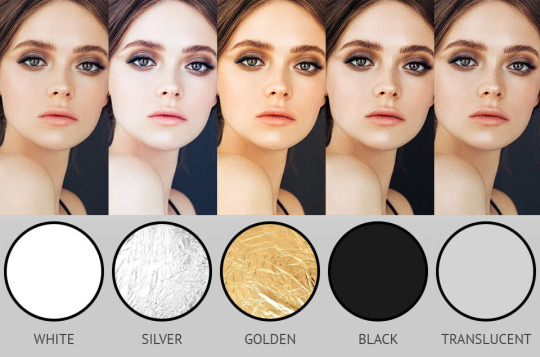
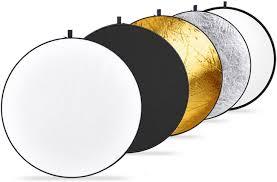
Reflectors:
Reflectors are essentially anything with the quality to bounce light back from a key light to the subject, silver surfaces are probably the most effective at this but are also the harshest in light quality. Due to this, most opt for something white like a large piece of white card or perhaps a white reflector. Photographers are known to get creative with their resources however, you could even use a white car to reflect hard sunlight if you were out shooting in the street or at home. There are also Gold reflectors, if you’re shooting in really warm colour temperatures such as “Golden Hour”
The purpose of reflectors is to fix shadows, if there’s too much in the subjects face or perhaps the eyes just need a little catchlight in them to give them some soul.
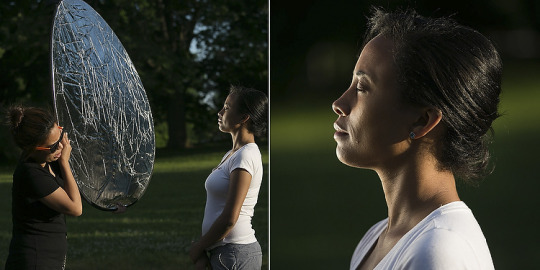
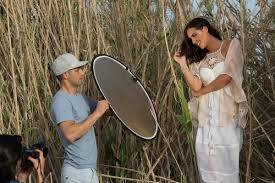
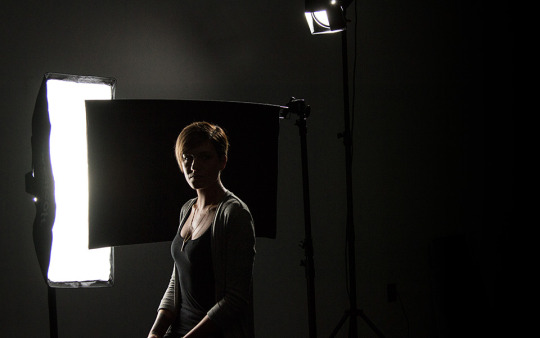
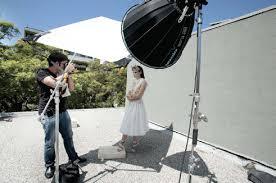
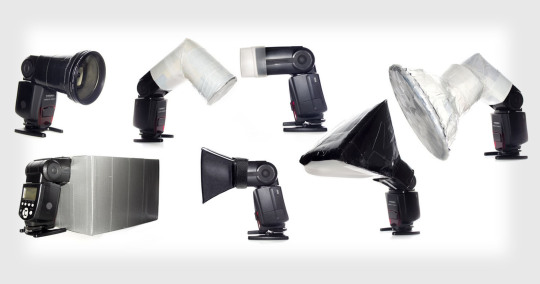
Diffusers:
Diffusers are often used in unison with reflectors, I feel like photographically they are both sides of the same coin. Diffusers by definition are any translucent material which will allow light to pass through it, thereby softening the quality of the light. The closer the diffuser is to the subject however, the softer this light will be and the photographer can still achieve a harsher look by positioning the diffuser a little further away from the subject if they wish.
Diffusers can be used in a studio environment or on location, whether it’s a soft-box on an expensive flash rig or it’s a cheap shower curtain set over a window in the event of unwanted harsh sunlight during a shoot. There’s tonnes of alternatives, for photographers on a budget theres: Pillowcases, White bin bags, thin white t shirts and shower curtains. Creativity is key when looking for modulators.
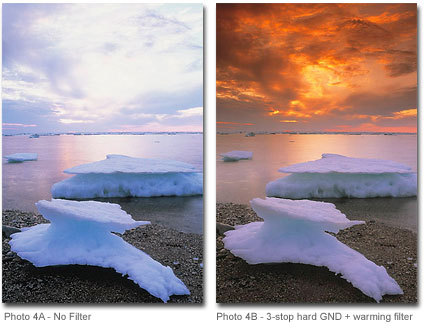
Filters:
Filters are a wonderful tool in a photographers arsenal, from creative colour filters, ND filters (Neutral Density) which block light giving you that extra stop or two to play with to polarising lenses which remove reflections, there’s a filter for every photographer. A filter is fixed onto the front of the lens or optical path of a camera, you can check which size of filter your lens fits by looking at the bottom of the front of the lens, just in front of the focus wheel.
Colour Lenses:
Colour lenses have many different effects on a photo and are typically only used in certain branches of it, I’ll list them below:
Red- Red filters are firstly my favourite, they are often used in black and white photography with high contrast finish because they absorb blues and greens. This often brings really dramatic skies into the photos which make it perfect for landscapes and architecture photos
Blue- Will enhance reds and oranges, giving a soft contrast but not as much as the red filter.
Green- Often used in portraits, it is sympathetic with skin tones and used especially under artificial lighting, perhaps more towards tungsten to cool out the skin tone.
Orange- These are slimly used but are especially effective at enhancing a sunset due to the golden hour tones.
Yellow- Popular with black and white film and landscape photographers, commonly used to bring out the clouds in an image as the yellow filter absorbs the blue behind the clouds, darkening them and giving them more definition.
Non-Colour Filters
There are a few filters which are neutral in colour, which affect mostly exposure and how light is received in the sensor. I’ll list them below:
Neutral Density filters (ND):
Neutral Density filters are a neutral grey tone by name and increase the optical density over the lens which makes it far easier to shoot in bright conditions by allowing less light through, making bright snowy days or just incredibly bright scenes less of a challenge. It’s essentially like your camera wearing a pair of sunglasses. These can be bought made for a number of stops down, giving you the creative freedom in those lighter scenes.
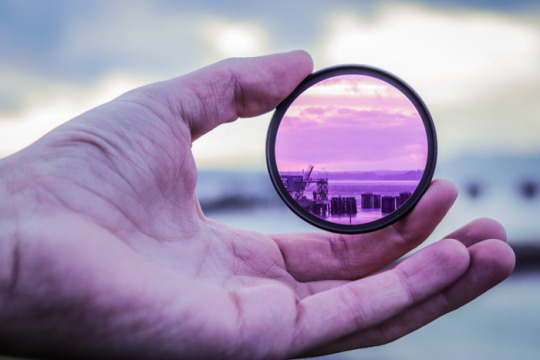
Polarising Filter:
Polarising filters have many small quirks to them, but mainly they are used to reduce reflections in non metallic surfaces in photography. Transparent surfaces such as water or glass can greatly benefit from these kinds of filters, they wont be removed entirely but using a polarising filter can greatly reduce this. It is also worth adding that they are the only filter which cannot be replicated in post, so it is recommended that photographers pick one up.
They have also known to be used in removing glare from the sun, this can also be applied to the water or glass if they reflect the harsh light directly. These lenses also do some justice to the colour saturation of images, as well as fighting off glare and reflections.


5 notes
·
View notes
Video
youtube
Here we have a video to test the Fixed ND Lens Set (ND2, ND4, ND8, ND16, ND32), by our staff, not by any professional photographers!
Here is link to learn more about our ND Filter Lens:
https://dckina.com/index.php?main_page=advanced_search_result&keyword=Neutral+Density
We have also this same video on Youtube too.
https://www.youtube.com/watch?v=bUx70EXfsJk
#Neutral Density Filter Lens#ND Lens#NDx2#NDx4#NDx8#NDx16#NDx32#ND2#iPhoneX#iPhone#iPhoneXS#iPhoneXSMAX#iphonexr
2 notes
·
View notes
Photo

The Narrative
On July 19, 2021, Carthage College came under fire from its community and student body for attempting to restructure a number of its departments. In reality, the school was attempting to fire tenured professors because they were too expensive to keep employed, but they lacked cause to fire them. Their response to the situation was to "restructure" the departments, pressuring the professors into retiring early, in order to fire them without “firing them”.
Carthage students did not take kindly to this.
The college had trained their students to be critical thinkers and active participants in their community.It took no time at all for the students to organize a group and fill the campus to protest the restructuring.
After hours of making signs, giving speeches, and marching up and down the campus under a scorching July sun, John Swallow, Carthage's president, made an appearance.
He listened to some of the speeches by students, and tried his best to answer questions from the protestors. But nothing he said assuaged anyone with concern for their favorite professors. Once the tension grew too great, President Swallow took a step back from the crowd and went towards his home, a stately building at the edge of campus.
President Swallow stood behind the wrought-iron fence that separated him from his students, looking out at them. The students begged him to reconsider his decision, but it seemed the gap between the student body and the school's president was too great. The separation between the two stood firmly, like a wrought-iron fence post stuck deep into the ground.
The Technical
I carried a few lenses with me during this protest, but I chose to keep my f/1.8 85mm lens on for most of the day. Paired with my full frame Sony A7III, I often find that the 85mm offers the ability to create depth in an image and highlight a subject's importance against their background.
In this case, I wanted to be able to stand behind the students protesting, keeping them in the foreground, and center President Swallow in the frame, making the fence in front of him serve as a visual guideline for the most important elements of the photo: the students and the president.
I shot at ISO 100 because the light outside was plentiful and anytime I can keep the ISO low to minimize photo noise, I'm happy to do so. I chose to shoot this at 1/1600th of a second to get an absolutely crisp background subject (President Swallow), wanting to avoid the potential of the president moving and losing an otherwise amazing image to, for example, a blurry hand.
Seeing as there was almost too much light, I considered using a neutral density filter, which is a dark filter that controls how much light enters the camera sensor. However, I decided to opt out of using one, as the level of speed I was able to utilize due to the massive amount of light was too valuable to lose. The tradeoff was that there were moments where I had to turn down exposure in editing because there was, in fact, too much light in the image. But because I shoot exclusively in RAW file format, I was able to easily fix this issue in editing while gaining the benefit of extremely fast shutter speed. And as much as I'd like to be able to fix a blurry hand in editing, turning exposure in an image down a bit is a much more reasonable editing workload to put on yourself.
The Effect
Covered by a thick layer of trees older than most of the people there that day, President Swallow's home is separated from his students by fences both literal and figurative. In this photo, I sought to represent the literal barrier becoming a metaphorical one, separating the man from the people he's supposed to lead, who stand in the foreground, holding signs made from cheap cardboard and leftover paints they brought from home. Choosing to keep the president in the background crisp while blurring the students in the foreground highlights the contrast in the power dynamic of the situation. I wanted the viewer to feel the tension between the groups, while making it clear who the more "important" subject was through the use of that visual contrast.
0 notes
Text
Price: [price_with_discount] (as of [price_update_date] - Details) [ad_1] The lens filters Kit is specifically designed for the DJI Mavic Mini/Mavic Mini 2 camera. This lens filters accessories set, features sharp AGC glass. Multi coating film results in minimizing reflections, flares and improves image quality. Hydrophobic Nano coating reduces fingerprints, fog, water, and dust.Also resulting in high transmittance, capture clear image, restore ture color. Water-proof & Oil-proof & Scratch-proof, effectively protecting Mavic Mini/Mavic Mini 2 Camera. ND Filter: - ND stands for Neutral Density Filter Which acts like sunglasses for you drone camera. They will darken what the camera sees so you can use a lower shutter speed so your footage looks smoother and more cinematic. They are rated by how strong (how dark) they are, the higher the number the stronger or darker they are. -The ND4 filter allows 1/4 of incoming light through, equal to a 2-stop filter,For a minor reduction in brightness to adjust shutter speed. -The ND8 filter>/b> allows 1/8 of incoming light through, equal to a 3-stop filter,For partly to mostly cloudy days or approaching sunset or after sunrise. -The ND16 filter allows 1/16 of incoming light through, equal to a 4-stop filter,For partly cloudy days or early to mid-morning, medium light. -The ND32 filter allows 1/32 of incoming light through, equal to a 5-stop filter Best for very bright, full sun days. PL Filter:- PL stands for Polarizing Filter,This type of filter reduces glare and brings out better saturation and clarity in your photos and videos, especially when filming around water. ND+PL Filters have both in one filter,You will get the nice saturation and clarity from the PL and you will be able to control the shutter speed and exposure with the ND. Performance: - These filters are multi coated optics which results in clear image capturing by restoring true color. Also, they will protect the drone lens from scratches. Lens Filter:- ND filter that stands for neutal density filter acts as a sunglass to your drone camera making your footage more smoother and cinematic. PL filter stands for polarizing filter reduces glare and bring out saturation and clarity in your image and video. ND+PL Filters have both in one filter,you will get the nice saturation and clarity from the PL and you will be able to control the shutter speed and exposure with the ND. Installation: - Very easy to use, these filters are based on plug and play features. You just have to place the filter above the lens and push a little to fix its position and you are good to go. Package Include: - This pack includes a box of 4 lens filters, i.e ND4/PL, ND8/PL, ND16/PL and ND32/PL filters. [ad_2]
0 notes
Text
Illuminate Research, Planning and Development
Image 1:
Photograph by Darlene Hildebrandt
I found this image to be quite interesting, yet can’t decide if I like it or not. I feel like the colour of the sky is slightly off putting, yet it fits in with the subject itself, being old and rusty. I do, however, think the light painting itself has been done very well.I found this image to be quite interesting, yet can’t decide if I like it or not. I feel like the colour of the sky is slightly off putting, yet it fits in with the subject itself, being old and rusty. I do, however, think the light painting itself has been done very well.
Image 2:

Photograph by Catalin Anastase
This is a really creative, fitting painting with light photograph. The light gives the image a sort of mythical look, as if it were taken from a fairy-tale. It looks as if the image is layered, multiple pictures of the same thing being put together to create this image. I think the sky is slightly too dark, but overall it works well.
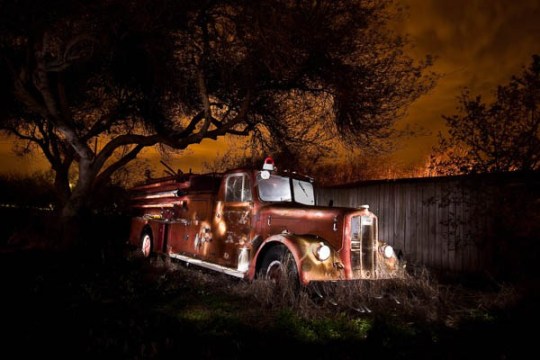
Image 3:

Photograph by Dave Black
This painting with light is slightly different from the other images in terms of location. It has almost certainly been shot inside, and doesn’t show much in terms of background. I feel like there could maybe be some more light in certain areas, but is all round well done. This painting with light is slightly different from the other images in terms of location. It has almost certainly been shot inside, and doesn’t show much in terms of background. I feel like there could maybe be some more light in certain areas, but is all round well done.
Image 4:

Photograph by Simon Plant
This lighting in this image is has been done to a high standard, and I particularly like how the tree behind has also been light up. For me, I feel like the sky is slightly too dark, at least on one side on the photograph. This lighting in this image is has been done to a high standard, and I particularly like how the tree behind has also been light up. For me, I feel like the sky is slightly too dark, at least on one side on the photograph
Image 5:
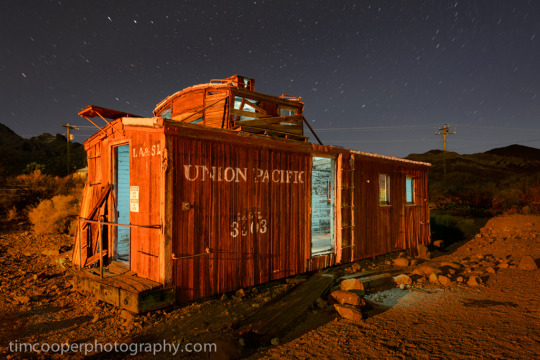
Photograph by Tim Cooper
This is my personal favourite. The sky fits perfectly with the light and tone of the building, as it seems to be in a pastel kind of tone. I think the lighting has been done extremely well, as the image as a whole just works very well together and is aesthetically pleasing.
Image 6:

Photograph by Diana Ferguson
This is one of my own images using painting with light. I really enjoyed shooting this, and had great fun experimenting with the settings and how to move the light to create the best type of lighting. It was quite challenging trying to keep the light facing away from the camera, and moving fast enough to not get caught yet slow enough to light the subject. I shot this using one long exposure, no layering.
What is ‘noise’ and why does it happen?
Much like with sound where noise refers to auditory disruptions, within photography noise refers to the visual distortion. Noise looks like small coloured pixels or specks in your photograph and occasionally resembles the grain you can see in film photography.
Things such as sensor size, higher ISO and long exposures can be factors that bring about noise in images.
Noise generally tends to happen when the sensor heats up. For example, images with a higher ISO. The higher the ISO, the more the sensor has to work to let more light in, causing the temperature to rise. This is why the noise becomes more apparent each time you bump up the ISO.
Difficulties associated with night photography:
Camera shake.
This can be solved with something as simple as using a tripod and a remote trigger, minimising and contact with the camera that could cause camera shake.
Noise.
This can be solved by reducing the ISO and using a longer shutter speed, paired with a tripod, to compensate for the low ISO.
Images being out of focus.
This can be solved by manually focusing instead of relying on autofocus. If possible, light could be added to the subject to give you enough to see your focus point, then the light can be removed leaving the focus still set.
Shadows.
This one is slightly more challenging, as it may involve adding additional light to your subject. It could be done by diffusing light, bouncing it off a reflector so as it is not direct, or even just adding light straight onto the subject.
Difficulties associated with long exposures:
Camera shake.
Again, this can be fixed by using a tripod and a remote trigger to reduce contact with the camera.
Light flares.
This could be resolved by flagging any unwanted light, or even using a diffuser to lessen the light being captured by the camera.
Noise
Using longer shutter speeds and a lower ISO, the noise should be reduced.
Use filters
ND (Neutral Density) filters block out light being taken in through the lens, much like sunglasses. You would then have to adjust your camera settings to suite the filter.
Methods by which the effects of ‘noise’ can be minimised (pre and post editing):
Reducing the ISO
Adding flash or additional lighting will allow you so shoot with faster shutter speeds and a lower ISO.
Use a fast shutter speed if possible.
Keep your camera cool if possible. Noise is a reaction to temperature, so the cooler you can keep your camera the better. Try not to let it overheat.
Edit your images during post-production. There are many ways to reduce noise using software's such as Lightroom, Photoshop or Bridge. I found that Camera Raw in Bridge works best for me. Bumping up the Luminance (no higher than 20) and adding some Clarity really helps to reduce noise, although it ever so slightly softens the images.
Layering images. Noise is completely random, so layering images could help in reducing noise.
Noise reduction tools.
Equipment list:
Canon EOS 4000D
Tripod
Extra batteries
Lense (18-55mm)
SD cards
Notebook and pens for notes
Additional lighting such as a torch
Bags for storing the kit/umbrella in case of rain
An extra set of hands! (A friend to help when needed and also for safety)
Planning and Development:
The first stage of this brief is the research stage. I have researched relevant photographs and techniques so that I have a good understanding of what it is I am going to do when it comes to shooting.
I have also made a list of all the equipment I will need so that I have everything I need when I go out to shoot.
The next stage is to decide on what I would like my subject to be. I would like to shoot this in my home town, North Berwick, on the beach or surrounding areas (harbour, viewing points, benches, etc.)
Ideally, I would like to go home between the 30th March and the 5th April. This will give me time to scout out possible locations, take test shots and shoot my final image. I plan on shooting at dusk, so I will look up what time dusk is closer to the shooting date.
I would like to take some test shots during the day of things like; rocks, bushes, benches, posts, decorations and surrounding buildings.
Once I have my spot and time, I will make sure to give myself time to set up. Set up will include getting my tripod in place, getting the right camera settings, briefing my assistant on what needs done, and making sure all lights/batteries are working.
After setting up, I will use the window of time to shoot my subject, getting my model to light it, possibly myself lighting it too (using a timer or remote trigger).
After my shoot is complete and I am home, I will spend time looking over my shots to see if I have a final image and doing any editing if needed.
I will possibly look to do another shoot depending on how the first one goes.
Contact Sheets:


Final Image and Evaluation:

I really enjoyed shooting for this brief as well as researching for it. I had originally planned to shoot this down at the beach while I was home, but due to a change of circumstances, I wasn’t able to get to the beach. I then had to change my plan, and decided to shoot in my back garden. My original plan was to shoot a tree in my back garden. For this, I went out during the day to do some recce shots and to decide where I wanted to shoot from. Once I had figured out what I was going to do, I went out in the evening and shot the tree. Half way through, however, I found that I didn’t like how my images were turning out, and instead tried using the slide instead. This turned out to be a much better option, although looking back now I could have spent more time shooting the slide. I had my images looked over during class time and was told I needed to re-shoot. This was slightly awkward for me as I wouldn’t be going home again for a while, so I was able to leave the re-shooting until after I had finished with my personal project. I was able to re-shoot not long after my project was finished, and spent more time on it than the last time. The editing processes took slightly longer than I had expected, as I had to layer a few images together and used the brush tool to even a few areas out. I feel as though I could have planned and timed this brief slightly better than I did, and in the future I will pay more attention to planning, scheduling and getting test shot, but overall, I think I done reasonably well and am happy with my final image.
References:
Image 1 - https://digital-photography-school.com/light-painting-part-one-the-photography/
Image 2 - https://www.catalinanastase.com/lightpaintinglandscapes/h6844AC59
Image 3 - https://www.nikonusa.com/en/learn-and-explore/a/tips-and-techniques/lighting-techniques-light-painting.html
Image 4 - https://www.ephotozine.com/article/light-painting-and-photography-12297
Image 5 - http://intothenightphoto.blogspot.com/2013/03/painting-with-light-by-tim-cooper.html
1 note
·
View note
Text
A Complete Guide to Fiber Optic Attenuator
A fiber optic attenuator is mainly used in fiber optics to debug optical power performance and optical instrument calibration correction, and fiber signal attenuation to ensure the optical power is stable and desired level in the link without any changes on its original transmission wave. This article provides a comprehensive understanding of fiber optic attenuators.
What is a Fiber Optic Attenuator?
A fiber optic attenuator also called an optical attenuator is a passive device used to reduce the power level of an optical signal in free space or an optical fiber. It provides low insertion loss, precise attenuation values, and easy operation features. In addition, fiber optic attenuator is usually used in single-mode long-haul applications but is also available in multi-mode attenuators.
Working Principle of Fiber Optic Attenuator
There are three working principles of fiber optic attenuators:gap-loss, absorptive and reflective principle.
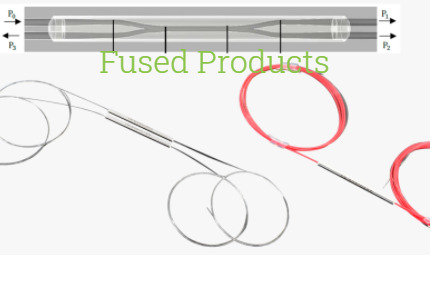
1. Gap-loss Principle
The gap loss principle is used in fiber optic attenuators to reduce the optical power level by inserting the device in the fiber path using an in-line configuration. Gap-loss attenuators are placed close to the transmitter to prevent the saturation of the receiver. They use a longitudinal gap between two optical fibers so that the optical signal passed from one optical fiber to another is attenuated. This principle allows the light from the transmitting optical fiber to spread out as it leaves the optical fiber. When the light gets to the receiving optical fiber, some of the light will be lost in the cladding because of the gap and the spreading that has occurred.

2. Absorptive Principle
The fiber optic has the imperfection to absorb optical energy and convert it to heat. The absorptive principle is used in the design of fiber optic attenuator, using the material in an optical path to absorb optical energy. This principle is simple but can be an effective way to reduce the optical signal power.

3. Reflective Principle
Another imperfection of fiber optics is also being used to reduce the signal power, which is reflection. The major power loss in optical fiber is caused by the reflection or scattering. The scattered light causes interference in the fiber, thereby reducing the signal power. The reflective principle is used in the planned attenuation of a signal, and the material used in the fiber optic attenuator is manufactured to reflect a known quantity of the signal, thus allowing only the desired portion of the signal to be propagated.

Fiber Optic Attenuator Types
The fiber optic attenuator is divided into fixed optical attenuator (FOA) and optical variable attenuator (VOA) types.
Fixed Optical Attenuator
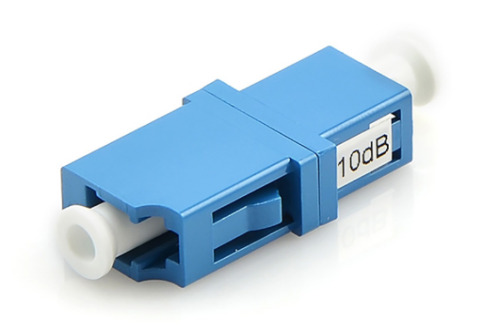
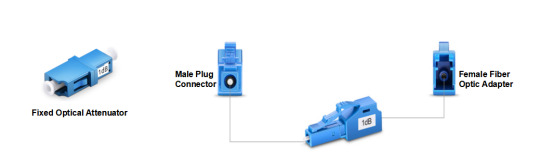
Fixed optical attenuator (FOA) is used in fiber optic communication systems to reduce the optical fiber power by a certain level. Typical attenuation values are between 1 and 30 dB. Fixed value attenuators consist of in-line type and connector type. The in-line type optical attenuator is incorporated into the patch cable. The connector type attenuator has a male plug connector at one side to allow the fiber attenuator to be plugged directly into receiver equipment or adapters in the patch panel and has a female type fiber optic adapter at the other side to allow the patch cords to plug in. FOA is available in LC, SC, ST, FC, and MU styles with APC and UPC polish.
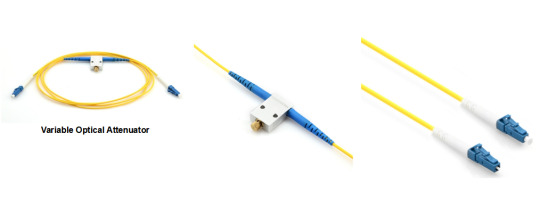
2. Variable Optical Attenuator
A variable optical attenuator (VOA) uses a variable neutral density filter and has the advantages of being stable, wavelength insensitive, mode insensitive, and offering a large dynamic range. VOA includes stepwise variable attenuator and continuously variable attenuator types. The stepwise variable attenuator can change the attenuation of the signal in known steps such as 0.1dB, 0.5dB, or 1 dB. The continuously variable attenuator provides a precise level of attenuation through flexible adjustment.
Applications
A fiber optic attenuator is used in fiber optic communication systems, CWDM and DWDM, CATV systems, data center networks, test equipment, FTTx networks, telecommunication networks, local area network (LAN), digital multimedia transmission systems, etc.

Conclusion
A fiber optic attenuator is a crucial passive component in the fiber optic communication system. It can adjust optical signal levels to increase network flexibility and provide management of optical power. Sun Telecom provides a wide range of fiber optic attenuators. Contact us if you have any needs.
1 note
·
View note
Text
Motion Photography Ideas and Techniques
In David Koonar’s opinion, motion blur photography may be used to create a feeling of calm or rush in your pictures. A key component in producing this effect is the shutter speed, which is the period of time the camera's shutter is open. While a slower shutter speed results in a fuzzy picture, a faster shutter speed allows you to capture the action. In advertisements for vehicles and motorcycles, these two methods are widely used.
This method entails tracking the subject while using a slow shutter speed to blur the backdrop while preserving the subject's details. Although this method takes effort, the finished product is a delicate, abstract depiction of the topic. Use a tiny aperture and low ISO settings if you want to capture a lengthy exposure. If you want to maintain a constant shutter speed and prevent any camera shaking, a tripod is helpful. The shutter speed must remain consistent in order to maximize the effectiveness of this approach, but it must be compressed at precisely the proper moment to prevent blur.
You need to take special care to align your phone and camera while using a tripod. Make sure your camera is first configured for landscape shooting. Second, make sure there are no obstacles in the way of the subject. Mark the tripod's feet if you can so they can be secured into position. For camera steadiness, you should additionally use a remote trigger. After that, check to see whether your camera's exposure, shutter speed, and white balance settings are set appropriately.
Get a good view of the thing that is entering the frame while photographing a moving subject. Additionally, make sure you have enough space to turn around and follow the motion line until the target is in focus. It is essential to continuously practice and refine this skill. As soon as you get the hang of this method, you may utilize it to make interesting moving pictures. You'll also be able to eliminate obtrusive backdrops and establish a continuous visual flow with experience.
David Koonar pointed out that another method for capturing movement is panning. This technique blurs the backdrop while freezing the subject. Panning requires both a moving subject and a slow shutter speed on the camera. The shutter speed has to be between 1/15 and 2 seconds for panning to be effective. Last but not least, panning is a challenging technique, and the photographer should concentrate on the action's smoothness and the background's blur.
Another method for capturing light trails along a railway track is the long exposure. I captured the photograph with a Canon EOS RP camera at 105mm, f/8, ISO100, and 32 seconds. To achieve a stable shot, the camera has to be placed on a reliable base. The Bulb exposure method is another option if you want a blurred backdrop. The shutter of the camera opens for a sufficient amount of time to record light trails, but you need make sure that the camera is securely fixed on a tripod to prevent it from tipping over.
Getting a feeling of the subject's movement is the most crucial phase in motion photography. Tracking the target while taking the photo via the viewfinder is possible. The subject will be defined when moving if the shutter speed is used properly. The chosen aperture, focal length, and subject speed all have a role in choosing the appropriate shutter speed. If you're unsure, you may adjust the ISO or aperture to get the desired result.
Neutral density filters are the following motion photography method. In order to lower ambient light, this method uses neutral density filters. For the greatest results, utilize a tripod in addition to neutral density filters. Keep in mind that there is no ideal approach for motion photography; some trial and error may be necessary. Plan your shots and don't be afraid to retake them if you're not happy with the results of your initial shot.
According to David Koonar, another crucial step in motion photography is raising your camera's f-stop. You may decrease the depth of focus and blur some aspects of the picture by setting the f-stop. High f-stops may sharpen the whole picture, but low f-stops can blur the backdrop. You could consider utilizing a flash in conjunction with fast shutter rates to compensate for dim lighting. You may use it to lighten up a dark image.
0 notes
Photo
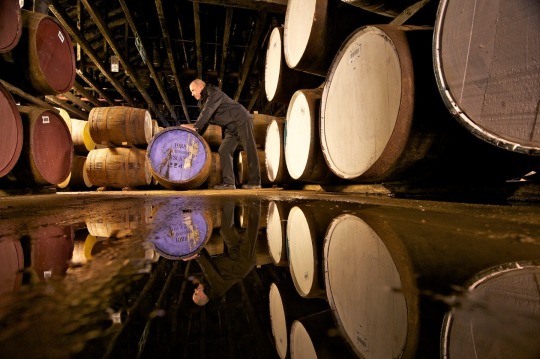
Scotland Fix of the Day: Bunnabhain distillery on the northeast coast of the Isle of Islay, one of the islands distinctive peat-laden whiskies that fans adore and others disdain. Sea air inevitably creeps into the casks over the years, lending seaside notes to the flavor, one of the ways whiskies reflect their territorial roots. (If the name confounds you try this: boo-nuh-HAV-inn.) As is common the village and the distillery are one and the same, built in 1881 to house the distillery workers, at a time when it took a fair workforce, now much diminished. Distillery workers today are patient when visiting photographers (like me) want a picture of moving casks around the warehouse. Of course the warehouse is a favorite photo location, as much for the "Angel's Share" as for the views. 📷 Technical Tip: The trick of reflections is getting the camera down low, close to the water. And I mean really low. In this case the bottom of my camera was actually sitting in the water. The other trick is that the reflection will always be dimmer than the subject. In this case I used a 2-stop soft neutral-density grad filter to tone down the upper part of the image so that the subject and the reflections came into a closer tonal relationship. #scotland #whisky #bunnahabhain #islay #bestofscotland #hiddenscotland #thehighlandcollective #scotland_highlights #photosofbritain. #drivescotland #ig_scotland #visitscotland. #scotlandgreatshots #scotlandmagazine #highlands #scottishhighlands #scotland_greatshots #scenicbritain #uk_greatshots #igersscotland #scotland_lover #lovescotland #unlimitedscotland #scotlandgreatshots #scotlandtrip #scotlandtravel #scotlandtrip #scotlandthebigpicture — view on Instagram https://ift.tt/3uJizeH
9 notes
·
View notes
Text
Seeing the light - Equipment research
Reflectors
A reflector is used to help reflect light and control your light source they redirect existing light. They can be used to fix shadows on the face and create catch lights in portraits.

Filters
Filters are used to block certain colours or types of light coming into the camera. The 3 main types of filters are UV filters, Polarizing filters and Neutral Density filters. They are a cheap alternative to a Marco lens.
Flags
Flags are used to block light they can be used to cast a shadow, provide negative fill, or protect the lens from a flare.
0 notes
Text
Everything You Need To Know About In-line Polarizer!!
When it is about an in-line polarizer, it is right to say that a linear polarizer is a tool that only the orientations of certain plane-polarized light. At one orientation, a linear polarizer might only permit the passage of vertically polarized light. On the other hand, when rotated by approx 90 degrees, it may allow the passage of only horizontally polarized light. In addition to this, if only rotated halfway, meaning 45 degrees, the only plane-polarized light is allowed.
You may be wondering what the use of the linear polarized device is, right?! Well, plenty of light sources put forward randomly polarized light. In other words; an equal mixture of different sorts of polarization. Just in case, if objects reflect this light without making any changes, every polarizer will begin to act like a neutral density filter.
For your better understanding, the polarizer can also enhance the color saturation by reducing or removing some amount of light reflected via various things like leaves or grass. Not to mention, this stuff can also be slightly polarized. In addition to this, the in-line polarizer is known for its ability to darken the light in the sky, particularly approx 90 degrees from the position of the sun. The main reason behind this is that the light which is scattered from the different parts of the sky is strongly polarized with the help of the scattering process. On the off chance, if the in-line polarizer is specifically oriented to block the passage of this polarized component, the sky will appear darker! Whatsmore, as the source of atmospheric haze, is also a part of scattered light, a polarizer can shred down the atmospheric haze! Nevertheless, the scattering procedure is slightly different from the light scattering from the blue sky; still, there can be a bit of induced linear polarization.
Well, linear polarizers can be utilized in a wide variety of applications. For example, in the field of electronics, photographic, scientific and in some industries as well. The heaviest single application of linear polarizer is used in liquid crystal displays (LCDs). In LCD screens, the linear polarizers are fixed on both sides of the LCD with their axes intersected at 90 degrees. In this way, polarizers do not permit the light to pass through them. Although, when the LCD is in power-off mode, the liquid crystal cells present in the LCD panels in between the crossed polarizers, rotate light passing through them at ninety degrees, which also defeats the impact of crossed polarizers. Because of this, the display appears to be transparent. However, when the area of a single liquid crystal cell is activated, the cell stops itself from rotating the polarized light, which as a result appears as a pitch dark spot o the screen. By electronically managing the activation or charged state of the cells in the LCD panel, detail may be shown. The same happens with every black and white as well as color LCDs.
For more information, please feel free to get in touch with us.
#polarized#fusedcoupler opticalfusedcoupler#infant optics dxr-8 3.5 video baby monitor system#optical
0 notes
Text
Creative long exposure
Creative long exposure
A long exposure is using a slow shutter speed, this allows you to show movement with motion blur in photos like light trail for cars or the stars. This technique can be used to get rid of people in a scene.


https://www.thephotoargus.com/32-great-examples-of-long-exposure-photography/
https://iso.500px.com/basic-astrophotography-tutorial/
Long exposures can vary in length from around 1 sec and longer but there can be issue with longer shutter speeds.
Kit
· A tripod to keep the camera steady.
· A timer or external shutter cable so you don’t move the camera.
· Neutral density filter. (ND Filter) If you are taking photos during the day
ND Filters
If you are trying to take long exposure during the day time it is mostly impossible to get the exposure correct even with f22 and a low ISO. To achieve a longer exposure during the day photographers used Neutral density filter. A ND filter is like a pair of sunglasses for your lens. It reduces the amount of light getting onto the sensor of the camera. ND filter come in different designs. One design is a screw one and this screw onto the end of your camera lens and the other has a bracket that screws onto the lens, and you can slide the filter into the bracket. Both have pros and cons. The screw one type has no light seepage, but it can only fit onto a certain diameter lens. The Bracket type are often more expensive because the glass is bigger, but you can use it on different size of thread lens as long as the bracket fits. ND filter are not meant to cast any colour, but this is not always the case. The more expensive ND filter are generally better for not leaving a colour cast. If there is a colour cast this can be most often fixed in photoshop.
Calculate Shutter speed with ND Filter
· ND0.3 or 1 stop = 2x shutter speed
· ND0.6 or 2 stops = 4x shutter speed
· ND0.9 or 3 stops = 8x shutter speed
· ND1.8 or 6 stops = 64x shutter speed
· ND3.0 or 10 stops = 1000x shutter speed
If your correct exposure is 1/60th of a second and you place a 10 stop ND filter on it the way you figure it out is by:
1/60=0.016666
0.016666x1000=16.66666
New shutter speed 16.6 seconds.
Or you can download an app to help you.
Tripod
When shooting long exposure, you need to make sure your camera is all locked down on your tripod. Think about your location cars on roads produce vibration that can add shake to your shot, sometimes attaching a weight to the bottom of your tripod can help reduce movement.
Bulb Mode
When shooting long exposure most camera modes will let you shoot up to 30sec after that you will need to use bulb mode. This mode let you keep the shutter open as long as the shutter is pressed. This is one of the reasons why a external shutter cable is import so you don’t have camera movement from your pressing the shutter.
Heat
The longer the shutter speed is the camera produces heat. The sensor gets hot and can produce unwanted noise in the shot. The noise that is produce is called fixed pattern noise or Hot pixels. Hot pixels is random noise which is brighter and can over saturated pixels. This mostly happens with long exposure and low ISO speed.
If you are taking long exposure where you need to have a higher ISO like stars you can get random noise. This is when pixel colour fluctuation above and below of what the image is. You can make cleaner images by taking multiply shots and in photoshop ask photoshop to delete any pixels that have not in all the photos and this makes the image cleaner.
My Turn

https://www.capturelandscapes.com/ultimate-guide-long-exposure-photography/
https://www.cambridgeincolour.com/tutorials/image-noise.htm
https://expertphotography.com/long-exposure-photography/
1 note
·
View note
Text
Moving Image - Technical Research 2
20/05/21
Frame Rate and Shutter Speed
Shutter Speed for Video EXPLAINED: How Frame Rates & Shutter Speed Work Together - YouTube
youtube
A video is composed of a series of still images, which are also known as frames, that are played back in sequence to create the appearance of motion. When shooting video, the shutter speed and frame rate are important as they impact how natural the motion looks depending on the number of frames taken within a second of exposure.
Frame Rate - The frame rate is the number of frames, or still shots, that are played within each second of a video and is measured in frames per second (fps).
Shutter Speed - The shutter speed is the duration of time that the shutter is open to expose the sensor or film to light, this is measured in fractions of a second.
The connection between the frame rate and the speed of the shutter is important to consider when shooting a video and there are a few things to keep in mind and rules to follow:
When using a shutter speed that is slow, it means the duration is longer and more light is allowed through the lens (e.g. 1/20th of a second). However, using slower shutters will create more visible motion blur throughout the video.
When using a shutter speed that is fast, it means the duration is shorter and less light is allowed through the lens (e.g. 1/250th of a second). By using a faster shutter speed, the video may be under exposed but motion blur will be less visible, with movement appearing normal as it would be seen in real life.
Something to consider when selecting a shutter speed is the 180 degree rule, this rule suggests that the shutter speed that is chosen should be double what the frame rate is set to. So if the frame rate is 30fps the shutter speed should be set to 1/60th of a second.
It should be noted to never use a shutter speed that is slower than the set frame rate because the video may appear to be staggered as well as increasing motion blur because there is too much time when the shutter is open to shoot the selected number of frames per second.
When working with higher frame rates, the shutter speed should be double the frame rate or faster, however sometimes the video is still over-exposed. To fix this, the shutter can be increased further until the video is exposed correctly because the impact of this on the appearance of motion is not significant when already using faster shutter speeds. (E.g. with a frame rate of 50fps and a shutter speed of 1/100ths of a second, the shutter could be increased further to 1/125 or 1/200).
When working with lower frame rates, the shutter speed should still be set to double what the rate is. However, if the video is still over-exposed then a neutral density filter may be used to reduce the mount of light entering the lens.
0 notes
Text
Gobe is an Australian Lens Adapter and Camera Filter Brand That Plants Five Trees for Every Purchase Made
Gobe is an Australian Lens Adapter and Camera Filter Brand That Plants Five Trees for Every Purchase Made
Cinematographer/director Paul Leeming of Leeming LUT Pro dropped by yesterday and very kindly gave us two vintage M42-mount manual-focus prime lenses, a Panagor 28mm f/2.8 and a Pentacon 50mm f/1.8.
Both lenses are in excellent condition and are a reminder of how useful such lenses are for shooting video with recent and current generations of hybrid cameras equipped with focus peaking.
This…
View On WordPress
#Australia#Byron Bay#camera accessories#Canon EF mount#fixed neutral density filters#Fujifilm X-Mount#Gobe#Gobe Corp Pty Ltd#lens adapters#M4/3#M42-mount#M43#M43-mount#Micro Four Thirds#ND filters#UV filters#variable neutral density filters#VND filters
0 notes