#furby eyelash tutorial
Explore tagged Tumblr posts
Visit Tumblr Blog
Explore Tumblr blogs with no restrictions, modern design and the best experience.
Last Seen Tumblr Blogs


Fun Fact
In 2020, Tumblr had 29.4 million users in the US.
Text
🌟 1998 Furby Re-Lashing Guide 🌟
A visual step-by-step guide to my own process for giving 1998 Furbies lashes that retain the classic look. There may be other guides and methods out there, this is just my own way to do it!
MATERIALS NEEDED:
Detached Eyelids ( guide for removal: CLICK HERE )
13mm D-Curl Lash Extensions ( see photo )*
Mod Podge
Tacky Glue
X-Acto Knife
Small Paint Brush
Q-tip
Lightweight Paper
SHARP Scissors
Clean Water
Washcloth or Paper Towel
Optional, Ruler with cm/mm marks & Marker or Pen * 13mm will be closest to original length, I would not recommend anything longer than 15mm unless you want the lashes to really look insanely long.

I will put all of the steps under the readmore! 👇
Step 1:
Use the x-acto knife to gently peel up an eyelash foil strip, and be careful not to disturb the lashes. Go slowly and only handle the strip by the sticky foil. You will only need one strip for a pair of lashes!


Step 2:
Place the sticky strip on the lightweight paper, I put it close to the edge because it'll be easier to cut out later. Paint a thin layer of Mod Podge over the base of the lashes on the strip to secure them. This is an important step, there isn't much else keeping them in place, otherwise!


It's hard to wait, but let the glue dry before handling the strip again, I suggest a good 30 minutes or so.
Step 3:
Now that the glue has dried, cut out the paper around the strip and very carefully trim the foil and paper at the sides and underneath the curl of the lashes. Do this slowly, so you don't accidentally snip the lashes, you ONLY want to trim back the paper+foil. This will make them appear more flush with the eyelid when glued in.


Step 4:
Optionally, use a ruler to find the center of the strip and mark it with a marker, I used a Sharpie because it dries instantly. It's possible to eyeball this, but I like them to be as even as possible.
Snip the strip in half, very sharp scissors will prevent the foil from bending or warping. Again, be careful not to snip the lashes themselves! It's ok if you lose one or two in this process, as long as they still look relatively clean and even once split.


Step 5:
Apply a drop of tacky glue to the back of each eyelid and use the Q-tip to spread it in a thin, sticky layer. The eyelids have a little trench you can use as a guide for placement.
You can repeat this process if you wish with the top of the lash strip where it will be applied, as well, to make it stick better. I haven't tried this myself, yet.
Place the base of the lash strip over the tacky glue and press it into position, I use the backs of my thumb nails to hold them firmly while the glue sets. It make take some effort and patience to get them to stay in the curve, just try not to slide them around.


Step 6 (Final):
After the tacky glue has had some time to dry, I like to apply a final coat of Mod Podge over the paper and underside of the eyelids to seal and protect everything. Give this 30 minutes to an hour to fully dry before re-assembling your Furby!


✨ Voila! Fresh new eyelashes! ✨
They won't look exactly like the original, but close enough for me. I'm sure the process can be improved in some ways, so if you have any feedback please share it in comments or tags!
Good luck with your projects and thank you for reading! 🌟
#furby#furblr#all furby#furby community#safe furby#furby 1998#safefurby#furby gore#custom furby#guide#furby guide#furby eyelashes#relashing furby#furby eyelash guide#furby eyelash tutorial#tutorial#furby tutorial
78 notes
·
View notes
Text
Not sure if it's the nostalgia, the inspiration from furblr, or the lack of sleep within the last three days due to the meds I have to take (stupid allergic reaction to mosquitoes), but I had the urge to pull ol' Furb out of the storage box.
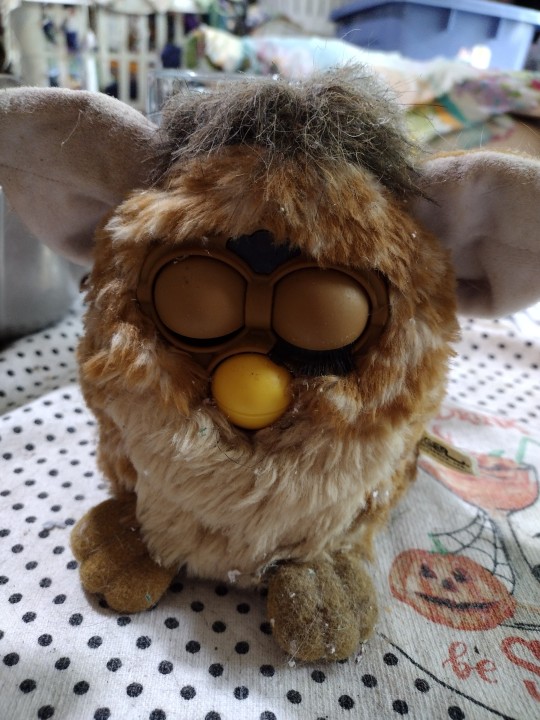
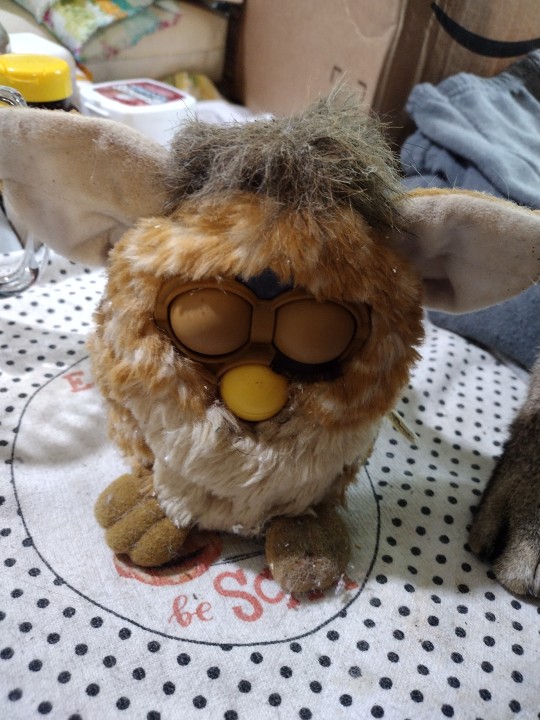
He has definitely seen better days. And did something run off with his eyelash?!
Needless to say, I think it's time that Furb should be re-furb-ished. (Hur Hur Hur, my puns are so funny)
So I'm going to look up tutorials on how to fix a furby! Any advice is good and nice.
13 notes
·
View notes
Text
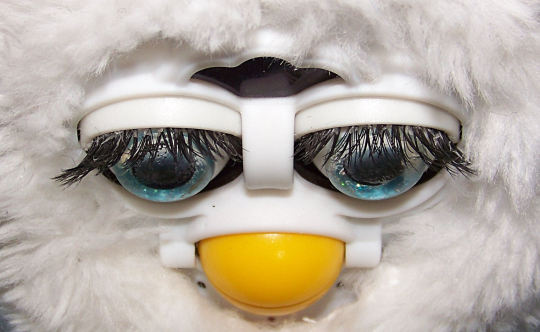
1998 Furby eyelash tutorial (alternative)
So you got yourself a beautiful 1998 Furby, but the poor thing lost an eyelash (or two!) Maybe they had an accident , maybe they were born without them, it doesn't matter. I'm here to show you that you can complete them once again using Human (yknow, you and me) fake lashes!
First you'll need to disassemble and get your stuff together.

Then find any kind of clear glue. I use regular ass craft glue, but superglue works fine too. MAKE IT STRONK.


Y'see? you just smush 'm on there until you're happy about the placement and THEN add glue to the bottom and/or top part of the eyelids. No more moving it, no more fiddling with it, grab a tiny brush you wanna ruin and glue that sucker on there.
Now is the time to put those new peepers into your skeletal furb and reassemble!

Attach their fur, fix up their ears, and give m a nice brushing ✨

Hope this helped even though nobody asked for it!! I accidentally broke her lashes so i just wanted to give this a try. Happy customising!!
889 notes
·
View notes
Text

For anyone wondering how I accomplished this:
Things you need:
Yarn (preferably wool but i used acrylic)
A pet brush
The tiniest motherheckin' screwdriver
Adhesive like... Elmer's glue or something.
Hairclipping scissors.
(For this particular instance) yogurt lid or other flat surface you dont mind tossing.
(For this particular instance) spray on modge podge.)
Tweezers
THE TUTORIAL I USED
Now I didn't do EVERYTHING like the tutorial and I don't have pics but bare with me.
Take the yarn and cut it longer than you need.
Tie it in a knot at the end (i didn't have the grids the tutorial used)
Tease the yarn with the brush at the tips and work your way down until its all brushed out.
I used acrylic so I could NOT use a flat iron it would burn and melt so instead i ran water as hot as it would go and rinsed the wefts.
Let dry and brush again. Repeat if neccesary.
Remove the skin and faceplate.
Unscrew the plastic casing (keep all small parts you take out, be it on purpose or by accident in the same container so you can reassemble.)
Remove the little metal rods that attatch to the eyes.
If you can't remove the eyes or the eyelids from under the inner plate (like me.) Then unscrew the black voice box in front so you can get to the inner plate, unscrew the plate and wiggle the eyelids out from under the loose space.
Once seperated, set everything but the eyelids aside. Take off old eyelashes if needed.
I DID NOT HAVE ELMER'S GLUE ALL I HAD WAS SPRAY ON MODGE PODGE.
So I took some tweezers and an old yogurt lid and sprayed a bigass amount of modge podge in there
Cut the yarn wefts at the knot and leave them there to float around in the air until the end of time. You were not smart enough to buy elmers glue in advance.
Take the tweezers amd thin amounts of wefts and dip one end of the weft in the modge podge and apply it to the underside of the eyelid.
Cry.
Let dry and repeat until you have full enough lashes. Make sure not to go overboard or they eyes won't be able to close correctly. (I added light blue and white on the first layer and then strips of dark purple on the underlayer for this particular effect but you can do whatever you want)
LEAVE THOSE LONG ASS WEFTS and admire what a fanciful old man your furb's gonna look like.
Put the eyelids back in their proper home and close your furby up.
Hell even put the outer faceplate back on before you trim so you know how the eyelashes are gonna interact batting up and down.
Make sure to hold onto the longass wefts between placing so no yarn gets stuck in the gears
Appricate redicuously long eyelashes for a minute. Turn them on for a moment and laugh your head off. Eat your heart out Vouge.
THE FUN PART. Decide how you want the eyelashes to look before cutting. I wanted mine to tapwr off to a long thin point so I took it into account before cutting.
With the cutting scisors cut horizonally and leave it longer than you want them to get rid of the bulk.
Start trimming them holding your scisors vertically rather than all the way across and maybe make some lil V shapes, or whatever. You can practice on your leftover wefts because you've made WAY more than you expected you'd need so Might as Well.
Once they're at a desired shape, maybe run the brush or a comb thru the lashes to even them out. Wet your fingers and twist the ends a bit. Add some glitter whatever. You're done.
This was a great alternative to buying lashes because I can chose the color texture and shape and I did have fun. I just know what to do right the next time I do this lmao.
47 notes
·
View notes
Note
What do you suggest for eyelashes when it comes to a Furby? I’m currently looking for some so I can make the eyelashes pop out from my current customs fur color!
any false eyelashes should do the job!! you can find some super cheap ones like from a drugstore or probably the dollar store :) or if you want something more dramatic or unusual you can look online!! i think these are the ones i've used and they're really cute! you can also find colourful ones if you're looking for a contrast! or buy some white lashes and use acrylic paint to colour them :D trim them to the right size and use all purpose glue to secure them under the furby's eyelids! this is way easier if you take the furby apart and the eyelids are separated from the rest of the face so i would recommend that (you can find tutorials on how to do this online) but it is possible to stick the eyelashes in without taking it apart- just be super careful to not get glue on the furb's eyes!! i hope this helps <3
2 notes
·
View notes
Photo
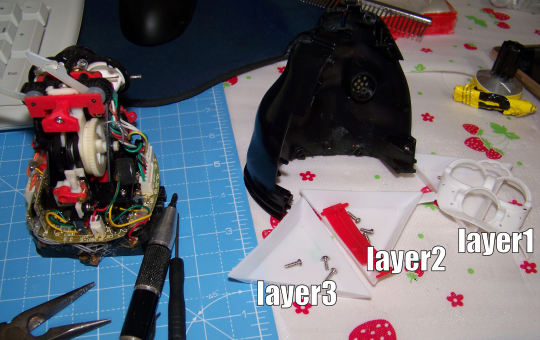
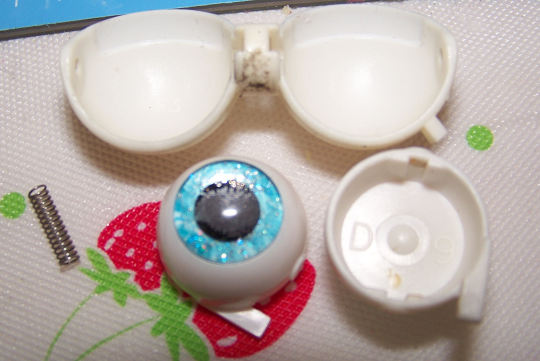
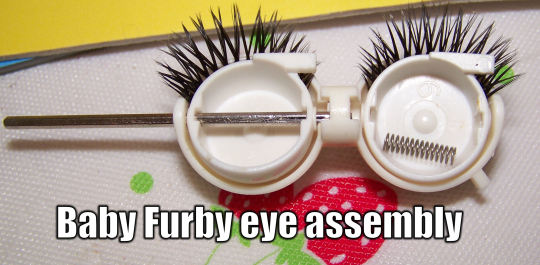
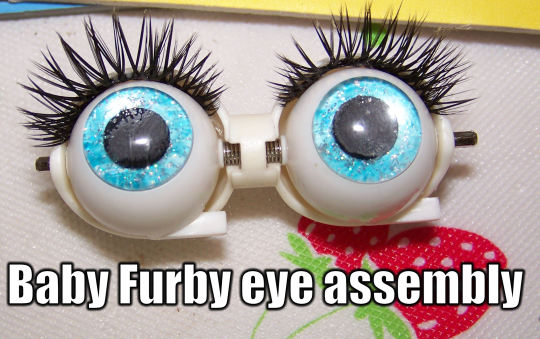
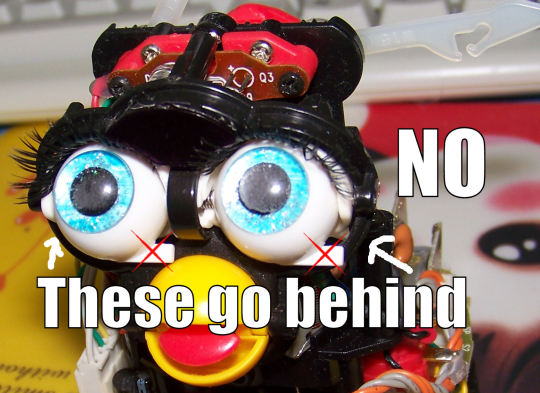
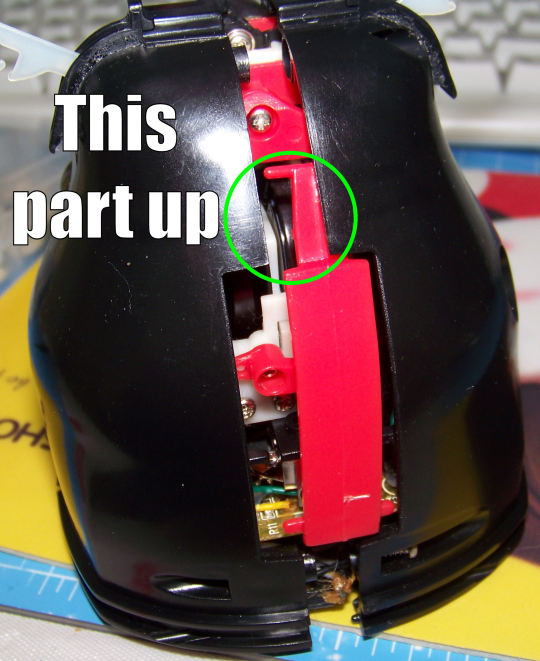

Furby reference: Baby furby eye mechanism assembly. (TESTED and works)
I followed the tutorials to the letter taking photos of each part and yet still found myself confounded by the baby furby eye mech so here are some photos and notes.
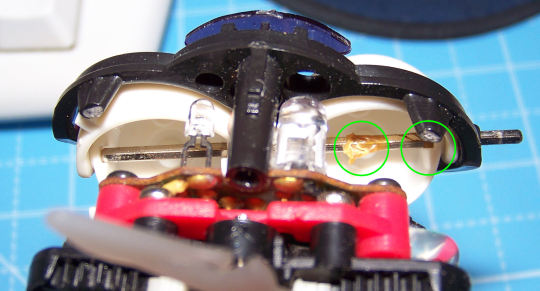
Notes:
I’d been warned that there might be glue on the bar that prevents it from moving, alcohol didn’t work so i scraped it off using a knife and tweezers.
The metal eye bar is a hexagon shape, realigning everything is very fiddly especially as you have a spring in the middle. I do not recommend removing them on baby furby unless you have to since baby furbys lack eye socket holes to push out the 12mm eyechips anyway.
Using thick eyelashes with domed eyechips makes a mess of your glue even if it’s dry. I’m either going to wash these (it’s just white glue!) and redo them once I’ve found flatter eyes (these were experiments which is why the backing isn’t properly glued down) or cover the mess with glitter.
102 notes
·
View notes
Text
I scream, you scream, we all scream, for: Ice Cream! My first try at plushifying a furby!


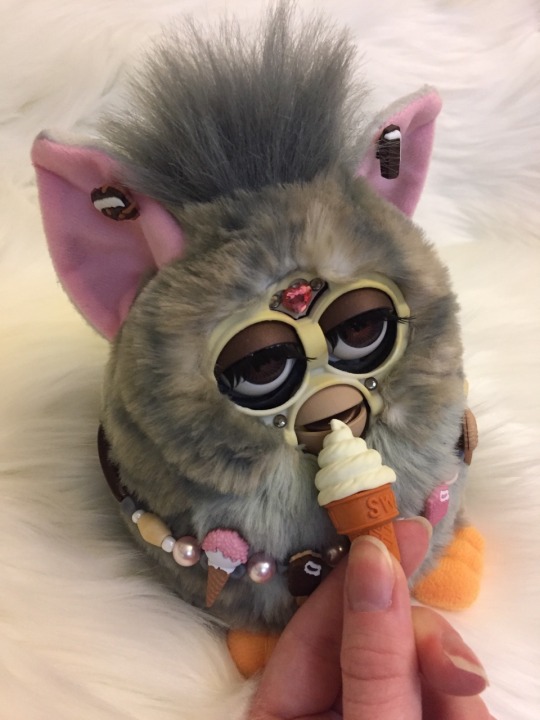
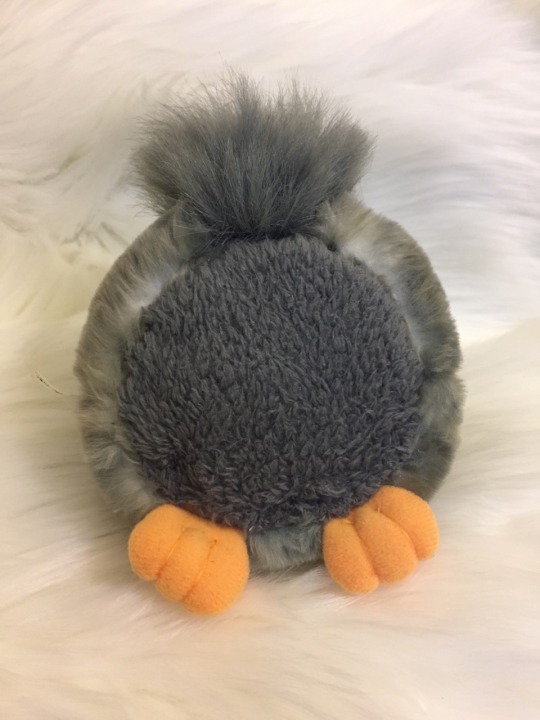
Ice Cream was given a bath, brush, custom ice cream themed necklace and earrings, painted beak with chocolate colored tongue, neopalitan painted eyelids, face plate and sensor gems, stuffed with love (poly fiber fill), a fuzzy bum, and lovely new eyelashes n_n

Credit to @kool-dool for their tutorial, otherwise I'd probably be in tears trying to figure this out on my own!
#furblr#furby#safe furby#all furby#custom furby#plushblr#plushie#ice cream#custom toy#plush furby#wolf furby
110 notes
·
View notes
Note
Hi! Do you know how to remove and replace a furby Buddy's eyelashes? my boi cornelius is very sad...
Hello friend! 💗❤️🧡💛💚💙💜 Personally I have never messed with my Furbys eyelashes but here’s a great tutorial:
Good luck!!!
39 notes
·
View notes
Text
I couldn’t help myself!
I was on Mercari yesterday and saw a 1999 Furby adult up for sale for $25 with free shipping. They looked in such poor shape - listed as not working, with no eyelashes, no tail, and the tuft on top of the head looked like it was badly chopped and falling out. My boyfriend told me I shouldn’t get it so I didn’t...
Until this morning! I woke up around 8 a.m. and felt rather awake, which is unusual for me. I am NOT a morning person. Something told me to check my phone, and when I did I saw I had a notification from Mercari saying that the seller of the Furby I was looking at was offering it for only $20!!! Taking that as a sign I should get it, I excitedly woke my boyfriend and told him I was buying it. He grumbled at me that he’d been dreaming (Ooops! Sorry! I love you, boyfriend!!!) and turned away from me to go back to sleep.
Very soon I will be the new owner of this cute, broken baby! Once she gets here, she is immediately getting a bath! I’m going to see if I can make her a new hair tuft and tail, as well. I watched a tutorial online that shows how to make a ball of fur using faux fur material, so I might try that with some white faux fur I have and then sew them on her. We’ll have to see how that goes!

I’ve been calling her Spooky Kid in my head because her colors give me Halloween vibes, but that’ll most likely be a nickname. So far names I’ve liked for her are Cinder, Ebony, Maisy, Noire, Raven, or Rue. I’m welcome to suggestions for other names! She’s already listed as shipped so she’ll be here real soon!
12 notes
·
View notes
Photo


there’s a new post up on my neocities site! it’s the first in a series of tutorials i’m doing over there- this one is on skinning/washing 1998 furbys! my eyes/eyelashes tutorial is by far the most popular post on here, so i wanted to expand it into a series as i switch to neocities for hosting original content
4 notes
·
View notes
Text
Tranzfubby’s eye chip tutorial
this is my eye chip tutorial! this is how to make clear eye chips by reusing the eye chips your furby comes with! no need for hot glue sticks.
this post is long and contains a lot of pictures, so im putting a read more so it doesnt clog up peoples dash. tutorial under the cut!

first you should get the furby you want to customize and skin them. if they havent been skinned before and you dont know how to do that, here is a tutorial on doing that!
https://furbytech.tumblr.com/post/171974431784/how-to-skin-a-furby-1998

now that you have your furby skinned, its time to unscrew the casing. there will be 1 screw on the top of their head, one below their pet sensor, and 2 on each side of their casing.

great! now that your furbys casing is off, turn them around! (dont mind the q-tips, this boy was FILTHY and i was cleaning him up)

you should see this! there is a screw underneath the plastic we need to get at, and if the screw isnt exposed, turn this gear (also used for push-starting your furby) until you can see it.


once you can get at it, unscrew it.

now look for this screw! (located under the beak) your furby may not have this screw, or may have a screw on the side of their face. if your furby has a screw beneath their beak, you will have to unscrew their tickle sensor and speaker to get at it. if your furby does not, skip this step.

once you have the tickle sensor + speaker unscrewed, move it out of the way and unscrew the screw underneath the beak.

now get something small like a tiny screwdriver, earring, etc. and push out the little bar in the beak and eyes. keep these somewhere safe! at this point you should be able to take the beak apart and get out the eyelids and eyes of your furby.

at this point you should have only the eyes, i personally couldnt get the bar to come out of his eyes so i left it in.
now take some rubbing alcohol (DO NOT use nail polish remover i BEG you!! it can destroy the plastic!!) and fill a little bowl with it and submerge the eyes. if you had trouble getting the bar out of the eyes like i did, you can submerge the eyelids with the eyes, but the eyelashes will fall off. this happened to me, but i reattached them with a little bit of glue. leave the eyes to soak either overnight or for 24 hours. (do not dump out the alcohol once the eyes have soaked! you will need it in a minute!!)

once your furbys eyes have soaked, take something small but blunt (important!!) and push the eye chips out. using something sharp may damage your furbys chips. i used a pushpin and it left marks in the plastic.

once you get em out, plop these back in the alcohol for about 10-15 min. once they have soaked, take a cloth, paper towel, q-tip, etc. and clean the paint off the back. you may not get all the paint off the first try, so you can put them back in the alcohol for another 10-15 min and try again until the chips are clear.

your chips will look something like these now! even though they are clear now, they still have grooves carved into the back. if you dont mind this, you can use these as-is. if you want them to be completely clear, move to the next step.
take some mod podge (i used matte mod podge but this would probably work better with glossy!) and coat the backs of the chips with it. let them dry and continue to add thin, even coats (i used about 3) until your chips are clear.
they should be pretty clear now!

now print out a design (or paint/colour one like i did) and cut it out. plop the design in the empty eye and then place the eye chip on top.

and you are done! clear eye chips using the ones your furby came with! i hope this tutorial was clear enough! feel free to message me (or ask! anon is always on) with any questions!
#safe furby#furby#furblr#furby fandom#furbys#furbies#furby tutorial#furby eye chips#furby eye chip tutorial#custom furby
24 notes
·
View notes
Text
Pull them off. Try to use even pressure, because they can sometimes come out in pieces. It's not hard to get the eyelashes off, and when you're done, you can glue them back in place! Then your fubby will stay dry!
Anyone know how to curl a Furby’s original lashes?
Please help. My darling Sigma’s lashes are all spread out and unkempt
#furby#safefurby#allfurby#all furby#safe furby#furby fandom#furb#fubby#hehe fubby#good stuff#furby tutorial#furby eyelashes#furby tips
18 notes
·
View notes
Text
tiny thing for @protectiveforce !!
“ You know, Todd, I don’t care much about Valentine. ”
For the sake of the record, it should be noted that Dirk woke up at the break of dawn feeling rather as though his heart was just about ready to crawl up his throat. Which, yes, he’s aware might sound like a worrying medical condition, but he’s quite sure the phenomenon’s ENTIRELY related to the sleepy-eyed, blanket-cocooned wonderfulness of Todd Brotzman curled up next to him. Todd, who’s all his for the day: the agency is closed down due to important domestic business, their phones have very wisely been shut off ( and, hopefully, up ), and there’s reason to trust that the flat is blissfully empty of anything verging even remotely on the dangerous and boyfriend-devouring side of things. Now, only seconds after Dirk dragged his adorably tousled darling out of bed, his heart STILL doesn’t seem to have rediscovered its ability to not explode all the sodding time. But how could it? Todd feels so soft and dream-warm in Dirk’s arms ( wrapped lovingly around him from behind as they are ), and his long, unfairly swoop-y eyelashes tickle butterflyishly against Dirk’s palms where they rest across his boyfriend’s face. “ I’ve never even met him. Her? Really, no idea what all the fuss is about. I think it should be called Todd’s Day instead. Brotzday?? A day dedicated solely to spoiling your very favourite Todd! Although I do suppose I would have a lot of competitors to tourney. You must be everyone’s favourite Todd! You’re certainly mine. Not that you’d be surprised to hear it; you’re my favourite everything! ”
Smiling exuberantly to himself, the detective steers his beloved past the veritable jungle of flowers that bloomed up in the living room overnight. He pauses only briefly to snatch the head off a particularly nice-smelling pink flower - cruel, but necessary, considering the circumstances -, tucking it snugly behind his boyfriend’s ear. There. Perfect. “ No peeking! Everything’s a surprise! ” If there’s a hint of panic to be observed, it’s soon quenched when Dirk slaps his hands across Todd’s eyes once more --- and the task absolutely does require both of his hands, what with the mind-boggling ENORMOUSNESS of those eyes. Some wary part of his brain is convinced Todd can still magically see past the barrier of Dirk’s fingers. Incidentally, it’s the very same part that continuously fails to understand how anyone’s anatomy can have this much of a propensity for extremes: extremely hug-able, extremely soft, extremely sweet-lipped, extremely attractive, extremely beautiful in absolutely every last way. It’s simply not humanly possible, nor very believable. Yet here he is, extremely inconvenienced by Todd’s toddness as usual. So much so that he absolutely needs to plant a fond little kiss on the back of his boyfriend’s neck before they pick up their journey through the flower-infested room. And then another one on the tender little curve where Todd’s nape meets his shoulder. For good measure, duh.
“ Oh, sorry, don’t trip! Wait, I’ll allow you to open your eyes in just a second -- ” Nudging the bathroom door open with a somewhat clumsy kick of his knee, Dirk shoves their entangled selves forward until they nearly collide with the bathtub. The wonderfully transformed bathtub, glistening with the many colours of the first Valentine’s surprise Dirk thought up for their very special occasion. Truthfully, he could hardly be more satisfied with his work. “ Ta-dahh! ” When he releases Todd’s face from his blinding grip, the detective watches eagerly for any twitch of emotion, bouncing almost hysterically on his socked feet. “ You see --- oh --- yes! What BETTER way to start the international day of sweetness than this?! I surmise you find yourself plagued by questions, Mr Easily-Readable-Eyebrows Brotzman! The whole affair’s actually quite logical and simple to explain, though. It goes without saying that my first obvious thought was to fill the tub with rose petals, but !! Todd! Have you got any idea how much those buggers cost?! We both know we’re not exactly swimming in money - nor, indeed, in rose petals - after that regrettable incident with Mr Jimenez’ high-priced furbie collection. Although to be fair, he totally overreacted! So --- !! I opted for the only rational solution and bought sixty kilos of THESE! ”
Still beaming with pride, he fishes out a handful of brightly shining jelly beans and allows them to trickle joyfully back into the tub --- except for the lime-green one he sticks unceremoniously between Todd’s slightly parted lips. “ Bean bath !! It’s much more elegant anyway, wouldn’t you say? Come to think of it, rose petals are just the littlest bit pedestrian, right? Anyone can do rose petals. At least with these, we’ll never run out of dessert! Don’t worry, I got them quite cheap. ” A downright brilliant impulse crosses Dirk’s unresisting mind, and he obliges without hesitation. One of the many { many! } advantages of Todd’s smallness, after all, is that he can effortlessly be picked up whenever and consequently placed wherever one likes ( even though it’s earned Dirk no small amount of glares in the past and one time even a half-hearted punch to the chest ). He watches on with unmitigated delight as his boyfriend becomes engulfed in the tide of sweets and then follows with a huge leap, beans springing every which way. “ Oh, darling, they really bring out the blue of your eyes! Okay, look, we have a big day ahead of us! Firstly, you absolutely MUST be fed strawberries for breakfast. No eye-stabbing included this time. I’ve bought so many ??, and they’ve travelled an even longer distance than me to get here! Secondly, I want you in bed for HOURS. I watched some very interesting video tutorials on ... oh, doesn’t matter, you’ll see. You mentioned how utterly cheesy you find those heart-shaped pizzas, remember?, so that’s lunch settled. Yes, we’ll TOTALLY have pineapple on them! I’m hoping it’ll rain at some point in the afternoon, because if it will? I’m so going to stand on the street and gaze longingly at the window for at least fifteen minutes. Maybe ten. Well, let’s say five. Oh! If there’s no rain, perhaps you could pour a few buckets of beans on me !! That’ll solve part of the problem I’m second-thoughtily fearing I may have caused, now that we’re chest-deep in it. After that, we’ve got all evening for your plans, which I’m hoping involve cuddles, since that would coincide almost SPOOKILY with my own preferences. ------ Todd!!! ”
Finally, finally Dirk finds himself forced to pause for breath, chest heaving with dizzying enthusiasm as he reaches out and gives his bamboozled ( and bambeanzled ) darling a thorough shake by the shoulders. “ Today is going to be PERFECT! Any day with you is always going to be perfect, but this one, God ... ” It seems that his eyes can never not mist over when he leans in to touch their foreheads together and breathe the tiniest kiss to Todd’s soft lips --- softer than any sea of rose petals. This time is no exception. “ Todd, you’re ... you’re here. With me. Even though I toppled over your entire life, even though I filled our bathtub with beans, Todd, you’re ... you’re my boyfriend! I get to spend today with you, I get to spend forever with you, I ... I ... Todd, I love you so much! ” And he does. And he will. And he has, always, without fail. It makes all the many uncountable days spent without the braver half of his soul so very bloody worth it.

#protectiveforce#cw valentine's day#love is too small a word for our forever. ( dirk/todd verse )#[ just a small thing???? because i needed these boys to spend a dorky and cute day together!!!#also bye the idea of dirk gaily and longingly standing in front of their apartment while todd pours jelly beans on him#why is he like this.#he terrorises my every waking moment <3 ]#[ also this is meant to be a one-off thingie !! you don't have to reply at all!!! ]
4 notes
·
View notes
Text
And it looks like factory differences from the furby the one who made the tutorial for putting on new eyelashes has mean I actually did all this for nothing because the screws to remove the faceplate aren’t accessible... D:
2 notes
·
View notes
Text
Furby Tutorial Masterpost
If you want anything deleted, added, or fixed let me know and I’ll be more than willing to do so! If you use any of the tumblr tutorials, or find them helpful, please consider reblogging them from the source! Good luck with your furbs :))
Last Update: 06-Apr-25
Note: Some tutorials fall under multiple categories (i.e. a tutorial that includes both Skinning and Repair), so if you can’t find what you’re looking for under one section, try checking another. I tried to label the tutorials clearly with every term that applies. Use Ctrl+F to find things quicker.
1998 - 2000 Furbys
Body / Fur:
Body Measurements by E.H Wesson
Custom Ears by wessysfurbs
Custom Face, Feet, & Fur from Youtube by Tiny Badger
Custom Furby Sock Skin & Yarn Fur by confetti-furb
Disassembly by kevere
Ear Bone Removal by furbytech
Folded Ears by furbypurrs
Reattaching Skin & Tag from Youtube by furby_fanatic_4ever
Sew Ears Back On from Youtube by Ah-Bay and May-Doo
Sewing Custom Skin from Youtube by FeatherFae
Sewing Pattern (Adult - Maned) by cavity-sam
Sewing Pattern (Adult - Maned & Tailed) by furbing-atrocities
Sewing Pattern (Baby) by charliedidtheirbest
Sewing Pattern (Buddy) by nemoboyistired
Sewing Pattern (Maned Buddy) by pocket-furbs
Sewing Pattern (Maned & Tailed Buddy) by daftfurby
Sewing Pattern (Keychain McFurby) by fuzzy-furby-on-a-string
Shell & Speaker Removal from Youtube by furby_fanatic_4ever
Skinning from Youtube by Bean Spills
Skinning by crayfurbs
Skinning from Youtube by furby_fanatic_4ever
Skinning (em português) by furbykiwi
Skinning by furbypurrs
Skinning by furbytech
Skinning from Youtube by MadeBy-SG
Skinning by sporksfriendlyfurbs
Skinning w/ pictures | w/o pictures by rancidbunny
Skinning & Cleaning from Youtube by myreadingisodd
Skinning, Cleaning, & Reattaching Ears from Youtube by Retro Furby
Skinning, Cleaning, Eyechip & Lash Replacement from Youtube by Retro Furby
Skinning (Baby) by refurb
Skinning (Baby) by sodapop-hospice
Tail Removal by ejfurbish
Tag Removal w/o Cutting by redroadrot
Zip-Tie Elastic Replacement by mr-furby
Face:
(Eyechip Sizes: Babies - 12 mm, Buddies - 12 mm, Adults - 14.5-15 mm)
Beak Carving by beansfurbies
Beak Carving by furbeeb
Beak Carving | Youtube link by lemons-bizarre-adventure
Beak Carving by sniffanimal
Beak Nose Ring | Youtube link by mossrotts
Disassembly w/ Eye & Eyelid, Eyechip (Poke Out), & Beak Removal | Youtube link by foervraengd
Eye Assembly (Baby) by firespirited
Eye & Eyechip Removal - Poke Out by cafeaibo
Eye Removal by dinofurby
Eye & Eyelid Removal from Youtube by Furby Queen
Eye & Eyelid Removal & Eyelash Replacement by batterypoweredbaby
Eye & Eyelid Removal & Eyelash Replacement from Youtube by Furby Queen
Eye & Eyelid Removal & Eyelash Replacement by furbyish
Eyechips - Accurate 1998 Recreations by furbyfreakazoid-blog
Eyechips - Craft Tape Iridescent by furburb
Eyechips - Drawn or Printed by furbyte
Eyechips - Paint | Part 2 by cephalopuff
Eyechips - Paint | TikTok link by f3rbaliciou5
Eyechips - Paint & Glitter | Youtube link by justanotherelsen
Eyechips - Paint & Stickers by furbypurrs
Eyechips - Painted Over by furbitchy
Eyechip Cleaning by blue-change
Eyechip Cleaning & Printing by furby-o-rama
Eyechip Cleaning & Reusing by ejfurbish
Eyechip Printing Help by furburb
Eyechip Printing Help by pancake-furby
Eyechip Printing Template by furbeeb
Eyechip Removal - Hot Glue by furbypurrs
Eyechip Removal - Hot Glue from Youtube by Retro Furby
Eyechip Removal - Poke Out from Reddit by ravegore
Eyelash Replacement by furba
Eyelash Replacement by furbyfab
Eyelash Replacement & Eyelid Painting from Youtube by justanotherelsen
Eyelid Carving by raptorfurby
Tongue Carving by obsessedwithfurbies
Repair / Hacking:
Anatomy of the Furby from alumni.media.mit.edu by Kelly Heaton
Furby 1999 Schematics reverse engineered by Chris Brown
Furby Autopsy (Skinning, Mechanics, & Hacking) from Phobe.com
Battery Contact Replacement / Repair by l3x01d
Disassembly & Hacking from Instructables by monkeywidget
Hook up to a Microcontroller from Instructables by monkeywidget
LED Eyes from Instructables by monoapp3
MSA Cure by refurb
Muffle Speaker by refurb
Muffle Speaker by softservos
Push-Start from Instructables by lambsb
Push-Start w/o Skinning by flowerfurbs
Push-Start w/o Skinning from Youtube by Furby Queen
Repair & Troubleshooting by aibo7m3
Speaker Reattachment from Youtube by furby_fanatic_4ever
Speaker Swap by fake-furby
Swap out Speech Chip from Arduino Project Hub by amurison718
Sync Screw Adjustment by furbytech
Volume Knob by draibo
Furby Friends
Shelby:
Skinning & Push-Start by furbytech
Gizmo:
Battery Compartment Replacement | Part 2 | Part 3 from Youtube by furby_fanatic_4ever
2005 Furbys
Body / Fur:
Skinning | Part 2 from Youtube by Amiable Furbies
Skinning from Youtube by Bean Spills
Skinning from Youtube by furby_fanatic_4ever
Skinning (2005 Baby) from Youtube by Furby Queen
Skinning & Beak Replacement from Reddit by Desperate_Guess_6201
Skinning, Cleaning, & Reassembly from Youtube by Furbia
Skinning, Cleaning, & Reassembly from Youtube by Misclae
Skinning w/ Eye & Ear Repair from Youtube by Furby Queen
Skinning & Painting from Youtube by Misclae
Skinning & Repair by furbytech
Face:
Beak Recreation from Youtube by Furby Queen
Beak Recreation by ratmistressrat
Pose Beak Manually by boobtoucher89
Eye Cleaning Tip from Reddit by ExpressPersonality12
Eye Painting (check OP’s comment at bottom of post) by basslinegrave
Eye Removal & Reattachment from Youtube by furby_fanatic_4ever
Repair / Hacking:
Battery Compartment & Corroded Battery Removal from Instagram by wolfcatcreative
Broken Eye Repair by wanderingwishcraft
Circuit Bending from Youtube by MAS68saxophone
Mechanics Breakdown & Disassembly from Youtube by Thought Bomb Design
Repair from Youtube by Briar’s Rabbits
Repair & Washing from Youtube by With or Without Fur
Speaker Replacement from Youtube by Amiable Furbies
Tickle Sensor Repair by daintee
2012 - 2016 Furbys
(2012 tutorials should also apply to Booms and Crystals; they're similarly made. Connects are different enough that 2012 tutorials won’t work on them.)
Body / Fur:
Disassembly (Connect) from Youtube by FurbyFactoryStore
Notes on Skinning (2012) by sniffanimal
Sewing Pattern (2012) by mustachewashitape
Sewing Pattern (2012) | Ko-fi link by E.H Wesson
Sewing Pattern (Connect) by furbing-atrocities
Sewing Pattern (Connect) by tentafurb
Skinning (2012) from Bot Thoughts by Mike Shimniok
Skinning (2012) from Instructables by Look_I_Made_A_Hat
Skinning (2012) from Instructables by Modified_Plushies
Skinning (2012) by furbycrimes
Skinning & Washing (2012) | Youtube link by softfurbs
Skinning, Washing, & Reassembly (2012) from Youtube by Retro Furby
Skinning (Connect) by from Youtube by adafruit
Skinning (Connect) from Youtube by With or Without Fur
Face:
Custom Eyes (2012) by edmond-gray-the-long-furby
Faceplate Removal (2012) by spibsfurbyobsession
Shaker Eyes (2012) from Reddit by themostamazinggrace
Repair / Hacking:
Hacking (Connect) by furby-science
Mute w/ Pictures (2012) by popufurb
Mute w/o Pictures (2012) by popufurb
Mute Chirping (2012) by clownsfurby
Mute Chirping (2012) by vultureworth
Speaker Removal (2012) by refurbed-furbs
Speaker Replacement (2012) from Youtube by Gregg Adventure
Troubleshooting (2012) by angel-nee
Volume Reducing (Connect) by furbyfab
2023 Furbys
Body / Fur:
Skinning from Youtube by BeckySter
Skinning, Painting, & Reassembly by l3x01d
Furblet Disassembly by fubbybebby
Furbling Disassembly | Part 2 by gachadiy
Face:
Paint Removal & Painting by crayfurbs
Adaptable Customization
(Can apply to multiple generations of furbys.)
Belly Pouch by deerholdfurb
Clay Horns by furbypurrs
Effectiveness of Different Dyeing Materials by mr-furby
Eyelash Dyeing - Paintwash by rainbow-valley-furbys
Fur Dyeing - Markers Post 1 | Post 2 (check post notes) by snotgirlfurb
Fur Dyeing - Paintwash by furburb
Fur Dyeing - Paintwash by rainbow-valley-furbys
Fur Dyeing - Paintwash by refurb
Fur Dyeing & Plastic Painting - Paintwash by funnyfurby
Fur Dyeing - Synthetic Dye (2012) by phestarrgenderfuckangelvapor
Painted Freckles by rainbow-valley-furbys
Plastic Painting / Paintwash Tips by daftfurby
Reattaching Skin / Fur by refurb
Teeth by hte-furby
Teeth by raptorfurby
Yarn Fur by plushiicore
Yarn Tufts Sewn into Fur by sniffanimal
Yarn Tufts Sewn into Fur by ejfurbish
Oddbody / Stuffed Furbys
Add Doll Limbs (Buddy) from Youtube by The Odd Body
Bald Furby (1998) from Youtube by CholFable
Crochet Furby from Ravelry by Lori-Anne Carr
Foam Furby (adaptable / 1998) by luidilovins
Folded Paper Furby | Printouts by 101-furbys-101
Furberos Sewing Pattern by nardacci-does-art
Polymer Clay Shelby | Docs link by rosemauled
Faceplates:
3D Printed Articulated Faceplate (1998) from Thingiverse by Averybee
3D Printed Faceplate (Buddy) | Thingiverse link by fresh-furby
3D Printed Faceplate (Buddy) from Thingiverse by itherina
3D Printed Faceplate (Buddy) from Thingiverse by Joshisprobablyonfire
Crochet Faceplate by mygoogledrivescaresme
Faceplate Mold - Hot Glue (Keychain / adaptable?) by greengomifurbs
Faceplate Removal (Buddy) by fuzzy-furby-on-a-string
Felt Faceplate / Long Furby Tutorial from Instructables by SrP2g
Modeling Dough Faceplate / Long Furby Tutorial from Youtube by The Odd Body
Long Furbys:
3D Printing - Spine-to-Furby Connector (1998) from Thingiverse by im_new_to_this
Long Furby (adaptable) | Ko-fi link by E.H Wesson
Long Furby (adaptable) | Sewing Pattern from Youtube by Levi The Furby King
Long Furby (adaptable) from Instructables by Look_I_Made_A_Hat
Long Furby (adaptable) from Youtube | Written Tutorial by The Odd Body
Long Furby - Gandalf (adaptable) from Youtube by The Odd Body
Long Furby - Glowing (adaptable) from Youtube by The Odd Body
Long Furby (1998) by oddlylongcuriosities
Long Furby (1998) from Youtube by soapytoastpants
Long Furby - Functioning (1998) from Youtube by CholFable
Long Furby - Functioning (1998) from Youtube by Frey Finley
Long Furby (Buddy) by adafriend
Long Furby (Buddy) by furbyfuzz
Long Furby (Buddy) from Reddit by fritziko
Long Furby (Keychain McFurby) from Youtube by LavilyDay
Long Furby (2012) from Youtube by SpartanSPI
Long Furby (2012) from Instructables by croccqueen
Stuffed Furbys:
(Most of these contain Faceplate Removal if you’re looking for that.)
Stuffed Furby (1998) by kooldool
Stuffed Furby (1998) by sporksfriendlyfurbs
Movable Beak (1998) by sporksfriendlyfurbs
Stuffed Furby (2005) by fuzzy-furby-on-a-string
Stuffed Furby (2005) by prince-chungo
Stuffed Furby (2005) by walrus-furbs
Stuffed Furby (2005 Baby) | Part 2 by furbiefreckles
Stuffed Furby (2012) by ezra-furbs
Stuffed Furby (2012) from Aminoapps by Fox
Furby Fakes
Dubby Skinning, Cleaning, & Repair from Youtube by Electronic Gore!
Cleaning
Battery Corrosion from Youtube by Furbtastic
Battery Corrosion by furbytech
Battery Corrosion by wanderingwishcraft
Fur Brushing (1998 / adaptable) by furbyfreakazoid-blog
Fur Cleaning (adaptable) by furbytech
Fur Cleaning (1998 / adaptable) by furbiis
Fur Cleaning (1998 / adaptable) by mr-furby
Fur Cleaning (1998 / adaptable) by sporksfriendlyfurbs
Fur Cleaning (1998 / adaptable) by that-pineapple154
Fur Cleaning, Drying, Brushing, Conditioning | Part 2 from Youtube by furby_fanatic_4ever
Fur Cleaning, Smell Removal, & Whitening (1998 / adaptable) by crayfurbs
Fur Surface Cleaning by funky-furby
Fur Surface Cleaning by furbaliciousprincess
Furby Buddy Cleaning by furbymancer
Furby Buddy Cleaning by jesterfurbs
Plastic Whitening (1998) by furbyfab
Tilt Sensor Cleaning (1998) by furbytech
Furby Clothing & Accessories
Furby Clothing Making Tips (& 1998 Shoe Pattern) by ladyfurbton
Cape (adaptable / oddbody) by universalblips
Crochet Beanie (adaptable / Buddy) | Docs link by bambini-della-luna
Crochet Beret (adaptable / 1998) by furbsindecay
Crochet Furby Sling (adaptable / 1998) from Reddit by Kyaritty
Crochet Furby Sling (adaptable / 1998) by millalya
Crochet Furby Sling (adaptable / 1998) | Ko-fi link by rayn--cloud
Crochet Socks (adaptable / 2023) by millalya
Crochet Sweater (adaptable / 2023) by millalya
Demin Jacket (adaptable / 2012) by furbmiester9000
Dungarees / Overalls (adaptable / 1998) by dirtybongwaterfurby
Hood (adaptable / 1998) by rancidbunny
Knit Beanie (adaptable / 1998) by garlic-the-gnome
T-Shirt (adaptable / 1998) by rancidbunny
Ball Gown (1998) from Ko-fi by E.H Wesson
Button Up Shirt (1998) from Ko-fi by E.H Wesson
Cape (1998) by glitt3rcritt3r
Cape & Pointed Hat (1998) from Ko-fi by E.H Wesson
Dress (1998) from Ko-fi by E.H Wesson
Hoodie (1998) by ajaxblacknight
Overalls (1998) by bubbleycake2
Socks (1998) by pocket-furbs
Toque (1998) by tiedyefur
Onesie (2005) by nemoboyistired
Velcro Decos (2023 / adaptable?) by millalya
Long Furby Carrier Backpack by topson-longboi
Misc.
1998 Furby Instruction Manual
1998 Furby Patent
1999 Furby Babies Instruction Manual
Furby Toolkit Must Haves + Tips by furbandco & furbeetle
Furby Trainer’s Guide Deluxe | Drive link by nudnickel et al. (Troubleshooting, Repair, Cleaning, Clothing Patterns, & More for all generations of Furbys)
Guide to Furby Eye Colours (1998) by asexual-furby
How to Find Your Furbys Birthday (1998 - 2001) by asexual-furby
How to Find Your Furbys Birthday (1998 - 2002) by kah-way-loh
How to Find Your Furbys Birthday (2005 - 2023) by astralcat
How to Give Your Furbys Scents by furbyutopia
How to Take Your Furbys Outside by tarotfurbyandchill
Megalist of Unique Furby Names 2.0 (1.0) by tarotfurbyandchill
Resize Kid’s 1998 Furby Carrier Backpack for Adults by kidcuisinefurb
Tip to Prevent Hand Cramps by furburb
Various Paid Furby Sewing Patterns | Ko-fi link by crayfurbs (Maned & Tailed 1998 Adult, Maned 1999 Baby, Shelby, 2005 Adult, 2023)
#furby reference#tutorial masterlist#allfurby#safefurby#furby#furby fandom#furby tutorial#furby guide#furby cleaning#furby hacking#furby masterlist#tutorial#furby customization#furby customizing#oddbody#long furby
8K notes
·
View notes
Text
Intro Post + Tagging System
Hey guys! Custom Furbies seem to be getting more popular in the fandom, so heres a blog to showcase them! A disclaimer, I have not customed my own Furbies beyond faceplate and body swaps, so I cant give advice!
This blog is going to be using the following tagging system to keep things organized:
•Custom- Any Furby that has been customized to a degree beyond removable accessories (Ex: Plastic parts repainted, eyes modded, new fur)
•Semi-custom- Any Furby with very minor changes (Ex: New eyelashes, swapped faceplates, dyeing only a small part of the fur)
•Eye Mod- Any Furby whos eyechips have been replaced
•Custom Fur- Any Furby whos had a completely new fur be made for it
•Sculpting- Any Furby who has had pieces sculpted for it (Ex: Teeth sculpted into the beak, claws sculpted for paws)
•Dyed- Any Furby whos fur has been dyed
•Repaint- Any Furby who’s faceplate, eyelids, eyechips, and/or beak have been repainted
•Patches- Any Furby who has had patches sewn onto their fur or ears
•Full Custom- Any Furby thats been totally customed. New fur and eyechips
•Frankenfurb- Any Furby that has been customed using parts from another Furby (Ex: A Snowball with a Sherbet faceplate)
•Tutorials- Tutorials on how to custom your Furby
•Concept art- Concept art for custom Furbies
•Not a Custom- Asks and Mod Posts go in this tag
Feel free to submit posts and tag me in things! Id love to see them all!
28 notes
·
View notes