#gtk4
Explore tagged Tumblr posts
Visit Tumblr Blog
Explore Tumblr blogs with no restrictions, modern design and the best experience.
Last Seen Tumblr Blogs


Fun Fact
In Q3 of 2020, 31% of US users access the Tumblr app daily.
Text
so i installed dino as an xmpp client and i really don't like how gtk4 applications look insanely out of place if you'e not using gnome (and it's impossible to theme it too).
0 notes
Text


12.01.25
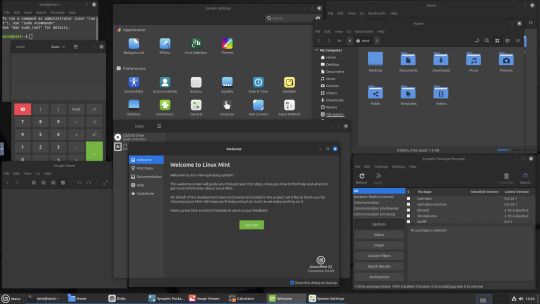
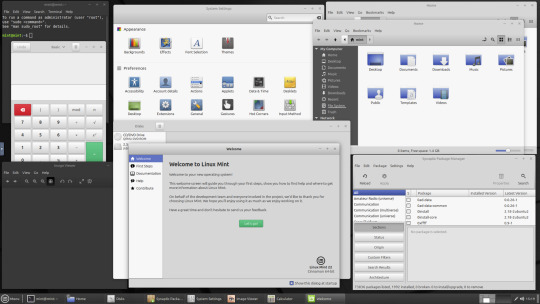
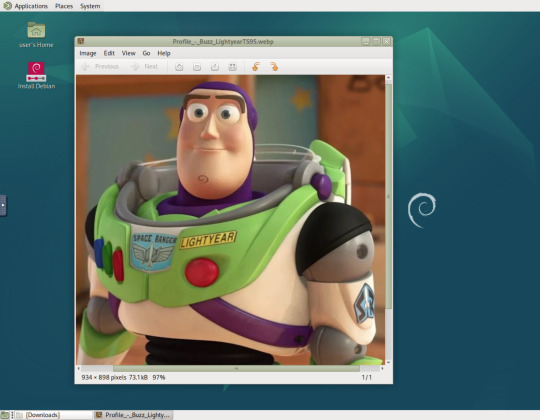
Here are two Linux distributions running in a virtual machine on Distrosea. They are Linux Mint 22 Cinnamon and Debian 12 MATE.
These images show some of the themes which you can select in each distro. Linux Mint uses two themes, known as 'Mint-Y (Arc)' and 'Mint-X (Greybird)'.
Mint-X is a redesign of the Graphical Toolkit 2 (GTK2) version seen in older versions of Mint made to work with the newer GTK3 and 4 versions. All themes are available in a range of colours and include light and dark variants.
Read Linux Mint's release history here:
https://en.wikipedia.org/wiki/Linux_Mint#Release_history
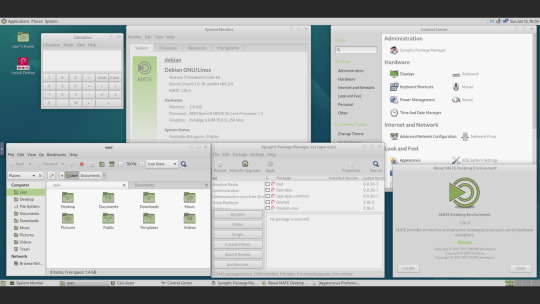
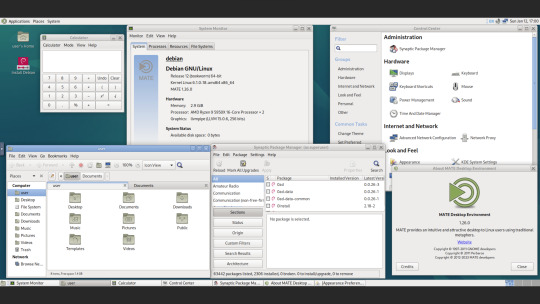
In Debian 12 MATE, there are a range of retro themes including 'Green Menta' which is the default.
This is Debian's background featuring the 1999 Debian red swirl logo, which also features in Pixar's Toy Story, rotated around on the chin of Buzz Lightyear!
The name for this version of Debian is Bookworm, all releases since 1996 feature the names of various Toy Story characters.
Find out Debian Linux's name history here:
https://en.wikipedia.org/wiki/Debian_version_history
I have selected a theme called 'TraditionalOK' which is a GTK3 theme based on a classic GTK2 version called 'Clearlooks' which was built from a similar theme used in the old free version of Red Hat Linux.
Most Linux distros use either GTK3, Qt4 or OpenBox as a theme toolkit.
The original GTK was developed in 1997. It was inspired by the success of the KDE project.
See wiki link to learn more about GTK:
https://en.wikipedia.org/wiki/GTK
Using GTK3 or GTK4 has many advantages over GTK2 such as the ability to support modern features such as HiDpi as GTK3 uses vector graphics (SVG files) instead of PNG files to display all the windows on screen.
See post below for my write up on Distrosea.
5 notes
·
View notes
Text
gtk4 shit bubbly mess i hate adwaita why are there so many apps in this awful screenwasting playmobile fuckass visual style
2 notes
·
View notes
Text
Multiple days later, I've actually managed to get Debian 12 running on my old MacBook. I'm going to throw my troubleshooting into the world, just in case. Not like anybody comes to Tumblr for tech support, but I'd be remiss if I didn't at least present this information in a public way.
Solved
GPU Drivers
Apparently this whole time, the thing causing the black screen on boot was the AMD dGPU. These things are known for failing in this generation of MacBook. Mine, however, has not failed, so I didn't even think to suspect it. I know it's okay because OCLP macOS, Zorin OS, and Pop!_OS were all capable of booting with it still enabled.
For some reason, though, Debian absolutely shits its pants when presented with the AMD Radeon 6490M. I followed this guide for Ubuntu 20.04 LTS and disabled the AMD dGPU, forcing Debian to only see the Intel HD 3000 iGPU, and everything booted–no problem.
Wi-Fi Drivers
Debian won't install the necessary Wi-Fi drivers for this machine during install, but I got the Wi-Fi working, regardless. However, apparently the "b43" open-source driver really hates the Broadcom BCM4331 chip that 2011 MacBook Pros have (despite claiming to support it). Not only did it not detect 5 GHz networks, but it also would just randomly stop working. The network would stay connected, but stuff would just get super slow and eventually start timing out. The fix was to purge "firmware-b43-installer" and install the "wl" (broadcom-sta-dkms) drivers instead (I did this in reverse order because I didn't want to lose connection and have to get up and plug the thing into Ethernet. Nothing bad happened as far as I can tell). Now the WiFi works perfectly.
Custom Cursors
The cursor I use (A Linux Conversion of the Posy Cursor for Windows) did not like being placed in [ ~/.local/share/icons ]. That wasn't enough for it. The arrow and pointer would work, but only in some apps. The loading hourglass was nowhere to be seen. Apparently, you also have to place a copy of the cursor folder in [ /usr/share/icons ]. Which is weird because Debian doesn't allow you to move files into that directory without using the "sudo cp" command in terminal, but whatever. The folder's there, and my cursor's fixed.
Partially Solved
Custom Theme
On Debian (although I think this is more specifically a GNOME issue), custom shell and GTK themes just love to be inconsistent. I still haven't fixed everything. Some apps still disobey my custom theme's macOS-like window control buttons, but it's whatever. They were always a luxury, so I can deal with some apps (like Firefox) not having them.
This isn't, however, the only thing that's still broken with my Custom Theme. For the record, I'm using Orchis. Apparently GNOME's auto dark/light mode just doesn't work anymore. The option is still there in Settings, but setting it to "Default" (which clearly shows an icon of both a dark and light window, indicating it'll change on its own) will do nothing. It just picks one theme and stays that way. I tried using GNOME extensions to fix this. Specifically, I tired "Night Theme Switcher" and "User Theme X." Both would properly switch the Shell Theme. However, they wouldn't change the GTK4 theme, which meant apps like the GNOME Files App would just not obey the new system theme unless I manually added the theme's files to [ ~/.config/gtk-4.0 ] and then logged out and in again.
So: bummer. Auto Light & Dark mode doesn't work, and for now I don't think it's possible to fix. Not the end of the world. I just set everything to dark mode for now, but it is a bummer. I do like using Light Mode during the day, and on the low contrast screen this 14-year-old laptop has, it really helps, but oh well. It's not a deal breaker.
Not Solved
Debian 13 "Trixie"
During my escapades and attempts to make Debian work, I ended up trying to install Debian 13 RC1 to see if newer packages and kernels would fix the AMD GPU issue. I tried both the Netinst ISO and the DVD ISO. Both of them would not work, period. I would select the EFI boot from the Mac Boot Picker, and the installer would immediately black screen and freeze. Debian 12 at least let me install the operating system before failing. Why Debian 13 RC1 did this, I have no idea. I haven't tried installing it since I disabled the dGPU, and I won't be trying until Debian 13 is the main stable release. So for now, Debian 13 is completely unrunnable and uninstallable on this hardware (in it's default form, anyway), and I can only hope the dGPU disable fixed it, or whatever they do between now and it's first stable release does.
#rambles#tech#technology#we're back baby#linux#debian#debian 12#debian bookwork#debian 13#debian trixie#computer#computers#linux help#troubleshooting#gnome#gtk#macbook#planned obsolescence#preservation
0 notes
Link
0 notes
Text
Ghostty Terminal على لينكس يقدم تجربة جديدة للمستخدمين
تجربة استخدام Terminal على لينكس يمكن أن تكون عاملًا حاسمًا في تحسين الإنتاجية، خاصة مع توفر خيارات متعددة تناسب احتياجات المستخدمين المختلفة. Ghostty Terminal هو واحد من أحدث الإصدارات التي تعد بتجربة سلسة وأداء قوي. بفضل ميزاته الفريدة وتصميمه الحديث، يوفر بيئة عمل محسنة للمطورين والمستخدمين العاديين على حد سواء. لكن هل يقدم Ghostty تجربة تستحق التبديل إليه، أم أن الخيارات الأخ��ى تبقى الأفضل؟
أحدثت محطة Ghostty ضجة في مجتمع لينكس. بصفتي مستخدم لينكس شغوفًا باستكشاف الأدوات الجديدة، كان عليّ تجربتها. كانت تحتوي على بعض الميزات الرائعة التي أردت استكشافها. ولكن هل يستحق استبدال محطة طرفيتك؟ لنكتشف ذلك.
ما هو Ghostty؟
Ghostty هو محاكي محطة طرفية حديث، ابتكره ميتشل هاشيموتو بشغف. صُمم ليكون سريعًا، غنيًا بالميزات، ومتوافقًا تمامًا مع كل من لينكس وماك. يسعى إلى توفير تجربة سلسة ومتكاملة للغاية للمستخدمين المحترفين. تتميز Ghostty بنهج واجهة المستخدم الأصلية، باستخدام تقنيات خاصة بالمنصة. Swift وAppKit وSwiftUI على ماك، وZig مع GTK4 على لينكس. يدعم ميزات المحطة الطرفية الأساسية مثل بروتوكول رسومات Kitty، والروابط التشعبية، وإشعارات الوضعين الفاتح/الداكن. علاوة على ذلك، يوفر وظائف على مستوى التطبيق مثل علامات التبويب الأصلية، والعروض المقسمة، ومحطة طرفية منسدلة على ماك. يُعد الأداء أيضًا محور تركيز رئيسي، مع تحسينات لسرعة بدء التشغيل، وسلاسة التمرير، وسرعة إدخال/إخراج عالية.
تثبيت Ghostty على لينكس
يمكنك تثبيت Ghostty على لينكس بعدة طرق. للبدء، يمكنك استخدام مدير الحزم الخاص بتوزيعتك. كنت سأجربه على أوبونتو. للأسف، لم تكن هناك حزمة رسمية لأوبونتو، ولم تكن متوفرة سوى حزمة يديرها المستخدم. لذلك اخترت AppImage لسهولة تثبيته وكونه عالميًا. أولًا، نزّل ملف AppImage الخاص بـ Ghostty من GitHub. يمكنك الانتقال إلى مستودع Ghostty AppImage والعثور على أحدث إصدار في الأعلى، أو يمكنك إدخال أمر كهذا، مع تعديل الإصدار الذي تريده: wget https://github.com/psadi/ghostty-appimage/releases/download/v1.0.14/Ghostty-1.0.1-x86_64.AppImage انتقل إلى المجلد الذي نزّلت منه الملف، ومنحه الإذن الصحيح. قد يبدو اسم ملفك مختلفًا عن الاسم الموضح أدناه، لذا تأكد من تعديله ليناسب ملفك الذي نزّلته. chmod +x Ghostty-x86_64.AppImage الآن، قم بتشغيل ملف AppImage. ./Ghostty-x86_64.AppImage سيؤدي هذا إلى تشغيل محطة Ghostty بنجاح. إذا كان Snap مُفعّلاً لديك، يمكنك أيضًا تثبيت Ghostty كـ Snap. يتيح لك استخدام مديري الحزم أو Snap حرية أكبر في استخدام Ghostty مقارنةً بـ AppImage. لتثبيته باستخدام Snap، شغّل: sudo snap install ghostty --classic

ثم قم ببساطة بتشغيل الأمر ghostty لتشغيله أو فتحه من درج التطبيقات.
ما أعجبني في Ghostty
يُقدّم Ghostty بعض الميزات الجديدة والمفيدة التي تستحق التجربة، بما في ذلك علامات التبويب وخيارات التكوين. التنقل السلس بين علامات التبويب والتقسيم

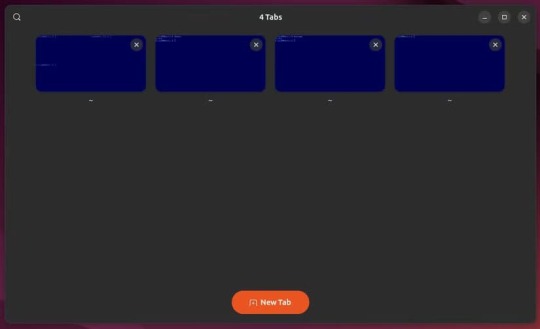
عند تعدد المهام على جهاز الطرفية، ستدرك مدى سهولة استخدام علامات تبويب متعددة وتقسيم الشاشة. يُضفي Ghostty المزيد من السهولة على هذا الأمر. يمكنك إنشاء علامات تبويب متعددة بالضغط على رمز الإضافة في الزاوية العلوية اليسرى من نافذة الطرفية. من الميزات الجديدة التي وجدتها في Ghostty إمكانية عرض جميع علامات التبويب المفتوحة دفعةً واحدة. لن��ترض أن لديك 5 أو 6 علامات تبويب مفتوحة ولست متأكدًا من أيها تريد التبديل إليها. يُسهّل عليك الاطلاع على جميع علامات التبويب العثور على علامة التبويب التي تبحث عنها.
لتقسيم الشاشة، يمكنك إنشاء تقسيمات للشاشة في أي من الاتجاهات الأربعة. ستجد خيارات التقسيم في قائمة "الهامبرغر" في الزاوية العلوية اليمنى. لكن ميزة التقسيم في Ghostty تكمن في استخدام اختصارات لوحة المفاتيح. يمكنك استخدام اختصارات لوحة المفاتيح الافتراضية أو تحديد اختصاراتك الخاصة. أعجبتني سرعة تقسيم الشاشة في اتجاهات مختلفة بضغطات قليلة. خيارات التكوين يأتي Ghostty مزودًا بالعديد من خيارات التخصيص. وبصفتي من عشاق لينكس، فإن حرية التهيئة كما يحلو لي دائمًا محل تقدير. يمكنك تعيين سمات وخطوط وألوان وتبطينات مختلفة واختصارات لوحة مفاتيح وغيرها الكثير. مع ذلك، يعد Ghostty بأنه أداة لا تتطلب أي تهيئة. هذا يعني أنك لست بحاجة إلى تهيئة لاستخدامه. الإعدادات والتكوينات الافتراضية التي يأتي معها جيدة بالفعل. تهيئة Ghostty سهلة أيضًا. كل ما عليك فعله هو إنشاء ملف تهيئة وإعلان القيم التي تريد استخدامها. سأتناول هذا بمزيد من التفصيل لاحقًا. مفتش الطرفية من الميزات المثيرة للاهتمام التي لاحظتها في Ghostty نافذة مُفتِّش الطرفية التي تعرض لك بعض معلومات النظام. تخيلها تمامًا مثل مُفتِّش الويب (المعروف أيضًا باسم أدوات المطور) في المتصفح. يمكنك رؤية إعدادات مختلفة، مثل وضع الطرفية، وأحجام الخطوط والشبكات، وبيانات تعريف الخلايا، والألوان، وغيرها.

وثائق رائعة بالنسبة لمحاكي طرفية، عادةً ما لا تتوقع أن تكون الوثائق بهذا الشمول. لقد تجاوزت وثائق Ghostty كل ما تحتاج لمعرفته تقريبًا لل��صول على أفضل تجربة. علاوة على ذلك، وعلى عكس العديد من الوثائق الأخرى، فهي مُصقولة ومنظمة للغاية. يمكنك بسهولة العثور على المعلومات التي تبحث عنها، وخاصة خيارات التكوين المختلفة.
تهيئة Ghostty
لن يكون هذا الشرح كاملاً إذا لم أعرض لك بعض إمكانيات التهيئة في Ghostty. عند تثبيت التطبيق لأول مرة، يتم إنشاء ملف تهيئة في مجلد "~/.config/ghostty". يمكنك أيضًا إنشاء ملف إذا لم تجده في هذا المجلد. اضغط على أيقونة قائمة الهامبرغر ثم اضغط على "فتح التكوين".

تهيئة Ghostty سهلة للغاية. يستخدم ملف التهيئة نظام أزواج المفاتيح والقيم لتقييم تهيئة جهازك الحالية. ستجد هنا العديد من الإعدادات لاستكشافها، مثل الألوان، وروابط المفاتيح، والخطوط، والسمات، وغيرها. إليك مثال على إعدادات التهيئة التي يمكنك استخدامها والتعديل عليها: background = 000052 foreground = 89bbf6 keybind = ctrl+z=close_surface keybind = ctrl+shift+L=new_split:right font-family = Courier 10 Pitch Regular بعد الانتهاء من تعديل ملف التكوين، انتقل إلى قائمة "الهامبرغر" واضغط على "إعادة تحميل التكوين" أو اضغط على Shift+Ctrl+ (فاصلة) لتطبيق التغييرات. الآن، لنلقِ نظرة على السمات. يمكنك الاختيار من بين مجموعة من السمات الافتراضية أو إنشاء سمة مخصصة. للاطلاع على جميع السمات المتاحة، شغّل: ghostty +list-themes
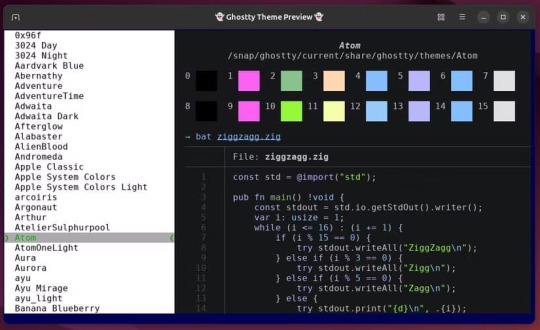
بعد اختيار سمة، تذكّر اسمها، إذ يمكنك اختيارها من هذه القائمة. ارجع إلى ملف التكوين واضبط السمة هناك. theme = "Mirage" يمكنك أيضًا تحديد سمات مختلفة للوضعين الفاتح والداكن. سيختار Ghostty السمة بناءً على مظهر نظامك. كما يمكنك الاطلاع على عائلات الخطوط وروابط المفاتيح المتاحة. ghostty +list-fonts ghostty +list-keybinds # Use ghostty +list-actions to check available actions هذه مجرد لمحة. يمكنك مراجعة الوثائق للاطلاع على خيارات التكوين الشاملة.
يحتاج إلى بعض التحسينات.
لا يزال Ghostty جديدًا جدًا في السوق، وهذا واضح. واجهت بعض المشاكل أثناء استخدامه. في بعض الأحيان، كان فتحه يستغرق بعض الوقت. اختبرتُ الفكرة بفتح نافذة طرفية Ubuntu الافتراضية. كانت تفتح نافذة الطرفية الأصلية أسرع بكثير من Ghostty في معظم الحالات. الآن، لست متأكدًا تمامًا مما إذا كان هذا بسبب استخدامي لحزمة Snap. بالحديث عن حزمة Snap، لا تحتوي Ghostty على حزم رسمية لتوزيعات Debian وFedora وUbuntu. نظرًا لشعبية هذه التوزيعات، توقعتُ وجود حزم رسمية بدلًا من الحزم التي يُديرها المجتمع. قد يكون هذا في المستقبل. قد يبدو هذا الأمر شخصيًا، لكن بعض روابط المفاتيح الافتراضية بدت غريبة بعض الشيء بالنسبة لي. بالطبع، يمكنك تكوينها. مع ذلك، أتوقع المزيد من التفكير فيها نظرًا لأن معظم مست��دمي المحطات الطرفية سيستخدمونها. يوفر مُحاكي المحطات الطرفية Ghostty بعض الميزات الرائعة وبعض الميزات الجديدة أيضًا. مع ذلك، لم أجد سببًا وجيهًا لهذه الضجة حتى الآن. أنا شخصيًا لن أستخدمه إلا إذا وجدتُ في تحديث مستقبلي ميزةً أكثر إقناعًا ألتزم بها. إذا كنت مهتمًا بتطبيقات طرفية بديلة، فقد سبق لي مراجعة Warp Terminal، وقد تجده أكثر جاذبية. Ghostty Terminal يقدم تجربة مميزة بفضل تصميمه وميزاته المتقدمة، مما يجعله خيارًا جديرًا بالاهتمام للمستخدمين الذين يبحثون عن بيئة عمل محسنة. لكن الاختيار يعتمد على احتياجات كل مستخدم، حيث قد تظل بعض البدائل التقليدية أكثر ملاءمة لمن يفضلون البساطة أو التكامل مع أدوات محددة. تجربة Ghostty قد تكون بداية لتحسين تجربة استخدام Terminal على لينكس بطرق غير متوقعة. Read the full article
0 notes
Text
VLC/OFFICE
VLC sudo apt install vlc sudo snap install vlc Office sudo apt install libreoffice libreoffice-gtk4
0 notes
Text
Hupsz
depclean-dist -p:
[ 68.2 G ] Total space from 483 files would be freed in the distfiles directory
depclean-dist --deep -p:
[ 84.9 G ] Total space from 880 files would be freed in the distfiles directory
Aztán csodálkozás van, hogy hova tűnt a sok hely.
Mondjuk szörnyen megnőtt mindennek a mérete. 39 csomag frissül, Firefox, Chromium, Vivaldi, Mesa, rc kernel, gtk4, qtmultimedia, hogy csak a jelentősebbeket említsem.
Összesen több mint 7GB-ot töltött le a csomagkezelő. Persze, ezek források, nem binárisok (kivéve Vivaldi), de akkor is elég sok.
Még szerencse, hogy nem forgalomkorlátos a net. :D
0 notes
Text
Dissent – A GTK4 Discord client written in Go
https://github.com/diamondburned/dissent
0 notes
Text
Still no ligatures
Black Box is a GTK4 Terminal App With a Unique Look – OMG! Ubuntu Black Box is a GTK4 terminal emulator for Linux desktops. It boasts innovative UI features, 12 terminal themes, and is easy to install from Flathub. Nice, but still, font ligatures support is missing as it requires quite a lot of work on VTE. I’m quite happy with Qterminal these days

View On WordPress
0 notes
Text
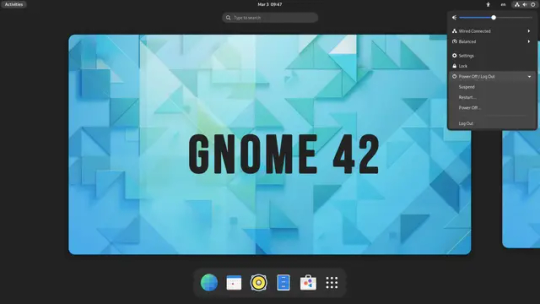
GNOME 42 Desktop-Umgebung mit spannenden Funktionen veröffentlicht
GNOME 42 Desktop Environment steht jetzt zum Download zur Verfügung. GNOME 42 ist vollgepackt mit einigen erstaunlichen neuen Funktionen und Verbesserungen. In GNOME 42 wird die GNOME-Software auf GTK4 portiert. Sie finden Text Editor als Standard-Texteditor-App und ersetzen den alten Gedit-Texteditor. Einige der Funktionen und Verbesserungen, die Sie in GNOME 42 finden werden, sind: GNOME 42…
View On WordPress
0 notes
Text
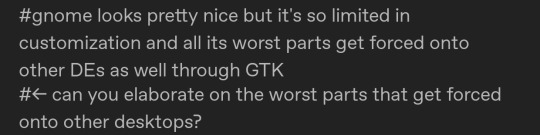
the heavy use of client-side decorations especially for headerbars makes it incredibly difficult to find programs for other GTK-based desktop environments that play nicely with your setup's settings and don't look incredibly out of place because of that lack of generalization, see e.g. me preferring global menus due to a history of using mac and running into clearly "everyone uses gnome right?"-style programs that don't Have a menu to global, at least not in a way that those more general-purpose functions/extensions of DEs could yoink from the window and move to the fixed top bar
and then you get into how hard the theme Adwaita (literally "the only one"/"the one and only" in Sanskrit) is pushed as, well, the only option, and how that shit rolls downhill onto other DEs through GTK4 and especially libadwaita
ask my partner about the triple (or even quadruple) menu bars she gets with her Xfce setup in some programs whenever they get redesigned
Actually I fucking hate gnome now
216 notes
·
View notes
Link
0 notes
Text
GIMP 3.0 متاح الآن أخيرًا
ملخص - أخيرًا، صدر الإصدار 3.0 من برنامج GIMP بعد أكثر من عقد من التطوير، متضمنًا واجهة مستخدم مُحدثة وتحسينات في إدارة الألوان. - يتضمن التحديث الانتقال إلى مجموعة أدوات GTK3، وشعارًا جديدًا، وشاشة بدء، وتحسينات في سمات الأيقونات القديمة. - يتوفر GIMP 3.0 تدريجيًا للتحميل عبر منصات متنوعة مثل Flathub، مُقدمًا مراجعات لإضافات BMP وTIFF. إذا كنت من مستخدمي GIMP، فربما تساءلت لفترة عن موعد حصولك على التحديث 3.0 الذي طال انتظاره. آخر مرة شهدنا فيها تحديثًا رئيسيًا كان في عام 2004، أي قبل 21 عامًا. والآن، صدر GIMP 3.0 أخيرًا بعد جولة اختبار طويلة، والتحديث حافل بالميزات. بعد أكثر من عقد من التطوير، أصدر برنامج تحرير الصور مفتوح المصدر الشهير GIMP رسميًا إصداره 3.0 الذي طال انتظاره. ما زلنا ننتظر الإعلان الرسمي عن الإصدار من موقع مشروع GIMP، ولكن تم إضافة إصدار GIMP 3.0.0 إلى Git بين عشية وضحاها، والتحديث متاح بالفعل عبر قنوات متعددة. يمكنك الوصول إلى الإصدار الجديد عبر Flathub، حيث تتوفر حزم Flatpak. كما يمكنك الوصول إلى إصدارات AppImage وشيفرة المصدر من خلال موقع تنزيل المشروع. لقد طال انتظار هذا التحديث. لقد حصلنا على العديد من التحديثات لـ GIMP 2.0 على مدار العقدين الماضيين، بميزات وتغييرات جديدة، ولكن إصدار GIMP 3.0 لا يمثل فقط أول تحديث رئيسي منذ عدة سنوات، بل يمثل أيضًا إنجازًا كبيرًا للبرنامج من نواحٍ عديدة. التغيير الأهم في GIMP 3.0 هو الانتقال من مجموعة أدوات GTK2 القديمة إلى GTK3 الحديثة. لقد تم إصدار GTK4 منذ فترة الآن، لذا فإن GTK3 ليس الأحدث والأعظم على الإطلاق - كما أننا لا نعلم متى قد يصل GTK4 إلى GIMP، إذا كان سيحدث ذلك على الإطلاق - ولكنه بالتأكيد أفضل بكثير من GTK2. يُضيف هذا التحديث أيضًا واجهة مستخدم مُحدثة، تتضمن شعارًا جديدًا وشاشة بدء، وتحسينات على سمة الأيقونات القديمة. ومن أهمّ ما يُركز عليه هذا الإصدار دقة إدارة الألوان، مما يضمن عرض ملفات المشاريع القديمة (.XCF) من إصدارات GIMP السابقة بشكل صحيح. يُحتمل أن يكون هذا مصدر قلق كبير للمستخدمين الذين ينتقلون من الإصدارات القديمة، لذا من الجيد أن نرى أنه يجري العمل على حل هذه المشكلة. كما أُجريت تغييرات على المكونات الإضافية لتنسيقات مثل BMP وTIFF، مع إضافة خيارات تدرج لوني جديدة. صدر أول إصدار مرشح (RC1) في نوفمبر 2024، ولكن قبل ذلك، كانت فترة ��طوير هادئة، وإن كانت طويلة، شهدت أيضًا عدة مراجعات للإصدار 2.0. أما الإصدار المرشح الأخير، RC3، فقد صدر في فبراير، وكان قريبًا جدًا من المنتج النهائي، لذا فليس من المستغرب أن يُطلق بعد شهر واحد فقط في حالته المستقرة تمامًا. عادةً ما يكون GIMP من الأدوات التي لا تعاني من أي أعطال، وبالتالي لا تحتاج إلى إصلاح، وبالنسبة للعديد من مستخدميه، فقد أدى وظيفته بشكل جيد في حالته الحالية. ولكنه كان أيضًا بحاجة إلى تجديد طال انتظاره، خاصةً فيما يتعلق بمجموعة أدواته الداخلية - صدر GIMP 2.0 في عام 2004، ولكن صدر GTK2 في عام 2002، ولا يزال يُستخدم في GIMP حتى اليوم. يسعدنا أننا نحصل أخيرًا على ترقية. أصبح التحديث متاحًا للتنزيل تدريجيًا من قنوات الإصدار المفضلة لديك، بما في ذلك Flathub. لم يُنشر بعد على بوابة التنزيل الرئيسية لبرنامج GIMP، ولكن ربما يكون الأمر مسألة وقت قبل ظهوره هناك أيضًا. المصدر: Phoronix Read the full article
0 notes