#handbrake keyframes
Explore tagged Tumblr posts
Visit Tumblr Blog
Explore Tumblr blogs with no restrictions, modern design and the best experience.
Last Seen Tumblr Blogs


Fun Fact
Tumblr has been banned in Indonesia for providing people with access to pornographic content.
Text
Handbrake: How to set keyframe interval
Under the Video tab, there's a text box called "Advanced Options", type keyint=30 to set the keyframe interval to every 30 frames.
I had to set mine to keyint=10 on a short older video with a slow framerate (that also may have a bit of corruption), otherwise during playback I was unable to seek, and the video player would become unresponsive.
(From my understanding, the more often you have keyframes, the easier it is to seek precisely within a video, but it reduces compression efficiency and increases filesize. A key frame is also called an intra-frame.)
#handbrake#handbrake keyframes#handbrake keyframe interval#handbrake generating corrupt video#how to define keyframes in handbrake#keyframes#techtroubleshootingtips
0 notes
Note
How do you make your gifs?

Hello hello! I love talking about gifmaking, so thank you for giving me the chance to ramble.
Instead of a detailed step-by-step walkthrough, I will link tutorials and resources written by the wonderful Tumblr creators on here along the way. Everyone has their method and preferences, and there’s no right or wrong way to make gifs. I’m going to share techniques and resources I picked up along the way that work best for me—they may or may not be suited to your preferences, but I hope you’ll find some helpful things here.
(Warning: screenshot/image heavy)
USEFUL TUTORIALS AND RESOURCES
Here are some tutorials and resources that I found very useful when I got back into gifmaking:
Gifmaking tutorial using video timeline by @hope-mikaelson is identical to my own process
Gifmaking and coloring tutorial by @kitty-forman, whose process is very similar to my own
Giffing 101 by @cillianmurphy, an incredibly detailed tutorial that covers everything you need, including a step-by-step guide to using HandBrake
Gifmaking and coloring tutorial with 4K HDR footage by @sith-maul, another incredibly detailed tutorial with many useful tips
Gifmaking tutorial by @jeonwonwoo, incredibly comprehensive and covers so many aspects of gifmaking from basics, sharpening, captioning, and text effects
Gifmaking/PS tips and tricks by @payidaresque
Action pack by @anyataylorjoy, the Save action is especially a true life-saver
@usergif and @clubgif are amazing source blogs with many tutorials on gifmaking, color grading, and gif effects, can’t be thankful enough for the members for their work curating and creating for these blog!
TOOLS
Adobe Photoshop CS6 or higher, any version that supports video timeline. @completeresources has many links to download Photoshop, have a look!
Photopea is a free alternative to Photoshop, but it has a slightly different UI, check out these tutorials for gifmaking with Photopea
HandBrake or any other video encoder, especially if you’re working with .MKV formats
4Kvideodownloader for downloading from YouTube, Vimeo, Instagram, etc.
OBS Studio or any other similar screen capturing software. To prevent duplicate frames in gifs that prevents your gifs from looking smooth, try to match the recording frame rate (FPS) with the source.
IMPORTING FOOTAGE AND WORKING IN VIDEO TIMELINE
I work exclusively in video timeline instead of importing video frames to layers or loading files into stack. For videos that don’t require converting/encoding using HandBrake, especially ones that are already in .MP4 format, I tend to open the video directly on Photoshop, and trim the videos around directly.
As mentioned above, this gifmaking tutorial using video timeline is exactly how I make gifs. I find it more efficient, especially if you’re making multiple gifs from the same video/the same scene with little to no change in lighting conditions You can simply slide around sections of gifs you want to save, and they will all be the same length.
Another thing also covered in the tutorial linked is the ability to change video speed in video timeline mode. Right click on the video and set the speed before proceeding with cropping/resizing. This is also very useful when you’re making blended gifs where you need the footage to have the same length.
Slowing footage down.
As mentioned in this post, changing the FPS before slowing down the gif results in smoother gifs. Doubling the frame rate before slowing down your gifs usually yields the best result.
Speeding footage up.
I love using this to speed up slow motion B-rolls to make the speed slightly more natural. It will result in nice, smooth gifs:

(B-roll footage, normal broadcast speed)

(200% speed)
Subject won’t stay in frame?
Another feature of the video timeline mode. Keyframes are your best friend. This tutorial by @kangyeosaang covers everything you need to know about panning gifs. I use this technique regularly, it’s a life-saver.
COLORING
Here are some coloring tutorials I found very useful:
Coloring tutorial by @brawn-gp beloved, their coloring style is second to none
Mega coloring tutorial by @yenvengerberg, for stylized /vibrant coloring
Understanding Channel Mixer by @zoyanazyalensky
Coloring rainbow gifs by @steveroger, which delves deep into Channel Mixer
I tend to go for neutral-saturated coloring in general, especially for minimalist gifsets with no effects (blending/isolated coloring/overlays etc.), but the possibility is endless for stylized coloring. Here’s what my adjustment layers look like for the example gifs above.
The base footage for this Charles gifset is incredibly desaturated. I started with a Curves layer to bring contrast to the gif, as well as do some color-correcting to bring the base footage to a more neutral tone. To bump contrast, I also like to add a black and white Gradient Map layer with a Soft Light blending mode at 10%-30% opacity:
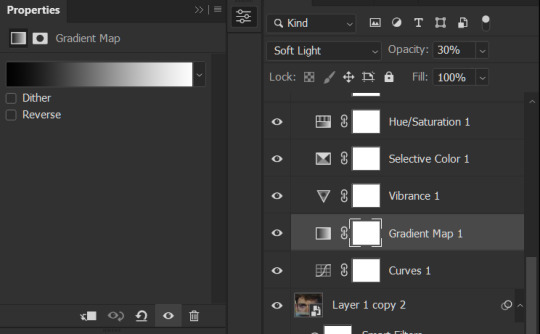
The Vibrance layer is then used to lift the saturation of the base footage, with the Selective Color, Hue/Saturation, and Channel Mixer layers to help remove the green/yellow tint to his skintone.
An underrated adjustment layer/preset in my opinion is the Color Lookup. You can layer in pre-loaded .LUT color grading presets to help speed up your process. For this gif, it’s simply a base preset Soft Warming Look to achieve a warm, pink-tinted tone.
In hindsight I feel like this gifset is too saturated, his skintone is skewing very red/pink, I could’ve bumped down the lightness of the reds with a Selective Color layer or a Hue/Saturation layer. Try to err on the side of neutral for skintones. Experiment with layer orders—there’s no right or wrong! Remember that each layer build up on the one before it.
The base footage of the Jalen gif is already quite nicely color-graded, but it’s still muddy and underexposed. As with the Charles gif, I started with a Curves layer to bring the gif to a better baseline contrast. Then I focus on brightening the gif with the Brightness/Contrast and Exposure layers.
The Hue/Saturation and Selective Color layers are to color-correct Jalen’s skin tone—it’s something I spend most of my time coloring gifs and focus a lot on, especially when color grading BIPOC skintones. Putting a Vibrance layer, upping the Vibrance and Saturation, and calling it a day would make his skintone skew very, very yellow/orange.
Focus on the reds and yellow for skintone, play around with the Saturation and Lightness sliders, use the Hue slider with caution.
It can be tricky to achieve the right skin tone when working with sports footage vs the higher quality, higher dynamic range footage of films or TV shows, but I try to keep it as close to the subject’s natural skintone as possible.
Here are some of tutorials with tips and tricks on coloring BIPOC:
How to fix orange-washed characters by @zoyanazyalensky
How to prevent pink-washing and yellow-washing by @jeonwonwoo
Coloring tutorial by @captain-hen
Changing lighting conditions?
Fret not—this is why I love working in video timeline. I’ll take this gifset as an example: it’s a deceptively difficult one to color. The footage is 720p and the sunlight shifts throughout the video, so matching across gifs was tricky.
My solution was to split the clips in sections with consistent lighting, and apply adjustment layers to the individual sections before applying general color grading layers on top of everything.
We can make use of the Fade Transition effect for sections where the lighting changes within the gif section we want to color.

(without vs with Fade on the Brightness/Contrast layer)
The difference is subtle in this example, but the brightness in the right gif is noticeably more consistent throughout. You can also add the Fade Transition effect to the beginning for a fade in, of course.
SHARPENING AND OPTIMIZING GIF QUALITY
This tutorial by @anya-chalotra covers everything you need to know about optimizing gifs for Tumblr.
Sharpening.
Sharpening is essential to making crisp gif images. Here’s another ask I answered re: my own sharpening settings and maximizing gif quality.

(base footage, unsharpened)

(color graded, unsharpened)

(color graded, sharpened)
The final gif is sharpened with Smart Sharpen, 500% at 0.3px and 10% at 10px (my standard sharpening settings).
Here are some tutorials and resources on sharpening:
Sharpening process by @anya-chalotra
Sharpening tutorial with added gaussian blur by @haleths
Sharpening action by @daenerys-stormborn
Size your gifs for Tumblr correctly.
This is essential: full width gifs are 540px wide.Two side-by-side gifs should be 268px wide. Here’s a handy post on gif size guide for Tumblr.
Incorrectly sizing your gifs will take away the quality of your gifs: undersizing your gifs will especially make them grainy, blurry, and /or pixelated, and won’t display correctly on many people’s desktop theme. Oversizing usually isn't as dramatic as undersizing, but it will make the gifset glitch when displayed, and the file size will be unnecessarily bloated.
Work with HD footage if possible.
Media fandoms (films/TV shows) are luckier than us in the sports trenches—we have to work with what we have. Broadcast footage is usually subpar: lacks contrast, pixelated, very desaturated, the list goes on. But it’s possible to still make high quality gifs from subpar footage. Here are a couple of tutorials to mask low source footage quality:
low quality video ➜ “HD�� gifs tutorial by @nickoffermen
Sharpening low quality footage by @everglow-ing
(This gifset I made is from a 480p footage with horrendous lighting conditions and colors, and the end result is decent I’d say)
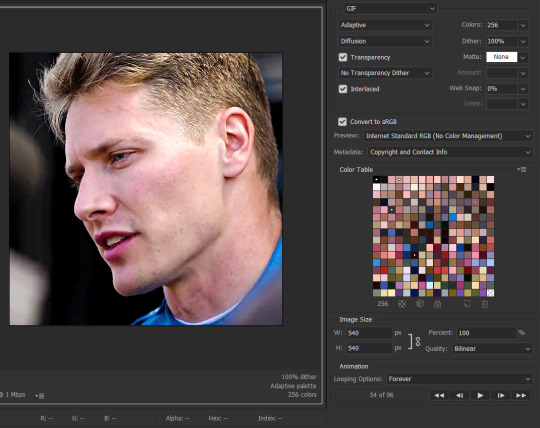
Save for Web (File > Export > Save for Web (Legacy) or Ctrl + Alt + Shift + S) settings.
I default to Adaptive + Diffusion but also use Adaptive + Pattern from time to time. Any combination of Adaptive or Selective + Diffusion or Pattern will give you a good result. In my experience some gifs will need the Selective color table for the colors to display correctly.
Here are my default settings:
SAVING AND EXPORTING FOR TUMBLR
Converting to frames and adjusting the gif speed.
If possible, avoid exporting your gif and reopening it to adjust the frame speed. I used to do this sometimes when I’m lazy, I have to admit, but this is where this Action as mentioned at the beginning comes in very handy. It converts all visible layer into smart object, then converts it back to frame animation.
Step-by-step:
1. Select all layers
2. Right click > Convert to Smart Object
3. Go to the Timeline menu (≡) > Convert Frames > Flatten Frames into Clips
4. Go to the Timeline menu again (≡) > Convert Frames > Convert to Frame Animation
5. In the same menu (≡), select Make Frames from Layers
6. Delete the first frame (it’s a duplicate) then set your frame speed

Now you can adjust the frame speed before exporting it (Save for Web).
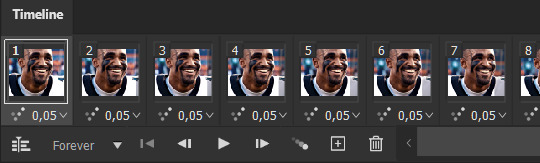
Pay attention to the source framerate.
The frame delay of 0.05 s is usually the default to make gifs for TV shows and films, and it is preferred by most gifmakers. This stems from the fact that most movies and TV shows are 24 or 25 FPS. This may not be the case for all source videos: you might get 30 FPS footage, and sports or gaming footage can be 50 or 60 FPS. Gif speed also depends on the FPS of your original file. Play around with gif speed and see what feels most natural to you.
My rule of thumb is the frame delay Photoshop gives you + 0.01 s. For example, 50 FPS footage will give you 0.02 s frame delay (25 FPS gives you 0.04, 30 FPS gives you 0.03, etc.), so set it to 0.03 s. I usually err on the side of a faster frame delay for smoothness in in-game sports footage, anything else (interviews, press conferences, B-rolls) can get away with being slowed down. Again, experiment and see what you think looks best!
Keep gifs under the Tumblr file size limit (10 MB).
Cut down the number of frames. My gifs are usually around 60-70 frames for 540px full-width gifs, but depending on the coloring, sometimes you can get away with more. 268px gifs can go up to 200+ frames.
Crop your gifs. Remember to keep full-width gifs at 540px wide, but if necessary, you can crop the height. My go-to sizes are 540x540, 540x500, 540x450, and 540x400.
Amp up the contrast of your gifs. Flat colors like black cut down gif size.
The Grain filter or Noise filter, though beautiful for aesthetics or simply necessary sometimes to mask low source footage quality/pixelating, may bloat your gif size.
Play your gifs back before exporting.
Pay attention to duplicate frames or glitches, you might need to get rid of them!
Hope this is helpful! Don’t hesitate to send an Ask or DM if you need any help, I will happily answer all your questions and send over PSDs. (I’m also on Discord—just shoot me a message if you need my tag!) Happy creating :]

#tutorial#PS asks#gif tutorial#Photoshop tutorial#I guess this is more of a resource link dump than tutorial but. Hey. Why reinvent the wheel...#Sorry for the late answer I hope you see this Anon :]#completeresources#allresources#userxoames#userbarbi#usernrzr
1K notes
·
View notes
Text
How I encode videos for YouTube and archival
Hello everyone! This post is going to describe the way in which I export and encode my video work to send it over the Internet and archive it. I’ll be talking about everything I’ve discovered over the past 10 years of research on the topic, and I’ll be mentioning some of the pitfalls to avoid falling into.
There’s a tremendous amount of misguided information out there, and while I’m not going to claim I know everything there is to know on this subject, I would like to think that I’ve spent long enough researching various issues to speak about my own little setup that I’ve got going on... it’s kind of elaborate and complex, but it works great for me.
(UPDATE 2020/12/09: added, corrected, & elaborated on a few things.)
First rule, the most golden of them all!
There should only ever be one compression step: the one YouTube does. In practice, there will be at least two, because you can’t send a mathematically-lossless file to YouTube... but you can send one that’s extremely close, and perceptually pristine.
The gist of it: none of your working files should be compressed if you can help it, and if they need to be, they should be as little as possible. (Because let’s face it, it’s pretty tricky to keep hours of game footage around in lossless form, let alone recording them as such in the first place.)
This means that any AVC files should be full (0-255) range, 4:4:4 YUV, if possible. If you use footage that’s recorded with, like, OBS, it’s theoretically possible to punch in a lossless mode for x264, and even a RGB mode, but last I checked, neither were compatible with Vegas Pro. You may have better luck with other video editors.
Make sure that the brightness levels and that the colors match what you should be seeing. This is something you should be doing at every single step of the way throughout your entire process. Always keep this in mind. Lagom.nl’s LCD calibration section has quite a few useful things you can use to make sure.
If you’re able to, set a GOP length / max keyframe range of 1 second in the encoder of your footage. Modern video codecs suck in video editors because they use all sorts of compression tricks which are great for video playback, but not so efficient with the ways video editors access and request video frames. (These formats are meant to be played forwards, and requesting frames in any other order, as NLEs do, has far-reaching implications that hurt performance.)
Setting the max keyframe range to 1 second will mildly hurt compressability of that working footage but it will greatly limit the performance impact you’ll be putting your video editor’s decoder through.
A working file is a lossless file!
I’ve been using utvideo as my lossless codec of choice. (Remember, codec means encoder/decoder.) It compresses much like FLAC or ZIP files do: losslessly. And not just perceptual losslessness, but a mathematical one: what comes in will be exactly what comes out, bit for bit.
Download it here: https://github.com/umezawatakeshi/utvideo/releases
It’s an AVI VFW codec. In this instance, VFW means Video for Windows, and it’s just the... sort of universal API that any Windows program can call for. And AVI is the container, just like how MP4 and MKV are containers. MP4 as a file is not a video format, it’s a container. MPEG-4 AVC (aka H.264) is the video format specification you’re thinking of when you say “MP4″.
Here’s a typical AVI VFW window, you might have seen one in the wild already.
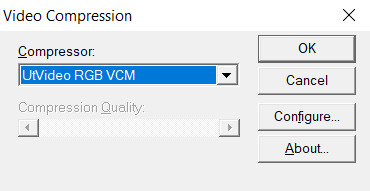
In apps that expose this setting, you can hit “configure” and set the prediction mode of utvideo to “median” to get some more efficient compression at the cost of slower decoding, but in practice this isn’t a problem.
Things to watch out for:
Any and all apps involved must support OpenDML AVIs. The original AVI spec is 2GB max only. This fixes that limitation. That’s normal, but make sure your apps support that. The OpenDML spec is from the mid-90s, so usually it’s not a problem. But for example, the SFM doesn’t support it.
The files WILL be very large. But they won’t be as large as they’d be if you had a truly uncompressed AVI.
SSDs are recommended within the bounds of reasonability, especially NVMe ones. 1080p30 should be within reach of traditional HDDs though.
utvideo will naturally perform better on CGI content rather than real-life footage and I would not recommend it at all for real-life footage, especially since you’re gonna get that in already-compressed form anyway. Do not convert your camera’s AVC/HEVC files to utvideo, it’s pointless. (Unless you were to do it as a proxy but still, kinda weird)
If you’re feeling adventurous, try out the YUV modes! They work great for matte passes, since those are often just luma-masks, so you don’t care about chroma subsampling.
If you don’t care about utvideo or don’t want to do AVIs for whatever reason, you could go the way of image sequences, but you’ll then be getting the OS-level overhead that comes with having dozens of thousands of files being accessed, etc.
They’re a valid option though. (Just not an efficient one in most cases.)
Some of my working files aren’t lossless...
Unfortunately we don’t all have 10 TB of storage in our computers. If you’re using compressed files as a source, make sure they get decoded properly by your video editing software. Make sure the colors, contrast, etc. match what you see in your “ground truth” player of choice. Make sure your “ground truth” player of choice really does represent the ground truth. Check with other devices if you can. You want to cross-reference to make sure.
One common thing that a lot of software screws up is BT.601 & BT.709 mixups. (It’s reds becoming a bit more orange.)
Ultimately you want your compressed footage to appear cohesive with your RGB footage. It should not have different ranges, different colors, etc.
For reasons that I don’t fully understand myself, 99% of AVC/H.264 video is “limited range”. That means that internally it’s actually squeezed into 16-235 as opposed to the original starting 0-255 (which is full range). And a limited range video gets decoded back to 0-255 anyway.
Sony/Magix Vegas Pro will decode limited range video properly but it will NOT expand it back to full 0-255 range, so it will appear with grayish blacks and dimmer whites. You can go into the “Levels” Effects tab to apply a preset that fixes this.
Exporting your video.
A lot of video editors out there are going to “render” your video (that is to say, calculate and render what the frames of your video look like) and encode it at the same time with whatever’s bundled in the software.
Do not ever do this with Vegas Pro. Do not ever rely on the integrated AVC encoders of Vegas Pro. They expect full range input, and encode AVC video as if it were full range (yeah), so if you want normal looking video, you have to apply a Levels preset to squeeze it into 16-235 levels, but it’s... god, honestly, just save yourself the headache and don’t use them.
Instead, export a LOSSLESS AVI out of Vegas. (using utvideo!)
But you may be able to skip this step altogether if you use Adobe Media Encoder, or software that can interface directly with it.
Okay, what do I do with this lossless AVI?
Option 1: Adobe Media Encoder.
Premiere and AE integrate directly with Adobe Media Encoder. It’s good; it doesn’t mix up BT.601/709, for example. In this case, you won’t have to export an AVI, you should be able to export “straight from the software”.
However, the integrated AVC/HEVC encoders that Adobe has licensed (from MainConcept, I believe) aren’t at the top of their game. Even cranking up the bitrate super high won’t reach the level of pristine that you’d expect (it keeps on not really allocating bits to flatter parts of the image to make them fully clean), and they don’t expose a CRF mode (more on that later), so, technically, you could still go with something better.
But what I’m getting at is, it’s not wrong to go with AME. Just crank up the bitrate though. (Try to reach 0.3 bits per pixel.) Here’s my quick rough quick guideline of Adobe Media Encoder settings:
H.264/AVC (faster encode but far from the most efficient compression one can have)
Switch from Hardware to Software encoding (unless you’re really in a hurry... but if you’re gonna be using Hardware encoding you might as well switch to H.265/HEVC, see below.)
Set the profile to High (you may not be able to do this without the above)
Bitrate to... VBR 1-pass, 30mbps for 1080p, 90mbps for 4K. Set the maximum to x2. +50% to both target and max if fps = 60.
“Maximum Render Quality” doesn’t need to be ticked, this only affects scaling. Only tick it if you are changing the final resolution of the video during this encoder step (e.g. 1080p source to be encoded as 720p)
If using H.265/HEVC (smaller file size, better for using same file as archive)
Probably stick with hardware encoding due to how slow software encoding is.
Stick to Main profile & Main tier.
If hardware: quality: Highest (slowest)
If software: quality: Higher.
4K: set Level to 5.2, 60mbps
1440p: set Level to 5.1, 40mbps
1080p: keep Level to 5.0, 25mbps
If 60fps instead of 24/30: +50% to bitrate. In which case you might have to go up to Level 6.2, but this might cause local playback issues; more on "Levels” way further down the post.
Keep in mind however that hardware encoders are far less efficient in terms of compression, but boy howdy are they super fast. This is why they become kind of worth it when it comes to H.265/HEVC. Still won’t produce the kind of super pristine result I’d want, but acceptable for the vast majority of YouTube cases.
Option 2: other encoding GUIs...
Find software of your choice that integrates the x264 encoder, which is state-of-the-art. (Again, x264 is one encoder for the H.264/AVC codec specification. Just making sure there’s no confusion here.)
Handbrake is one common choice, but honestly, I haven’t used it enough to vouch for it. I don’t know if the settings it exposes are giving you proper control over the whole BT601/709 mess. It has some UI/UX choices which I find really questionable too.
If you’re feeling like a command-line masochist, you could try using ffmpeg, but be ready to pour over the documentation. (I haven’t managed to find out how to do the BT.709 conversion well in there yet.)
Personally, I use MeGUI, because it runs through Avisynth (a frameserver), which allows me to do some cool preprocessing and override some of the default behaviour that other encoder interfaces would do. It empowers you to get into the nitty gritty of things, with lots of plugins and scripts you can install, like this one:
http://avisynth.nl/index.php/Dither_tools (grab it)
Once you’re in MeGUI, and it has finished updating its modules, you gotta hit CTRL+R to open the automated script creator. Select your input, hit “File Indexer” (not “One Click Encoder”), then just hit “Queue” so that Avisynth’s internal thingamajigs start indexing your AVI file. Once that’s done, you’ll be greeted with a video player and a template script.
In the script, all you need to add is this at the bottom:
dither_convert_rgb_to_yuv(matrix="709",output="YV12",mode=7)
This will perform the proper colorspace conversion, AND it does so with dithering! It’s the only software I know of which can do it with dithering!! I kid you not! Mode 7 means it’s doing it using a noise distribution that scales better and doesn’t create weird patterns when resizing the video (I would know, I’ve tried them all).
Your script should look like this, just 3 lines
LoadPlugin("D:\(path to megui, etc)\LSMASHSource.dll")
LWLibavVideoSource("F:\yourvideo.avi")
dither_convert_rgb_to_yuv(matrix="709",output="YV12",mode=7)
The colors WILL look messed up in the preview window but that’s normal. It’s one more example of how you should always be wary when you see an issue. Sometimes you don’t know what is misbehaving, and at which stage. Always try to troubleshoot at every step along the way, otherwise you will be chasing red herrings. Anyway...
Now, back in the main MeGUI window, we’ve got our first line complete (AviSynth script), the “Video Output” path should be autofilled, now we’re gonna touch the third line: “Encoder settings”. Make sure x264 is selected and hit “config” on the right.
Tick “show advanced settings.”

Set the encoding mode to “Const. Quality” (that’s CRF, constant rate factor). Instead of being encoded with a fixed bitrate, and then achieving variable quality with that amount of bits available, CRF instead encodes for a fixed quality, with a variable bitrate (whatever needs to be done to achieve that quality).
CRF 20 is the default, and it’s alright, but you probably want to go up to 15 if you really want to be pristine. I’m going up to 10 because I am unreasonable. (Lower is better, higher numbers means quality is worse.)
Because we’re operating under a Constant Quality metric, CRF 15 at encoder presets “fast” vs. “slow” will produce the same perceptual quality, but at different file sizes. Slow being smaller, of course.
You probably want to be at “slow” at least, there isn’t that much point in going to “slower” or “veryslow”, but you can always do it if you have the CPU horsepower to spare.
Make sure AVC Profile is set to High. The default would be Main, but High unlocks a few more features of the spec that increase compressability, especially at higher resolutions. (8x8 transforms & intra prediction, quantization scaling matrices, cb/cr controls, etc.)
Make sure to also select a Level. This doesn’t mean ANYTHING by itself, but thankfully the x264 config window here is smart enough to actually apply settings which are meaningful with regards to the level.
A short explanation is that different devices have different decoding capabilities. A decade ago, a mobile phone might have only supported level 3 in hardware, meaning that it could only do main profile at 30mbps max, and if you went over that, it would either not decode the video or do it using the CPU instead of its hardware acceleration, resulting in massive battery usage. The GPU in your computer also supports a maximum level. 5.0 is a safe bet though.
If you don’t restrict the level accordingly to what your video card supports, you might see funny things happen during playback:

It’s nothing that would actually affect YouTube (AFAIK), but still, it’s best to constrain.
Finally, head over to the “misc” tab of the x264 config panel and tick these.

If the command line preview looks like mine does (see the screenshot from a few paragraphs ago) then everything should be fine.
x264 is configured, now let’s take care of the audio.
Likewise, “Audio Input” and “Audio Output” should be prefilled if MeGUI detected an audio track in your AVI file. Just switch the audio encoder over to FLAC, hit config, crank the slider to “smallest file, slow encode” and you’re good to go. FLAC = mathematically lossless audio. Again, we want to not compress anything, or as little as possible until YouTube does its own compression job, so you might as well go with FLAC, which will equal roughly 700 to 1000kbps of audio, instead of going with 320kbps of MP3/AAC, which might be perceptually lossless, but is still compressed (bad). The added size is nothing next to the high-quality video track you’re about to pump out.
FLAC is not an audio format supported by the MP4 container, so MeGUI should have automagically changed the output to be using the MKV (Matroska) container. If it hasn’t, do it yourself.

Now, hit the “Autoencode” button in the lower right of the main window. And STOP, do not be hasty: in the new window, make sure “no target size” is selected before you do anything else. If you were to keep “file size” selected, then you would be effectively switched over to 2-pass encoding, which is another form of (bit)rate control. We don’t want that. We want CRF.
Hit queue and once it’s done processing, you should have a brand new pristine MKV file that constains lossless audio and extra clean video! Make sure to double-check that everything matches—take screenshots of the same frames in the AVI and MKV files and compare them.
Now all you’ve got to do is send it to YouTube!
For archival... well, you could just go and crank up the preset to Placebo and reduce CRF a little bit—OR you could use the 2-pass “File Size” mode which will ensure that your video stream will be the exact size (give or take a couple %) you want it to be. You could also use x265 for your archival file buuuut I haven’t used it enough (on account of how slow it is) to make sure that it has no problems anywhere with the whole BT.601/708 thing. It doesn’t expose those metadata settings so who knows how other software’s going to treat those files in the future... (god forbid they get read as BT.2020)
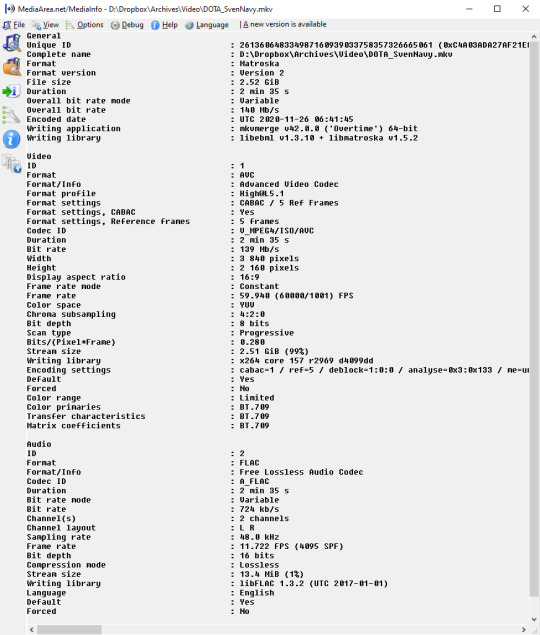
You can use Mediainfo (or any player that integrates it, like my favorite, MPC-HC) to check the metadata of the file.
Good luck out there!
And remember to always double-check the behaviour of decoders at every step of the way with your setup. 99% of the time I see people talk about YouTube messing with the contrast of their video, it’s because they weren’t aware of how quirky Vegas can be with H.264/AVC input & its integrated encoder.
Hope this helps!
15 notes
·
View notes
Text
ok. today maybe I’ll learn this command line..
do I have it installed already..
yes.. I have it
https://www.ffmpeg.org/general.html#AMD-AMF_002fVCE
and this option also is available already without installing anything
https://stackoverflow.com/questions/45181730/ffmpeg-encode-x264-with-amd-gpu-on-windows
options
https://opensource.com/article/17/6/ffmpeg-convert-media-file-formats
“The command ffmpeg -codecs will print every codec FFmpeg knows about. The output of this command will change depending on the version of FFmpeg you have installed.”
“h264 H.264 / AVC / MPEG-4 AVC / MPEG-4 part 10 (decoders: h264 h264_qsv h264_cuvid ) (encoders: libx264 libx264rgb h264_amf h264_nvenc h264_qsv nvenc nvenc_h264 )“
so if I use the.. hardware acceleration command.. it should automatically detect the.. hardware codec?
why handbrakes doesn’t support.. I mean.. I still don’t know if there is this option available in command line
“ External wrapper decoders are used by setting a specific decoder with the -codec:v option. Typically they are named codec_api (for example: h264_cuvid) “
damn.. for decoding and encoding.. there’s 2 codecs..
ffmpeg -hwaccel_device 0 -hwaccel cuda -i input -vf scale_npp=-1:720 -c:v h264_nvenc -preset slow output.mkv
ok.. so.. decoding codec.. is specified.. before the -i parameter.. and encoding is specified after input parameter
https://stackoverflow.com/questions/45181730/ffmpeg-encode-x264-with-amd-gpu-on-windows
there are all the options
all the options that handbrake doesn’t have.. can I use them in handbrake?? no.. they weren’t on the list
https://handbrake.fr/docs/en/latest/technical/video-vce.html
there’s less options
this encoder options are a lot more different
https://github.com/HandBrake/HandBrake/issues/1762#issuecomment-450376269
“We had a similar issue with NVENC where an encoder option needed to be set to force IDR frames whenever HandBrake needed a keyframe at a chapter boundary. Looking at the AMD amfenc code, there isn't even a way to force a keyframe. It ignores the frame flag we set that forces one of these. I don't know the amf encoder api well enough to say whether this is fixable or not. “
why they add some weird options.. instead of just.. letting people use the ffmpeg options.
why won’t they just let people use ffmpeg options instead of adding their own customized options that nobody understands.. god..
why they have to make a bigger mess out of this.. it’s like.. using ffmpeg.. so why are they making it 2 times more complicated.. by creating more of their own commands..
https://support.medialooks.com/hc/en-us/articles/360000210192-H-264-encoding-options#AMD%20AMF
so like.. these are the ffmpeg options??
ok like.. which one is the.. keyframe interval option
https://en.wikipedia.org/wiki/Video_compression_picture_types
this may be.. the.. “delta qp” parameter maybe
for B-frames
one of these options has to be keyframe interval
“ B-Picture Delta QP “ means.. b-picture quality difference
so.. my brain was melting.. so.. like.. this.. pumpkin.. actually turned out to be a melon.. what the.. so I made french fries instead.. that’s 3rd day in a row eating potatoes.. but. I’m like.. who doesn’t like french fries..
those are melons.. they taste disgusting..
national squash day date moved to the next year
they’re good with ketchup. haven’t eaten french fries with ketchup for long time
https://youtu.be/Ur8Mpgc53ts
https://youtu.be/Ur8Mpgc53ts?t=98
https://youtu.be/Ur8Mpgc53ts?t=118
https://youtu.be/66dmNlOCpY0?t=117
https://youtu.be/66dmNlOCpY0?t=231
poreiro
nuber seben
and I wanted to get better at peelling potatoes
so I had a little bit more practice
https://youtu.be/7ZYcb57btNU?t=9
https://youtu.be/7ZYcb57btNU?t=38
https://youtu.be/7ZYcb57btNU?t=153
https://youtu.be/7ZYcb57btNU?t=171
https://youtu.be/7ZYcb57btNU?t=210
https://youtu.be/7ZYcb57btNU?t=239
it looked like a pumpkin but it’s a melon
https://youtu.be/hfiPI540DFI
it’s so bad
and then I grabbed something to drink.. and it appeared to be also a melon.. juice..
https://youtu.be/0AzVPH4HC6k?t=128
do they have more videos with this dude talking on the phone??
https://youtu.be/hfiPI540DFI?t=343
https://youtu.be/hfiPI540DFI?t=446
https://youtu.be/yM9z-h2vIPo?t=10
https://youtu.be/vyr6oqU-0gs
https://youtu.be/9uFtaOICl7c?t=52
https://youtu.be/W-N5HkbZpT0
https://www.youtube.com/c/%E7%BE%85%E5%B0%8F%E7%99%BDSwhite%E5%AE%98%E6%96%B9%E9%A0%BB%E9%81%93/videos
https://youtu.be/vyr6oqU-0gs
https://youtu.be/04pwoYzbVjk
https://youtu.be/Y8YL29QcAs4?t=20
https://youtu.be/XMIMehEBubo?t=233
https://youtu.be/hfiPI540DFI?t=475
this melon is so disgusting..
I’m getting sleeping after eating
https://youtu.be/O7DNZuDigNA?t=93
https://youtu.be/O7DNZuDigNA?t=106
xD
https://youtu.be/kkg4pO8RgWM
https://youtu.be/bsS_7EEYx1Y?t=22
I had broken mixer.. I mean.. it was getting.. like.. it works but it smells bad.. when it’s being used for like.. few minutes
https://youtu.be/eeXXz_qTXVM
national squash day postponed by a year
which parameter.. means frametime interval..
https://youtu.be/E4TygUpWUTQ?t=41
they didn’t ban me yet..
but I like killing noobs.. in low rank games..
I mean.. they’re not bad..
https://youtu.be/E4TygUpWUTQ?t=229
easiest is gold
nice landing.. -36
not bad I removed some of the stuff
another team..
26k kills
somebody has no life
finally normal platinum 4 squad
how the f*ck did I get arced..
he f*cking arced me?? what the..
damn ninjas..
how
it is just not possible..
why they hit me every single time like.. one clipping.. arcing..
I do play caustic though.. he has a big hitbox..
how is it possible..
and these idiots spamming text chat..
jumping in between 2 squads..
literally.. arcing me..
literally arcing me and I can’t move my cursor
like.. wingman.. is like.. it was impossible to hit any shots.. they had snipers.. and.. like.. I was shooting.. like.. in a straight line.. so the bullet drop was the highest.. so I couldn’t hit anybody
ok.. so like.. what is the gravity slow effect on bullets.. in this
if I shoot up bullets don’t seem to slow much
how far does a bullet fly if it’s shot up
this can be calculated by knowing initial speed of the bullet and bullet weight
or like.. no.. do I need bullet weight??
no.. I guess not.. like.. speed is.. like.. 0.7km/s
with sniper rifle.. with other weapons.. it’s.. like.. 300 or less.. with wingman.. it would be like.. less than 200
lets say 150m/s
gravity is.. 10m/s^2, so.. it would stop after.. like.. 15 seconds..
wow.. that’s a lot of time
15 seconds.. really??
it would also be slowed by air.. so it would be less
if there was no air slow then it would be 15 seconds
damn these people with 26k kills
I’m easier to hit with caustic
and I’m losing rades.. with snipers.. because it’s easier to hit me
I can bunker up I’m easier to hit in trades with snipers
I’m like.. 2 times easier to hit
snipers can hit me more easily
I wanted to play more.. but.. like.. games.. are not going too well
what else to do..
every single game is with teams..
I’m like.. 80 hp.. so he has.. like.. g7 scout.. so he needs 3 shots on me.. and I have highground.. so I though that I should get him.. and then he starks me.. and mouse is getting slowed.. so I can’t move aim
https://youtu.be/E4TygUpWUTQ?t=223
https://youtu.be/E4TygUpWUTQ?t=199
it’s a painted sponge..
https://youtu.be/E4TygUpWUTQ?t=224
https://youtu.be/Q2meWkWqc-I?t=76
she kinda looks like her
https://youtu.be/Q2meWkWqc-I?t=135
I mean.. the use similar colors in the video.. purple..
https://youtu.be/E4TygUpWUTQ?t=226
https://youtu.be/v3kyYoDdtb8
these apples are not sweet..
red prince?? really??
it’s not a prince.. it’s peasant at most
https://youtu.be/E4TygUpWUTQ?t=223
lol.. she made a shocking expression.. and she hit him second time a second after.. that’s so funny
https://youtu.be/E4TygUpWUTQ?t=270
no... I finally know how she looks like.. a-yeon
https://www.youtube.com/channel/UCdld7SHk9IyYSkNrHA9B6Dw
finally.. figured out..
finally figured it out
https://youtu.be/vyr6oqU-0gs
https://youtu.be/-6w_3P_l5FA
https://youtu.be/9b6lWVqSXgo?t=24
https://youtu.be/E4TygUpWUTQ?t=222
https://www.youtube.com/c/%EA%B1%B8%EB%BD%80/videos
I was sleepy and I still haven’t slept.. after eating
https://youtu.be/zdoB2TPqWxs?t=195
these songs are so short..
I should have slept
https://youtu.be/E4TygUpWUTQ?t=223
what the heck.. like.. eating sleeping.. where is time for playing games..
I don’t even have time to play games.. damn.. right.. I was learning this.. command line today.. that’s why time went by so fast and I didn’t even have time to play
this is why I didn’t have time to sleep..
damn I should have slept like.. I think it would be like.. 20 minutes or something..
now I feel kinda.. still want to sleep
I should have just.. gone to sleep.. jesus christ..
damn..
how am I supposed to compete with people who have 26k kills
should I go back to wraith.. or.. any other champion with smaller hitbox??
I got really close to the solution with this command line.. but.. like.. still don’t know which parameter.. and.. what value I need to set..
https://youtu.be/E4TygUpWUTQ?t=223
https://youtu.be/E4TygUpWUTQ?t=222
I wanna get back to dota more and more.. thinking more and more about getting back to dota
I don’t know.. it kinda.. drives.. me.. like.. people that are there.. like.. I don’t know..
muting text chat every time..
15% damage reduction.. and.. like.. -5% damage reduction.. or.. like.. 45% hitbox reduction..so like.. trading like.. it’s like.. 22% damage reduction vs 45% smaller hitbox.. which is like.. actually.. like.. damage reduction.. because you get hit less times.. especially at long range
damn snipers..
and.. like.. ye.. I just.. get hit almost 2 times more times
because of the hitbox..
imagine me shooting at wraith.. across the map
with wingman
I would miss 2 times more often
and this dude starked me.. like.. that’s just mindblowing
ninjas
https://youtu.be/04pwoYzbVjk?t=299
https://youtu.be/0AzVPH4HC6k?t=43
https://youtu.be/7ZYcb57btNU?t=239
https://youtu.be/7ZYcb57btNU?t=171
ye I was looking for this part where he was talking to a ruler
https://youtu.be/7ZYcb57btNU?t=209
yes. I didn’t watch to the end..
but caustic has gas
and I don’t have to hear this loud slowing effect..
https://www.gamesradar.com/apex-legends-hitboxes/#:~:text=The%20confirmed%20Apex%20Legends%20hitboxes,44%20square%20cm%20%2D%2033%25%20increase
omg.. bloodhound has such a tiny hibox now?? omg..
watson and crypto the same as wraith??
no.. lifeline and bloodhund the same.. wattson.. the same.. omg.. ok.. I’m gonna maybe play bloodhund.. everyone is playing bloodhund now..
so many people are playing bloodhund
so many bloodhounds in the game
caustic is 105%.. that’s even worse
I though it was 90%.. 90% is pathfinder..
bloodhound lifeline wattson or wraith then
gameplan
plan works
again.. 2 headshots in a row.. with wingman
they were shooting a lot at me but they didn’t hit any shots.
omg. watson lifeline wraith
they shot at me 3 people at the same time.. and I died in like.. half a second
and they hit all wingman shots
how did they all had line of sight on me
lol wraith is really short.. I knew that it’s a stupid idea to go outside zone.. and.. they didn’t even wanna push them.. like.. they let them res the one that I downed.. jesus.. like.. why were they not pushing..
when I downed one dude.. they didn’t push.. I killed him with 2 wingman body shots and one headshot
https://youtu.be/8cRBO8bDn6Q?t=40
my squad didn’t move at all
so I backed
lifeline wattson again
https://youtu.be/3idAooHqySw
people who chase forever.. I just turn on them and kill his teammate
https://youtu.be/3idAooHqySw?t=55
2 headshots but with lvl 3 helmet it’s only 61 damage.. not that much more
https://youtu.be/u6K6kQFASUc?t=93
https://youtu.be/u6K6kQFASUc?t=28
xD
https://youtu.be/u6K6kQFASUc?t=104
https://youtu.be/E4TygUpWUTQ?t=259
and she looks like
https://youtu.be/WIPhgoockNA?t=12
https://youtu.be/q_eo5j5sib8?t=64
I guess she looks the most like this girl
they make videos without pauses..
and.. like.. their videos are longer.. and.. there’s more happening
there are no long solo vocal parts
or long solo instrument parts
https://youtu.be/E4TygUpWUTQ?t=200
like here I mean.
https://youtu.be/E4TygUpWUTQ?t=213
and there’s a lot of repetitions
in that song
like she doesn’t have enough lyrics to sing. I mean.. I don’t understand korean
a lot of repetitions and like.. the intro ends too fast.. it starts with chorus.. and there’s no verse right away
I think there should be verse
it shouldn’t stop right after it started
https://youtu.be/E4TygUpWUTQ?t=252
repetitions.
https://youtu.be/E4TygUpWUTQ?t=113
music video is interesting
makes more sense to me after seeing it few times..
https://youtu.be/q_eo5j5sib8?t=161
yes she looks the most like her.. she looks a lot like her
right? she looks a lot like her really similar
ok I guess the pagefile on hard drive works
https://youtu.be/7ZYcb57btNU?t=238
https://www.twitch.tv/videos/786484419?t=1h42m9s
saidy
https://youtu.be/HGFh4IjX5Pk?t=235
this sounds like one other song
https://youtu.be/cz6kwiDsfcc?t=52
with wraith they can’t hit me now.. 2 times less chance that I get hit
what legend is she playing..
https://youtu.be/E4TygUpWUTQ?t=222
ok like.. condensed milk is like.. what? sugar and milk??
I had like.. low blood circulation in arms.. so I laid on bed for a while
and stretched.. I should have stretched more.. but..
it’s getting late.. and I need to go to sleep soon.. I guess. so.. I did it fast..
yes. and a f*cking disconnect..
what the f*ck..
what a f*cking joke. why do I get a disconnect so often at night
what the fuck
I had like.. 3 times disconnect at this time recently
this time it was 1 minute.. but previously it was.. like.. sometimes hour sometimes even like.. few hours
what a joke.
this was my game.. I had wingman on the start
with lvl 3 heavy mag
and a lot of loot
and volt
now I lost all remaining points and wait 10 minutes
https://youtu.be/ghuwJmRJr7k?t=3
she looks like her
f*ck this game.. jesus.. like.. plaing solo.. because team dies in the first 5 seconds of the game..
there’s no point of playing solo
they literally died both at once.. in like.. 2 seconds
they took all guns.. went and died
without any armor
https://youtu.be/NUApAvB8XSk
that’s my team guys.
знакомтесь
https://youtu.be/E4TygUpWUTQ?t=252
https://youtu.be/XNUkw5M1514
https://www.dailymail.co.uk/femail/article-3819946/I-t-make-happy-YouTube-star-Miranda-Sings-sobs-admits-divorcing-husband-just-one-year-heart-wrenching-video-watched-SIX-MILLION-times.html
https://youtu.be/XNUkw5M1514?t=53
I was saying that pitbulls are not like.. safe..
it looks like it’s old dog
https://youtu.be/XNUkw5M1514?t=352
https://youtu.be/XNUkw5M1514?t=380
https://youtu.be/XNUkw5M1514?t=402
imagine people who treat these dogs like normal dogs
https://youtu.be/XNUkw5M1514?t=453
he could kill her
https://youtu.be/XNUkw5M1514?t=525
she has some scratches
cerbers look the same
https://images.app.goo.gl/E1MwaqqvfghpwrNS9
cerbers in harry potter looked the same
https://youtu.be/W3wYABF20lo
esplod
https://youtu.be/W3wYABF20lo?t=797
https://youtu.be/W3wYABF20lo?t=873
australian maybe
https://youtu.be/W3wYABF20lo?t=901
https://youtu.be/W3wYABF20lo?t=1007
https://youtu.be/E4TygUpWUTQ?t=221
https://youtu.be/FZfFjvTEW_I
I wish I would buy 2nd monitor.. it’s not expensive
I’m like.. do I need anything else.. for this computer.. and I’m like.. like.. it’s kinda.. it has everything I actually don’t need anything
I could get 2nd monitor.. it’s cheap upgrade
I used to be like.. I felt like I will always want something else for it.. but.. well now it’s actually like.. has everything.. next thing that I would get.. would be.. like.. I would want like.. 64GB of ram.. but I would have to replace motherboard..
0 notes
Text
Sound
In the shots I have for each scene the sound that was recorded with the clip is incredibly loud and also has some of our voices in them. As the sound they had is unusable I have searched for sound bites from the web that can set the scene nicely.
Tent ad - Forest ambience, birds chirping, rustling of tent fabric, tent zip
Car Park ad - Traffic ambience, planes ambience, engine turning off, handbrake
Bedroom ad - Traffic ambience (establishing shot), Quiet room ambience
All this sound for each advert will be at a lower decibel compared to the dialogue we are adding so that it doesn't distract away from what is important.
We thought music would be a great way of setting the mood in our adverts. Lucy researched the best music to be put into our adverts and came up with;
youtube
youtube
youtube
I edited these songs into the adverts but found that they were too loud and distracted away from the dialogue and other audio we had incorperated in. To fix the problem i found out that you can lover the decibels of the song and gradually edge it back in using keyframes in the audio settings.
0 notes