#how to create a website using html and css
Explore tagged Tumblr posts
Visit Tumblr Blog
Explore Tumblr blogs with no restrictions, modern design and the best experience.
Last Seen Tumblr Blogs


Fun Fact
12.7% of mobile users access Tumblr.
Text
Software Development Company in Salem

Looking for a reliable software development company in salem? Fox Digital Techno Services is your one-stop solution.
We offer a wide range of software development services, including web application development, mobile app development, and custom software solutions.
Our team of skilled developers utilizes the latest technologies and industry best practices to create high-quality software that meets your specific requirements. As a leading software development company in salem, we are dedicated to delivering exceptional results and exceeding your expectations.
For More Details:
Website: https://www.foxdigitaltech.com/software-development-company-in-salem/ Map: https://g.page/r/CcxH6BqJkXIgEBM/
YouTube: https://youtu.be/pdDHOreA7Kc Contact Info: +91 90420 34551
#social media marketing#email marketing#sms marketing#marketing agency#branding agency in Salem#pay per click advertising company in salem#social media advertising company in salem#instagram marketing company in salem#ad agency in salem#advertising agencies in salem#what is a digital marketing#how to do digital marketing#how to do social media marketing#digital marketing agency in salem#digital marketing companies in salem#benefits of seo#seo services in salem#seo agency in salem#web design services in salem#how to create a website using html and css#how to create a website using javascript#how to choose a good website design agency#how to create a website#how to create a website using html#best website creator in salem#best website company in salem#best website company near salem#best website developer in salem#best website design company in salem#bulk sms service provider in salem
1 note
·
View note
Text
Working on my javascript for my web page. Turns out I have the perfect kind of setup to accomplish some of the project requirements, specifically with even handlers and user interactions
My website, conceptually, will load a different employee details page depending on what employee name is clicked on. But I need to load it dynamically (instead of hard-coding it) so that the user can add or delete employees & it'll be able to still load the relevant shit.
So! Only one employee details page, but depending on how it's loaded, it'll load a different employee's information. Still working on getting down Exactly how to do it (I'm thinking using URL parameters that'll read a different object depending on what ID is used)
It's entirely doable. In fact, it's probably extremely common to do in web pages. No one wants to hard-code information for every new object. Of course not. And thus the usefulness of dynamic javascript stuff.
I can do this. I can very much do this.
#speculation nation#i wasnt very good when i got home and i read fanfic for a while#then took a nap. and now im up again and Getting To Work.#i dont have to have this 100% perfect for final submission just yet. bc final submission isnt today.#but i need to have my final presentation over my thing done by noon (11 hours from now)#and im presenting TODAY. and part of that will be giving a live demo of my project website#so. i need to have all of the core functionality of my website down at the Very Least#might not be perfect yet. but by god if im gonna show up to my presentation with my website not working.#i need to have the employee list lead to employee details with personalized information displayed per employee#i need to create an add employee field that will Actually add an employee. using a form.#and that employee will need to show up on the list and have a new id and everything. the works.#need to set it up so that employees can be deleted. shouldnt be too much extra.#and it would be . interesting. to give an actual 'login' pop-up when someone clicks on the login button#with some kind of basic info as the login parameters. this cant be that hard to code.#the project requirements are: implement 5 distinct user interactions using javascript. at least 3 different eventhandlers#at least 5 different elements with which interaction will trigger an event handler. page modification & addition of new elements to pages#3 different ways of selecting elements. one selection returning collection of html elements with customized operations on each...#hm. customized operations on each... the example given is a todo list with different styles based on if an item is overdue or not#i wonder if my personalized detail page loading would count for this... i also have some extra info displayed for each#but i specifically want the employees to be displayed in the list uniformly. that's kinda like. The Thing.#actually im poking around on my web pages i made previously and i do quite enjoy what i set up before.#need to modify the CSS for the statistics page and employee details to make it in line with what i actually wanted for it#maybe put a background behind the footer text... i tried it before & it was iffy in how it displayed...#but it looks weird when it overlaps with a page's content. idk that's just me being particular again.#theres also data interchange as a requirement. but that should be easy if i set an initial employee list as a json file#good god im going to have to think of so much extra bullshit for these 10 made up employees#wah. this is going to be a lot of work. but. im going to do it. i just wont get very much sleep tonight.#that's ok tho. ive presented under worse conditions (cough my all nighter when i read 3gun vol 10 and cried my eyes out)#and this is going to be the last night like this of my schooling career. the very last one.#just gotta stay strong for one more night 💪💪💪
6 notes
·
View notes
Text

Website design using Bootstrap
#website using bootstrap#create a website#how to create a responsive website#html css#frontenddevelopment#webdesign#html#css#divinectorweb#css3#how to create a website#responsive web design
4 notes
·
View notes
Text
Hi, this is Creative School. Today we share with you how to generate PDF documents from any website. If you want to develop a website and want to provide PDF downloading features, you are exactly in the right place. This video will help you to insert a PDF generator feature in your website on any page of any specific size and shape. GitHub Link: https://github.com/BorhanHosen/How-to-add-pdf-file-download-option-in-your-website.git 0:00 Explanation 3:10 Intro 3:39 Explaining Puppeteer 7:12 Server Side Code Explanation 15:01 Client Side Code Explanation 26:21 Final Touch 28:18 Outro Here are some of our previous tutorial links. You can watch and learn new things and techniques. Enjoy them: How to Send Data from HTML Form Data to Google Sheets | Creative School https://youtu.be/A4TPkOw2Ess Mastering Full Invoice Inventory Management in Microsoft Excel | Creative School Tutorial https://youtu.be/f8BTxan1QTo Motion Graphics in PowerPoint Full Playlist: https://youtube.com/playlist?list=PLsWfHxHIjBT87YgBulwX6X-bnEk4TayQu How to Create the Best Animated Info-graphic in PowerPoint [Part-1] 2020 || Creative School || https://youtu.be/rV-mykyBQIM Awesome Flat Intro Animation In PowerPoint Part 2 || Creative School || https://youtu.be/TafoVSYadEg The Night Sky with a Mountain, fountain, a tree, Bird & Moon Creating in PowerPoint || Creative School || https://youtu.be/jyCTlxJrGyg SAMSUNG Galaxy Boot Animation in PowerPoint [Full Tutorial- 2020] https://youtu.be/pqh-P1mUNp8 How to make an intro video of 10-minute school in PowerPoint 2020. [Part 1] https://youtu.be/I1xObR_SVco Water Animation In PowerPoint Animation! || Creative School https://youtu.be/WfzKTzbGVRA How to add pdf file #download option in your #website https://youtu.be/cNhQ-0VBt5A ===HashTags=== #reactjs #creativeschool #pdfconversion #html #nodejs #vscode #website #javascript #convertpdf #generatepdf #pdfconverter #downloadpdf #puppeteers #mernstack #javascript ===Related Tags=== react pdf generator, generate pdf using react, generate pdfs from html & css with nodejs using puppeteer, certificate generator website, how to create a pdf file using reactjs, html to pdf using javascript, generate pdf from html, generate pdf using javascript, how to add pdf object on a website, how to convert html to pdf in react app using jspdf, easy way to embed pdfs on a website, how to convert html content to pdf in react app using jspdf, generate pdf with react, how to create a pdf with node and puppeteer, generate pdfs from html & css with nodejs using puppeteer, puppeteer, getting to know puppeteer with example, get started with headless chrome and puppeteer, headless chrome and puppeteer, how to generate pdf from html with node.js, how to create a pdf file using reactjs, generate pdf using javascript, how to create pdfs with node js and react, puppeteer examples, puppeteer tutorial, puppeteer html to pdf generation with node.js,
#react pdf generator#generate pdf using react#generate pdfs from html & css with nodejs using puppeteer#certificate generator website#how to create a pdf file using reactjs#html to pdf using javascript#generate pdf from html#generate pdf using javascript#how to add pdf object on a website#how to convert html to pdf in react app using jspdf#generate pdf with react#how to create a pdf with node and puppeteer#javascript#creativeschool#mernstack#puppeteer#website#download
3 notes
·
View notes
Text
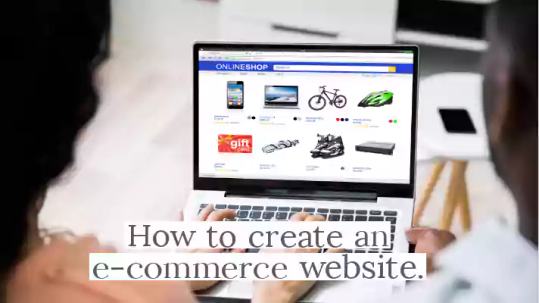
E-commerce website: How to create an e-commerce website
How to create an E-commerce website If you are thinking about creating your ecommerce website then this information will be very beneficial for you. It is very easy to setup an e-commerce business, you just have to follow some information, after this you can create an e-commerce business and sell your goods. We will tell you step by step simple methods here. 1, first of all you must have thought…
View On WordPress
#build an e-commerce website from scratch with react#design and launch of e-commerce website notes#e commerce website example#e commerce website name#e commerce website project#e commerce website templates#e-commerce website design#e-commerce website in india#how to build an e-commerce website step by step pdf#how to build an ecommerce website from scratch#how to create an e-commerce website using html#how to create an ecommerce website for free#how to create e commerce website#how to make an e-commerce website with html css and js#how to make e-commerce website using html and css#steps to design and develop an e-commerce website#top 10 e-commerce websites
0 notes
Text
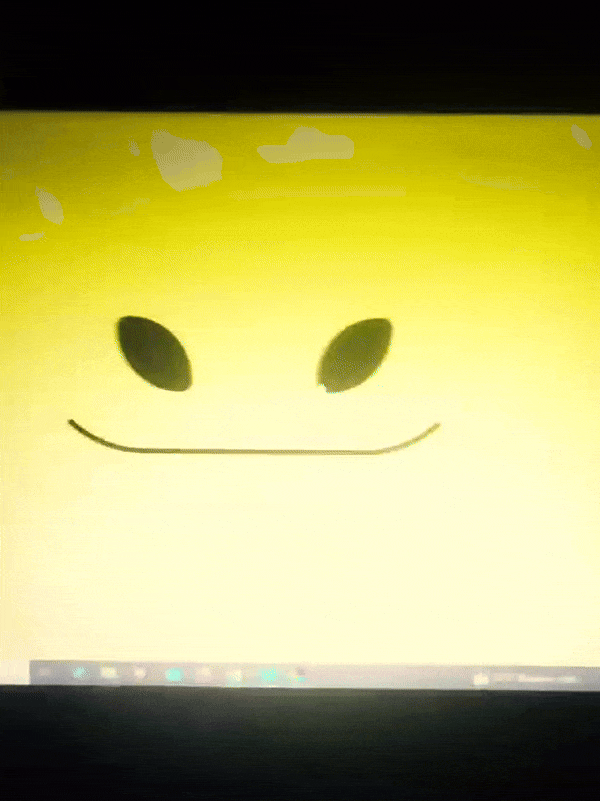
Edgaring time!
Tutorial on how to make your own responsive Edgar :D I will try to explain it in really basic terms, like you’ve never touched a puter (which if you’re making this… I’m sure you’ve touched plenty of computers amirite??? EL APLAUSO SEÑOOOREEES).
If you have some experience I tried to highlight the most important things so you won’t have to read everything, this is literally building a website but easier.
I will only show how to make him move like this:
Disclaimer: I’m a yapper.
Choosing an engine First of all you’ll need something that will allow you to display a responsive background, I used LivelyWallpaper since it’s free and open-source (we love open-source).
Choosing an IDE Next is having any IDE to make some silly code! (Unless you can rawdog code… Which would be honestly impressive and you need to slide in my DMs and we will make out) I use Visual Studio!!!
So now that we have those two things we just need to set up the structure we will use.
Project structure
We will now create our project, which I will call “Edgar”, we will include some things inside as follows:
Edgar
img (folder that will contain images) - thumbnail.png (I literally just have a png of his face :]) - [some svgs…]
face.js (script that will make him interactive)
index.html (script that structures his face!)
LivelyInfo,json (script that LivelyWallpaper uses to display your new wallpaper)
style.css (script we will use to paint him!)
All of those scripts are just literally like a “.txt” file but instead of “.txt” we use “.js”, “.html”, etc… You know? We just write stuff and tell the puter it’s in “.{language}”, nothing fancy.
index.html
Basically the way you build his silly little face! Here’s the code:
<!doctype html> <html> <head> <meta charset="utf-8"> <title>Face!</title> <link rel = "stylesheet" type = "text/css" href = "style.css"> </head> <body> <div class="area"> <div class="face"> <div class="eyes"> <div class="eyeR"></div> <div class="eyeL"></div> </div> <div class="mouth"></div> </div> </div> <script src="face.js"></script> </body> </html>
Ok so now some of you will be thinking “Why would you use eyeR and eyeL? Just use eye!“ and you’d be right but I’m a dummy who couldn’t handle making two different instances of the same object and altering it… It’s scary but if you can do it, please please please teach me ;0;!!!
Area comes in handy to the caress function we will implement in the next module (script)! It encapsulates face.
Face just contains the elements inside, trust me it made sense but i can’t remember why…
Eyes contains each different eye, probably here because I wanted to reuse code and it did not work out and when I kept going I was too scared to restructure it.
EyeR/EyeL are the eyes! We will paint them in the “.css”.
Mouth, like the eyeR/eyeL, will be used in the “.css”.
face.js
Here I will only show how to make it so he feels you mouse on top of him! Too ashamed of how I coded the kisses… Believe me, it’s not pretty at all and so sooo repetitive…
// ######################### // ## CONSTANTS ## // ######################### const area = document.querySelector('.area'); const face = document.querySelector('.face'); const mouth = document.querySelector('.mouth'); const eyeL = document.querySelector('.eyeL'); const eyeR = document.querySelector('.eyeR'); // ######################### // ## CARESS HIM ## // ######################### // When the mouse enters the area the face will follow the mouse area.addEventListener('mousemove', (event) => { const rect = area.getBoundingClientRect(); const x = event.clientX - rect.left; const y = event.clientY - rect.top; face.style.left = `${x}px`; face.style.top = `${y}px`; }); // When the mouse leaves the area the face will return to the original position area.addEventListener('mouseout', () => { face.style.left = '50%'; face.style.top = '50%'; });
God bless my past self for explaining it so well, but tbf it’s really simple,,
style.css
body { padding: 0; margin: 0; background: #c9c368; overflow: hidden; } .area { width: 55vh; height: 55vh; position: absolute; top: 50%; left: 50%; transform: translate(-50%,-50%); background: transparent; display: flex; } .face { width: 55vh; height: 55vh; position: absolute; top: 50%; left: 50%; transform: translate(-50%,-50%); background: transparent; display: flex; justify-content: center; align-items: center; transition: 0.5s ease-out; } .mouth { width: 75vh; height: 70vh; position: absolute; bottom: 5vh; background: transparent; border-radius: 100%; border: 1vh solid #000; border-color: transparent transparent black transparent; pointer-events: none; animation: mouth-sad 3s 420s forwards step-end; } .face:hover .mouth { animation: mouth-happy 0.5s forwards; } .eyes { position: relative; bottom: 27%; display: flex; } .eyes .eyeR { position: relative; width: 13vh; height: 13vh; display: block; background: black; margin-right: 11vh; border-radius: 50%; transition: 1s ease } .face:hover .eyeR { transform: translateY(10vh); border-radius: 20px 100% 20px 100%; } .eyes .eyeL { position: relative; width: 13vh; height: 13vh; display: block; background: black; margin-left: 11vh; border-radius: 50%; transition: 1s ease; } .face:hover .eyeL { transform: translateY(10vh); border-radius: 100% 20px 100% 20px; } @keyframes mouth-happy { 0% { background-color: transparent; height: 70vh; width: 75vh; } 100% { border-radius: 0 0 25% 25%; transform: translateY(-10vh); } } @keyframes mouth-sad { 12.5%{ height: 35vh; width: 67vh; } 25% { height: 10vh; width: 60vh; } 37.5% { width: 53vh; border-radius: 0%; border-bottom-color: black; } 50% { width: 60vh; height: 10vh; transform: translateY(11vh); border-radius: 100%; border-color: black transparent transparent transparent; } 62.5% { width: 64vh; height: 20vh; transform: translateY(21vh); } 75% { width: 69vh; height: 40vh; transform: translateY(41vh); } 87.5% { width: 75vh; height: 70vh; transform: translateY(71vh); } 100% { width: 77vh; height: 90vh; border-color: black transparent transparent transparent; transform: translateY(91vh); } }
I didn’t show it but this also makes it so if you don’t pay attention to him he will get sad (mouth-sad, tried to make it as accurate to the movie as possible, that’s why it’s choppy!)
The .hover is what makes him go like a creature when you hover over him, if you want to change it just… Change it! If you’d rather him always have the same expression, delete it!
Anyway, lots of easy stuff, lots of code that I didn’t reuse and I probably should’ve (the eyes!!! Can someone please tell me a way I can just… Mirror the other or something…? There must be a way!!!) So now this is when we do a thinking exercise in which you think about me as like someone who is kind of dumb and take some pity on me.
LivelyInfo.json
{ "AppVersion": "1.0.0.0", "Title": "Edgar", "Thumbnail": "img/thumbnail.png", "Preview": "thumbnail.png", "Desc": "It's me!.", "Author": "Champagne?", "License": "", "Type": 1, "FileName": "index.html" }
Easy stuff!!!
Conclusion
This could've been a project on git but i'm not ready and we're already finished. I'm curious about how this will be seen on mobile and PC,,, i'm not one to post here.
Sorry if I rambled too much or if i didn't explain something good enough! If you have any doubts please don't hesitate to ask.
And if you add any functionality to my code or see improvements please please please tell me, or make your own post!
98 notes
·
View notes
Text
Friendly reminder that Wix.com is an Israeli-based company (& some website builders to look into instead)
I know the BDS movement is not targeting Wix.com specifically (see here for the companies they're currently boycotting) but since Wix originated in Israel as early as 2006, it would be best to drop them as soon as you can.
And while you're at it, you should leave DeviantArt too, since that company is owned by Wix. I deleted my DA account about a year ago not just because of their generative AI debacle but also because of their affiliation with their parent company. And just last month, DA has since shown their SUPPORT for Israel in the middle of Israel actively genociding the Palestinian people 😬
Anyway, I used to use Wix and I stopped using it around the same time that I left DA, but I never closed my Wix account until now. What WAS nice about Wix was how easy it was to build a site with nothing but a drag-and-drop system without any need to code.
So if you're using Wix for your portfolio, your school projects, or for anything else, then where can you go?
Here are some recommendations that you can look into for website builders that you can start for FREE and are NOT tied to a big, corporate entity (below the cut) 👇👇
Carrd.co

This is what I used to build my link hub and my portfolio, so I have the most experience with this platform.
It's highly customizable with a drag-and-drop arrangement system, but it's not as open-ended as Wix. Still though, it's easy to grasp & set up without requiring any coding knowledge. The most "coding" you may ever have to deal with is markdown formatting (carrd provides an on-screen cheatsheet whenever you're editing text!) and section breaks (which is used to define headers, footers, individual pages, sections of a page, etc.) which are EXTREMELY useful.
There's limits to using this site builder for free (max of 2 websites & a max of 100 elements per site), but even then you can get a lot of mileage out of carrd.
mmm.page

This is a VERY funny & charming website builder. The drag-and-drop system is just as open-ended as Wix, but it encourages you to get messy. Hell, you can make it just as messy as the early internet days, except the way you can arrange elements & images allows for more room for creativity.
Straw.page
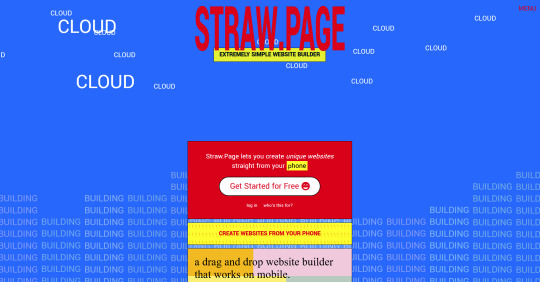
This is an extremely simple website builder that you can start from scratch, except it's made to be accessible from your phone. As such, the controls are limited and intentionally simple, but I can see this being a decent website builder to start with if all you have is your phone. The other options above are also accessible from your phone, but this one is by far one of the the simplest website builders available.
Hotglue.me

This is also a very simple & rudimentary website builder that allows you to make a webpage from scratch, except it's not as easy to use on a mobile phone.
At a glance, its features are not as robust or easy to pick up like the previous options, but you can still create objects with a simple double click and drag them around, add text, and insert images or embeds.
Mind you, this launched in the 2010s and has likely stayed that way ever since, which means that it may not have support for mobile phone displays, so whether or not you wanna try your hand at building something on there is completely up to you!
Sadgrl's Layout Editor

sadgrl.online is where I gathered most of these no-code site builders! I highly recommend looking through the webmaster links for more website-building info.
This simple site builder is for use on Neocities, which is a website hosting service that you can start using for free. This is the closest thing to building a site that resembles the early internet days, but the sites you can make are also responsive to mobile devices! This can be a good place to start if this kind of thing is your jam and you have little to no coding experience.
Although I will say, even if it sounds daunting at first, learning how to code in HTML and CSS is one of the most liberating experiences that anyone can have, even if you don't come from a website scripting background. It's like cooking a meal for yourself. So if you want to take that route, then I encourage to you at least try it!
Most of these website builders I reviewed were largely done at a glance, so I'm certainly missing out on how deep they can go.
Oh, and of course as always, Free Palestine 🇵🇸
#webdev#web dev#webdesign#website design#website development#website builder#web design#websites#sites#free palestine#long post#I changed the wording multiple times on the introduction but NOW I think im done editing it
503 notes
·
View notes
Note
Hi!! I wanted to say that I loved reading about your journey of creating a personal website. I'm still unsure between Vercel and Netlify. I have a small question to ask. See, one of the reasons I want to make a website is to archive drawings and journal/sketchbook. Would you have any tips for creating an area on my website just for the diary/journal, which has tags, files for each entry, etc.?
Bello!

Really happy to hear about your interest in websites! I want everyone to make their own site so I don't have to log into social media and get instant tummyaches ♥
Vercel vs Netlify: I think I settled on Vercel for absolutely no reason whatsoever. I just made a site on Netlify, then tested on Vercel, and now I have like 5 websites on Vercel so I just kept using it LOL. I'm sure a more tech-savvy person would know the difference - I think they have certain integrations with specific programs.
Creating a diary or journal with tags:
There's a couple of different ways you can do that, with different levels of work needed.
you got me yapping again:
This sadgrl tutorial might be outdated and may or may not work, but explains the process better than I can.
Easiest: make a journal on Dreamwidth, or another blogging site (wordpress??) that allows easy tags and RSS feed, and embed that RSS feed onto your site.
This requires almost no HTML set-up, and the easiest to organize tags, but you don't truly have the data on your own site since it's just embedded.
When I snuck into a web design class at college, this was one of the methods that the professor used for a blog within a portfolio site LOL.
Shit like wordpress is what a LOT of ~professional~ sites do for their blog section. They code it separately from the main site haha. It's the most popular thing, but not necessarily the best. And wait til you read on what the CEO of wordpress has been having meltdowns about... he owns tumblr too!
It's made with a tutorial for Neocities if that's what you use.
Medium: Set up zonelets.
It will require some HTML and JS editing, but will help automate making headers/footers for each page of a blog.
I've never used it myself, but I see other people speak highly of it.
HARD FOR ME CUZ I'M A GORILLA: I believe a lot of professional web devs will slap your face with their coding cock until you use a static site generator (SSG) to make your site.
You will need some coding knowledge to set up the tagging system since it doesn't come with it enabled by default. But it's made explicitly to be an alternative to big Static Site Generators which are...
It requires some more intimidating knowledge, because it's a lot of scripts that turn files that are not HTML/CSS/JS into plain HTML.
Also you have to use the command line, and that doesn't come with buttons that tell you what you can do. You have to copy/paste all that shit or memorize the code to 'dev build astro' and it all looks silly.
I've used Eleventy, and now am using Astro. Other people use Hugo or Jekyll or some other stuff with crazy names like Glup Shitto. I hate all these sites cuz none of the words mean anything to me. This is a common theme for me and tech. I don't know what NODES or CONTENT or ISLANDS are!!!
I had the most success attempting to learn how to use a SSG by downloading a template and altering it with github + VScodium. Here's the template page for Astro. You click on a theme you like, and it takes you to its github page. (If you don't want to use evil Microsoft stuff sorry. Skip this entire section.) Follow the instructions on the page for "forking" the glup shitto. When it tells you to run commands, I run those commands through the terminal window in VScodium. These tutorials never tell you what these commands do cuz they assume you already know. Usually those commands automatically install the files you need onto your computer, and create the final files.
You can see my wip here for a "tag system" that SHOULD show members of a web listing haha but I don't know what I'm doing and I have a reading disorder AND don't know cumputer good.
THEORETICALLY this will be the simplest and easiest way to maintain tags and files, because after you set it up you just have to write the "content" of the blog page. And you don't have to set up the header/footer ever again. I see the vision, and potential, but I am not there yet when it takes me 5 hours a day to figure out what any of the words in the documentation mean and I don't want to ask an actual tech person cuz they will be like 'obviously just press the Blip on the Repository and then Suck My Ass in the command line".
(side note I haven't updated fujofans in like a year cuz I'm struggling with this part to make updating easier).
Con: the final HTML/CSS code is really ugly if it's "minified", and a lot of themes use """"""professional"""""" CSS libraries like Bootstrap and Tailwind that I honestly think are ugly cuz that's what every fuckin' tech website uses to style their pages and make them look Professional and Minimalist with stupid code like style="500-w dark-gray-balls D-cup-bra" on every single element. Even Toyhouse uses Bootstrap. Eugh!
But maybe you're smarter than me and can wrangle these things better!
That was really long. Woops. I hope you can slug through this wall of text and find something helpful. Feel free to email me if you have any more specific questions. I may or may not be helpful.
If someone else sees this and has better suggestions for making BLOGS, please chime in. I'm begging you.
64 notes
·
View notes
Text
Convert HTML to Image: A Step-by-Step Guide ✨

Do you want to turn some HTML code you've made that's on your website and have a way to convert it into an image for you to save?
Well, look no further! I too wanted to do the same thing but funny enough, there weren't any straightforward tutorials out there that could show you how! After hours of searching, I finally discovered the solution~!
This is an old tutorial I made 🐼

💛 Set your environment
Before we dive into the conversion process, I'll assume you already have your HTML code ready. What you want to learn is how to turn it into an image file. You should have a good grasp of HTML and JavaScript. For this tutorial, we'll use the following HTML code example:

We won't include the CSS code, as it doesn't affect this tutorial. The JavaScript file (script.js) at the bottom of the body element is where we'll add the functionality for the conversion.
Your page should resemble the following:

As you can see, the "Click me" button will handle the conversion. We aim to convert everything within the div.info-div into an image.
💛 Using the html2canvas JavaScript Library
The html2canvas library allows you to take screenshots of webpages and target specific elements on a screen. Here are the steps to include the library in your project:
The steps to put the library in your project:
Visit the html2canvas website for more information.
Copy the CDN link from here

and include it in a script tag in your project's head tag in the HTML file:

That's it for including the library on the HTML side. Now, let's move on to the JavaScript code.
💛 JavaScript Functionality
Here's the JavaScript code to handle the conversion:

In this code, I want to turn the whole div.info-div into an image, I put it into a variable in const div = document.querySelector(".info-div");.
I also put the button into a variable in const button = document.querySelector("button");
I added a click event listener to the button so when the user clicks the button, it will follow the code inside of the event listener!
You can find similar code like this in the documentation of the html2canvas library:

What is happening here is:
We add the div (or what the element we want to take an image of) into the html2canvas([element]).then((canvas)
Added the image file type url to a variable = const imageDataURL = canvas.toDataURL("image/png"); - You can replace the png to other image file types such as jpg, jpeg etc
Created an anchor/link tag, added the href attribute to imageDataURL
The download attribute is where we will give the default name to the image file, I added "dog.png"
Perform the click() function to the anchor tag so it starts to download the image we created
And that's it!
💛 The End
And that's it! You've successfully learned how to turn your HTML into an image. It's a great way to save and share your web content in a unique format.

If you have any questions or need further clarification, please comfortable to ask. Enjoy converting your HTML into images! 💖🐼
#my resources#coding#codeblr#programming#progblr#studying#studyblr#programmer#html#html css#javascript#neocities#coding tips#html5 tutorial#html tutorial
155 notes
·
View notes
Text
Useful F2U Programs (and 1 F2U Website) For Writers
Can't afford Microsoft Office?? No problem, just download LibreOffice or OpenOffice, both in which are not-for-profit + open source, and you're good to go.
Need a dictionary to use when you're offline and have no internet or just need to know what something means + synonyms/antonyms?? No problem, just download WordWeb and you're good to go.
Need to create some fictitious deities for your fictitious race?? No problem, just go to Chaotic Shiny Productions, press CTRL + F, and type in Pantheon Generator Portable. Once downloaded, you're good to go.
Need to know how many words you need to write a day to reach your monthly goal of _____ number of words?? No problem, just go to Chaotic Shiny Productions, press CTRL + F, and type in NaNoWriMo Calendar. Once downloaded, you're good to go.
Want something that's better than Notepad because it auto-backups every-so-often and has a countdown word counter?? No problem, just download yEdit2 and you're good to go.
Need a program that allows you to do a scene-by-scene play for your works?? No problem, just download yWriter7 and you're good to go.
Want to be able to use ProWritingAid Pro without needing to purchase it?? No problem, just head to The ProWritingAid Team Trial Signup, get a Temporary Email (almost any of them will suffice), and create a new account every seven (7) days which will lead to an infinite number of #7DayTrails. You'll also need to download ProWritingAid and you're good to go.
Want to create your own Wikipedia?? No problem, just download this Wikipedia HTML-CSS-JS Template from HTML5 Templates, create an account on Neocities, and download Brackets to edit said Wikipedia Template. Once finished, you're good to go.
#pvposeur's tutorials#pvposeur's tutorial#pvposeur's how to#pvposeur's how tos#pvposeur's psa#pvposeur's public service announcements#pvposeur's public service announcement#writing tutorial#writing tutorials#free to use#f2u#writers on tumblr#writer on tumblr#authors on tumblr#author on tumblr#writeblr#authorblr#microsoft word#microsoft office#libreoffice#openoffice#yedit2#ywriter7#wordweb#nanowrimo#prowritingaid#brackets#wikipedia#neocities#free to reblog
27 notes
·
View notes
Note
Do you have any tips on going about making a website for your art/yourself
Think about your site layout Research the website layout you want to fit your art the best first, above anything!
I had to make this seperate blog because my currently portfolio site does not best fit my art needs, but I also can't up and delete it. So now I am paying for 2 seperate websites.
Domain name and coding If you don't already, I recommend learning basic coding (html/CSS) so you can have full control over your site. Squarespace (my portfolio site) is ok but im limited on what I can do with it. Im currently learning how to do HTML myself.
It will cost money on top of paying for the site hosting, but get an official domain for your site. Be sure that this domain name is easy enough to spell and represents you in some way (your name, art subject, etc.
Accessibility Take accessibility into consideration when creating your site. Such as using a max of 3 different fonts, have colors contrast each other, use alt text where you can, and have your font be dyslexic friendly.
The dyslexic friendly font is typically the less aesthetic fonts, but at least your audience will be able to read it lol.
141 notes
·
View notes
Text
Web Design Services in Salem

Are you looking for top-notch web design services in salem? Fox Digital Techno Services is your one-stop solution. We offer a comprehensive range of web design services tailored to meet the unique needs of your business.
Our team of experienced web designers is committed to delivering high-quality websites that are not only visually appealing but also user-friendly and effective.
We understand the importance of a strong online presence in today's competitive market, and we strive to create websites that help our clients achieve their business goals. Whether you need a simple brochure website or a complex e-commerce platform, Fox Digital Techno Services has the expertise to deliver exceptional results. Contact us today to discuss your web design needs and get started.
For More Details:
Website: https://www.foxdigitaltech.com/web-design-company-in-salem/ Map: https://g.page/r/CcxH6BqJkXIgEBM/
YouTube: https://youtu.be/pdDHOreA7Kc
Contact Info: +91 90420 34551
#social media marketing#email marketing#sms marketing#marketing agency#branding agency in Salem#pay per click advertising company in salem#social media advertising company in salem#instagram marketing company in salem#ad agency in salem#advertising agencies in salem#what is a digital marketing#how to do digital marketing#how to do social media marketing#digital marketing agency in salem#digital marketing companies in salem#benefits of seo#seo services in salem#seo agency in salem#web design services in salem#how to create a website using html and css#how to create a website using javascript#how to choose a good website design agency#how to create a website#how to create a website using html#best website creator in salem#best website company in salem#best website company near salem#best website developer in salem#best website design company in salem#bulk sms service provider in salem
1 note
·
View note
Text
Web designer in Jodhpur
Creative Web Design
We are a web designing company that has a team of skilled and experienced web designers and developers who can create stunning and functional websites for any type of business or domain. We offer a variety of web designing services, such as custom web design, web development, web hosting, SEO, and maintenance. We also provide you with a free web design consultation, where we can discuss your goals, needs, and preferences, and provide you with a web design proposal that suits your requirements and expectations.
What we do in Web Design
Our web designing services are the services that provide web designing solutions for clients who want to create or improve their online presence. It involves the use of various elements such as colours, fonts, images, graphics, animations, and interactions to convey the message and purpose of the website to visitors. Web designing services can help clients with various aspects of web designing, such as Consultation: Our web designing services can help clients understand their goals, needs, and preferences, and provide them with expert advice and guidance on how to achieve them . Strategy: Our services can help clients develop a clear and effective web design strategy that aligns with their brand identity, target audience, and business objectives.Design: We help clients create a unique and attractive web design that reflects their vision and personality, and that engages and impresses their visitors.Launch: Our services can help clients launch their website to the public, and provide them with web hosting, domain registration, and security services.
Our Design Technology
At Web Farm House, we understand that web design is not just about making a website look good. It is also about making it work well, communicate effectively, and provide value to the users. That is why we use the latest web design technology to create websites that are:
Visually appealing: We use web graphic design to create stunning and consistent visual elements for your website, such as colours, fonts, images, icons, and animations.
Easy to use: We use user interface design to create intuitive and interactive elements for your website, such as buttons, menus, forms, and navigation.
Functional and reliable: We use web development to code and program your website, using languages such as HTML, CSS, JavaScript, PHP, and others. We follow the principles of web standards, web accessibility, web performance, and web security, to ensure the quality and reliability of your website.
Our Work Process
At Web Farm House, we follow a systematic and collaborative work process to create your website. Our work process consists of four main phases: Discovery, Design, Development, and Delivery:
Discovery: This is the phase where we get to know you and your project. We will ask you some questions about your goals, needs, preferences, budget, and timeline. We will also conduct some research on your industry, competitors, and target audience. Based on the information we gather, we will create a project proposal and a contract for you to review and approve.
Design: This is the phase where we create the visual and interactive elements of your website. We will start by creating a sitemap and a wireframe, which are the blueprints of your website’s structure and layout. We will then create a mockup, which is a prototype of your website’s appearance and functionality. We will present the mockup to you and ask for your feedback and approval. We will make any revisions as needed until you are satisfied with the design.
Development: This is the phase where we code and program your website. We will use the latest web development technology to create a website that is functional, reliable, and compatible with different devices and browsers. We will also test and debug your website to ensure its quality and performance. We will show you the progress of the development and ask for your feedback and approval.
Delivery: This is the final phase where we launch and maintain your website. We will upload your website to your chosen hosting service and domain name. We will also provide you with a user manual and a training session on how to use and update your website. We will also offer you ongoing support and maintenance services to keep your website running smoothly and securely.
We will also listen to your feedback and suggestions and make any changes as needed. We will work with you as a partner and a friend, not just as a client and a vendor. we value your input and satisfaction throughout the work process. We will communicate with you regularly and keep you updated on the status of your project.
Our Web Designing Services
Our is provides web design services for clients who want to create or improve their online presence. We help clients with various aspects of web designing, such as consultation, strategy, design, development, testing, launch, and maintenance:
Static web design
Liquid web design.
Adaptive web design.
Dynamic web design.
Responsive web design.
Single-page web design.
Why Choose Us?
We are a One-Stop Solution for delivering the best web design and development services. We render customized and affordable web design facilities to suit your requirements. Choose the best plans for building a responsive web design according to your needs:
Excellent technical support
Core PHP &Codeigniter + MySQL.
Secure and Reliable coding.
Satisfactory Customer Support.
SEO-friendly web development.
33 notes
·
View notes
Text
useful resources for fanfic writers and readers
AO3 Floating Comment Box A script to create a floating comment box at the bottom of the page for works on AO3.
Floaty Review Box To review fics on AO3 as you read.
FanFictionDownloader (FFDL) A little tool to download your favorite stories from different websites to your local computer or eBook-reader.
FicLab FicLab is a browser addon that allows you to download fanfiction and original stories directly from supported websites in a number of different ebook formats, including ePub, Kindle and PDF.
Comment Builder The @/longlivefeedback comment builder is a tool created to help fanfiction readers respond to stories and communicate with authors.
ao3 savior Hide specified works on AO3
AO3: Kudosed and seen history Highlight or hide works you kudosed/marked as seen.
AO3 Additional Filter Tools Adds additional filters to the AO3 filter sidebar on works listings, including creator, hits, kudos, comments and bookmarks.
AO3 Works List CSV Bookmarklet Lets you download the contents of a works listing as a CSV.
Hide Empty Paragraphs Hide empty paragraph tags from a work.
AO3 Statistics CSV Bookmarklet Lets you download your AO3 statistics as a CSV.
Fic Trackers A tool to keep track of your fics!
AO3 Automagic App Exchange requests summary eyeball searing on AO3? No problem. View an exchange that's already been scraped, or scrape a new one!
Google Docs script to handle issues when copying from a doc into AO3 A script for Google Drive that will take your finished work and convert all basic formatting into HTML for you.
AO3: Hidden search operators cheatsheet
Shortening long tag fields skin by Xparrot Puts all tag fields on the Show Works page over a certain length into a scrollbox.
Reversi skin by AO3 AO3 dark mode.
ByLine skin by Branch Breaks warnings, relationships, characters, and freeform tags into separate groups.
AO3 Work Skins/Tutorials
A Complete Guide to 'Limited HTML' on AO3
CSS code scripts for Ao3
How to Mimic Social Media in an AO3 Work
Works Skins
24 notes
·
View notes
Note
sorry if you’ve answered something similar before but how do you format things for your website? in the collections you have for poems
i love how it looks. the book kind of format it has
and i want to do similar/the same formatting for my own works but im really struggling…
i've been asked stuff like this a lot and i don't mind explaining it often because i want people to make websites more. i made a tutorial video at some point but it's kind of hard to make a curriculum or tutorial or whatever around this kind of thing because it's really just a self expression thing. i'll try to break down as much of my thought process as makes sense.
i design my pages in photoshop with either double/single page display in mind and then i use html to set them next to each other. most of the choice here comes down to how overwhelming i want my designs to feel. in the case of the lonely leaver page, the entire book was designed to be something that could be a physical book, and so from the getgo i made the pages in that kind of format. i previewed things in acrobat which has a booklet view mode (which singles out the front and back cover around the contents of the file) & allows you to process double page view as well. as for the actual process in photoshop before that point, i typically will open a canvas that is the size of the full 2 page spread (i.e. 8 inches wide for 2 pages which are both 4 inches wide) and i set grid lines for bleed margins and to mark the center of the page so that i can make the composition something that im comfortable with having a gap in the middle from the book folding. with lonely leaver i had to reformat about half the book at some point because i wanted to make it a larger resolution which was annoying but i just keep my guidelines for a print size in mind while im working. often if im a certain amount of time into a project that i feel like i will be spending a lot more time with i'll create a dummy psd file at this point which is devoid of content but which has all of the margins/resolution stuff set up already so i can just open that up and save a different version of it when i'm done.
my actual writing process and my design process is generally extremely intertwined, that's why things tend to be varying degrees stream of conscious in my work i think. i'll for instance, have a thought im stuck on for several days, and then open photoshop without having a poem or comic in mind, but i'll fill the canvas with some kind of color like red or yellow or a photo or whatever, and then open a text box or start drawing. telling a story through composition (i.e. page layout itself) is generally my favorite aspect of art and design because i enjoy how violent and dramatic framing angles can make the content of a piece feel so i'll try to move stuff around as much as possible in order to get my desired effect, often times using place holder shapes in lieu of finished design elements in order to get a rough blocking. as i do this i tend to react to what i'm writing/making as i'm doing it, and i do a lot of selective self editing during this part. for instance, i'll start manipulating rasterized text or cutting around images or whatever. i'll reread and look at whatever im doing for a couple of hours and then when i'm done with a spread or whatever i will save the document as a psd with a combined full spread and then each page separately as pngs or whatever (split at the middle grid line, back to the example, i'll save 2 different 4 inch wide images by changing the canvas size).
when it's time for me to put stuff on my website i then batch convert whatever pngs i exported into webp's because they load faster and take up less space on the server/my computer. you can look at my direct html/css files in your internet browser's explorer mode to see exactly what i do but essentially i just have either 1 or 2 images in a block and then a series of repeating vertical blocks containing images. i don't have an extremely efficient way of uploading pages and i'll typically just copy the same
"<p><img src="01.png"> <p><img src="02.png">"
like, 30 or 40 times or whatever into a html document. i use visual studio code for this stuff because it lets me do a bunch of stuff like having several files open at once & the navigation pane is nice & there's a live server extension that automatically refereshes the html file in my web browser on file save which is really awesome. i have a css page that i made like, 5 years ago, and i usually just link new projects to that because it has a bunch of different settings in it which i'll toggle on or off depending on the needs of whatever page or i'll add new div id's to it. it's kind of messy at this point, but it gets the job done. i use filezilla and something like bluehost or something for webhosting/file management.
i arrange and organize all of my art extremely methodically so usually in my like "<root catch all poetry folder>" inside of my "<root catch all art folder>" there will be a "<name of specific poem book>" folder which just contains the poems named by their actual name e.g. "dedication to saint eulalia 4.png" and then another folder inside of that is called "paginated" where i, using the acrobat document i arrange stuff in as reference, rename copies of my pages which i have placed in that folder to be named things like "01.png" so that i can then manually flip through it sequentially in the windows photo viewer and also just so that i don't have to go through the arduous process of renaming and tracking stuff inside of the root folder i'm containing that project's files in.
i'm 26 now and i made my first website when i was like 18, and my first zine project and i'm tired of feeling feeling around that same time, so i've got like, coming up on a decade of trial and error behind this and this is generally what has worked for me. my website isn't super complicated and mostly just gets the job done but because i try to think about style and presentation up front with whatever projects i'm doing i tend to just make plans based around that as early as it makes sense. to me having a website for art presentation has always been the Primary Method and intended landing zone for my art so it's genuinely always been a consideration in my process to try to plan around how i will put it on my website. i do this because i believe having my own curated space for containing my art allows it to exist in a context which best heightens whatever message i'm trying to convey. if there's an issues with my website right now they are that i'm very bad at mobile browser formatting & i havent updated the main look of the website in something like 4 years barely at all.
anyway, at the end of the day i think really as long as you can identify whatever your intentions are and do some planning/problem solving around that you should probably be able to find your own method which works for you better than mine might but if you do just want to copy my website the tools to do so are within your brain and internet searches and i believe in you. i think the biggest strength of my website is that it shows how easy it is to just put art big as fuck on a webpage and how effective that kind of minimalism can be. i just want my website to be like a museum's walls. and it's not super complicated to get to that level of html knowledge.
12 notes
·
View notes
Text
website update log #24 (April 13th, 2025)
I FINISHED RECREATING THE WEBSITE !!!

the look is more or less the same, with subtle differences and the removal of the image carousel (for now) BUT EVERYTHING IN THE HTML AND CSS FILE HAS BEEN CHANGED!!
i made a system for me to edit and add panels really easily, where i used classes for the panel design and reusable elements (ie “long-box” for really long elements like the github chart, and “three-boxes” for three panels in one row), and IDS for specific non-reusable elements like the navbar and the comment section.
now that editing the website became more flexible (compared to the previous version atleast), i FINALLY CREATED A GOOD LOOKING MOBILE VERSION OF MY WEBSITE WITH BOTTOM NAVBARS AND STUFF

i had a hard time making the previous version compatible to mobile, so it just doesnt look that great…

and besides the one before this, which looks really decent and actually mobile optimized,

it just gets worse and worse…


when i created these websites i never had “making it look great for mobile” in my mind at ALL..but when i found out how important it is for people to have a good-ish mobile experience, i gave it a try lol
ANYWAY!! NOW THAT THATS OUT OF THE WAY, LET ME SHOW YOU THE CHANGES IVE MADE TO THIS SITE YAYY!!!
- replaced the twitter feed panel to an “88x31 buttons ive made” panel

i made a whytee.xyz 88x31 button A YEAR AND A HALF AFTER I REDESIGNED MY WEBSITE

moved the under construction disclaimer from an overlay to its own panel

modified the "made by sushiwt" box by adding "built with firefox/chrome and vscode" and a "- 2025" beside the year

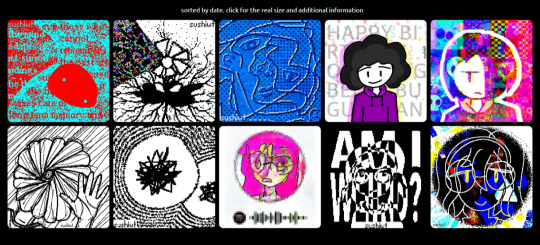
and i FINALLY made the artwork section for my website..
now all that's left is the section about myself, and this website is BASICALLY FINISHED!!!!
developing this website was so fun, and until i get the urge to remake it again, it will look like this for a while…
thank you for reading these logs btw :> i really really really appreciate you coming along for the ride (and by “the ride” i mean the creation of this)
- sushiwt <3
10 notes
·
View notes