#how to get wordpress username and password from database
Explore tagged Tumblr posts
Visit Tumblr Blog
Explore Tumblr blogs with no restrictions, modern design and the best experience.
Last Seen Tumblr Blogs


Fun Fact
Hackers stole 65M passwords from Tumblr in 2013.
Text
Find the step-by-step guide to easily find your WordPress admin username and password from cPanel. Let’s get started & retrieve it!
#how to find wordpress username and password in cpanel#how to check wordpress username and password from cpanel#how to find wordpress admin username and password from cpanel#how to get wordpress username and password from cpanel#how to find database username and password in phpmyadmin cpanel
0 notes
Text
How Secure Is Your WordPress Website?
With over 40% of the web powered by WordPress, it’s no surprise that it's also a prime target for hackers and bots. While WordPress is a secure platform at its core, many websites become vulnerable due to poor practices, outdated plugins, or weak hosting setups. So, how secure is your WordPress website — really? Let’s dive into the key factors that affect WordPress security and how you can protect your site.
1. Are You Using Strong Login Credentials?
The easiest way for hackers to get in is through weak usernames and passwords. Avoid “admin” as a username and use a complex, unique password. Consider enabling two-factor authentication for an extra layer of protection.
2. Is Your WordPress Core Updated?
WordPress regularly releases updates that fix bugs and security vulnerabilities. If you're not updating your WordPress core, you're leaving the door open for attacks.
3. What About Plugins and Themes?
Outdated or poorly coded plugins are among the top reasons for WordPress site breaches. Always use plugins from trusted sources, update them regularly, and remove any that you’re not actively using.
4. Have You Installed a Security Plugin?
Tools like Wordfence, Sucuri, or iThemes Security can detect malware, block malicious IPs, and notify you of suspicious activity in real-time. These act as the first line of defense against threats.
5. Do You Have Regular Backups?
Backups won’t prevent attacks, but they can save your website in case one happens. Use plugins like UpdraftPlus or Jetpack Backup to schedule automated backups.
6. Is Your Hosting Provider Secure?
Not all hosting environments are equal. Choose a provider that offers SSL, firewall protection, malware scanning, and regular server updates.
7. Are You Using HTTPS?
If your website isn’t using an SSL certificate (HTTPS), both users and Google will flag it as untrustworthy. Most hosting providers now offer free SSL certificates — make sure yours is enabled.
8. File Permissions and Database Security
Set correct file permissions and secure your wp-config.php file. Also, regularly monitor your database and consider changing the default WordPress table prefix to make SQL injections harder.
9. Monitor User Activity
If multiple users access your dashboard, use a plugin to monitor and log activity. This helps you catch suspicious behavior before it becomes a serious issue.
10. Avoid Nulled Themes and Plugins
Tempted to download a premium plugin for free? Don’t. Nulled software often contains hidden malware that compromises your entire website.
Final Thoughts
Securing your WordPress website isn’t just about installing a few plugins — it’s about adopting a proactive, layered approach to safety. If you’re unsure whether your site is truly secure or need professional help hardening it, a WordPress Development Company in Udaipur can perform a full security audit and implement best practices tailored to your needs.
0 notes
Text

How to Set Up Your Local Development Environment for WordPress
Setting up a local development environment is one of the best ways to experiment with and build WordPress websites efficiently. It offers you a safe space to test themes, plugins, and updates before applying changes to a live site. Whether you’re a beginner or an experienced developer, having a local environment is essential in streamlining your workflow and minimizing website downtime.
Before we dive into the technical steps, it’s worth mentioning the benefits of WordPress for your business website. WordPress offers unmatched flexibility, scalability, and user-friendliness, making it an ideal platform for businesses of all sizes. When paired with a solid local development setup, WordPress becomes even more powerful in enabling fast and secure site builds.
Step 1: Choose Your Local Development Tool
There are several local development tools available that cater specifically to WordPress users:
Local by Flywheel (now Local WP): Extremely beginner-friendly with features like SSL support and one-click WordPress installs.
XAMPP: A more general-purpose tool offering Apache, MySQL, PHP, and Perl support.
MAMP: Ideal for macOS users.
DevKinsta: Built by Kinsta, it offers seamless WordPress development and staging capabilities.
Choose the one that suits your OS and comfort level.
Step 2: Install WordPress Locally
Once you’ve chosen your tool:
Install the software and launch it.
Create a new WordPress site through the interface.
Set up your site name, username, password, and email.
After setup, you’ll get access to your WordPress dashboard locally, allowing you to install themes, plugins, and begin your customizations.
Step 3: Configure Your Development Environment
To ensure an efficient workflow, consider these configurations:
Enable Debug Mode: Helps in identifying PHP errors.
Use Version Control (e.g., Git): Keeps your changes tracked and manageable.
Database Access: Tools like phpMyAdmin help manage your WordPress database locally.
If your project requires dynamic functionality, leveraging PHP Development Services during the setup phase can ensure custom features are implemented correctly from the beginning.
Step 4: Customize Themes and Plugins Safely
With your local environment set up, now's the time to begin theme development or customization. You can safely create or modify a child theme, experiment with new plugins, and write custom code without any risk of affecting your live site.
For those unfamiliar with theme structures or WordPress standards, it’s often wise to hire a professional WordPress developer who understands best practices and can ensure clean, maintainable code.
Step 5: Syncing to a Live Server
After building and testing your site locally, you'll eventually want to push it live. Popular methods include:
Using a plugin like Duplicator or All-in-One WP Migration
Manual migration via FTP and phpMyAdmin
Using version-controlled deployment tools
Syncing should always be done carefully to avoid overwriting crucial data. Regular backups and testing are essential.
Step 6: Maintain Your WordPress Site Post-Launch
Launching your website is only the beginning. Ongoing updates, security patches, and performance optimization are critical for long-term success. Enlisting website maintenance services ensures your site remains fast, secure, and up-to-date.
Services can include:
Core, plugin, and theme updates
Malware scans and security hardening
Site performance monitoring
Regular backups
Final Thoughts
A local WordPress development environment not only speeds up your development process but also protects your live website from unintended changes and errors. With tools and strategies now more accessible than ever, there's no reason not to use one.From learning the basics to running advanced builds, setting up locally gives you the confidence and space to grow your WordPress skills. And if you want to see real-world examples or follow along with tips and tricks I share, feel free to check out my work on Instagram for practical inspiration.
0 notes
Text
13 Routine Maintenance Tasks that You Should Do on WordPress and WooCommerce

Maintaining a WooCommerce store is a lot of work. There are a lot of routine maintenance tasks for WordPress and WooCommerce that need to be done on a regular basis. In this post, we list down the most important tasks that you should do on your WooCommerce store.
1. Create Regular Website Backups

2. Update WordPress, WooCommerce, Themes and Plugins
Updating all elements of your WooCommerce store should be done on a regular basis. Do this weekly if you have the time. If not, monthly updates are good enough. Updates include updating WordPress Core, themes, WooCommerce and all other installed plugins. Remember to backup up your site before proceeding with updates since updates could cause your website to break. If you have a development site, it would be best to test the updates first on this staging environment. Then, do some user testing to make sure that there are no errors.
After that, you can proceed to update your live site. When that’s done, you will need to do another round of testing. Some important elements to test include checkout, add to cart, contact form emails, opt-in forms and other customizations that were done on the site.
3. Update WooCommerce Template Files
After updating WooCommerce, you will sometimes get an error notifying you of outdated WooCommerce template files. This just means that your theme has not updated to include the latest WooCommerce template files. In some cases, this could cause some formatting issues on your store. If there are no errors on your store, you can simply wait for your theme to release an update that includes the most recent template files. Or you can also fix this manually by following the steps in this documentation from WooCommerce.
4. Change User Passwords
It is important to use strong passwords. However, it is just as important to change passwords on a regular basis. There are times when security breaches can go undetected for a long time. Changing your password regularly blocks out these security breaches that you might not realize are there. You should change your password for WordPress admin, FTP, database and cPanel. And a pro-tip, never use “admin” as your username. This is the first username that hackers try out when brute forcing into websites.
5. Optimize Your Product Images
We’ve always emphasized the importance of optimizing images for your WooCommerce store to keep your site running fast.
If you have uploaded any product image that is more than 100KB in size, it might be a good idea to replace that image with an optimized product image. To learn more, you can check out our blog post on how to optimize images.
6. Approve and Respond to Product Reviews

7. Approve and Respond to Blog Comments
If you have a blog that is made to drive customer engagement, then your blog will most likely attract comments. Same with product reviews; don’t delete the negative comments. Rather, address them positively. Remove any spam comments as this will negatively impact the user experience of your blog. If you are using Akismet: Anti Spam plugin, this will block out most spam comments. However, some spam comments can still get through and you will need to manage them manually.
8. Test Your Contact Forms and Email Opt-in Forms
Every now and then, you will need to make sure that your contact forms and email opt-in forms are working. Just fill in your forms and send. If you receive it in your email, then you’re all good. But if you don’t, there’s something wrong and you need to do something about it. Have your developer look into it.
9. Optimize Your Database
Over time, your database accumulates a lot of gunk and you need to clean it to make sure your website runs fast. Before you go about this task, make sure you create a backup. You can choose to clean your database manually if you are comfortable and familiar with working on your database. Otherwise, you can use a plugin to do the optimizations for you. Notable plugins include WP-DBManager and WP-Optimize. You can check out our guide on how to clean your database.
10. Test Your WooCommerce Store’s Speed
If you have not yet made optimizations to your WooCommerce store’s speed, you should consider doing it now. Site speed has become increasingly important for WooCommerce store owners. Google now considers site speed as a ranking factor for SEO. Also, if you have a slow site, this will negatively impact the customer’s experience on your site. It is easy for your customers to buy instead from your competitors. You can test your site speed on Google’s Page Speed test and Google will provide you with recommendations on how you can improve your site’s speed. Other notable tools that you can use to test your site are Pingdom Website Speed Test and GTmetrix.
11. Scan Your Site for Malware
One way to keep on top of your website’s security is to regularly test your site for any malware. If you are connected to Google Search Console, it will let you know if malware is detected on your site. If your site has been found to have any form of malware, Google Chrome will actually alert your visitors that your site is dangerous. This can have devastating effects on your traffic and conversion rate.
No one will want to enter their payment information on a site that has malware. In extreme cases, Google may block your site from appearing in the Google search results page. You want to prevent this from happening. It would be best to invest on your site’s security by installing a security plugin such as Sucuri Security and WordFence. Even if you have those plugins installed, it is still a good idea to a manual scan. You can scan your website at Sucuri’s Website Malware and Security Scanner, or at SiteGuarding. If any manual scans detect anything malicious, you can contact your developer to fix the issue. You should get it fixed before Google applies any penalties. Wooassist also offers a security hardening service to improve the security of your site so you can prevent this from happening.
12. Fix Broken Links

13. Test Your Checkout Process
Last but definitely not the least; you should regularly test your checkout process. If you suddenly experience loss of sales, it’s a good idea to test your checkout. There might be an error that prevents your customers from checking out. Testing also gives you a feel of what your customers go through so you can optimize your checkout. Once you’ve determined that your checkout has problems, you can check out our post on how to fix the most common checkout problems in WooCommerce.
Final Notes
By doing these tasks on a regular basis, you can keep yourself on top of any issues that may occur on your WooCommerce store. If you find yourself overwhelmed by the all these, you can hire someone else to do it. You can also contact us and our team will be glad to assist with any of these tasks.
Are there any other routine maintenance tasks for WordPress and WooCommerce you think should be done on a regular basis? Do you have any suggestions? Let us know in the comments.
0 notes
Text
How Does WordPress Get Hacked?

WordPress, the popular content management system (CMS), powers millions of websites worldwide. Its user-friendly interface and extensive customization options make it a go-to choice for bloggers, businesses, and developers alike. However, its widespread usage also makes it a prime target for hackers. Understanding the various avenues through which WordPress can be compromised is crucial for safeguarding your website's security.
Outdated Software: One of the most common reasons WordPress sites get hacked is due to outdated software. This includes the WordPress core, plugins, and themes. Hackers actively scan the internet for websites running on outdated versions, as these are more likely to have known vulnerabilities that can be exploited.
Insecure Plugins and Themes: While plugins and themes extend the functionality and design of WordPress sites, they can also introduce security risks. Hackers often target poorly coded or unmaintained plugins and themes, exploiting vulnerabilities to gain unauthorized access to websites. It's essential to only install plugins and themes from reputable sources and keep them updated regularly.
Weak Passwords: Weak passwords are like an open invitation to hackers. Many WordPress users still use easily guessable passwords like "password123" or "admin," making it effortless for hackers to brute-force their way into a website's admin panel. Using strong, unique passwords for both the WordPress admin account and hosting account is critical for securing your site.
Inadequate Hosting Security: The security of your WordPress site is only as strong as your hosting provider's infrastructure. Shared hosting environments, in particular, can pose security risks if other sites on the same server are compromised. Opting for reputable hosting providers that prioritize security measures can help mitigate these risks.
SQL Injection: SQL injection attacks involve exploiting vulnerabilities in web applications that use SQL databases. Hackers inject malicious SQL code into input fields, manipulating database queries to extract sensitive information or gain unauthorized access. WordPress sites using poorly sanitized inputs are susceptible to SQL injection attacks.
Cross-Site Scripting (XSS): Cross-site scripting is another prevalent attack vector for WordPress sites. Hackers inject malicious JavaScript code into web pages viewed by other users, leading to cookie theft, session hijacking, or the defacement of websites. XSS vulnerabilities can exist in themes, plugins, or even the WordPress core.
Brute Force Attacks: In a brute force attack, hackers use automated scripts to systematically guess usernames and passwords until they find the correct combination. WordPress sites with weak or easily guessable passwords are particularly vulnerable to these types of attacks. Implementing measures like limiting login attempts and using two-factor authentication can help mitigate this risk.
File Inclusion Exploits: File inclusion exploits involve tricking a web application into including files from an external source. Hackers can exploit this vulnerability to execute malicious code on a website's server, leading to unauthorized access or the manipulation of website content.
In conclusion, WordPress websites can be hacked through various avenues, including outdated software, insecure plugins and themes, weak passwords, inadequate hosting security, SQL injection, cross-site scripting, brute force attacks, and file inclusion exploits. To protect your WordPress site from these threats, it's crucial to stay vigilant, keep your software updated, use strong passwords, choose reputable plugins and themes, and opt for secure hosting environments. Additionally, implementing security measures like firewalls, malware scanning, and regular backups can further enhance your website's defenses against potential cyber attacks.
This article provides a comprehensive overview of the different ways WordPress sites can be hacked, catering to a social bookmarking audience interested in website security and WordPress vulnerabilities.
0 notes
Text
Use Laravel’s Illuminate Database Query Builder With WordPress
I’ve been working on Smolblog, a social web blogging app. To help me get to a minimally viable product sooner, I’ve been building it on top of WordPress. However, WordPress is built exclusively for the MySQL database, and I eventually want Smolblog to work with many different databases, especially SQLite. This means, for my own code, I need to abstract the database away.
The first pass I had at this was to simply have Query objects and services to handle those. This would effectively abstract away the entire data layer, making it completely system-agnostic. It wouldn’t even need to be a traditional database. But as I built this system out, I was making more and more assumptions about what the database and data code would look like. And while the database code was all abstracted away, I still had to write it. A lot of it. And every line I wrote using $wpdb was another line I’d have to rewrite someday.
I’ve been looking at other frameworks to use, and Laravel is by far the strongest contender. Their approach to dependency injection and services seems to line up well with how I’ve organically built Smolblog to this point. So when I found out that their database abstraction layer also included a way to use the library without taking on the entire Laravel framework, I decided to make “someday” today.
Prerequisites
Composer: While you can use this library without using Composer, it’s very much not recommended. That being said, if you’re using this in a plugin for general use or otherwise don’t have control over your entire WordPress environment, be sure to use Mozart or some other tool to isolate the namespaces of your dependencies.
Populated database constants: Some of the more modern WordPress setups use a connection string or other way to connect to MySQL. I didn’t find a way to get that information out of the $wpdb constant, so this code relies on having DB_HOST and other constants from wp-config.php defined.
PDO::MySQL: Illuminate DB uses PDO to handle databases, so you’ll need to make sure your PHP server has the PDO::MySQL extension installed. I’m using the official PHP image, so I needed to add these two lines to my Dockerfile:
RUN docker-php-ext-install pdo_mysql RUN docker-php-ext-enable pdo_mysql
Step 1: Dependency Injection
We’re going to use dependency injection to separate creating the database connection from using the database connection. This way the database connection can change without as much code changing.
The documentation for Laravel’s query builder involves calling their DB facade, a global class that calls a singleton instance. Digging through the documentation and code, it looks like the underlying class conforms to the Illuminate\Database\ConnectionInterface interface. So that’s what we’ll use in our service’s constructor:
use Illuminate\Database\ConnectionInterface; class ContentEventStream implements Listener { public function __construct( private ConnectionInterface $db, ) { } }
Inside the service, we’ll follow the documentation, replacing any use of the DB facade with our $db object:
$this->db->table('content_events')->insert(['column' => 'value']);
Step 2: Connection Factory
Now that we know what we need, we need to create it.
The README for the Illuminate Database package has good starting instructions. We’ll combine those with data from wp-config.php and $wpdb:
use Illuminate\Database\Capsule\Manager; use Illuminate\Database\ConnectionInterface; function getLaravelConnection(): ConnectionInterface { global $wpdb; $capsule = new Manager(); $capsule->addConnection( [ 'driver' => 'mysql', 'host' => DB_HOST, 'database' => DB_NAME, 'username' => DB_USER, 'password' => DB_PASSWORD, 'charset' => DB_CHARSET, 'prefix' => $wpdb->prefix, ] ); return $capsule->getConnection(); }
(As mentioned, we’re pulling the connection information straight from configuration. If you know how to get it from $wpdb, let me know!)
The prefix property on the connection works much the same way as WordPress' table prefix. Since we’re using the connection object to also build our queries, it will add the prefix to our queries automatically. Using this property will also use the correct tables for blogs in multisite, so data from one blog doesn’t leak into another.
For Smolblog, I only want one set of tables regardless of multisite. I also want to prefix the Smolblog-specific tables, mostly so they’re all in one place when I’m scrolling. So my prefix property looks like this:
$capsule->addConnection( [ // ... 'prefix' => $wpdb->base_prefix . 'sb_', ] );
Because I don’t want a global object or the Eloquent ORM, I can ignore the rest of the setup from the project README.
Finally, we’ll want to store this created object somewhere central. Smolblog uses a simple dependency injection container, so we’ll store it there. The first time a service that needs a database connection is created, the container will run this function and provide the object.
(Honestly, the container probably deserves a blog post of its own; you can look at the source code in the meantime.)
Step 3: Update the Schema
We have our code to build queries. We have our connection to the database. The only thing we need now is the actual tables for the database.
Here is where we can use WordPress to its full extent. We will be using the dbDelta function in particular. This will tie into WordPress' existing system for updating the database structure alongside WordPress itself.
Some plugins tie this migration code to an activation hook, but we want to be able to modify the tables even after the plugin is activated. So our process will look like this:
Loop through the different tables we will need.
Check the blog options for a schema version.
If the version matches what we have in code, we’re up-to-date. Skip to the next table.
Pass the new table schema to dbDelta and let it do its thing.
Save the schema version to blog options.
Rinse and repeat for each table.
At this point, I should bring up some of the caveats with the dbDelta function. The comments on the WordPress documentation are invaluable here, especially as they point out a few things that need to be consistent with our schemas.
Because there’s so many things that need to be consistent, we’ll isolate the unique parts of our table schemas to two things:
A name. Because every table needs one. We will declare it without the prefix.
The fields excluding the primary key. We can have UNIQUE indexes on other fields for a similar effect, but every table will have an auto-incrementing id field.
A series of values keyed to short strings? That sounds like an array! Here’s part of what Smolblog’s schema array looks like:
class DatabaseHelper { public const SCHEMA = [ 'content_events' => <<<EOF event_uuid varchar(40) NOT NULL UNIQUE, event_time varchar(30) NOT NULL, content_uuid varchar(40) NOT NULL, site_uuid varchar(40) NOT NULL, user_uuid varchar(40) NOT NULL, event_type varchar(255) NOT NULL, payload text, EOF, 'notes' => <<<EOF content_uuid varchar(40) NOT NULL UNIQUE, markdown text NOT NULL, html text, EOF, ]; public static function update_schema(): void { foreach ( self::SCHEMA as $table => $fields ) { self::table_delta( $table, $fields ); } } //... }
A brief aside: Smolblog uses UUIDs for its unique identifiers, and they’re stored here as full strings in fields ending with _uuid. I ran into trouble storing them as bytes, and something in WordPress would frequently mess with my queries when I had fields named things like user_id and site_id. I’m noting this here in case you run into the same things I did.
When WordPress loads the plugin, it will call the update_schema function declared here. That function loops through the array, extracts the table name and fields, and passes them to this function:
public static function table_delta( string $table, string $fields ): void { global $wpdb; $table_name = $wpdb->base_prefix . 'sb_' . $table; $charset_collate = $wpdb->get_charset_collate(); $sql = "CREATE TABLE $table_name ( id bigint(20) NOT NULL AUTO_INCREMENT, $fields PRIMARY KEY (id) ) $charset_collate;"; if ( md5( $sql ) === get_option( $table . '_schemaver', '' ) ) { return; } require_once ABSPATH . 'wp-admin/includes/upgrade.php'; dbDelta( $sql ); update_option( $table . '_schemaver', md5( $sql ) ); }
This function takes care of the boilerplate we talked about earlier and runs the steps:
It creates the table name using the same pattern as before: the base prefix plus sb_.
It creates a CREATE TABLE SQL statement using the table name and fields. (It’s okay to build a SQL query this way because all of the data is coming from constants inside the PHP file; none of it is coming from form data or other untrusted sources.)
It takes the MD5 hash of the SQL statement and compares that to the saved option for this table. The hash will change when the code changes, so this is a quick way to keep our code and database in-sync.
If the database needs to be updated, it requires the correct file from WordPress Core and runs the dbDelta function.
Finally, it saves the MD5 hash to the blog options so we know what version the database is on.
By calculating the version using the hash of the actual SQL, we don’t have to worry about whether some other version number has been updated. This may or may not be the approach you want to take in a production application, but it has proven very useful in development. This is the same idea as using the filemtime function as the “version number” of static CSS and JavaScript in your theme.
So there we have it. We’ve used the connection information in WordPress to hook up a Laravel database connection. And at some point in the future, it’ll be that much easier to let Smolblog work with SQLite which will in turn let Smolblog work on even more web hosts. And you can use this to do whatever you want! Maybe you just wanted to transfer some skills from Laravel to WordPress. Maybe you’re just in it for the academic challenge.
One thing you can do with this is unit-test your services using an in-memory SQLite database… and I’ll leave you with that.
final class DatabaseServiceUnitTest extends \PHPUnit\Framework\TestCase { private \Illuminate\Database\Connection $db; private DatabaseService $subject; protected function setUp(): void { $manager = new \Illuminate\Database\Capsule\Manager(); $manager->addConnection([ 'driver' => 'sqlite', 'database' => ':memory:', 'prefix' => '', ]); $manager->getConnection()->getSchemaBuilder()->create( 'content_events', function(\Illuminate\Database\Schema\Blueprint $table) { $table->uuid('event_uuid')->primary(); $table->dateTimeTz('event_time'); $table->text('payload'); } ); $this->db = $manager->getConnection(); $this->subject = new DatabaseService(db: $this->db); } public function testItPersistsAContentEvent() { $event = new class() extends ContentEvent { public function __construct() { parent::__construct( id: Identifier::fromString('8289a96d-e8c7-4c6a-8d6e-143436c59ec2'), timestamp: new \DateTimeImmutable('2022-02-22 02:02:02+00:00'), ); } public function getPayload(): array { return ['one' => 'two', 'three' => 'four']; } }; $this->subject->onContentEvent($event); $expected = [ 'event_uuid' => '8289a96d-e8c7-4c6a-8d6e-143436c59ec2', 'event_time' => '2022-02-22T02:02:02.000+00:00', 'payload' => '{"one":"two","three":"four"}', ]; $this->assertEquals((object)$expected, $table->first()); $this->assertEquals(1, $table->count()); } }
1 note
·
View note
Text
How to Change Your WordPress Password [ A Guide ]
How to Change Your WordPress Password [ A Guide ]
It is very much common for WordPress users to ask how to change their password. If for any reason you are one of these WordPress users, you are very much welcome. In this article, you’ll get a complete and comprehensive guide on How to Change Your WordPress Password. However, before going further, it is important to highlight some important points just so you can understand this guide. First, you…

View On WordPress
#how to change local wordpress password#how to change wordpress admin password#how to change wordpress password in cpanel#how to find wordpress username and password#how to get wordpress username and password from database#wordpress reset admin password#wordpress reset password function
0 notes
Text
How to Improve the Security of a Linux VPS

A true disruptor in the hosting industry, Linux VPS gives consumers access to the power, performance, and storage of a mini-dedicated server for only a small premium over shared hosting. Customers are able to accomplish more with improved efficiency and dependability at the same time. However, a VPS must be kept secure just like any other hosting option. For those who are unfamiliar with this crucial aspect of Linux VPS administration, here are some useful security tips to keep your virtual server safe.
1 - Use a reliable firewall
A strong and well-designed firewall should be a key component of your security arsenal. As its name implies, its function is to protect your server from online cybersecurity threats. Intruders, malware, and other dangerous network traffic will be identified and blocked, keeping them from accessing your VPS many business listings.
2 - Keep root login threats at bay
The advanced technologies used by cybercriminals to guess usernames and passwords. The task of the hacker is made so much easier when users utilise default usernames that are widely known, which would leave your VPS highly vulnerable. Since the default username for Linux VPS is "root," it is crucial to replace all admin-level usernames to something a little more difficult to guess. Additionally, for added security, disable the "root" login entirely.
3 - Obtain an operating system update
If a Linux OS is found to have a security flaw, developers will start working to repair it right away. The OS will no longer be vulnerable after installing the fix, which will be released as an update or security patch. These quick responses from developers are what make Linux such a secure and well-regarded operating system. The drawback is that these security weaknesses continue to exist if a Linux user neglects to maintain their operating system updated. Cybercriminals specifically scan the internet for these vulnerable servers using cunning bots, and once they find them, they launch an attack on them.
The best defense against these attacks is to upgrade your operating system as soon as a new update or patch is available.
4 - Put auto-updates in place
Not just operating systems but all software might be vulnerable. Therefore, updating all of your apps is equally crucial. It could be simpler to say than to actually perform this manually. Even if you merely manage a website, you still need to keep your website software, such as WordPress or Magneto, updated in addition to any additional themes, plugins, or add-ons that you may use. Setting up auto-updates to occur automatically without your involvement is a simple method to lessen the risk. Depending on the website software you are using, you may be able to do this via your control panel or through a number of alternative methods. It's also preferable to remove any outdated plugins or themes for extra security business listings.
5 - Put two-factor authentication to use
In an age where hackers, equipped with Digital hacking tools and databases of hijacked login credentials, can quickly crack them, relying just on robust username and password combinations is no longer appropriate. By requiring the user to enter a code that is typically emailed to their phone or created by an app on their phone, two-factor authentication adds an extra layer of protection to the login process. This means that a hacker cannot utilise brute force assaults to get access if they do not have the user's phone in their possession.
6 - Ensure you backup
A backup might mean the difference between a firm surviving or failing. It is not a defense against cyberattacks but a necessity for protection from the tragedy that an attack brings. Having a backup is your sole option for swiftly returning to the internet if malware or hackers destroys your software, files, and data. Without it, re-establishing everything from scratch might take months and some data would be lost forever free business listings.
A solid backup system will give you the freedom to backup anything you need, schedule backups to occur automatically at the intervals you desire, encrypt backups for security, and, most critically, test their integrity to ensure they will function if you need them.
While your VPS will boost the storage, power, and performance of your hosting, it still needs to be safeguarded from the sophisticated cyberattacks of today. Hopefully, these pointers will enable you to strengthen the security of your Linux VPS.
2 notes
·
View notes
Text
What is the best WordPress hosting site?

At first glance, it may seem easy to choose the best. Although, in reality, it’s a quite frustrating process when you don’t have pointers that could help you decide what is the best choice for you. So, let’s get straight into it. The first thing to check is if the host, which you’re considering to use, meets recommended requirements for WordPress support: · PHP 7.3+. In this case, I would recommend PHP 7.4. WordPress websites present faster execution times and less memory usage when using PHP 7.4, compared with previous versions. Just make sure that your WordPress theme and plugins are updated for the recent release. Also, it’s worth mentioning that PHP 7.4 comes with many other exciting features. · MySQL 5.6+ or MariaDB 10.1+. Make sure that your potential host uses a secure and high-performing relational database management system (RDBMS). An industry-standard like MySQL or MariaDB with its cutting edge features like GIS support should do the trick. · HTTPS support (SSL/TLS). HTTPS is a secure extension of HTTP. Websites that install and configure an SSL/TLS certificate can use the HTTPS protocol to establish a secure connection with the server. The goal of SSL/TLS is to make it safe and secure to transmit sensitive information, including personal data, payment, or login information. SSL/TLS is a must whenever confidential information such as usernames and passwords or payment processing information is being transferred. · LiteSpeed web servers (LSWS). I would definitely recommend this, although it isn’t a requirement. LSWS increases the performance and scalability of web hosting platforms through its event-driven architecture. So, it has the capability of serving thousands of clients simultaneously with minimum usage of server resources such as memory and CPU. To put a cherry on top - WordPress has the LiteSpeed Cache plugin developed by LiteSpeed engineers. It vastly improves the loading speed of your website. Since many of the hosts meet these recommended requirements, it shouldn’t be hard for you to find an attractive web host. After you’ve done that, there are other things to check: · Price. Keep in mind that you don’t need to choose the most expensive hosting or plan to get the best quality. There are hosting providers that are perfect for WordPress hosting, and for a simple website that doesn’t require many resources, you can get a deal from $2.95/month. So, your budget doesn’t have to be huge! · Uptime. One of the most influential aspects when choosing a web host. What you should settle for is a host with an uptime of at least 99.9%.
Here is a step-by-step guide on how to create a blog or website with Bluehost.
· Support. From time to time, things get complicated or confusing. In this case, hosting providers have customer support agents who do their best to help you out. What you should look for is if they provide 24/7 live chat support. I believe that this kind of support is the most effective when solving technical problems. Sharing structured, easy-to-read instructions, making it easy for a client to follow, even without much technical knowledge. · Easy WordPress installation. If you’re merely a beginner, using a CMS could be overwhelming. So, it’s a bonus if a hosting provider offers a WordPress auto-installer. Just fill the required fields and click “Install”! · WordPress tutorials. Some web hosts got your back on that part - many WordPress and web hosting-related tutorials. Not a must but a good thing to have within a hand’s reach. The last thing left to do is to choose the right plan for your website. It isn’t too hard of a task when you know what each plan is best used for: · Shared hosting. The most popular type of hosting. It isn’t the best option for websites receiving lots of traffic but a really excellent and cheap choice for blogging and small businesses. · VPS hosting. With Virtual Private Server (VPS) you get dedicated server space, so it’s a more secure and stable solution than shared hosting. However, it’s smaller-scale and cheaper than renting an entire server. Perfect for high-traffic blogs and established websites. · Cloud hosting. This type of hosting uses multiple different servers to balance the load and maximize uptime. This means that if one server fails, another kicks in to keep everything running. The main benefits of cloud hosting include a significant focus on uptime, isolated resources, easy scaling, and a dedicated IP address. If a website is mission-critical, meaning that the company can’t function without it, then cloud hosting is a good idea. It’s also chosen by many e-commerce stores, lead generation sites, corporate websites, and high-traffic projects. In the end, it all comes to many choices when trying to discover the best. As you can see, there are numerous things to consider, but it’s well worth it to dedicate time for some research and make sure that your website is in the care of the most significant web hosting company you could find. Hopefully, this answer will aid you in finding the best fit for your project. Bluehost is recommended by WordPress.
1 note
·
View note
Video
youtube
How to Install Wordpress With Nginx on Debian 10 VPS
This video shows you how to install WordPress with Nginx on Debian 10 VPS.
============================== INITIAL SERVER SETUP DEBAIN 10 ============================== Login to Server: ssh root@your_server_ip
apt update -y && apt upgrade -y
adduser debian
usermod -a -G sudo debian
Configure SSH : nano /etc/ssh/sshd_config
Add and change the information: Port 22500 Protocol 2 PermitRootLogin no
Add to End of File : UseDNS no AllowUsers debian
Save and Close
Restart SSH service: systemctl restart ssh.service
Logout:
Ctrl+D
Login using user with sudo privilages: ssh -p 22500 user@ip_address
============================== INSTALL NGINX, PHP AND MARIADB ============================== Install Nginx, MariaDB, PHP, and other PHP modules : sudo apt install nginx mariadb-server mariadb-client php-cgi php-common php-fpm php-pear php-mbstring php-zip php-net-socket php-gd php-xml-util php-gettext php-mysql php-bcmath unzip wget git curl -y
Open the php.ini file: sudo nano /etc/php/7.3/fpm/php.ini
Make the following changes: post_max_size = 64M memory_limit = 256M max_execution_time = 300 upload_max_filesize = 32M date.timezone = America/Chicago //optional
Save and Close : Ctrl O+X
Restart PHP-FPM service: sudo systemctl restart php7.3-fpm.service
============================== CONFIGURE NGINX FOR WORDPRESS ============================== Create root directory: sudo mkdir /var/www/domain
sudo nano /etc/nginx/sites-available/domain.name
------------------------------ server { listen 80; root /var/www/linuxscoop.cc; index index.php; server_name domain.name www.domain.name;
access_log /var/log/nginx/domain.name_access.log; error_log /var/log/nginx/domain.name_error.log;
client_max_body_size 64M; location = /favicon.ico { log_not_found off; access_log off; }
location = /robots.txt { allow all; log_not_found off; access_log off; }
location / { try_files $uri $uri/ /index.php?$args; }
location ~ \.php$ { try_files $uri =404; include /etc/nginx/fastcgi_params; fastcgi_read_timeout 3600s; fastcgi_buffer_size 128k; fastcgi_buffers 4 128k; fastcgi_param SCRIPT_FILENAME $document_root$fastcgi_script_name; fastcgi_pass unix:/run/php/php7.3-fpm.sock; fastcgi_index index.php; } location ~* \.(js|css|png|jpg|jpeg|gif|ico|svg)$ { expires max; log_not_found off; } } ------------------------------ sudo nginx -t sudo ln -s /etc/nginx/sites-available/domain.name.conf /etc/nginx/sites-enabled/ sudo systemctl restart nginx.service sudo systemctl restart php7.3-fpm.service
============================== CONFIGURE A WORDPRESS DATABASE ============================== sudo mysql_secure_installation
mysql -u root -p
CREATE DATABASE dbwordpress DEFAULT CHARACTER SET utf8 COLLATE utf8_unicode_ci;
GRANT ALL ON dbwordpress.* TO 'wpuser'@'localhost' IDENTIFIED BY '5tR0n6p@s5WorD';
FLUSH PRIVILEGES;
EXIT;
============================== INSTALL WORDPRESS ============================== cd /tmp wget https://wordpress.org/latest.tar.gz tar -xvzf latest.tar.gz cd wordpress cp /tmp/wordpress/wp-config-sample.php /tmp/wordpress/wp-config.php sudo cp -av wordpress/. /var/www/domain/
WordPress secret key generator : curl -s https://api.wordpress.org/secret-key/1.1/salt/ ------------------------------ define('AUTH_KEY', '|V^%QD3_3G*Q7oaQRYtC).`CRE2c(pOf rR9D8|%G-y~=AmGH.bhf.vYJ1j~-wQR'); define('SECURE_AUTH_KEY', '_Wa.<dawj6|+w0%0:K3D<0;+d,|]H7-oea,CVT_(2ha~+N(&7d+] ${-RA#^S9o<'); define('LOGGED_IN_KEY', 'hQH<I^d3G20Lp,ep%>f}m#beM9|vL&Yxt5iJwK4qlK25Qe#_+Np4Su?WZzQ~)+@R'); define('NONCE_KEY', ')b(/p}n{+BR=<| ^Hs=7G<A?Q9C?X=}fnR2x8r)U-V;|-|A4G:zV58pxicLd~G%/'); define('AUTH_SALT', 'HLJl6K5b4uGPsb^ev?E!Qi<4_0PD[z/|.CNx+cM8 O-&Qe l(tQ_j#@ellU)kd +'); define('SECURE_AUTH_SALT', 'sw1uE~TgH5~gYK23kdvn_p.<yS,G{8_G^=.m)1Y2U+34vvQWK4}D[}} %K:w^tw='); define('LOGGED_IN_SALT', 'y1Yb 2xG;yHgN*&*L|i2{mrfdGmPX2.E|l=U%gekC$x@G;dxTIL|-cw]zJZv{- <'); define('NONCE_SALT', '.coEf^|KY.|$`>MmuW5H(bEFY&_*r4Jky(Dh?,M6V)`!867aG~9-V+ESJK}rq9`8'); ------------------------------ sudo nano /var/www/linuxscoop/wp-config.php ------------------------------ // ** MySQL settings - You can get this info from your web host ** // /** The name of the database for WordPress */ define( 'DB_NAME', 'database_name' );
/** MySQL database username */ define( 'DB_USER', 'database_user' );
/** MySQL database password */ define( 'DB_PASSWORD', 'database_passsword' );
/** MySQL hostname */ define( 'DB_HOST', 'localhost' ); ------------------------------ sudo chown -Rv www-data:www-data /var/www/domain/
============================== INSTALL AND CONFIGURE LET'S ENCRYPT SSL CERTIFICATE ============================== sudo apt install python3-acme python3-certbot python3-mock python3-openssl python3-pkg-resources python3-pyparsing python3-zope.interface sudo apt install python3-certbot-nginx sudo certbot --nginx -d domain.name -d www.domain.name
Renew : sudo certbot renew --dry-run ============================== SETTING UP FIREWALL ============================== sudo apt install ufw sudo ufw enable sudo ufw app list sudo ufw allow 22500/tcp comment 'Open port ssh tcp port 22500' sudo ufw allow 80 sudo ufw allow 443 sudo ufw status
============================== COMPLETE WORDPRESS SETUP ============================== Install wordpress through Web Browser
5 notes
·
View notes
Text
How to Set Up a Local Server on Mac for Beginners #NotADeveloper #WordPress
Let’s start by inserting a disclaimer, I am not a developer or coder in any way. I am not “tech savvy” or futuristic. I can work a computer enough to get online and manage my daily tasks or watch youtube videos. Oh ,and of course email. But l wanted to learn more about what Landon and Cliff do, to enter their world and understand their nerd talk. So they walked me through setting up a local server running WordPress on my mac laptop, and I took notes. Stay tuned for more blogs to come, including setting up divi builder (the fun stuff)! It was difficult to understand at some points, and others straight up made no sense, but alas! We made it through and I am here to share that experience. Sharing it with the hope that someone out there like me, can find this useful and motivating. Or the rest of you smarties find it amusing!
First things first, download WordPress. This is a commonly used CMS or content management system where you can login in to your site and make changes etc.

Once you download WordPress, you will want to move the file into your Sites Folder in Finder. (You can check for the download on your desktop or in Finder under downloads.) This is located in the Home folder. ( the one with the little house next to it.) If this folder does not yet exist, just right click and create a new one.

Once you add the WordPress download (drag and drop the folder here), you can rename if you’d like. Here in my test run, I named it “HairByKelseyAnn”. This can keep you more organized if you want to create multiple sites. (This will be talked about in another blog post to come. For now, let’s just stick with one!)

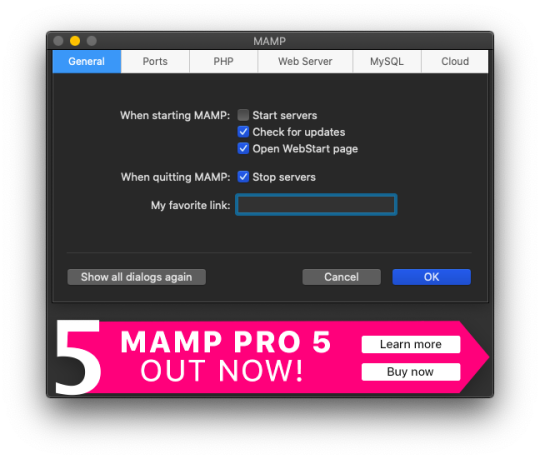
Next, download MAMP (”Stands for "Mac OS X, Apache, MySQL, and PHP." MAMP is a variation of the LAMP software package that can be installed on Mac OS X. It can be used to run a live web server from a Mac, but is most commonly used for web development and local testing purposes” Description from techterms.com) In this case, we are using it for testing purposes. You can download MAMP (I downloaded MAMP instead of MAMP pro because it’s free) Once you have that downloaded, open it up . If you are having trouble finding it, or any applications, hit command key (⌘) and the space bar at the same time. This will pull up a search bar so you can just type in MAMP and hit enter.

Once you have MAMP open, there are two ways to get to your preferences. You can either select MAMP in the top bar of your computer (next to the apple in the top left corner) or you can hit command key (⌘) and comma(,) at the same time. You will get a drop down like in the image below.
Select the Web Server tab, and this is where you make your document root to the folder you created. (Hit select and add the folder you created from your WordPress download.) This is basically creating a starting point for your localhost server so it knows what files to work from.
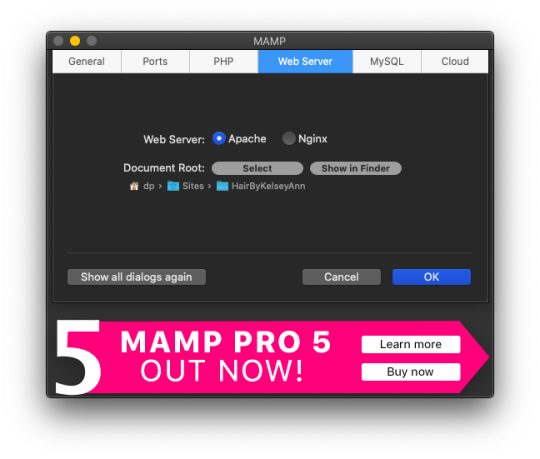
After you have your document root folder linked, click ok and it will bring you back to the “home screen”. At this point, you can click Start Servers.

Open a new tab or window, and go to- http://localhost:8888/phpMyAdmin From here you will click the database tab and create new. I chose to name my new DB the same name as the other folders I created. (This is where you create a custom database that WordPress will use. This is highly advanced and you should not find yourself here, beyond initial creation. )

After you have created your DB (DataBase), go to http://localhost:8888/ and follow through the WordPress setup. This is where you are setting up the foundation for your site.
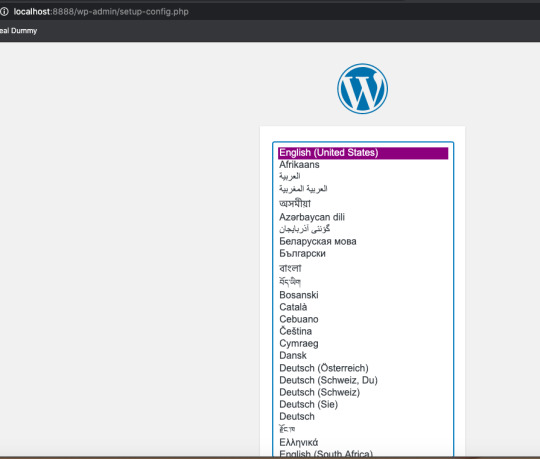
Once you get to this screen (see below) your DataBase Name should be the same as the DB name you previously created a local host file for. Username and Password set to “root” This is a general password for WordPress to login. This is not your personal account or information. Submit this, and on the next screen, click Run the Installation.

The next page will ask you for your Site name and username/ password. This is your personal information. Do Not Share! There is a checkbox asking if you want to discourage search engines ( Google, Yahoo, Bing, etc) from finding your site. You want to check this box because you are only trying to build your website on your computer (For now!). Launching your website to “go live” is separate documentation. This is for building your “rough draft” so you make sure your site is perfect before you let the world see it. After you submit this, you should have this screen.

At this point, you have set up a local server (YAY!) and created the skeleton of a WordPress website, on your computer. From here you can see my next blog post on how to customize and what your different sidebar tabs can do.
Setting up a local host on your computer gives you the ability to work on your website without being connected to the internet. The link below is how you can visualize your saved changes. (Refresh the page to see new changes made)
http://localhost:8888/
Below is the link to your WordPress dashboard. This is where you can start to mess around with themes and layouts. You can end here, or you can download the divi theme builder to really customize your site. Divi builder makes it easier to see the layout and customize as you’re looking at your site.
http://localhost:8888/wp-admin/index.php
Be sure to have your server turned on in MAMP to access your site!
I hope that you enjoyed this article and found it useful! Ideal Dummy is all about sharing knowledge and educating people on how to manage their websites. Or just computer knowledge in general! This is a tech savvy era, and we are here to help! So from one beginner to another, you can do it!
For more information, check out our website.
Written and Documented By: Kelsey Ann
#idealdummy#wordpress#computer#localhost#serversetup#localserver#software development#phpmyadmin#MAMP#macintosh#mac#database#website build#education#computer education#developers & startups#beginner#technology#kansascity
1 note
·
View note
Text
How to install wordpress – Complete wordpress tutorial

2 Things You Need Before Installing WordPress Before you installing WordPress, first you will need a domain name and second a good web hosting company. Most web hosting company provides shared space on a web server for less than $8-$10/monthly. Also many hosting company will install and maintain wordpress for you. Today, we highly recommend that you use BlueHost. Because they will give you a free domain as you like. And their hosting plan price start only $3.95/monthly. You will be happy and feel secure to hear that BlueHost is also an official recommended hosting company of wordress.

How to Install WordPress using Softaculous Softaculous is a most popular auto-installer script. Just a few clicks, you can easily install wordpress. The most popular BlueHost company use Softaculous in their control panel. Now just login to control panel account and look for WordPress icon (see below the image). You will get them under Softaculous apps installer section.

After clicking on wordpress icon you will see an overview of wordpress as like below the image. Now you need to click on the Install tab to continue the install process.

As protocol, you need to choose http:// or http://www. And if your site has SSL and HTTPS, then as protocol you have to select https:// or https://www. After that, you need to choose the domain name where you want to install WordPress. Most users want to install WordPress in their domain’s root directory, like example.com. In that case, you need to make sure that the ‘In Directory’ field is blank. (You will see ‘wp’ in directory filed as default)

Then down a little, you will see the site settings section. Under this section, first you need to fill a title and description of your site. If you don’t want yet, don’t worry you can easily change them from your wordpress admin area after installation. Next, you need to choose an admin username, strong password, and email address. Softaculous will automatically fill in the username and password fields for you. It will use a non-dictionary word for username and a strong password.

You can change them if you want so that they are easy to remember for you. However, we strongly suggest you to always use a strong password. Always you will use correct email address in the admin email field. Because wordpress will send notifications and password reset link if you ever forgot your password. Rest of the options are optional. So you can now click on the install button to run the installer.

Softaculous will run the installer using the settings you provided. You will see a progress bar with installation status. It will take a couple of minutes, do not close the window until the progress bar reaches 100% otherwise this may affect your wordpress installation. You will see a success message after the installation is finished. It will also show you a link to your website and another link to your wordpress admin area.

How to Install WordPress using FTP Just the five steps to install wordpress. Download the latest version of WordPress.Upload those files to your web server, using FTP or cpanel file manager.Create a MySQL database and user for WordPress.Configure WordPress to connect to the database that you created for you wp site.Complete the installation and setup your website! First thing you need to do is download the latest version of WordPress. Unzip the file, and use FTP to upload WordPress files into your web host directory of your choice.

If you want to install WordPress on your root domain name (like example.com), then you need to upload WordPress files to your website’s root directory. Usually this directory is called /public_html/. On the other hand, If you want to install WordPress in a subfolder (like example.com/myblog), then upload it in a folder /public_html/myblog/. Once you are done uploading WordPress, go to your hosting control panel to create a database. We are using cPanel web hosting, so you will find icon as like below screenshot.

You will see a field to create a new database. Enter your database name, and click “Create Database”.

Now that you have created your database, MySQL still needs a username MySQL Databases page in your cPanel account, down a little MySQL Users section. Simply provide a username and password for your new user and click on the ‘Create user’ button.

This new user still does not have access to the database you created earlier. For that you will need to add the user to the database and give them permissions to perform all actions. On the same MySQL Databases page in your cPanel account, down a little ‘Add User to a Database’ section. Select the database user you created from the dropdown menu next to user, then select database, and click on the add button.

You will be now asked for the privileges you want to allow this user. Select all privileges and click on the Make changes button.

Your MySQL database and user are now ready, and it is time to run the install. Now go to to the URL where you uploaded WordPress. If it is in the main domain, then enter your domain name in the browser window, like example.com or www. example.com. You will see the language selection page. You can choose a language and click on the continue button to procced.

You will now see some installation instructions. Wordpress will need database name, password, and mysql host information. Click on the ‘Let’s go’ button to continue.

Now wordpress will show you a database connection form. You need to enter the database name, user name, password and database host.

Then click on submit button.

Next you will see ‘Run the install’ page. So you have to click on ‘Run the Install’ button to continue. Now wordpress will create tables in your database and then send you to the next step of the installation. Then you need to fill some information for wordpress to setup your site. This includes site title, username, password, and admin email address. If you do not want your website to be visible to search engines, then you can check the box next to search engine visibility

Click on the Install wordpress button to continue. Wordpress will setup your website and finish the installation. You will see a success message showing your username. You can now click on the Log in button to sign in to your wordpress site.

Read the full article
1 note
·
View note
Text

Ananova technical experts recommend disabling access to wp-config. PHP to secure WordPress thus preventing unauthorized access. The file contains sensitive information like database credentials, configuration settings and security keys. The administrators can change table prefixes, relocate core WordPress file folders like wp-plugins, wp-uploads, and wp-content, and perform other advanced configurations.
<?php /** * The base configuration for WordPress * The wp-config.php creation script uses this file during the installation. * You don't have to use the web site, you can copy this file to "wp-config.php" * and fill in the values. * This file contains the following configurations: * * Database settings * * Secret keys * * Database table prefix * * ABSPATH * * @link https://wordpress.org/support/article/editing-wp-config-php/ * * @package WordPress */ // ** Database settings - You can get this info from your web host ** // /** The name of the database for WordPress */ define( 'DB_NAME', 'database_name_here' );
/** Database username */ define( 'DB_USER', 'username_here' );
/** Database password */ define( 'DB_PASSWORD', 'password_here' );
/** Database hostname */ define( 'DB_HOST', 'localhost' );
/** Database charset to use in creating database tables. */ define( 'DB_CHARSET', 'utf8' );
/** The database collate type. Don't change this if in doubt. */ define( 'DB_COLLATE', '' ); /**#@+ * Authentication unique keys and salts. * Change these to different unique phrases! You can generate these using the {@link https://api.wordpress.org/secret-key/1.1/salt/ WordPress.org secret-key service}. * You can change these at any point in time to invalidate all existing cookies. * This will force all users to have to log in again. * * @since 2.6.0 */ define( 'AUTH_KEY', 'put your unique phrase here' ); define( 'SECURE_AUTH_KEY', 'put your unique phrase here' ); define( 'LOGGED_IN_KEY', 'put your unique phrase here' ); define( 'NONCE_KEY', 'put your unique phrase here' ); define( 'AUTH_SALT', 'put your unique phrase here' ); define( 'SECURE_AUTH_SALT', 'put your unique phrase here' ); define( 'LOGGED_IN_SALT', 'put your unique phrase here' ); define( 'NONCE_SALT', 'put your unique phrase here' );
/**#@-*/ /** * WordPress database table prefix. * You can have multiple installations in one database if you give each a unique prefix. Only numbers, letters, and underscores please! */ $table_prefix = 'wp_'; /** * For developers: WordPress debugging mode. * Change this to true to enable the display of notices during development. * It is strongly recommended that plugin and theme developers use WP_DEBUG * in their development environments. * For information on other constants that can be used for debugging, * visit the documentation. * * @link https://wordpress.org/support/article/debugging-in-wordpress/ */ define( 'WP_DEBUG', false ); /* Add any custom values between this line and the "stop editing" line. */ /* That's all, stop editing! Happy publishing. */ /** Absolute path to the WordPress directory. */ if ( ! defined( 'ABSPATH' ) ) { define( 'ABSPATH', __DIR__ . '/' ); } /** Sets up WordPress vars and included files. */ require_once ABSPATH . 'wp-settings.php';
Courtesy: https://jetpack.com/blog/wp-config-php/
How To Disable Access to wp-config.php Using .htaccess
# to protect wp-config.php<Files wp-config.php>order allow,denydeny from all</Files>
Here “deny all” will deny everyone access to wp-config.php.
0 notes
Text
Wordpress localhost ampps alternative

#Wordpress localhost ampps alternative how to#
#Wordpress localhost ampps alternative install#
#Wordpress localhost ampps alternative update#
I had mega problems getting the XAMPP Server working locally, so I decided to try the WAMP. In “Step 5”, you say “With your browser go to Should this be: Thanks so much for your assistance! In “Step 4”, you say “…… the username is root, enter nothing between the ‘.’, and host……” What is the “enter nothing between the ‘…’ referring to? The password?ģ. In “Step 3″, you say ” Go to wamp / www”… This directory does not exist. (get “IE cannot display this webpage” error on this one. No luck on either front, as constant “The requested URL was not found on this server” errors.
#Wordpress localhost ampps alternative install#
Having endless problems with the install and have tried both Nicks and your directions. If you’re having a problem getting your WAMP or XAMPP server online, that’s a whole ‘nother issue, but check to make sure you’re not using IIS infact disable IIS if possible. Step5.)With your browser go to Hope that helps! New file structure will be wamp / Step4.)Unless you’ve changed the db username, password or host name then the db_name is whatever you created in Step 2, the username is root, enter nothing between the ‘.’, and host is localhost. Step 3.) Go to wamp / to a folder ( mysite) with only the content of the wordpress folder dumped directly into ( mysite). With WAMP installed (or XAMPP) your Step 3, 4 and 5 will look different then, our gracious host has suggested, with a MAMP install.
#Wordpress localhost ampps alternative how to#
In the next chapter, I’m going to show you how to create a custom WordPress theme in designer way (no PHP skill is required).įor anyone using WAMP (and possibly XAMPP, have not tested) who has any issues related to Step 3-5, here is your solution: With your browser, go to and follow the instructions to install WordPress.
#Wordpress localhost ampps alternative update#
Open wp-config.php and update the database details (db_name, user, password, host) according to your local server. In the folder, rename the wp-config-sample.php to wp-config.php. Go to the htdocs folder (where you installed the MAMP), extract the wordpress.zip to a new folder (eg. Go to and download the latest build of WordPress. In the phpMyAdmin page, create a new database (eg. Create a New DatabaseĪfter you’ve installed MAMP, run it and it should take you to the start page. I’m using Mac here, so I’m going to install MAMP. In order to run any PHP/database application on a local computer, you need a local host (ie. Run wp-admin/install.php and follow the instructions to install WordPress.īefore you start, let’s look at the requirements to run WordPress: Rename the wp-config-sample.php file to wp-config.php and update the database details according to your local server. Install a local server ( Mac: MAMP, PC: XAMPP or WAMP).ĭownload WordPress from and extract the files to a new folder under the htdocs folder. Here are the simplified steps on how to install WordPress on a local computer: If you have some technical background, you can skip the detailed steps in this tutorial. This tutorial is intended for beginners who want to learn how to run WordPress locally. You can also use the local version to test new plugins, themes, and upgrades. By doing so, it will save you time from updating and previewing files (so, you don’t have to frequently upload files on every change). In this chapter, you will learn how to install WordPress on a local computer. This is the first chapter of the Complete WordPress Theme Guide series.
0 notes
Text
This guide is intended to help you install and host your WordPress website using Caddy Web server. Caddy is an open-source, production-ready that is build to be fast, easy to use, and makes you more productive. Caddy is available for Windows, Mac, Linux, BSD, Solaris, and Android. You can also use some of the popular WordPress hosting platforms for your website hosting needs. If you don’t have Caddy Web server installed, use our guide Install Caddy web server on an Ubuntu 18.04 with Let’s Encrypt SSL to set it up. For Nginx users, see How to Setup WordPress Multisite Network with Nginx and Let’s Encrypt Once you have Caddy web server up and running, proceed to configure it for WordPress hosting: Using Caddy Web Server to host WordPress Website In this section, we will install and configure WordPress to be powered by Caddy web server. To run a WordPress website, you need PHP, Web server, and Database server sudo apt -y update sudo apt -y install php-fpm php-mysql php-curl php-gd php-mbstring php-common php-xml php-xmlrpc For CentOS 7 server run: sudo yum install http://rpms.remirepo.net/enterprise/remi-release-7.rpm sudo yum install epel-release sudo yum install yum-utils sudo yum-config-manager --disable remi-php54 sudo yum-config-manager --enable remi-php72 sudo yum -y install php-cli php-fpm php-mysql php-zip php-devel php-gd php-mcrypt php-mbstring php-curl php-xml php-pear php-bcmath Install and Configure MariaDB Database server Install and configure MariaDB database server using: Install MariaDB 10.x on Ubuntu 18.04 and CentOS 7 Once done, login as root user and create a database for WordPress $ mysql -u root -p Enter password: Welcome to the MariaDB monitor. Commands end with ; or \g. Your MariaDB connection id is 520 Server version: 10.3.9-MariaDB-1:10.3.9+maria~bionic-log mariadb.org binary distribution Copyright (c) 2000, 2018, Oracle, MariaDB Corporation Ab and others. Type 'help;' or '\h' for help. Type '\c' to clear the current input statement. MariaDB [(none)]> CREATE DATABASE wp_site; Query OK, 1 row affected (0.001 sec) MariaDB [(none)]> GRANT ALL PRIVILEGES ON wp_site.* to 'wp_user'@'localhost' IDENTIFIED BY 'StrongPassword'; Query OK, 0 rows affected (0.001 sec) MariaDB [(none)]> FLUSH PRIVILEGES; Query OK, 0 rows affected (0.001 sec) MariaDB [(none)]> quit Bye Download WordPress and Install Now download WordPress and untar the archive wget http://wordpress.org/latest.tar.gz tar xvf latest.tar.gz This will extract all content of the tarball to a folder named wordpress on your working directory. Move the wordpress folder to /var/www directory sudo mv wordpress /var/www Change ownership permissions to userwww-data and group. sudo chown -R www-data:www-data /var/www/wordpress Configure WordPress database connection mv /var/www/wordpress/wp-config-sample.php /var/www/wordpress/wp-config.php Edit the file to configure sudo vim /var/www/wordpress/wp-config.php Set below variables // ** MySQL settings - You can get this info from your web host ** // /** The name of the database for WordPress */ define('DB_NAME', 'wp_site'); /** MySQL database username */ define('DB_USER', 'wp_user'); /** MySQL database password */ define('DB_PASSWORD', 'StrongPassword'); /** MySQL hostname */ define('DB_HOST', 'localhost'); /** Database Charset to use in creating database tables. */ define('DB_CHARSET', 'utf8'); /** The Database Collate type. Don't change this if in doubt. */ define('DB_COLLATE', ''); Configuring Caddy to Serve the WordPress Site We have WordPress installation ready, we now need to configure Caddy Web server to serve our WordPress website. Start by creating a Caddy configuration file on /etc/caddy/Caddyfile sudo vim /etc/caddy/Caddyfile Add the content example.com tls [email protected] root /var/www/wordpress gzip fastcgi / /run/php/php7.2-fpm.sock php rewrite if path not_match ^\/wp-admin
to path path/ /index.php?query Replace example.com with your actual domain for WordPress website and [email protected] with an actual email address used to request Let’s Encrypt certificate. We’re using php-fpm via fastcgi to support php. Start caddy service sudo systemctl start caddy.service If the start was successful, you should get a successful message: # systemctl status caddy ● caddy.service - Caddy HTTP/2 web server Loaded: loaded (/etc/systemd/system/caddy.service; enabled; vendor preset: enabled) Active: active (running) since Sun 2018-09-02 14:34:26 EAT; 7s ago Docs: https://caddyserver.com/docs Main PID: 32443 (caddy) Tasks: 12 (limit: 4704) CGroup: /system.slice/caddy.service └─32443 /usr/local/bin/caddy -log /var/log/caddy.log -agree=true -conf=/etc/caddy/Caddyfile -root=/var/tmp Sep 02 14:34:26 wp.computingpost.com systemd[1]: Started Caddy HTTP/2 web server. Sep 02 14:34:34 wp.computingpost.com caddy[32443]: Activating privacy features... done. Sep 02 14:34:34 wp.computingpost.com caddy[32443]: https://wp.computingpost.com Sep 02 14:34:34 wp.computingpost.com caddy[32443]: //wp.computingpost.com Access the WordPress dashboard by visiting.https://example.com You should get initial wordpress setup page. Provider username and password. Thank you for reading our guide on how to Install Caddy web server on an Ubuntu 18.04 with Let’s Encrypt SSL. I like Caddy simplicity, robustness and the fact that it uses HTTPS by default. No routing and redirects needed to host your website.
0 notes
Text
Building Your First Elementor Website: A Step-by-Step Guide
Learn the basics of website creation with guides on setting up WordPress, building a website from scratch with Elementor, and optimizing your site so it’s ready to be published. - Install and Set Up WordPress - Download the Necessary WordPress Tools - Start Building Your Site Using Elementor - Optimize and Publish Your Site Before we get ahead of ourselves, there’s a few things you’re going to need before following the rest of this guide. The first thing you’re going to need is a domain name and a web host. Most web hosts can sell you domain names directly in combination with your hosting package. However, you can also buy a domain name independently and then enter it into the web host that you want to use. There is a nearly endless supply of different web hosts. While any of them will do, we recommend doing some research to figure out which option is going to be the best fit for you.
Step 1: How to Install and Set Up WordPress
WordPress is well known for it’s easy set up. In fact, many web hosts now offer tools to automatically install WordPress for you. If this is the case with the web host you chose, feel free to gloss over this section of the guide and move onto the next step. Before you proceed with the installation it’s important to note the differences between WordPress.com and WordPress.org. The two are often used interchangeably, but they are in fact very different. WordPress.org is where you will go to download WordPress. It is also where you will find the free version of WordPress. It’s important to note that while using the free version of WordPress you will have to host your website through a third-party hosting service. How to Install WordPress Through Your Hosting Service Most hosting services allow you to download WordPress directly through them. While some hosting services may vary, this can typically be achieved by going into My Accounts and clicking on the WordPress icon. Next, simply follow the steps to complete the installation process. You will need to enter a username and password that you will use to log in to your site in addition to some other information. Then, click on Finish Installation. Now your website has WordPress! After the installation is finished simply log in to WordPress using the username and password you set up and you’ll be able to access your website’s WordPress dashboard. How to Install and Set Up WordPress Manually If your web host doesn’t offer this service, not to worry. Simply go to the download page on wordpress.org and click on the button titled Download WordPress.

Once you have downloaded and unzipped the WordPress file package, you’ll need to create a database for WordPress on your web server. In addition to the database, you’ll need to set up a MySQL user that has fully access to modify the database. Then, all you need to do is upload the files to the desired location on your web server. You can run the installation by accessing the URL in a web browser. This should be the URL that you uploaded the WordPress files to. More detailed installation instructions on downloaded WordPress manually can be found here if you need additional resources.
Step 2: Download the Necessary WordPress Tools
Once you’ve logged in to your WordPress dashboard, you’re going to need to download a few more things. Within your WordPress dashboard, go to Plugins -> Add New and search for Elementor. Once you’ve selected Elementor click Install. Keep in mind that you will still need to activate any plugin you install before it will be added to your WordPress dashboard. In addition to installing Elementor, you’re going to need a theme. There are a lot of themes available to use, both free and premium. Spend some time looking around and pick out a theme for your website. For help on choosing the right WordPress theme, you can view our guide here on How to Choose and Customize Your WordPress Theme. You’re also going to need some plugins. Which plugins you need will depend greatly on the type of website you’re building, and the kind of features that are important to you. WordPress comes with a list of recommended plugins. It can be helpful to look through this list and see if any of the plugins would be useful to you. Remember not to install too many plugins that you don’t need, as this will slow down your site. For more recommendations on some of the most useful WordPress plugins, you can view our guide here on The 25 Most Useful WordPress Plugins for your Website.
Step 3: Start Building Your Site Using Elementor
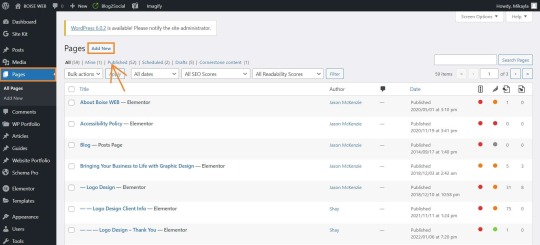
Adding a New Page Once you’ve laid the groundwork and installed all the necessary tools, it’s time to start building your website. Before you can build your page with Elementor, you must create the page. From the WordPress dashboard click on Pages > Add New.
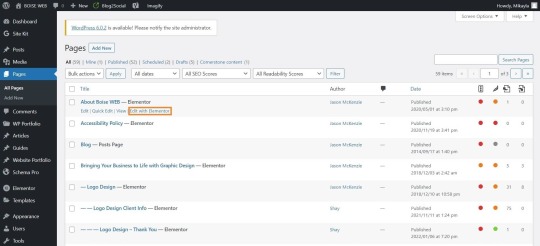
You can also edit an existing page but hovering over the name of the page and then clicking on Edit with Elementor.
This will bring you to a page that looks like this:

Elementor Building Blocks Elementor is made up of ‘building blocks’ that allow you to visually build your site from the ground up. There are three main building blocks that Elementor uses: sections, columns, and widgets. Sections are the largest blocks that house the column blocks, and the column blocks then house the widgets. To add a section to your site, click on the red + button. This will pull up a column menu where you can select how many columns you want, and the orientation you want them in.

The section and the columns will then appear on the page. To add widgets to the column, simply drag and drop them from the left-hand menu.

There are a lot of widgets already available to you for free, but if you want to go even further you can pay for the premium widgets and customize widgets for your site. Editing with Elementor Once your widgets are in place, you’ll need to edit them. To edit a single block or column you can click on it directly, or you can click on the blue handle to edit the entire section. The editing menu is made up of three sections: layout, style, and advanced. For the purposes of this guide, we’re only going to focus on the layout and style sections. The layout section allows you to edit things like size, alignment, text content, and column gap. The style section allows you to edit things like typography, color, backgrounds, and borders. Using the advanced editing options allows you to inject even more personality and customization into your site. However, for your first page it’s best to stick to the basics and learn how everything works before moving on to more advanced settings. Creating a Home Page The most important page on your site, and the page that you should build first, is your home page. Your home page is the first thing that people will see when they go to your site. You want to make a good impression. Most themes come with pre-built templates for home pages that you can tweak to make your own, or you can start from scratch to make something truly unique. If you want some more tips in building your home page, Elementor has some great guides available to you. You can check out their guide on how to create a homepage here. Once you’ve created the page, you still have to tell WordPress that it’s your home page. Otherwise, it will get listed the same as any other page. This is how you get your home page to show up as www.yoursite.com, rather than www.yoursite.com/home. You can learn how to assign a home page here.
Step 4: Publish Your Site
Once you’ve built your first page, it’s time to publish it. To do that, simply click on the green publish button at the bottom of the left hand Elementor menu. Note: You will need to give your page a name before it can be published to your site.
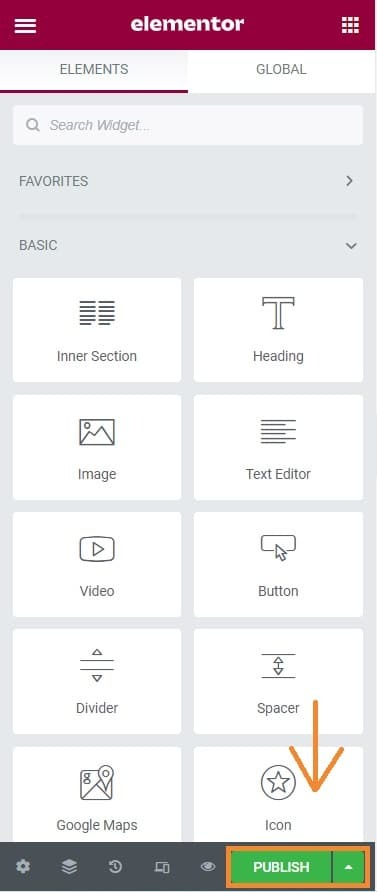
If you’d like to save your page and come back to it later, you can click on the arrow to the right of the publish button and save the page as a draft. This arrow also allows you to save your pages as templates. If you’re interested in learning more about templates, we can help with that too! You can look at our guide here on How to Save, Import, and Export Elementor Templates in WordPress. Read the full article
0 notes