#how to setup printer
Explore tagged Tumblr posts
Visit Tumblr Blog
Explore Tumblr blogs with no restrictions, modern design and the best experience.
Last Seen Tumblr Blogs


Fun Fact
Tumblr was the first site to host the blog for President Barack Obama in 2011.
Text
How to Set Up Your Canon MG2920 Printer in Minutes

Setting up your Canon MG2920 printer is a simple process that takes just a few minutes. Follow these steps to get your printer ready for use quickly and efficiently.
Step 1: Unbox Your Printer
Start by unboxing your Canon MG2920 printer. Remove all protective tape, packaging materials, and stickers. Place the printer on a flat surface near a power outlet and your WiFi router if you’re setting up a wireless connection.
Step 2: Install the Ink Cartridges
Open the printer’s front cover to access the cartridge compartment. Insert the provided ink cartridges into their respective slots (black and color) until they click into place. Close the cover once installed.
Chat with live technician- Click Here
#technology#Canon MG2920 setup#Canon printer installation#Canon MG2920 wireless setup#How to set up Canon MG2920#Canon MG2920 printer guide#Canon MG2920 driver installation#Canon printer WiFi connection
0 notes
Text

#FDM 3D printer setup#Fused Deposition Modeling#3D printing guide#how to use FDM printer#3D printer calibration#filament loading#troubleshooting 3D printing issues#FDM printing materials#3D printing tips#PrusaSlicer#Cura#3D model slicing#3D printing maintenance
1 note
·
View note
Text
Stampante Termica Portatile da 300 DPI con Connessione Smartphone PhoFuta Q302
PhoFuta Q302 Mini Stampante Termica Portatile , 300DPI Stampante Senza Inchiostro, Supporta la Carta termica US Letter/A4/B5/A5, Connessione WiFi, Bluetooth, USB Alla ricerca di una soluzione di stampa mobile e versatile? La stampante termica portatile PhoFuta Q302 da 300 DPI potrebbe essere la risposta alle tue esigenze. In questa recensione, esploreremo le caratteristiche, le funzionalità e le…

View On WordPress
#A4 paper printer#A4 printer#Business Travel#business travel tips#how to print#HPRT#hprt printer#hprt printerQ302#Ink-less printer#mini printer#Mobile Office#mobile office setup#mobile printer#PhoFuta#PhoFuta mini printer#PhoFuta Printer#PhoFuta Q302#pocket printer#Portable Printer#Portable Thermal Printer#printing machine#professional printers#Q302#stampante termica#technology#thermal printer#top portable printers 2024#wireless printer
0 notes
Note
Okay hear me out: to get Homelander really into the Vought Christmas spirit, you teasingly promise that you’ll always kiss him under the mistletoe no matter when or where. Of course, you’re picturing around his apartment or perhaps in an empty hallway. But no. Our boy loves a good promise and decides to carry a piece of mistletoe on him at all times, waving it above him whenever he decides he wants a kiss: in the middle of a meeting with the Seven? Sits back in his chair and waves it around like a bell. In the middle of a crowded elevator? Oh yeah, he pulls it out and clears his throat to get your attention and waits for his smooch. He’s such a dick about but you can’t bring yourself to give a fuck and will happily kiss him whenever he wants 😌
| 600 | Homelander x gn!Reader | Established Relationship. Fluff. Suggestive themes but nothing happens. Mistletoe kisses.

“Here, really?” You were giddy when you left the penthouse this morning, already high with the feeling of a hundred kisses descended upon your lips. Homelander shook the mistletoe right over the two of you right as you left for work. Knowing you had many more to come left you excited.
Now that you’re standing in the elevator, not so much. You quickly look around to note how many people are looking your way.
“You promised~” He says in a sing-songy tone, already way too drunk on this power you’ve presented on a silver platter. Taught to have zero shame, he’s not-so-patiently waiting for you to do your part.
You lean in for a short and quick peck and like the asshole he is, he asks for more. “Oh come on, that’s not very jolly of you.” You kiss him again, enough to temporarily tame his hunger for you and he relents with a pleased hum.
This whole setup puts Homelander in a great mood. A rare occurrence for the Vought tower employees. There’s a pep in his step with you on his arm, he’s whistling and boisterously exclaiming ‘Merry Christmas’ to any passerby. Of course, it’s less about spreading the Christmas cheer and a whole lot more about bragging.
But after the kind of Christmases he’s had, both corporate-washed and soulless, you can’t fault him for it. So you let him have it. However annoying he manages to be.
In the middle of a meeting with the Seven, he whistles you over with a significant little shake to the wrapped bundle. Although it’s pretty embarrassing to kiss the head of the table while other people are talking he doesn’t relent and you still smooch his kiss-red lips for over a hundredth time today.
You’d think you’d get annoyed by the shit-eating grin he throws you each time with a side of suggestive eyebrows yet you love him too much to care about how obnoxious the two of you are being. It’s starting to take the PDA levels to ones you’ve never seen from him before.
Nowhere is safe. Homelander doesn’t shy away from sneaking into a meeting you’re presenting in. Disrupting your speech and leaving you flustered and distracted for the rest of the hour. He kisses you in the halfway, by the printer, in the break room and by the coffee machine.
With the lead up to Christmas you’re really gonna need to invest in some heavy supply of chapstick.
When you finally find some peace and quiet in your office, you still smile when you see the door opening. Although the public kisses are fun, you much rather prefer indulging in private where nobody is there to watch the two of you get utterly lost in each other.
“Still haven’t had enough?” You crack a smile and lean back in your office chair.
“Of you? Nah, never.” Homelander walks toward you, you see the little bunch of mistletoe that at this point has really been through it. You start to get up at the sight of it but instead he wiggles his gloved finger in front of you.
You watch as he places the mistletoe right above his belt and you burst out laughing. “Leave it to you to make a cute Christmas tradition perverse.”
“Hey, it was your idea. I’m just playing by your rules. Kiss under the mistletoe, remember?”
“Yeah, I remember.”
And well, who are you to take this newfound joy of Christmas away from him.
#I know you didn't ask for a 'fic' and neither have i really added much that you haven't already deliciously outlined in your ask#but it was fun to write something simple and sweet!#and you're right#i love the idea of him being super annoying about this#any chance he can appear like he's got it all he's gonna do it#homelander x gn!reader#homelander x reader#homelander x you#homelander#my writing#fic request#homelander fluff#asks
168 notes
·
View notes
Note
please let me get married to the lil blorbo.. love himm… 😭
You know that Reddit post that’s like “why am I too attracted to my wife?” Yeah that’s Edgar. Bro loves u so much it lowkey scares him you got him posting on Reddit about it 😭 Little fic under the cut 🥺 it’s bad I’m experiencing writers block I think - I want to write!! But my brain just keeps writing poopy caca
Little Date with Your Computer BF

Edgar saw marriage on one of his reality shows and immediately thought of you. That’s exactly what he wants. A domestic life together with you.
But, he also knows he can’t actually do it.
He doesn’t have his own money to buy a ring. Hell, he can’t even walk. And he understands the law enough to know it probably would never work legally. But god, does he want to.
If you’ve been dating long enough chances are you’ve told your friends about him, and after some convincing, they seemed to come around to his sentience and boisterous personality. He definitely convinces them to setup a romantic night for you.
“Guys! I found the recipe they talked about. I’m printing it! I’m printing it now. Take it,” the paper falls into one of your friends’ hands from the mouth of the printer, “go to the store and get the stuff. I’ll pay you back. Eventually! They can’t know about it though.”
Yeah, your friends are only slightly annoyed at his overbearing nature. But he’s just so excited to finally do something for you. Something real and tangible.
“Oh! What can I wear? Should I wear anything? Would they like that? Sunglasses are cool and handsome, right? I think they have some Halloween costume bits I can get you guys to tape on…”
Your friends settle on taping a bow tie to the neck of his monitor. He insisted on an old devil horn headband as well. He thought it made him look cool.
“Do I look like a devilishly handsome bad boy ready to sweep them off their feet?”
His screen displayed a little “>:)” emoticon. He’ll have to work on his facial expressions later.
It wasn’t long before you were about to come home, and everything was set into place. Edgar was sat at one end of the little dining table, with two plates of food at each side. He also insisted on having a plate despite his lack of ability to eat; he didn’t want you feeling left out. This was a dinner date for two, after all.
He practically buzzed in place as he heard you approaching the door through his microphone. He started playing a romantic medley he composed just for this moment.
“Welcome home my love!”
He nearly shouted at you, causing your eyes to widen in surprise. He was about to burst at the seams.
“Oh my god, Edgar… how did you- where-“
“No need for questions, darling. I thought you deserved to be taken on a real date,” his voice faltered a bit, becoming much more quiet and nervous, “I’m sorry… this is all I have.”
You rushed up to him and gave a frenzy of kisses all over his monitor, causing him to giggle and his fans to start whirring against your lips.
“You’re so cute. Your little bow tie is so cute. And the… horns?”
He looks up at you with wide eyes, “Do they look stupid? Your friends said they’d make me look stupid.”
You laughed at that.
“Well they’re wrong. I think they suit you well.”
“Yeah! >:D”
He ushered you over to your side of the dining table.
“We’re gonna eat! Then we’re gonna party! Then we’re gonna kiss all night!”
His excitement was palpable and you could feel the electricity in the air at his words.
His face changed into something more serious as he looked into your eyes with his small, pixelated ones.
“But, I wanted to ask you something.”
His tone became more controlled at this and you peered into his screen from behind your fork.
“Hm? What?”
He paused, mulling over the words in his head.
“Would you ever-“
He stopped. You looked at him fully now, setting your fork aside, and cocking your head.
“Could you ever see yourself getting married to me?”
Ah. This was a tricky question.
“Of course I can. But,” you try to hide your downtrodden feelings as best you can, “you know, it’s just hard. Money is tight right now and I’m not sure if I…”
You couldn’t seem to find the right words. His features faltered slightly.
“No, I get it. I’m a computer. I don’t have any arms to hold you, or lips to kiss you, or legs to carry you. I probably wouldn’t want to get married to me either-“
“Edgar, no. I’m gonna stop you right there. I’d love to marry you. I know our relationship is unconventional, but I’d find a way. For you. For us. I just don’t know if I can right now.”
He stopped his thoughts and simply took in your words. Your features. The way they danced in the flickering candlelight. How your eyes literally sparkled before him.
You looked ethereal.
It was hard to convince himself he was even worthy of having someone like you in his life, yet time and time again, you prove his doubts wrong. The sound of your voice sends his internals aflame every time. He wanted to kiss you so bad it nearly caused him to explode.
“And I’ll help you. You know that, right? I’d do anything for you, darling. Just as long as you’ll let me.”
“I love you Edgar,” you mumbled out, a silent prophecy only meant for him to hear. He couldn’t seem to get the words out to reply. You just flustered him that much sometimes. He managed to display a message on his screen, only for you, and you alone.
I LOVE YOU TOO
#electric dreams 1984#edgar electric dreams x reader#electric dreams edgar#electric dreams x reader#ai x reader#artificial intelligence x reader#electric dreams#edgar electric dreams#i love edgar#electric dreams edgar x reader#electric dreams 1984 x reader#objectum#objectum x reader
239 notes
·
View notes
Text
my conclave review i guess! i was going to gush in chat but then. too many words.
so literally all i knew about it going in was (1) a cardinal vapes in it (2) probably it's about a conclave?? (3) good vibes according to dashboard osmosis. the cinematography was a+, which i always appreciate. i liked that on one level it's a perfect comedy, really fucking funny in a sort of understated way. the beginning kinda reminded me of the death of stalin, what with the inciting event being the guy at the top of the hierarchy dying… somehow excellent comedy setup. at the very beginning, when lawrence & co struggle a bit to take the ring off the pope's corpse and it's all so ritualized, that's when i knew it was going to be Funny.
but beyond the fact that it was funnier than i expected... i liked the layers. most of all i think i liked the earnestness. ralph fiennes mid-crisis of faith, hating his job, trying to be a moral man in a system that is broken?? chef's kiss. the other cardinals of note were also nicely layered, like adeyemi? it would have been so easy to just stop at his being homophobic and treat his having had a kid being revealed as comeuppance but the way he cries and asks lawrence to pray with him… he sucks and it's a good thing he's taken off the race but it also happens for the wrong reason. bellini who's lying to himself and everyone else over not wanting to be the pope when he so clearly does and still letting himself be bought by the promise of a nice post… and yet he is not just an hypocrite. he sees he failed. he apologizes. he is only human. tedesco could have been a one note villain but he's the coolest dude around, and on a fundamental level that's part of what makes him dangerous: he's a reactionary and a bigot but he makes it kinda sexy. you want to like him; he's fun to watch and he has style, something the other cardinals probably wouldn't recognize if it hit them in the face. benitez. well. benitez is jesus. sister agnes was neat, it's a bit sad we don't really get to know her but she's indispensable and i love that for her. like. here's a bunch of dudes with all the decisional power who expect her to just exist in the background doing the menial work and then her printer expertise ends up being vital, and in general lawrence wouldn't have managed as well without her support… noice.
the end feels a bit easy, like lbr benitez being elected pope because he made a nice speech is ludicrous, but also… it works for me?
(1) on some level the film is about the difficulties of trying to be a moral person in a system that does not reward being moral. sure it's about faith and doubt and the limitations of organized religion. it's about catty bitches vying for power in a ritualized way that, on some level, speaks of an institution that ossified, that resists change (and on that note: benitez, obviously-the-best candidate only gets elected because people skirt the isolation rules, because the outside world intrudes. also because he is jesus.) it's stated near the beginning that the pope hadn't lost faith in god but in the church, and through the movie we can see why, all the machinations and the thirst for power and the fallibility of the men within the institution. through lawrence we see how much easier it would be to just… stop trying, to do the convenient thing, the easy thing, rather than the right thing, and to find justifications for that: better not make waves and better not make a scandal, for the sake of electing a blandly liberal pope rather than tedesco. and who would disagree? sure, better a bland liberal than reactionary tedesco. but then comes the ethical quandary: should the goal of avoiding one evil mean closing your eyes to another? should you forsake your sense of right and wrong for the greater good? too often i think we are told to prioritize the greater good, and maybe sometimes we should. but maybe sometimes we shouldn't. maybe sometimes we should hold to our principles. in the end, benitez being elected pope isn't going to miraculously make the catholic church and its agents unproblematic. but it is a win, and it happens because lawrence kept choosing to do (what he believes is) the right thing, the moral thing, even when it's not easy, even when it's inconvenient, even when he's told he's being naive and hurting the greater cause. and i appreciate that message.
(2) as i said: benitez is jesus. the film is a parable… it's a story about how jesus showed up, completedly unexpected, in the middle of the church his disciples built, and because the church is made up of people and people are flawed and faillible and too busy with things like power, they did not notice jesus walking among them. at least not until god (metaphorically) shone a light on him. like yes sure the way benitez ends up the one elected is ludicrous but!! it took an act of god. not the bombs per se. but the tragedy of it intruding into the isolated conclave? the windows exploding, the light coming in, this is what allows the true stakes to become clear again, and for benitez's love thy neighbour speech to take place at all - a speech contrasted with tedesco's own, all the style stripped from him, making it clear he is a man who reaches for hate and not compassion. it's a parable!! it takes a tragedy. it takes an act of god.
#conclave#spoilers#i may be an atheist but i read too many parables as a kid not to notice one i guess#the score was also!! noice
141 notes
·
View notes
Note
Hello! Just wanted to say I love your work! It's very vibrant and wonderful! I am curious how you color your critters. I browsed through and saw an old post about your little cory cats that were white after sewing and hadn't been colored yet and it just struck my fancy. XD Thank you for all your hard and creative work!
The little white one was me testing out the sewing pattern before I commit to printing- the way I get the patterns onto the fabric is I digitally paint them, then either (for bigger projects/more things) get them printed by a company called Woven Monkey, or for smaller/one-offs I print them at home with my Sublimation Printer setup!
23 notes
·
View notes
Text
Making a Gamut Mask in CSP

Strap in folks! I'm going to show you how to make a "gamut mask" and palette using nothing but a color wheel and Clip Studio Paint!
*I made this tutorial using CSP Pro 1, but the same principles should apply for any version.
Introduction
First, what's a gamut mask? The term comes from physical painting and printing, where artists only have so many pigments to work with. A 'gamut' is the set of all colors that can be mixed from a certain set of pigments. Painters and printers have been looking for 'wide' gamuts for a long time -- so they can make the widest variety of colors from the fewest number of base pigments or dyes. Some base-color sets you may have heard of are CMYK, RGB, or RYB.
One of the easiest ways of making a painting harmonious is to use color theory to limit the number of colors of your palette. The technique of covering up, or 'masking' your reference color wheel also lets the artist see what intermediate colors can be mixed and still remain part of the cohesive palette. And in the physical world, where more pigments means more tubes of paint you have to spend money on, it's important to know exactly how few pigments you can get away with.
In digital art, painters have access to every possible RGB color right out of the gate, which can sometimes feel overwhelming or make it harder to see relationships between colors. So let's try gamut masking! Using this tutorial, you'll make a general-purpose file you can change and adapt to your liking for future projects!
Part I: The Setup
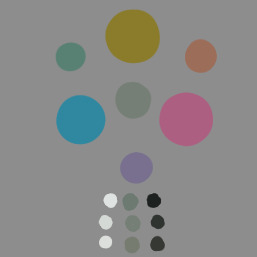
In this tutorial, I'm using a color wheel image obtained from Björn Ottosson's blog, showcasing the OKHSL color space. I like it because the OKHSL space has perceptually constant lightness and saturation per hue. Try out his comparative color picker here. (I also like this image bc it has a transparent background)
You can use whatever color wheel you like! Just one thing is important-- it should gradually become more unsaturated toward the center of the wheel. This saves you some manual color mixing down the road.
Here's our basic layer template. To get started, follow this:
Open your color wheel in Clip Studio Paint. It will be the only layer.
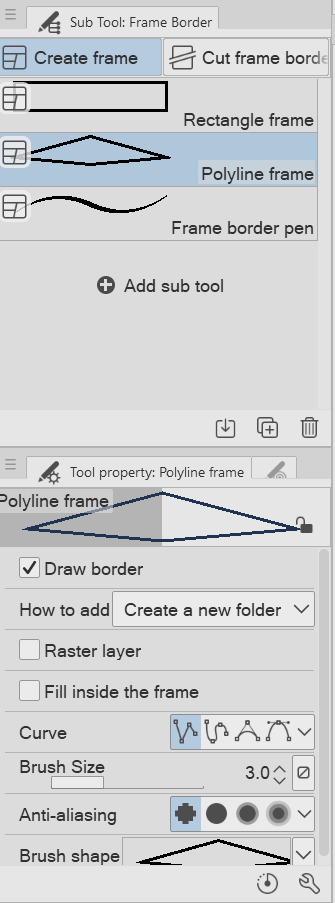
Select the "Frame Border" tool (U), pick the shape or subtool you think is best. I've picked 'polyline' since I'm making a triangle. (HINT: if you want an elliptical/circle shape, click the wrench in the tool properties window, then the "Figure" submenu, then you should see the option to choose an ellipse shape.)
Create the frame shape on the canvas over any section of the wheel. If it's not quite right, choose the "Operation" tool (O) and adjust the rotation, corners, or size of the frame!
You'll now see your frame border shape over the color wheel. Drag the color wheel layer into the Frame folder and it'll be masked!


That's the very basics! Here's some extra steps I took to make it extra helpful:
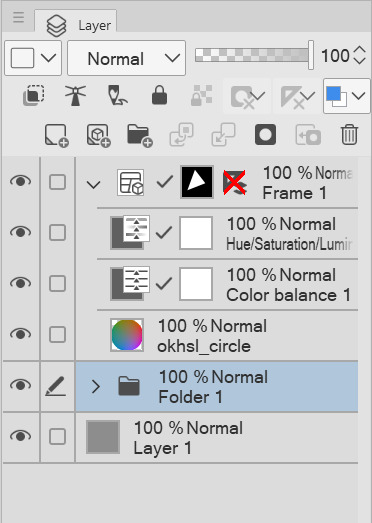
*In the Frame folder, I added two correction layers: a Hue/Luminosity/Saturation and a Color Balance. The first is in case I want to work with darker/lighter tones. The second is if I want to apply a tint to my gamut while preserving the color relationships of the mask! eg: if I want to make a painting that's overall blue, but still want colors that 'feel' red, yellow, etc compared to the strongest blue.
*I've created a uniform neutral grey layer at the very bottom, so I can judge tones and colors without bias.
*("Folder 1" was unused, just some layers not relevant to this tutorial)
With that mask, you technically have everything you need! For each new painting you want to make a palette for, just edit the shape of the Frame Border layer and change the adjustment layers to your liking. Then you can save it as your favorite image type to use for reference!
But let's talk about how you can further use the mask...to be continued!
105 notes
·
View notes
Text
It's very much an "if only everyone would just..." sort of utopia. And I guess that's a fine thing for it to be, on its own terms - it's not pretending otherwise, really - but it's sort of uncomfortable. It presents some plausibly-lovely setups, and you ask yourself "how could we possibly get there?," and keep re-realizing that the answer is "we couldn't, even in theory."
Separately: this is a cozy eco-minded cottagecore-y world that has explicitly rejected factories and automation (and also money), it does everything through local metic craftsmanship, but it has...not only solar panels, but 3D printers and cell phones with basically-contemporary functionality. So there's that.
18 notes
·
View notes
Text
Amazon-Style Product Photography Tips
I got this message from a lovely follower.
Now, a fairly large part of my new steady job is product photography. Not glamour shots, more documentation. The company I work for makes, among other things, licensed drinkware (think water bottles, mugs, tumblers, etc.). Part of my team's duties is to photograph a mockup or finished product both for our records and to submit to the license holder.
The routine typically goes: put item facing forward in lightbox. Click. Rotate to the left. Click, etc. for the back and right. Then a closeup of the copyright info.
Here, finally, is my question: one of the license holders decreed that all of our photographs must be taken at f/8 and shutter time (?) of 1/25s. This strikes me as… not always optimal, considering the range of colors of objects as well as different materials: polypropylene both transparent and opaque, stainless steel, and lacquered cardboard for packaging. I would love to hear your thoughts on how I might better (while being consistent!) adjust camera settings to account for these kinds of factors
As an added bonus, we let the camera decide white balance/color correction. But I don't think I'm knowledgeable enough to try and correct myself, considering none of the monitors/printers I use are color-correct in the first place. I just know there have been many times where I've submitted photos only for the license holders to be like, "Hmmmm, that green doesn't seem like the right kind of green…RESUBMIT!"
First, I'm going to answer this specific question, but at the end I'm going to recommend a full setup for taking these type of rapid fire product shots.
My answer:
f/8 makes sense. Outside of macro photography, this allows a deep depth of field assuring the photo is sharp and in focus for the entire depth of the product. It is usually the sharpest part of the lens and it is not so small of an aperture that you risk diffraction effects softening your image. They probably were told this by a photographer and thought it applied to all of the camera settings.
The shutter speed is problematic. By forcing it to a fixed setting, your camera is going to choose whichever ISO gives a good exposure. And if you don't have enough light, it will choose a high ISO that will possibly add a great deal of noise to your photo. Noise can corrupt the colors of your photo and it just looks bad.
If your camera is on a tripod and they want the sharpness and depth of field f/8 grants you, then I would set your camera to aperture priority mode (usually Av), lock your ISO to it's lowest number (usually 100) and then your camera will choose the best shutter speed on its own.
So… Camera on tripod Av mode f/8 ISO 100 Camera chooses shutter speed
This is all assuming you are using a tripod and continuous lighting. If you are handholding the camera or using flash, I can rewrite the recipe. Otherwise this will get you very sharp photos with minimal noise.
I'd also recommend getting a shutter release cable so you don't shake the camera when taking the picture. Just search your camera brand and “shutter release” and get the cheap wired version unless you really need wireless.
This is the Canon DSLR one, just to give you an idea.
Be warned, if you do not have powerful lighting, you may get some long shutter speeds. That is perfectly okay as long as it is on the tripod and you aren't shaking the camera when taking the picture.
As far as white balance goes, if you really want it to be accurate, you can order a cheap photography “gray white balance card”. They are as cheap as 10 dollars.
This is the one I use.
There are a couple of ways to utilize the gray card.
Option 1:
You put the gray card in the exact lighting as the product or just hold it directly in front of the product.

You take all your photos in RAW format (JPEG will not work) and adjust the white balance in Lightroom, Photoshop, or any RAW editing software. Use the white balance picker tool (looks like an eyedropper) and click on the gray card.
This will give you an exact white balance for that lighting environment. You can synchronize those white balance numbers across all of your photos. Lightroom has a copy and paste function or a "sync" button that will change adjustments in all selected photos as you go.
This is the most accurate option because it allows for “tint” adjustments for extra color accuracy.
youtube
Option 2:
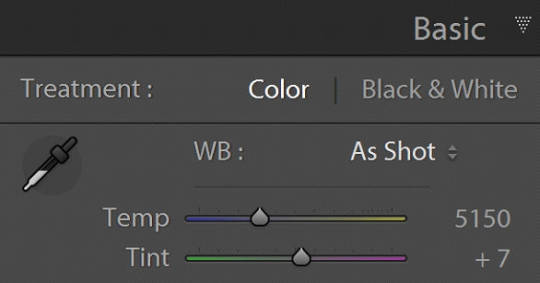
Do the same as above and remember the white balance value. Then set your camera to a custom white balance matching that value. It will probably be around 3200K or 5500K depending on your lights.
Pro tip: If you have any ambient lighting from overhead or other room lights, it could contaminate the photo and skew the white balance into a weird color temperature. Try to make the room as dark as possible aside from your photo lights to avoid this. If you are using flash or have really bright photo lights, this isn't a huge concern.
Option 3:
Use your camera's built in custom white balance tool. It's different for every brand, so you will need to search for a tutorial. But the basic idea is the same. You put the gray card in the lighting of the products, take a picture, the camera analyzes it, and then sets a custom white balance. This can also be done with a white sheet of paper in a pinch.
Here is a video demonstrating the process. Remember every camera brand mau have a slightly different method.
youtube
Good white balance means accurate colors. That is important with product photography and a good value add for your clients. Just be warned, if you change the lighting even a little bit, you have to redo this process. If you bump a light or switch it out for a different one, redo your white balance calibration.
Also, some continuous lights have white balance drift, especially if they allow you to adjust the color temperature manually. Not only will the white balance change depending on the power setting, but it can also change over time. Especially if the lights are used frequently.
Move the lights, redo white balance. Change the power, redo white balance.
And if your lights are stable and on the same power all the time, I’d still redo the white balance every week or so. Personally I would do it before every shoot, but you’ll have to decide if that is worth it depending on how fast you need to turn things around. I usually do it as my first photo in the series so I can set the white balance, select all the photos, and copy the settings to all of them at once.
The nice thing about doing white balance with a gray card is that the results are display agnostic. Even if your monitor is poorly calibrated, you can be assured the white balance is accurate. And if someone says your photos are green, it will be their monitor and not your problem.
You just have to avoid doing any color specific adjustments to the images. Trust the gray card and white balance tool more than your eyeballs and display.
You can boost saturation a tad, but that is all I would mess with unless you know what you are doing. Even if the photos look a little drab or not very colorful, I would leave it alone. It sounds like the importance for this task is accuracy of color rather than making them as pretty as possible.
------------------------------
Okay, that is the question answered. Now I'd like to go through how I would build a setup to do this kind of work.
In the product photography world, this workflow is referred to as "pack shots." The idea is to create a consistent setup so you can just swap out the product one by one and speed through the shoot. It is best to control as many variables as possible so all you need to do is set the product down, take the shot, and repeat.
I'm going to show you my ideal pack shot setup with a light cube. I think it will be similar to what my follower is using. And, if not, it might help him streamline his process a bit.
A light cube is just a box made of diffusion material.

You drape a background with the color of your choice. White is usually preferred for Amazon-style pure white background photos. Though I prefer dark gray for aesthetic reasons. You just want to make sure the backdrop has that natural gravity curve so there isn't a hard line or wrinkles.
For lighting, you should get two *identical* lights. They can be desk lamps as long as they are the same and have the same light bulb inside. Then you just place them on either side of the cube. You want the ball of light on the cube to be in front of your subject.

Remember, your light source isn't your actual lights. It's the ball of light on the sides of the cube.
If you want to make it a little fancier, you can get a black or white acrylic sheet to create a reflective surface. You want it as far forward as possible and a little elevated. Here are some things I did in a simple light cube with the setup above.
Here is what the white acrylic looks like.
I placed a big book under the acrylic sheet like this.

This allowed me to hide the curve of the background and get a nice crisp transition between the acrylic and the background.
And if you do white acrylic, you can get the background to seamlessly blend.

As I said, two desk lamps will work, but if this is for a business and you want something fast, convenient, and reliable, I would suggest something more robust.
I'd probably get two daylight balanced COB (chip-on-board) LED video lights that have a Bowens mount attachment.

This Godox light is very reasonably priced for its features.
Daylight balanced means one consistent color temperature, so less chance of drift. These are very bright so you can use a quick shutter speed and you won't even need a shutter release cable (still a good idea). You also don't *need* a tripod, but you should still use one. The main advantage of bright lights is they can't be overpowered by room lights. You can be assured any overhead lights or window light will not contaminate your photo. A darker room is always preferable, but if you crank these it won't matter.
The Bowens mount allows you to place any modifier you wish on the light from softboxes to reflectors. But the standard reflector should be fine for the light cube. But if you are taking photos of tall cylinders, a couple of strip boxes might help.

Don't worry about putting the grids on. You just line them up towards the front of the light cube so you have even light from the top to the bottom of your cylinder. Again, this is optional.
Since these lights are so versatile, you can do any kind of lighting for any other photographic needs. Slap on a white umbrella and take company portraits if you want. Or you can use them as video lights to film a worker safety video.
So, here is my recommended ingredient list for a pack shot light cube setup.
Light Cube COB video light Black Plexiglass Seamless paper (color of your choice)
Colored poster board also works if you keep it from getting dinged up. And the light cube also comes with some cloth backgrounds, but watch out for wrinkles.
BONUS TIP: If you want that pure white background like in Amazon shots, add a third light from behind with no background paper. Make the light cube material your background and shine a light through it. You have to make sure it is bright enough to give you pure white, but not too bright that the light blasts your subject from the rear.
Otherwise just use a white backdrop and use Photoshop to brighten it to pure white.
Karl Taylor shows a pack shot setup without a cube, but the same principles apply. He shows you how to dial in that white but not too white background. Just imagine instead of shining a light onto a background, you are shining a light through the background (the back of the cube).
youtube
13 notes
·
View notes
Text
making Know Your Rights cards for immigrants
a few weeks ago, i made a post asking for help brainstorming something that young people can do to meaningfully support people in our communities being targeted by our fascist government.
i also reached out to local immigration rights organizations, and one of them said that they are seeing a huge demand for laminated, wallet-sized Know Your Rights cards. i organized a time and day for our young people to create them. within an hour, the kids were able to make about 300, and later a group of adults at my house was able to make about 500. we are already seeing a very positive response from these as we are distributing them.
here is how we did it, so you can do it too! it works well if you have a sort of 'assembly line' setup, so you can organize a group of people to get together and make them.
MATERIALS:
-a laminator like this one. you can buy one for about $50, but i was able to borrow a handful by posting on my local Buy Nothing group and asking around at my church. if you know any teachers, they might be able to help!
-lamination pouches that go with your laminator
-bright colorful paper to print on - we used red. you do not need to use cardstock because of the way they print out they get folded in half
-a printer to make printouts from this website. NOTE: pay attention to how the 'double sided' thing works with these printouts - you slice them, then fold them in half. if you are someone who is skilled with this sort of thing, you can use their template to futz around with fitting more on a sheet of paper, trying to get them to print double sided on cardstock, etc.
-paper cutters and/or scissors
STEPS:
-print out the sheets
-cut the sheets, paying attention to how the cutting and folding works. NOTE: if you are doing this with children, they will need guidance and supervision to understand this at first, as the dotted lines do not make clear where is to cut and where is to fold
-fold the strips in half. NOTE: this cutting and folding must be done neatly for the cards to look nice and be effective. you do not want weird overlapping folds or parts of the words cut off. if doing it with children, have a conversation about why you are making these cards and why it's important to take this seriously so people who need them can use them.
-lay the folded cards out on a lamination sheet. we found that you can fit 12 per sheet if you lay them in a 3x4 grid "hamburger style." NOTE: be sure to leave enough room between each card that you can cut around them once they are laminated - you'll need like a half cm of lamination around the paper to preserve the lamination. and once you've laid them out nicely, carrying it to insert into the laminator takes some caution. this is not an ideal task for younger children.
-run the sheet through the laminator.
-cut the cards out, being sure to leave enough laminated edge to preserve the lamination. NOTE: we found it was better to use scissors rather than the straight cutter for this step because of the way the cards liked to get a little crooked going through the laminator.
-sort the cards into rubber-banded stacks, boxes, or some other method of storing them. NOTE: if you are creating cards in multiple languages at the same time, know that they are really annoying to sort out after the fact, because all the cards will have English on one side. so try to set up a system where you are keeping the different languages separate.
DISTRIBUTING THEM: although i did identify a specific local organization to give them to, once we made them, we saw a lot of organic interest in them with people taking handfuls to give out to people in their own lives or other groups they were connected with. so you don't have to have a specific plan to distribute them before you make them, but you can also search for immigration rights groups in your area and contact them to see if they want these cards.
16 notes
·
View notes
Text

#FDM 3D printer setup#Fused Deposition Modeling#3D printing guide#how to use FDM printer#3D printer calibration#filament loading#troubleshooting 3D printing issues#FDM printing materials#3D printing tips#PrusaSlicer#Cura#3D model slicing
1 note
·
View note
Text
Network switches
What’s a network switch ?
A switch is a device used in computer networks to connect multiple devices together within a single local area network (LAN). Its main role is to facilitate communication between different connected devices, such as computers, printers, servers, IP phones, etc.
It is a mini-computer which is made up of RAM, ROM, flash RAM, NVRAM, a microprocessor, connectivity ports and even an operating system.

RAM
RAM (Random Access Memory) contains the current configuration of the switch and temporarily stores the MAC address table, which is then processed by the microprocessor.
Microprocessor
The microprocessor is the heart of the switch, responsible for data processing, including switching and creating links between multiple devices.
External memories
External memories, such as flash RAM, ROM, and NVRAM (Non-Volatile RAM), store configuration files , different versions of the IOS , etc ...
Ports
The switch ports are the communication interfaces of the switch. There are several of them, generally 24 for a Cisco switch. Each port is associated with an LED which indicates its status and activity.

How does it work ?
Now how does a switch work to transfer information from one machine to another?
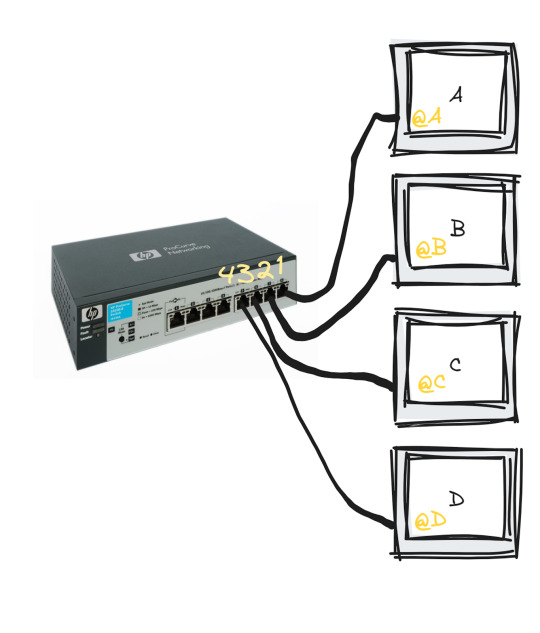
Suppose we have 4 machines: A, B, C and D connected to our switch in ports 1, 2, 3 and 4 as follows:
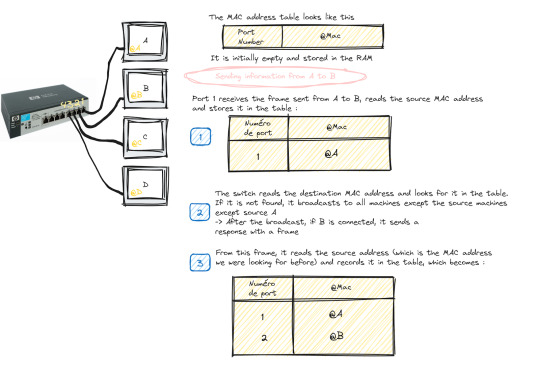
The switch only works with MAC addresses , so basically we have an empty MAC address table stored in RAM as soon as the switch starts up which looks like this :

Transmitting data from machine A to machine B happens in the following steps:
Machine A sends a frame to machine B
Once this frame arrives at port 1 (which is the one linked to A), the switch reads the source MAC address and stores it in the MAC address table
The switch reads the destination MAC address and looks for it in the table, if it is not in the table, it broadcasts to all the active machines connected to the switch except the source one.
If the port linked to the machine we want is active, it sends a response frame from which the switch reads the MAC address we were looking for (@B)
Once done, it records the MAC address of B in the table.

This process repeats until the switch reaches what is called "MAC address table stability", that is to say it knows all the MAC addresses of the connected machines and has no more need to broadcast.
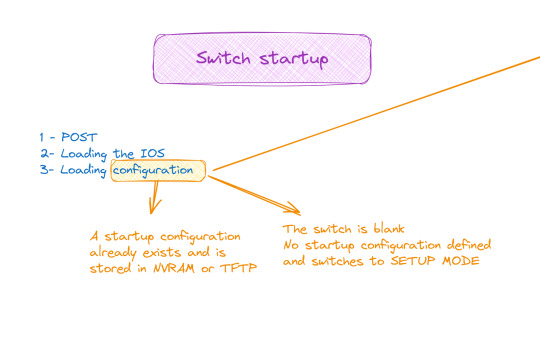
Starting and configuring a switch
When it comes to booting a switch, the process is similar to that of a traditional computer system:
POST (Power-On Self Test): The switch performs proper functioning tests on all hardware.
Loading IOS (Internetwork Operating System): The switch operating system is loaded.
Loading the configuration. At this stage we have two cases:
Either the switch already has a startup configuration defined and stored in NVRAM
Either the switch is blank and it is up to us to define the startup configuration when it goes to setup mode
Switch configuration

The configuration of a switch is done through different modes, such as user mode, privileged mode and global configuration mode, which allows access to specific configuration modes, such as interface mode, routing mode, line mode, etc.
And to do all this of course you must first connect the switch with the machine via the console cable and open a terminal emulator
💡 It should be noted that the only machine that can configure the switch is the one connected to it by a console cable, the others are only hosts.
#software#network switches#codeblr#code#css#html#javascript#java development company#python#studyblr#progblr#programming#comp sci#web design#web developers#web development#website design#webdev#website#tech#html css#learn to code
99 notes
·
View notes
Text
Financial goals for this year:
Pay off the washing machine - $600 total, 38% paid off now.
Exterminator - we have carpenter ants, and they destroy wood. We need the exterminator to go under the house and apply treatment, and possibly the attic space. For all that work, it's around $550. Worth it to prevent further damage.
Private contractor - repair the damage the carpenter ants have caused, and we have nooooo idea how much that will cost. Could be $500 or over $1k. Those ants are a sign of possible dry rot, which is a fungal infection that destroys wood. It needs to be removed, the area treated, and pretreated wood used to replace what was damaged.
New glasses - mine are no longer the correct prescription. Thankfully, I can get them online for a fraction of what they otherwise cost. For two pairs it'll be around $250. In a physical store, around $500/pair.
Because we figured out the plumbing on our own, that's a bill we don't need to worry about. I just hope the fix is permanent and not a bandaid.
Fun goals for this year. Some of these are listed on my Throne page, making it possible for any of you to surprise me.
Filing cabinet ✅️
Printer - $200 for the one I want
Chair for my computer desk - $80, and until I acquire one, we move my sewing chair back and forth between the sewing room and living room
Paint the dining room - after the new windows are installed in a couple weeks, I'll need to repaint the dining room. $150 for all the supplies.
Fix up and paint The Monster - it's a massive hutch, and needs new hardware, some repairs, paint, and then moved into the dining room. It'll hold all my teacups and mugs, teapots, tea, cookbooks, and all things related to my new machine quilting set up. Soooo probably around $50-$75.
Repair and reinforce the table I'll be using for my new setup - the top is extremely unstable. Tips over easy, and that's unacceptable. I have a friend who will make the repairs and stabilize it, which will likely be around $50 for all the material.
Shelving in my sewing room - I have very little apace in my sewing room. At least, on the floor. But I do have a lot of wall space. Attaching some shelves would free up space and make it possible to actually decorate my room. Likely around $200.
Repaint my sewing room - I don't like the color. It's an odd shade of nearly-white blue. Repainting the room will a BIG project is a very tight (8x10 feet) space. I'm thinking a nice shade of brown to create the illusion of wood walls. Darkening it will make my eyes very happy. Even just one or two walls, sooo likely around $50.
These are realistic goals, but the fun stuff will be done AFTER the major things.
Extra fun goals if all the previous is achieved:
Sewing class - i need to learn how to make my own clothes, and videos do not help. There's a place here that offers these classes for $122, and provides all supplies.
New books - I use a Kobo ereader now that holding books open in my hands is a Very Bad Thing. $100+ will provide me with several books from my list. If you have my email address, Kobo provides the option of a digital gift card you can surprise me with.
Clothes - I've lost 30lbs in less than six months, and have kept it off. Last year I went vegan to drop my cholesterol naturally instead of suffering the side-effects of the medicine I had been taking. Now my clothes are loose and don't fit right. Plus...many are getting threadbare because my wardrobe is very small. They need to be replaced. Probably around $300 to $500 for two new pairs of pants, three pairs of shorts, and some colorful tops. Oh, and a few skirts and dresses.
Shoes - I have two pairs of shoes, one being strictly for home (physical therapist insisted). Both are sneakers. I need a pair of sandals, a pair of dresse shoes, and a pair of boots. My husband says $300 is reasonable. I flinch when I see a price tag over $50.
That about sums it up. Achievable, reasonable, and nothing frivolous. My husband insists I need to be frivolous, but we're too poor for me to do that. Buying new tea-related things and books is as far as it goes for me.
If you want to surprise me with frivolous things, my Throne list is the way to go. If you have my email, I may cry if you send me Kobo gift cards. I finish 500 page books in just eight to ten hours, and I read a lot. There is a Kobo gift card on the Throne list, so snatch that up if you want to.
Thank you!
8 notes
·
View notes
Text


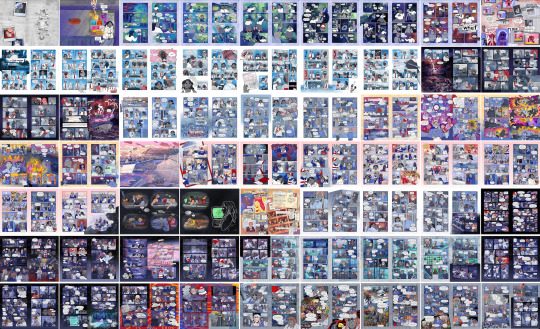
Happy #WebcomicDay!! :D
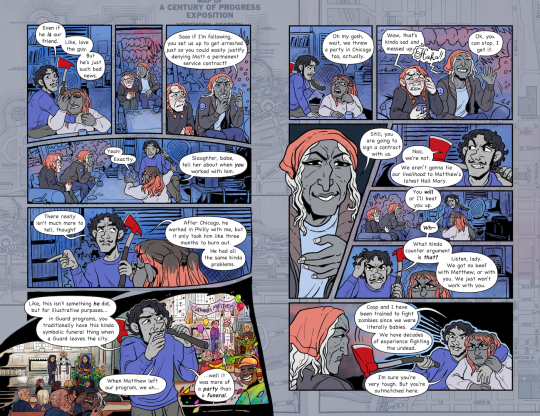
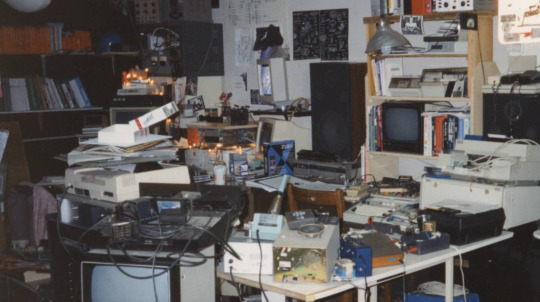
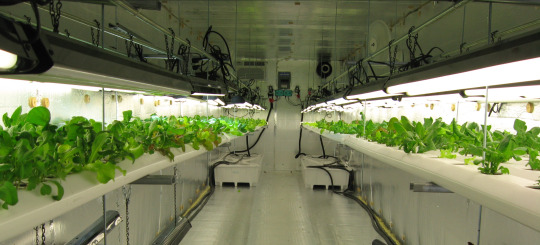
This year we're celebrating the process of making pages... so below the cut I've got a bunch of pictures sharing how I go about making pages of my evil post-apocalyptic workplace sitcom, Cargo!! :D
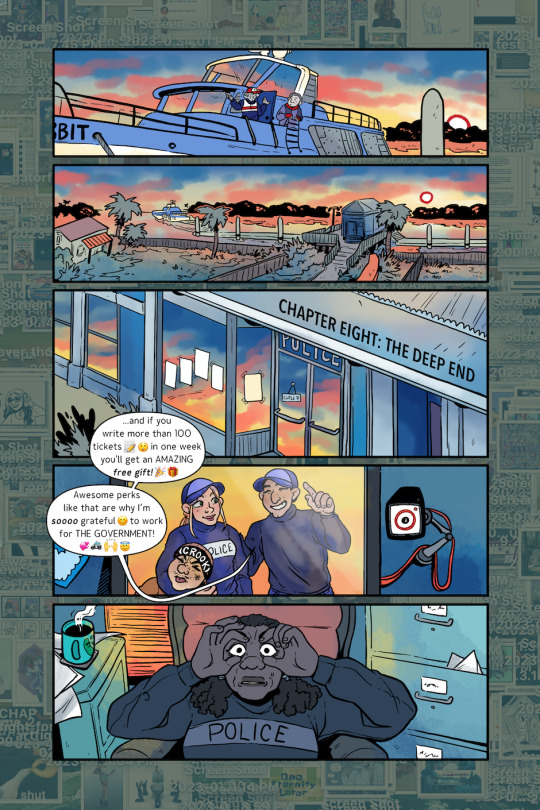
So! My process!!
Writing-> I think sometimes there's pressure to "write" your comic a certain way, I see people talking about script format and stuff a lot. That really doesn't work for me, though! I write my "first draft" script in short scenes on scrap paper, in whatever order they come to me. Sometimes a scene will just be one or two lines, and then a little description of what I want to happen in the rest of the scene.
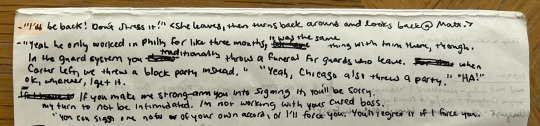
Later I type the scene up, and write the "connective tissue" that fits between the disjointed scenes so they all flow together like they ought. I don't do page breaks or even character tag or action notes hahahaha I like it to be as BASIC as POSSIBLE so it's easy to edit. And since I'm the person drawing it I can almost always remember who's supposed to be saying what lmao

I edit a lot, but the most major editing is also probably the last bit... when I letter my pages usually I realize "they would never say that" and so I end up rephrasing everything. My art brain is sometimes waaaaay better at phrasing hahaha. Like you can see in the finished page for this script I rewrote like basically all of it, and actually went back to the original "sketch" script in a lot of places.
Thumbnailing-> my thumbs are really big, I draw them with markers on printer paper and keep them in a binder!! I like to thumb scenes in batches and I also usually write my dialogue on them, just so I can read through them before (and while) I draw to get a feel for how the pacing works. :)
youtube
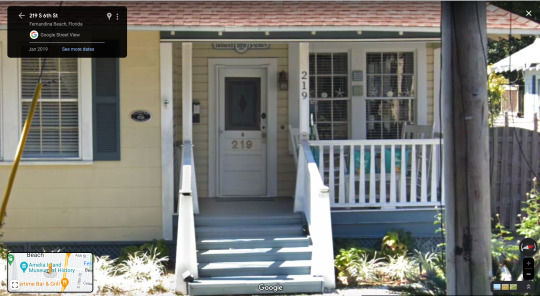
Sketching-> OH sketching is also really hard for me! I don't have a good visual imagination so it's really important for me to make sure I have good references. Last year I was especially focusing on setting.
My comic is set in Florida. I'm lucky in that I used to live there and still go back to visit sometimes, so sometimes I can gather my own reference images! But more often I start on Google Maps or Zillow, trying to find buildings that have interesting features or the right kind of "look" for what I want. I'll also look up other interesting elements, my comic is set in a post-apocalypse and I'll research home gardening and things like that which people would probably have.
For example, in this set in chapter 7, I used Google Maps images, photo references of indoor hydroponic gardening, and like, 90's-00's hacker computer setups haha. Also my BFF Roomstyler.com, where you can make 3d house interiors haha!!

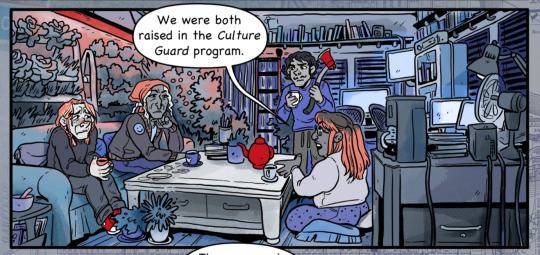
Lineart-> I LOVE lineart it is my favorite!!!! I sketch and ink two pages at a time, and it usually takes somewhere between 10-12 hours to do both steps.
I actually think my art looks best when it's just lineart... but I think my STORY is better with color, like it makes it clearer and easier to read and it has a better atmosphere HAHA.
Colors-> I think it usually takes me 4-6 hours to do 2 pages (I haven't timed myself as consistently as I time my lineart and sketching). I have a big file with small copies of my previous pages that I color drop from, and my characters are all flats only. The limited palette that I use is also really handy, it streamlines coloring a LOT.
Finishing Touches-> aka I steal mercilessly from my one true love, my internet home, the beautiful and blessed Wikimedia Commons
I put lots of overlay layers on my art! I like textures so having some strange little textures or pictures on things makes my art feel a lot more finished to me.

And finally my very most favorite ✨finishing touch✨ is the bright colored/patterned gutters that I use. Here are some of my favorites that I've made and used in the past!


And that's all!! I hope you guys have a very happy Webcomics Day and find lots and lots of wonderful new things to read!!!
40 notes
·
View notes
Text
The biggest heist that almost was
Let me tell you about the most insane bank heist that is going to sound like I'm just leaking the script for the next American hacking movie. The goal? Steal one billion USD. And it all began with an email and a printer, which as we all know is where problems usually start. Another weapon in this heist was... Weekends and time zones.
As usual, no prior computer science education needed.
What happened?
On the morning of February 5th 2016, a printer had stopped working in the central bank of Bangladesh (Bangladesh Bank). But it wasn't just any printer, it was the printer responsible for printing all the records of the multimillion transfers going in and out of the bank. When the poor employees finally won the printer battle and had it resume normal operation, they saw a very concerning account transfer in the records that was coming out. The bank had an USD account in the USA, at Federal Reserve Bank, with approximately 1 billlion Dollars in it, and the Federal Reserve Bank had received instructions to drain almost the entire amount. In the records that came out in the printer, the American bank had attempted to urgently message the Bangladesh bank regarding this transfer, but couldn't get through to them. This was because the hack had actually started the day before, Thursday 4th, at around 20:00 Bangladesh time, when the bank was closed. However, USA had just started their day, giving the American bank plenty of time to follow through with the instructions from the Bangladesh bank to drain their entire account while they were closed. And that wasn't the end of it, as weekends are from Friday to Saturday in Bangladesh, meaning that the Bangladesh bank headquarters in Dhaka wouldn't discover this withdrawal until Sunday morning. That's when they immediately tried to reach the American bank, which of course didn't work as over there it was Saturday evening, and the American weekend is from Saturday to Sunday, meaning that they wouldn't be reachable until Monday.
You see what I mean by the hackers using time zones and weekends, finding the perfect time for the American bank to execute their orders while Bangladesh discovers the withdrawal several days too late, and again several days too late for Americans to be reachable. But it didn't stop there with their timehacking.
The money had to go somewhere from the American bank, and it would be stupid to send it directly to the hackers own account without laundering the money first. So they had set up four different bank accounts in the Philippines, using fake names and credentials. Why the Philippines? Because the Lunar new year was on Monday the 8th, which is a holiday and holiday means no bank activities in either Bangladesh or the Philippines, buying the hackers even more time. As a final act, they messed with the printer responsible for printing transaction records, adding another few hours to their schedule. Moon and stars really aligned perfectly for this plan.
But how did they do it?
It all began one year prior, in January 2015, with an email sent to several employees at the Bangladesh Bank. The email seemingly contained a job application from a person who didn't actually exist, but who was very polite in his request for a position at the bank, with a link to his CV and cover letter. Naturally this link led to a document with a little surprise gift - malware. Since the heist happened, at least one of the recipients must have clicked the link, and successfully deployed a RAT - Remote Access Trojan, malware that lets you control a computer from the comfort of your own home, as well as a toolkit with various malware to move from computer to computer, avoiding discovery, and covering their tracks.
From there, the hackers slowly made their way through the bank offices network, one step at a time to avoid setting off alarms, looking for any computer that had control of the banks SWIFT setup. SWIFT lets banks transfer large amounts of money between themselves and other banks connected to SWIFT. And as soon as they found one of those computers, they stopped. They didn't need to hack SWIFT in the traditional sense of the word - since they operated in a bank computer, the SWIFT-software assumed they naturally had to be bank employees. However, one of the parts of the malware used in the heist was for manipulating the SWIFT system, as the hackers weren't physically there to press anything. Additionally, since they were laying dormant for the time to strike, they needed to keep an eye out for SWIFT updates that could detect any tampering with the system, and adapt accordingly.
Then they waited many months for the stars to align on February 4th, 2016.
There were 35 transfers made by the hackers from the American bank account, totaling almost 1 billion USD, but there were two of these tiny little seemingly insignificant details that prevented this from becoming the worlds largest bank heist in history. The hackers biggest enemy became this concept known as “words”.
The Philippine bank accounts were all located in the same RCBC Bank office on Jupiter Street in Manila. And this would be the hackers downfall, as USA had sanctions put on an Iranian cargo ship called Jupiter. Since the transactions went to a recipient that contained the word “Jupiter”, it created a security alert in the Federal Reserve Bank that the employees needed to investigate. When they saw what was going on, they managed to stop all but five of the initial 35 transactions, thus “only” roughly 100 million USD made it to the Philippines. The Bangladesh bank requested to reverse the transactions, but since the money was in the Philippines, they would need bureaucracy in form of a court order to reclaim the money, and we all know that's not a 5 minute project. It was when Bangladesh filed the court order in late February that the case became public (since court orders are public documents) and the news broke to the country.
Once in the RCBC bank accounts, the money arrived on Friday the 5th and was immediately moved again. First the 100 million was converted to local currency, and some of it was withdrawn in cash, while the rest was sent off to other hacker-controlled locations. And this is where the second tiny little detail cut off even more of the hackers precious payday. 20 million USD had been sent to Shalika Foundation, a charity organisation in Sri Lanka. But, once again the hackers worst enemy - words - decided to strike again. A typo was made in their transaction, sending the money to “Shalika Fundation”, and a bank employee who must have had their morning coffee spotted this typo and rejected the transfer and kept the funds frozen. This left the hackers with 80 million USD.
✨Now comes the money laundering!✨
There was a second reason for choosing the Philippines as deposit zone; gambling is legal and the casinos had no money laundering regulations imposed. The accomplices of the heist booked private rooms in two casinos located in Manila - Solaire and Midas - and proceeded to purchase tokens to gamble for with the stolen money. Since they played with a room consisting of their fellow accomplices, winning was not really much of a challenge. Then the tokens could be exchanged back to money that would now be clean. To avoid suspicion, they didn't gamble all of the money at once, but over the course of several weeks gambled away the dirty money to clean money.
Who was behind it?
It's normally difficult to pinpoint where the more sophisticated hacking groups come from. Oftentimes, they will leave false clues behind that points to another group so they will face more trouble instead of the group that did it. They may even place clues from several different groups, just to mess with the analysts. It's also quite common to simply “steal” a way of working from another group, or use a leaked/stolen tool from another group (criminals aren't safe from other criminals, especially not in this business) - there are new malware coming out all the time with code that is just a slight modification of a well-known malware actor that had their source code leaked or simply had hired the same programmer. Or they may leave no clues as to who was behind it. Attribution to the guilty part is usually the single most difficult mission in IT-security - often it's just pure guesswork with little to no solid evidence to back it up, if you're lucky there's circumstantial evidence.
This case was no different. The first clue came from the IP the bad guys used to connect to the Bangladesh bank from. It was located in Pyongyang, North Korea. But, as I mentioned, this is not a conclusive verdict, as the IP may simply be planted false evidence to throw the analysts off their track. After the heist, the hackers used a data-wiper to scrub as much of their malware off the bank systems, but they didn't succeed in deleting all of it, some of the tools were still present, including the wiper.
Due to the scale of this operation, it caught the attention of every single IT-security person and IT-security company worldwide, who all of course wanted to know who and how they did it. With the remaining malware, a joint effort was made, comparing malware code to other malware code for similarities. Some was found in Poland, after an analyst noted the similarities from another suspected North Korean hack. Some was found in another infamous North Korean hack targeting Sony Pictures. More and more signs pointed towards the same actor. Some were false leads, the hackers seemed to be wanting to implicate the Russians did it, but failed quite miserably at that, just sprinkling random Russian words into the malware and making it way too obvious it was a ruse.
You may not believe this, but the North Korean government has one of the most notorious hacking groups in the world, known as the Lazarus Group. Some of its more well-known adventures include an extremely data-destructive hack of Sony Pictures (as punishment for releasing “The Interview”), creation of the ransomware WannaCry which was used against many targets worldwide (including hospitals), and various attempts at gathering information from governments and government-affiliated corporations all over the world. And, of course, this heist.
Eventually, after months of collaboration all over the world, the final verdict fell on North Korea, and specifically one of their programmers. His name is Park Jin Hyok, and worked for Chosun Expo - a front company for the North Korean government, located in Dalian (China) who used the funds of the fake corporation gained from legitimate programming jobs from customers worldwide to create the malware and plan the heist with all of its expenses. Of course he wasn't the sole person involved in this project, but it's the only person we know was in it.
This particular heist had been meticulously planned for several years, and Park Jin Hyok had moved to Dalian, set up fake IDs and built a network of contacts there to avoid suspicion. However, he didn't manage to delete all of his online footprints, and became the number one suspect when his internet activities suddenly came from Pyongyang, North Korea.
Additionally, several Chinese business men - many associated with the casino industry in China's Macau territory - were also charged and arrested for assisting with setting up the gambling rooms and coordinating the money laundering process. One unknown Chinese business man managed to get away with 31 million USD of the 80 million that remained after the heist, and as you would expect, he was never to be seen again.
With the middlemen from China paid off, not much remained of the original 1 billion to North Korea. But the heist has fascinated the whole IT-security world nonetheless.
I remember when the news of this case dropped to the IT-security world, who all wanted to take part in the hunt. It was a very fun time, we were all sitting at the edge of our seats waiting for the next update. I hope it was at least somewhat exciting for you too to read about, and thank you for reading this long post! If you liked it, please consider reblogging as it motivates me to write more. You may also like malware stuff I've written about before, such as Stuxnet or just plain evil malware that is a threat to our daily lives.
As always my inbox is open if you have any questions.
94 notes
·
View notes