#how to use font tag in html
Explore tagged Tumblr posts
Visit Tumblr Blog
Explore Tumblr blogs with no restrictions, modern design and the best experience.
Last Seen Tumblr Blogs


Fun Fact
130K people were victims of a chain letter scam that affected Tumblr in May 2011.
Note
i replied with this
but honestly the brainworms took me so here it goes like this (in my soul)
and then crash accidentally references Red or #Nonny Knocks to Izzy during a fight and they both just combust on the spot
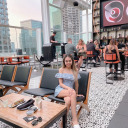
horrid concept: Izzie runs an askblog on the side for shits&giggles
supplemental idea: crash finds it in a way completely unrelated to Izzie not knowing what incognito mode is
not a bad idea. Ill think on it.
#crash machinima#izzy crash#crash crash#lol funny tag#my writing#i guess#does this count as fanfic?#this was of moderate effort idk what possessed me to do this#i edited tumblr's html to do this lol#also i havent practiced writing these guys yet so they're still kind of calibrating in my soul bear with me if it sounds weird#i was going for like#izzy lightening up a lot when shes online in a fandom space running an ask blog#but also shes still a bit obsessive over perfection which is why crash taunting her with a nonexistent typo worked#shes assuming it's a troll (coping) (but also correct)#crash was just fucking with her at first#he lied about the typo because he was bitter about her snips#but her earnest reply for some godforsaken reason got him to read a little and hed rather shoot himself before admitting that#Izzy is pretty deliberate in how she types even if it doesn't look that way#mostly correct grammar and punctuation in body text unless it's for a specific reason#and then more slang and colloquialisms that fit in with “tumblr culture” in the tags#crash is kinda just typing on the computer but he gets invested near the end there#i guess this counts as fanfiction#what are the character tags though lmao#anyway again i'm not used to writing these characters but i hope it's okay! was in my brain#i used the firefox inspector on a random post and then edited all the text in it lol#i could have photo edited it but then i'd have needed to find fonts n shit and i didn't feel like it#this was easier#and kinda fun in between attempts at cracking adobe software#crash was fun btw#my logic was that someone that writes werewolf smut and runs an askblog probably acts very different online
28 notes
·
View notes
Note
Hi hi! I hope you're having a good day so far! 😊 I have been super appreciating seeing you creating site skins and I saw you said you were self taught. I wanted to ask if you might share some of the resources you've found helpful in learning to make them. I've gone through the posts ao3 has in the FAQ and I have got some limited experience with html from the myspace/livejournal/early tumblr days (though it's been a while since I used them and am definitely rusty lol) so I got a grasp on basics. I can figure out how to make changes like color and font and padding and etc, but where I've been struggling is trying to figure out what the available selectors are and what they control. Like .workskin and .bookmarks. I've tried to find something like a glossary or list of what's available to mess with and I've tried just going through other people's skins to see what I can decipher, but it's definitely been a struggle to process and understand working that way. Any pointers or resource suggestions you might have are greatly appreciated! Thank you!
My main resource for the CSS code skills is W3Schools.com. The tutorials are mostly easy to follow, and most of them have an option where you can run their code and then modify it to run your own version.
If I can't find what I need there then I just google "CSS drop cap" or whatever I'm trying to do and something usually pops on StackOverflow or CSS Tricks.
As for the selectors, that's where you want to be on a computer instead of a mobile device so that you can use your browser's Inspect feature. Right click on the page you want to look at and this menu pops up. You can choose Inspect down there near the bottom.
Using a cut because of length and screenshots.

This is what AO3 looks like with the Inspect window open in the Firefox browser. If you're using Chrome, the window will open along the right hand side instead.
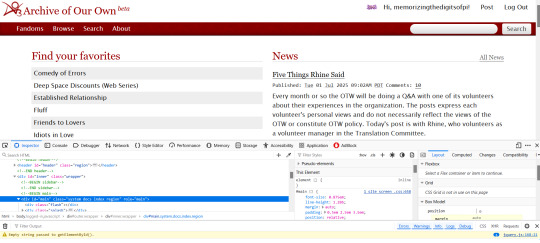
The thing that makes the magic happen is the tiny little arrow inside the tiny little box in the far left upper corner.
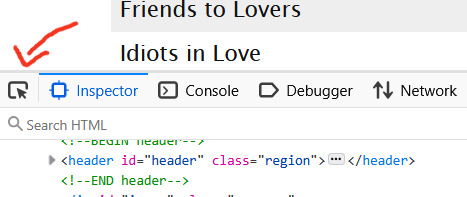
Click on that little arrow and then hover your mouse over the website. As you move your mouse around, different areas will highlight. You'll also see some mouseover text telling you the selector for that element.

a.tag is still pretty generic, though. That just tells you it's a link (the html a tag) that is also a tag. So how do you get to know that specific link in particular in that specific part of that specific page?
Click on it. When you do that, the inspect window will shift automatically to that exact area of the code, including selectors
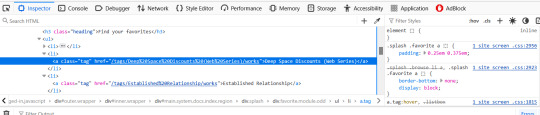
On the left, you can see the favourited tag link is highlighted. On the right, you can see a couple of different snippets of code that start with .splash .favorite a
if I scroll down within that window, I can see more code for that area of the page
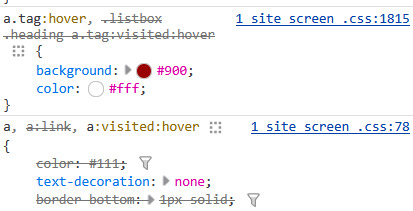
this shows me that tag links have a red background and white text when you hover over them
a.tag:hover { background: #900; color: #fff; }
The great thing about the inspect window is that you can do temporary edits in there to try stuff out. So you could change that red to a blue. You could change the white to black. You can add more lines of code like a border or increased padding etc and see it change live on the screen. All changes will revert if you refresh the page.
The other thing, that I only JUST noticed as I was making that medieval skin (or maybe the rustic hospitality one I made just before it?) is that there's also a breadcrumb along the bottom of the lefthand window!

That breadcrumb shows me the exact selector I need for the element I clicked on! In this case, that favourited tag can be styled with
.splash .favorite.module.odd li a
I have no memory of why I know this but you leave off the div when you're writing the CSS
You can get as specific as a link (and even use a pseudo-class like nth-of-type if you want to make each one of those links a different colour) or you can leave off the li a (list item link) and just style the box itself. That's how I added the woman throwing hearts into the favourites in the medieval skin.
This might be too much information or it might make you crave even more, but either way I hope it gets you started? Good luck!
116 notes
·
View notes
Text
Disco Elysium: The Final Cut Work Skin
I put together a work skin for Disco Elysium AO3 fics or any other HTML/CSS styling! It's compatible with and without dark mode or a dark site skin like Reversi, though I think it looks best with a dark site skin like Reversi, since it's made to look like the game (Final Cut version, anyway, which is what I started with).
Works that use this skin: KK57-1903-1145 THE SHINING MACHINE
Default Site Skin (without work skin | with work skin)
Reversi Site Skin (without work skin | with work skin)

Not pictured but included in the full CSS: choices, active skill checks and skill check results. Full CSS under the cut!
.skill { text-transform: uppercase; font-weight: bold;} .psyche { color: #634CA8;} .intellect { color: #5BA6B7;} .physique { color: #A73F5C;} .motorics { color: #C39E3C;} .check-result { color: #808080;} p { text-indent: -2em; margin-left: 2em;} .white-check { background-color: white; border: 2px solid black; color: black !important; } .white-check-locked { background-color: RGBA(1,1,1,0.8); border: 2px solid black; color: RGBA(0,0,0,0.8) !important;} .red-check { background-color: red; color: white !important;} .choice { text-indent: 0; padding: 0; margin: 0;} .new { color: RGBA(168,60,41,1);} .hovering { background-color: RGBA(0,0,0,0.7); color: white; font-weight: bold;} .used { color: RGBA(168,60,41,0.8);}
Tutorial: Creating a Work Skin
How to use this work skin in particular:
Wrap your labels with tags and use class "skill" for all of them. Add the stat class if appropriate. For example: LOGIC for a LOGIC label (based in the INTELLECT stat, but KIM KITSURAGI for a person.
In the tags for your choice items, add "choice" and any other appropriate classes. You will need to add "new" if you want them to be colored red as they are in the game. This is to prevent incorrect cascading when used with other classes.
Be sure to preview your work skin before you post!
If there are issues or questions please feel free to @ me or drop me an ask 🩵💜🩷💛
#disco elysium#ao3#ao3 work skin#formatting#fanfiction#for as polished as the game is this was surprisingly quick to put together
123 notes
·
View notes
Note
Hey so I'm not very tech savvy but I was wondering if adding random silly lines or just something that makes no sense between paragraphs/sentences on our fics can poison AI if the fics are scraped?? I tried something by adding some random lines with white text between paragraphs of my fic which don't show up on default ao3 mode but they are a part of the text nonetheless. Of course that'll involve more efforts on part of the writers to add lines and format the white text using html and workskins but if it does turn out to be effective it might make ao3 less lucrative for AI scraping if a major amount of works contain this and it'll make it harder for AI training. It does have drawbacks that it'll only work on default mode so anyone using dark skin on ao3 might have to switch to be able to read properly and it'll make works less accessible to readers who use text to audio if there are random lines in between but what other options are we left with if even archive locking our works doesn't work??
You absolutely could, but there are limitations to that.
For one, like you said, you're making your work inaccessible to certain readers. That's fully within your rights, though I think most of us strive not to exclude people using screen readers.
Second, from what I know, when you download a dataset like this and intend to use it to train an AI model, you first go through the dataset looking for obvious junk data and toss that out. So if you're putting something that is clearly not real fanfic in there, any decent data analyst is probably going to spot it and toss your fic. If that's your goal, that's a win for you. Personally, if I'm making the effort to inject poison data, my goal is to be included in the training data used so I can trash the model, so I don't want it to be obvious.
Third, I don't see anything explicitly in AO3's TOS against adding data poison in this way, but I don't see them endorsing doing that either. It feels like a grey area to me, and I'm not sure you're allowed to do it, so I am not recommending anyone do this. Rest of this post is theoretical.
So theoretically, how I would do it is putting the junk data at the end of the fic/chapter. Hide it like you're saying, by changing the font and/or background color of the section with CSS. Then put a nice, clear message right after the chapter ends and the junk data starts, something like, "Hey, readers! This chapter is over. Turn off your screen reader and move to the next chapter now." That gives your real humans a warning and stops them from being confused or wasting their time. Then dump your poison. You can also write something in the beginning A/N, I believe. I know this most recent scraper never ever pulled data from the author's notes, so the AI wouldn't see anything you put in that section.
Scrapers are typically pulling your work without the workskin enabled, so for formatting, you're really just trying to make it look nice for your real readers so they don't have to see your poison.
As far as actual poison, my suggestions:
Your own writing or writing you have explicit permission to use, so you're not breaking anyone's copyright. Easy mode: jumbled paragraphs of your own past works for any fandom except the one your current fic is for.
As mentioned above, don't put absolute nonsense in there. If it's bad enough, it'll be spotted and filtered out. Like, if it's not even real words, anyone feeding it to AI is probably going to catch that and toss your data out, excluding it from the model. It might be fine if it's all real words, but not in any sensible order. Not sure on that. But don't just insert keysmashes if you want your data to be used in the AI training.
Terrible crackfic would be good. So would writing for a completely different fandom and different tags. The writing should not fit well with the tags you use for the fics. (So if the real fic is tagged Fluff and Alternative Universe - Coffee Shop, your poison should not include that. Make the poison a hurt no comfort canon-compliant fic or something else different.)
Keep in mind you should not be putting E-rated data poison in a G-rated fic. Real humans may still see this no matter how much you hide it, particularly if they download a PDF copy of your fic. If it's content that requires a warning per AO3's rules (explicit content, graphic violence, etc), you do still have to tag for that, even if it's designed to be invisible to humans.
Use unique writing, so even if someone later using it for AI catches it once, they can't just search for the exact wording you used in one fic and easily filter out all the rest of your poison. Again, this is if you want to be included in the AI training to throw the model off.
Again, theoretically, if I were going to do this, this is the CSS code I might use for my poison section of the fic:
#workskin .fuckai { background: #333333; color: #333333; font-size: 1%; }
It would theoretically look like a weird grey gap to mobile users or be nearly invisible to desktop users, even if it contained, say... 1,000 additional words.
Finally, scrapers are trying to grab millions of fics from AO3 when they do it. They're not looking closely at 13 million fics. They're only searching for the most obvious junk. So the only reason you would want to hide it like that is to make a better experience for your real readers. You don't need to hide it to get it into a scraper's AI model.
38 notes
·
View notes
Note
Hi, Mr Prokopetz, I'm a big fan. Apologies if you've answered this before, but I was wondering what software you use to create the pdf and epub layouts of your ttrpgs, and whether you'd recommend it to a hobbyist who wants to try putting together something more professional than a gdoc for their own ttrpg?
My workflow is unfortunately not terribly accessible unless you have a fair amount of technical know-how.
In brief, I write all of my games in Notepad++ as HTML documents, taking care to use only the subset of HTML5 tags which are supported by most popular EPUB readers. I then use Calibre (or, more, precisely, the command-line utility that comes with Calibre, though you can get mostly the same results via the GUI) to bundle the HTML document as an EPUB3 file. I typically distribute both the HTML and EPUB versions (the former in a zipfile with all of the fonts and images and such) because web browsers tend to have much better screen-reader support than EPUB apps do.
The PDF, meanwhile, is generated from the same master HTML document using CSS paged media extensions – the layout is all generated automatically based on rules specified in a big, gnarly CSS file, and is never touched by human hands. There are a number of software packages which can do this sort of CSS-driven HTML-to-PDF conversion, some of them free or open source; I use a commercial product called Prince because, to the best of my knowledge, it's the only such software which has out-of-the-box support for PDF/UA semantic tagging (i.e., the stuff you need to do in order to make your PDFs screen-reader friendly), but you have more options if you're willing to tag your PDFs manually. (I am not.)
As for whether I'd recommend doing it this way? Like I said, unless you're a proper gearhead, not really; it's super efficient once you get it all set up – the only version of the game I actually maintain is the master HTML document, and generating updated versions of all the other formats is a one-click affair – but it's really only feasible for me because I already knew how to all that workflow automation stuff for unrelated reasons. I can't imagine teaching yourself all that from scratch just to write elfgames!
349 notes
·
View notes
Text
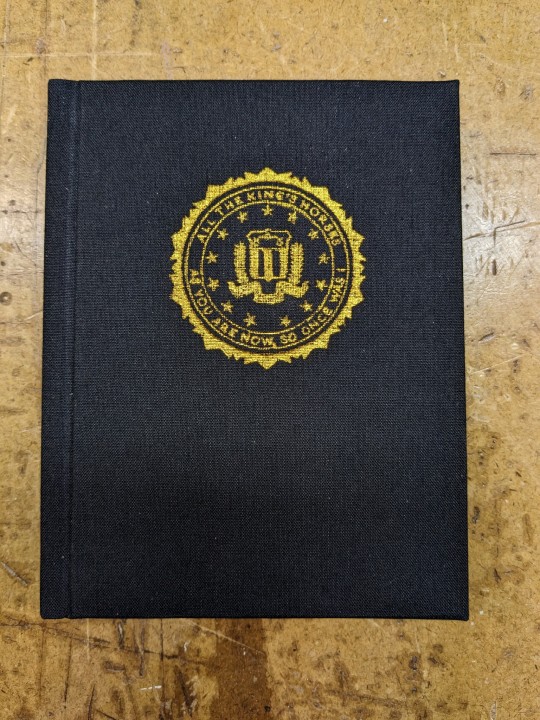

All The King's Horses | As You Are Now, So Once Was I by @samwpmarleau (grumkinsnark)
All The King's Horses [LiveJournal ch1] [Fanfiction.net ch1]
As You Are Now, So Once Was I [LiveJournal ch1] [Fanfiction.net ch1]
Fandom: Supernatural, Criminal Minds
Rating: Teen | PG-13
Category: Gen
Words: ~36,192
All The King's Horses: Protect and Serve. Fidelity, Bravery, Integrity. To what lengths would you go to uphold those oaths? When it comes to a particularly brutal and unsolvable case, the BAU just may have to resort to some more unorthodox methods. SPN/Criminal Minds crossover.
As You Are Now, So Once Was I: Sequel to "All the King's Horses." When Dean catches J.J.'s press conference on the news about a current case and notices a few...inconsistencies, he realizes the BAU is definitely going to need his help. Again. ON HIATUS


About the Book
FORMAT: Letter quarto, flatback bradel binding, french link stitch, no tapes
FONTS: EB Garamond [via Google Fonts], Supernatural Knight [via DaFont], D-Din [via Font Squirrel], Daniel [via DaFont], Permanent Marker [via Google Fonts], Arial
IMAGES: Seal of the FBI [via Wikipedia], Dean's handprint scar [by greenhorn-art]
MATERIALS: 24lb Xerox Bold Digital paper (8.5"x11"), 80pt binder's board (~2mm), 30/3 size waxed linen thread, embroidery floss (DMC #721), 1.9mm cording, brown cardstock, black Cialux bookcloth, gold foil transfer sheet (came with We R Memory Keepers hot foil pen)
PROGRAMS USED: Fic exported with FicHub, word doc compiled in LibreOffice Writer, Typeset in Affinity Publisher, imposed with Bookbinder-JS, title pages designed in Affinity Designer/Photo
.
I first read these stories on LiveJournal back in 2013, some time after I first encountered Tumblr, Supernatural, and the wider world of online fandom. Once I discovered SPNxCriminal Minds crossovers I devoured so many of them. Something about POV Outsider on the Winchesters, the existing connections with investigating monster vs human-crazy cases, and run-ins with the FBI... it's just works so well.
Of all the SPNxCM fics I read and enjoyed, All The King's Horses is among those that bookmarked themselves in my brain. Since it's been living there all these years, I thought it deserved a place on my bookshelf too.
(Rambling below)
Sourcing the Fic
I used FicHub to download the fics off of Fanfiction.net as HTML. Then I pasted them into LibreOffice Writer and created rich text documents of each fic, so I could Place them into Affinity Publisher.
The stories were crossposted, first on LiveJournal and then Fanfiction. I included the metadata from both sites in the appendices.
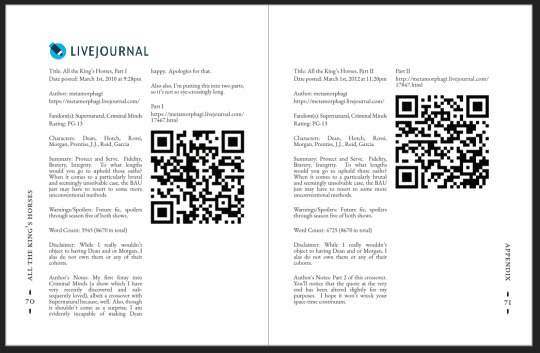
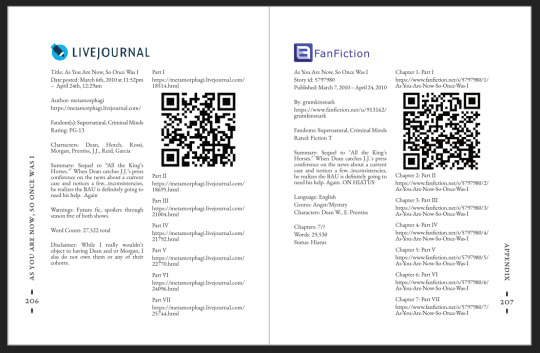
(It's fascinating to see the differences in the same work between platforms. FFN requires genres, so if the author doesn't add them on LJ then by default there's more info on FFN. But FFN limits listed characters to 2, so authors have to pick and choose the most important. Then there's the author's amusing disclaimers and spoiler warnings for these fics, which are only included in the LJ version)
Shoutout to the author for how they linked/listed their accounts on other platforms! Thanks to that I was easily able to track down all the tags/metadata for the fics, and find them here to express my appreciation for their stories!
Typesetting
Fonts
EB Garamond is my new favourite body font, 11pt as per my usual.
The title page is entirely Arial: 1) it was the closest match I have to the case file prop I was copying, and 2) if it was a government doc they wouldn't be using anything but the most basic fonts.
Headings and the the bullets bracketing the page numbers are set it Supernatural Knight, a free font in the style of Supernatural's title.
The location segments are in D-DIN, the closest free match to the font Criminal Minds uses (which is probably DIN).
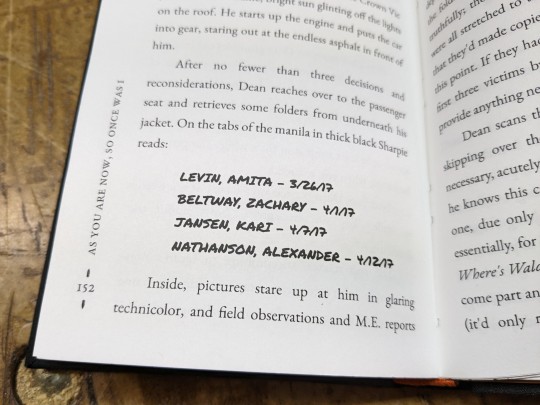
Daniel is used for Dean's 'rushed but legible' note.
Permanent Marker for the 'thick black Sharpie' case file labels.
Artwork
Title pages designed as FBI case files, copied from a prop found online (specifically Etsy's propfictionstudios', but it's all over the web so no idea who actually created it). I had fun plugging in all the fanfic/bookbinding meta!
The ID# above the author's name is the FFN story ID, and the date is the date originally posted on LJ.
The handprint used in the headings of ATKH is Dean's scar. I traced off of a screenshot from s4e01 Lazarus Rising. I chose to use the handprint instead of the anti-possession tattoo or a Devil's Trap as my SPN art element because 1) it's specific to Dean, and 2) indicates/reminds that the story is not set during the season 3 Agent Henriksen/FBI arc.
Grabbed the FBI seal off of Wikipedia.
Construction
Both fics typeset and printed separately, then sewn together into one book. Title page for the sequel was tipped in like an endpaper prior to sewing.
Endbands sewn with orange embroidery floss (DMC 721) around 1.9mm cording. I chose orange because Dean's being in jail brought to mind the orange prison jumpsuits Sam and Dean wore in s1e19 Folsom Prison Blues.

Black bookcloth for the cover, like the Winchesters' beloved black '67 Chevy Impala. (I'd wanted a Supernatural reference to balance out the Criminal Minds-ness of the FBI case files).
I'd originally planned to make lineart of the front of the car, and have it stretch across the bottom of the cover (maybe even wrap around to the back). Even found a useful reference to trace [from here], but it didn't look as good as I'd hoped. Instead I reused the FBI seal and swapped out its text with the titles.
(The effect of shiny foiled FBI symbol on small black book reminds me of one of those FBI badge wallets!)
The foiling process was an unnecessarily long and gruelling affair. My laptop served as a massive power bank for the hot foil pen as I spent 2hrs ever so slowly tracing the image, and then 15mins on the author name and touch-ups. Did it need to take so long? Moving slowly, pushing down hard, going over everything at least three times? I'm sure it didn't. BUT I did not want to chance peeling up the foil to check how I was doing and risk shifting it. It was worth it in my books (haha) ‒ I feel giddy and kick my feet like a schoolgirl whenever I see it!
New Things
Used 24lb paper for the first time, and I love it! It's a little thicker and heavier then regular 20lb printer paper, feels more substantial.
The page numbers & running/section headers are along the outer margin, instead of in the header/footer. This was my way around Affinity's buggy-ness regarding pinning things inline in master pages. (More about that below). If I had been thinking, I could have formatted them like the tabs on a file folder and cut the textblock to match. Oh well, the things you notice once it's printed 😔
This time I also started new chapters/sections using text flow & paragraph spacing settings, instead of using a master. As always, there are pros and cons.
Pro: much faster and less involved. (find chapter start, apply paragraph style VS working from the end cutting text, inserting a frame break, unlinking frames, inserting new pages with master, relinking, pasting, and adding chapter title to a different text box)
Con: images need to be added manually (whether by adding image directly, or by applying a master with the image). I forgot to do this for the second fic, so only ATKH have Dean's handprint scar.
Difficulties Encountered
Affinity Publisher is fighting me on pinning things inline on master pages. They like to disappear on regular pages I've applied the master to. Sometimes it works, sometimes it doesn't, sometimes it only works on some of the pages. Idk what's up. (The bullet character only faces one way so I had use textboxes, flip/mirror one, and pin them inline to the page number).
So instead of having page numbers in the footer, bookended left and right by text boxes with Supernatural Knight's bullet, I put it vertically down the side.
Updated Publisher and all my paragraph styles' fonts changed/went funny. Something to do with the update's variable font support, I think. What was previously 'EB Garamond' regular, was now something along the lines of 'EBGaramond-Regular' which isn't a font. Issue seems to have ironed itself out in my original (near-complete) doc while I was busy remaking it. 😐
On the bright side, the update brought QR code generation to Affinity!
#All The King's Horses#As You Are Now So Once Was I#grumkinsnark#samwpmarleau#fanfiction#bookbinding#fanbinding#supernatural#criminal minds
109 notes
·
View notes
Text
Sysboxes FAQ
Responses to some questions we frequently get! This post is long, so full responses are under the cut, but here are the main questions this post addresses, in order:
What are userboxes and how do I use them?
How do you make your userboxes?
What styles/customization can I request?
Do you have a box for X?
When can I send in a request/When will the askbox reopen?
How many requests can I send in per ask or per user?
Is there any particular media you absolutely won’t make boxes for?
Why hasn’t a box been made for my request yet?
What does X term mean?
What is your syscourse stance/Why can’t pro/endos interact?
Who can reblog/use these boxes?
What are userboxes and how do I use them?
Userboxes are rectangular images, often with an image on the left and information about a person on the right. They were originally meant to appear on a Wikipedian’s user page to convey something about a person. To use our boxes, you can reblog them to your tumblr page and/or right click to save the image for later use.
We have seen people put userboxes in their intro posts, in a certain tag on their tumblr, in Discord and PluralKit profiles, on their SimplyPlural (this post explains how), or in exchanges with friends. We generally request that you credit sysboxes when using our userboxes.
How do you make your userboxes?
Different mods use different methods, like Canva and MS Paint, but our main method of making boxes is using yerich.net/userbox. In the box that says “Left Box (ID) Text”, enter the code “src=“yourpicturelinkhere” height=“45px” width=“45px”>”, replacing yourpicturelinkhere with your image URL. Customize your userbox using the rest of the options on the site. You can screenshot your box here, or you can go to htmleditor.com and paste the “Raw HTML” code from yerich. Then you can use HTML coding to mess around with size, font, and color before screenshotting your finished box.
What styles/customization can I request?
This post details a lot of the customization options you can request, like boxes vs. banners, different fonts, colors, and images, including hand-drawn art by mods. You can also request a specific mod do your box. Most mods are adults, but if you feel uncomfortable with a minor making your request, you are free to add that in your ask. Note that if you are requesting an image that contains someone else’s art, we must get permission from the artist to use the image for a userbox.
This being said, we are not infallible to making mistakes on the origins of an image. We do try to reverse image search when provided with an image in an ask, but if you notice your art in a userbox without having been asked permission for its use, please let us know so we can remedy the situation.
Do you have a box for X?
Please search our blog using a keyword for the box you’re looking for and possible variants on it. For example, if you’re looking for a box about food, try food, foods, eat, eats, and eating as keywords. If you’re looking for a box whose keyword is a common tag on our blog, try checking #hard to find tag on our blog for boxes. If you cannot find a box with these steps, we likely have not made one yet or whatever we do have is unlikely to fit your request idea.
When can I send in a request/When will the askbox reopen?
We let people know whether requests are open or closed in three ways: the box in our intro post, the title of the askbox itself, and a post when requests first open or close with the tag #sysboxes status update. When our requests are closed, please do not send any in for “when requests are open”; it will be deleted.
At any given time, we have hundreds of requests in our askbox. We try to keep requests open as long as we can, but even with a large number of mods, there is only so much we can do. We run this blog in our free time, while dealing with work, school, and mental and physical health issues. We do accept questions/appreciation while our requests are closed, but sometimes we save them to respond to when we clear the askbox, to look forward to later.
How many requests can I send in per ask or per user?
We don’t limit how many asks a single user can send in, but if possible, we prefer you send in multiple asks if you have multiple requests. We’ll still do multiple requests in one ask, but one request per ask allows us to more easily sort and number requests. It also lets us respond to when requests will be posted individually instead of waiting until every one is queued or posted to respond to a non-anonymous ask.
Is there any particular media you absolutely won’t make boxes for?
We are okay with requests pertaining to fictives from most media, as we understand they cannot control what source they introjected from. We will not make requests that express support for harmful media. As for media we won’t do requests for introjects from, we have decided not to make boxes pertaining to true crime or nazi introjects, for our and others comfortability. This is not a complete list, as different mods have different boundaries, but we try to honor requests whenever possible.
Why hasn’t a box been made for my request yet?
If you want to know exactly when your userbox will come out, send in your request off anon, and when we queue it, we will privately respond to your ask letting you know when to expect your box. Note our queue is very long.
We do not always do requests in the order we receive them. Some requests we must discuss or reword (for length, misinfo, etc.) before making. We do not make requests that incite hate/harassment, include misinformation (and can’t be reworded), include (specific) details that may endanger the user, or put us in the middle of heavy discourse we do not want to be roped into.
What does X term mean?
This is a userbox blog, and as such, we prefer you do not direct your questions about DID here. We are not professionals (and cannot diagnose anyone), and we recommend looking for credible resources. If you cannot find anything for your question or would like resources, some of the mods are ok with asks about things relating to DID on their system blogs. Mod blogs ok with these questions include @fromthewondersystem and @thecircularsystem.
What is your syscourse stance/Why can’t pro/endos interact?
Individual mods fall across the syscourse spectrum, but this blog is overall anti-endo. In truth, we do not know nor much care whether it is possible to have a non-traumagenic system. We feel our system experiences are deeply informed by our trauma, and this is very different from endos’ experiences.
Additionally, mods of this blog have faced much harassment and harm from the pro-endo community, including being set back in recovery, misinformation, cultural appropriation, abuse, death threats, and doxxing. We are aware these issues extend beyond just the pro-endo community, but this is where we have most commonly found them. For these reasons, we do not want endos or pro-endos interacting with our blog or using our userboxes. There are plenty of pro-endo userbox blogs already.
Who can reblog/use these boxes?
First and foremost, these boxes are for people with (traumagenic) CDDs. The main people who can’t use the boxes we make are those who fall under our DNI.
We do allow syscourse-neutral/unaligned people to use our boxes - we are not here to force you to pick a side. This also includes people with alters who fall across the syscourse spectrum. People who are not pro-endo but allow pro-endos to interact with them may use our boxes, but we recommend noting that we are an anti-endo blog.
As for singlets, we ask them not to use boxes that specify they are for systems or use system-specific terms. We have decided they may use our other boxes. They may also reblog system-specific boxes for system friends. We do request that singlets do not make userbox requests, as other non-system-specific userbox blogs are out there to make requests for them, and we already receive so many.
74 notes
·
View notes
Note
Previous anon here! I would love to read how you did it. Im suprised you managed to did it in Google Docs. I thought you used a program similar to InDesign or programs that are more suitable for graphic design ANYWAY i am also curious how many chapters you used. Was it seven? Did you stop there because the length was convinient or because a story arc ended there? I am not really good at identifying where an arc begins and stops. okay bcgjkkcj THANK YOU FOR YOUR TIME
YAYYY I LOVE TALKING ABOUT ARTS AND CRAFTS!!
gonna put this in main tags as well this time so:

this is my bookbind of trod pt 1 :] by @bamsara which u can and SHOULD read here
ok so this first bit is how I made the pdf and then the next bit is how I turned it into signatures for binding. Then the last bit is splitting up chapters and stuff. If anyone has any advice or tips on what I could do differently (for free or v cheap haha) please let me know!! This is so fun I love learning and discussing and making things
first thing I did was grab a real book so I could take a look at where they put the title page, where they left the pages blank, etc
I then formatted the title and contents and stuff in docs by messing with font and position on the page (etc) until it was to my liking! THEN I realised I wanted an image on the very first page so I went back and put that in. I got to design it it was sooo fun
OH. I ALSO STUCK A SHAMURA QUOTE WHERE THE DEDICATION WOULD BE. HEHE
thennn I went and changed all the heading, title and normal text options for the doc so that they looked nice! I used times new roman size 16 :) but that might be a bit big for most people. I like bigger text
^^ that step was important so that when I started copy-pasting in the text it would all come out the right size automatically. also so that my chapter titles and notes pages looked consistent
next I downloaded trod from ao3 as a html file! I found it works better than pdf bc there aren’t any page breaks
I just copied and pasted trod in one chapter at a time and added in the notes and summary for every chapter where I wanted it and that worked pretty well for me
THEN SPELLCHECK. I didn’t want to do it automatically (docs had some horrible opinions sometimes. Also kept trying to erase bits of the writing style that made perfect sense and sound beautiful???) so I had to confirm every change which took a while but I think was worth it
lastly I added page numbers. They did not want to cooperate with me and I still do not understand the tiny fuckers, but I managed to get them in the middle of the page for book 2 so it looks less weird (hurrah). There’s a button for it
then I saved it as a pdf!
OK NEXT THING : SIGNATURES
this post is my bestest friend (link is to a tumblr post that was really helpful)
and this webpage is how I got a pdf of the signatures (it’s the same one linked in the post)
CHAPTERS:
yeah I split it into chunks of 7 chapters! Book 1 ends on the argument in the field bc a) it was getting wayyy too long and b) I want to lend it to my friends and that’s a delightful emotional cliffhanger. Book 2 (which is actually finished. I’ll try and post photos later today or something) ends after hekets release from purgatory which is I thiiiink another 7 chapters? Book 3 is gonna be a bit longer bc I want to do it up to the most recent chapter, which I was gonna leave out bc of length but then it came out and I went insane haha
OH in book 2 I did drop caps and title decoration which I designed in procreate and then imported into docs and moved around as imported photos. I’ll put a bunch of pictures at the end too
THANK U FOR ASKING!!! If there’s anything else u want to know then let me know!! :]


16 notes
·
View notes
Text
We gotta go back to our roots with tone tags. Don't just use '/j' to indicate it's a joke. it wont change the plaintext at all. you gotta write out the full html tag, angled brackets and all. if you dont tell the rich text editor that you're </joking> how is it supposed to know to infuse the vibes of the post with the silly energy of a joke. the text editor can't make the font into curlz mt of the soul unless you give it the instruction to
15 notes
·
View notes
Note
sorry i couldn't find out how to ask on your other blog.
that book binding you posted is gorgeous btw !!
I noticed that in one of the photos you included the disclaimer that you also edited it. I just had a question about how you formatted the text.
one of my biggest gripes with AO3 is text formatting (i often feel like i'm reading a legal document vs a novel/story) . Did you change how it is formatted on AO3 compared to printed?
I feel like i'm in the 0.5% that hate AO3 formatting but i thought i might as well ask in case you have any tips for that. >,>
(also how do you decide on the page size, do you just choose a standard size for all your projects? or do you vary it depending on what you are binding?)
thanks so much for taking the time to answer and for sharing your projects :) !!!!!!!!!!!
hey anon! I have asks turned off for the sideblog, but happy to answer here. Thanks very much!
I'm taking this opportunity to info-dump and link a lot of resources. I think they're useful for people new to either typesetting or bookbinding, but not all are directly related to your queries. That said, hope this is of use!
one of my biggest gripes with AO3 is text formatting (i often feel like i'm reading a legal document vs a novel/story) . Did you change how it is formatted on AO3 compared to printed?
I do a fair bit of editing when I'm binding a fic; typesetting is often the longest part of the process. Your mileage will vary depending on your experience with using word processor software, particularly the paragraph style and page style settings. Another factor is how simple/complicated you want your typeset to look. Replicating a published novel in format is difficult but learnable for a complete beginner.
I'm not equipped to give a full tutorial on how to typeset, but I'll point you towards some useful resources for ficbinding then talk about my own process.
ArmouredSuperHeavy has a tutorial on how to make Ao3's HTML downloads into a printable book in Microsoft Word. I use LibreOffice Writer myself, so this adaptation of the same tutorial is what I follow. Both are very helpful to reference as you're learning the typesetting ropes.
Personally, I don't mess around with HTML. I find it easiest to start by doing a Ctrl+A copy of the Entire Work fic view on Ao3 then pasting that into my word processor. This video tutorial by Beautifully Bound runs through how to do this in Microsoft Word using an AO3 fic as an example, including the associated steps needed to make the fic look novel-like. This is probably the best tutorial to address your gripe with AO3 formatting. Other than that, I'd recommend looking into videos or tutorials about typesetting novels for print. Same idea, and you may get more hits than searching for fanbind/ficbind typesetting tutorials.
More under the cut! Once I start yapping, it's hard to shut me up 🤷♀️
As a point of comparison, here's one of my fics on Ao3 and the corresponding typeset side by side:


Beautifully Bound explains this in far better detail than I will, but off the top of my head, the steps involved:
making a new document and setting the default page size to whatever size I want the book's pages to be (A5 or A6 usually). You can also set the margins at this point, taking account of your printer settings.
CTRL+A and copying the entire work's text on AO3 then pasting it into the document.
removing all hyperlinks and AO3 frontmatter, things like the author tags, summary, notes, etc as well as any website text that got copied over alongside the fic.
(optional) running a spell check and ensuring grammar usage is consistent. For me that's substituting em dashes for hyphens between clauses, enforcing curly double quotation marks for dialogue, etc. LibreOffice Writer automates a lot of this with customisable settings, via Tools -> Auto-Correct. Here's also where to make sure character names are all spelled right, convert the text to or from US to UK English, etc.
picking out fonts for the body text, headers, page numbers, etc. This is where you'll want to use paragraph style settings. Page style settings also comes in clutch if, for example, you'd like different headers on alternating pages. I like having the author on the right, the fic title on the left.
setting the body text first line indent to whatever makes sense visually). This in particular helps make the fic feel more like a novel. You can also play around with line spacing and space between paragraphs at this stage. For this A6 typeset, I had a 0.75cm first line indent, 1.15 line spacing, and 0.15 spacing between paragraphs.
(optional) formatting the first line of the work to use small capitals and to add a drop caps to the first letter of the first word. Again, this is a convention in publishing which add a novel-like feeling to a printed fanwork.
Inserting page numbers, adding images, coming up with how I wanted the "copyright" page to look—optional for the most part, but these are details that make a fic appear more like a novel.
For multi-chapter works, there's extra work in formatting chapter titles as headings so that they're referenced correctly in the automatic table of contents word processors can generate.
Once you have a typeset you're happy with, and if you're considering printing and binding it as a book, then you'll need to look into how to create and print signatures. Personally, this is something I had to actually try (and mess up a bunch of times) before I got to grips with it. Understanding how both your printer and your PDF reader work, particularly printer margins and booklet print settings, is key.
I won't go into as much detail on this, but if it's something you have an interest in, I'd recommend starting with DAS Bookbinding's tutorial. DAS has tutorials for everything bookbinding related so when in doubt, check his channel! Plenty of other YouTubers also have good videos on making signatures.
This resource is extremely useful once you've got your head around how to print signatures manually, so here's a link for anyone in that space: GitHub Bookbinding Imposer. Essentially, this does the signature creation for you, removing the need for booklet print settings in your PDF reader.
also how do you decide on the page size, do you just choose a standard size for all your projects? or do you vary it depending on what you are binding?
I have access to both A4 and A5 sized paper and my printer can handle printing on either size. In bookbinding, normally two pages are printed per side of the paper (which are then folded in half as part of a signature). That is, when I print on A4 paper, it's to make an A5 sized book. Printing on A5 paper will yield an A6 sized book.
Before I begin typesetting, I'll usually know what paper I plan to use, so the typeset will be one size down from the paper. So far, I've made softcover pamphlets at A6 size and casebound books in A5. No real method of choice for me, it's whatever I feel most suits the project.
---
If you made it this far anon, thanks for reading! Here's links to a few general resources if bookbinding is something you'd like to explore more:
DAS Bookbinding (YouTube, bookbinding in all forms)
Sea Lemon DIY (YouTube, bookbinding and other crafts)
bitter melon bindery (YouTube, bookbinding, particularly beginner friendly!)
Jess Less (YouTube, demonstrations of fanbinding and re-binding existing novels)
Papercraft Panda (blog, lots of detailed tutorial on bookbinding)
Renegade Bookbinding Guild (collective and website, loads of fanbinding-specific resources from their members and they have a helpful Discord).
24 notes
·
View notes
Text


THEME 21 v2 by Ari Anomaly: SACCHARINE !!! 【 preview 】 • 【 code 】 【 all themes + pages 】
this is actually a theme (well, theme redesign) i saw in a dream! the first one is more accurate to what was in the dream, and the second is with more of the options on. it is incredibly customizeable despite how simple it is
i realized how similar it was to an old theme of mine id been planning on redoing, so i just said "fuck it" and this is now a revamp!
font: inconsolata icon font: fontawesome character in the preview: aspartame
Options :
custom favicon
optional custom cursor
custom scrollbar
custom tooltips
optional blog border
optional post borders
optional rounded corners
optional back to top button
ask, about, links & tag tabs
in the links and tags tabs, you can put as many links as you want
Any bugs or general HTML questions? Message me!
And please like or reblog if you use! Thank you!
#anomaly.html#tumblr theme#tumblr themes#my theme#my themes#themes#theme#all in one theme#themehunter#theme hunter#codingcabin
7 notes
·
View notes
Note
Hiiiii I’m new to neocities and I love ur site!!! I like how you organized everything and the whole aesthetic is really cool 🍔🕷️ !
I was wondering if you have any recommendations for learning css? The little neocites interactive course on html was super helpful to me, cause it had a little sandbox area to test out commands in. The course on css wasn’t as interactive and I’m struggling 2 learn :(
Wow thank you! I worked very hard to make that thing look good lmfao
I learned the foundations of my html/css knowledge from a class I took in high school and then everything afterwards was a sort of "fuck it we ball" effort so DISCLAIMER: I am shit at this because I just shake it around violently until it works
If you want a "sandbox" like you mentioned to just test stuff out in without reloading a html file x2000 on your computer, I recommend this lightweight site. You can use a <style> tag to slap CSS onto things without creating a new file or you can look into a proper WYSIWYG program, I have no recommendations because I'm very very picky...
As far as actually diving into CSS, I sincerely wouldn't know how to step into it besides the aforementioned "fuck it we ball" In high school, the way it was taught to me was more watching a video of someone coding CSS into a site, explaining things as they went while you followed along and coded with them. This sort of thing doesn't work for everyone but it might be the level of interaction you need.
I'm sure you have already seen this site mentioned but I definitely recommend checking out w3schools, it has tutorials of its own and references for every single CSS property, selectors, and even lists of web safe fonts and colors.
#I hope this was at least marginally helpful. I am no good at explaining processes and tools#astronautcorpse
35 notes
·
View notes
Note
Hello, how are you?
I promise I'll read Half-smoked Cigarettes soon, and yap about how much I love it. I've been busy studying, so I haven't had much free time.
I've also been writing, and setting up my blog. Do you have any tips on either, if you don't mind sharing? I'm a huge fan of your writing style and I think your blog layout is the most gorgeous on Tumblr. Do you use CSS?
-doll anon
hi baby!! don’t worry about it, take your time!! hehe i hope your studying goes well and that you pass whatever you need to pass!! ( ⸝⸝•ᴗ•⸝⸝ )♡♡♡ sorry that i’m answering this like a day or two late <//3
and boy omg i do have tips!! do you have anything specific you want tips on?? i have a whole tag for it (which i have to convert over to my new username so i’ll do that right after answering this lmao.. i’ll also add it to this post) if you wanted to look through that as well! ♡♡
but eeee i’m happy that you like my writing style!! that really means a lot to me omg,, especially since i’m kinda rusty right now and i’ve been feeling insecure about it (TwT。)
and no i don’t use CSS!! tbh i don’t even know what that is >w< but i use https://redketchup.io/color-picker for selecting certain colors from pictures and then i use http://patorjk.com/text-color-fader/ to use the hex codes for the text and turn it into html!! for like the fonts and everything i use https://yaytext.com !!
if you want a full tutorial on how to get like custom colored text or anything, just let me know and i’ll make one!! ♡
#i love giving tips!!#it’s so fun to help each other out hehe#but omg!!! you’re making a blog i’m so excited for you eeee!!!!#﹙✉️﹚𝓫𝗼𝘁𝘁𝗹𝗲𝗱 𝓵𝗲𝘁𝘁𝗲𝗿𝘀!ヽ( ˃ ヮ˂)ノˎˊ˗#﹙ doll ﹚𝓪𝗻𝗼𝗻! (⸝⸝ᵕᴗᵕ⸝⸝)♥︎#𝓉𝑖𝑝𝑠 𝓌𝑖𝑡ℎ 𝒻𝑎𝑒𝑦𝑢𝑛.ᐟ 𝜗𝜚
2 notes
·
View notes
Note
Hello! I hope I don't bother you again. I have two questions for you (I think there are more). I'm writing a zosan fanfic and I came up with the idea of putting "titles" in what happens in the "chapters" separated by the divider, like the titles of anime episodes (very One Piece with spoilers about what happens in the episode), I would like to know what do you think of this idea? I have images of what these titles would look like if you want them for better visualization. 2- Is there a skin work on ao3 that imitates these "titles", as if they were chapter titles of a book (but without having to have several chapters as I want to make a oneshot)?
hello! yes, I think that sounds like a neat idea. you should go for it!!
I don't watch one piece so I hope I'm visualizing it right. if I got it wrong, feel free to send me a picture.
anyway. are you trying to do something like this?
if this is what you're going for, you can try this code out! I also created a pastebin for this one, so you can just copy paste to your own workskin.

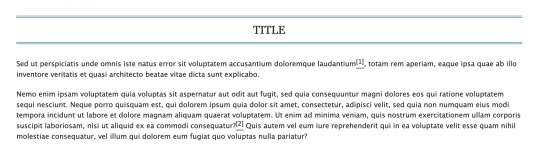
so here, we're creating the lined-title css class. you can just add it to your <p> tags in the html when you want to apply them. e.g.
<p class="lined-title">TITLE</p>
feel free to play around with border-style and the border-color (or any other attribute). you'll want border-style:solid if you just want one single line, for example.
you can also check AO3's FAQ on what colors and fonts you can use. fun fact: border-style:double is the same css they use to add those double lines in the FAQ!
note that this will span the entire width of the page. so if you have a short title, it'll look like this on desktop:
if you don't want it to span the whole page, we could try this instead (also included in the pastebin link):

which will result in this:

however, we can't manipulate the spacing between the text and the lines in this one. on the other hand, it has text-decoration-style:wavy which the first option doesn't have!
for custom scene dividers, you can also check out these guides:
How to Make Customized Page Dividers by La_Temperanza
Dividers & how to style them by skinofthesoul
Rainbow Paragraph Divider by benwvatt
bonus: inspect element
also, are you familiar with inspect element yet? if you are, great! you can just skip this. otherwise, if you're still getting the hang of working with workskins and aren't used to editing css, you can try this:
right click on the text you want to change on AO3, then click "inspect" or "inspect element" (not sure what it's called in browsers these days; on firefox, it's just "inspect"). this will bring up a bunch of developer tools and it kinda looks like this:

it might look different depending on the browser.
but here on the side, you can see the html on top and css at the bottom. as you can see in the screenshot, we are inspecting the title and we can see the different css rules for the title.
if you want to play around with the css, you can just change them from this panel and it will automatically reflect on the page. these changes are not permanent so it's a good way to test different styles without having to go through the cycle of updating the workskin and refreshing the fic page.
if this is your first time trying this out, it might look overwhelming, but it's very helpful if you get the hang of it. but of course, you don't need to learn how to do this to style your fics. :D
9 notes
·
View notes
Note
wahhh perfect timing thank you so much for letting us come to you for help 🥲
is it possible to write and do everything on mobile tumblr even if it's inconvenient? i'm a new writer and i really want to do all what other writers on here are able to do (like the formatting and all those aesthetics i suppose!) but i'm worried i'd specifically need to have a laptop to publish my works as proper as theirs, but since i don't have one i'll have to make do 😞 you seem to be knowledgeable about it so i want to know if it's possible to do everything on the mobile tumblr (just with a little more hassle, but possible nonetheless!) or should i try website tumblr on mobile? i'm afraid it would refresh any time though and i lose progress 😵💫
how do people do the wordcounts? i can never seem to get the hang of it, do they write their work somewhere where words can be counted or does tumblr already have that feature that i don't know of? bc if so, i don't know any apps for that (all i really have is my phone TT) and if it's okay, can you perhaps let me in on what you use for it or alternatives on the phone, please? (i'm really a newbie with tumblr and all🥲but i want to be able to navigate it expertly soon :))
i have also noticed that some writers do not have a cut to their work, like you know the 'keep reading' button? yes, i had this fic in my likes that had 30k wordcount and no cut at all and i had one heck of a time scrolling through my likes to find some things whenenever i come across that fic 😭😭😭 i thought that tumblr automatically cuts your work if it gets quite long, but it seems to be done manually if i'm not wrong? 😀
you seem to be the perfect person to ask these questions to so i hope you don't feel bothered by how much i've just blurted out :')
oh yes let's go bubbles it's time for me to shine^ㅁ^you have found the PERFECT person for these questions!!


you're welcome love, you can come to me anytime you have any queries i'd love to help!! it's totally okay and don't worry with time you will be able to expertly have your way around the app it's not that hard! and like i said you can always ask for help, if not me then someone else. and no you did not bother me at all <33

( 001. ) i dare say close to all of that formatting, aesthetics, writing and literally everything a blog needs is 100% possible just using the mobile tumblr!
i personally have never used the laptop for my tumblr besides just looking through my notifs when my phone is on charge. i legit do everything single thing from my phone, even the writing.
though i would say some things require you going back and forth with the web tumblr but it's okay cause it's not like an everyday thing.
things you can do on the mobile app: writing, post layouts(the three picture thing, different fonts, dividers, read more line thing), add the links(in posts), asks(answer and send including pictures and links and anonymous), change your description(including colors and fonts), change your background and accent colors, change your profile picture, queue, schedule and reblog posts, making side blogs and literally anything besides those mentioned below.
things you can not do on mobile tumblr and hence have to use the web tumblr: using colors(including gradient) for your fonts besides the default colors allowed on the app(you have to do it through html post editor available on the web tumblr post editor options), adding links in your description, blocking someone from your side blog, checking your activity status as in how many followers or notes you gained in a day or week or month, mass post editing(which is like editing the tags of multiple posts at once this one you need the laptop!) and that's all i can think of for now but it's the main things.
the chances of losing progress on tumblr is possible whether you use mobile app tumblr, mobile web tumblr or laptop tumblr. best thing is to use your google docs to write and then copy paste it to tumblr at the time of posting.
( 002. ) bingo! you are correct. tumblr does not have the feature to show the word count so writers do use different apps for it. google docs has the word count feature and i use it for my longer fics, wattpad also has the word count feature so for my headcanons and reactions i usually use wattpad.
( 003. ) this one is a bit complicated in a sense, let me explain it in small steps. so when you publish something you always have the option of putting the keep reading cut anywhere you want.
tumblr has this thing where under a specific tag, let's say enhypen imagines tag, in order to not clog up the dash of that specific tag it automatically adds the keep reading if your keep reading cut shows more than what tumblr allows. however all the other places like if anyone has liked it or rebloged it, the post will appear as originally or as presently the post is formatted.
so if in your likes that post is showing the entire fic it means the writer has not added the keep reading cut anywhere. but when you search up the enhypen imagines tag and find the same fic it will show a keep reading cut as per tumblr's rules.
this is the button for the read more option!

8 notes
·
View notes
Note
idk if you can help but ive been using your theme Requested for a few months but now when i go to change anything like colour/font/etc i just get a message saying "HTML tags are not allowed in custom CSS code" do you know what that means and how to get around it, tysm
Hi, sorry for the late reply. I was busy, but I also tried looking for solutions to your problem but didn't find much.
I tried the code, and everything seems to work fine, but I couldn't find anything related? like it doesn't seem to be a problem within Tumblr, so my solution would be to try resetting your blog theme settings, following this tutorial (from step three (3)) by glenthemes, then copy the code from GitHub using the little icon on the top right of the top bar.

[transcript. Screenshot of Github site showcasing some repository and highlighting the button on the code header wich allows you to direct copy the raw file, used as reference to the sentence above.]
Also, don't know if this could help you, but I'm gonna share some links regarding the "HTML Invalid" trouble, maybe try checking some out and see if it works for you too (:
theme-hunter/psa-invalid-html-message-if-you-are-receiving
nyctothemes/hello-there-i-am-trying-to-use-your-amethyst
megscoding/invalid-html
Invalid html Tumblr tag
I do hope this helps you and please do not hesitate to reach out again if there seems to be another problem with any code. Have a nice day xx
3 notes
·
View notes