#if you have any questions or want me to do another tutorial on something else dont be scared to ask!
Explore tagged Tumblr posts
Visit Tumblr Blog
Explore Tumblr blogs with no restrictions, modern design and the best experience.
Last Seen Tumblr Blogs


Fun Fact
There were a total of 171.5 billion posts on Tumblr in 2019.
Text
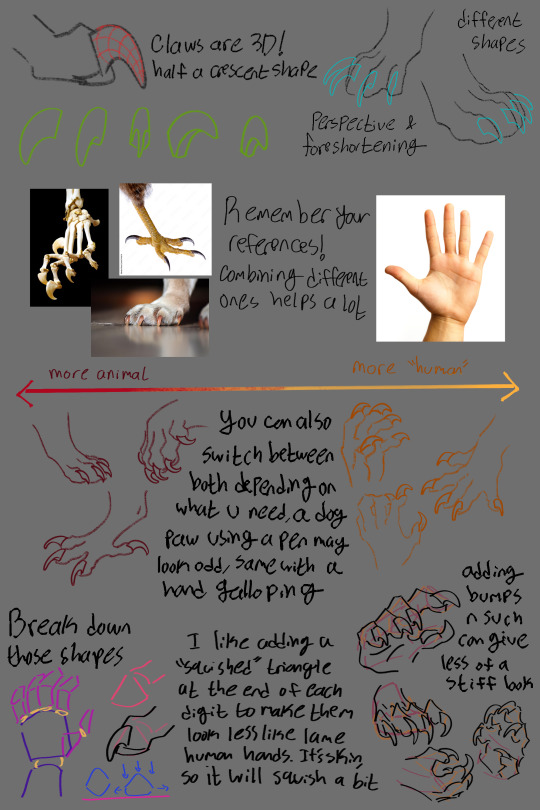
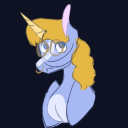
i remade my old talon tutorial with a few extra tips! these are just things i have learned from references, other artists and experimenting myself, so i hope they can be helpful for you!
#art tutorial#i guess#art#dragons#idkkkkk what to tag#anyways :3#you can use both this and my old tut to compliment each other idk#some talons came out a bit wonky looking but thats what i get for drawing on the ipad#if you have any questions or want me to do another tutorial on something else dont be scared to ask!#tutorial
2K notes
·
View notes
Note
Hi Von! First off, I love tetro and you've done a great job! This fangan has actually inspired me to create the fangan ideas that have been rattling around in my head for the past year. I'm currently trying to do the character building and thought asking you a few questions could be helpful! First, how did you go about things like plot and character building/character design? Second, how did you go about assembling a team for tetro?
im glad youre enjoying it! thank you for the high praise! this got long, so ill put my answer beneath the cut!
one tip ill give before i say ANYTHING ELSE because this is my strongest gripe in the fangan universe: if youre planning on making something like tetro, or any fangan at all, DO NOT CAST UNTIL YOU ARE READY TO GIVE OUT CONSISTENT WORK. one of the biggest pitfalls in fangans is that fangan directors cast WAY before they actually need voice actors. if you arent yet in a place where you are going to be able to CONTINUE REGULARLY GIVING OUT SCRIPTS, you dont need to cast yet. focus on the other tasks!
in terms of plot/character building, you should consider what roles need to be filled in the story and what types of characters will be needed to keep the story interesting/moving forward. a lot of fangans struggle with having characters that dont really do a lot - not every character needs to be bombastically doing things all the time, but every character needs to have some sort of point in being there. it can be really tricky when youre working with the usual danganronpa numbers of 16 characters per cast, but take your time and really consider how you want your story to play out.
another thing i advise strongly is to make sure you're writing your characters in a way that lets the audience connect with them. the whole drive of danganronpa is that characters will die, so your audience needs to care when that happens. one of the biggest pieces of feedback i get with tetro is people saying that they like the whole cast and dont want to see anyone die - when you can cultivate that kind of cast, death matters. give each character something the audience can relate to in some way. you can still get interesting and specific with backstories and lore, but make sure the core of the character is something that someone can connect with. for example: harada. a lot of people probably cant relate to the idea of bullying people in their youth. however, many people can relate to the idea of doing something you regret down the line because you wanted to fit in or avoid trouble. the core should be something people can connect with. focus on that core!
in terms of assembling a team, i put up a casting call page! there are a couple different websites you can use, but this is the one i find to be the most effective. i only cast voice actors for tetro - other roles ended up getting taken on by people who were eager to do more work in the project or help out. i always say that if there's a job that needs doing in your fangan, you should be prepared to do that job entirely on your own, because the odds of getting help for free are slim. other people who know nothing about you or your project arent going to want to give you free art, video, music, animation etc., and from my experience, a lot of VAs will see a casting call full of calls for animators and artists and view that as a red flag. fangans are chronically unfinished, so make sure you can do every job by yourself if need be. learn whatever skills you need! there are tutorials everywhere!
hope this was helpful in some way!
33 notes
·
View notes
Note
I'd love some resources, thank you! Especially if you have anything on making gifs from videos. I'm in a smaller fandom that doesn't have nearly as many clips to sift through as Supernatural that I'd really love to make gifs for. Thanks again! ❤️
yeah of course! although I'm not sure what you mean by gifs from videos, do you mean like using youtube videos rather than full episodes or video tutorials or something else? but I will list some general stuff below and if you have any more questions feel free to send another ask or DM me on tumblr or I'm also on discord @ wewriteletters if you prefer that :)
read more because I'm going to divide these up by subject
photoshop- this is the program most tumblr gif makers including myself use. for a bit of background there's basically two different ways to make a gif in photoshop: using screencaps you get from a video or importing the video directly into photoshop. I have always used the latter because it's the way I first learned (I literally just learned the screencapping method a couple days ago because I heard it produces better quality gifs but I'm probably not changing my method any time soon just because it's what I'm used to). that being said, I'm going to link a few tutorials, some that use screencapping and some that use importing videos so you can see the difference (I would check out the first tutorial listed regardless, even if you end up using importing videos, it is SUPER comprehensive and includes information about getting photoshop and videos, ect). I will also list if it's a tutorial written out in text on tumblr, or a video tutorial on youtube.
gifmaking for beginners (screencapping method, tumblr tutorial)
how i make a simple gif (screencapping method, tumblr tutorial)
callie’s gif tutorial (importing videos method, tumblr tutorial)
basic gif tutorial (importing videos method, tumblr tutorial)
bru's how-to: giffing and coloring (screencapping method, youtube tutorial)
how to make HD GIFs for Tumblr (importing videos method, youtube tutorial)
also just note that some of these tutorials are older and include the old tumblr gif dimensions/size limit. first part of this post includes a great visual reference for what the current gif dimensions are. all you need to know about the size limit is it used to be 3 mb maximum, then it went up to 5mb, and it is currently at 10 mb. so no matter what, make sure your gif is no bigger than that, otherwise tumblr won't even let you upload it as a draft let alone post it smh. I'll end this section with some tumblr blogs that focusing specifically on gif making and have a ton of tutorials covering all different kinds of stuff: completeresources, allresources, gifmakerresource, clubgif. and never be afraid to just google "[thing you want to know about gif making] + tumblr tutorial" that's how I learned 99% of this stuff lol.
photoshop alternatives- photoshop is definitely the gold standard in terms of quality and the kind of effects you can use, but there's also a lot of alternatives if you don't want to deal with photoshop for whatever reason.
photopea- probably second best to photoshop. it is really similar, but free and on a website, which means you don't have to deal with either buying a photoshop subscription or finding a d*wnload and it's not going to take up a bunch of space on your computer because it's all online AND it can be run on computers that otherwise don't support photoshop. I've only used this once and it was to see how similar I could make a gif made there look to one I made in photoshop (I only uploaded it as a private post to my prodigal son sideblog bc I was helping a friend gif that show but it's here if you want to see how it looks! photoshop version is on top and photopea version is on the bottom and follow that blog while you're there). here are two photopea tutorials: one for windows and one for mac. also check out photopeablr for more tutorials, resources, and examples of gifs made using the site.
goodgifswithfreetoolschallenge- not a method but a blog dedicated to a bunch of different ways to make gifs using free programs. I haven't looked through most of it but there is a TON of resources and information in the pinned post.
and finally I will do some self promo of my own tutorials from my main blog. first one is for photoshop, second two are for alternatives (instagiffer and ezgif). just keep in mind they're all over three years old and I only use photoshop now so idk how up to date they all are, but the photoshop one at the very least shows how I still MAKE the gif, although my coloring process has changed since then (maybe I'll update it with a focus on giffing supernatural next time lmao). anyway, hope this can help you or anyone else who is curious :) feel free to reach out with questions or anything else!
#oh my god this got away from me... i swear it started with like three links 😭😭😭#hope it helps someone at least lol!#answered#anonymous
8 notes
·
View notes
Note
Your GIFs are so good! I keep looking at them. Would you be willing to give advice on learning how to make good GIFs?
ah thank you so much anon you're so sweet 💙💙 I'm more than happy to help! these are some of the biggest things I can think of at the moment, but if you have specific questions I'd be happy to answer those as well
1. The Download Quality:
2. Cropping:
this is the first thing you need to focus on. always work with 1080p (or 4k if you want but honestly it isn't that huge of a difference unless you're brightening up very dark scenes, super zooming in and doing multiple effects. I personally don't work with 4k at all because I don't have the space or the bandwidth 💀 but if you do go for it!) the bigger the size of the file the better the quality is, I usually go with something around 2-4 GB for shows with 42 min episodes. look for AMZN in the file link, those tend to have the best quality (don't worry too much if you can't find those, god knows I rarely do)
but if you can't find big files, just go for it lol. like for the earlier seasons of 911 I don't have large files because I couldn't find them at the time plus I don't have that much space, so I'm working with files that are less than 1 GB in size. and I've not had any complaints. for visuals, gifs number 3, 4 and 7 are from large files that are around 2.5 GB in size. the rest of the set is all from under 1 GB (those can be difficult to do too much color manipulation and effects with so I don't 100% recommend them unless you can't find anything else. just don't make it the thing that stops you from giffing yk?)
make sure you're following Tumblr's width guidelines when cropping. so 540 if you're planning on putting one single gif in a row. 268 and 268 for two gifs. and 177, 178, 177 if it's three. the closer you crop to the edge the better the quality is. so unless you're trying for a specific effect or wanting to zoom in on something, stick to the edge
3. Sharpening:
sharpening settings make a ton of difference. here are mine
4. Coloring:
each scene is different and you need to experiment with different methods and see what looks good to YOU personally. for me, i usually start with a blank Brightness/Contrast layer with its blending mood set to Screen. sometimes you need to lower the opacity of the layer if the scene is already bright enough (some scenes don't work with this layer so I go for Levels and Curves next. and those are a lifesaver for brightening up a shot and getting rid of the awful filters some shows have. if you want more details on this, this and this tutorials are amazing)
then I go for a black and white Gradient Map set to Soft Light with opacity from 10-25%
from here on out the world is your oyster. experiment with different layers to see what you like. Selective Color and Color Balance are your best friend to make a scene truly pop. one trick I always always use (as long as it works lol) to fix a scene's coloring and make it as neutral as possible is to add a Curves layer right after the Gradient Map, select the middle ink dropper and click on the yellowest parts of the gif. this works by bringing out the color opposite of what you click on, so you click on yellow, it brings out blue. that's why it's important to click on dark rather than bright areas to bring out darker blues and thus make the scene look more neutral. but this part is always experimental with me. I click somewhere on the gif, it doesn't work, I Ctrl+Z and click another part. and again and again until I find the perfect spot. sometimes I have to decrease this layer's opacity (anywhere between 90 and 10) because it sometimes looks way too bland
5. Exporting:
this can all sound overwhelming at first, trust me I know. so try out a method, if it works, perfect. stick with it. until you encounter a scene where it doesn't work or you get used to it and want to try something new, then look for another method, find which you prefer and stick with it. etc. some scenes have me try out every single thing I know to make them look decent. with time you'll get used to these steps and it will come easy to you
here are my settings

that's all I can think of at the moment, if you need anything else, let me know! oh and go to @usergif they have a TON of resources and tutorials that have helped me so much
9 notes
·
View notes
Text
✨ fave creators art challenge ✨
for the second in this series who else could it be but @nataliescatorccio
becca, there are simply no words for your talent and the ways in which you have inspired so many people on here, not least yours truly. i mean, my colouring was definitely a lot worse before i found your tutorials and they changed my whole process. your blending tutorials helped me beyond belief, and i swear every set you make blows me away in new ways i didn't think possible and makes me want to create in the ways that you do seemingly effortlessly (even though i know all to well just how much effort goes into it). i'm sure there are so many creatives on this site who would say exactly the same, your impact is insane. and to top that all off, you are the nicest, funniest, sweetest, wittiest person ever with the most immaculate taste and the greatest patience for my questions and thoughts i happen to burden you with. i'm so grateful to know you in our little corner of the internet (and the planet! you being my british twin honestly just makes so much sense) and i am so excited to keep supporting and gagging over your talent, even when i don't know the show (and the power your sets have to make me watch pretty much anything should be studied). so saying all of that, here are just a few of my favourite sets of yours (narrowing this down was so so hard my goodness!!)
snowbaird + wuthering heights: a lot of this post will be me gushing about how you use colour because oh my goodness! knowing how much trouble i had colouring this movie gives me even more respect for you, you made it your own!! nothing you can't do you make every scene bend to your will! and i know very well how difficult it is but you make it look easy. and this quote?? for THEM??? insane inspired incredible show-stopping
yennefer + all aretuzan witch: RED RED MORE RED !!!! i'm obsessed with this set and red is so yennefer's colour (besides purple) and that's all because of you!! the bold typography perfectly matches the whole vibe and brings it together and this is just the perfect song for her.
rhaenicent + taylor swift: i don't know if there are even enough words in the english language to describe this??? i mean first off you know purple is my weakness so this was an instant win for me. the amount of effects and creativity on display here - this set has everything! shattered glass, ripped paper, ink drops i can't keep up! truly showing off your range of skills and my eyes are so happy about it.
annabeth + nikita gill: i love red sets and you do them so well!!! the shapes - hearts, daggers, geometric patterns - elevate this set to new heights. matching up different shots of annabeth so even her eyes and expressions match up is just insane??? how did you even know which scenes to pick it's crazy!! i'm actually obsessed like i keep looking and there's always something new to love about this
percy jackson season 1: incredible show-stopping spectacular!! the effort! the COLOURS! the SHAPES THE LAYOUT! EVERYTHING! i can't wait to see what you do for s2 of this show because s1 already gave me everything i've ever wanted. looking at this set alone is filling me with inspiration to get back to giffing that's your power.
percy jackson characters + the elements: another set you executed flawlessly. it shows off your ability to make any colour just WORK and the shapes are just perfection to match each element. your blending is off the charts i'm seriously in awe.
yellowjackets + loss: i still don't fully understand all of this set yet (just finished s1, slow watcher i know) but it's a good job i don't mind spoilers so i can appreciate this masterpiece. the glitches alone have my jaw on the floor. it's hard to comprehend the work and effort and the little touches of red in the text bring it together.
yennefer + family: i love purple i love flawless blending i love found family!!! so this set is just perfection to me it's so soft yet stunning (like yen hehe) and i could literally watch it for hours. fitting so many shots of these pairings into one gif each is a skill in itself.
chappell roan anniversary: SUCH a fun concept and it's executed to absolute perfection!! yellow and pink is the PERFECT combo for her and once again you prove your colouring mastery. the creativity here is off the charts and it's such a good tribute for a banger album!!
rhaenyra + madeleine l'engle: this whole set is actual insanity and i still can't believe it's real. you made older and younger rhaenyra practically indistinguishable from each other and i just don't know how. the patience to find these shots. the skill to make them match up. the skill and patience and creativity to colour them all (even here eyes!!!) so you can barely tell the difference is just!!!??? i'll lose my mind just thinking about it. your insane and crazy and i love that about you sm.
#fave creators art challenge#userbecca#this post could've been 10 pages longer lbr but i'll restrain myself#legit not even a tenth of your sets i love
6 notes
·
View notes
Note
Hii!! I found out about trading an hour ago and am a bit confused. Like, how do you even find the bootlegs if not on youtube? Also, why trade instead of posting publicly?
I have a YouTube page where I post slime tutorials and the like of shows I have watched or proshots I have downloaded. Why gatekeep? I'm literally just curious, I don't mean to offend.
So, the thing that I really, really want to emphasize, because I feel like it'll make everything make more sense, is that bootlegging is illegal. It is against the law, people can and do get arrested for it, and there have been many recorders (mostly filmers) in the past who have been caught and simply disappeared, taking with them any unreleased boots and all potential boots they could have filmed in the future.
And I say that because I REALLY want to emphasize that when people, especially filmers, say, "Hey, can you not post these on YouTube or anywhere else publicly?" it's NOT because they are trying to "gatekeep". Many of them are making their bootlegs as accessible as possible by making it available for purchase and/or trade down the line. They are doing it for their own safety. They are risking legal repercussions getting these bootlegs to you and are asking you not to get them into trouble by blatantly posting their stuff on the most accessible video-sharing site out there. THEY ARE TRYING NOT TO GET FINED, ARRESTED, OR WORSE.
Okay, got all that? Great! Now I can answer your questions.
First - many traders, myself included, have trading sites where we post everything we have available to trade. That is a great place to find bootlegs, and even better, people who have those bootlegs and might be willing to trade or (if you're polite) gift them to you! Here's mine. How do you find these sites? Honestly, a lot of times I just stumble on them by Googling something like "[name of show] bootleg trade". What I also personally do is start bookmarking sites of traders that have large collections of shows I'm interested in (like Phantom) or the sites of people who record bootlegs, so that I can easily check up on them every week or so.
There are also many areas where traders congregate! Musical Exchange on LiveJournal is one of the easiest to find. There was a Yahoo board back in the day that has now turned into a Groups io thing. There's Encora Reprise (I don't use it and I feel like it keeps going down but some swear by it). There are also several Discord servers devoted to trading or set up by filmers. Those are also great places to find other traders and newly released boots.
Second, I partially answered your question about posting publicly with the safety issue, but the other answer is, simply, that trading is decentralized because it's illegal. I don't think there's any one person who has every bootleg ever recorded, it's all spread out amongst us, and it's going to be extremely difficult to get everyone to pool it all together because, well, this is also a hobby, not a job, and we just don't have time for that. And even if we did, there probably is no person with enough space and money and time to upload every bootleg in the world and maintain it, because they will not get enough benefit out of it because musicals are a relatively niche interest.
Here's another way of thinking about it. I'm at the point of trading almost exclusively Phantom. I don't have every bootleg in the world, but my collection of Phantom boots alone is 2.7 TB. That is Phantom alone, I haven't even considered every other musical in the world and all their bootlegs. If you want me to have all these available publicly, I would basically need to get my own server. If I want my own server, I'm probably going to pay money. Hundreds of dollars of money. And I will have to maintain this, which will also cost money, with possibly the only way I get money back being to use, I don't know, ads or making users pay money for accounts, and unless I finagle things legally I could also be responsible if the site gets found and taken down, and you want me to do this, constantly, for bootlegs that 99% of people won't download? (You really think some people are raring to get the blurry 1992 video of Jun Sawaki, for example?) Yeah, that looks like a lot of work and trouble for me to do something that probably won't save others a lot of trouble either.
Anyway, I know you don't mean to be rude and I hope the above didn't come off as aggressive, it's just that, well, I've seen these arguments time and again and it never really seems to cross people's minds that, at the end of the day, this is a hobby that is technically illegal, that just about all the rules and limitations around are done for the safety of the bootlegger and not because they enjoy waving the boot out of your reach, and that trading is done because it's the safest, most anonymous way of, well, getting theatre bootlegs, that people have come up with. At any rate, I hope that answers your questions!
42 notes
·
View notes
Text
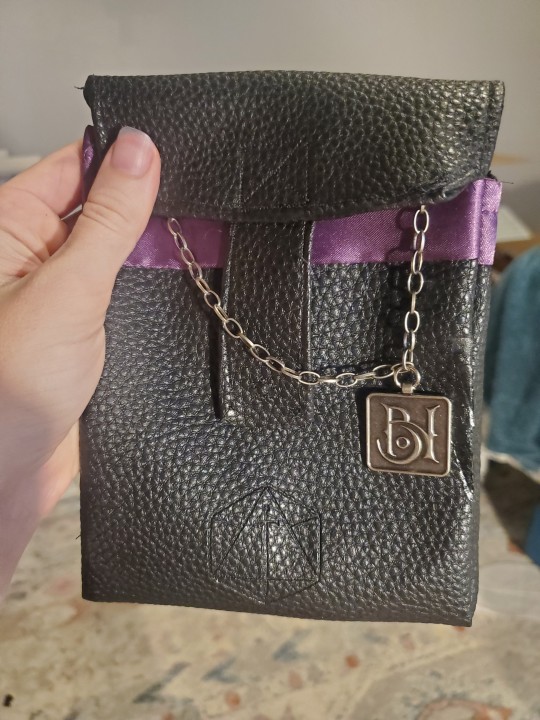
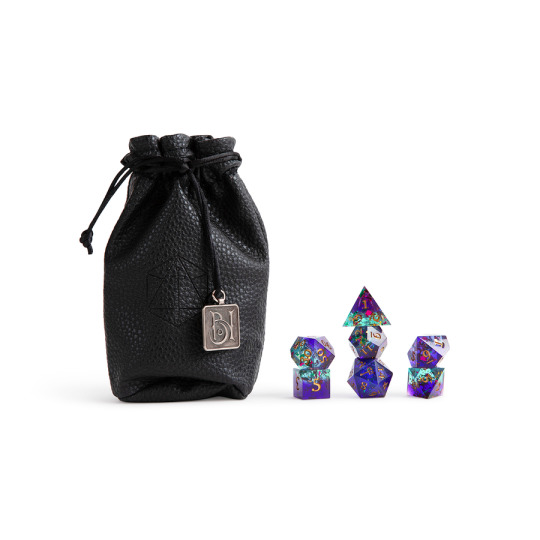
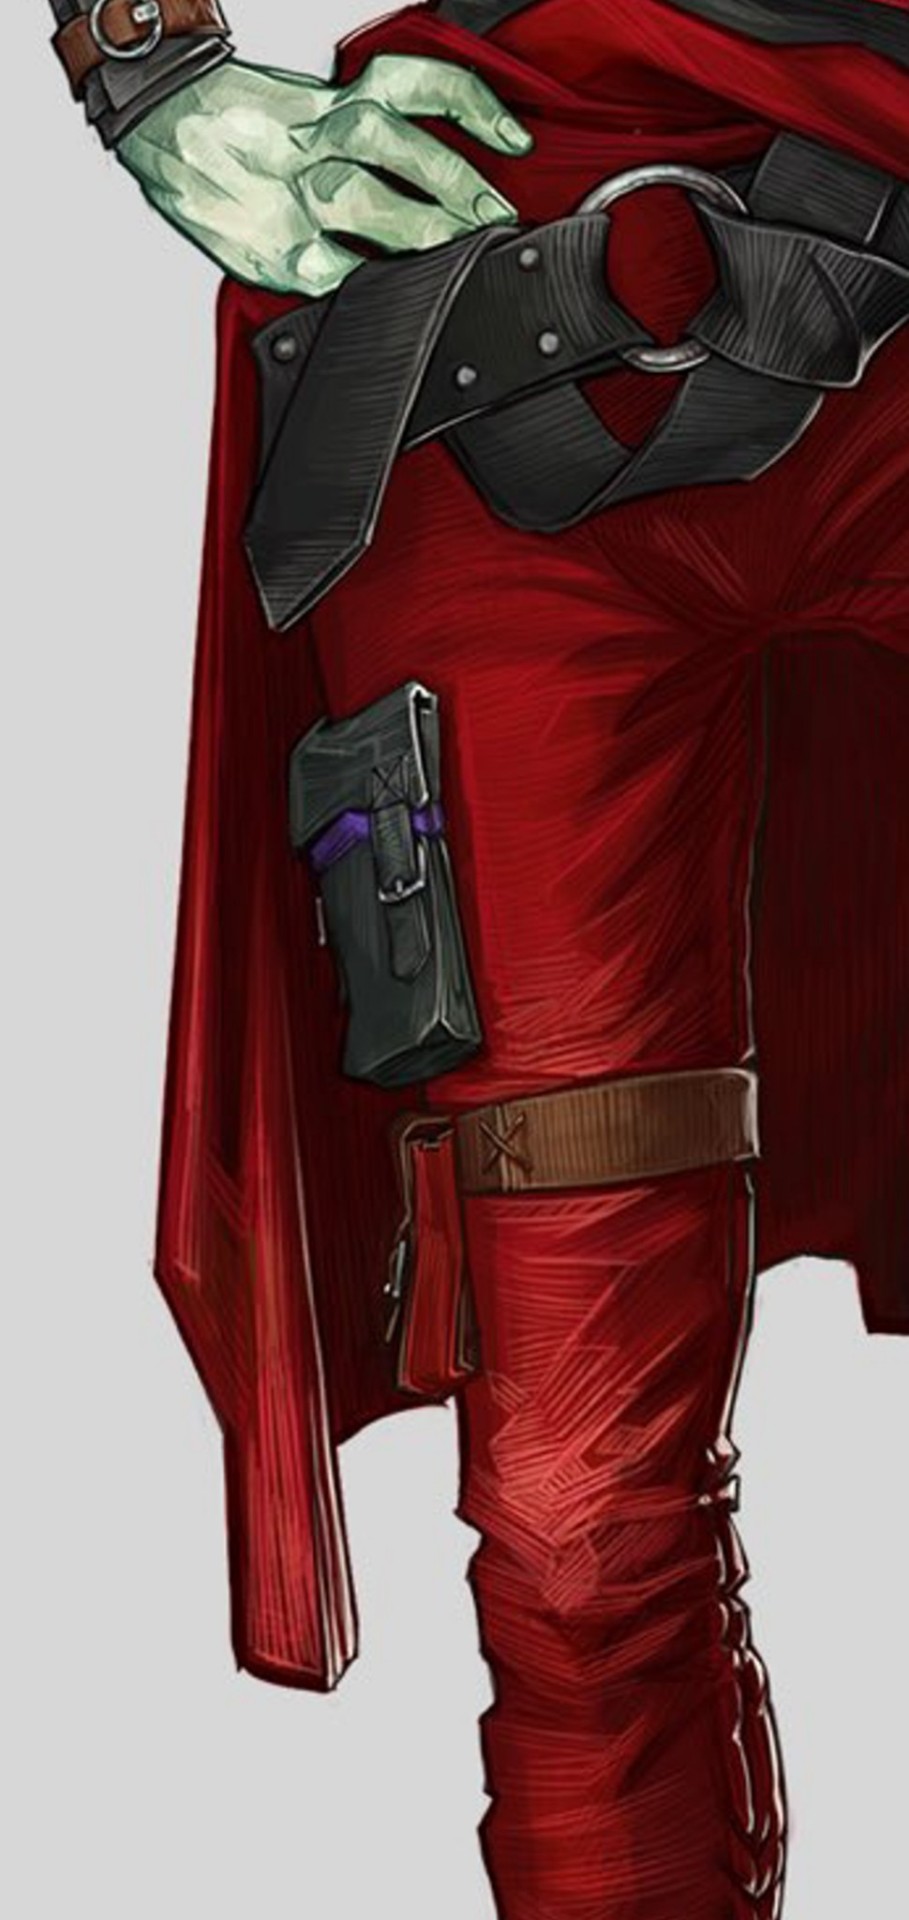
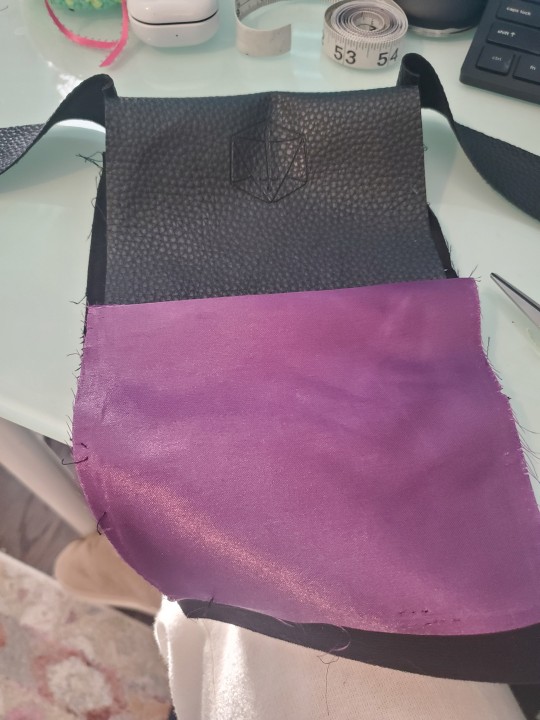
From one bag to another!
Hey yall, I just recently made Ashton's black side pouch for cosplay and uh, turns out it's relatively easy! You just need a few extra materials and nerves of steel for cutting into your official cr dice bag.
Tutorial under the cut! but ofc if there are any questions, just let me know. Image Descriptions tacked onto the images.
Material list: - CR Dice Bag (I used Ashton's cus i bought the dice and was like, woah the insides are purple just like they're side leg pouch! oh dang!) - Seam Ripper - Cloth the same color as the leather (or not! but you will need some cloth for the back.) - Purple and Black thread (I am assuming yall have a sewing machine, if not this will take longer, but it's not Not doable) - Needle -Seam glue/ Fray glue if needed - Snaps/ buckles/ whatever closures you want to use -Extra chain (though you can probably also use ribbon, embroidery floss or whatever else you have on hand.)
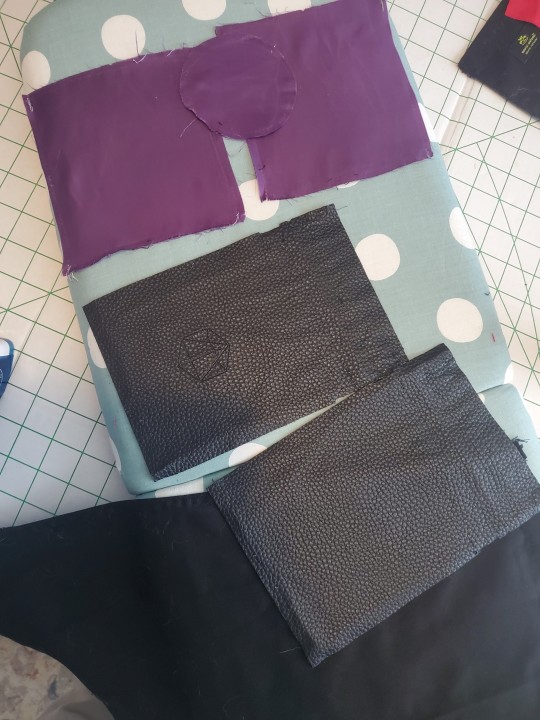
1- First step is carefully cut the seams using a seam cutter. This process does need to be exact if you're going to keep as much as the fabric viable to use.
2- Second step is iron everything out. The leather melts easily so please put something (cloth) over it to stop that from happening.
3- cut the fabric. The approximate end dimensions for the finished bag are: 5.5in x 4.5in x 1.0in OR 13.9cm x 11.4cm x 2.5cm Which mean you will cut the leather side into 4 parts.
Do Not Cut the one with the CR logo if you want to it decorate the front.
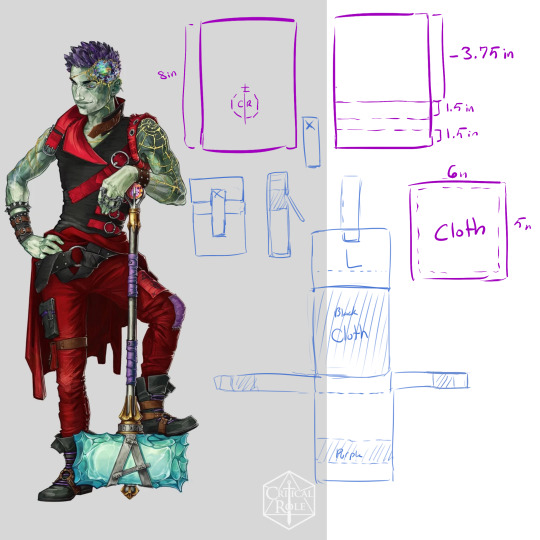
Look at the purple squares in the pic above. Do Not alter the width of the leather pieces, instead cut so you have two 1.5in (3.8cm) long pieces and one 3.75in (9.5cm) long piece. There Will Be Extra Leather Left Over.
Cut cloth in a 6in by 5in square (15.2cm by 12.7cm) (the extra .5in (1.27cm) is seam allowance)
4- Assembling. Look at the blue pattern I've drawn out above and lay out the bag pieces how they should be. Always sew with the right sides of the fabric facing each other. Sew the front/bottom of the bag (same piece) to the back, then sides to the front/bottom.
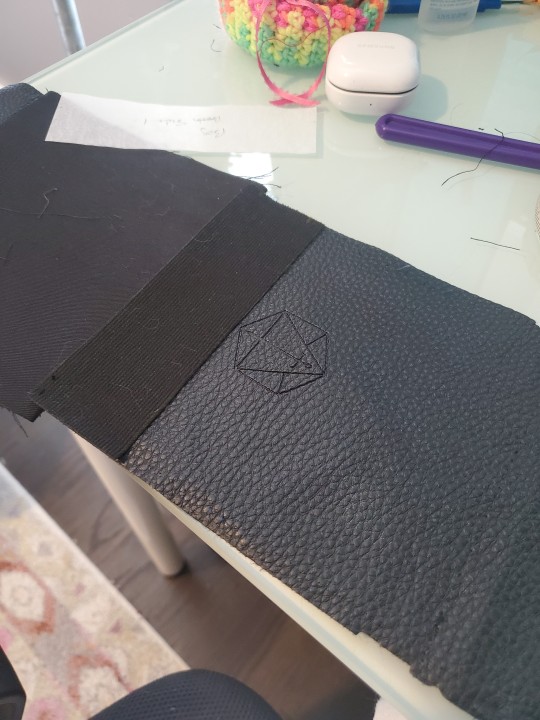
5- Add the purple/ contrast color/ lining of the bag. Determine where you want the contrast color to start (mine is a little less than 2in (5cm) away from the top) Sew the right sides together and then flip the fabric over.
Cut the excess so you have enough to hem (so the edges don't fray) (1in (2.5cm) or so, whatever you're comfortable with) and then hem it down.
You can do the same process with the sides, just be careful if you want the contrast colors to match up with the sides.
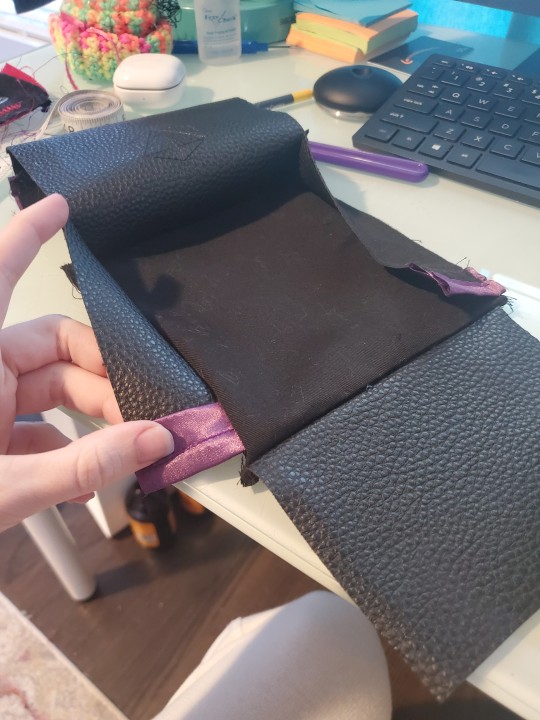
6- Sew the sides to the back, then the front. Once Again the right sides are together. I used a machine for this, but if the ends are too close, you can hand sew this in your preferred method (back stich, blanket stitch etc) And then you can turn it inside out and boom! bag looking thing!
7- Next up comes down to a lot of preferences. Hem the flap of the bag in the style you want (I put rounded corners in mine and messed up a bit lol) I have found the leather slips on the sewing machine and is a bit difficult! Be careful of this, go slow.
After hemming the top, you can use the round piece of leather to cut a strip (give or take an inch (2.5cm)) hem it if you want, sew it onto the bag with an X pattern if you want, you choose how you want the front of the bag to look.
I sewed on black snaps to close the bag.
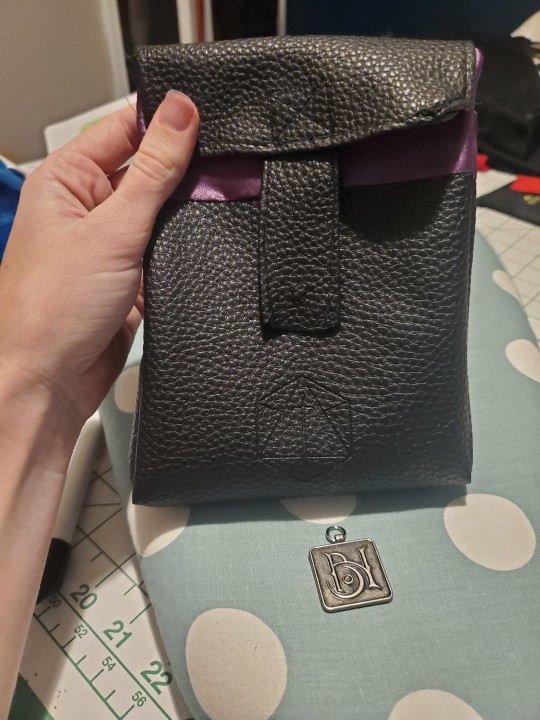
8 - Add the bell's hells pendant. I used an extra chain I had laying around (in gun metal color to match) and simply sewed the chain onto the bag in a way I thought looked cool. Customize it! I imagine Fearne's bag would look cute with a peach ribbon, Laudna with some red string/yard etc etc! go ham.
this bag is going to be attached to my Ashton pants using more snaps but add more things if you want! Add a loop for a belt! etc etc.
I have never made a tutorial before so if there is anything unclear or missing let me know! and if you have tried this, show me how it went!
108 notes
·
View notes
Text

Submissions End Tomorrow at 11:59PM EST!
Here is a tutorial on how to submit to the tumblr via web. If you have an issue with submitting please contact a mod (@awanderingmuse-fandom @craniumknight, or @fridurwrites) via DM and we will be happy to help!
Submissions will be placed into the queue in the order they were received and posted every 28 minutes. (Tumblr figured out how to add 6 minutes to the time loop, yay!)
We have also opened a collection for posting on Ao3. Please still submit links to the blog as well, if you choose to post to the collection. The tutorial for submitting to the collection can be found here.
TIMELINE
Sign-ups Begin November 1 Sign-ups End November 22 Matches go out by November 30 First Check-In December 22 Final Check-In Dec 29 - Pinch Hitters assigned to anyone who has not confirmed they are ready to post. Posting Period January 5 - January 11
GOSSAN’S HANDBOOK/RULES:
You must sign up by filling out the google form.
Everyone who signs up for a gift must also create a fan work.
You must include a method of contact in your sign up such as your blog name.
Sign-ups containing non-prompts such as “anything” or “Outer Wilds” will be deleted.
Crossovers or NSFW content are not permitted.
For fics the word count must be at least 1,000 words.
For art the piece must have shading and/or flats.
You must adhere to the preferences of your recipient.
Do not talk to your recipient about your gift. If you have a question for your recipient the mods would be happy to pass it along. Just message the event blog.
If something comes up and you can no longer participate let a mod know as soon as possible, so that we may assign a pinch hitter. If a participant does not respond to a check-in message from a mod within two days of a mod reaching out we will assign a pinch hitter to your prompt.
For submitting works, we prefer you use the submission button if possible. If Tumblr is not working or your submission has multiple images you may message your work directly to one of the mods and we will post for you.
Submissions must be appropriately tagged for triggers/spoilers/etc.
LOST TRAVELERS INFORMATION GUIDE/FAQ
Q: What is an Exchange? An exchange is a type of fan challenge in which participants create fanworks to give to one another. It's kind of like a secret santa, but for fanworks! Participants will submit prompts. The mods will match participants for exchanging gifts. All gifts will be posted to the blog so everyone can see! Q: Do I have to make something to participate? Yes. Q: Do I have to make art for this? Traveler, we aren’t all artists and that’s a good thing! You can respond in any medium you want, art, fic, music, or anything else you can think of is fine! Just put what mediums you might work with in your sign up form. Q: Is shipping allowed? Yes, specific ships are one of the things you can request or refuse in the form. Q: What if I don't have Tumblr or my messages are closed? Please include another way we can reach you! Perhaps Discord or email? Q: Assignments went out and I haven’t gotten one? We do delete requests that are against Gossan’s Handbook. However, if your request was within the rules, it is possible that it was missed. You can always send in an ask, though we won’t be able to help much if it’s anonymous. You can also send the blog a direct message. Q: I have a burning question for my recipient and it'd be really easy for me to just ask-? And ruin the surprise? If you have a question just ask us and we'll get the information for you! Q: Can I just give my recipient their gift by DM? No can do. All participating assignments will be posted to the blog so that everyone can enjoy them! Q: I have another question. That’s why there’s an ask button, Traveler.
9 notes
·
View notes
Note
Sorry if I bother you, but I really love your gif sets! Do you know some tutorials or, app, or anything, to learn how to make good gif? I am learning and I feel very stupid because all my gifs are shit. (if my ask is inappropriate or anything, please ignore me)
you're not bothering and none of this is inappropriate, you're more than welcome in my inbox! as for your questions, let's see what i can do.
1) tutorials — i've been doing this for long enough that i don't really have much to recommend here, the only tutorials i use nowadays are all about specific things and not how to make gifs as a whole. that being said i've linked this one before, i personally do some things differently but it's a very good tutorial, well-received by gifmakers who are just starting and well written, from what i've skimmed through.
another good post to look through is this one, not a gifmaking tutorial per se but it goes into sizes, sharpening, and how to get neat & clear gifs. two of the main points are A) while you can get away with making gifs out of a 720p quality video, 1080p is what is usually recommended. you could use 4k as well, but a 1080p video is usually easier to find, will take less space in your storage, and will give you really good results already. no need for overkill <3 as for B) size matters here on tumblr dot com, mostly width. the op of the post linked in this paragraph has included a nice graphic for the size limits for gifs, you can refer to it as you make your gifs so that whatever you make won't turn out pixelated once you upload it to tumblr.
if you're curious, i've been asked about my sharpening settings here and i spoke before on tumblr sizing here
2) software — you mentioned app, if by app you mean mobile stuff then i'm sorry, i can't help you! i've never made gifs through mobile and i wouldn't even know which direction to point towards for you to find more information. as for computers, if you mean programs then these are what i use to make my gifs: potplayer (for taking screencaps) and photoshop cc 2020 (for making the actual gifs, this is the post i used but here's one with more links)
now i'd like to mention something my grandma always used to say: no one is born learned. you're not stupid just because it's taking you a while to do something, learning is a process and everyone has their own pace. i've been making gifs for a decade now and i know there are things i could do better! i'm also still learning, i make plenty of "shit" gifs before stumbling my way to something i am okay with posting, and sometimes i'm really proud of what i've made and other times i think it's just "good enough". i understand feeling disheartened but please do not feel stupid about any of this!
no use in putting yourself down, now hold my hand and let's add the finishing touches on this long ass reply <3
3) tips — we've mentioned video quality, sharpening, and sizing. what else, what else. personally i would start simple (and i did, way back when, and still do!! most of my gifs are quite simple). so: cropping/resizing + coloring + sharpening. it'll help get the basics down and then you'll have a good foundation for everything else you might want to learn. i mentioned in another ask, almost two years ago now lmao, that i used to download other people's free psds (that is, pre-made settings and layers to color your gifs) and instead of using them i would open them up and pick them apart to see how people were coloring things, which layers they used, in which order, stuff like that.
remember: there is no right or wrong to do this! you could ask ten different people how they make their gifs, and their preferences for any specific part of the process, and you'd get ten different answers. if you find a tutorial and don't vibe with it, throw that aside and look for another. pick and choose, find what works for you and what doesn't! and that means do not be afraid to experiment and try things out.
also, don't like photoshop? no problem! i started with gimp, now personally i wouldn't recommend it over ps but it's a good program, it taught me a lot, and there's really nothing to hate about it. it might have less functions than ps though, and already a decade ago there weren't that many tutorials/resources for it.
don't like photoshop AND don't want to download a program? try photopea, i haven't used it but it works directly from your browser and it should do everything photoshop does!
let me know if there's anything else i can help with <3
17 notes
·
View notes
Text
@acaelusstern asked what i did so heres a tutorial!
here is my setup on gimp, (make sure to select the ENTIRE canvas). set the alpha image as the top layer

select Colors -> Color to Alpha

copy this exact setup. i have split view enabled so you can easily see what is happening. select OK

so now you should have a nice cutout of the character. all you have to do is find a way to compare the two layers, and remove the difference between them with respect to the alpha layer to the other one. (what ISNT in the alpha layer and ONLY give me that as the end result)
to do this, go to the Mode: Normal drop down menu
select Erase. and bam. you are done. (make sure you have selected the TOP layer, or else you wont see any changes). from here you can export as is, or merge and then export, whatever

i think itd be a good idea to merge them, add another layer with a harsh color and confirm it looks nice cuz nothing feels worse than posting something and only after the fact realizing its not clean like you wanted. but yeah like!!! look at that nice opacity on the cloak. im super happy i found a solution to this cuz it felt so doable but so impossible to figure out what the process was

lmk if you have any more questions or something, i will try my best to help and answer
8 notes
·
View notes
Text
I've been drawing for a very VERY long time. I've been inspired by artists on the internet and I've been looking at a LOT of beginner drawing tutorials on YouTube. But no matter how hard I tried, I couldn't improve as much as I wanted. My characters looked weird, and my coloring and lines were horrible…
But if like me you've watched HOURS of drawing tutorials and have been practicing for DAYS, but feel frustrated in your improvement anyways, you're just like me! And do you know why? Because like me, you've never worked on the drawing fundamentals!
Don't worry anybody can learn about the fundamentals with enough practice, effort, and most importantly, good information!!
So if you've been drawing for a long time and you think that you didn't improve enough, or if you want to start drawing but you've never known where to start, this is the perfect article to guide you in your art journey!
Keep reading and let's start to draw seriously together!! :D
The joy of starting!
Drawing is an excellent way of self-expression, a way to become more creative, and a way to see the world from a whole new perspective! You'll be so proud and happy to share your ideas and create beautiful drawings! And you'll learn SO MUCH about the world and the objects around you!
But if there is one thing that you have to keep in mind during this journey, is that everyone starts as a newbie! So don't be harsh on yourself and give yourself some time to learn and practice the things that will make you improve! Being an artist is a wonderful journey! Take some pleasure to live it!
Something else to keep in mind is that material is not an excuse! A pen and some printing paper are more than enough to start! The most important is to actually draw consistently! Anecdote: I started to draw in my notebook during French class in middle school. (Don't be like me though listen during class)
So now you should be asking…
But what are the fundamentals I need to learn?
And you're right to ask this question! Just drawing every day isn't enough to improve your competence. You'll need to draw things that will make you improve!
Having a good drawing foundation is important to build a good drawing style!!
So here are the fundamentals you need to learn as a beginner:
Perspective
That is what will make your line on the paper feel 3D!
Here you'll need to learn about what makes an object feel like it has volume, how something farther away would look like, etc.
I have two exercises for this fundamentals! The first one is to actually draw objects! Draw cubes, cylinders, and spheres in any direction you can think of!

Here is what it looks like when I do this exercise!
The second exercise is to draw these objects in an environment! Horizon lines and vanishing points will be your friends here.
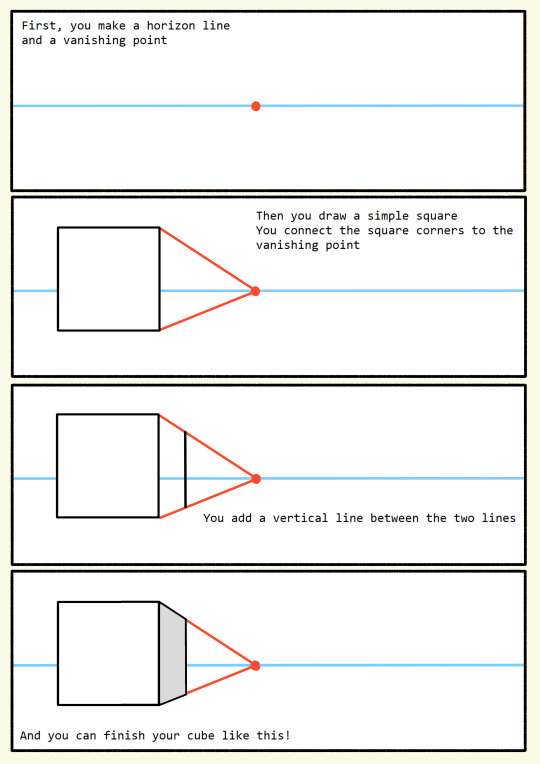
Here this will make it clear to you!
Construction
Construction is the ability to build new things with the simple shapes we saw earlier! You'll try to understand how objects would connect together.
With this skill mastered, you will be able to draw ANYTHING! Because all things and objects can be broken down into simple shapes and volumes!
Looking at references can be a good idea here! Look at a simple object and try to draw it with the volumes!

This is the way I practice construction
Gesture
I only have one thing to say here: GESTURE DRAWING! What is gesture drawing? Is an exercise! The goal of this exercise? To draw people with a time limit! You'll draw a pose in one to two minutes at first! Your goal is to get the GESTURE of the character in your drawing.
There are a few websites for doing gesture drawing! You just have to select the time and the type of images you want and draw! One of my favorite websites is Quickposes! But I'm sure you could find another one if you search a bit on the internet!
Now you know what to practice! Practice these fundamentals consistently and you'll see your drawing skills improving!
Of course, you don't have to just draw spheres, cubes, and simple people you can draw things you want to draw! Just draw from good references!
Another thing that can help you with improving your art is…
Drawing challenges!
They're fun, put you out of your comfort zone, and make you draw things you would have never drawn otherwise! Isn't that amazing?
That's why it's such a good idea to participate in art challenges! Plus, having other people participating in the same challenge can help you boost your motivation!!
There is plenty of art challenges on the internet, but the one you should do to start drawing is certainly Marc Brunet's 30 days art challenge! An art challenge that will help you start drawing in a month! You will practice the fundamentals and you'll see the improvement by the end of it!
Maybe should I do this challenge? (Btw Marc Brunet's channel is an excellent place to learn from! Go look at some videos!)
In conclusion
You now have all you need to start drawing! You know that you'll need dedication and persistence, you know about the fundamentals you need to practice! You also have a perfect challenge to start drawing! Don't forget that drawing is an enjoyable journey! Don't overdo yourself, practice consistently, and be curious!
Feel free to ask questions or share some drawings so we can all track our progress!
One of the most essential pieces of advice I'll give you in this post is to find fun in the process :D
33 notes
·
View notes
Note
Hiii! This is the same anon who asked abt mb tips, I just wanted to say thank you you’re post was so helpful! I have another question, on mbs I see all these really cute like captions or bios and I’m just wondering how to do them and still make them match the style of the mb! enjoy your day🫶🏾🫶🏾
HIII!!!
me personally, i dont know about anybody else but i always have a song in mind when i made my moodboards.
if i dont, i look for a song (sometimes it takes a while) and i keep my ears open for a good lyric i really resonate with or just something that sounds good ^_^
oorrrrr i really speak from the heart and type something that has meaning to it! or you can use quotes from any type of media you like cause thats what i do sometimes!
you can also base your moodboard around the quote you want
i use a font generator causeee i dont really wanna download an app... but anything works just fine!
for symbols, you can use those websites that have a bunch. heres a really good one 🪻
i use the symbols i collected over time in my notes app but you can do anything that helps you
search for symbols that have the same energy/vibe or look as your moodboard if that makes sense
like if your moodboard looks very soft and has a delicate look dont add stuff that looks too bold
and also i sometimes use the gradient text to add a little pop to my moodboard!!!! i use any colors from my mb that i like and use it for my text! you can watch a tutorial on youtube for it but its fun!
idk if the bio explanation was a huge help, but i hope it guides you in the right direction at least a little bit!!
sincerely, atsu ꒰˃o˂ 🗯♡꒱
2 notes
·
View notes
Note
how did u teach ur self to draw ? i’ve been tryin for years and for some reason i just can’t get the hang of it
any pointers?
Hm. Okay, before I get into any advice imma provide some background:
- I've been drawing (with the intention to improve) since I was about 6, so since elementary school. Yes my memory goes back that far don't say nun 😭
- My mom studied fashion design and was always drawing around me so I had access to all her books and supplies and stuff! Fun times
- this means that I had A LOT of time on my hands to practice and get better at drawing
Alright! So! If I could pinpoint some of the things that helped me improve the most, it would be YouTube tutorials. I started off w those "how to draw manga" videos? Like I used to watch Mark Crilley DOWN I wanted to draw like that so bad.
Then eventually I started watching more tuts about actual technique (anatomy, perspective, shading) and I think that's where the improvement REALLY got started imo. I'd suggest covering the fundamentals instead of "how to draw" videos because you'd just be learning to imitate someone else's art style without understanding the reasoning behind what's being done, and I assume you want to do more than that.
Speaking of style...follow artists with a variety of styles that work in a variety of mediums! I love my pencil sketching, but I also do digital and used to paint with watercolor a lot. Sometimes knowledge from one will bleed into how you approach another medium, which is great for getting fresh new perspectives!
Art channels/artists that I watch a lot:
-Proko
-Chris Hong Art
-Victoria Gedvillas
-Marco Brucci
-Likelihood Art
Another thing: be nice to yourself! Drawing while frustrated with yourself is not fun it sucks ass do not do that! If something isn't coming out right, step back and reassess your approach, or ask for feedback from others if you have access to other artists.
Understand what your goal is for a particular drawing session. (sometimes you might be doing studies or anatomy, other days might be character art, or maybe you just wanna doodle whatever!) The older I get, the more I realize that multitasking for any art form usually makes things more frustrating. So I don't do that anymore.
And lastly...you might wanna determine what kind of artist you wanna be. I have chosen to be more of a hobby artist, so I'm not gonna be learning things as in-depth as someone who plans on working at Pixar Animation Studios. You will be more focused in your learning this way.
Anyways, that's it! Everything in between that I didn't cover you will probably figure out yourself sjfjdk but if you have any more specific questions feel free to shoot me an ask! Good luck fren 🫶🏾
10 notes
·
View notes
Text

it's the anniversary... of the game's development. idek why I'm making these at this point, I suppose because it gives me some kind of purpose or motivation to continue on despite the shit that's been happening in my life. The massive burnouts, the lack of motivation, my dayjob eating up my time to the point that I'm unable to sit down and work on the game.. the depression.. but I keep persevering..
Last year I released a remade demo of the game, where I rehashed the entirety of the game, from the gameplay to the story, the entire thing was changed.. And there were lots of struggles and hurdles I needed to surpass just to release a (somewhat) perfectly functioning demo, completely bug-free.. That's an achievement if I do say so myself... I did take a break from the game afterwards and ended up making Escape Button, a.. quite short and silly little experimental game where I tried to emulate a 'point-n-click' setting.. It's possible, you just gotta be a little creative. *pensive* For the most part it worked, and from there, I applied what I learned in Esc and slapped it into burdel borble, you will see what I mean in a few.. enough sob stories about my crippling depression and burnout, you came here for the good shit, but if I end up wallowing in my own self-pity, that's on me. I'm a tired creature, that is all I am..
I unfortunately did not receive any questions, so I may as well make up some questions you might wanted to ask me.
WHY IS IT TAKING YOU SO LONG?!
To put it bluntly, I'm a one man developer.. People might misinterpret what I mean by that, so let me elaborate. Other than music and the assets I receive from volunteers who want to see my game come to fruition, I am left to do everything else that isn't in the music department or general assets. Which means coding, mapping, setting up events, story and dialogue, constant beta-testing, yadda yadda. Other factors play in this, and it has to do with my day-job. Since I started my day-job back in February, all my focus shifted onto my work, so I have been unable to sit down and work on the game..
I know people want to see my game get finished someday, but idk when exactly that someday will be.. Might not be tomorrow or next year.. My fg does not have a deadline and it's better that way, so I don't end up stressing myself out.. When it comes out, I hope to make it into a grandiose deal or some shit like that..
For the most part, I'm mostly re-working on dialogue and certain events in game to make it pop a little bit more and make it look more.. mine you know.. like I made it with my own 2 hands..
WHAT ARE YOUR PLANS FOR THE FUTURE?
Finish the game ofc, and then begin working on new projects.. I do have something in mind, might be another experimental one, who knows.. And ofc, finally kickstart my twocrown tutorial channel, where I post rpgmaker related tutorials.. I'll keep that short haha.
WHAT DO YOU HAVE SO FAR? WHAT WILL WE SEE IN THE FUTURE/FINAL VERSION?
Lots of things actually! Let's start with the most basic..
Animated facesets. It came to me in a dream lol So I wanted to try out a thing where the characters are able to speak. As in you see the faceset's lips move. This one took time to implement because I kept running into issues.. Then the bird brain awoke and was like: remember that large sprite tutorial for 2003? Make it for the facesets! And so I did!!

Aleyes shop gets a bit of an overhaul! learning from Esc, I made a panorama for his little shop, where he will sell you goods. This is a point-n-click segment.. don't worry, there will be more, in the form of minigames and puzzles! they are fun to make!!

First person battle. Think Earthbound. Just think Earthbound!! This one comes with it's pros and cons unfortunately.
The major Pro here is that it will not be necessary to constantly change the battle sprites, all i have to do is just change the faceset and I'm moving on with my life.. the con? well, when their HP reaches 0, they are dead, but they're unable to show.. I'm trying to figure out a way to overcome this, but I am drawing blanks.. i do see potential in the window c variant (the first person view), I haven't seen much people use this type (WITHIN the fangames!! not outside, within!!!)
and that's about it I suppose.. I don't have much else to show cuz everything else is spoiler territory and I don't want to spoil!
So yea, happy anniversary, and.. let's hope I finish this game someday..
#borderline related#borderline (off fangame)#off (game)#off spinoff#off fangame#off (mortis ghost)#borderline (off spinoff)#rpgmaker#anniversary or some shit idk
12 notes
·
View notes
Note
thank you so much! another question when giffing/screencaping/or taking videos of either the pacific or band of brothers, do you need to give credit or anything?
You're welcome!
I would give credit if I took something from another creator and incorporated that in my work in any way. So if I use somebody else's templates, coloring, etc. I will try to give credit for that where I can. It's considered to be a really common courtesy to include a link to the original work and/or creator. They worked hard on their stuff and deserve the attention for it! I tend to build a lot of my own work from scratch and follow tutorials to be able to produce it myself, though, so for me the credit situation rarely comes up.
Similarly, and I really want to say this to any and all fic authors: it's a must to credit the gifmaker whose gif you use in a fic or imagine or prompt or whatever else have you. Better yet, reach out to the gifmaker and ask if you can use their gif in your fic! Usually the answer will be positive, but please also listen if a gifmaker refuses. They might have spent hours on a particular piece of that work and might not want it to be used 'out of context', or they might not support the ship or story you want to use their gif for.
You do not need to credit everyone who was involved in creating the show, though. It usually suffices to use the show's tag, like "band of brothers" or "the pacific", because if people want to know which show it is they will rely on that and be able to google the rest. Basically: credit what you cannot google, do not credit what can be googled in 5 seconds flat.
6 notes
·
View notes
Text
art things i wish i could tell younger me under the cut
if ur working on something and the only thing keeping u going is "it'll look better once i add colours/shading/lighting" then chances are ur not gonna be happy w/ the final product.
learn what the word draftsmanship is and study it.
"learn from real life" /=/ learn realism/use ONLY real photos as reference. learning how things are commonly stylized and how your favourite artists draw is just as if not more important. understanding what u are simplifying and stylizing /=/ having to draw that thing hyper-realistically to earn the right to stylize it.
on that note LEARN FROM ANIME. YOU LOVE ANIME.
more than anything find ppl to idolize for specific elements of their process and apply that to urself. u can like someone's colours but nothing else for example and just take the colours and mash it up with another style u enjoy to make ur own thing
YOUR PROCESS IS JUST AS IMPORTANT AS THE FINAL PRODUCT. legit stop seeing drawing as the laborious journey to get to Picture. You will learn more and have more fun if you figured out a way to draw u actually enjoy trust me. (stopdoingcleanlineworkyoufuck)
use ur brain and think when ur at each step. don't just go into autopilot. HOW do you want to do this tho.
question question question everything u've seen online. every tutorial every pro artist interview every Thing. just because they're good at doing art their way doesn't mean the same thing will apply to you. people who started their careers 20+ years ago can be incredibly skilled but have no clue what it's like trying to get your first job now. people use different techniques. find alternate POVs where ever possible.
you are NOT talented, you are SKILLED. stop pretending you're one of those people who just "get" perspective, anatomy, colour, etc. you're a medium-sized fish in a small pond with no frame of reference. everything you know now you worked for and that's way more badass than "i just Get colour". Keep studying keep learning keep kicking ass. you are rock lee, not gaara.
you will get more knowledge and progress out of self-study than any course Ever.
and finally BE MORE CRINGE. BE SO SO SO CRINGE. BE MORE VULNERABLE MORE RAW MORE UNFILTERED MORE FUN. the people who dislike your work will dislike it either way. draw what you want to see and you'll end up near people who you'll engage with much better.
4 notes
·
View notes