#keeping this tutorial for later ;3
Explore tagged Tumblr posts
Visit Tumblr Blog
Explore Tumblr blogs with no restrictions, modern design and the best experience.
Last Seen Tumblr Blogs


Fun Fact
Tumblr was acquired by Yahoo for $1.1B in 2013.
Text
In the future I believe I shall be calling looped Chou Piéride even tho they'd still go by Chou for clarities sake 👍
#rat rambles#stars posting#new game+#we'll see if I do enough with this sub au to give it it's own name#but yeah piéride vc well clearly my loops broke because I had it too easy *throws like two tutorials at loop before fucking off*#it doesn't help that ultimately they just. don't see themself in either siffrin. at least not until getting to know them better#they see themself as being here to make sure loop doesn't make the same mistakes as they did#and since from their perspective loop Wasnt making those mistakes during their endless death march they didn't do shit#they also never directly spoke to loop like loop does to siffrin so loop genuinely didn't know abt piéride during their loops#piéride still continues to be distant and not particularly helpful after loop becomes loop but theyre at least willing to talk to loop now#mostly because they view their role as loops guide as having shifted from helping them not break the loops to helping them guide siffrin#needless to say they aren't fond of loops methods#they won't stop loop tho since they don't want to risk breaking things more#to be clear they didn't explain their perspective basically at all nor supply any of the deeply valuable info they have#at least not until far later#you see they have a pretty crippling fear of finding answers as they'd rather keep bashing their head into a wall and hope it works than#know for sure that theres nothing they can do abt something#the whole reason they made their last wish was because they finally let the others in and let them help them find answers and the#conclusion they came to broke them#so going from that to being a guide left them just wanting to stay as distant from any real problem solving as possible#also because they think it was them wishing for basic qol stuff that broke their loops they think direct intervention is a bad idea#because evidently the universe gave them nice things and died for it so they should learn from that and do jack shit for loop <3#look they were stuck in their loops for at least a decade of course they got some shit stuck in their head
2 notes
·
View notes
Text
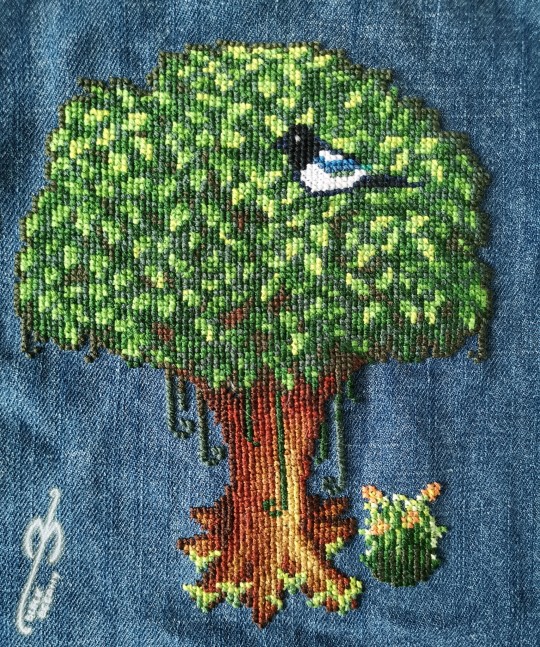
I have recently received another ask about my canvas pulling and since I've been thinking about making a serious tutorial for a while now, I took the opportunity to take some pics and vids while finishing the tree. Do please enjoy :3
1. Why pulling out canvas at all?
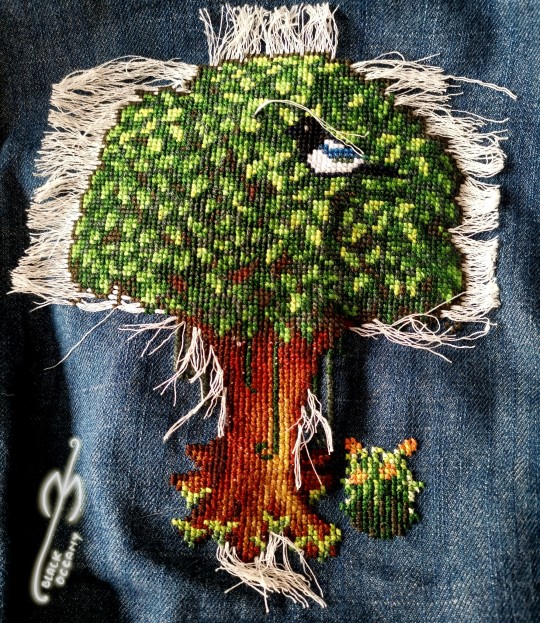
Primarily, this is a fantastic technique to apply cross stitch patterns directly to the item you want OR to make patches from old jeans, like this one:
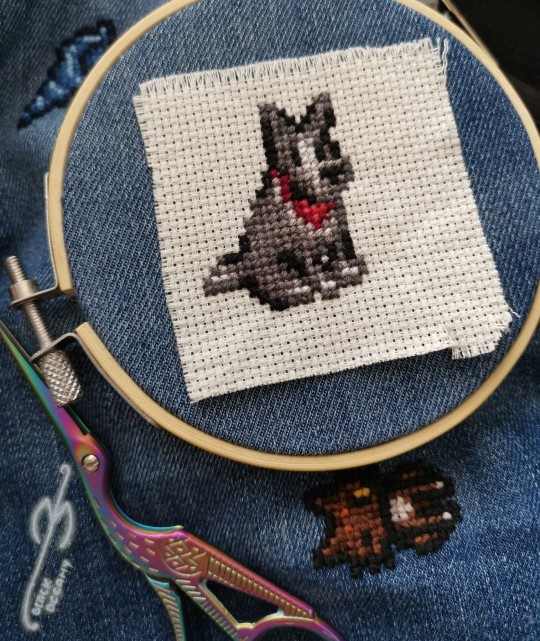
With small patterns I usually don't bother to sew the canvas prior to embroidering, like with the pupper above. In case of the bigger patterns, I usually sew it lightly on the edges just to keep the canvas in one place. The more stretchy the material type is, the more important it's going to be to keep it in place.
2. Why not use a soluble canvas?
I'm sure you can and that they'll be as successful as the regular one 😁 However, as I mentioned in my previous posts here and here, I prefer to err on the side of cheaper, hence the tutorial.
3. Okay. I'm convinced - I even have a pattern embroidered on! What's next?
With small patterns (like the doggo earlier) it's going to be pretty easy. You just pull the threads one by one - preferably starting on the thinnest part of the pattern - and you may not even need the pliers. The fun (?) is with the large pieces, because the canvas has on average quite fragile threads and they like to break. Note - the canvas I'm using and I suppose most of the existing canvas types, will have four threads per one embroidery row. It's usually easier to pull one first and then the other three, bit that may vary when, for example, you managed to pierce the thread during stitching phase earlier 😉
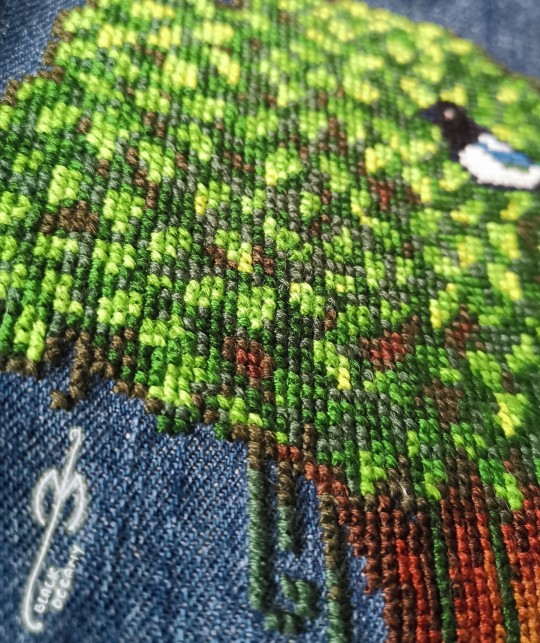
If you were already careful during the stitching, you paid extra attention to embroider EXACTLY between the canvas threads and avoid piercing them at all. There are two benefits to that being extra careful: one, it's easier to pull it out later; two, the stitching gains an extra precision to it (and it looks great!). I recently discover that the round tip needle is making it much easier and if you're interested, there's a separate post about it as well!
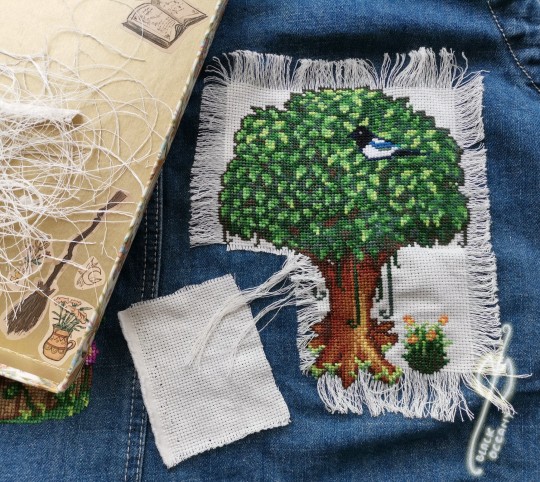
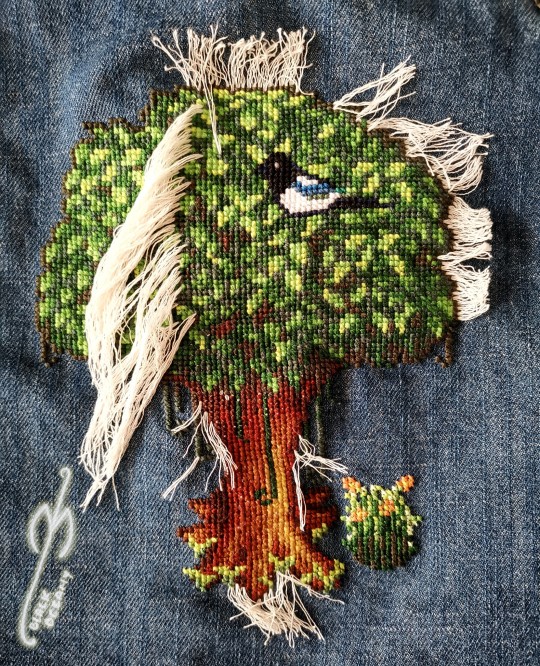
On to the process! You can see from the pictures how I started with cutting out a piece of canvas that I can later reuse for something small (recycling is my hobby 🤷🏻♀️). I also pulled loose threads from around the tree:
Next part was to clean up the trunk and the grass on the right:
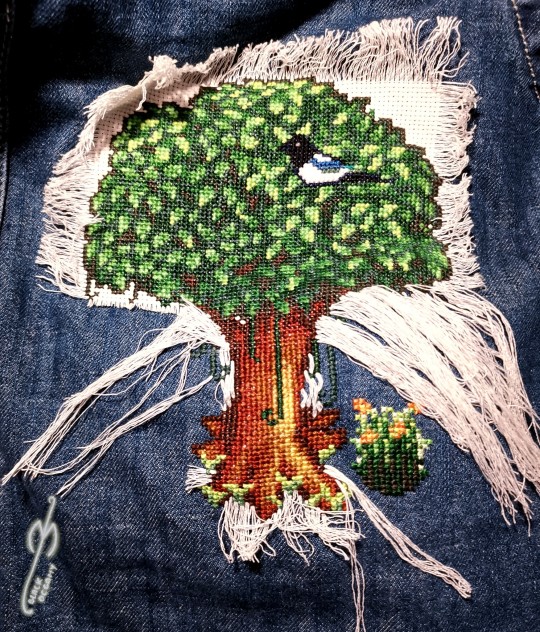
I then cut off the excess to avoid the threads tangling and slowly moved to the sides of the leaves on right and left:
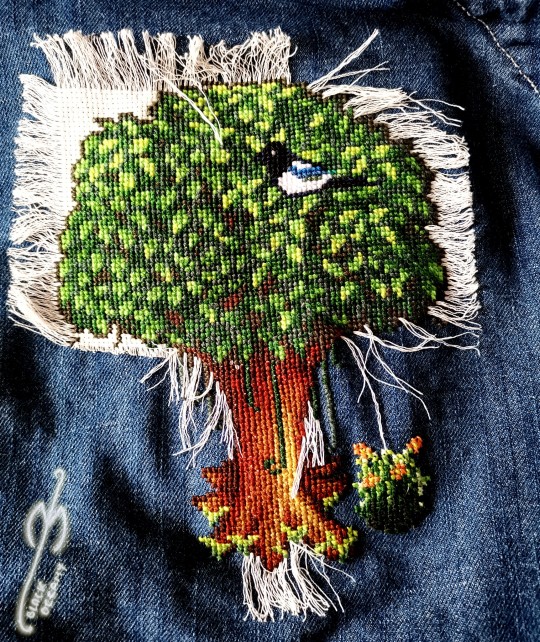
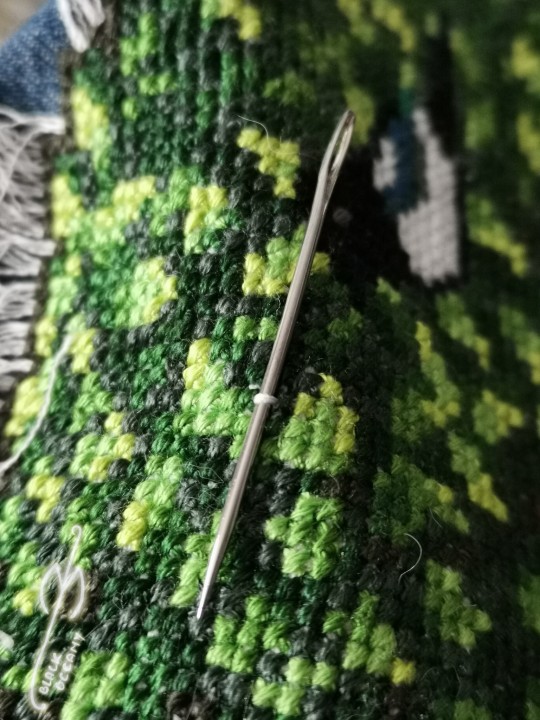
You'll notice that the last photo has the thread pulled halfway through the pattern. That's because on this stage it's usually impossible to simply pull the thread out - even with the pliers it is just going to break off. I use a needle to pluck it from between the embroidery like this:
If you're more of the visual learner, I made this vid that I hope explains the process in more detail. You'll notice that I'm using my fingers and not the pliers here, because it's faster than to switch between tools.
And finally, when you're left with single direction threads like these, it's just a matter of pulling them out one by one.
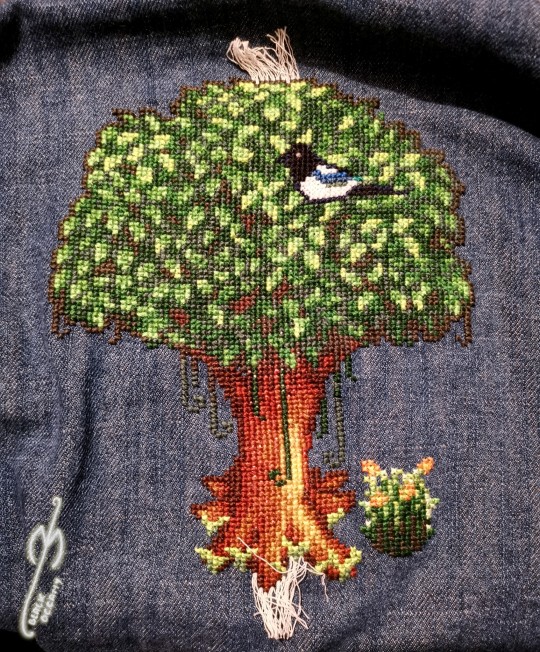
And that's it! The final product looks clean and neat, AND you will notice that without the canvas beneath it's also getting a bit of volume that looks cool (and helps even out small mistakes you may have made along the way).
Thanks for reading this far! Let me know if there's something else I forgot to explain 😊
2K notes
·
View notes
Text
Interlude | s.r


who? spencer reid x pianist!reader
summary: Penelope drags Spencer to some fancy gala to cheer on her friend. He expects to be incredibly bored but finds himself extremely captivated by the night's performer.
word count: 1.4k
a/n: me thinking "i should probably get back to playing" ended up with my keyboard still collecting dust and this . enjoy <3
Spencer finds himself at Garcia’s office – doing nothing, like it usually happens, he has finished his share of paperwork and doesn’t really have anything to do.
He’s slowly spinning around in a chair while Penelope talks on the phone, the soft hum of her many machines filling the space like background music. She sounds excited, he notices. Not her usual sunshine demeanor, even more, somehow. He doesn’t mean to eavesdrop, but her animation intrigues him so he stills the spinning to focus on her words.
“I’m so happy for you,” she says, her voice dripping with affection. “Oh this is so amazing”
The other person on the line says something that seems to prompt Penelope to firm her tone.
“No, no, it’s still important. It might open doors for the future.” As she says this, her head is shaking and her brows are lifted like the person on the other end could see.
“Yes, that’s the energy i want,” she adds the smile returning to her face “Oh and can i come?”
Spencer hears something like a chuckle through the phone and then a muffled reply
“Okay, amazing” Penelope says and at that moment she turns just to see Spencer and her face lights up instantly. “I am also bringing someone - some extra support”, she says and Spencer’s features twist in confusion because he knows the someone she is referring to is him.
Another chuckle and muffled reply.
“Shh, stop trying to downplay it” she says tenderly “Everyone starts somewhere. Love you, keep me updated. Byee”
“So where are you taking me?” He asks resigned knowing that arguing is not even on the table.
“We’re going to some fancy gala thing, rich people buying art and classical piano music in the background, my friend is going to be playing. I hope you have a good suit”
— ꕤ—
“You’re taking Reid instead of me?” Morgan exclaims, hand over his heart faking offence “Who will slow dance with you?”
“I don’t think you can slow dance to classical music babe” Penelope fires back
“Well it depends on the piece, if we’re talking Beethoven Symphony No. 5 probably not. But I can imagine something like Clair de Lune or Liebestraum” Spencer says.
Penelope shoots a look at him pretending she’s mad that he just discredited her response.
“It’s a fundraiser, nobody is going to be dancing” she tells them matter of factly
“Whatever,” Morgan beams “enjoy yourselves” he pats Spencer’s shoulder as he walks past.
— ꕤ—
Spencer didn’t actually agree to go, not that he had an option anyway. But two days later he finds himself in a rented suit, fixing his tie and hair on the backseat of a taxi, Garcia beside him with a perpetual smile framing her features.
“Looking good Spence” she says, glancing at him.
“Can’t believe you pressed me into doing this” he mutters
“Correction,” Penelope says holding up her index finger “I didn’t press you to do anything, I politely informed you of our plans for the weekend”
“Right,” Spencer shakes his head “and you also texted me suit options and a tie knot tutorial”
She grins proudly “And don’t you look amazing?”
Before he can respond, the cab pulls up to the venue, – a sprawling building through the windows he can see marble columns, huge chandeliers cast a warm glow that spills to the street and an entry way that suggests everyone inside considers Versace casual.
He eyes the grand glass front doors warily. “So…what exactly is someone supposed to do at an event of this kind?”
“Look put together, sip champagne, and smile” Penelope answers as she steps out of the car and smooths her dress. “Oh and clap, there’s a lot of clapping”
He goes to stand beside her with a sigh “Is this your idea of fun?”
She hooks her arm through his. “I’m here to support my friend, but watching you attempt small talk will be an enjoyable bonus”
He just makes a face which makes her laugh and they walk in.
Inside, everything is almost obnoxiously elegant. The sound of glasses clinking, heels clacking, hushed conversations, forced laughter and soft notes of a piano fill the atmosphere. Penelope scans the room, eyes searching for the source of the music. Once her gaze lands on an elevated platform, she smiles.
A baby grand piano sits on the centre of the stage and seated on its bench is a woman in a long black dress. Her hair tied low on the back of her head, and her eyes are closed as she plays, her head tilted slightly, fingers moving softly and confidently over the keys. It's as if the piano is an extension of her. Spencer is instantly mesmerized.
When the piece ends, the woman opens her eyes and leans forward to reach and turn the sheet music. As she does, her eyes fall on Garcia and him. A smile appears on her lips mirroring Penelope’s expression. Garcia waves, the woman responds with a nod before going back to playing.
Spencer just stares at her, how she seems to be playing with her whole body, how her head lowers at low notes and rises at the higher ones, how she barely glances at the sheet music because she seems to know the notes by heart. Her fingers move in a cascade, fluidly – an arpeggio. Spencer knows how technically demanding they are – the wrist movements, finger gymnastics, the precision, the control – but she plays multiple of them in succession like it’s simple. Effortless. Natural. As if she’s doing something as plain as breathing.
Garcia is as captivated at her friend’s talent, she glances at Spencer after a member of the waitstaff dressed in black and white offers them glasses.
“She’s amazing” Penelope says quietly
“Very impressive yes” Spencer adds never taking his eyes off the pianist
When this piece ends, a man in a sharp emerald green suit steps onto the stage, smiling as she approaches the microphone “Ladies and gentlemen I am incredibly delighted by your presence tonight. The evening has begun on a splendid note, so, before we continue, let’s offer a warm hand to our performer”
The woman rises from the bench smoothly and applause echoes through the hall, she nods in acknowledgement then steps off the stage. She’s not even finished going down the small stairs when a small group approaches and praises her.
“You were divine” a woman with an intricate updo says “Absolutely breathtaking” the woman beside her adds. “I felt that in my soul, it was beautiful” an older man says after taking a sip from his champagne flute.
She thanks them politely with a tight smile and gracefully slips through the sea of tailored suits, and sparkling jewelry until she reaches Spencer and Penelope.
Garcia grins and pulls her into a side hug “Amazing, as always” says Garcia “I had almost forgotten how beautifully you play”
“Ah thank you so much Penny, and thank you for coming” She casts a glance at Spencer and adds “The both of you.”
“I’m sorry she dragged you here” she says with Garcia’s hand still around her.
“It was totally worth it, your performance was gorgeous” He says rushedly “I’m Spencer, nice to meet you” he adds not knowing what to do.
“ Nice to meet you, Penny talks about you and the team a lot” she answers with the smile on her lips never fading.
While the man on the stage goes on with his speech, Garcia and her friend fall into the rhythm of a conversation with Spencer occasionally commenting.
Eventually the man finishes his speech and the woman has to go again.
“That’s my cue,” she says taking the last bite from her tiny sandwich “Don’t go without me” she adds over her shoulder, already walking away.
She steps up the stairs and gives a small nod to the man now leaving the stage, he nods back and goes down leaving the stage for her again. Without missing another moment she resumes playing, just as graceful, just as mesmerizing. Spencer finds himself simply watching again, the rest of the room melting aways with the gentle sounds
“Where does she usually play?” Spencer asks, voice low like he’s afraid of breaking the spell.
Penelope caught off guard, just blinks for a moment “At the little bar at 14th,” she replies then smiles “It’s very your vibe, I think you’ll like it”
“What makes you think I want to go?” he shoots back without missing a beat
She sips her drink, smug. “I know you do,” she says simply. “And because you haven’t blinked in two full minutes.”
He rolls his eyes, but the corner of his mouth twitches, and Penelope considers that a win.
ty for reading!
#criminal minds#spencer reid#spencer reid x reader#spencer reid x you#spencer reid fanfiction#spencer and penelope#mwah <3
394 notes
·
View notes
Text

Did you know you can modify your game files to start with custom lots in the lot bin? Did you know you can add your favorite lots to the program files and you'll never have to import them ever again? I sure didn't. Here's how.

Part 1: Freshen Up That Lot!
Locate the lot you want to freshen up. If it's in your Documents > LotCatalog, it'll be named something like cx_00000001.package. [Hint: you can use CleanInstaller to browse your LotCatalog with pictures!]
Clean it up using LotCleaner and LotCompressor (and Magic Wand, if you want). Here's a tutorial. Do NOT skip this step, or you risk contaminating future save files with old sim references.
Make it a spiffy new picture. Personally I like to lump my similar lots together with a similar title/street name. And I color-code using CatherineTCJD's color-coding format. If you want to match me, you can download my template psd here.
Open your lot in Simpe and replace that old preview. Click 'jpg/png image'. Right click the property > Replace. Change file format to 'all files' to see your image. Click either 'yes' or 'no' on the 'resource changed' popup (it doesn't matter--one updates the image preview immediately, the other doesn't). Click save.


Part 2: Relocation Time! *MAIN LOT BIN*
You cleaned up your lot, right? No sim references left? Don't skip this step or you risk messing up future hoods. Clean up that lot!
Select your lot file and rename it to the cx_00000000.package format. You can use any numbers but it must be in that format and have 8 digits. The number denotes the order so get creative with your categories. (ex: lots cx_00000100-150: modern houses / cx_00000200-250: beachy, etc.). You can use any bulk renamer to rename files in order without having to manually number each one.
Pick an Expansion for your files. Mansion and Garden comes first in the lot bin, Base Game last. The expansion you select will denote the location of your lots within the catalog. The file location is the same in every expansion, so you can even spread your lots around for max organization.
Move your cx_#.package lot file to Program Files > The Sims 2 > [expansion of your choice (ex. Nightlife)] > TSData > Res > UserData > LotCatalog. You will already see some files here. These are the maxis lots that fill the lot bin every new game. You can delete them if you really want to, or just change the extension to something else to make them go away. (Catherine has a backup if you need them back.)
Done! Now your custom lots will prefill the lot bin every time you generate a new The Sims 2 save file in your documents!
This will not pre-fill existing games. If you want to put your new clean lots into your current file, rename your main The Sims 2 save file (in your Documents folder) something else. Launch Sims 2 so it regenerates a clean copy. Create a new Hood, let the game load, and check out the LotCatalog. It will be now filled with your brand-new lots. Copy them over to your main file's LotCatalog. [Check your main LotCatalog in game to make sure you won't be deleting/overwriting anything you want to keep (make a backup just in case!) Check it again with CleanInstaller. Do not delete/overwrite occupied homes! And delete your old and crusty lots in game if you want to be extra safe.]

Part 3: Relocation Time... 2! *SPECIALTY LOT BIN*
You cleaned up your lot, right? No sim references left? Don't skip this step or you risk messing up future hoods. Clean up that lot.
We will now populate the second tab in the lot catalog, the Specialty lot bin that holds Hotels and Apartments. You can put whatever you want in here; it doesn't have to be hotels or apts. You can move lots from the main catalog to this one, if you want. These lots do not appear in the LotCatalog of your main save file, in case you try to look for them there later. They only exist in the program files.
Rename your files. Unlike the previous lots, you can name these lots anything you want, as long as it ends in _Permanent.package. stinky_Permanent.package is perfectly fine. Name it something descriptive.
Pick an Expansion for your files. You can put them in any Expansion folder, but personally I keep my apts in Apartment Life to stay organized.
Move your files. Take your stinky_Permanent.package and move it to Program Files > The Sims 2 > [expansion of your choice (ex. Nightlife)] > TSData > Res > LotTemplates. You'll see some other files here already. These are blank lots and hotels/apts (if you're in Apt Life or Bon Voyage). Don't touch the blank lots, but you can remove the hotels/apartments if you don't want them. (You can move them to the main lot bin by renaming the files to the cx_# format and moving to the location in part 2). You can open them in SimPe to check what they are, but Catherine has a visual list here.
Done! These lots will appear in the Specialty lot bin every time you boot up the game, even in your current saved game.
Have fun and enjoy organizing!
[PS: did you know you can not only delete or relocate existing bin lots, but replace them with better, and cooler lots by simply overwriting the existing cx_0000000 files in your UserData > LotCatalog folders? Catherine has a visual guide which file is which, if you want to reinvent them all. The lot bin is your oyster!]
credits: CatherineTCJD for the Lot Refresh project that made me learn this. Bluerubberbear for the majority of the lots in my thumbnails and the lot in the psd file. Plumbtales for the other lots in the thumbnails and for the beautiful lot makeovers that I replaced maxis's community lots with.
#sims 2#the sims 2#ts2#sims 2 tutorial#ts2 tutorial#lot tutorial#tutorial#mine#this literally blew my mind when i learned you could do this. i hate how messy the lot catalog is!!!!!!!!#and how you cant tell apart community lots from residential. smh.
246 notes
·
View notes
Text
My GIF Making process: Screen capturing using MPV player, Organizing files, 3 Sharpening settings, Basic Coloring PSD + Actions set

This is a very long post so heads up.
I’ll try to be as thorough and true as much as possible to the way I make my gifs (I already use Photoshop Actions which I’ve long since set up but now for this tutorial I’m reviewing them to show you the exact steps I’ve learned to create my gifs 😃) and present them to you in a semi-coherent way. Also, please bear with me since English is my second language.
First things first. Below are the things and tools we need to do this:
Downloaded 4K or 1080p quality videos (let’s all assume we know where to get these—especially for high definition movies and tv series—so this post doesn’t get removed, okay? 😛)
Adobe Photoshop CC or the CS versions can work as well, but full disclosure I haven’t created gifs using the CS versions since 2020. I’m currently using Adobe Photoshop 2024.
mpv player. Use mpv player to get those frames/screenshots or any other video player that has a screen grabber feature. I’ve used adapter for the longest time but I’ve switched to mpv because the press to screenshot feature while the video is playing has been a game changer not to mention ultimate time saver for me. For adapter you need to play it in another video player (like VLC player), to get the start and end timestamps of the scene you want to gif which takes me ages before I can even open Photoshop.
Anyway! Please stop reading this post for a moment and head over to this amazing tutorial by kylos. She perfectly tells you how to install and use mpv player, both for Mac and Windows users.
One thing I have to share though, I had a tough time when I updated my MacOS to Sonoma since MPV is suddenly either duplicating frames or when I delete the duplicates the player seems to be skipping frames :/ I searched and found a solution here, though it didn’t work for me lol. My workaround for this in the meantime is decreasing the speed down to 0.70 then start screenshotting—it’s not the same pre Sonoma update but it works so I’ll have to accept it rather than have jumpy looking gifs.
Now, after this part of kylos’ tutorial:

you can continue reading the following sections of my gif tutorial below.
I want to share this little tip (sorry, this will only cater to Mac users) that I hope will be helpful for organizing the screenshots that MPV saved to the folder you have selected. Because believe me you don’t want to go through 1k+ of screenshots to select just 42-50 frames for your gif.
The Control + Command + N shortcut
This shortcut allows you to create a new folder from files you have pre-selected. As you can see below I have already created a couple of folders, and inside each folder I have selected screenshots that I want to include in one single gif. It's up to you how you want to divide yours, assuming you intend to create and post a Tumblr gifset rather than just one gif.

Another tip is making use of tags. Most of, if not all the time, I make supercorp gifs so I tag blue for Kara and red (or green) for Lena—just being ridiculously on brand and all that.
Before we finally open Photoshop, there's one more thing I want to say—I know, please bear with me for the third? fourth? time 😅
It's helpful to organize everything into their respective folders so you know the total number of items/frames you have. This way, you can add or delete excess or unnecessary shots before uploading them in Photoshop.
For example below there are 80 screenshots of Kara inside this folder and for a 1:1 (540 x 540 px) Tumblr gif, Photoshop can just work around with 42-50 max number of frames with color adjustments applied before it exceeds the 10 MB file size limit of Tumblr.

Sometimes I skip this step because it can be exhausting (haha) and include everything so I can decide visually which frames to keep later on. You'll understand what I mean later on. But it's important to keep the Tumblr 10 MB file size limit in mind. Fewer frames, or just the right amount of frames, is better.
So, with the screenshot organization out of the way, let's finally head over to Photoshop.
Giffing in Photoshop, yay!
Let’s begin by navigating to File > Scripts > Load Files into Stack…

The Load Layers window will appear. Click the Browse button next.
Find your chosen screenshots folder, press Command + A to select all files from that folder then click Open. Then click OK.
After importing and stacking your files, Photoshop should display the following view:

By the way, I'll be providing the clip I've used in this tutorial so if want to use them to follow along be my guest :)
If you haven't already opened your Timeline panel, navigate to Windows > Timeline.
Now, let's focus on the Timeline panel for the next couple of steps.
Click Create Video Timeline, then you’ll have this:

Now click the menu icon on the top right corner then go to Convert Frames > Make Frames from Clips

Still working on the Timeline panel, click the bottom left icon this time—the icon with the three tiny boxes—to Convert to Frame Animation
Select Make Frames From Layers from the top right corner menu button.
So now you have this:

Go and click the top right menu icon again to Select All Frames
Then click the small dropdown icon to set another value for Frame Delay. Select Other…

The best for me and for most is 0.05 but you can always play around and see what you think works for you.
Click the top right menu icon again to Reverse Frames.
I think Photoshop has long since fixed this issue but usually the first animation frame is empty so I just delete it but now going through all these steps there seems to be none of that but anyways, the delete icon is the last one among the line of feature buttons at the bottom part of the Timeline panel.
Yay, now we can have our first proper GIF preview of a thirsty Lena 😜

Press spacebar to watch your gif play for the very first time! After an hour and half of selecting and cutting off screenshots! 😛 Play it some more. No really, I’m serious. I do this so even as early (lol) as this part in the gif making process, I can see which frames I can/should delete to be within the 10 MB file size limit. You can also do it at the end of course 🙂
Now, let’s go to the next important steps of this tutorial post which I’ve numbered below.
Crop and resize to meet Tumblr's required dimensions. The width value should be either 540px, 268px, or 177px.
Convert the gif to a Smart Object for sharpening.
Apply lighting and basic color adjustments before the heavy coloring. I will be sharing the base adjustments layers I use for my gifs 😃.
1. Crop and Resize
Click on the Crop tool (shortcut: the C key)

I like my GIFs big so I always set this to 1:1 ratio if the scene allows it. Press the Enter key after selecting the area of the frame that you want to keep.
Side note: If you find that after cropping, you want to adjust the image to the left or another direction, simply unselect the Delete Cropped Pixels option. This way, you will still have the whole frame area available to crop again as needed and as you prefer.
Now we need to resize our gif and the shortcut for that is Command + Opt + I. Type in 540 as the width measurement, then the height will automatically change to follow the ratio you’ve set while cropping.
540 x 540 px for 1:1
540 x 405 px for 4:3
540 x 304 px for 16:9
For the Resample value I prefer Bilinear—but you can always select the other options to see what you like best.
Click OK. Then Command + 0 and Command + - to properly view the those 540 pixels.

Now we get to the exciting part :) the sharpen settings!
2. Sharpen
First we need to have all these layers “compressed” intro a single smart object from which we can apply filters to.
Select this little button on the the bottom left corner of the Timeline panel.


Select > All Layers
Then go to Filter > Convert for Smart Filters
Just click OK when a pop-up shows up.
Now you should have this view on the Layers panel:

Now I have 3 sharpen settings to share but I’ll have download links to the Action packs at the end of this long ass tutorial so if you want to skip ahead, feel free to do so.
Sharpen v1
Go to Filter > Sharpen > Smart Sharpen…
Below are my settings. I don’t adjust anything under Shadows/Highlights.
Amount: 500
Radius: 0.4
Click OK then do another Smart Sharpen but this time with the below adjustments.
Amount: 12
Radius: 10.0

As you can see Lena’s beautiful eyes are “popping out” now with these filters applied. Click OK.
Now we need to Convert to Frame Animation. Follow the steps below.
Click on the menu icon at the top right corner of the Timeline panel, then click Convert Frames > Flatten Frames into Clips
Then Convert Frames > Convert to Frame Animation
One more click to Make Frames From Layers
Delete the first frame then Select All then Set Frame Delay to 0.05

and there you have it! Play your GIF and make sure it’s just around 42-50 frames. This is the time to select and delete.
To preview and save your GIF go to File > Export > Save for Web (Legacy)…
Below are my Export settings. Make sure to have the file size around 9.2 MB to 9.4 MB max and not exactly 10 MB.

This time I got away with 55 frames but this is because I haven’t applied lighting and color adjustments yet and not to mention the smart sharpen settings aren't to heavy so let’s take that into consideration.
Sharpen v1 preview:

Sharpen v2
Go back to this part of the tutorial and apply the v2 settings.
Smart Sharpen 1:
Amount: 500
Radius: 0.3
Smart Sharpen 2:
Amount: 20
Radius: 0.5
We’re adding a new type of Filter which is Reduce Noise (Filter > Noise > Reduce Noise...) with the below settings.

Then one last Smart Sharpen:
Amount: 500
Radius: 0.3
Your Layers panel should look like this:

Then do the Convert to Frames Animation section again and see below preview.
Sharpen v2 preview:

Sharpen v3:
Smart Sharpen 1:
Amount: 500
Radius: 0.4
Smart Sharpen 2:
Amount: 12
Radius: 10.0
Reduce Noise:
Strength: 5
Preserve Details: 50%
Reduce Color Noise: 0%
Sharpen Details: 50%
Sharpen v3 preview:

And here they are next to each other with coloring applied:
v1

v2

v3

Congratulations, you've made it to the end of the post 😂
As promised, here is the download link to all the files I used in this tutorial which include:
supercorp 2.05 Crossfire clip
3 PSD files with sharpen settings and basic coloring PSD
Actions set
As always, if you're feeling generous here's my Ko-fi link :) Thank you guys and I hope this tutorial will help you and make you love gif making.
P.S. In the next post I'll be sharing more references I found helpful especially with coloring. I just have to search and gather them all.
-Jill
#tutorial#gif tutorial#photoshop tutorial#gif making#sharpening#sharpening tutorial#photoshop#photoshop resources#psd#psd coloring#gif coloring#supercorp#supercorpedit#lena luthor#supergirl#my tutorial#this has been a long time coming#guys. i'm BEGGING you. use the actions set - it was a pain doing all this manually again ngl LMAO#i've been so used to just playing the actions#so this has been a wild refresher course for me too 😆
779 notes
·
View notes
Text
🍥Summer Day🍥

🍥 the set's name has literally nothing to do with the cc 😋
🍥 TOU applies
🍥 my mesh
🍥 for this single bed's textures, I hand cut and redesigned every pattern myself except the marshmallow cat!
🍥 when making this PC, the mouse originally moved... but then textures went wild . after fixing them, the mouse stopped working 😭 just deal with it for now _(:з」∠)_
🍥 now... welcome to my ramble zone lol
🍥 I just wanted to share this furniture set before my new computer arrives because I’m not 100% sure I backed up all my data, and I’m kinda scared some stuff might get lost during the transfer 😅 so hey, better early than never, right? and… OMG GUYS I just realized I’ve hit over 5k followers across my platforms!!!🥺 that’s insane I’m so touched, you have no idea. so consider this drop a little 5k follower special |•'-'•)و✧
okay, real talk I know some subs might be because my Patreon’s set to "followers-only downloads," but STILL!! the fact that none of you unsubbed?? seriously, that makes me SO SO SO SO happy🥰 It really feels like people actually like the mods I make!!
if we’re being honest, I only got into Blender after watching Greenyardsims and L3 00’s rendering tutorials. later, I picked up sculpting and a bunch of other stuff, and honestly? I started modding partly 'cause there were things I wanted that nobody made yet… and also because Blender is just stupid fun, lol
It’s only been like, three months since I first imported my own model into the game my skills are still baby level I can make simple models, UV unwrap, sculpt, and bake textures… that’s about it 🥹. every time I see other creators’ insanely gorgeous cc, I low key bawled my eyes out internally 😭 when will I ever be that good?
MASSIVE thanks to every creator who shares tutorials online , and to those sweet souls who helped me out when I nervously slid into their DMs with questions 🥺 you guys are actual angels <3
anyway… just feeling all the feels rn 🥰 moving forward, I’ll keep pushing to improve my skills might even dip my toes into pose mod territory someday Here’s to all of us growing and glowing together!!!!! ദ്ദി˶>v<)✧
🍥 Preview video below👇
🍥DOWNLOAD - Patreon

235 notes
·
View notes
Note
Coloring anon here, yes, I would definitely like to know more about how you color frame by frame and the other techniques you mentioned! It would be much appreciated, thank you!
Hi anon! I'd be happy to go over my preferred methods for colouring!

First resort (ideal):
Painting over shots with little movement (the first method in this tutorial)
Colour manipulation using selective colours (the second method in this tutorial; alternate tutorial -> i also sometimes add a hue/saturation layer on top to manipulate the cyans/blues as well)
Second resort:
Keyframes for shots with consistent movement where it's easy to hide "imperfections" (tutorial 1, tutorial 2)
Last resort:
Frame by frame colouring -> DISCLAIMER: the way I do this method is the easiest way I've gotten it to work for me but that also means that it's very inflexible when it comes to editing any of the colouring afterwards. Once you start colouring in frame animation mode you're basically locked in so you need your gifs to be exactly the way you want them prior to adding your colour
So in this tutorial I'll go over how I do my frame by frame colouring as well as how I create actions to automate the repetitive parts of this process! (Some resources that explain how to create actions are here: 1 2)
To use the select subject feature you will need Photoshop CC 2018 or later
Step 1: Preparing your gif with base colouring
So first you want to do your base colouring for your gif in timeline mode, which I've explained here. I keep my gifs short (ideally 40 frames or less) since this colouring process is tedious!
I make sure that in my hue/saturation layer, I turn the saturation in the yellow, green, cyan, and blue tabs all down to -100 (and for the yellows I usually add around +20 to +60 in lightness)
Here's my gif with the base colouring that I'll be starting with:

Note: turning down the saturation in almost all the colours gives you that nice silver/grey neutral background to paint on top of. It's a lot less noticeable when your painted layers aren't perfect
Step 2: Converting to Frame Animation Mode
I use the save action from this action pack to convert my gif from timeline mode to frame animation mode.
You cannot edit your base colouring from this point onwards!
Step 3: Using Select Subject
If you're recording an action this is the step you would *start recording*
This is what your window should look like:

Making sure your first frame and first layer are selected, go to Select at the top of your window and click Subject

You should then see the marching ants outline around the person in your gif

You then want to create a new solid colour fill layer (which can be found when you click that little circle icon at the bottom of your layers panel), and set the layer blending mode to colour.
The layer mask will automatically be created since you had the marching ants outline.

Since my person is in colour and not the background, I want to invert the layer mask by clicking on it and using command + i (or ctrl + i), and now this is what it looks like:

Note: Select subject isn't always perfect!!!, depending on how cluttered the scene is and how much contrast there is between your person and the background, select subject could either do a really good job like it did here, or screw up a little like it did here:

That's okay though because it still gives us a good base to start from! We can fix any issues by painting with black and white brushes on the layer mask.
Step 3.5: Create clipping mask
Thanks to @wolfchans for telling me about this because it gives us back a little bit of flexibility when colouring frame by frame! Instead of merging down, we can make a clipping mask instead. Right click the solid colour fill layer and select create clipping mask.


If you're recording an action, it's at this point where I would *stop recording*
Step 4: Fixing the layer mask if needed
So now I want his jacket and t-shirt to also be purple, and to show his fingers behind the glass. I make sure the layer mask is selected, and paint with a brush at 60-70% hardness (painting with black erases the colour, painting with white shows the colour). User smaller brush sizes to paint smaller details!
This is what my canvas and layer mask look like now.

Step 5: Repeat
Now I click on my second frame and second layer, and repeat steps 3-4. As you can see, using the clipping mask allows you to still see and edit the colouring of the previous frame, just make sure you click on the right frame and it's corresponding layer when you're doing further editing.

This is where an action is super helpful in cutting down all the repetitive steps and clicks you need to do. So at this point I'd just play the action I created and paint on the layer mask as needed.
Repeat for all your frames and then you're done! After this I convert it back to timeline mode again so that I can add my text and do any other effects such as blending or transitions. Hope this helped!!
#answered#Anonymous#*tutorial#userbeanie#userwintersoldado#userishh#userfaiths#usercats#usertj#tuserhol#userahri#usereus#usershreyu#userchibi#userbunneis#usermibbles#uservivaldi#carolook#userbuckleys#usertenacious#tuserheidi#userholtz
251 notes
·
View notes
Text
dating sister barnes headcanons <3

ੈ♡˳ You both meet at your favourite coffee shop, you having noticed her buying tea every morning while having your own drink by the table in the corner.
ੈ♡˳ It’s endearing to watch her give you one of her sweet smiles until she finally gets the courage to introduce herself. but as that happens, there won’t be a day in which sister barnes doesn’t pick up a chat with you.
ੈ♡˳ Baby gets so antsy when she realizes your smile makes her stomach erupt in butterflies, thinking there’s something so wrong with her.
ੈ♡˳ Feels the most guilty when you ask her out for dinner and she feels forced to say no, your sad smile making her stomach churn with regret.
ੈ♡˳ Shows up to your doorstep later and practically begs you to forgive her, finding it too unbearable to think that loving you could ever be something wrong.
ੈ♡˳ Once you go on your first date, they just keep on happening. Even with her opening hands to look beyond her religion to be with you, still wants to take things slow and only like holds hands with you on the 5th date < :).
ੈ♡˳ Loves to talk to you about her recent reads and could rant about her favorite hobbies for hours.
ੈ♡˳ Walks on the park are more than common for the both of you, laying on the grass with hands interlocked as you share giggly whispers.
ੈ♡˳ Once you ask her to be your girlfriend, she doesn’t hesitate to say yes and now be prepared to be her literal wife.
ੈ♡˳ Your first kiss is a sweet one like in the movies, you’re outside having one of your walks while sipping on some coffee and you get a bit of cream on your lips so she decides it’s the best idea to kiss it off ;)
ੈ♡˳ Is the most reassuring ever, always knows how to calm you down and the best choices to make.
ੈ♡˳ So happy whenever you give her flowers or do something meaningful like buy her new earrings because she said she lost hers.
ੈ♡˳ You both move in together quite early in the relationship, buying a small but cozy house by the beach or countryside and adopting an orange cat that’s your literal child.
ੈ♡˳ Calls you “honey” and “sweetheart” with that deep voice of hers that’s actually even more raspy when she’s just woken up.
ੈ♡˳ Willingly lets you braid her long hair, one of your favourite activities is to sit on your couch watching a new braiding tutorial while she sits between your legs on the ground. Giggling like little kids when it ends up silly looking.
ੈ♡˳ Makes tea on the kettle every morning, always having a cup of ready by the counter for when you finally get out of bad. Is an absolute early bird and will have every single chore done by like midday.
ੈ♡˳ Leaves little notes on the fridge whenever she goes out without telling you, never wanting to worry you. Also puts little reminders there so you don't forget important things.
"Out shopping, be back in a second <3"
"Don't forget to buy cat food!! Ly :)"
ੈ♡˳ Holds your hand at almost all times, pulling you along when you're in a store that she's specifically excited about or standing slightly behind you when you're introducing her to your friends, hands shaking a bit with nervousness.
ੈ♡˳ Can be sooo protective, type of girlfriend to order for you in restaurants if you're anxious about it and will so go up to the waitress because "she said no pickles".
ੈ♡˳ Comes up to you while you're laying in bed watching a movie, settling between your legs so she can read her book while cuddling up to you. Most of the times your cat joins the snuggle by settling on her stomach with a purr <3
ੈ♡˳ You're the one who has her whole devotion, the family she's always wanted and she's just not letting that go easily.
#sister barnes#sister barnes x reader#herectic#sister barnes herectic#sophie thatcher#sophie thatcher x reader#wlw
140 notes
·
View notes
Text
How to run The Sims 3 with DXVK & Reshade (Direct3D 9.0c)

Today I am going to show you guys how to install Reshade and use Direct3D 9.0c (D3D9) instead of Vulkan as rendering API.
This tutorial is based on @nornities and @desiree-uk's awesome guide on "How to use DXVK with The Sims 3", with the goal of increasing compatibility between DXVK and Reshade. For users not interested in using Reshade, you may skip this tutorial.
If you followed nornities and desiree-uk's guide, it is strongly recommended that you start from scratch, meaning you should uninstall DXVK AND Reshade completely. Believe me when I say this: it will save you a lot of time, frustration, and make your life so much easier.
For the purpose of this tutorial, I am on patch 1.69.47 and running EA App on Windows 10, but it should work for version 1.67.2 on Steam and discs, too. This tutorial does not cover GShade.
Before we start
Backup your files, even the entire folder (Program Files\EA Games\The Sims 3\Game\Bin) if you want to be extra safe; you will thank yourself later. If you do not wish to backup the entire folder, at least backup the following:
reshade-presets
reshade-shaders
Reshade.ini
Options.ini (Documents\Electronic Arts\The Sims 3)
Keep them somewhere secure, for your peace of mind (and sanity).

Done? Great stuff, let us begin!
Step 1:
If you installed DXVK following nornite and desiree-uk's guide, go to the bin folder and delete the following files to fully uninstall DXVK, we are starting from scratch:
d3d9.dll
TS3.dxvk-cache
dxvk.conf
TS3_d3d9.log (or TS3W_d3d9.log)
Step 2:
If you already have Reshade on your PC, uninstall it using this: https://reshade.me/downloads/ReShade_Setup_X.X.X.exe (replace X.X.X with version number)
Step 3:
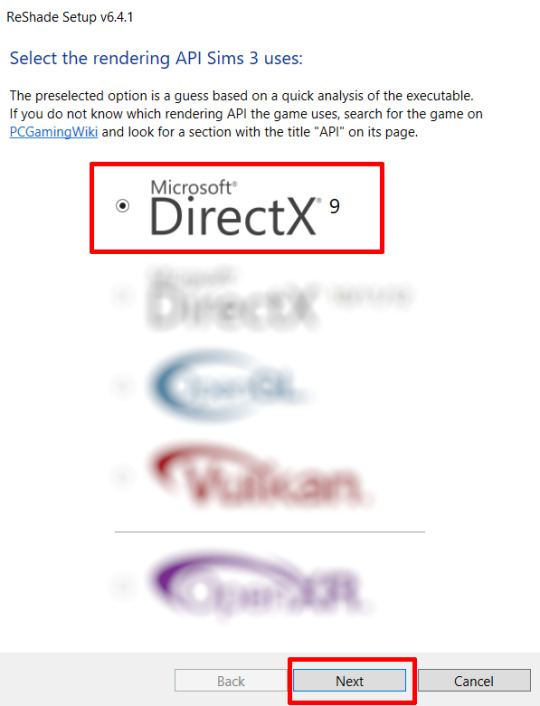
Perform a clean install of Reshade (I am using the latest version - 6.4.1 at the time of writing). Please note that you need a version no older than 4.5.0 or this method will not work. Choose DirectX9, click next.
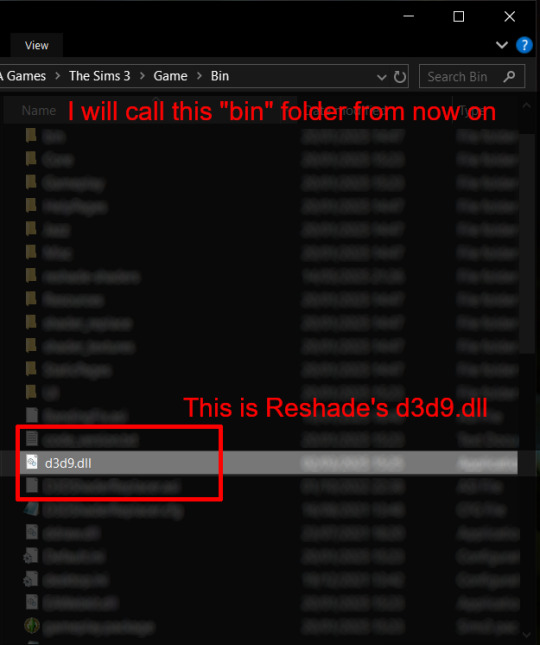
Once the installation is complete, you should see a "d3d9.dll" file inside The Sims 3's bin folder (Program Files\EA Games\The Sims 3\Game\Bin):
It may all seem familiar thus far. Indeed, this is how we installed Reshade in the past before using DXVK, but here comes the tricky part:
Step 4:
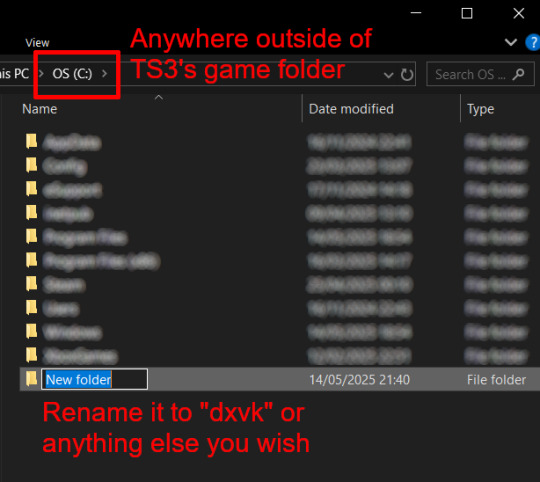
Create a new folder outside of The Sims 3's game folder (I created it on my C drive), name it "dxvk" or whatever else you like. Remember where you saved this folder, we will return to it later.
Step 5:
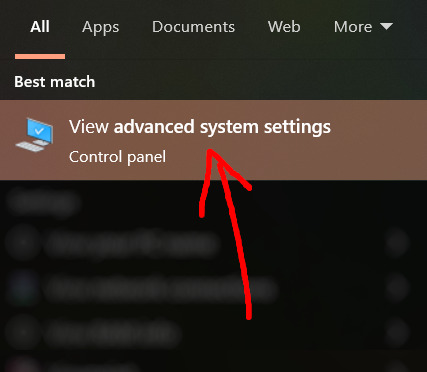
Now we need Reshade to load the next dll in order to chain Reshade with DXVK. Click on the search bar, and type in "View advanced system settings".
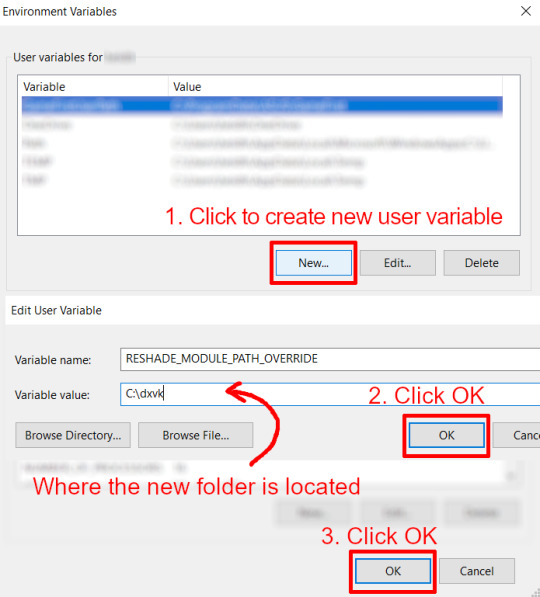
Click on "Environment Variables..."

Under "User variables", click "New..."
In the new pop-up window, find "Variable name:" and type in:
RESHADE_MODULE_PATH_OVERRIDE
for "Variable value:", paste in the directory that leads to the folder we created earlier. Once you are done, hit OK, and then hit OK again to save the changes made.
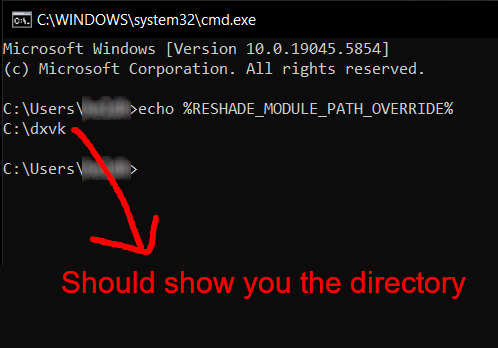
You can use Command Prompt to check if this new environment variable has been registered by entering:
echo %RESHADE_MODULE_PATH_OVERRIDE%
It should return you the folder's location. If not, make sure you have typed in the variable name correctly and confirm the folder's location.
Step 6:
Download DXVK (version 2.3.1) from here: https://github.com/doitsujin/DXVK/releases/tag/v2.3.1 and unzip "dxvk-2.3.1.tar.gz" (I use 7-Zip, but winRAR works, too). Remember to choose x32, and move only "d3d9.dll" to the folder we made earlier.
Now we have two "d3d9.dll" files, one from Reshade (lives in the bin folder), and the other from DXVK (in this new folder, outside of The Sims 3 game folder).

Step 7:
Download "dxvk.conf" here: https://github.com/doitsujin/dxvk/blob/master/dxvk.conf delete everything inside, and enter the following:
d3d9.textureMemory = 1 d3d9.presentInterval = 1 d3d9.maxFrameRate = 60 dxvk.hud = devinfo
Ctrl + S to save the document.
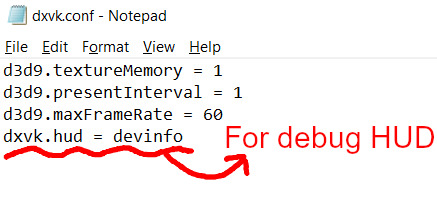
The first 3 lines are taken from @nornities and @desiree-uk's guide.
The last line is only for debugging purposes. Due to the inconvenient location occupied by the HUD (top left corner of your screen), it should be removed once the installation is successful.
Step 8:
Drag "dxvk.conf" into the bin folder, where Reshade's "d3d9.dll", "TS3.exe", and "TS3W.exe" all live.

Step 9:
Now fire up the game and check if both are showing up:

Lastly, check for “TS3.dxvk-cache” in the bin folder:
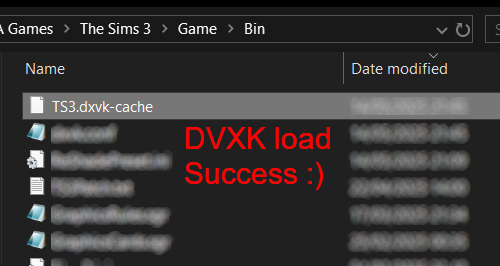
If it is there, congratulations! You have successfully installed DXVK and Reshade utilising D3D9 as API! You can now go to "dxvk.conf" and remove its last line "dxvk.hud = devinfo" and have fun! :)
Hope this tutorial isn't too confusing, the last thing I want is to over-complicate things. If you still need some help, comment down below or send me a DM/ask, I'll try and troubleshoot with you to the best of my ability.
Credits:
@nornities and @desiree-uk for their fantastic guide.
@criisolate for promulgating the usage of DXVK in TS3 community.
reddit user folieadeuxmeharder for helping me troubleshoot and informing me of this workaround.
doitsujin for creating DXVK.
crosire for creating Reshade.
148 notes
·
View notes
Text

Hearthfire Health and Resting Overhaul
Artsource
TLDR: You can solve nearly all problems with D&D's powercurve (and a lot of other problems beside) by limiting the overall hitpoints your party gets, basing it off profficency bonus rather than character level.
If you’ve played anywhere close to as much d&d as I have, you’ll notice the game tends to play best at levels 3-8. Lower than that feels like being trapped in the tutorial, with players denied the majority of their interesting character options and the DM having to use kid gloves or else risking a party wipe. High level play invariably breaks down as player abilities trivialize most encounters, forcing the DM to reach deeper and deeper into the monster roster to provide adequate challenge, making more work for themselves in the process. There’s a definite sweetspot, and like anyone with a head for game design I want to widen that sweetspot to encompass as much of the game as possible.
As is typical of someone who’s into game design; I’ve bit off more than I can chew, deciding to build several interlocking rules changes/subsystems that I think will help me make the game function more like I want it to. This isn’t going to be for everyone, but if you’re feeling the need for a rules lite overhaul to rebalance how you plan encounters/ the rigours of adventure, this might be for you.
Here’s the overhaul in short form:
Character HP is determined as (Max Class HD + Con modifier) X proficiency bonus. This means they keep the same Max HP throughout the tier (1-4, 5-8 etc)
This means that low CR enemies stay relevant for far longer, making encounter building more reasonable. Likewise this prevents mid/high CR enemies from being trivialized. It allows you as the DM deploy mundane threats ( a steep drop, a detachment of city guards, the threat of a building catching fire) as legitimate challenges well into the later chapters of the campaign.
Temporary HP can be gained from using improved provision consumables (including those harvested from monsters), or by resting at inns and better establishments in town. A hardy, homecooked meal gives the party the strength they need to take on greater challenges, far more than a diet of salt pork & hardtack. In rare cases permanent HP boosting items can be sought as treasure.
Long resting in the wilderness is more difficult, requiring the party to find a safe campsite and spend provisions. Making sure they don't burn through these finite resources before encountering the real challenge makes for a great resource management challenge to go along with exploration based gameplay, acting as an informal ticking clock.
First, A small Testimonial: I've now tried this system with four different groups, and while there's still some bugs to work out I can say it feels a lot closer to my ideal form of d&d than the baseline rules. Planning combats is SO EASY, and I can actually scare my players with big monsters again. I've dropped the weird XP calculation and I can now use the group's level as a budget for medium-challenge combat encounters. Lower HP totals on both sides keep fights fast and punchy, which means I can fit more of them into a session, getting more progress through a gauntlet of challenges. While considering implmenting this system, I also encourage you to take a look at some of my combat hacks, which help to supplement fights the same way this system is meant to supplement exploration.
PROVISIONS: In order to get the benefits of a long rest while travelling you need 1) A place to set up camp that's not exposed to the elements 2) To spend a use of your provisions
Rather than beancounting individual servings per person, provisions are tracked through "The provision die", an abstract representation of what your party has left to eat that ranges from a d4 to a d20. This works off a depletion die system, meaning that every time provisions are used (generally once per night) you roll the die, and if it's a 1 or 2 it shrinks a size category. If it shrinks while it's a d4 the party is officially out of supplies and starts taking levels of exhaustion.
The base price or provisions is 5gp for a d4 depletion die, larger sizes of die may be bought based off the linked chart.
Alternatively, provisions (of an enhanced rarity even) may be salvaged from a monster, dungeon meshi style.
Without the extra carrying capacity from a bag of holding or wagon, the party's provision die is limited to a D6. Going offroad is tough, requiring characters to live off the land.
Living off the land generally requires a survival check with a DC based on how verdant the area is. Failure can mean a lack of finding anything suitable, or a delay in trying to acquire necessary provisions.
Features that can keep people fed like the outlander background or goodberry spell prevent the exhaustion buildup but still do not allow a long rest.
If ever the party is traveling for a week or more between settlements, their provision die drops by one size, regardless of how many times in the week they've rolled.
A party can buy better rations (consumable) or improve their camp gear (permanant) in order to gain temporary hitpoints when they consume provisions. A common upgrade will get you 2 class HD in temporary hitpoints, an uncommon will get you 4, a rare upgrade will get you 6. Enchanted camp gear (such as high quality tents, enchanted cookwear, rare spices) may also grant other bonuses when provisions are consumed, such as resistance to weather effects, bonuses to saves against fear, or even inspiration.
HAVENS: If the party is sticking in one place for a while it's likely that they'll be doing so in a Haven such as a tavern, outpost, or perhaps even their own bastion. Havens are rated on the same rarity system as camp upgrades and provisions are, which determines their overall level of quality and the amount of temporary HP they bestow per night.
As a guideline, if the party has to pay to stay in a haven, it costs 1sp per person per night for common accommodations, with the associated rarity price jump: (5 silver for uncommon, 5 gold for rare). Many inns have varying levels of accomidation, so some party members might chose to spring for greater amounts.
#homebrew#survival#resting#hearthfire#dnd#d&d#d&d homebrew#dnd homebrew#mechanic#homebrew mechanic#exploration
169 notes
·
View notes
Text
jj maybank headcannons
blackcat!reader x bf!jj
requested by this ask 💋
warnings: a little suggestive, thats all!


sfw:
rolls all your weed for you, bc hes such a good boyfriend. he doesnt even get mad when you steal his joints, because you'll make it up to him later.
he attempts to paint ur nails for you, trying his best not to let the polish get on your pretty skin.
definitely blows smoke in ur mouth while yall are getting high together.
he lets you paint his nails or practice designs on him just because it makes you happy <3
he keeps blankets and nail polish for you at his house, and stocks up on ur fav hair products cus he knows your always gonna be there.
if you dye your hair, he will do most of it for you, so you don't get most of the dye on your pretty hands. (even if he doesn't know how, he's def gonna watch youtube tutorials)
he doesn't let you get or smoke weed from anybody but him cus he doesnt trust anyone else to give weed to his girl.
will get you to do black eyeliner on him, and hate it, so he will never do it again
short and sweet for @jjblunts thank you for the request 💋
#outer banks#rafe cameron#jj maybank#the kooks#fluff#imagine#jj maybank imagine#jj maybank smut#jj maybank x reader#jj maybank prompt#jj mayback imagine#jj mayback x reader#jj maybank x you#obx jj#jj obx#rafe outer banks#john b routledge#rafe x reader#reqs open#outerbanks smut#outerbanks season 4#outerbanks imagine#outerbanks fic#outerbanks fanfiction#thanks anon!#jj maybank icons#jj maybank series#jj maybank texts#liah yaps!
371 notes
·
View notes
Text

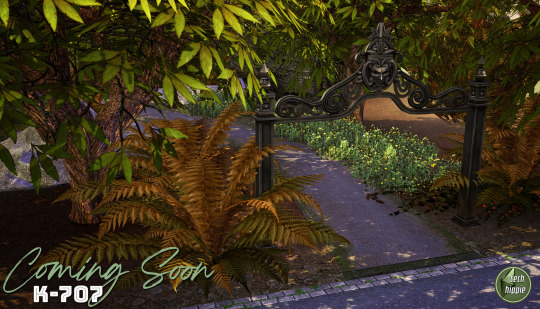
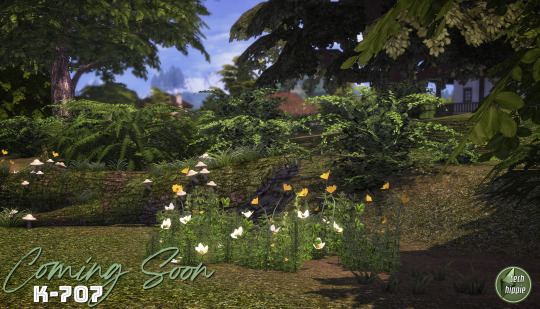
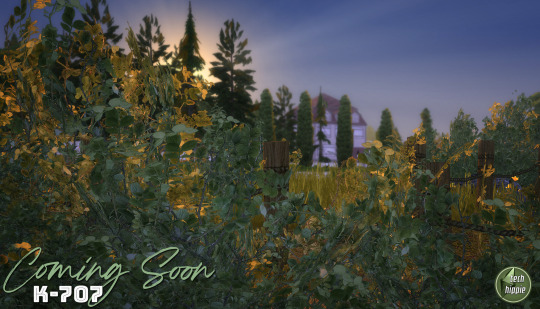
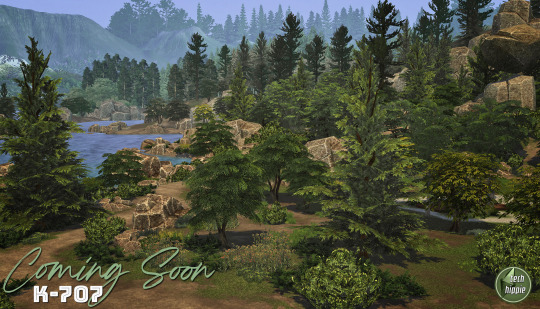
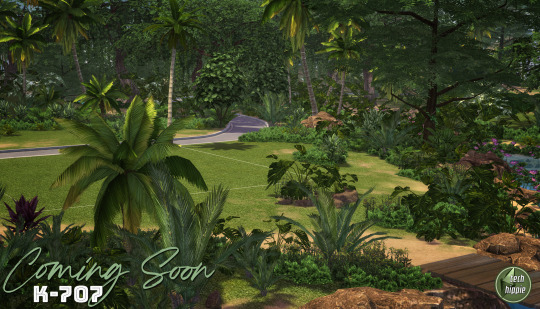
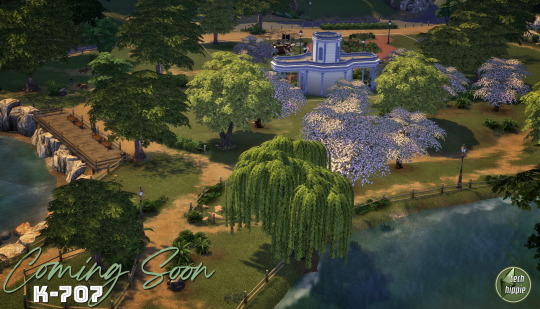
k-707 2025 BOLD UPDATE INSTRUCTIONS
Hello everyone :)
The new k-707 is going to be released in the coming days :D but as it is a kind of new experience, we have some kinda instructions in order to get everything working fine.
Step right up, folks, for the grand unveiling of our biggest project yet! The K-707 isn’t just a mod—it’s a green revolution. Taking on almost every flower, patch of grass, bush, and tree makes this even more massive than the K-505. And trust us, our brains are already feeling the strain! :D
But before instructions, let me tell you the k-707 story ;)
We really hope you'll enjoy it. We worked hard on it with 5 rules :
Replace EVERY tree of the game
NO overrides with crazy high polygons amount
Follow as much as possible the Maxis directions ( trees style )
Decrease amount of polygons where it is possible
No trees defying gravity and laws of physics
It took long for few reasons ...
At first, we always knew the first version was a vast experiment. When ea made its direct x11 update, it was time to make a bold update ... but we didn't want simply remove the non-strictly-dds-x2 images and replace them ... we wanted more. We always wanted more, even we are not kinda ea gurus :D ( hey EA ! don't you want hire some true creators with a long term vision of your game ? ) <- poll : would you like k-hippie as maxis creators or not ? :D
Joke apart, it was difficult. Almost 1 year long, we searched and searched solutions to get rid of all problems we met when replacing foliage on a debug tree, or modifying anything on a debug tree ( for info : we are not blender gurus nor sims 4 core users )
All we knew was few lines :
When cloning a tree, you cannot lose the any of the vert color data. I suspect whatever tool(s) you are using to do the cloning is losing this data, since this setup is somewhat unique to trees.
The vertex color layout for trees is as follows. Green and Blue are ignored for channels 1…4 : Color 0 RGB Surface color tint Color 1 R Rustle direction X Color 2 R Rustle direction Y Color 3 R Rustle direction Z Color 4 R Rustle phase ( game generates two wind scales that change over time, this term interpolates between the two )
The pipeline keeps the rustle information in a vertex color format for what the game engine will load, which means it’s in the range 0 and 1. The shader remaps this into a 0.5 to -0.5 range before scaling it and applying the offset to the leaves. Note that these directions are clamped but not normalized ( they’re allowed to be different lengths ) The WindMagnitude material parameter acts as a scaling factor.
So, we started with this information, begging in vain for some help, both inside the Sims community and outside ... but nobody helped us. And frankly, it interested no-one except us and our beloved followers :)
We found multitude of tutorials ( funny how many they are as soon as it is clothes related ) but nothing related to our specific target. We paused our research many times, made direct x11 updates for our other k-mods and so on. Until ... zaceitorius in July 13rd 2024
Who is zaceitorius ? We do not know. A simple member of sims4studio with 6 posts who gave us a simple bright clue which seems obvious after all, but yet very very precious indeed !
And here we are today. 300 trees and numerous plants later ... <- another reason why it took a long time :D
We made a lot of vertex experiments, we lost data colors, remade again and again some other experiments and well, we are still experiment, remake small details which seem important to us and so on ... And for now, it works :D And now you are warned : the k-707 is far from perfect.
And now, the instructions :)
The k-707 covers both trees & plants, both debug and lot trees & plants
What's new ? No more than usual. We tracked all the non-strictly-dds-x2 images, reshaped some trees ( such as the multitude of oaks ), added some flowers ( where we removed them in 2021 ) but kept many foliage we already did. We tried to simplify many details but added some others and replaced some plants.
How many stuff it represents ? We do not know. Many indeed. We stopped the count :D
Because of its size ( and our love for our sanity ), THE RELEASE WILL ROLL OUT IN PARTS ( not slowly but piece by piece ). If we waited until it was all perfect, you’d be seeing it around ( maybe ) September 2025 ... Let’s not tempt fate—or burnout! :D
The K-707 is neatly organized for your convenience :
Each DLC gets 2 folders : one for plants, one for trees.
The base game gets 4 folders ( a bit different since most of the greenery is drawn from there ) divided into lots and debug folders.
Expansions which have very few greenies ( City, Get to Work, University ) get the same folder named : k-hippie-k707-multi-greeny-2025
IMPORTANT :
Leave them in each of their folders ( or create your owns based on a similar methodology )
If you merge files : we can’t help troubleshoot if it doesn’t work anymore, so be smart ;)
You’re free to do as you like, but we strongly recommend keeping this tidy folder setup. If you need to troubleshoot down the line, it’ll save you a major headache.
And for the mavericks out there who love merging files—go for it, but know this : we won’t be able to help if things go haywire.
Now, we could wax poetic about how stunning the K-707 is, how every leaf, petal, and blade of grass is crisper, richer, and beautifully integrated into your worlds—but hey, we'll do it later, inside the release post :D
We could do more, more realistic trees and so on but we do not want integrate crazy high poly models. We do not want an unplayable game isn't it ? ;)
The k-707 is not yet finished. We got some more work to do on it, shape the last details, and some re-checks.
But here is what is new compare to the previous version : we kinda cracked ( a bit only ) the code. Trees swinging in the wind like it’s a dancing contest ? No more. Trees defying gravity and laws of physics by groveling into the ground ? No more. Just remember we do not have the hands upon the worlds construction, so, when trees are not into the ground, well, call your reseller aka EA itself ...
#sims 4 custom content#sims 4#sims 4 wysiwyg#sims 4 cc#k-hippie talk#ts4#the sims 4#k-hippie#k-mods#k-707#k hippie#k-505#sims 4 green#sims 4 expansions#sims 4 base game#sims 4 trees#sims 4 plants#ts4 overrides#sims 4 overrides
361 notes
·
View notes
Text
bllk headcanons! #2
blue lock! with a pretty but sleep deprived s/o
a/n: i re-did this fic yesterday because i made a mistake on this request TT. this plot was suggested from this request!
starring: chigiri hyoma, reo mikage, yukimiya kenyu, and kiyora jin


CHIGIRI HYOMA
“how are you always this pretty while also looking like you haven't slept since last week?”
he’s lowkey annoyed at how effortlessly pretty you are. like he puts so much effort into his haircare, skincare, stretching, injury maintenance, but you’re just sitting there with the barest hint of lip balm and bedhead and still make his heart skip.
you sleep through half his hair care routine talks, and he doesn’t even mind. he actually gets quieter just so you don’t wake up.
when you're too tired to hold a proper conversation, he just takes the lead with soft sarcasm like, “you know, if you pass out in front of me one more time, i’ll start charging you rent for the bed.” while gently pulling a blanket over you!
he lets you nap with your head in his lap, scrolling through hair tutorials with one hand and brushing your bangs aside with the other.
lowkey enjoys how comfortable you are around him, your softness balances out his sharpness.
he’ll whisper, “get some sleep, lazy,” but tuck your hair behind your ear so gently you can tell he’s smiling.

REO MIKAGE
reo adores you. not just because you’re insanely pretty (though he’ll say it 5x a day), but because you're the only person who can look dead-tired and still steal the spotlight.
“seriously, how do you look like you walked out of a perfume ad while looking like you haven’t slept in days?”
he buys you luxury under-eye patches and acts all cool like, “no big deal. you looked like you needed them.”
he tries to get you on a sleep schedule. he actually downloaded 3 different wellness apps for you, even though you just ignored them and passed out on the couch.
you fall asleep during one of his mini business plans, and he deadass keeps talking like you're awake. “...so if we reinvest that, oh, you’re out cold. okay. nap first, conquer the world later.”
will 100% take photos of you sleeping and save them like treasures. “don’t worry, i won’t post it. but look at you. angel.”
even if you're snoring slightly, he thinks it's cute. he’ll kiss your temple and mumble, “try not to work yourself to death, yeah? i like you alive and pretty.”
YUKIMIYA KENYU
he thinks it’s adorable how you can barely keep your head up, yet still manage to look absolutely ethereal!
when you're half-asleep and babbling nonsense, he’ll go along with it just to hear your sleepy voice.
“you look like a painting, babe.” “paintings don’t need 5 cups of coffee to function!” “then you’re the first.”
always brings you warm drinks, quietly checking in on you: “hey. sleep last night?” “...five hours total.” “that's a solid improvement!”
likes having you curled up next to him while he flips through football clips. you keep drifting off, and he’ll nudge you like, “hey, i’m showing you messi. you're not allowed to sleep on messi!”
but deep down, he doesn’t mind. he loves that you let your guard down around him. your prettiness isn’t even the main thing, it’s the way you trust him enough to rest.
KIYORA JIN
"you look dead," he says. "still hot, though."
“i’m so tired i could cry.” “then sleep.” you stare at him. he stares back. you blink once and fall asleep on his shoulder. he doesn’t move.
doesn’t compliment you often, but thinks you're insanely pretty and shows it through actions.
if someone else says you look tired in a rude way, he’ll glare at them and go, “she looks better tired than you do fully rested.”
walks slower when you’re next to him so you don’t trip from exhaustion. keeps conversations short and soft when he knows you’re drained.
when you're napping with your cheek pressed to his chest, he stays completely still. not because he’s nervous—he just doesn’t want to wake you.
quietly watches over you like it’s second nature. you don’t even need to ask.
ㅤㅤㅤㅤㅤㅤㅤㅤㅤㅤㅤㅤㅤdedicated to @🪷 anon

જ⁀➴ © sevarchive ✦ masterlist like/reblogs are appreciated ꣑ৎ
#sevarchive 🍎#fan order! 🍎#bllk#bllk x reader#blue lock fluff#blue lock angst#blue lock#blue lock au#chigiri hyoma#chigiri x reader#blue lock chigiri#bllk chigiri#reo mikage x reader#reo bllk#reo blue lock#reo mikage#blue lock yukimiya#yukimiya kenyu#bllk yukimiya#yukimiya x reader#kiyora jin#kiyora x reader#bllk kiyora#blue lock kiyora
110 notes
·
View notes
Text
Floyd Leech Shared Lines

Tutorial: Whatcha doin' today~? Maybe I'll tag along.
Level Up 1: How's that? Am I doin' good?
Level Up 2 / Buddy Level Up: Hey, c'mon, let's do some more~
Level Up 3: Ain't this fun, Shrimpy-chan?
Level Max: I feel like I can do anything today. Maybe I'll show off what I can really do. Ahah!
Vignette Level Up: I never get bored whenever I'm with you, Shrimpy-chan, 'cause we're always doin' something fun. Let's keep on having fun, 'kay?
Spell Level Up: Ehhh, I'm not feelin up to showing off my magic right now. Can't I do it later?
Friendship Level Up: Hey, make a chair just for me. One that’s round, but also sharp; that makes a statement, but is also subtle.
Friendship Level Max: I feel like I’m one of your regulars here, huh. It’s kinda rare for me to be able to hang in one place for so long without gettin’ bored. Keep it up, I’m counting on ya.
Uncapped: What limits? I just wanna see how far I can go.
Groovification: Ahah, this feels great~ I kinda wanna do somethin' fun!
Lesson Select 1: I think I'll tag along with you today for class. Which one you choosin'?
Lesson Select 2: Try guessin' what class I wanna take today. Jade'd get it one go, y'know.
Lesson Select 3: [yaaaaawn] ...I'm not really feelin' it, so pick a class I can sleep in~
Lesson Start: Let's get started~
Lesson Finish: I focused up, yay me!
Battle Start: You wanna get squeezed by me?
Battle Won: Why didja think you could win?
Trouble 1: Ahn? Why’re you stopping me? You wanna be my opponent instead?
Trouble 2: Ahaha, that’s so much fun~! That got me so pumped up!
GIFT CALENDAR 2023: “How will you be spending the day?” Yesterday I saw someone wearing these boots lined with fur, and it looked kinda fascinating, so I thought I’d try to find some in town. I wonder if it’s hard to walk in? If I find a good pair, I think I’ll buy 'em and try 'em out.
Birthday Login Message 1: You remembered Jade’s and my birthday. I thought about squeezing you if you had forgotten but… too bad. So, Shrimpy-chan, what are you going to do for us? Of course, you’ve come up with something amazing, right?
Birthday Login Message 2: Shrimpy-chan, thanks for celebrating with meー Look, I got a bunch of other presents too. Ah? It’s not like I forcibly took it from them or anything. There’s a trick to receiving presents. I guess I can teach you how to do it as a special treat. If you say, “Today’s my birthday~ …Don’t you have something to give me?” then eeeverybody’ll give you something, so try it out sometime.
Birthday Login Message 3: Ah, hey, it’s Shrimpy-chan. So you’re gonna give me whatever I want as a present? Then, tell me a fun story you know from up here on the surface. …What, you weren’t expecting me to ask for somethin’ intangible? I mean, this is waaay better than getting somethin’ I don’t need. But I ain’t gonna let it slide if you tell me a boring story. Mmkay, you can go ahead and start now~
Birthday Login Message 4: Hey, Shrimpy-chan. Jump a little for me. [jumps] Hm? I don’t hear nothin’. Today’s my birthday, and you don’t have a present for me? Don’t worry, it’s fine. You just gotta go out and buy something now, then. Soooo, what should I ask you to get, hmmm?
Birthday Login Message 5: Eh, you brought me a birthday gift? Shrimpy-chan, you’re the best! Wish others’d take a page outta your book~ Those guys in the Basketball Club are the worst. I was just checkin’ with them, making sure they didn’t forget my birthday, and you know what Sea Snake-kun said? He said that there’s no way he’d forget a day that’d end up being more trouble than it’s worth for him if he did. That sent Crab-chan into a fit of laughs, too. Oh yeahhh, come to think of it, I still haven’t gotten my gifts from 'em yet. Think I’ll start if off by heading off to Crab-chan’s place first.

Requested by Anonymous.
#twisted wonderland#twst#floyd leech#twst floyd#twst translation#mention: jade#mention: yuu#mention: jamil#mention: ace
95 notes
·
View notes
Text

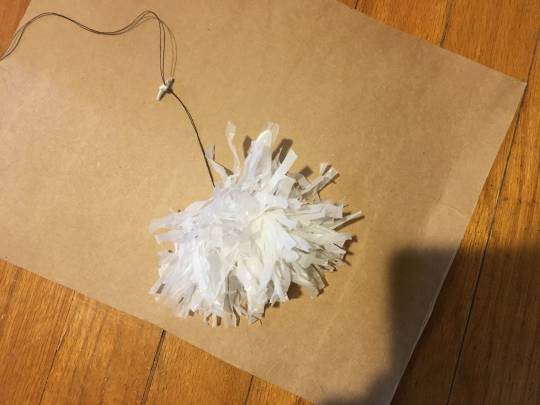
Grocery Bag Tail Tutorial!
Buckle up, this is a long one lol! Also please mind any typo's. We're very dyslexic.
(Note: While I feel this craft can be relatively straight forward and repetitive once you get in the rhythm, still be prepared for this to take a several hours to complete)
Step 1:

thread a long piece of thread on a needle to roughly the length you want your tail to be. (A little bit of extra length is always good. This can be trimmed later.)
Step 2:

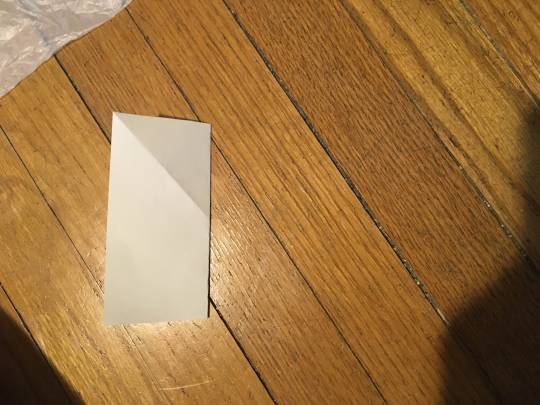
Measure out a 5"x5" (127mm x 127mm) square template out of paper, (This will roughly end up being the width the tail is around.) then fold it in half.
Step 3:
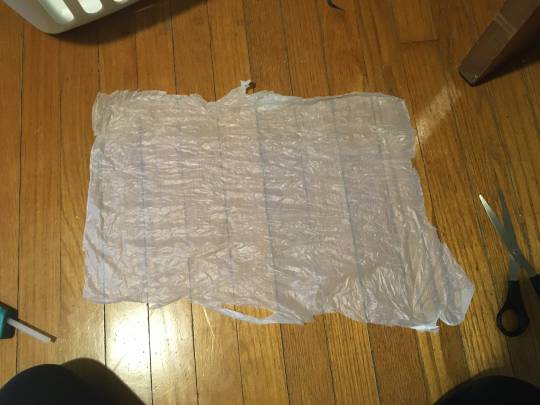
Cut the bag into a rectangle shape, preferably not including the label for a solid color. (Or leave it, that's up to you!) (Also, I like to save the access trims from the bag for other projects)
(Hint: If you paint a light wash of acrylic paint on the bag at this step you can change the color of the tail ;3 )
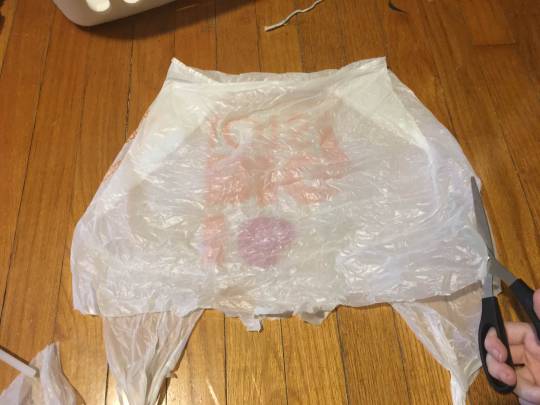
Step 4:


Fold the rectangle once vertically, and once horizontally.
Step 5:

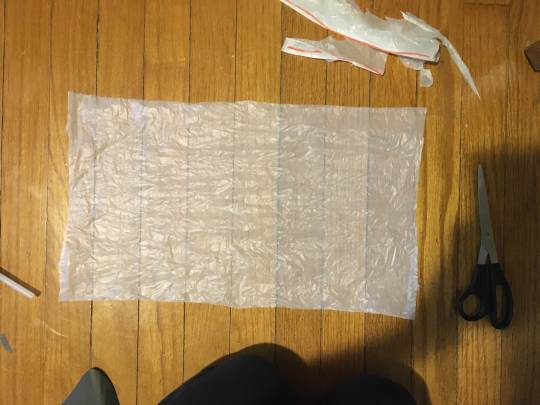
Cut along 3 of the folded sides but NOT the side where they are all attached! (This is so it remains one solid piece) Fold It back out and it should have cleaner edges. (Once again I like to keep the trimmings for use in other projects.)
Step 6:

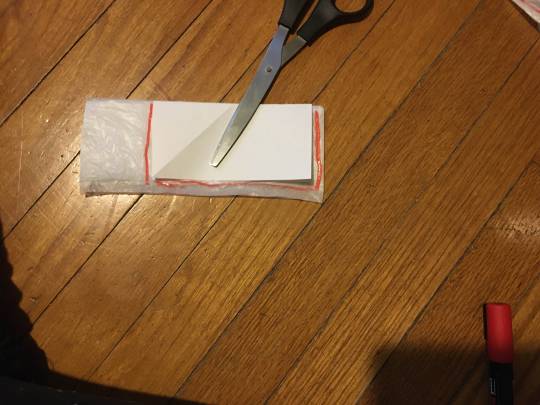
Fold the rectangle towards you and roughly to the size of the folded paper template (see step 2) Trim three edges; the one closest you you, and the side edges. NOT the top!
Step 7:

Hold the bag in the middle of the non-cut side and cut strips into the CUT sides of the bag. (it should end up looking like the second picture)
Congrats! You're over half way! Keep it up, you got this!
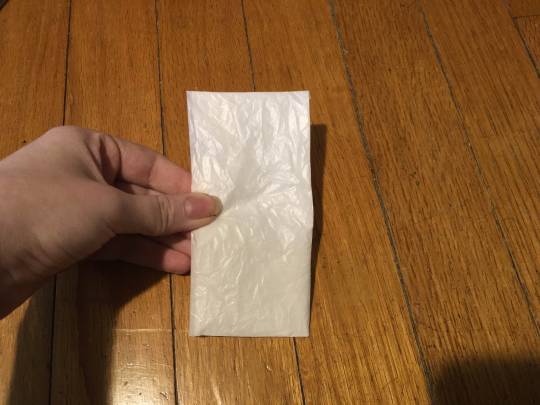
Step 8:

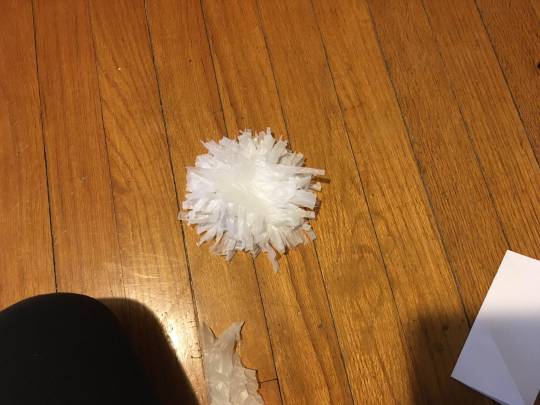
GENTLY pull each piece apart and lay them out. if done correctly up to this point, they should look like the image above. Repeat steps 3-8 until you have a decent amount of these. (You should make around 10-15 of these before moving on to the next step.)
Step 9:

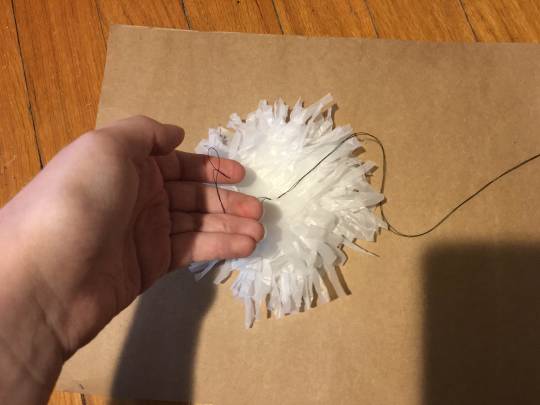
Pile each of the squares on top of each other, then thread them through the center once one way and then back close to the center a second time. Make sure to leave some extra thread. (See the second image.) (Don't string it back through the same hole or it wont hold.)
Step 10:
Tie a double knot with the end of the thread and the other part of the thread still attached to the needle.
Step 11:


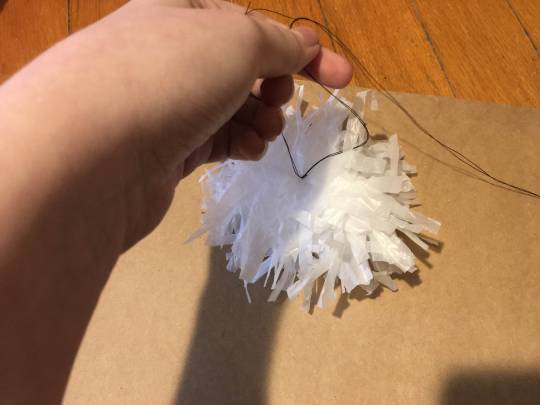
Trim the access from the side not attached to the needle. (Do NOT cut the thread attached to the needle! (It should look roughly like the second image.)
Step 12:
Tie a piece of string to the thread and double knot it. Trim extra. (this will help bulk it uses so you wont need to make nearly as many squares.)
One more step!
Step 13:


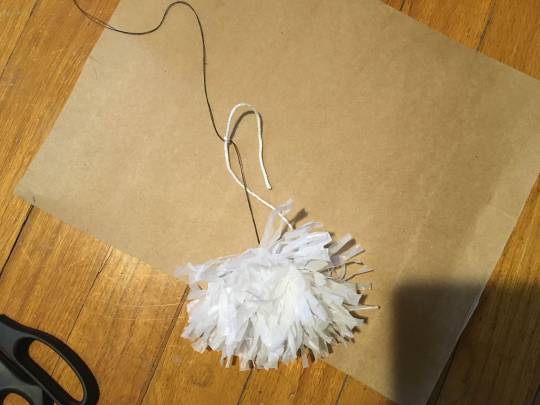
Slide the knot down to the the end where the bags are, then string another square.
Continue this process of alternating tying a knot of string and adding a plastic square until you are satisfied with the length! Simply tie it off at the end when you're done! (trimming at the end for shaping the tail can help too)
-
If anyone makes this and wants to post it, please tag us! we'd love to see! This method can most likely be used with other materials as well so get creative!
Also:
-Let us know if anyone finds a way to improve on how to make these more efficiently.
-If anyone has any questions about the tutorial, please let us know in the comments, and we'll try my best to answer. -Max
#alterhuman#alterhumanity#therian#adult therian#otherkin#furry#otherhearted#therian community#therianthropy#therian crafts#therian tail#recycled art
265 notes
·
View notes
Text
NEVER ENOUGH.


you feel like your not enough for your boyfriend since, he keeps staring at other girls, you even think he’s in love with his high school crush even though she’s with his best friend. for him he thinks everything is perfect, when he zones out a girl just goes to where he’s staring, he calls her pretty for Tanaka since his words get jumbled up (ex. “Tanaka said you look pretty”). A few weeks later you break up with him and now, he’s trying to get you back.
genre: romance, x reader, angst, fluff, college
warnings: lovers to exes to lovers,
a/n: hey guys welcome to my makeup tutorial
status: on hold (I don’t feel sad enough for this yet)
taglist: open @3lectraheart @getvaccinated @kuroaka @choerry-picking @spiderlily-w1tch-blog @4rmins @hwanghyunjinismybae @integers

yn playlist | nishinoya playlist | main playlist
featuring
dti vips | noya support group
CHATROOM 1.
MESSAGE 1. MAYBE WE SHOULD BREAK UP ✎
MESSAGE 2. GET HER BACK
MESSAGE 3. I’M NOT ENOUGH
MESSAGE 4. TEXT BACK WHEN YOU CAN
MESSAGE 5. AM I PATHETIC
MESSAGE 6. PLAY LET ME GO BY DANIEL CEASAR
MESSAGE 7. WILL YOU LOVE ME AGAIN
MESSAGE 8. HEAR ME OUT
MESSAGE 9. I’M SORRY
MESSAGE 10. I STILL LOVE YOU
CHATROOM 2.
MESSAGE 11. PITY PARTY FOR 1
TBA!
EXTRA
yn moodboard | nishinoya moodboard
yn style board | nishinoya style board
#haikyu x reader#haikyuu#nishinoya x reader#nishinoya yuu#haikyuu nishinoya#nishinoya yū#hq nishinoya#nishinoya fluff#nishinoya x y/n#nishinoya x you#Nishinoya angst#haikyuu smau#hq smau#hq x reader#hq fluff#hq fanfic#hq#never enough
171 notes
·
View notes