#libusb
Explore tagged Tumblr posts
Visit Tumblr Blog
Explore Tumblr blogs with no restrictions, modern design and the best experience.
Last Seen Tumblr Blogs


Fun Fact
Post activity is at the highest at 4:00 pm EDT; notes peak at 10:00 pm EDT.
Text
the random segfaults (yes it keeps happening) somehow seem connected to libusb... argh
#tütensuppe#maybe libusb tries to allocate absurd amounts of memory idk#but this is not very motivating
2 notes
·
View notes
Text
NO LONGER BEING UPDATED
emulation sources
roms megathread (ssa wii u internet archive download) (may require cdecrypt if not downloading roms through usbhelper) dolphin wiki + download rpcs3 wiki + download cemu wiki + download zadig (if using a real portal. i know dolphin and rpcs3 have portal emulation, unsure with cemu) prototype builds: giants builds (useful info), ssa xpec builds, swap force build, superchargers build
will update if i get any more information. feel free to add anything additional info based on stuff i've toyed with (i don't know my specs): > you may need to allow a usb passthrough in dolphin, it's in the config > as stated on the wikis, cemu requires updating the usb input driver while dolphin requires zadig to have it changed to a libusb/winusb driver (either work about half the time. technology moment). the portal is under spyro porta. i recommend having separate portals for cemu and dolphin so you don't need to mess with drivers > i used vulkan graphics for cemu and default for dolphin. i'm not a tech guy though so just play with whatever works best ig i just use default settings. portal compatability guide > for dolphin gif making, i used 8x msaa anti aliasing and had the internal resolution as 1920x1080. for the most part it ran average on a half dead computer from 2015. i'd recommend 1280x720 w/ no or minimal anti aliasing though > ssa and giants' main gameplay both ran mostly fine with vbi skip on (though i haven't checked heroic challenges) with occasional drops to 12fps, only superchargers racing's first cup and parts of the second have been tested > never used rpcs3 and i don't know if citra can run skylanders games, until i learn more it'll be absent > swap force is pretty broken on cemu, lawl > ir sensors for dolphin will need to be configured if using something like an xbox controller, have relative input on so the cursor doesn't snap back to the middle > ssa and giants can lag often and being in the ruins starting from around the middle part of the game will be noticeably slower. co-op is very slow. cemu handles co-op great though and generally is pretty fast > if you wanna play online with a friend, get parsec > if not using the console's controller type, i'd recommend just using your own controls rather than setting them to whatever makes sense (like having the trigger be your primary instead of something like A w/ an xbox controller) > if the game lags hard enough your skylander might disconnect for a sec (only experienced in giants when recording with obs). pausing the game for a couple seconds if having lag usually fixes it > dolphin games run fine when being recorded w/ obs or streamed on discord. haven't checked cemu yet > cutscenes in dolphin always have a weird like. screen tearing? thing? as far as i know there's no way to fix it, but they play fine besides that > newer (experimental) versions of cemu seem to break with skylanders >if you're getting wii u roms from the internet archive you'll need to get cdecrypt. its newest release is super easy to use (drag the rom folder onto it and it'll do everything for you, thank god) >dolphin is the only emulator with freecam >superchargers racing was buggy on both computers i got it on. 2015 pc wouldn't launch it and my 2022 laptop disconnects the portal after every race, requiring the game to be restarted >cemu would crash after doing about two races (updated 31/8/2024. added another piece of info)
#skylanders#story scrolling#dolphin emulator#cemu#figured i'd do a proper post instead of little posts every now and then
39 notes
·
View notes
Text
Oh wait I got the stupid library working--though the example program keep throwing libusb errors when I call the cleanup functions. Guess I'll want to do it from scratch anyway.
3 notes
·
View notes
Text
Google Coral Dual Edge TPU M.2 is capable of 16 TOPS. That means trillion operations per second.
OS= MX Linux 21 "Wildflower" Note that "Wildflower" has Python 3.9 and meets all other requirements to install coral drivers etc.
Mx Linux 23 is the current release. So you don't really want to leave it internet connected. From my uploaded install notes, I've found about 10 more necessary steps.
sudo crelay -s "AQ03CFDT" "5"
Method 1: sudo visudo username ALL=(ALL) NOPASSWD: /usr/bin/command1, /usr/bin/command2
Alt method: sudo nano /etc/sudoers.d/myuser-nopasswd
yourusername ALL=(ALL) NOPASSWD: /usr/local/bin/crelay
(What that does is you still have to use sudo in front of the command but it won't require a password.)
To give agent dvr access to shellscripts you need to find the agent dvr service and edit it in featherpad making sure it contains: Group:root something like User:root
Note that they modified the commands directory to opt/agentdvr/media/commands
and rather than creating a startup service for codeproject ai...you need to open session and startup in mx linux and add a link to the start.sh in the codeprojectai dir which is in /bin
Then you use my script that launches the agent dvr browser in kiosk mode also in sessions and startup.
===MX Linux additional configs==== Type boot in the start menu search and open mx linux boot options. Boot to: Mx 21.3 Wildflower, with Linux 5.10.0.35-amd64 (systemd)
===SainSmartUsbRelay==== https://github.com/ondrej1024/crelay https://github.com/signal11/hidapi sudo apt-get install libftdi1 libftdi-dev libhidapi-libusb0 libhidapi-dev libusb-1.0-0 libusb-1.0-0-d sudo apt-get install libftdi1 libftdi-dev libusb-dev git clone https://github.com/labbots/SainsmartUsbRelay.git cd sainsmart-usb-relay make sudo make install
IMPORTANT sudo chmod -R 777 /dev/bus/usb/
sudo apt-get install libudev-dev libusb-1.0-0-dev git clone git://github.com/signal11/hidapi.git ./bootstrap ./configure make sudo make install https://github.com/signal11/hidapi
IF this fails: git clone git://github.com/signal11/hidapi.git Try this instead: git clone https://github.com/signal11/hidapi.git
As for what I had said about not updating first only install...I tested and it doesn't seem to matter just beware of what you agree y,n, etc to during the upgrade for grub. It can make your os unbootable.
That said just don't try to do a system wide upgrade from v21 to v23 otherwise it only updates the components to the latest versions of mx linux 21.
PS each of the steps for crelay, hidapi etc ....start a new terminal window...do not run these all in the same one or you end up adding all into one directory. Also the cd commands may be off.....this is basic common sense. What is cd? Change directory....so you can find the created directory in your home folder open it right click and open terminal here to complete the next steps. (git clone usually clones them into your home directory.)


0 notes
Text
0 notes
Text
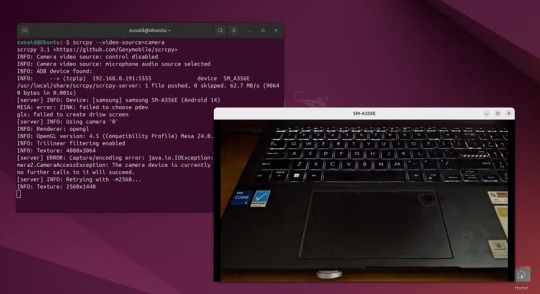
كيفية عكس شاشة هاتفك الأندرويد على نظام لينكس باستخدام أداة مجانية
قد تحتاج أحيانًا إلى عرض شاشة هاتفك الأندرويد على جهاز الكمبيوتر لأغراض متعددة مثل تقديم العروض أو تنفيذ التطبيقات بشكل أكثر راحة. لحسن الحظ، يمكنك فعل ذلك بسهولة على نظام لينكس باستخدام أدوات مجانية تمامًا. هذه الطريقة توفر لك تجربة سلسة، وتتيح لك التحكم في هاتفك من خلال شاشة الكمبيوتر باستخدام تقنيات بسيطة وفعالة. في هذه المقالة، نعرض لك طريقة عكس شاشة هاتف الأندرويد إلى نظام لينكس خطوة بخطوة باستخدام أداة مجان��ة وآمنة.
هل تبحث عن طريقة لعكس شاشة هاتفك الأندرويد بسهولة على سطح مكتب Linux الخاص بك؟ لقد وجدت أداة تتيح لك القيام بذلك. أفضل جزء؟ إنها مجانية ولا يوجد شرط مرتبط بها. تسمى scrcpy. دعنا نستكشفها ونرى إمكاناتها في هذا الدليل.
ما هو scrcpy؟
scrcpy (تُلفظ "نسخة الشاشة") هي أداة خفيفة الوزن مفتوحة المصدر تتيح لك عكس شاشة جهاز Android والتحكم فيه مباشرة من جهاز الكمبيوتر الخاص بك. إنها تدعم Windows وmacOS وLinux، ولكنها تحظى بشعبية خاصة بين مستخدمي Linux لبساطتها وتعدد استخداماتها. تستخدم scrcpy جسر تصحيح أخطاء Android (ADB) لإنشاء اتصال بين جهاز Android والكمبيوتر الخاص بك. تستخدم الأداة إمكانيات بث الشاشة في Android لترميز شاشة جهازك في دفق فيديو H.264. يتم إرسال هذا الدفق إلى جهاز الكمبيوتر الخاص بك عبر USB (أو Wi-Fi للإعدادات المتقدمة). الشيء الرائع هو أن scrcpy يقوم بإعادة توجيه مدخلات لوحة المفاتيح والفأرة من جهاز الكمبيوتر الخاص بك إلى جهاز Android الخاص بك، مما يسمح لك بالتفاعل مع الشاشة المنعكسة بسلاسة. على الرغم من كونه خفيف الوزن، فإن scrcpy يتمتع بكفاءة عالية، حيث يوفر زمن انتقال منخفضًا ومعدلات إطارات عالية ودعمًا لدقة 1920x1080 أو أعلى.
تثبيت scrcpy على Linux
للتوضيح، أستخدم Ubuntu 24.04 LTS. ومع ذلك، سأشارك التعليمات الخاصة بتوزيعات Linux الأخرى حيثما ينطبق ذلك. أولاً، تحتاج إلى تثبيت scrcpy على Linux. إذا كنت تستخدم Arch Linux أو مشتق من Arch، فقم بتثبيته من مدير ال��زم لديك باستخدام هذا الأمر: pacman -S scrcpy ينبغي على مستخدمي فيدورا استخدام هذا الأمر: dnf copr enable zeno/scrcpy && dnf install scrcpy على Gentoo Linux، استخدم: emerge scrcpy إذا كنت تستخدم Debian أو Ubuntu أو مشتقاتهما، فيمكنك تثبيته باستخدام snap: snap install scrcpy
الحصول على scrcpy على Debian/Ubuntu بدون snap
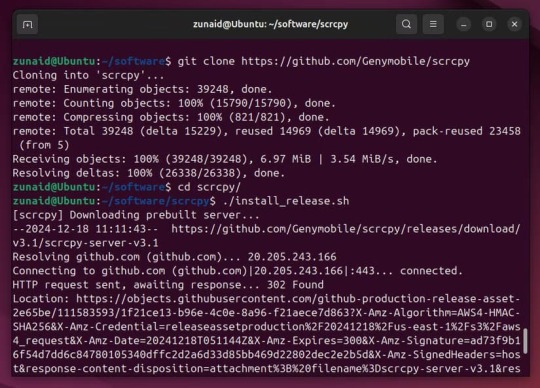
إذا كنت لا تريد استخدام snap على نظام Debian أو Ubuntu، فكن على علم بأنه لا يُنصح باستخدام حزمة APT الرسمية لتثبيت scrcpy لأن الحزمة قديمة جدًا. بدلاً من ذلك، يمكنك استخدام البرنامج النصي للتثبيت المقدم. أولاً، قم بتحديث نظامك: sudo apt update بعد ذلك، قم بتثبيت هذه التبعيات: sudo apt install ffmpeg libsdl2-2.0-0 adb wget gcc git pkg-config meson ninja-build libsdl2-dev libavcodec-dev libavdevice-dev libavformat-dev libavutil-dev libswresample-dev libusb-1.0-0 libusb-1.0-0-dev بعد ذلك، قم باستنساخ مستودع GitHub الخاص بهم وقم بتشغيل البرنامج النصي للتثبيت: git clone https://github.com/Genymobile/scrcpy cd scrcpy ./install_release.sh
بمجرد تثبيته بنجاح، تحقق من الإصدار عن طريق تشغيل: scrcpy --version
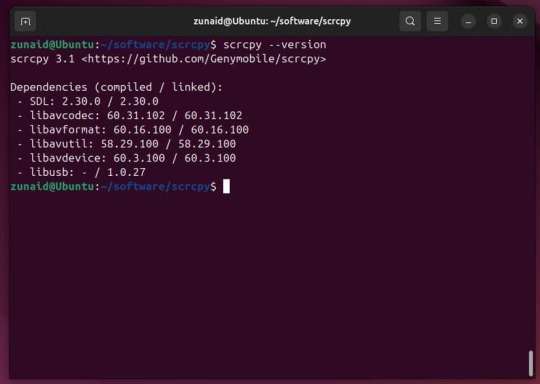
يؤكد هذا أن التثبيت كان ناجحًا. إذا كنت بحاجة إلى تحديث scrcpy كلما كان هناك إصدار جديد، فاسحب المحتوى من مستودع GitHub مرة أخرى وقم بتشغيل البرنامج النصي للتثبيت: git pull ./install_release.sh
عكس شاشة Android ��لى Linux عبر USB
أولاً، قم بتوصيل هاتف Android بجهاز Linux باستخدام كبل USB. تأكد من تمكين تصحيح أخطاء USB على Android إذا لم تكن قد فعلت ذلك بالفعل. إذا كنت تقوم بتشغيل Linux على جهازك العادي، فيجب أن يتصل هاتفك بسطح المكتب على الفور. ومع ذلك، إذا كنت تقوم بتشغيل جهاز افتراضي، فأنت بحاجة إلى تمكين الجهاز من قائمة USB. في VirtualBox، انتقل إلى Devices > USB. حدد المربع الخاص باسم هاتفك. لتأكيد الاتصال، قم بتشغيل أمر adb هذا في المحطة الطرفية الخاصة بك: adb devices
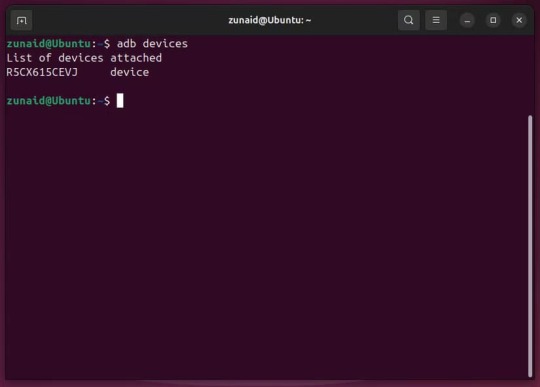
لقد قمنا بتوصيل الجهاز بنجاح. لعرض شاشة Android على جهاز Linux الخاص بك، قم بتشغيل: scrcpy
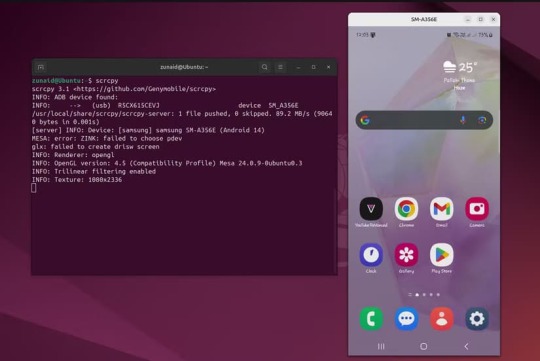
يمكنك استخدام الماوس للتحكم في هاتف Android. انقر فوق أحد التطبيقات لفتحه أو قم بالتمرير لتغيير النافذة. يعمل زر النقر بزر الماوس الأيمن كزر الرجوع. يعمل زر النقر الأوسط كزر الصفحة الرئيسية. هناك العديد من الاختصارات المفيدة الأخرى التي تتيح لك التحكم بشكل أفضل باستخدام الماوس ولوحة المفاتيح. إذا كان لديك أجهزة متعددة متصلة بجهاز Linux الخاص بك في نفس الوقت، فيمكنك تحديد الجهاز الذي تريد عكسه بأربع طرق: 1. تمرير الرقم التسلسلي للهاتف كحجة. يمكنك العثور على الرقم التسلسلي في إعدادات الجهاز. scrcpy --serial=example_serial_number 2. عكس شاشة الهاتف المتصل عبر USB (يعمل عندما ي��ون هناك جهاز واحد فقط متصل عبر الكابل) scrcpy --select-usb 3. عكس الهاتف المتصل عبر TCP/IP (يعمل عندما يكون هناك جهاز واحد فقط متصل بهذه الطريقة) scrcpy --select-tcpip 4. تمرير عنوان IP الخاص بالهاتف كحجة إذا كان يستمع على TCP/IP scrcpy --tcpip=192.168.1.1:5555
عكس شاشة Android لاسلكيًا على Linux
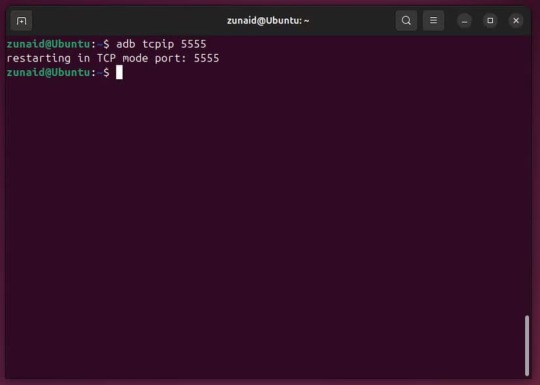
إذا كنت لا تريد الوقوع في مشاكل الكابل، فيمكنك أيضًا إعداد scrcpy لعكس شاشة هاتف Android لاسلكيًا. لهذا، يجب أن يكون كلا الجهازين على نفس شبكة Wi-Fi. أولاً، قم بتوصيل هاتفك بسطح مكتب Linux عبر كابل USB. تأكد من التعرف عليه بواسطة adb: adb devices ثم قم بتمكين تصحيح الأخطاء اللاسلكية على هاتفك عن طريق تشغيل هذا الأمر: adb tcpip 5555
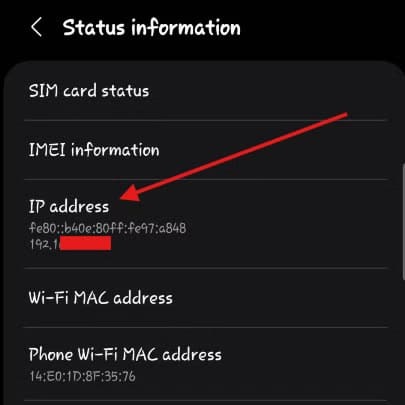
الآن افصل الهاتف عن كابل USB. ابحث عن عنوان IP الخاص بهاتفك. يمكنك العثور عليه في إعدادات الهاتف أو إعدادات Wi-Fi. أنا أستخدم جهاز Samsung، لذلك في حالتي، كان علي الانتقال إلى الإعدادات > حول الهاتف > معلومات الحالة للعثور على عنوان IP.
بمجرد العثور على عنوان IP، قم بتشغيل هذا الأمر في المحطة الطرفية: adb connect ip.address.of.phone:5555
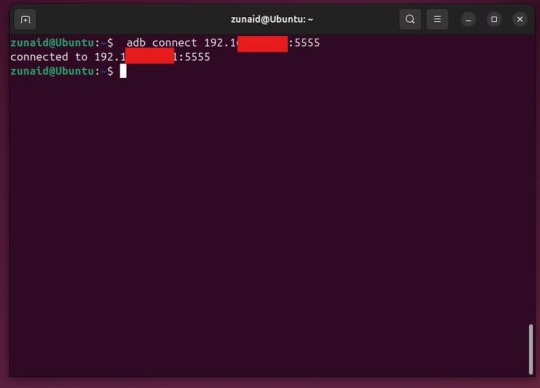
إذا كان كل شيء يبدو جيدًا، قم بتشغيل scrcpy لعكس شاشة Android لاسلكيًا: scrcpy يجب أن ترى شاشة هاتفك على سطح المكتب حتى لو لم يكن متصلاً عبر USB. بناءً على اتصالك بالإنترنت، قد تلاحظ انخفاضًا في الأداء أو تأخيرًا أكبر في الاتصال اللاسلكي مقارنة بالاتصال السلكي. أنا شخصيًا أفضل النسخ اللاسلكي لأنني لا أضطر إلى التعامل مع الكابلات.
إليك ما يمكنك فعله أيضًا باستخدام scrcpy
scrcpy هو أكثر من مجرد أداة نسخ شاشة Android. يمكنك تسجيل شاشة Android الخاصة بك واستخدام كاميرا الهاتف وتشغيل الصوت على سطح المكتب والتحكم في كيفية تفاعلك مع هاتف Android الخاص بك عبر scrcpy. دعنا نستعرض بسرعة بعض الميزات التي قد تجدها مثيرة للاهتمام. يمكنك تغيير بعض إعدادات دفق الفيديو الذي تقوم بإعادة توجيهه من هاتف Android الخاص بك، مثل حجم الشاشة ومعدل البت وترميز الصوت ومعدل الإطارات. scrcpy --max-size=1024 # The width is calculated from your device's aspect ratio scrcpy --video-bit-rate=2000000 scrcpy --max-fps=15 scrcpy --video-codec=h265 إذا كنت تريد عكس كاميرا هاتفك بدلاً من الشاشة، قم بتشغيل: scrcpy --video-source=camera
أما بالنسبة للصوت، فإذا كنت تقوم بعكس الشاشة، فسيتم تشغيل الصوت الصادر من هاتفك افتراضيًا على سطح المكتب. وإذا كنت تقوم بعكس الكاميرا، فسيتم تشغيل صوت ميكروفون هاتفك على سطح المكتب. ويمكنك اختيار مصدر الصوت الذي تريد استخدامه أو تعطيله تمامًا. scrcpy --audio-source=mic # or --audio-source=output scrcpy --video-source=camera --no-audio # audio isn't forwarded إذا كنت تريد تسجيل الفيديو والصوت الذي يتم عكسه، قم بتشغيل: scrcpy --record=file.mp4 scrcpy --no-audio --record=file.mp4 # to only record the video scrcpy --no-video --audio-codec=raw --record=file.wav # to only record the audio هناك ميزة أخرى لفتت انتباهي وهي العرض الافتراضي. في الأساس، يمكنك إنشاء المزيد من الشاشات وعكسها على سطح المكتب، وليس بالضرورة عكس شاشة هاتفك. على سبيل المثال، يمكنك جعل شاشة واحدة تعكس شاشة الهاتف بينما تعرض شاشة أخرى، وهي شاشة افتراضية، تطبيقًا. على سبيل المثال، إذا كنت ترغب في تشغيل VLC في شاشة افتراضية، فقم بتشغيل: scrcpy --new-display=1920x1080 --start-app=org.videolan.vlc
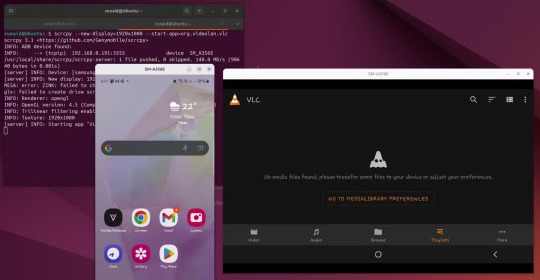
وبالمثل، يمكنك بدء العديد من العروض الافتراضية الجديدة كما يحلو لك. تتوفر العديد من أدوات عكس الشاشة لنظام Android. ومع ذلك، فإن scrcpy مجاني ومفتوح المصدر ويحتوي على العديد من الميزات القوية مما يجعله منافسًا قويًا. إذا كنت تريد معرفة المزيد حول هذه الأداة، فقم بتشغيل man scrcpy على محطتك الطرفية أو قم بزيارة الوثائق الرسمية. عكس شاشة هاتفك الأندرويد إلى جهاز الكمبيوتر بنظام لينكس ليس مهمة معقدة كما قد يبدو. باستخدام الأدوات الصحيحة، يمكنك الوصول إلى ميزات متعددة تجعل التحكم في هاتفك عبر الكمبيوتر أمرًا أكثر سلاسة وفعالية. باتباع الخطوات التي تم شرحها في هذه المقالة، ستتمكن من الاستفادة من هذه الميزة بسهولة دون الحاجة إلى أي تطبيقات مدفوعة. Read the full article
0 notes
Text
RDS Data Extraction with RFtap and Wireshark
RDS (Radio Data System) is a communication protocol standard used for embedding small amounts of digital information in traditional FM radio broadcasts. It enables radio stations to transmit data such as station identification, program information, and traffic updates.
To capture and decode RDS data, one method involves using a Software Defined Radio (SDR) along with GNU Radio and RFtap. GNU Radio provides a framework for creating software radios, while RFtap acts as a bridge between GNU Radio and conventional network monitoring and packet analysis tools like Wireshark.

Unfortunately, as of the time of writing, RFtap is no longer being maintained and does not work with the latest version of GNU Radio (version 3.10.10). This post offers guidelines for rebuild and using RFtap with the new GNU Radio release.
This post assumes that the reader has access to DVB-T dongles based on the Realtek RTL2832U and a PC running Ubuntu or Debian Linux. For this, I used an RTL dongle with Rafael Micro R820T tuner and Ubuntu 24.04 LTS release.
As the first step install the following GNU Radio build dependencies into the OS:
sudo apt-get install cmake libboost-all-dev \ liblog4cpp5-dev qtcreator qtbase5-dev \ qt5-qmake python3-cheetah python3-numpy \ python3-pygtk python3-gi python3-gi-cairo \ gir1.2-gtk-4.0
sudo apt install git g++ libgmp-dev swig \ python3-mako python3-sphinx python3-lxml \ doxygen libfftw3-dev libsdl1.2-dev \ libgsl-dev libqwt-qt5-dev libqt5opengl5-dev \ python3-pyqt5 liblog4cpp5-dev libzmq3-dev \ python3-yaml python3-click \ python3-click-plugins python3-zmq python3-scipy \ libcodec2-dev libgsm1-dev libusb-1.0-0 \ libusb-1.0-0-dev libudev-dev \ python3-setuptools
sudo apt install pybind11-dev python3-matplotlib \ libsndfile1-dev libsoapysdr-dev soapysdr-tools \ python3-pygccxml python3-pyqtgraph
sudo apt install libiio-dev libad9361-dev \ libspdlog-dev python3-packaging python3-jsonschema \ python3-qtpy
sudo apt remove swig
Next, clone and build Volk (Vector-Optimized Library of Kernels)
mkdir ~/rf cd rf git clone --recursive https://github.com/gnuradio/volk.git cd volk mkdir build cd build cmake -DCMAKE_BUILD_TYPE=Release -DPYTHON_EXECUTABLE=/usr/bin/python3 ../ make sudo make install sudo ldconfig
After installing the Volk library, we can proceed to build GNU Radio.
cd ~/rf wget https://github.com/gnuradio/gnuradio/archive/refs/tags/v3.10.10.0.tar.gz tar -xvf ./v3.10.10.0.tar.gz cd gnuradio-3.10.10.0 mkdir build cd build cmake -DCMAKE_BUILD_TYPE=Release -DPYTHON_EXECUTABLE=/usr/bin/python3 ../ make -j8 make test sudo make install sudo ldconfig

Now GNU Radio is installed with all necessary components. To enable RTL SDR support, we must build and install Osmocom RTL SDR libraries and SDR components.
cd ~/rf git clone https://gitea.osmocom.org/sdr/rtl-sdr.git cd rtl-sdr mkdir build cd build cmake ../ -DINSTALL_UDEV_RULES=ON make sudo make install sudo ldconfig
cd ~/rf git clone https://gitea.osmocom.org/sdr/gr-osmosdr cd gr-osmosdr mkdir build cd build cmake ../ make sudo make install sudo ldconfig
Before plugging in the RTL-SDR dongle, we need to prevent the kernel modules for the RTL-SDR USB device from being loaded into the kernel and taking ownership of the device. To do this, simply navigate to the /etc/modprobe.d directory and create a file called rtl-sdr-blacklist.conf with the following content:
# This system has librtlsdr0 installed in order to # use digital video broadcast receivers as generic # software defined radios. blacklist dvb_usb_rtl28xxu blacklist e4000 blacklist rtl2832 blacklist rtl2830 blacklist rtl2838
Next, you should clone and build the FM RDS/TMC transceiver module for GNU Radio.
cd ~/rf wget https://github.com/bastibl/gr-rds/archive/refs/tags/v3.10.tar.gz tar -xvf ./gr-rds\ -v3.10.tar.gz cd gr-rds-3.10 mkdir build cd build cmake .. make sudo make install sudo ldconfig
For the next steps, we need to have Wireshark and RFTap. Wireshark can be installed using a package manager.
sudo apt-get install wireshark
To run Wireshark without requiring root user permissions, use the following set of commands:
sudo dpkg-reconfigure wireshark-common sudo usermod -a -G wireshark $USER newgrp wireshark
A message may be prompted in the first step above and proceed by selecting the "Yes" option.
Now restart the OS and continue with the RFTap installation.
The official RFTap repository is no longer being maintained and is not compatible with newer versions of GNU Radio. For this step, please use the RFTap fork available in my GitHub repository. This version has been successfully tested with GNU Radio 3.10.10 and Wireshark 4.2.2.
cd ~/rf git clone https://github.com/dilshan/gr-rftap.git cd gr-rftap mkdir build cd build cmake .. make sudo make install sudo ldconfig
Now get the modifier version of rds_rx_rftap.grc from the above repository.

The Wireshark Dissector file for RDS data is also available in the repository. Copy it to the ~/.config/wireshark/plugins directory. Create the directories if they do not exist.
Launch Wireshark and monitor the loopback (lo) adapter. Start GNU Radio and execute the rds_rx.grc file, which was downloaded in the above step.
youtube
If all the steps are performed correctly, the RDS data should appear in the packet list pane as UDP messages. The dissected messages can be observed through the packet bytes pane.
0 notes
Text
tryna port a ruby program for controlling my laptops rgb keyboard to python, and libusb and hidapi r not playing nice :(
so far i have figured out that i do not understand linux permissions once again, and that i can very easily disable all input from the keyboard by detaching the kernel driver from it.
if anyones got any ideas, help would be appreciated
1 note
·
View note
Text
Verb Suffix Drill: Rover -be’
-be’ not
This verb suffix indicates the negative of a state or action.
First Person Singular
jIbejbe' I do not watch jIchoHbe' I do not change jIHarbe' I do not believe jIHoHbe' I do not kill
qaleghbe' I do not see you qaQoybe' I do not hear you qatlho'be' I do not thank you qaHoybe' I do not congratulate you
vIHotbe' I do not touch him, her, it vIHIvbe' I do not attack him, her, it vIpoQbe' I do not need him, her, it vIneHbe' I do not want him, her, it
SawIvbe' I do not choose you Saqelbe' I do not consider you Savoqbe' I do not trust you SamuSbe' I do not hate you
vIchovbe' I do not evaluate them vIlo'be' I do not use them vIcherghbe' I do not tolerate them vIlIjbe' I do not forget them
Second Person Singular
bIbepbe' you do not complain bI'ovbe' you do not compete bIve'be' you do not travel with purpose bIyI'be' you do not speak respectfully
cho'angbe' you do not show me choqeSbe' you do not advise me choqIpbe' you do not hit me chomerbe' you do not surprise me
Da'avbe' you do not guard him, her, it DaSonbe' you do not relieve him, her, it Da'anbe' you do not are wasting him, her, it Da'olbe' you do not verify him, her, it
ju'ombe' you do not resist us juje'be' you do not feed us juSuvbe' you do not fight us ju'oSbe' you do not represent us
Damolbe' you do not bury them DaSopbe' you do not eat them Damojbe' you do not become them Da'Irghbe' you do not bully them
Third Person Singular
'Ipbe' he, she, it does not swear 'oDbe' he, she, it does not arbitrate Qambe' he, she, it does not stand 'oghbe' he, she, it does not invent
mumevbe' he, she, it does not stop me mubotbe' he, she, it does not obstruct me mularghbe' he, she, it does not smell me muHotbe' he, she, it does not touch me
Dulay'be' he, she, it does not promise you Dulanbe' he, she, it does not place you (e.g. at the scene) Dujolbe' he, she, it does not beam you DumImbe' he, she, it does not delay you
lobbe' he, she, it does not obey him, her, it welbe' he, she, it does not owe him, her, it Qolbe' he, she, it does not beam him, her, it away laghbe' he, she, it does not disassemble him, her, it
nuHonbe' he, she, it does not doubt us nuHubbe' he, she, it does not defend us nuHejbe' he, she, it does not rob us nujabbe' he, she, it does not serve us (food)
lIbuSbe' he, she, it does not pay attention to you lIHo'be' he, she, it does not admire you lIHevbe' he, she, it does not receive you lI'uchbe' he, she, it does not hold you
lIqbe' he, she, it does not round them up Hupbe' he, she, it does not punish them jeybe' he, she, it does not defeat them tIchbe' he, she, it does not insult them
First Person Plural
mavumbe' we do not toil malopbe' we do not celebrate maqetbe' we do not run mache'be' we do not rule
pIHIjbe' we do not deliver you pIqengbe' we do not carry you pIHay'be' we do not duel you pIghobbe' we do not do battle with you
wIghochbe' we do not track him, her, it wISambe' we do not find him, her, it wIghelbe' we do not ask him, her, it wImuvbe' we do not join him, her, it
retlhejbe' we do not accompany you rengepbe' we do not override you rechaw'be' we do not allow you rengu'be' we do not identify you
DIperbe' we do not label them DImupbe' we do not strike them DI'uybe' we do not press them down DIcharghbe' we do not conquer them
Second Person Plural
Sunajbe' you do not dream SuSIvbe' you do not wonder Suba'be' you do not sit Supojbe' you do not analyse
tuwoHbe' you do not pick me up tuchaghbe' you do not drop me tuchopbe' you do not bite me tughuHbe' you do not alert me
boghorbe' you do not break him, her, it bochoHbe' you do not change him, her, it boghombe' you do not meet him, her, it boqIHbe' you do not meet him, her, it for the first time
cheponbe' you do not persuade us chepIHbe' you do not expect us cheqa'be' you do not replace us cherurbe' you do not resemble us
boSangbe' you do not obliterate them bochoHbe' you do not change them boSujbe' you do not disturb them boroSbe' you do not lick them
Third Person Plural
Heghbe' they do not die pe'be' they do not cut ghItlhbe' they do not mark jalbe' they do not imagine
muHajbe' they do not dread me mungejbe' they do not infect me munejbe' they do not look for me muraQbe' they do not handle me (physically)
nIghongbe' they do not abuse you nImoqbe' they do not beat you nInge'be' they do not take you away nIghovbe' they do not recognise you
luDelbe' they do not describe him, her, it lurI'be' they do not call him, her, it luSIQbe' they do not endure him, her, it lurupbe' they do not tax him, her, it
nuDechbe' they do not surround us nuSIghbe' they do not influence us nuSIchbe' they do not reach us nutlhojbe' they do not are aware of us
lISeHbe' they do not control you lIghalbe' they do not envy you lItembe' they do not deny you lItoDbe' they do not rescue you
chotbe' they do not murder them tlhochbe' they do not contradict them Surghbe' they do not skin them tatlhbe' they do not return them (e.g. a gift to the donor)
#The Daily Klingon#Star Trek#Klingons#tlhIngan Hol#Klingon language#The Klingon Dictionary#new vocabulary#qep'a'#qepHom#Marc Okrand
3 notes
·
View notes
Text
found a project on github for communicating with another model from this manufacturer, using only python and libusb. the code doesnt even look all that complicated, so maybe i can give it a try?
opportunity to write new server code has presented itself and like i dont want to openly say i want to do it but i kinda want to do it,,
#tütensuppe#just have to figure out how to make libusb behave the way i want it to i guess#also the official driver is from 2015. why is software for scientific devices always like this
5 notes
·
View notes
Text
PothosSDR - Melhores Ferramentas RTL-SDR Para Windows
PothosSDR – Melhores Ferramentas RTL-SDR Para Windows
O Pothos SDR é um ambiente de desenvolvimento que inclui o conjunto de softwares de fluxo de dados Pothos e ferramentas gráficas, SoapySDR e kit de ferramentas pothos-sdr para hardware que fazem interface com vários drivers de fornecedores de hardware SDR comumente usados e kit de ferramentas GNU Radio para suporte ao processamento de sinais
O instalador do PothosSDR está disponível aqui.
A…
View On WordPress
#cubicsdr#demodulação de WBFM#GNU Radio#gqrx#libusb#PothosFlow#PothosSDR#RTL-SDR#rtl_adsb#rtl_fm#rtl_power#rtl_sdr#rx_fm#rx_power#rx_sdr#SoapySDR#SoapySDRUtil#Spectrogram#Windows#Zadig
0 notes
Link
It is a bit of a paradox that we are storing more and more information digitally, yet ever...
0 notes
Text
HOWTO install canon scanning software for MG6100 multifunctional printers in ubuntu 19.04 “Disco Dingo”
My Canon PIXMA MG6140 inkjet printer/scanner/copier is a wonderful, though a bit dated piece of technology. Unfortunately, Canon have dropped support for modern linux distros a few years ago.
In ubuntu 19.04 open source printing driver for the device could be installed by usual OS procedure. The driver is good enough for everyday purposes. But scanning seems not to be fully supported by open-source solution. Manufacturer’s scangearmp software worked very good for me a couple of years ago on older ubuntu distribution. But on Ubuntu 19.04 installation of the package fails.
The instructions below are for 64-bit (x86_64) version of ubuntu. They could be easily adapted for 32-bit variant.
Install prerequisite packages:
$ sudo apt install libatk1.0-0 libcairo2 libfontconfig1 libgtk2.0-0 libpango1.0-0 libusb-0.1-4 libxcursor1 libxfixes3 libxi6 libxinerama1 libxrandr2 libxrender1
Download legacy libpng library https://packages.ubuntu.com/xenial/amd64/libpng12-0/download. However, it could not be installed on Disco Dingo with dpkg -i :-(.
Unpack and install manually:
$ dpkg-deb -R libpng12-0_1.2.54-1ubuntu1.1_amd64.deb tmp $ cd tmp $ sudo cp lib/x86_64-linux-gnu/libpng12.so.0.54.0 /lib/x86_64-linux-gnu/ $ sudo ln -s /lib/x86_64-linux-gnu/libpng12.so.0.54.0 /lib/x86_64-linux-gnu/libpng12.so.0
Download Canon’s driver package from https://files.canon-europe.com/files/soft40264/Software/MG6100series-scanner_driver.tar
Unpack
$ tar xvf MG6100series-scanner_driver.tar $ tar xvzf scangearmp-mg6100series-1.60-1-deb.tar.gz
Install, forcing ignore of libpng12-0 dependent:
$ sudo dpkg -i --ignore-depends=libpng12-0 scangearmp-common_1.60-1_amd64.deb $ sudo dpkg -i scangearmp-mg6100series_1.60-1_amd64.deb
#ubuntu#ubuntu19.04#ubuntu-disco#cannon#scanner PIXMA#MG6140#MG6100series#driver#installation#scangearmp
1 note
·
View note
Text
How I Corebooted my thinkpad x220t
Note: I ordered my SOIC8 test clip from China, but it never came and so this guide is a theoretical write up of how I would’ve done this had it arrived. This was very unfortunate as I had everything else prepared.
This is a guide on how to coreboot a thinkpad x220t. Most thinkpads are pretty similar so this guide can also be used for an x200-x230, though you should still google for any model specific details.
Also backup your BIOS for the love of god, and don’t panic if you brick it, just reflash with your backup. And be careful not to fry the flash chip, if you do, you might be able to desolder and replace it.
This guide comes with no warranty, proceed at your own risk.
What you need
x220t
Raspberry Pi 3B
A linux computer to SSH into the Pi
Female jumper leads (to connect the Pi and the test clip)
SOIC 8 pin test clip (like this)
Procedure
Download and flash Raspbian Lite to a micro SD card.
Make a file called ssh in the root directory (to enable SSH)
Follow the directions here to set up wifi on the Pi so you can access it remotely (you can use a wired connection if you want)
Use nmap or check your router to find the ip address of the Pi
SSH into the pi (default user and pw is pi and raspberry)
Prepare the Pi for flashing by updating it and installing everything with the following commands
sudo apt-get update && sudo apt-get dist-upgrade && sudo reboot
sudo apt-get update && sudo apt-get install libftdi1 libftdi-dev libusb-dev libpci-dev subversion
sudo apt-get install build-essential pciutils usbutils libpci-dev libusb-dev libftdi1 libftdi-dev zlib1g-dev subversion
svn co svn://flashrom.org/flashrom/trunk flashrom
cd flashrom/
make
sudo make install
Use the following commands to add the SPI kernal modules to /etc/modules so they persist between boots.
sudo modprobe spi_bcm2835
sudo modprobe spidev
Shutdown the Pi, unplug the x220t and remove the batteries.
Remove the palmrest and keyboard from the x220t (consult the hardware maintenance manual for instructions on how to) and expose the flash chip (see image 1 in the appendix)
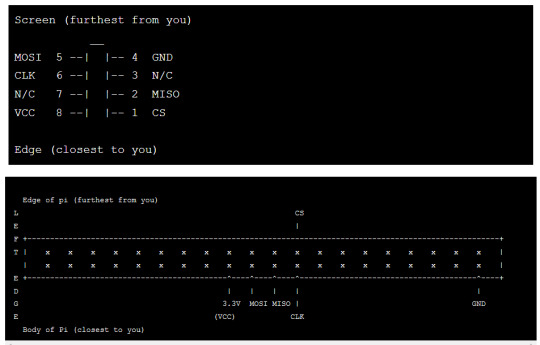
Hook up the test clip to the Pi (see image 2 in the appendix for a wiring diagram)
Connect the clip to the motherboard then turn the Pi on
Read the contents of the flash chip with the following command (do this several times and make sure the hash matches
sudo flashrom -p linux_spi:dev=/dev/spidev0.0 -r read01.bin
Download coreboot and use the ifdtool to extract whats need from the stock rom
git clone http://review.coreboot.org/coreboot.git ~/coreboot
cd ~/coreboot
git submodule update --init --recursive
cd ~/coreboot/util/ifdtool
make
sudo make install
cd ~
ifdtool -x ~/flash01.bin
mkdir -p ~/coreboot/3rdparty/blobs/mainboard/lenovo/x220
cd ~/coreboot/3rdparty/blobs/mainboard/lenovo/x220
mv ~/flashregion_0_flashdescriptor.bin descriptor.bin
mv ~/flashregion_2_intel_me.bin me.bin
mv ~/flashregion_3_gbe.bin gbe.bin
Use me_cleaner to neutralize the Intel ME
git clone https://github.com/corna/me_cleaner ~/me_cleaner
sudo apt-get install python3
./me_cleaner.py ~/coreboot/3rdparty/blobs/mainboard/lenovo/x220/me.bin
Configure coreboot
cd ~/coreboot
make nconfig
Build coreboot
make crossgcc-i386 CPUS=4 -b
make iasl
make
Flash coreboot
sudo flashrom -p linux_spi:dev=/dev/spidev0.0 -w ~/coreboot/build/coreboot.rom -c flashChipModel
Disconnect the clip and power up the laptop, it should boot to SeaBIOS
Appendix
image 1 - Flash chip on the motherboard
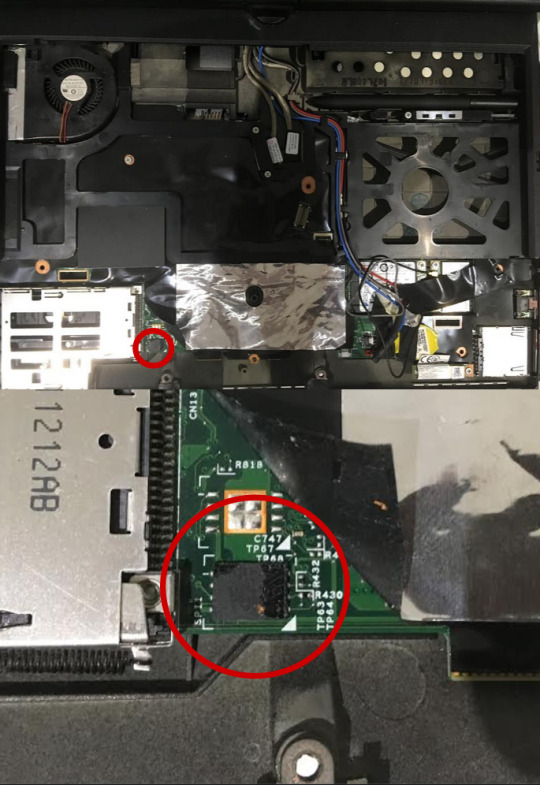
image 2 - Wiring diagram for the Pi
References
https://github.com/grisu48/Coreboot/tree/master/x220t
https://karlcordes.com/coreboot-x220/
https://tylercipriani.com/blog/2016/11/13/coreboot-on-the-thinkpad-x220-with-a-raspberry-pi/
https://wej.k.vu/coreboot/coreboot_on_the_lenovo_thinkpad_x220/
https://github.com/thetarkus/x220-coreboot-guide
1 note
·
View note
Text
รวมไดรเวอร์มือถือ สมาร์ทโฟน
ไดรเวอร์สมาร์ทโฟนรุ่นต่างๆดาวน์โหลดADB / Fastboot ไดรเวอร์คลิกที่นี่โปรแกรม Huawei Hi-suite ของ Huaweiคลิกที่นี่Huawei COM 1.0 Testpoint ไดรเวอร์คลิกที่นี่LG Smartphone ไดรเวอร์คลิกที่นี่OPPO MTK ไดรเวอร์คลิกที่นี่Samsung Odin และ MTP ไดรเวอร์คลิกที่นี่Spreadtrum SPD ไดรเวอร์คลิกที่นี่Smart Card ไดรเวอร์กล่องแฟลชคลิกที่นี่Motorola Driverคลิกที่นี่LibUSB Win32 Driver MTKคลิกที่นี่แก้ไข window 10…

View On WordPress
0 notes
Text
I2C master mode emulator
I2C is a popular data bus to communicate with inter-board peripherals. Today I2C based chips and modules are widely available in many categories, including data storage, ADC/DAC, I/O Expanders, sensors, etc.

The I2C master mode emulator allows communication with I2C devices by sending or receiving data to/from the I2C bus. To issue the I2C commands, the emulator should connect to a PC over the USB port. After initializing the emulator, the PC and directly control the I2C slave chip/module.
This emulator is base on ATmega16A MCU. The USB communication channel is develop using the V-USB firmware.
Initially, we develop this emulator to work with 5V I2C devices, but later it has extended to work with 3.3V I2C devices. The 3.3V design is still under testing, and at the prototyping stage, we found a couple of issues in 3.3V mode.
In 3.3V mode, the required output level is available only if the emulator is in a "ready" state. In all the other states, it provides 5V output. Therefore in 3.3V mode, necessary precautions need to be taken to protect the slave device from over-voltage damages.

To build the prototype, we use single side home-made PCB. The dimensions of the PCB are 96.77mm × 110.73mm.
This emulator needs an external power supply, and the recommended supply voltage is between 12V - 15V.
The control software of the emulator is developed using libusb and tested only with Linux operating systems.
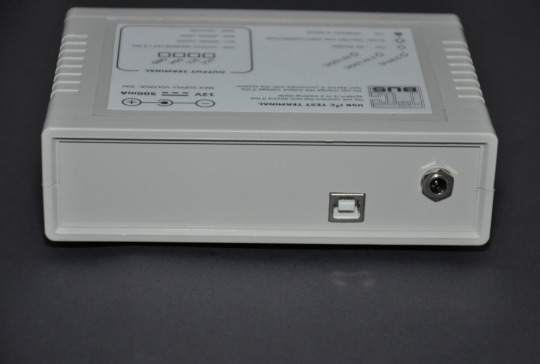
The control software source code, PCB design, schematics, firmware source code, and compiled binaries of this emulator are available at my GitHub repository. The complete documentation is also available in the wiki section of the GitHub repository.
0 notes