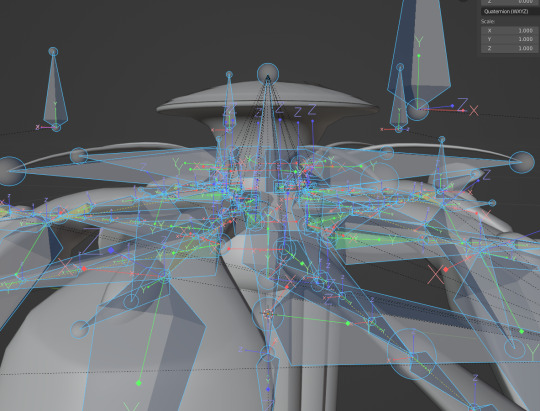
#like it has some blender specific stuff that comes from being a 3D animation software first
Explore tagged Tumblr posts
Visit Tumblr Blog
Explore Tumblr blogs with no restrictions, modern design and the best experience.
Last Seen Tumblr Blogs


Fun Fact
Tumblr.com rank in the US is 25.
Text
Blender's 2D animation environment seems like it's close enough to flash but with premiere's timeline that I might be able to pick it up quicker than I thought.
#like it has some blender specific stuff that comes from being a 3D animation software first#but once i understand how to export footage i might just be back in business#I'm not sure how long it's been since I've tried to animate. I'm pretty sure i don't have access to that software anymore anyway#this is encouraging#there is an overwhelming amount to take in#but this seems like the perfect software for animation compositing whatever audiovisual project#for like#inventive combining of mediums#like it might be faster for me to go shoot practical fire than it would be to learn how to make the computer do it.#and it would at least look interesting
0 notes
Text
my experience with blender and unity, together, has been a bit of a nightmare, but separately they haven't been bad. unity i've had issues with but they always felt surmountable, like, no matter what i can work around this problem.
blender i just enjoy, it has this reputation as like a weird badly designed software but maybe that's gone away w/ recent (recent as in.. years ago) ui changes. new features have been great and there isn't much for me to complain about here, but idk what a new user's experience is like. it's hard to tell people who ask me how to get started what to work with, bc everything i learned from is out of date.
the real headache comes from the transition between the two, which has been a real nightmare for me. once i'm all done working on wormgrubber 2.0, i need to put together workflow document to reference whenever i'm working on new 3d assets for unity in the future. it's a big list and it's been a real pain to discover each problem one at a time.
first and foremost it is obvious to me now that blender is not gamedev software. when i started gamedev, i split my time between learning shaders and learning 3d, not touching animation and mostly focusing on making little model display art pieces. i did this for a couple years. rigging was always a huge pain in the ass, weight painting moreso, so i just avoided it for a while. when i brought my first fully rigged piece into unity it was a nightmare, nothing looked right at all. this kind of thing honestly traumatized me, lol. i spent so much time trying to obsessively make perfect rigs bc i was terrified by shapekeys and drivers, horrified to spend hours setting something up only for it to be useless. this was wrongheaded for multiple reasons... there are so many features in blender that are just not relevant to unity and/or don't export through the only 3d format unity uses, fbx. this makes sense if you think about it for a bit, blender has a lot of features for rendering 3d animation and art but a lot of this wouldn't work in a realtime game, it's just too intensive. but! if you spend all your time learning 3D instead of specifically learning "3d for game animation" you come to lean on things like corrective smoothing or other modifiers.
3d is a weird mix of like, destructive and nondestructive workflows. blender will often let you work your way into positions you cant easily recover from without a lot of extra work or discarding work, setups that work fine within blender but absolutely will not export to unity. things like being unable to apply modifiers to models with shapekeys, but needing to apply all shapekeys to properly export a model, etc.
unity does this thing where it has very specific ideas about how things should work and it only tells you what it's doing maybe like 20% of the time. everything else is up to you to figure out the hard way. im not sure yet if this is an fbx problem or not but interpolation settings in blender aren't exported to unity, so it just comes up with its own. unity doesn't play the last frame of an animation. this makes sense for some contexts, because an animation is an interpolation between a start point and an end point, but like, nothing in unity tells you this the case. whenever i search for these things i always find forum posts, not unity documents. and you cant really change it without clumsy code slapped on top bc so much of this is below the closed off part of unity's code.
make games this way, not that way. i used to always think that when i was struggling against unity it was a sign i was designing something poorly, but now i know enough to know it's often because unity is itself struggling under the weight of choices made years ago, or half finished projects with poor documentation. arcane rules and practices i don't know bc i didn't go to college and because the knowledge is typically split across like several different jobs in a normal large studio.
i don't know how you learn this stuff other than trial and error. maybe in a college?? i dont know how other self taught indies deal with it. tutorials on youtube/etc seem to be split between like teaching you isolated tricks or teaching you very specific workflows without telling you exactly why you can't do this or that. blender tutorials are often for non-gamedevs, and unity tutorials are about following unity's design decisions without explaining them.
i know creating tutorials is a lot of effort and it's impossible to be fully comprehensive, but for something as common as 'take blender thing and put it in unity' should be for indie gamedev, i dont get why i havent seen more grumbling about this. i feel like every major snag i've come across (ones mentioned here are only a few of them) i was completely clueless about until i started doing some digging and the only thing to save me is some post from like 2016 on the unity forums.
its been a struggle!!!! i know i'm getting closer to the end of the tunnel but like every time i think it's a straight shot some new pit opens up. still, i'm getting there. my short advice to anyone is to always iterate, if you are trying to make art for games, make some art and put it in gamdev software. see what you like about it, how your desired workflow works with the software, etc. these skills arent separate, they have to be tied together.
4 notes
·
View notes
Text
Artist’s Software Surfing P1 - Sketching
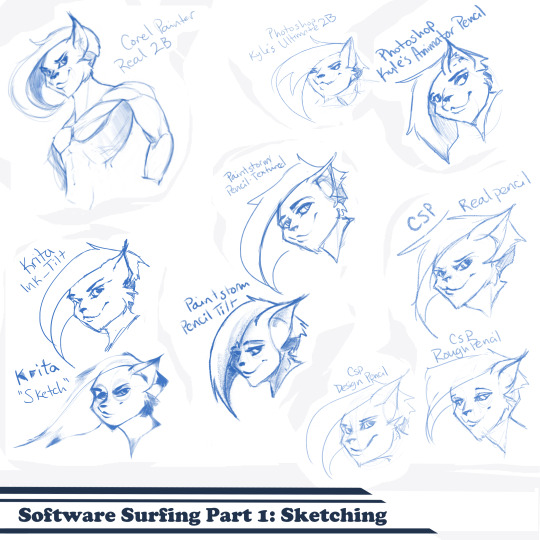
SSSo recently, after finishing (an admittedly long-overdue) a piece, I decided to download a trial of the new Corel Painter 2019. I hadn’t used Painter since my old DeviantArt days (circa 2005) and wanted to see how it felt with more digital art-veteran hands. Loaded it up, started sketching my default doodle-muse and wow, that “Real 2B” pencil feels great. I loved it so much, and wondered why.
That’s the story that is spawning this weird personal series of Software Surfing. I wanted to write little notes to future-me on how it felt using my favorite sketching tools in each program I have, and after the sixth one I thought it might be a good idea to check out inking, colouring, painting, etc. and writing those down as well.
So I’m writing this series for myself, but making it available in case anyone else can benefit as well. Thanks for sticking with the intro, let’s get into it.
Artist’s Software Surfing P1 - Sketching Artist’s Software Surfing P2 - Inking Artist’s Software Surfing P3 - Colouring Artist’s Software Surfing P4 - Painting
There are many ways to sketch, but this is specifically the classic “pencil” or “drawing” form using the tools with the program’s default settings.
As an introduction, this is my doodle-muse, Cloey. She was my first original character, and though I don’t usually share my anthro art on here (I know that’s not everyone’s thing) I do have a separate blog for that stuff that you can find here if you’re so inclined. If you’re familiar with Artgerm (and you should be), she’s basically my Pepper.
Corel Painter’s “Real 2B”:
The one that started it all. The pencil just GLIDES, and I’ve always loved when you can tilt a pencil tool and it will shade just like tilting a real-life pencil. The only thing I want from a program now is to be able to bind touch to blenders so I can use my finger to smudge-blend the scribbling. (I tried drawing that fist so many times /fume)
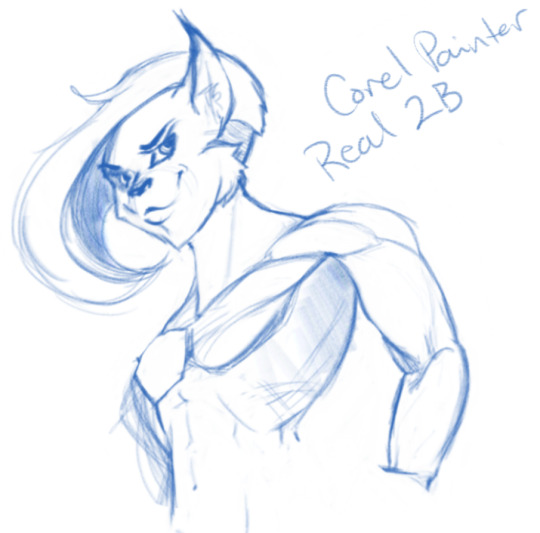
Likes: Tilt functionality, line width variance, stroke speed, eraser Dislikes: Rebinding Rotate Canvas tool was a pain. I like Shift+Space, and that key combo is reflected in the shortcut panel, but it just continued to pan. Never worked for me, and rotating or flipping the page quickly is crucial for my sketching process. Also sometimes if I quickly resize the eraser and mash it down to use, it won’t detect any input.
Photoshop, Kyle Webster’s “2B” & “Animator Pencil”:
**Disclaimer** Firstly, I’ve used Photoshop for over 15 years now, and it’s a great digital art tool, but for drawing and painting I find it’s sorely lacking. It’s slow, expensive, and unintuitive. That being said, there are some things this program does exclusive to others so I’m still clinging to it (desperately) and while I would definitely recommend something else for budding digital artists, I have to supplement my misgivings by purchasing additional plugins and tools, such as the famed Kyle T Webster’s Ultimate Megapack for Photoshop (
which is now complementary with Photoshop CC, damnit
). Unless otherwise noted, all the brushes I use in Photoshop will be from that pack. **End Disclaimer**
Following off the heels of Corel, I remembered messing around with another “2B” (which btw is my personal favorite traditional pencil to sketch with) in Kyle Webster’s Drawing Box in Photoshop. It felt a bit similar, but with no tilt functionality and it really lacked the chunky-thickness (a scientific term) I enjoyed with Painter’s pencil. I switched to my favorite (and the favorite of MANY digital artists btw) his “Animator’s Pencil”. So chunky, but the ability to shade lightly... It’s really a fun brush to use for sketching digitally. Still one of my absolute favorites.

Animator Pencil Likes: Line width variance, texture fills in and scales perfectly Dislikes: It’s a photoshop exclusive, a program that for some reason you can’t bind shortcuts to whatever you please, takes forever to load, and WAY too often suffers input lag while drawing. Also no tilt shading, :’( aw
Paintstorm’s “Textured Pencil” & “Pencil Tilt”
As a bit of an aside, I love Paintstorm, Paintstorm is what got me back into digital drawing and painting after doing 3D and game design for 7 years. I bought it for the very low price of entry (2 licenses for $30) and was impressed by its ability to customize literally anything in the program. You can create your own tool/brush boxes, bind any shortcut to any key combination, and every single brush tool adjustment comes with the most customization control of any program I’ve come across since Photoshop set the bar way back in the day. Out of the box a lot of the basic brushes have that old OpenCanvas or PaintTool Sai feel, but more recently they’ve added some very textured default brushes you can play around with. It’s also hands-down the FASTEST program I’ve ever worked in. I highly recommend giving it a try, it’s great for learning and experimentation. I grew a lot working in Paintstorm.

The Textured Pencil is a fun sketching brush, you can get as think or thick as you’d want and it keeps a clean outline. The Pencil Tilt really blew my mind the first time I used it. YOU CAN SHADE! It was the first time I had ever seen a program do that. The tilt has a great texture, fantastic control, and gets just as dark as you’d need. I’d recommend using them both, the Textured Pencil for a cleaner sketch, and the Pencil Tilt for something more expressive or loose.
Krita’s Ink-Tilt & “Sketch”:
I’ll be honest, I have almost no experience in Krita despite having downloaded and given it a try back in 2014. It was a hell of a time to figure out how to rebind my usual shortcuts (flip horz, rotate canvas). I couldn’t even rebind colour grab/eyedropper. Yikes. I opened up the “Sketching” brush box and there were only two options, made worse as one was a sketch pen... That lacked the flexibility of ballpoint.
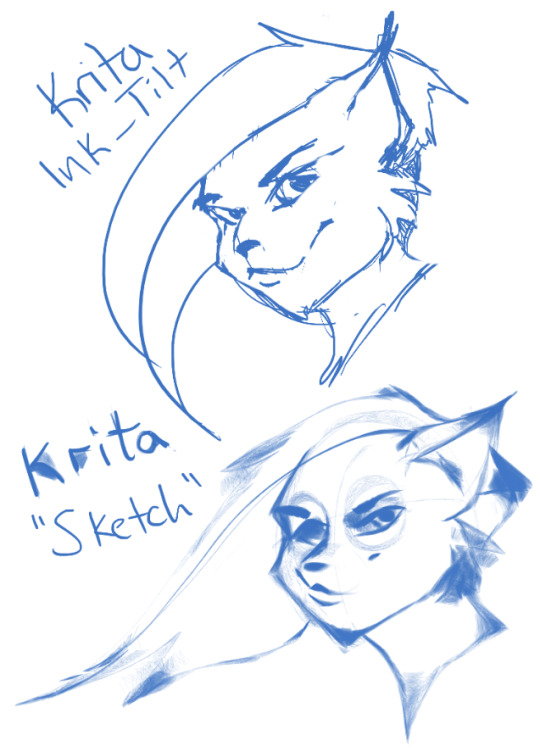
First I grabbed the pencil dubbed “Sketch” and was bewildered why the size of the circle was so large compared to the mark it made. Very confusing. Feeling intimidated, I abandoned it immediately to try out the “ink_tilt” (which by the way there’s no tilt functionality??) and hated it. I reluctantly went back to the pencil and just started trying to make marks. Wow. It’s weird, but surprisingly fun. You have to be willing to relinquish a LOT of control, but the shapes the brush makes while moving and tilting during a stroke can yield some really interesting and suggestive shapes. I would say great for early concepting or making something really loose and expressive. Fun to play with, but not really practical.
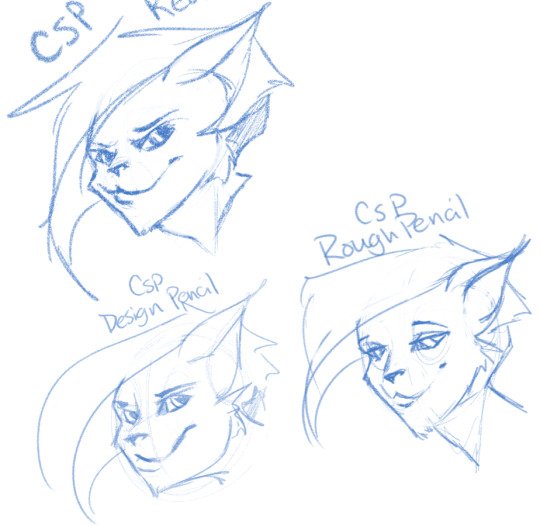
Clip Studio Paint’s Real Pencil & Rough Pencil
I’ve been wholly immersed in CSP since I purchased the program back in late 2016. It goes on sale often, so you can pick up a nice fully featured program for ~$35. I’d had my eye on it for a while and still really want to get into self-publishing comics, so I picked it up, bought a couple of brush packs for it (it’s pretty lacking in default painting tools) and I’ve been illustrating in it ever since. The brush creation isn’t as fun as Paintstorm, but brushes are quite customizable. I usually like to use the “Rough Pencil” if I want just a little texture and line variance, or the “Darker Pencil” for something cleaner. Trying to be different, I just jotted out a couple heads in ones I don’t normally use, the Real Pencil and Design Pencil. The Real Pencil has a lot of texture, but for some reason in CSP the textures don’t seem to scale with the brush, so I tend to avoid using it in most cases. I hate the design pencil, I just could never get dark enough. I guess that’s probably the point, though.
Well, that definitely wraps this digest up. I feel refreshed after trying out a lot of new digital sketching brushes. I was really reminded of how much I enjoyed drawing in Paintstorm. I hope someone other than me found this useful or otherwise inspiring! Sometimes, especially if you’re stuck in some art blockage, it’s a good idea to try something new, and for me digitally that’s hopping programs and trying new brushes.
I’m thinking about doing inks, colours, and painting at some point. Let me know if anyone’s interested in those! I’m planning on doing some for myself eventually, but I might expedite a post if anyone is interested. o/ Take it easy, y’all.
Artist’s Software Surfing P1 - Sketching Artist’s Software Surfing P2 - Inking Artist’s Software Surfing P3 - Colouring Artist’s Software Surfing P4 - Painting
6 notes
·
View notes
Text
Starting In 3D and Digital Art.
In the world of tech, VFX (Visual Effects), 3D modeling, Sculpting, Animating, Compositing and many more skills and things related to it has come so far and gotten far more improved. The number of digital artists around the world has increased by a significant amount. And as numbers increase, the expectations of each big industries raises over the top for VFX artists.
Back in the day many Visual effects artists used to rely on old potato computers for weeks and months just to get a janky render which were used to be very washed up and bland to the human eyes. But nowadays even a kid with a budget laptop can accomplish such fates into computer generated world building, that can put experienced digital artists to shame. There are many software(s) and digital platforms in today’s date where anyone can start their journey with VFX. “Cinema 4D”, “Autodesk Maya”, “Blender”, “3DS MAX”, etc are the examples of available digital platforms for beginners. Even big industries like Disney and Apple revealed that they use Autodesk MAYA as their go to 3d program. However in such esteemed companies, because of everyday increasing demands for better movies and photorealistic visuals, they have developed their own digital platforms to execute specific tasks only calculating heavy memory calculations with ease. These software(s) may not be commercial yet, but even then there’s a lot of doors open.
As a person of great enthusiasm for VFX, I looked for many 3d software(s) and ended falling in love with “Blender”.

Blender is an open source (free) software that allows the user with a very easy UI and great learning experience. It has all the features a digital artist can expect for. Being an open source software there’s always new updates coming with much improved and mind blowing features. It’s almost been a year for me, of using blender and making stuff out of scratch from my imaginations. In the beginning, I started with Blender Guru’s Donut tutorial, It took me almost 3 days to finish the whole project. And it was all worth it! There’s not any better beginner tutorial than Andrew’s Donut tutorial; there I said it. After that I followed some more of his tutorials and only I know how it feels to learn from a good teacher. Even learning online is fun and isn’t boring as such as schools make students feel.

And since then I’ve been using blender to make 3d models, computer generated worlds, etc and etc. It has been so much fun working on blender and after all this time, I cannot wait to learn more 3d programs.
1 note
·
View note
Text
the story so far
So while this might be my first writing for the project, I’ve been doing a lot of thinking, playing around with different ideas in my head with CCP in mind, and so I need to basically catch up with this. Right now, I don’t really know what my project proposal is going to be. I’ve got a few different ideas – and a general area of interest that I have identified over the last few months while working on realism and image and the page, so this is the perfect starting point for this blog which I hope to use to document the journey of the project properly. I’ve fell behind with this in every unit I have done so far at uni – and I think that’s been a big hindrance in my academic performance so far compared to how well I did on foundation. I feel like the end pieces have not been that well justified by my written work because so many parts of the decision making process get left behind somewhere and become natural parts of my thinking that usually aren’t that obvious to other people (which is especially bad given I tend to have quite disparate research sources and contextual influences). So that is my first and overriding goal with this unit – to fully focus on the blog as the ‘medium’ of the project – I really feel it’s the only way to get to grips fully with my practice which is highly centered around multi media experimentation and research.
The major thing going on in my mind coming into this project – thinking about the concept I am to tackle with the project – is one I extracted discussing my work on realism with Lee. While my immediate focus on that project was the subject matter of love, I feel that is something which was really only available to me in the work. Looking from an outside perspective, and looking back at the work myself, the really interesting thing about it is how it broke apart the ideas of photographic representation in a technical sense. As Lee said to me; “All of your work is concerned with revealing the structures behind things”. In my mind I was focused on the structures behind love and relationships in society – but that way very abstract in the final pieces. I haven’t got the grades back but I think that may be reflected negatively in the marking of the work – because the overriding thing that was deconstructed by the work I did was the way we perceive and experience photographs and images. I don’t want to talk too much about that project though because truthfully it was a nightmarish semester for me and I want to move forwards from it – but this is the genesis of the area I think I want to explore somehow.
Looking back further, this is indeed the best descriptor of my ‘artistic direction’ – I’m always concerned with the structures behind how images come into being. I think my work on photograph as object was effective (and also marked well) because that was so concrete in the final piece – it was essentially photographs turned into glass lenses digitally looking at other photographs. It was a really pure expression of my understanding of photographs at the time, and I think is some of my best work yet – and is actually going to be my first exhibited work (a refined version of it is being shown as part of a screening toured by the art critic duo The White Pube; it could potentially be shown at the ICA). My understanding of the work really came as I started to critically consider that work, and consider how that understanding of computer generated imagery and digital artworks could manifest in my practice going forward, which influenced a large amount of my technical choices for the realism unit (albeit a lot of this was subconscious and probably not written about – it was a hectic time). But that talk with Lee really kicked me into thinking about this stuff, and over recent weeks I’ve really started to think this has to be something I discuss with CCP.
A big way this thinking grew was watching the film Bladerunner. Films were perhaps my main influence growing up and were the backgrounds for my most effective work on foundation – but for practical reasons I’ve found myself majorly missing out on watching new, challenging films since being at uni. So my new year’s resolution is to watch more films, but I guess it is a goal for this project, and Bladerunner was first up on the list. There is a whole huge discussion I want to have about the film – I definitely need to re watch it and research it properly for the project, but the particular scene where he is looking at the photograph on the special magnifying machine to me is fascinating and entirely evocative of the way I am growing to understand photography as it is moving into the future. I really feel it has a lot to do with the sublime – a digital, technological sublime – and also the photographic perspective (and likely it’s connection to the ‘optical unconscious’ idea). It is also heavily centered around my understanding of fledgling photographic techniques that are going to become important very soon, especially computational photography and plenoptics and VR.
The lecture we had yesterday with Lucy Soutter – especially the second half – was the final nail in the coffin for this. She spoke about about how she has seen photography moving forwards over the last few years and straight away I was hooked when she mentioned Laurence Lek, an artist who I saw doing a live visual performance in 2014 in Liverpool who pretty much kick started my interest in 3D graphics as an artistic pursuit along with the glitch artist Mark Klink. She discussed how these kind of artists are pushing photography into a new area of ambiguity between real and artificial; with their very conservative visual nature despite their ‘artificial’ subject matter. Obviously this is hugely related to the hyperreal and the conceptuality of the lens as a tool, perspective and a whole bunch of things. She gave us some great texts to look at and I ended up having a great discussion with her afterwards, and I’m hoping to get an email from her at some point to discuss some ideas because a lot of this is truly evolving on the internet in closed groups and so on that I have somehow become pretty heavily involved with. Again though, I’m only at the beginnings of being able to articulate this stuff – but I think that is great as I will be able to show how I form a more specific brief from this area of thinking on photography.
Moving on, I want to research Bladerunner in more depth, and revisit my reading on posthumanism and cyberculture that tie into this, mostly to see where it takes me. I have been meaning to read Neuromancer by William Gibson for a long time too as it discusses many of these concepts. Also, I’m going to do some reading moving on from the texts that Lucy Soutter put me onto, again making sure I keep up with writing during this research.
I’ve also been playing around with a lot of new techniques and software recently; I’ve been playing around with Blender a lot more and trying to learn some more advanced techniques, as well as exploring some software I bumped into by way of it’s crazy online advertising, Daz 3D, which is centered around user friendly photorealistic animation of human characters. I’ve started playing around with it last night and it’s really neat but also really strange and problematic from a critical perspective, it’s definitely something I want to discuss with some experiments as I move forwards. I’m also, as an aside, working on sound a lot at the moment as I’m working on a project proposal for the fine art department’s sound group as we are working on a really neat touring exhibition at the moment. My practice tends to be pretty holistic in nature so this will no doubt have some influence on my direction with CCP, but this is something I need to develop going forwards.
1 note
·
View note
Text
A look inside 3D design: what goes into it and where its headed
When you’re looking at a photo that just looks a little bit too perfect, or a little bit beyond the range of normal—an object or a landscape that’s in uncanny valley—there’s a chance you’re not looking at a photo at all. You could be looking at a hyper-realistic 3D design like the ones Willem Stapel creates. That’s not to say 3D designers can’t create images that are indistinguishable from photographs, they can, but the magic of 3D design is the ability to push images beyond the realistic and onto a new, magical plane.
Via Willem Stapel.
To say we’re impressed with Stapel’s work would be an understatement. We’re huge fans, and when we recently got the chance to pick his brain about 3D design and his creative process, we ran with it.
Stapel got his start in 3D design while he was a graphic design student at Hogeschool voor de Kunsten in Utrecht, Netherlands. He began by playing around with 3D modeling software and says that’s all anybody with an interest in 3D design has to do to get started. It’s not the only way to learn 3D design, though. Colleges and universities all over the world offer courses in this type of design and for the less matriculation-minded, there are countless online tutorials that explain beginner and advanced techniques.
So what is 3D design all about and where is it headed? Keep reading to find out.
3D design explained
—
Via Willem Stapel.
So we’re on the same page, here’s the quick and dirty on 3D design:
You’ve seen Toy Story and other Pixar films. Those were made with 3D modeling software. 3D modeling software is the type of program that makes it possible for a designer to craft complex, detailed three-dimensional digital objects and worlds for them to inhabit. Images created with this type of software can be as realistic or as cartoony as the designer desires. For a more realistic film example of 3D modeling in action, think of Avatar.
The software provides a simulated 3D space where the designer can create objects by plugging coordinates into the program and then manipulating the shapes their coordinates create. If this sounds like geometry class to you, that’s because it kinda is—3D modeling is a blend of geometry and design visually represent the images specific coordinates map out. Often, designs start as basic polygons that designers refine into complex shapes using the tools available in their chosen software, like tools that create spline curves and tools for crafting non-rational b-splines (NURBS).
Different 3D modeling programs offer different tools, and some are better suited to designers with specific styles and design applications than others. According to Stapel, “CAD is usually used for things that are more industrial, like architectural or industrial designs. 3D meshes are usually a bit more free form, but can also be something very technical.”
A few popular 3D modeling programs include:
AutoCad
Blender
SketchUp
Zbrush
Stapel’s program of choice is Cinema 4D supplemented with a few plug-ins and side programs.
“3D design is still in an experimental space”
—
Via Willem Stapel.
Which means anything is possible. In his work, Stapel plays with bold colors and lighting choices while incorporating inspiration he finds in classical compositions and ancient art themes.
Right now, 3D design is more popular in commercial art than you probably realize. Car companies use 3D modeling in commercials regularly because it’s cheaper, easier, and when a commercial calls for extreme driving, safer than having an actual driver model the car’s capabilities.
“It could eventually replace a lot of photography, which it is already starting to do,” Stapel says. “If you look around in commercial and artistic fields there’s loads of 3D work cropping up.”
You’ll notice a lot of Stapel’s work involves furniture designs. Functionality is one of the hallmarks of 3D design: you can use it to render models of products in development and hash out ideas to see how a piece can work in a space. Also, one common practical use for 3D modeling is studying car accidents by recreating them in digital worlds.
Where is 3D design headed?
—
Via Willem Stapel.
People want to realize hyperrealistic aesthetics. To create impossible sceneries and make them reality.
- Willem Stapel
Stapel predicts a big change coming as more and more people discover what you can do with 3D design. “The first tendency of everyone in the art space seemed to be gimmicky ‘post-internet’ imagery but now you see that people want to realize hyperrealistic aesthetics. To create impossible sceneries and make them reality. Trends I personally really enjoy are photorealism in extreme ways, more complex implementation of 3D scanning techniques, and applying these innovative techniques in new ways and contexts,” he says.
There’s a huge element of functionality that transcends the ‘design’ appeal. 3D design can be used to actually make things, to create things efficiently that in the past might have been difficult to create.
Probably one of the coolest ways people are using 3D design is using it to make things, like how designer and inventor Markus Kayser created a solar-powered 3D printer that can turn desert sand into glass objects. Functional 3D design has applications in many different fields, and as Stapel says, “beyond having a place in the arts, there’s application to the health sector, industrially, and hopefully for environmental purposes eventually.” Exciting things lie ahead in the world of 3D design.
Finding inspiration for 3D design
—
Via Willem Stapel.
Although having formal design training never hurts, Stapel explains that he doesn’t think it’s a necessity for a successful 3D designer. What matters is to follow inspiration and to develop a vision. “Some people focus intensely on the technique and are extremely talented in that aspect, while others specialize in the making of a picture as expression of their artistry. I have a graphic design background and was interested in the history of the arts, which I wanted to combine and translate through contemporary techniques,” he says.
Personally, Stapel looks to classical designs for inspiration for his work. “I enjoy the themes being used since they’re always ancient stories, narratives, and themes which really lend themselves to contemporary reimagination. On a granular level, there’s something to the color schemes, the classical compositions, lighting, the materials”.
I enjoy making sceneries that look like someone has just been there.
- Willem Stapel
“I started with 3D by making imagery inspired by themes in ancient art, all reinvisioned with the help of 3D scans and 3D objects. This is still a big influence on my work. I enjoy making sceneries that look like someone has just been there. To also add the things that makes something real, the stains on a glass or a little rust on metal.”
Lately, Stapel’s been riffing on a post-human vibe in his work. By combining modernistic buildings with more classic designs and robotic objects, he creates surrealistic images.
Professionally, he aims for simplicity. You’ll see this in his website—the images define his brand and make it easy to know immediately what the viewer’s in for. As he sums it up, “let the aesthetic of the work speak for itself and translate into a visual identity.”
Via ManvsMachine for Squarespace.
Even a successful designer like Stapel has industry heroes they look toward and aspire to be more like. When we asked him who he looks up to, he responded, “there’s a couple of established companies and agencies who create beautiful commercial stuff like ManvsMachine (London & Los Angeles), Builder’s Club (London), and CATK (Berlin). I’m quite a big fan of the work of Frederik Heyman, whose work is a sort of post-apocalyptic renaissance by animating stills captures from 3D scanning.”
Stapel strives to strike a balance between his commercial work and his personal art. “I have more ideas than I have time to execute,” he says, “but it’s important to me to continue developing as an artist.”
How designers can get started in this field
—
Like Stapel said, all you really have to do to get started with 3D design is get on a computer and start playing around with rendering software. But playing around will only take you so far. 3D design has a bit of a steep learning curve, and to those who are serious about becoming 3D designers, Stapel recommends the following:
Learn how to do this and much more via GreyscaleGorilla.
“There’s a lot to be found on Youtube, or if you have a certain problem there’s always Google, as obvious as that seems. I think I started out with the tutorials from greyscalegorilla, who teach a lot about the basics of the program. There’s also amazing tutorials from the ENTAGMA, but those are all for Houdini, which is a more advanced 3D software.”
Achieving professional success as a 3D designer
—
Getting good at design is only one part of becoming a professional success. The other half is finding clients who’ll pay a fair price for your work and maintaining a steady workflow.
According to Stapel, a designer’s portfolio is key to landing and securing work: “In art school you learn not only to discover but also to develop your own style into something that works commercially and artistically. It’s subtle things like color palettes, lighting and mood, use of material, et cetera. It takes work to get work, and I’m lucky to have people approach me because of the portfolio I’ve built for myself. It’s a huge advantage to work with clients who are drawn to your established style, so emphasis on the portfolio is key.”
Technique is part, but not all, of building a strong portfolio. “I think figuring out what technique works best for you without being a slave to the technique. Let the technique work for you. But that’s true outside of design: painting with perfect technique doesn’t necessarily make you a good artist.”
Whether it’s worthwhile to do unpaid work for exposure is a controversial topic among creatives. For Stapel, it paid off. “I started to get commercial jobs because of the unpaid or autonomous work I already did. The commercial work gave me more insight on techniques and certain new-to-me aspects on how to create something beautiful, really broadening my horizon.”
Living and working as a 3D designer
—
Becoming a freelance 3D designer may be a challenge, but it offers amazing opportunities. “I love working with a broad variety of people, being able to create things that I love, and being my own boss,” Stapel says, reflecting on the freedom he has to travel and work from anywhere as a freelancer and the variety of clients he’s exposed to in this position. “It’s a wonderful life, to be honest.”
3D design is everywhere, and as a 3D designer, Stapel works primarily with photographers. As for the industries he’s designed for, everything goes. 3D design can be as technical or as freeform as a designer needs it to be.
Discover the magic of 3D design
—
What Stapel wishes more people understood about 3D design is how satisfying it can be for a creator. “It’s honestly pretty magical,” he says. “Every time I push the render button it’s a bit of a surprise what will come out. It’s extremely satisfying to create something that looks really realistic but is completely fabricated.”
The world of 3D design holds vast potential for designers and brands alike. Whether it’s hyperrealistic objects or surreal landscapes, anything is possible. What will you do with it?
Want to see more amazing 3D designs by professional designers?
Right this way.
Let's go!
The post A look inside 3D design: what goes into it and where it’s headed appeared first on 99designs.
via 99designs https://99designs.co.uk/blog/design-history-movements-en-gb/a-look-inside-3d-design-what-goes-into-it-and-where-its-headed/
0 notes
Text
A look inside 3D design: what goes into it and where it’s headed
When you’re looking at a photo that just looks a little bit too perfect, or a little bit beyond the range of normal—an object or a landscape that’s in uncanny valley—there’s a chance you’re not looking at a photo at all. You could be looking at a hyper-realistic 3D design like the ones Willem Stapel creates. That’s not to say 3D designers can’t create images that are indistinguishable from photographs, they can, but the magic of 3D design is the ability to push images beyond the realistic and onto a new, magical plane.
Via Willem Stapel.
To say we’re impressed with Stapel’s work would be an understatement. We’re huge fans, and when we recently got the chance to pick his brain about 3D design and his creative process, we ran with it.
Stapel got his start in 3D design while he was a graphic design student at Hogeschool voor de Kunsten in Utrecht, Netherlands. He began by playing around with 3D modeling software and says that’s all anybody with an interest in 3D design has to do to get started. It’s not the only way to learn 3D design, though. Colleges and universities all over the world offer courses in this type of design and for the less matriculation-minded, there are countless online tutorials that explain beginner and advanced techniques.
So what is 3D design all about and where is it headed? Keep reading to find out.
3D design explained
—
Via Willem Stapel.
So we’re on the same page, here’s the quick and dirty on 3D design:
You’ve seen Toy Story and other Pixar films. Those were made with 3D modeling software. 3D modeling software is the type of program that makes it possible for a designer to craft complex, detailed three-dimensional digital objects and worlds for them to inhabit. Images created with this type of software can be as realistic or as cartoony as the designer desires. For a more realistic film example of 3D modeling in action, think of Avatar.
The software provides a simulated 3D space where the designer can create objects by plugging coordinates into the program and then manipulating the shapes their coordinates create. If this sounds like geometry class to you, that’s because it kinda is—3D modeling is a blend of geometry and design visually represent the images specific coordinates map out. Often, designs start as basic polygons that designers refine into complex shapes using the tools available in their chosen software, like tools that create spline curves and tools for crafting non-rational b-splines (NURBS).
Different 3D modeling programs offer different tools, and some are better suited to designers with specific styles and design applications than others. According to Stapel, “CAD is usually used for things that are more industrial, like architectural or industrial designs. 3D meshes are usually a bit more free form, but can also be something very technical.”
A few popular 3D modeling programs include:
AutoCad
Blender
SketchUp
Zbrush
Stapel’s program of choice is Cinema 4D supplemented with a few plug-ins and side programs.
“3D design is still in an experimental space”
—
Via Willem Stapel.
Which means anything is possible. In his work, Stapel plays with bold colors and lighting choices while incorporating inspiration he finds in classical compositions and ancient art themes.
Right now, 3D design is more popular in commercial art than you probably realize. Car companies use 3D modeling in commercials regularly because it’s cheaper, easier, and when a commercial calls for extreme driving, safer than having an actual driver model the car’s capabilities.
“It could eventually replace a lot of photography, which it is already starting to do,” Stapel says. “If you look around in commercial and artistic fields there’s loads of 3D work cropping up.”
You’ll notice a lot of Stapel’s work involves furniture designs. Functionality is one of the hallmarks of 3D design: you can use it to render models of products in development and hash out ideas to see how a piece can work in a space. Also, one common practical use for 3D modeling is studying car accidents by recreating them in digital worlds.
Where is 3D design headed?
—
Via Willem Stapel.
People want to realize hyperrealistic aesthetics. To create impossible sceneries and make them reality.
- Willem Stapel
Stapel predicts a big change coming as more and more people discover what you can do with 3D design. “The first tendency of everyone in the art space seemed to be gimmicky ‘post-internet’ imagery but now you see that people want to realize hyperrealistic aesthetics. To create impossible sceneries and make them reality. Trends I personally really enjoy are photorealism in extreme ways, more complex implementation of 3D scanning techniques, and applying these innovative techniques in new ways and contexts,” he says.
There’s a huge element of functionality that transcends the ‘design’ appeal. 3D design can be used to actually make things, to create things efficiently that in the past might have been difficult to create.
Probably one of the coolest ways people are using 3D design is using it to make things, like how designer and inventor Markus Kayser created a solar-powered 3D printer that can turn desert sand into glass objects. Functional 3D design has applications in many different fields, and as Stapel says, “beyond having a place in the arts, there’s application to the health sector, industrially, and hopefully for environmental purposes eventually.” Exciting things lie ahead in the world of 3D design.
Finding inspiration for 3D design
—
Via Willem Stapel.
Although having formal design training never hurts, Stapel explains that he doesn’t think it’s a necessity for a successful 3D designer. What matters is to follow inspiration and to develop a vision. “Some people focus intensely on the technique and are extremely talented in that aspect, while others specialize in the making of a picture as expression of their artistry. I have a graphic design background and was interested in the history of the arts, which I wanted to combine and translate through contemporary techniques,” he says.
Personally, Stapel looks to classical designs for inspiration for his work. “I enjoy the themes being used since they’re always ancient stories, narratives, and themes which really lend themselves to contemporary reimagination. On a granular level, there’s something to the color schemes, the classical compositions, lighting, the materials”.
I enjoy making sceneries that look like someone has just been there.
- Willem Stapel
“I started with 3D by making imagery inspired by themes in ancient art, all reinvisioned with the help of 3D scans and 3D objects. This is still a big influence on my work. I enjoy making sceneries that look like someone has just been there. To also add the things that makes something real, the stains on a glass or a little rust on metal.”
Lately, Stapel’s been riffing on a post-human vibe in his work. By combining modernistic buildings with more classic designs and robotic objects, he creates surrealistic images.
Professionally, he aims for simplicity. You’ll see this in his website—the images define his brand and make it easy to know immediately what the viewer’s in for. As he sums it up, “let the aesthetic of the work speak for itself and translate into a visual identity.”
Via ManvsMachine for Squarespace.
Even a successful designer like Stapel has industry heroes they look toward and aspire to be more like. When we asked him who he looks up to, he responded, “there’s a couple of established companies and agencies who create beautiful commercial stuff like ManvsMachine (London & Los Angeles), Builder’s Club (London), and CATK (Berlin). I’m quite a big fan of the work of Frederik Heyman, whose work is a sort of post-apocalyptic renaissance by animating stills captures from 3D scanning.”
Stapel strives to strike a balance between his commercial work and his personal art. “I have more ideas than I have time to execute,” he says, “but it’s important to me to continue developing as an artist.”
How designers can get started in this field
—
Like Stapel said, all you really have to do to get started with 3D design is get on a computer and start playing around with rendering software. But playing around will only take you so far. 3D design has a bit of a steep learning curve, and to those who are serious about becoming 3D designers, Stapel recommends the following:
Learn how to do this and much more via GreyscaleGorilla.
“There’s a lot to be found on Youtube, or if you have a certain problem there’s always Google, as obvious as that seems. I think I started out with the tutorials from greyscalegorilla, who teach a lot about the basics of the program. There’s also amazing tutorials from the ENTAGMA, but those are all for Houdini, which is a more advanced 3D software.”
Achieving professional success as a 3D designer
—
Getting good at design is only one part of becoming a professional success. The other half is finding clients who’ll pay a fair price for your work and maintaining a steady workflow.
According to Stapel, a designer’s portfolio is key to landing and securing work: “In art school you learn not only to discover but also to develop your own style into something that works commercially and artistically. It’s subtle things like color palettes, lighting and mood, use of material, et cetera. It takes work to get work, and I’m lucky to have people approach me because of the portfolio I’ve built for myself. It’s a huge advantage to work with clients who are drawn to your established style, so emphasis on the portfolio is key.”
Technique is part, but not all, of building a strong portfolio. “I think figuring out what technique works best for you without being a slave to the technique. Let the technique work for you. But that’s true outside of design: painting with perfect technique doesn’t necessarily make you a good artist.”
Whether it’s worthwhile to do unpaid work for exposure is a controversial topic among creatives. For Stapel, it paid off. “I started to get commercial jobs because of the unpaid or autonomous work I already did. The commercial work gave me more insight on techniques and certain new-to-me aspects on how to create something beautiful, really broadening my horizon.”
Living and working as a 3D designer
—
Becoming a freelance 3D designer may be a challenge, but it offers amazing opportunities. “I love working with a broad variety of people, being able to create things that I love, and being my own boss,” Stapel says, reflecting on the freedom he has to travel and work from anywhere as a freelancer and the variety of clients he’s exposed to in this position. “It’s a wonderful life, to be honest.”
3D design is everywhere, and as a 3D designer, Stapel works primarily with photographers. As for the industries he’s designed for, everything goes. 3D design can be as technical or as freeform as a designer needs it to be.
Discover the magic of 3D design
—
What Stapel wishes more people understood about 3D design is how satisfying it can be for a creator. “It’s honestly pretty magical,” he says. “Every time I push the render button it’s a bit of a surprise what will come out. It’s extremely satisfying to create something that looks really realistic but is completely fabricated.”
The world of 3D design holds vast potential for designers and brands alike. Whether it’s hyperrealistic objects or surreal landscapes, anything is possible. What will you do with it?
Want to see more amazing 3D designs by professional designers?
Right this way.
Let’s go!
The post A look inside 3D design: what goes into it and where it’s headed appeared first on 99designs.
A look inside 3D design: what goes into it and where it’s headed published first on https://www.lilpackaging.com/
0 notes