#lora arduino library
Explore tagged Tumblr posts
Visit Tumblr Blog
Explore Tumblr blogs with no restrictions, modern design and the best experience.
Last Seen Tumblr Blogs


Fun Fact
The “We are the 99%” Tumblr blog became the slogan for the Occupy Wall Street movement.
Text
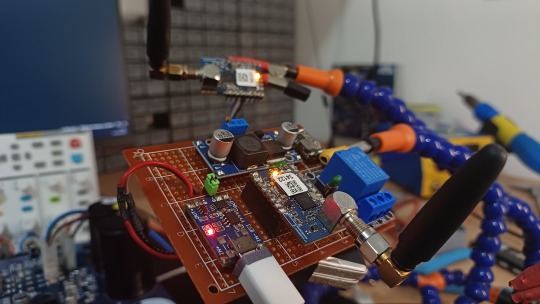
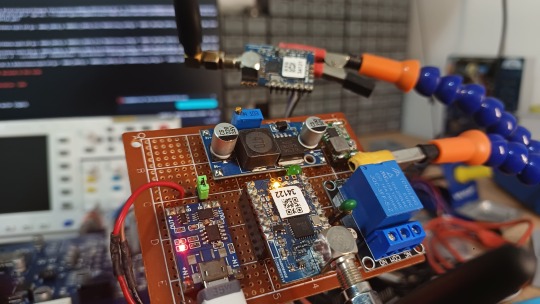
Transferência de Arquivos via LoRa
Um projeto que venho fazendo há alguns meses e que muitas pessoas estavam interessadas em transmitir imagens e agora será possível, mas claro, respeitando as limitações.
Transferência da arquivos via LoRa é possível assim como qualquer outra modulação, mas existem desafios particulares nessa tarefa que em outras modulações podem ser mais fáceis. Sobre a modulação LoRa Antes mesmo de partimos para a transferência de arquivos via LoRa, é preciso entender que o LoRa não foi feito para esse tipo de aplicação e sim para dispositivos IoT, mesmo embora tenha uma taxa…

View On WordPress
#arduino lora antenna#biblioteca lora arduino#esp32 lora arduino#esp32 lora arduino library#lora and arduino#lora arduino#lora arduino adafruit#lora arduino board#lora arduino example#lora arduino library#lora arduino projects#lora transmitter and receiver arduino#module lora arduino#multiple lora arduino#rfm9x lora arduino
0 notes
Text
How do you handle water meter reading using Lora (Raspberry Pi, Arduino, Lorawan, IoT)?
Install a LoRaWAN Gateway: Begin by setting up a LoRaWAN gateway. This gateway acts as a receiver for data transmitted by LoRaWAN devices and forwards it to the network server. It connects to the internet and communicates with LoRaWAN devices within its coverage area.
Attach LoRaWAN Modules to Water Meters: Next, equip your water meters with LoRaWAN modules or sensors. These modules are responsible for gathering important data, such as water consumption readings, from the meters.
Develop Firmware/Software: Program your Raspberry Pi or Arduino device to collect data from the water meters through the LoRaWAN modules. This programming may involve utilizing the LoRaWAN library or SDK provided by the module manufacturer.
Set Up a LoRaWAN Network Server: Install and configure a LoRaWAN network server. This server will receive and handle data from the water meters. Its functions include managing device registrations, routing messages, and storing data.
Ensure Secure Data Transmission and Encryption: Utilize LoRaWAN protocols to securely transmit the water meter readings from your Raspberry Pi or Arduino to the network server. LoRaWAN uses AES encryption to safeguard data privacy during transmission.
Data Processing and Storage: Once the network server receives the data, process it as needed. Extract the relevant water consumption readings and conduct any necessary calculations or validations. Store the data in a database or another suitable storage system.
Integration and Visualization: To make sense of the data, integrate it with your chosen IoT platform or application. This integration allows for further analysis and visualization. Consider creating a web-based dashboard or a mobile app to present the water consumption data in a user-friendly and informative manner.
It's important to keep in mind that the specific steps and details of implementation may vary based on the hardware and software components you select and any unique requirements associated with your water meter system. Adapt the above steps as necessary to align with your specific setup and development environment.
0 notes
Text
Industrial IoT Devices | Programmable Ethernet IoT Device | Industrial ESP32 | NORVI
Ready for the Future - NORVI IIOT
Programmable IoT Devices - Our Arduino based PLC s make it easy to automate processes, connect sensors, and create sophisticated automation systems. Get the most out of your IoT projects with programmable ESP32 Ethernet device. Our MQTT end device is designed to be easy to setup, while providing powerful performance.
Industrial Arduino Mega - Get reliable, secure, and customizable control of your industrial processes with Arduino Mega PLCs. Get the best out of your system. Industrial Arduino for Automation Applications which control industrial processes with Arduino based hardware and software. Programmable with Arduino IDE.
Modbus MQTT Device - NORVI Agent Industrial IoT Node. Ready to use IoT Node. Ready for industrial applications. WiFi LoRa NB-IoT. Wall mount IoT node is designed for industrial applications and boasts a range of features including WiFi, GSM, LTE and LoRa connectivity. Battery Powered IoT node with WiFi GSM LTE LoRa connectivity for industrial applications. Our programmable nodes are designed for powering your IoT solutions.
ModBus RTU ESP32 - MODBUS Communication on ESP32 NORVI IIOT via RS-485. ModBus RTU with ESP32 based industrial controller. MQTT over Ethernet devices - Norvi offers programmable MQTT devices come with a variety of features that make them suitable for industrial automation and IoT solutions. As a leading industrial IoT device manufacturer, NORVI Offers Industrial Controllers for IoT applications, ESP32 based Industrial Controllers, Industrial IoT Devices. Changing IOT One Device At A Time (4 - 20mA, 0 - 10V DC Analog inputs and Outputs). Programmable controllers with flexibility and open source software.
ESP32 Data Logger - NORVI can build a WiFi Data Logger using SD card, Combining few libraries of Arduino you can access or view the Temperature & Humidity via WiFi. NORVI's Analog Input ESP32 is designed for industrial applications, allowing you to measure and monitor 0-10V or 4-20mA signals using an ESP32 controller.
NORVI Controllers
Our Address :
ICONIC DEVICES PVT LTD
Phone : +94 41 226 1776 Phone : +94 77 111 1776
E-mail : [email protected] / [email protected]
Web : www.icd.lk
Distributors
USA
Harnesses Motion LLC
1660 Bramble Rd. Tecumseh, MI
49286, United States
Phone : +1 (734) 347-9115
E-mail : [email protected]
EUROPE
CarTFT.com e.K.
Hauffstraße 7
72762 Reutlingen
Deutschland
Phone : +49 7121 3878264
E-mail : [email protected]
Products :
ESP32 Ethernet Device
Industrial Arduino Mega
ESP32 Modbus device
Programmable sensor node
Battery Powered Programmable Sensor node
4 - 20mA ESP32
Know More About:
WiFi Datalogger
4 - 20mA Arduino device
Industrial IoT Devices
Modbus MQTT gateway
Arduino based Industrial Controller
#Programmable IoT Devices#Industrial IoT Devices#Industrial Arduino#Arduino PLC#ESP32 Ethernet Device#Programmable Ethernet IoT Device#MQTT End Device#Industrial Arduino Mega#Arduino Mega PLC#Arduino based Industrial Controller#Programmable MQTT Device#Modbus MQTT Device#ESP32 Modbus device#Wall mount IoT Node#Wall mount sensor node#Programmable sensor node#Wireless sensor#Battery Powered IoT Node#Battery Powered Programmable Sensor node#Solar powered sensor node#MODBUS RTU ESP32#Modbus to IoT gateway#Modbus MQTT gateway#Programmable MQTT devices#MQTT over WIFI devices#MQTT over Ethernet devices#Industrial IoT device manufacturer#0 - 10V Arduino device#4 - 20mA Arduino device#ESP32 data logger
0 notes
Text
Learn Arduino with “Arduino Workshop, 2nd Edition: A Hands-on Introduction with 65 Projects”
After eight years and much feedback from various readers, I’m proud to offer the second edition of my first book “Arduino Workshop”, from No Starch Press. This is a revised update to this very popular book which is aimed at any person who wants to make electronic devices using the Arduino platform – but has no experience in electronics, programming or microcontrollers.
The reader doesn’t need to buy or read any other book first to get started, from the beginning they are introduced to the basic concepts, required software installation and then introduced to various topics from blinking an LED to controlling devices remotely via a cellular phone.
Contents include:
Chapter 1: Getting Started Chapter 2: Exploring the Arduino Board and the IDE Chapter 3: First Steps Chapter 4: Building Blocks Chapter 5: Working with Functions Chapter 6: Numbers, Variables, and Arithmetic Chapter 7: Expanding Your Arduino Chapter 8: LED Numeric Displays and Matrices Chapter 9: Liquid Crystal Displays Chapter 10: Creating your own Arduino Libraries Chapter 11: Numeric Keypads Chapter 12: Accepting User Input with Touchscreens Chapter 13: Meet the Arduino Family Chapter 14: Motors and Movement Chapter 15: Using GPS with Your Arduino Chapter 16: Wireless Data Chapter 17: Infrared Remote Control Chapter 18: Reading RFID Tags Chapter 19: Data Buses Chapter 20: Real-time Clocks Chapter 21: The Internet Chapter 22: Cellular Communications
You can also review the entire book index from here.
Once the reader has progressed through “Arduino Workshop”, I have found that many people use it as a reference guide for various topics, and saves them time and effort. Instead of searching randomly for various videos, web pages or whatnot – this book offers solid, tried-and-tested information that can be relied on without worry.
Readers of the first edition will also be introduced to new chapters in this edition, such as learning how to create your own Arduino libraries, introduction to the new v2.0 IDE, using new types of LED displays, remote control of devices with LoRA wireless shields, an updated cellular chapter that uses contemporary 3G wireless, and more.


The book is printed using a convenient lie-flat technology, so you can have the book open to your side and not worry about the pages flapping about and losing your position while working on your projects. All the required code (or Arduino “sketches”) are included in the book, however you can also download them along with a list of parts and supplier information from the book’s website.
The Arduino platform in my opinion is still the easiest and most approachable way of learning about electronics and microcontrollers, and opens up a whole new world of creativity or even the pathway to a career in technology, and a copy of “Arduino Workshop” is the best guide to this world.
You can learn more about the book and order from the No Starch Press online store, amazon, kindle, or your preferred bookseller. Orders from No Starch Press also include a free electronic copy so you can get started immediately.
And whatever you do, have fun and make something!
Learn Arduino with “Arduino Workshop, 2nd Edition: A Hands-on Introduction with 65 Projects” was originally published on PlanetArduino
0 notes
Text
Hardware solutions for Eclipse IOT Challenge: Exploring LoRa/LoRaWAN
The Eclipse IOT challenge lead me to research more in depth different technologies both from the hardware and the software aspect. As part of product development and delivery one has to come up with the solution for a problem. In this case the problem is parking in urban areas, or the lack of smarter parking solutions. Such implementation would not only allow end users to have a better parking experience while saving time in finding an adequate spots but also provides the city with valuable data to be used for city planning and city improvement projects.
Once the issue is identified, it was important to find a technical solution that would align with our needs. For city implementations, given the broad area that needs to be covered, we would need a type of communication that is long range and low cost, both in cost of sending data and power consumption. I first tackled the hardware needs once the design was evaluated. The prototype for a smart city solution needs to also be scalable while adding the least overhead in cost and infrastructure needed.
In this article I will go more in depth on the research done to identify one of the key components of the project. I will share a summary of my findings in hopes of helping others that are also exploring similar solutions.
Evaluating communication solutions:
I evaluated BLE, bluetooth, cellular, satellite, Wi-Fi, SigFox, Zigbee and Lora. Bluetooth and Wi-Fi, given its range limitation and cost were not considered for this prototype. Cellular communications have a higher cost as well, and at even steeper price comes satellite communication; both this options were also discarded. SigFox and LoRa/LoraWAN were the runner up candidates. I came across a comprehensive post on the comparison of SigFox and LoRa that is worth the read https://www.link-labs.com/blog/sigfox-vs-lora . The winner was LoRa.
Why Lora?
As explained by Libelium on http://www.libelium.com/development/waspmote/documentation/lora-vs-lorawan/ LoRa contains only the link layer protocol and is perfect to be used in P2P communications between nodes. LoRa modules are a little cheaper that the LoRaWAN ones.. LoRaWAN includes the network layer too so it is possible to send the information to any Base Station already connected to a Cloud platform. LoRaWAN modules may work in different frequencies by just connecting the right antenna to its socket..
LoRa which stands for long range wireless operates at a low bandwidth, meaning that its best application is for sending smaller pieces of data such as sensor data. LoRaWAN is known for its good penetration and long coverage which has been recorded to reach over 10 KM distance. LoRaWAN operates on unlicensed bands, so in most countries is legal to have you own LoRaWAN gateway cutting down the cost given that you will not have to pay a carrier or third party to supply you with the service.
Additionally a selling point for me personally was the wide accessibility to various developer platforms and hardware solutions such as DIY LoRa kits, libraries and Arduino compatible LoRa modules. The Things Network offers a strong platform with access to resources, documentation and a great community of IOT LoRa enthusiast.

Gateway
Lets take a look at one of the hardware pieces now. “Gateways form the bridge between devices and The Things Network. Devices use low power networks like LoRaWAN to connect to the Gateway, while the Gateway uses high bandwidth networks like WiFi, Ethernet or Cellular to connect to The Things Network. Gateways are routers equipped with a LoRa concentrator, allowing them to receive LoRa packets”(see more at https://www.thethingsnetwork.org/docs/gateways/). Below is a list of some gateways that were evaluated for this project. I spent time looking at their platform flexibility, the documentation and support provided and what would be the most cost effective solution for a minimum viable product (MVP).
Lorixone
https://lorixone.io/
LORIX One is the first low cost gateway designed and assembled in Switzerland. Its technical specifications include Runx Linux Yocto 4.X SX1301 gateway chip SPI based 8 channels, 49 demodulators @ 868MHz
Lorixone counts with great documentation accessible at https://www.thethingsnetwork.org/labs/story/install-awesome-lorix-one-gateway

Kerlink
Details at https://www.kerlink.com/iot-solutions-services/IoT%20LoRaWan%20Solutions/
Wirnet iBTS is a range of modular and upgradeable gateways designed for IoT public operators. It can be upgraded up to 64 LoRa™ channels to offer an answer to massive messages supporting. I was unable to identify the price point for this gateway.
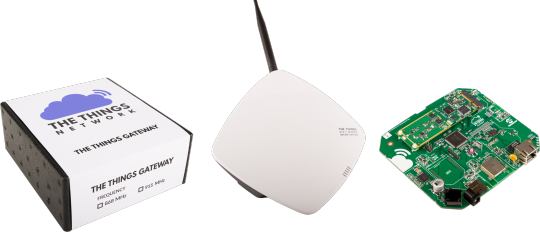
The Things Gateway
Details at https://www.thethingsnetwork.org/docs/gateways/gateway/
Retails: € 300.00 € 280.00 (ex VAT)
Originally started as a Kikstarter campaign viewable at https://www.kickstarter.com/projects/419277966/the-things-network it provides 10 km / 6 miles radius of network coverage, it can server thousands of nodes and its an straight forward to set up. It counts with ample documentation and a strong community.
Technical specifications:
Fastest way to get started with LoRaWAN (Long Range WAN)
Set up your own LoRaWAN network in as little as 5 minutes
Connects easily to your WiFi or Ethernet connection
Wireless range of up to 10 km (6 miles)
Engage with a global community of IoT developers
Easy cloud integration with popular IoT platforms
Based on open source hardware and software standards
Devices can freely communicate over all gateways connected to The Things Network
XBEE slot for future connectivity protocols or homebrew add-ons.
Security through the https connection and embedded in the LoRaWAN protocol
Can serve thousands of nodes (depending on traffic)
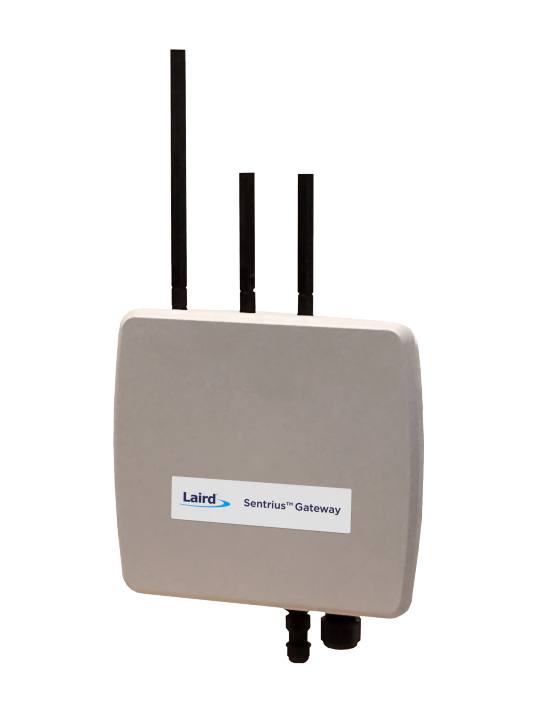
Laird — RG1xx
Details at: https://www.lairdtech.com/products/rg1xx-lora-gateway
Retail 400+ US dollars
This gateway counts with a dual-band Wi-Fi, BT v4.0 (BLE and Classic) and wired Ethernet; LoRa range up to 10 miles and pre-loaded LoRa Packet Forwarder software
Technical specifications:
Full Linux operating system — Kernel v4.x running on Atmel A5 Core @ 536 MHz
Multiple interfaces such as LoRaWAN, 802.11a/b/g/n, Bluetooth v4.0, and Ethernet
8-Channel LoRaWAN support with up to +27dBM max transmit power
Comprehensive Certifications for FCC / IC (RG191) and CE (RG186) (all pending)
Industrial temperature range (-30º to 70º C)
Advanced deployment tools including intuitive web-based configuration, integrated LoRa packet forwarder, and default settings for multiple LoRaWAN Network Server vendors
Enterprise-grade security built on Laird’s years of experience in wireless
Industry-leading support works directly with Laird engineers to help deploy your design
LoRa Network Server pre-sets — The Things Network, Loriot, Stream and Senet
Multitech
Developer resource http://www.multitech.net/developer/products/multiconnect-conduit-platform/
Retail 675–685 US dollars
Breakdown: base gateway MTCDT-H5–210L-US-EU-GB https://www.digikey.com/product-detail/en/multi-tech-systems-inc/MTCDT-H5-210L-US-EU-GB/881-1236-ND/5246365() $490, antenna (https://www.digikey.com/product-detail/en/multi-tech-systems-inc/AN868-915A-10HRA/881-1242-ND/5246371) $13, LoRa module MTAC-LORA-915 (https://www.digikey.com/product-detail/en/multi-tech-systems-inc/MTAC-LORA-915/881-1239-ND/5246368) $180
The MultiConnect® Conduit™ is a configurable, scalable cellular communications gateway for industrial IoT applications. Conduit allows users to plug in two MultiConnect mCard™ accessory cards supporting wired or wireless interfaces. It counts with open source Linux development, wwo mcard slots, Lora 8 channel receiver, Spred spectrum frequency hopping that is ued to Up to 10 miles line of sight. MultiConnect has done a great job with its documentation and it counts with its own platform that can be used as well.

Lorrier LR2
Details at: https://lorrier.com/#introducing-lr2
Developer resource: https://github.com/lorriercom
Retail €615.00 €755.00
Based on LoRaWAN™ protocol. This is a fully outdoor device intended to establish a wide coverage network by telecommunications operators and local network by individuals or IoT connectivity service providers. The whole solution, including both HW and SW parts, follows the Lorrier culture, and it is shared as an Open Source.
The gateway is based on iC880a LoRaWAN™ concentrator by IMST which uses Semtech SX1301 base band processor designed for use with LoRa® networks. BeagleBone Green with 1GHz (2000 MIPS) processor and fully operational on fast SPI bus was chosen as a powerful control unit.

LoRa/LoRaWAN Gateway — 915MHz for Raspberry Pi 3
Details at https://www.seeedstudio.com/LoRa%2FLoRaWAN-Gateway-915MHz-for-Raspberry-Pi-3-p-2821.html
Retails 289.00 US dollars
If you want to build you own LoRa network, there are 3 things that you should prepare to get started: a Gateway, at least one Node and a local server where you can monitor all your devices. This kit provides a gateway & local server that allows you to collect and transfer data among all your LoRa nodes. By connecting the gateway with Seeeduino LoRaWAN and Grove modules, you can build your IOT prototype within minutes.
Regarding the gateway module RHF0M301, it is a 10 channel(8 x Multi-SF + 1 x Standard LoRa + 1 x FSK) LoRaWan gateway moduel with a 24pin DIP port on board, users can easily connect the RHF0M301 with PRI 2 bridge RHF4T002, adapter for Raspberry Pi 3 and RHF0M301.

RisingHF gateway
Details at http://www.risinghf.com/product/rhf0m301/?lang=en
I have seen this solution mentioned and used across the LoRaWAN community. Its technical specs are RHF0M301 is a 10 channels (8 x Multi-SF + 1 x Standard LoRa + 1 x FSK) LoRa/LoRaWAN gateway or concentrator module. The module is integrated one 24 pins DIP hearder, with this header user could connect RHF0M301 with his own embedded platform to build a customized gateway easily.
LG01 LoRa OpenWrt IoT Gateway by Dragino Tech
Details at https://www.tindie.com/products/edwin/lg01-lora-openwrt-iot-gateway/?pt=ac_prod_search
Retails 56.00 US dollars
This gateway is a long distance wireless 433/868/915Mhz, OpenWrt, LoRa IoT Gateway
The LG01 is an open source single channel LoRa Gateway. It lets you bridge LoRa wireless network to an IP network via WiFi, Ethernet, 3G or 4G cellular.
DYI options:
There are various posts on DYI options based both from Raspberry Pi and Arduino boards. Below are a few:
Build your own gateway
https://www.thethingsnetwork.org/docs/gateways/start/build.html
Building a Raspberry Pi Powered LoRaWAN Gateway
https://www.rs-online.com/designspark/building-a-raspberry-pi-powered-lorawan-gateway
Hardware IMST iC880A LoRaWAN “concentrator” board and Raspberry Pi
The iC880A — LoRaWAN https://wireless-solutions.de/products/long-range-radio/ic880a iC880A is able to receive packets of different end devices send with different spreading factors on up to 8 channels in parallel. In combination with an embedded Linux board like Raspberry Pi, Beagle Bone, Banana Pi and the HAL software from https://github.com/Lora-net a complete LoRaWAN® gateway can be setup easily.
From zero to LoRaWAN in a weekend
https://github.com/ttn-zh/ic880a-gateway/wiki
Based iC880a concentrator board and a Raspberry Pi 2.
A DIY low-cost LoRa gateway
http://cpham.perso.univ-pau.fr/LORA/RPIgateway.html
The gateway is based on a Raspberry PI. RPI 1B+/2B/3B can be used. The LoRa modules comes from (a) Libelium LoRa radio module, (b) HopeRF RFM92W/HopeRF RFM95W (or RFM96W for 433MHz), © Modtronix inAir9/inAir9B (or inAir4 for 433MHz), (d) NiceRF LoRa1276. Libelium LoRa and RFM92W use the Semtech SX1272 chip while RFM95W, inAir9/9B and NiceRF LoRa1276 use the SX1276 which is actually more versatile.
Note: The LoRa module and the LoRaWAN module are not compatible because the protocols are different. The LoRa module implements a simple link protocol, created by Libelium. However, the LoRaWAN module runs the LoRaWAN protocol, a much richer and more advanced protocol, created by the LoRa Alliance.
Check out their Github page with detailed documentation https://github.com/CongducPham/LowCostLoRaGw
Conclusion on gateways:
The gateway is a key portion of this solution given that the sensors will need to send the information “somewhere” where it can either be analyzed on the edge or sent to the cloud. After considering price ranges on both the parts needed for a DIY solution or a full blown gateway I considered those solutions that would be cost effective and which I was most familiar with. The “LG01 LoRa OpenWrt IoT Gateway by Dragino Tech” seemed the best approach. The developer kit counts with an Arduino developer node and a Developer gateway. Note that this solution only counts with ONE channel, in comparison with other solutions that allow 8+ channels. This was a compromise that was evaluated and given that this will be a prototype the one channel option seemed sufficient.
In the following articles I will showcase both the remaining hardware parts and the software portion along with updates on how the project is coming along.
17 notes
·
View notes
Photo
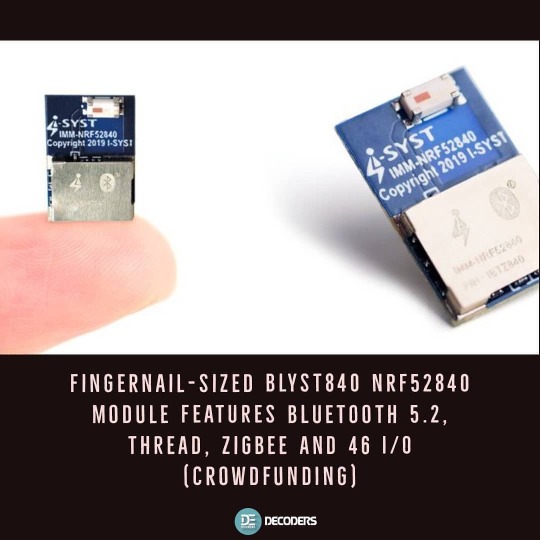
Canada based I-SYST inc has designed a tiny nRF52840 module about the size of a fingernail. BLYST840 module fully leverages the capability of Nordic Semi’s wireless microcontroller with Bluetooth 5.2, Thread, and Zigbee connectivity, and exposes 46 I/Os. BLYST840 specifications: Wireless MCU – Nordic Semiconductor nRF52840 Arm Cortex-M4F microcontroller @ 64 MHz with 1 MB flash, 256 KB RAM Connectivity Bluetooth 5.2 up to 2 Mbps, -96 dBm sensitivity for long-range; Up to 111 dB link budget; Bluetooth Mesh IEEE 802.15.4 radio support for Thread & Zigbee NFC-A Built-in ceramic antenna Output power – Adjustable from +8 dBm to -20 dBm 46 I/O pins exposed via pads around the edges of the module including QSPI/SPI/2-wire/I2S/PDM/QDEC Programmable Peripheral Interface (PPI) SPI interface @ 32 MHz Quad SPI interface @ 32 MHz EasyDMA for all digital interfaces USB 2.0 (12 Mbits) 12-bit/200K SPS ADC Security Arm TrustZone Cryptocell 310 128-bit AES/ECB/CCM/AAR co-processor Misc – Built-in 32 MHz & 32.768 MHz crystal Supply Voltage – 1.7 V to 5.5 V via battery or USB power. Dimensions – 14 x 9 x 1.6mm Certifications – FCC, IC & CE The module is programmable with MicroPython, IOsonata open-source multi-architecture multi-platform library for IoT project, as well as Nordic SDKs. You’ll find some documentation and firmware file on SourceForge. - - Source- CNX software - - ➖➖➖➖➖➖➖➖➖➖➖➖ Follow Us On: @decoders8421 Tag Your Friends 👼. Ask any query or doubt in comments. ➖➖➖➖➖➖➖➖➖➖➖➖ - #fpga #atmega #arm #nxp #embedded #iot #developmentboard #rpi #raspberrypi #arduino #arduinouno #raspberrypi3 #tinkercad #tinker #stm32 #esp32 #lorawan #lora #ai #ml #beagleboneai #raspberrypi4 #sbc #cortex #singleboard #singleboardcomputer #iot #zigbee #opencv #raspberrypicamera https://www.instagram.com/p/CBLtnTpHm-Q/?igshid=yket98i0uska
#fpga#atmega#arm#nxp#embedded#iot#developmentboard#rpi#raspberrypi#arduino#arduinouno#raspberrypi3#tinkercad#tinker#stm32#esp32#lorawan#lora#ai#ml#beagleboneai#raspberrypi4#sbc#cortex#singleboard#singleboardcomputer#zigbee#opencv#raspberrypicamera
0 notes
Text
GPIOs do LoRaMesh da Radioenge: Portas digitais
Aprenda como usar as GPIOs do módulo LoRaMesh da Radioenge
As GPIOs do LoRaMesh da Radioenge possibilita que possamos fazer aplicações de automação com um uso reduzido de hardware, dedicando apenas ao circuito de chaveamento (se necessário) e de alimentação. No total temos no LoRaMesh 8 GPIOs sendo todas configuráveis como entrada ou saída digital e duas como leitura analógica. Porém neste post vamos apenas abordar as portas digitais. Por qual motivo…
View On WordPress
#lora mesh arduino#lora mesh chat#lora mesh device#lora mesh library#lora mesh module#lora mesh network#lora mesh network raspberry pi#lora mesh protocol#lora mesh radio#lora mesh range#lora vs lorawan#loramesh#lorawan#lorawan devices#lorawan gateway#lorawan network#mesh lora
0 notes
Text
Leitura analógica do LoRaMesh da Radioenge
Aprenda como usar a leitura analógica com o módulo LoRaMesh da Radioenge
A leitura analógica com o LoRaMesh possibilita com que possamos fazer um amplo sistema de sensoriamento remoto sem precisar necessariamente de microcontrolador adicional na parte do slave. Por qual motivo usar a leitura analógica do LoRaMesh da Radioenge? Uma leitura digital em muito dos casos já é mais que o suficiente para saber se algo está ou não funcionando, mas a leitura analógica do…
View On WordPress
#lora mesh arduino#lora mesh chat#lora mesh device#lora mesh library#lora mesh module#lora mesh network#lora mesh network raspberry pi#lora mesh protocol#lora mesh radio#lora mesh range#lora vs lorawan#loramesh#lorawan#lorawan devices#lorawan gateway#lorawan network#mesh lora
0 notes
Text
Edge Impulse makes TinyML available to millions of Arduino developers
This post is written by Jan Jongboom and Dominic Pajak.

Running machine learning (ML) on microcontrollers is one of the most exciting developments of the past years, allowing small battery-powered devices to detect complex motions, recognize sounds, or find anomalies in sensor data. To make building and deploying these models accessible to every embedded developer we’re launching first-class support for the Arduino Nano 33 BLE Sense and other 32-bit Arduino boards in Edge Impulse.
The trend to run ML on microcontrollers is called Embedded ML or Tiny ML. It means devices can make smart decisions without needing to send data to the cloud – great from an efficiency and privacy perspective. Even powerful deep learning models (based on artificial neural networks) are now reaching microcontrollers. This past year great strides were made in making deep learning models smaller, faster and runnable on embedded hardware through projects like TensorFlow Lite Micro, uTensor and Arm’s CMSIS-NN; but building a quality dataset, extracting the right features, training and deploying these models is still complicated.
Using Edge Impulse you can now quickly collect real-world sensor data, train ML models on this data in the cloud, and then deploy the model back to your Arduino device. From there you can integrate the model into your Arduino sketches with a single function call. Your sensors are then a whole lot smarter, being able to make sense of complex events in the real world. The built-in examples allow you to collect data from the accelerometer and the microphone, but it’s easy to integrate other sensors with a few lines of code.
Excited? This is how you build your first deep learning model with the Arduino Nano 33 BLE Sense (there’s also a video tutorial here: setting up the Arduino Nano 33 BLE Sense with Edge Impulse):
Sign up for an Edge Impulse account — it’s free!
Install Node.js and the Arduino CLI.
Plug in your Arduino Nano 33 BLE Sense development board.
Download the Arduino Nano 33 BLE Sense firmware — this is a special firmware package (source code) that contains all code to quickly gather data from its sensors. Launch the flash script for your platform to flash the firmware.
Launch the Edge Impulse daemon to connect your board to Edge Impulse. Open a terminal or command prompt and run:
$ npm install edge-impulse-cli -g $ edge-impulse-daemon
Collect some data and build a model. We’ve put together two end-to-end tutorials: detect gestures with the accelerometer or detect audio events with the microphone.
Your device now shows in the Edge Impulse studio on the Devices tab, ready for you to collect some data and build a model.
Once you’re done you can deploy your model back to the Arduino Nano 33 BLE Sense. Either as a binary which includes your full ML model, or as an Arduino library which you can integrate in any sketch.

Deploying to Arduino from Edge Impulse
Your machine learning model is now running on the Arduino board. Open the serial monitor and run `AT+RUNIMPULSE` to start classifying real world data!

Keyword spotting on the Arduino Nano 33 BLE Sense
Integrates with your favorite Arduino platform
We’ve launched with the Arduino Nano 33 BLE Sense, but you can also integrate Edge Impulse with your favourite Arduino platform. You can easily collect data from any sensor and development board using the Data forwarder. This is a small application that reads data over serial and sends it to Edge Impulse. All you need is a few lines of code in your sketch (here’s an example).
After you’ve built a model you can easily export your model as an Arduino library. This library will run on any Arm-based Arduino platform including the Arduino MKR family or Arduino Nano 33 IoT, providing it has enough RAM to run your model. You can now include your ML model in any Arduino sketch with just a few lines of code. After you’ve added the library to the Arduino IDE you can find an example on integrating the model under Files > Examples > Your project – Edge Impulse > static_buffer.
To run your models as fast and energy-efficiently as possible we automatically leverage the hardware capabilities of your Arduino board – for example the signal processing extensions available on the Arm Cortex-M4 based Arduino Nano BLE Sense or more powerful Arm Cortex-M7 based Arduino Portenta H7. We also leverage the optimized neural network kernels that Arm provides in CMSIS-NN.
A path to production
This release is the first step in a really exciting collaboration. We believe that many embedded applications can benefit from ML today, whether it’s for predictive maintenance (‘this machine is starting to behave abnormally’), to help with worker safety (‘fall detected’), or in health care (‘detected early signs of a potential infection’). Using Edge Impulse with the Arduino MKR family you can already quickly deploy simple ML based applications combined with LoRa, NB-IoT cellular, or WiFi connectivity. Over the next months we’ll also add integrations for the Arduino Portenta H7 on Edge Impulse, making higher performance industrial applications possible.
On a related note: if you have ideas on how TinyML can help to slow down or detect the COVID-19 virus, then join the UNDP COVID-19 Detect and Protect Challenge. For inspiration, see Kartik Thakore’s blog post on cough detection with the Arduino Nano 33 BLE Sense and Edge Impulse.
We can’t wait to see what you’ll build!
Jan Jongboom is the CTO and co-founder of Edge Impulse. He built his first IoT projects using the Arduino Starter Kit.
Dominic Pajak is VP Business Development at Arduino.
Edge Impulse makes TinyML available to millions of Arduino developers was originally published on PlanetArduino
0 notes
Text
LoRa With The ESP32
If you are interested in deploying LoRa — the low power long-range wireless technology — you might enjoy [Rui Santos’] project and video about using the ESP32 with the Arduino IDE to implement LoRa. You can see the video below. He uses the RFM95 transceivers with a breakout board, so even if you want to use a different processor, you’ll still find a lot of good information.
In fact, the video is just background on LoRa that doesn’t change regardless of the host computer you are using. Once you have all the parts, getting it to work is fairly simple. There’s a LoRa library by [Sandeep Mistry] that knows how to do most of the work.
Although the project uses an RFM95, it can also work with similar modules such as the RFM96W or RFM98W. There are also ESP32 modules that have compatible transceivers onboard.
This is one of those projects that probably isn’t useful all by itself, but it can really help you get over that hump you always experience when you start using something new. Once you have the demo set up, it should be easy to mutate it into what you really need.
We’ve been talking about LoRa a lot lately. We’ve even seen it commanding drones.
youtube
LoRa With The ESP32 was originally published on PlanetArduino
0 notes
Text
ISM Communications for Arduino
If you want to wirelessly communicate between devices, WiFi and Bluetooth are obvious choices. But there’s also the ISM (industrial, scientific, and medical) band that you use. There are inexpensive modules like the SX1278 that can handle this for you using LoRa modulation, but they haven’t been handy to use with an Arduino. [Jan] noticed the same thing and set out to build a shield that allowed an Arduino to communicate using LoRa. You can find the design data on GitHub. [Jan] calls it the LoRenz shield.
According to [Jan], the boards cost about $20 to $30 each to make, and most of that cost was in having PC boards shipped. LoRa lets you trade data rate for bandwidth, but typical data rates are fairly modest. As for range, that depends on a lot of factors, too, but we’ve seen ranges quoted in terms of miles.
Depending on where you live, there may be legal restrictions on how you use a radio like the SX1278. You should understand your local laws before you buy into using the ISM bands. We aren’t sure it would be wise, but the board can coexist with three other similar shields. So you could get 4 radios going on one Arduino if you had too and could manage the power, RF, and other issues involved. The breakout board the module uses has an antenna connector, so depending on your local laws, you could get a good bit of range out of one of these.
[Jan] promises a post on the library that makes it all work shortly, but you can find the code on GitHub now. If you look at the code in the examples directory, it seems pretty easy. You’d have to sling some software, but the SX1278 can support other modes in addition to LoRA including FSK and other data modulation techniques.
We’ve seen other LoRa shields, but not many. If you are interested in other wireless technologies, we’ve talked about them quite a bit. If you want a basic introduction to LoRa, [Andreas Spiess’] video below is a good place to start.
Filed under: Arduino Hacks, wireless hacks
ISM Communications for Arduino was originally published on PlanetArduino
0 notes