#mariadb ide
Explore tagged Tumblr posts
Visit Tumblr Blog
Explore Tumblr blogs with no restrictions, modern design and the best experience.
Last Seen Tumblr Blogs


Fun Fact
The average Tumblr user visits about 67 pages every month.
Text
Aggregate Functions in MySQL: What They Are, Examples, and Best Practices

For developers, analysts, and database professionals working with MySQL, mastering aggregate functions is non-negotiable. A comprehensive guide published by Devart provides a thorough breakdown of how to use COUNT(), SUM(), AVG(), MIN(), and MAX() to extract actionable insights from large datasets.
The article covers both basic and advanced usage patterns—from counting non-NULL values to grouping data with GROUP BY and filtering aggregates using HAVING. It also walks readers through practical examples using the Sakila database, making it an accessible resource regardless of experience level.
What sets this guide apart is its integration with dbForge Studio for MySQL, a full-featured MySQL IDE that simplifies query building through a visual interface, intelligent code completion, and built-in analytics tools. These features help streamline data operations and boost productivity, especially when working with complex queries and large datasets.
Read the full guide on MySQL aggregate functions.
#database#databases#mariadb#mysql#mariadb ide#mariadb gui#mysql gui#mysql ide#aggregate functions in mysql#mysql aggregate functions#aggregate mysql
0 notes
Text
Tired of Paying for Tools? These 40 Open-Source Alternatives Have You Covered?
Let’s be real for a second.
We’ve all been there—mid-project, mid-semester, or mid-burnout—when a paid tool throws up a paywall and asks for $19.99/month just to export your file. It stings, especially when you’re trying to keep your budget lean.

But here’s the good news: the open-source community has your back. 💪 There are dozens of completely free, insanely powerful tools that can do (almost) everything their paid counterparts can—without locking your best features behind a subscription.
Whether you're a freelancer, student, startup founder, or just someone who loves great software, this list is your new toolbox.
🚀 Why Open-Source Is the Underdog That Wins Before we dive in, let’s clarify something: Open-source ≠ low quality. In fact, some of the world’s biggest companies (Google, NASA, Netflix) use open-source tools every day. These aren’t sketchy knockoffs—they’re community-powered, security-tested, and constantly evolving.
Now, let’s talk about the 40 free tools that could save you hundreds—or even thousands—of dollars a year.
🧠 Smart Swaps for Everyday Tools
LibreOffice → Ditch Microsoft Office Docs, Sheets, Presentations—all offline, all free.
OnlyOffice → Google Docs Vibes, but Yours Looks and feels like MS Office, works online or self-hosted.
Joplin → Evernote for Nerds Markdown-based, syncs securely, and doesn’t sell your notes.
Zettlr → Perfect for Writers & Academics Citation support + distraction-free writing.
🌐 For Browsing, Email & Team Chat
Firefox → More Privacy, Less Google Extensible and fast—and they don’t track you.
Brave → Built-in Ad Blocker? Yes Please Faster browsing + rewards system.
Thunderbird → Outlook Without the Overkill Email, calendar, and to-do list in one clean interface.
Mattermost → Slack Without the Bill Your team chat, your server, your rules.
Jitsi Meet → Free Video Calls—No Sign-Up Needed Start a call with a link. Done.
🎨 Designers & Creators, Rejoice
GIMP → Photoshop for the People Yes, it’s that powerful. Yes, it’s free.
Inkscape → Vector Design Like a Boss Great for logos, icons, and print design.
Krita → Digital Painting Heaven Designed by artists, for artists.
Blender → Hollywood-Grade 3D Modeling Used in actual movies. Free forever.
Darktable → Lightroom Without the Monthly Bill RAW editing + professional workflow.
🎧 Audio & Video Editing
Audacity → Podcasting, Remixing, Editing, Easy Intuitive multi-track editor.
OBS Studio → Streaming & Screencasting Gold What Twitch streamers use. Seriously.
Shotcut → Video Editing That Just Works Cross-platform and powerful.
Olive → Modern Video Editor in the Making Sleek, promising, and growing fast.
👨💻 Developers, You’re Going to Love These
VSCodium → VS Code Without Microsoft Tracking Same editor, privacy-respecting build.
Atom → Hackable to the Core Loved by web devs and hobbyists.
Eclipse → Java Devs’ Old-School Favorite Still rock-solid.
NetBeans → Full IDE for Polyglot Coders Good for Java, PHP, and C++.
Hoppscotch → Postman Without the Bloat Runs in your browser, free forever.
MariaDB / MySQL → Free SQL Workhorses The backbone of many web apps.
SQLite → Tiny, Powerful, Portable Database No server required. Zero config.
✅ Organize Your Life (and Work)
Wekan → Trello Clone, But Open Kanban boards made simple.
Focalboard → Self-Hosted ClickUp Alternative Task management that respects your data.
Redmine → Jira's Open Twin Great for bug tracking & agile workflows.
Taskcafe → Asana-Style, Cleaner Interface New kid on the block, with potential.
🔐 Privacy Tools That Feel Like Superpowers
Bitwarden → Best Password Manager, Hands Down Cloud, browser, and mobile support.
KeePassXC → Local, Bulletproof Password Vault For privacy purists.
Tutanota → Private Email That Just Works End-to-end encrypted email, minimal design.
Pi-hole → Block Ads on Your Entire Network Install it on a Raspberry Pi and say goodbye to web ads.
☁️ Sync, Store, and Share Files Securely
Nextcloud → Your Own Google Drive Private cloud, full control.
Syncthing → Dropbox, But Peer-to-Peer No servers. Just your devices talking securely.
rclone → Cloud Storage on the Command Line Sync anything, anywhere.
📊 Data, Dashboards & Decisions
Metabase → BI Dashboards Without the Headache Plug in your data, get answers fast.
Grafana → DevOps’ Favorite Dashboard Tool Real-time, customizable graphs.
Apache Superset → Data Exploration for Pros Used by Airbnb, Netflix, and more.
🤖 Bonus: Automate All the Things
AutoHotKey → Make Your Computer Work For You Automate anything on Windows. Seriously.
🌍 Your Wallet and Your Future Will Thank You Switching to open-source isn’t just about saving money (though that’s nice). It’s about:
💻 Owning your tools
🔐 Protecting your privacy
🌱 Supporting innovation and community
🧰 Having control over your workflow
These tools are built by people like you, for people like you. Try just a few of them, and you’ll wonder why you ever paid in the first place.
0 notes
Text
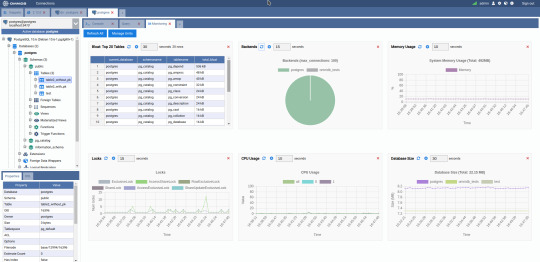
How to Drop Tables in MySQL Using dbForge Studio: A Simple Guide for Safer Table Management
Learn how to drop a table in MySQL quickly and safely using dbForge Studio for MySQL — a professional-grade IDE designed for MySQL and MariaDB development. Whether you’re looking to delete a table, use DROP TABLE IF EXISTS, or completely clear a MySQL table, this guide has you covered.
In article “How to Drop Tables in MySQL: A Complete Guide for Database Developers” we explain:
✅ How to drop single and multiple tables Use simple SQL commands or the intuitive UI in dbForge Studio to delete one or several tables at once — no need to write multiple queries manually.
✅ How to use the DROP TABLE command properly Learn how to avoid errors by using DROP TABLE IF EXISTS and specifying table names correctly, especially when working with multiple schemas.
✅ What happens when you drop a table in MySQL Understand the consequences: the table structure and all its data are permanently removed — and can’t be recovered unless you’ve backed up beforehand.
✅ Best practices for safe table deletion Backup first, check for dependencies like foreign keys, and use IF EXISTS to avoid runtime errors if the table doesn’t exist.
✅ How dbForge Studio simplifies and automates this process With dbForge Studio, dropping tables becomes a controlled and transparent process, thanks to:
- Visual Database Explorer — right-click any table to drop it instantly or review its structure before deletion. - Smart SQL Editor — get syntax suggestions and validation as you type DROP TABLE commands. - Built-in SQL execution preview — see what will happen before executing destructive commands. - Schema and data backup tools — create instant backups before making changes. - SQL script generation — the tool auto-generates DROP TABLE scripts, which you can edit and save for future use. - Role-based permissions and warnings — helps prevent accidental deletions in shared environments.
💡 Whether you’re cleaning up your database or optimizing its structure, this article helps you do it efficiently — with fewer risks and more control.
🔽 Try dbForge Studio for MySQL for free and experience smarter MySQL development today: 👉 https://www.devart.com/dbforge/mysql/studio/download.html
1 note
·
View note
Text
8 Best Laravel Homestead Alternatives for Efficient Development
Laravel Homestead has always been a favorite for Laravel developers when it comes to creating a development environment. But, as developers’ needs and preferences change, it’s important to check other options that might better meet those needs. In this post, we’ll look into eight good alternatives to Laravel Homestead that can help you improve your development process and make things more efficient.
Top 8 Laravel Homestead Alternatives
1. Laradock
Laradock is a strong development environment made for Laravel and other PHP frameworks, based on Docker. It has a lot of pre-set services and tools, making it easy to set up and manage your environment. With Laradock, you can run your Laravel apps inside Docker containers, giving you flexibility for different setups. It supports many services like MySQL, PostgreSQL, and Redis, making it a good choice for different types of projects.
2. Lando
Lando is a free tool made to make local development and DevOps easier for Laravel. It makes it simple to set up and manage your development environment, ensuring that your local setup is the same as your live setup.
3. Docker
Docker is a well-known platform that lets you put your app and its dependencies into a single container. This makes running and setting up your Laravel app across different setups easy. Docker is lightweight and effective for managing development environments, making it a strong choice compared to Laravel Homestead.
4. Takeout
Takeout gives a local development environment for Laravel using Docker. It has an easy-to-use interface that makes it simple to manage your development setup, letting you start, stop, and change your containers with ease.
5. Vessel
Vessel is a light and easy development environment for Laravel, also built on Docker. It offers a simple way to set up and manage your environment, making it great for developers looking for a quick solution.
6. Vagrant
Vagrant is a tool for building and managing virtual development environments. It lets you create lightweight, repeatable, and portable environments. While Homestead uses Vagrant, you can also use Vagrant on its own to set up your environment.
7. XAMPP
XAMPP is a well-known cross-platform solution that includes the Apache server, MariaDB database, and tools for running PHP and Perl scripts. It provides an easy setup for developing Laravel apps.
8. WAMP
WAMP is a Windows-based environment that includes Apache, MySQL, and PHP. It offers a simple way to create a development setup for Laravel apps on Windows.
Criteria for Choosing a Homestead Alternative
When picking an alternative to Laravel Homestead, think about the following points to ensure it fits your needs:
Ease of Setup: Does the option need a lot of setup, or is it ready to use? A simple setup can save you time.
Performance: Check the speed, how much resources it uses, and its ability to grow. A fast setup helps make your development smoother and avoids slowdowns.
Flexibility and Customization: Look for options that let you easily change PHP versions, web servers, and other important parts. Being able to automate changes adds to its flexibility.
Integration: See if the option works well with your IDEs, CI/CD pipelines, and other tools. It should also work with cloud services to make your workflow smoother.
Security Features: Look at the security features like isolation, encryption, and checking for vulnerabilities. A safe environment is key to protecting your projects.
Community Support and Documentation: Choose an option with good community support and clear instructions. This helps you learn and solve problems faster.
Cost: Think about if the option is free, open-source, or if it needs a subscription or one-time payment. Compare the cost with the value it gives.
Conclusion
While Laravel Homestead is a great option for setting up a development environment, it’s not the only one. By looking at the eight alternatives mentioned, you can find a solution that fits your needs and preferences better. Whether you want a light option like Vessel or a more detailed environment like Laradock, there’s an option that can help improve your development process and make you more efficient.
0 notes
Text
could not access pid file for vpn server
🔒🌍✨ Get 3 Months FREE VPN - Secure & Private Internet Access Worldwide! Click Here ✨🌍🔒
could not access pid file for vpn server
VPN server troubleshooting
A VPN server is a crucial component of a virtual private network, responsible for facilitating secure communication between users and the internet. However, like any other technology, VPN servers can encounter issues that may disrupt their functionality. Troubleshooting these problems is essential to ensure uninterrupted and secure connections for users.
One common issue with VPN servers is connectivity problems. Users may experience difficulties in connecting to the server, leading to failed connection attempts. This can be caused by network issues, firewall restrictions, or misconfigured server settings. To troubleshoot connectivity issues, administrators can check network settings, ensure the server is online, and verify firewall configurations to allow VPN traffic.
Another frequent problem is slow connection speeds. Slow VPN speeds can be frustrating for users and may result from network congestion, server overloading, or inefficient routing. Administrators can address speed issues by optimizing server resources, upgrading network bandwidth, or selecting servers closer to users to minimize latency.
Security concerns are also paramount when troubleshooting VPN servers. Data breaches, unauthorized access, or encryption failures can compromise user privacy and expose sensitive information. To enhance security, administrators must regularly update VPN software, strengthen encryption protocols, and monitor server logs for suspicious activities.
In conclusion, troubleshooting VPN server issues is critical to maintain a reliable and secure network environment. By addressing connectivity problems, optimizing speed, and enhancing security measures, administrators can ensure seamless and protected VPN connections for users.
Error accessing PID file
When working with MySQL or MariaDB databases, it is not uncommon to encounter various error messages that can be confusing and frustrating. One common error that users may come across is the "Error accessing PID file" message. This error generally indicates a problem with the MySQL or MariaDB server's process ID file.
The process ID (PID) file is a file that stores the server's process ID, which is a unique identifier assigned to each running process on a system. This file is essential for managing and monitoring server processes. When the server starts up, it creates a PID file to store its process ID for future reference.
If you encounter the "Error accessing PID file" message, it typically means that the MySQL or MariaDB server is unable to access or read the PID file. This can occur due to various reasons, such as incorrect file permissions, a corrupted PID file, or the server not having the necessary privileges to access the file.
To resolve this issue, you can try the following steps:
Check the file permissions of the PID file and ensure that the server has the necessary permissions to access it.
Verify that the PID file is not corrupted or empty. If it is, you may need to recreate the file.
Restart the MySQL or MariaDB server to recreate the PID file and see if the issue persists.
If the problem continues, you may need to investigate further to identify any underlying issues with the server's configuration or environment.
By addressing the "Error accessing PID file" message promptly and following these troubleshooting steps, you can help ensure the smooth operation of your MySQL or MariaDB server.
Server configuration issues
Title: Troubleshooting Server Configuration Issues: A Comprehensive Guide
Server configuration issues can be a nightmare for website administrators and IT professionals alike. These problems can disrupt the normal functioning of a server, leading to downtime, slow performance, and even security vulnerabilities. Understanding common server configuration issues and how to troubleshoot them is crucial for maintaining a stable and secure hosting environment.
One prevalent server configuration issue is incorrect file permissions. Improperly configured file permissions can prevent certain scripts or applications from executing properly, leading to errors or inaccessible content. To resolve this issue, administrators should ensure that file permissions are set correctly according to the specific requirements of the server and the applications running on it.
Another common problem is misconfigured DNS settings. DNS (Domain Name System) translates domain names into IP addresses, allowing users to access websites using human-readable addresses. If DNS settings are incorrect, users may experience difficulties accessing the server or the website hosted on it. Troubleshooting DNS issues involves verifying DNS records, checking DNS server configurations, and ensuring that DNS propagation is complete.
Additionally, server performance issues can stem from improper resource allocation or configuration. Inadequate CPU, memory, or disk space allocation can result in sluggish performance or even server crashes during periods of high traffic or resource-intensive tasks. Monitoring server resources and adjusting allocations as needed can help mitigate performance issues and ensure smooth operation.
Security vulnerabilities are also a significant concern with server configuration. Weak authentication mechanisms, outdated software, or misconfigured security settings can expose the server to various threats, including hacking attempts and malware infections. Regular security audits, software updates, and implementing best practices for server security are essential for safeguarding against potential security breaches.
In conclusion, addressing server configuration issues promptly and effectively is vital for maintaining the stability, performance, and security of a server environment. By understanding common issues and implementing proactive troubleshooting and preventive measures, administrators can ensure optimal server operation and a seamless user experience.
Debugging VPN server errors
Debugging VPN server errors can be a challenging task, but with the right knowledge and tools, it is possible to identify and resolve the issues effectively. VPN servers play a crucial role in ensuring secure and private communication over the internet. When errors occur, it can disrupt the connection and compromise the security of the data being transmitted.
One common VPN server error is the 'Failed to establish a connection' message. This error typically indicates a problem with the VPN configuration settings or a network issue. To troubleshoot this error, it is recommended to check the server settings, such as the IP address, port number, and encryption protocols. Verifying that the client-side settings match the server-side configurations can also help resolve this issue.
Another common VPN server error is the 'Connection timed out' message. This error often occurs when there is a network interruption or firewall blocking the VPN connection. To address this error, checking the network connection, disabling the firewall temporarily, and restarting the VPN server can help restore the connection.
Furthermore, troubleshooting VPN server errors may involve checking the server logs for any error messages or warnings that can provide insights into what is causing the issue. Utilizing network monitoring tools can also help in diagnosing connectivity issues and performance bottlenecks.
In conclusion, debugging VPN server errors requires a systematic approach and a good understanding of VPN technology. By following best practices and utilizing troubleshooting techniques, it is possible to resolve errors and ensure a smooth and secure VPN connection for users.
Resolving server access problems
Title: Troubleshooting Server Access Problems: A Comprehensive Guide
Encountering server access problems can be frustrating, especially when it disrupts your workflow or prevents users from accessing critical resources. Whether you're a website owner, system administrator, or an end user, understanding how to troubleshoot and resolve these issues is essential. Here's a comprehensive guide to help you navigate and resolve server access problems effectively.
Check Network Connectivity: Start by ensuring that your device has a stable internet connection. Sometimes, the issue might not be with the server but rather with your network connection.
Verify Server Status: Determine if the server is experiencing any downtime or maintenance activities. You can use online tools or contact your hosting provider for updates on server status.
Review Firewall Settings: Firewalls can sometimes block access to certain servers or ports. Check your firewall settings to ensure they are not inadvertently preventing access to the server.
Inspect DNS Configuration: Incorrect DNS settings can lead to server access problems. Verify that the domain name is correctly resolving to the server's IP address.
Examine Server Logs: Server logs can provide valuable insights into what might be causing the access issues. Look for any error messages or unusual activity in the logs.
Test from Different Devices and Locations: To isolate the problem, try accessing the server from different devices and network locations. If the issue is consistent across multiple devices, it's likely a server-side problem.
Contact Technical Support: If you're unable to resolve the issue on your own, don't hesitate to reach out to your hosting provider's technical support team. They can offer assistance and insights specific to your server environment.
By following these steps, you can effectively troubleshoot and resolve server access problems, minimizing downtime and ensuring smooth access to your resources. Remember, patience and persistence are key when dealing with technical issues, and don't hesitate to seek help if needed.
0 notes
Text
Programas
Diseño Gráfico (enlaces en los comentarios)
PHOTOSHOP ver.2021
INDESIGN ver.2021
ILLUSTRATOR ver.2021
---------------------------------------------------------------------------
Editores de texto (IDEs)
---------------------------------------------------------------------------
XAMPP (para trabajar con wordpress.org en local)
---------------------------------------------------------------------------
SEO
---------------------------------------------------------------------------
S.O. WINDOWS, OFFICE, MICROSOFT 365
0 notes
Text
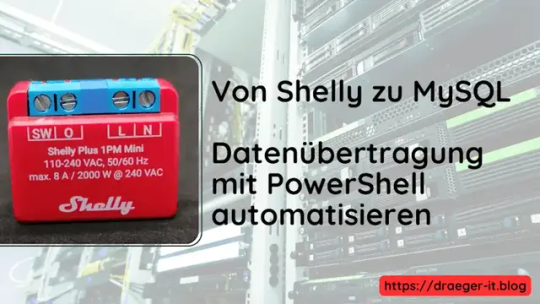
Von Shelly zu MySQL: Datenübertragung mit PowerShell automatisieren

Im letzten Beitrag habe ich dir gezeigt wie du die Daten von einem Shelly Plus PM Mini mit HTTP-Requests via VBA auslesen kannst. In diesem Beitrag soll es nun darum gehen wie du die Daten automatisiert vom Shelly mit PowerShell in eine MySQL Datenbank ablegen kannst.
Ich werde dir in den nächsten Abschnitten Schritt-für-Schritt erläutern, wie du: - die MySQL Datenbank auf einem Microsoft Windows PC installierst, - das PowerShell Skript in Visual Studio Code programmierst und ausführst
Schaltung mit dem Shelly Plus 1PM Mini
Für diesen Beitrag verwende ich eine kleine Schaltung mit dem Shelly Plus 1PM Mini, an welchen ich lediglich eine Lötstation über eine Steckdose angeklemmt habe.

Schaltung - Shelly Plus 1PM Mini mit Steckdose
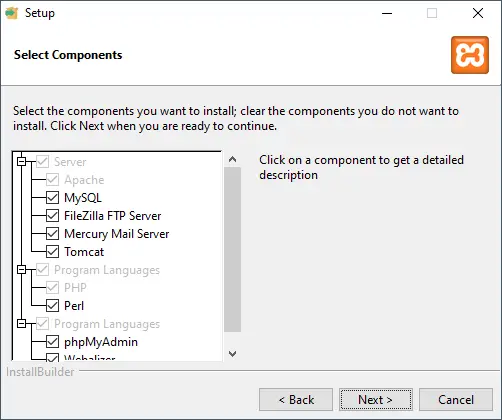
Installieren von XAMPP
Das Paket XAMPP enthält neben einem Apache2 Server, Php auch eine MariaDB welche mit MySQL kompatibel ist und kannst du dir kostenfrei unter https://www.apachefriends.org/de/download.html herunterladen. In meinem Fall lade ich mir die Version 8.2.4-0-VS16 herunter.


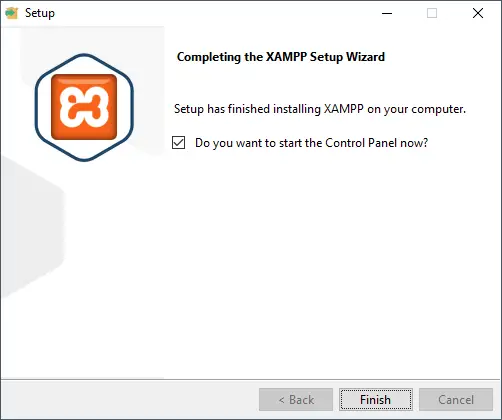
Wenn XAMPP erfolgreich installiert wurde, dann öffnet sich das XAMPP Control Panel aus welchem wir die Server / Dienste starten können.
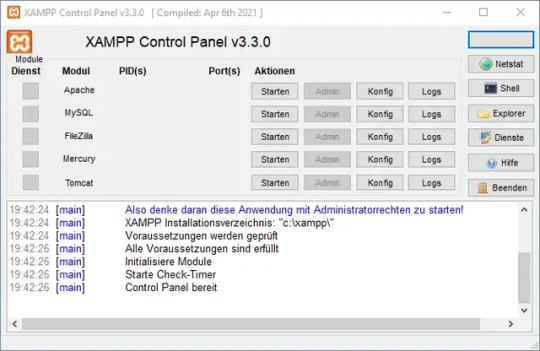
XAMPP_Control_Panel Bedenke, dass die Server / Dienste einen Port deines PCs belegen und somit ggf. andere Tools, welche diesen auch verwenden, in einen Konflikt geraten können. Starten der Dienste für die MySQL Datenbank Im nächsten Schritt starten wir nun das Modul "Apache" sowie "MySQL" indem wir auf die jeweilige Schaltfläche "Starten" klicken. Bei XAMPP ist das gute, dass dieses bereits alles Vorkonfiguriert ist und wir nur in Spezialfällen etwas ändern müssen!
Einrichten der Datenbank
Wenn wir XAMPP installiert haben müssen wir als Nächstes die Datenbank einrichten, das können wir entweder über die Konsole oder bequem per phpMyAdmin erledigen. In meinem Fall mache ich das per phpMyAdmin welches im Browser unter http://localhost/phpmyadmin/ aufgerufen werden kann. Auf der Konsole geht dieses auch, nur hier muss man die gesamten SQL Statements manuell eingeben.

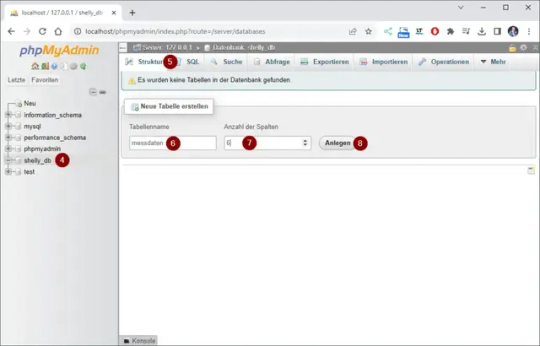
Webseite - phpMyAdmin für die Verwaltung der MySQL Datenbank im XAMPP Am Ende dieses Abschnitts stelle ich dir eine SQL-Datei zum Download bereit, welche das von mir erstellte Schema enthält, sodass du dieses nur importieren musst. Schritt 1 - Erstellen der Datenbank Im ersten Schritt erstellen wir die Datenbank und klicken auf den Reiter "Datenbanken" (1). Danach vergeben wir unserer Datenbank einen Namen, in meinem Fall nehme ich die Bezeichnung "shelly_db" (2). Dieses bestätigen wir mit der Schaltfläche "Anlegen" (3).

Schritt 2 - Erstellen der Tabelle für die Messwerte Im zweiten Schritt legen wir uns eine Tabelle an, um dort später die Messwerte abzulegen. Dazu vergeben wir im Reiter "Struktur" (5) im Feld Tabellenname den Namen der neuen Tabelle, in meinem Fall gebe ich hier "messdaten" (6) ein. Initial soll diese Tabelle 6 Spalten (7) haben. Diese Auswahl bestätige ich mit der Schaltfläche "Anlegen" (8).
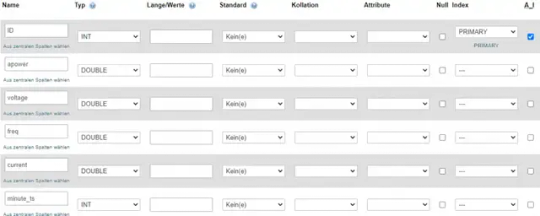
Im nächsten Schritt legen wir die Spalten an, hier sollten wir im Vorausplanen, welche Messdaten und in welchem Format (Datentyp) wir aufnehmen wollen. Der Shelly Plus 1PM Mini liefert nachfolgende Werte: - die Leistungsaufnahme (in Watt pro Stunde), - die Spannung (in Volt), - die Frequenz (in Herz), - die Stromaufnahme (in Ampere), sowie - einen Zeitstempel (Sekunden seit 01.01.1970) Zusätzlich erhalten wir auch die Temperatur in Grad Celsius sowie in Fahrenheit. Diese interessieren mich in diesem Fall jedoch nicht und daher lasse ich diese außen vor. Alle Werte außer der Zeitstempel werden als Gleitkommazahlen ausgegeben und daher legen wir für jeden Wert eine Spalte mit dem Datentyp DOUBLE an. Sowie noch eine Spalte ID welche als INT und mit "auto increment" angelegt wird. Die MySQL Datenbank legt automatisch auf diese Spalte einen Primärschlüssel.
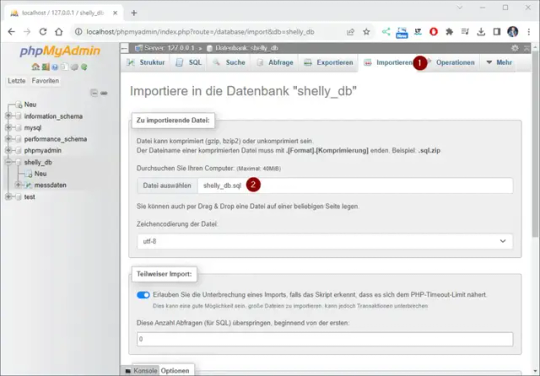
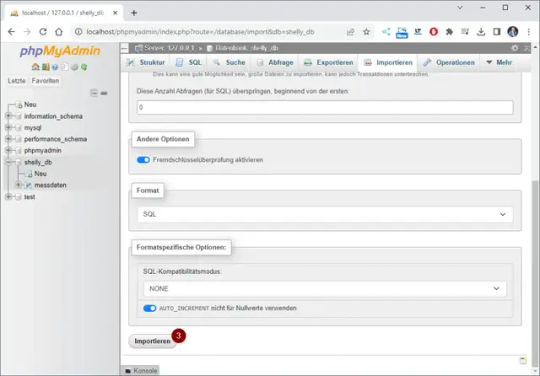
Download des Shema als ZIP-Datei Wenn du dir diese Schritte sparen möchtest, dann kannst du dir das Schema auch bequem als SQL-Datei herunterladen und importieren. MySQL Schema für die Datenbank "shelly_db"Herunterladen Zum Importieren dieser SQL-Datei navigierst du über den Reiter "Importieren" (1) und wählst zunächst die Datei (2) aus. Danach scrollst du das Fenster nach unten und wählst die Schaltfläche "Importieren" (3).
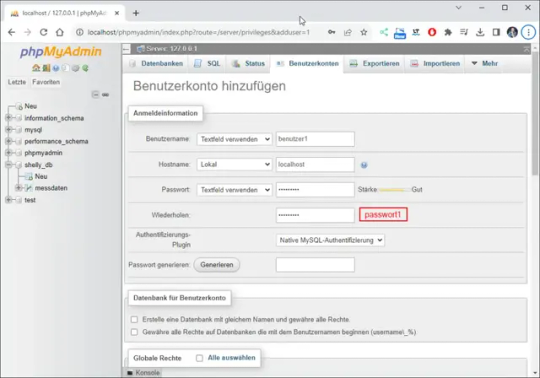
Anlegen eines Benutzers für die Datenbank
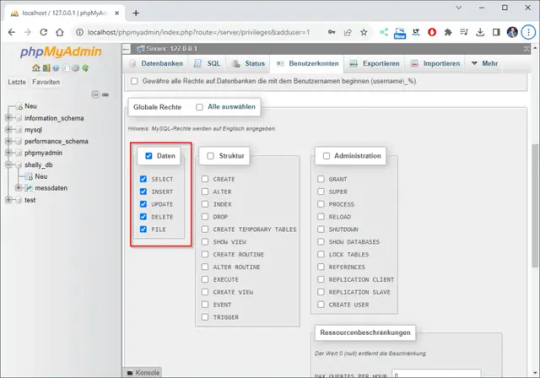
Es ist nie ratsam mit dem Benutzer root zu arbeiten da dieser sehr weitreichende Rechte hat. Über die Oberfläche von phpMyAdmin können wir uns einen Benutzer anlegen und diesem die benötigten Rechte für die Datenbank "shelly_db" geben.

Erstellen des PowerShell-Skriptes in Visual Studio Code
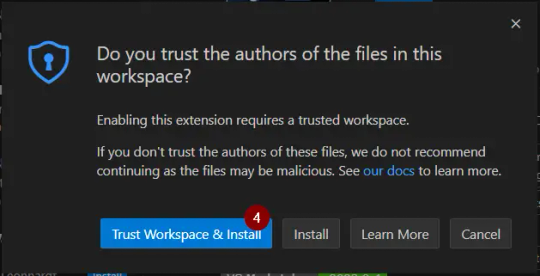
Das benötigte PowerShell Skript kannst du auch in einem einfachen Editor schreiben, jedoch bietet eine Entwicklungsumgebung noch zusätzliche Features, welche uns bei der Programmierung unterstützen. Das Programm Visual Studio Code kannst du dir unter https://code.visualstudio.com/download kostenfrei herunterladen und installieren. Wie du dieses machst, habe ich dir bereits im Beitrag zur Programmiersprache Rust erläutert. Schritt 1 - Installieren der Erweiterung für PowerShell in VSC Ich gehe nun davon aus, dass bei dir Visual Studio Code installiert ist. Somit können wir beginnen und die Erweiterung für PowerShell installieren. Dazu klicken wir in der linken Menüleiste auf "Extensions" (1) und suchen dann nach "PowerShell" (2) in meinem Fall wähle ich die offizielle Erweiterung von Microsoft und klicke dort auf die Schaltfläche "Install" (3).

Dem ganzen muss man noch zustimmten und die Installation startet sobald man auf "Trus Workspace & Install" (4) geklickt hat.
Schritt 2 - Verbindung zur MySQL Datenbank Damit wir eine Verbindung zur MySQL Datenbank aufbauen können, müssen wir zunächst ein Modul installieren, für diesen Beitrag verwende ich SimplySql. Zu diesem Modul gibt es eine sehr schöne Wiki-Seite https://github.com/mithrandyr/SimplySql/wiki/, auf welcher du die Funktionen mit Beispielen findest. Schritt 2.1 - Installieren von SimplySql Für die Installation muss ein PowerShell Terminal mit Administratorrechten geöffnet werden.
PowerShell mit Administratorrechten starten Im neuen Terminal gibt man nun den nachfolgenden Befehl ein. Install-Module -Name SimplySql Un bestätigt wärend dieser Installation mit "J". Wenn dieses Abgeschlossen ist, können wir das Terminalfenster schließen. Schritt 2.2 - Importieren von SimplySql Nun kehren wir in Visual Studio Code zurück und dort importieren wir dieses Modul. #Modul SimplySql importieren Import-Module SimplySql Schritt 2.3 - Aufbauen der Datenbankverbindung Danach bauen wir die Datenbank verbindung auf, hierzu nutzen wir den Benutzer welchen wir zuvor eingerichtet haben. #Aufbauen einer Verbindung zur Datenbank Open-MySqlConnection -server '127.0.0.1' -connectionname 'localhost' -database 'shelly_db' -Username benutzer1 -Password passwort1 Schritt 2.4 - SQL-Insert-Statement vorbereiten Für unsere Messdaten bereiten wir ein SQL-Insert-Statement vor. Als Values verwende ich hier gleich entsprechende Variablen welche im nächsten Schritt befüllt werden. $testconnection = Test-SqlConnection -ConnectionName 'localhost' #Wenn die Verbindung erfolgreich aufgebaut wurde,... if ($testconnection) { #SQL Statement $InsertQuery = "INSERT INTO shelly_db.messdaten (ID, apower, voltage, freq, current, minute_ts) VALUES (NULL, '$apower', '$voltage', '$freq', '$current', '$minute_ts');" #Ausführen des Statements Invoke-SqlUpdate -connectionname 'localhost' -Query $InsertQuery #Schließen der Datenbankverbindung Close-SqlConnection -connectionname 'localhost' } Wichtig ist, das am Ende die Datenbankverbindung geschlossen wird!
Schritt 3 - Abrufen der Messdaten vom Shelly
Die Messdaten vom Shelly lesen wir mit einem einfachen Aufruf per WebRequest. Hier prüfe ich zusätzlich ob die Antwort länger als 0 Zeichen ist, ansonsten verlasse ich das Skript mit einer Fehlermeldung. #Abrufen der Daten vom Shelly $response = Invoke-WebRequest -URI http://192.168.178.35/rpc/Switch.GetStatus?id=0 -UseBasicParsing #Wenn die länge des Textes gleich 0 ist dann soll das Skript verlassen werden! if ($response.Length -eq 0) { "Es wurde keine Antwort empfangen!" exit } Ansonsten wird die Anwort in ein JSON-Format geparst und in die Variablen geschrieben. #Umwandeln der Antwort in ein JSON-Format $data = $response | ConvertFrom-Json #Auslesen der Werte $apower = $data.apower $voltage = $data.voltage $freq = $data.freq $current = $data.current $minute_ts = $data.aenergy.minute_ts
Ausführen des PowerShell Skriptes zum Speichern der Daten eines Shelly in die MySQL Datenbank
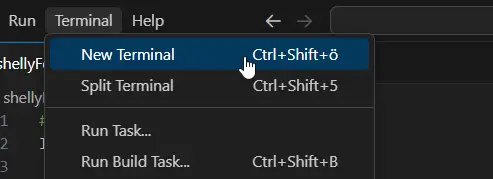
Aus Visual Studio Code kannst du das Skript per klick auf "Run" oben rechts das Skript ausführen.

Ausführen eines PowerShell Skripts per Klick auf "Run" Alternativ kannst du auch ein Terminal öffnen und zu dem Ordner navigieren und dort das Skript manuell ausführen.
öffnen eines neuen Terminalfensters
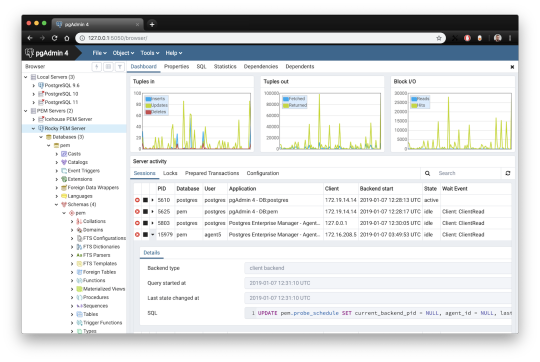
navigieren zum PowerShell Skript Ansicht in phpMyAdmin Wenn wir das Skript erfolgreich ausgeführt wurde, dann sehen wir in der Tabelle "messdaten" eine neue Zeile mit den aktuellen Messdaten.

phpMyAdmin - Tabelle "messdaten"
Fertiges PowerShell Skript zum speichern von Messdaten eines Shelly Plus 1PM Mini in eine MySQL Datenbank
Hier nun das fertige PowerShell Skript um die Daten eine Shelly in die MySQL Datenbank zu schreiben. #Modul SimplySql importieren Import-Module SimplySql #Abrufen der Daten vom Shelly $response = Invoke-WebRequest -URI http://192.168.178.35/rpc/Switch.GetStatus?id=0 -UseBasicParsing #Wenn die länge des Textes gleich 0 ist dann soll das Skript verlassen werden! if ($response.Length -eq 0) { "Es wurde keine Antwort empfangen!" exit } #Umwandeln der Antwort in ein JSON-Format $data = $response | ConvertFrom-Json #Auslesen der Werte $apower = $data.apower $voltage = $data.voltage $freq = $data.freq $current = $data.current $minute_ts = $data.aenergy.minute_ts #Aufbauen einer Verbindung zur Datenbank Open-MySqlConnection -server '127.0.0.1' -connectionname 'localhost' -database 'shelly_db' -Username benutzer1 -Password passwort1 $testconnection = Test-SqlConnection -ConnectionName 'localhost' #Wenn die Verbindung erfolgreich aufgebaut wurde,... if ($testconnection) { #SQL Statement $InsertQuery = "INSERT INTO shelly_db.messdaten (ID, apower, voltage, freq, current, minute_ts) VALUES (NULL, '$apower', '$voltage', '$freq', '$current', '$minute_ts');" #Ausführen des Statements Invoke-SqlUpdate -connectionname 'localhost' -Query $InsertQuery #Schließen der Datenbankverbindung Close-SqlConnection -connectionname 'localhost' } PowerShell Skript zum speichern von Messdaten eines Shellys in eine MySQL DatenbankHerunterladen
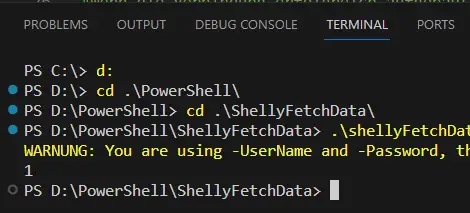
Troubleshooting
Fehler beim Ausführen von PowerShell Skripte In meinem Fall bekam ich beim ersten Ausführen des PowerShell Skriptes einen Fehler, dass dieses auf meinem System nicht genehmigt ist. PS D:PowerShellShellyFetchData> .shellyFetchData.ps1 .shellyFetchData.ps1 : Die Datei "D:PowerShellShellyFetchDatashellyFetchData.ps1" kann nicht geladen werden, da die Ausführung von Skripts auf diesem System deaktiviert ist. Weitere Informationen finden Sie unter "about_Execution_Policies" (https:/go.microsoft.com/fwlink/?LinkID=135170). In Zeile:1 Zeichen:1 + .shellyFetchData.ps1 + ~~~~~~~~~~~~~~~~~~~~~ + CategoryInfo : Sicherheitsfehler: (:) , PSSecurityException + FullyQualifiedErrorId : UnauthorizedAccess Nachfolgend die Schritte, um das Ausführen von PowerShell Skripte unter Microsoft Windows 10 zu erlauben: Read the full article
0 notes
Text
Which Is The Best PostgreSQL GUI? 2021 Comparison
PostgreSQL graphical user interface (GUI) tools help open source database users to manage, manipulate, and visualize their data. In this post, we discuss the top 6 GUI tools for administering your PostgreSQL hosting deployments. PostgreSQL is the fourth most popular database management system in the world, and heavily used in all sizes of applications from small to large. The traditional method to work with databases is using the command-line interface (CLI) tool, however, this interface presents a number of issues:
It requires a big learning curve to get the best out of the DBMS.
Console display may not be something of your liking, and it only gives very little information at a time.
It is difficult to browse databases and tables, check indexes, and monitor databases through the console.
Many still prefer CLIs over GUIs, but this set is ever so shrinking. I believe anyone who comes into programming after 2010 will tell you GUI tools increase their productivity over a CLI solution.
Why Use a GUI Tool?
Now that we understand the issues users face with the CLI, let’s take a look at the advantages of using a PostgreSQL GUI:
Shortcut keys make it easier to use, and much easier to learn for new users.
Offers great visualization to help you interpret your data.
You can remotely access and navigate another database server.
The window-based interface makes it much easier to manage your PostgreSQL data.
Easier access to files, features, and the operating system.
So, bottom line, GUI tools make PostgreSQL developers’ lives easier.
Top PostgreSQL GUI Tools
Today I will tell you about the 6 best PostgreSQL GUI tools. If you want a quick overview of this article, feel free to check out our infographic at the end of this post. Let’s start with the first and most popular one.
1. pgAdmin
pgAdmin is the de facto GUI tool for PostgreSQL, and the first tool anyone would use for PostgreSQL. It supports all PostgreSQL operations and features while being free and open source. pgAdmin is used by both novice and seasoned DBAs and developers for database administration.
Here are some of the top reasons why PostgreSQL users love pgAdmin:
Create, view and edit on all common PostgreSQL objects.
Offers a graphical query planning tool with color syntax highlighting.
The dashboard lets you monitor server activities such as database locks, connected sessions, and prepared transactions.
Since pgAdmin is a web application, you can deploy it on any server and access it remotely.
pgAdmin UI consists of detachable panels that you can arrange according to your likings.
Provides a procedural language debugger to help you debug your code.
pgAdmin has a portable version which can help you easily move your data between machines.
There are several cons of pgAdmin that users have generally complained about:
The UI is slow and non-intuitive compared to paid GUI tools.
pgAdmin uses too many resources.
pgAdmin can be used on Windows, Linux, and Mac OS. We listed it first as it’s the most used GUI tool for PostgreSQL, and the only native PostgreSQL GUI tool in our list. As it’s dedicated exclusively to PostgreSQL, you can expect it to update with the latest features of each version. pgAdmin can be downloaded from their official website.
pgAdmin Pricing: Free (open source)
2. DBeaver

DBeaver is a major cross-platform GUI tool for PostgreSQL that both developers and database administrators love. DBeaver is not a native GUI tool for PostgreSQL, as it supports all the popular databases like MySQL, MariaDB, Sybase, SQLite, Oracle, SQL Server, DB2, MS Access, Firebird, Teradata, Apache Hive, Phoenix, Presto, and Derby – any database which has a JDBC driver (over 80 databases!).
Here are some of the top DBeaver GUI features for PostgreSQL:
Visual Query builder helps you to construct complex SQL queries without actual knowledge of SQL.
It has one of the best editors – multiple data views are available to support a variety of user needs.
Convenient navigation among data.
In DBeaver, you can generate fake data that looks like real data allowing you to test your systems.
Full-text data search against all chosen tables/views with search results shown as filtered tables/views.
Metadata search among rows in database system tables.
Import and export data with many file formats such as CSV, HTML, XML, JSON, XLS, XLSX.
Provides advanced security for your databases by storing passwords in secured storage protected by a master password.
Automatically generated ER diagrams for a database/schema.
Enterprise Edition provides a special online support system.
One of the cons of DBeaver is it may be slow when dealing with large data sets compared to some expensive GUI tools like Navicat and DataGrip.
You can run DBeaver on Windows, Linux, and macOS, and easily connect DBeaver PostgreSQL with or without SSL. It has a free open-source edition as well an enterprise edition. You can buy the standard license for enterprise edition at $199, or by subscription at $19/month. The free version is good enough for most companies, as many of the DBeaver users will tell you the free edition is better than pgAdmin.
DBeaver Pricing
: Free community, $199 standard license
3. OmniDB
The next PostgreSQL GUI we’re going to review is OmniDB. OmniDB lets you add, edit, and manage data and all other necessary features in a unified workspace. Although OmniDB supports other database systems like MySQL, Oracle, and MariaDB, their primary target is PostgreSQL. This open source tool is mainly sponsored by 2ndQuadrant. OmniDB supports all three major platforms, namely Windows, Linux, and Mac OS X.
There are many reasons why you should use OmniDB for your Postgres developments:
You can easily configure it by adding and removing connections, and leverage encrypted connections when remote connections are necessary.
Smart SQL editor helps you to write SQL codes through autocomplete and syntax highlighting features.
Add-on support available for debugging capabilities to PostgreSQL functions and procedures.
You can monitor the dashboard from customizable charts that show real-time information about your database.
Query plan visualization helps you find bottlenecks in your SQL queries.
It allows access from multiple computers with encrypted personal information.
Developers can add and share new features via plugins.
There are a couple of cons with OmniDB:
OmniDB lacks community support in comparison to pgAdmin and DBeaver. So, you might find it difficult to learn this tool, and could feel a bit alone when you face an issue.
It doesn’t have as many features as paid GUI tools like Navicat and DataGrip.
OmniDB users have favorable opinions about it, and you can download OmniDB for PostgreSQL from here.
OmniDB Pricing: Free (open source)
4. DataGrip

DataGrip is a cross-platform integrated development environment (IDE) that supports multiple database environments. The most important thing to note about DataGrip is that it’s developed by JetBrains, one of the leading brands for developing IDEs. If you have ever used PhpStorm, IntelliJ IDEA, PyCharm, WebStorm, you won’t need an introduction on how good JetBrains IDEs are.
There are many exciting features to like in the DataGrip PostgreSQL GUI:
The context-sensitive and schema-aware auto-complete feature suggests more relevant code completions.
It has a beautiful and customizable UI along with an intelligent query console that keeps track of all your activities so you won’t lose your work. Moreover, you can easily add, remove, edit, and clone data rows with its powerful editor.
There are many ways to navigate schema between tables, views, and procedures.
It can immediately detect bugs in your code and suggest the best options to fix them.
It has an advanced refactoring process – when you rename a variable or an object, it can resolve all references automatically.
DataGrip is not just a GUI tool for PostgreSQL, but a full-featured IDE that has features like version control systems.
There are a few cons in DataGrip:
The obvious issue is that it’s not native to PostgreSQL, so it lacks PostgreSQL-specific features. For example, it is not easy to debug errors as not all are able to be shown.
Not only DataGrip, but most JetBrains IDEs have a big learning curve making it a bit overwhelming for beginner developers.
It consumes a lot of resources, like RAM, from your system.
DataGrip supports a tremendous list of database management systems, including SQL Server, MySQL, Oracle, SQLite, Azure Database, DB2, H2, MariaDB, Cassandra, HyperSQL, Apache Derby, and many more.
DataGrip supports all three major operating systems, Windows, Linux, and Mac OS. One of the downsides is that JetBrains products are comparatively costly. DataGrip has two different prices for organizations and individuals. DataGrip for Organizations will cost you $19.90/month, or $199 for the first year, $159 for the second year, and $119 for the third year onwards. The individual package will cost you $8.90/month, or $89 for the first year. You can test it out during the free 30 day trial period.
DataGrip Pricing
: $8.90/month to $199/year
5. Navicat

Navicat is an easy-to-use graphical tool that targets both beginner and experienced developers. It supports several database systems such as MySQL, PostgreSQL, and MongoDB. One of the special features of Navicat is its collaboration with cloud databases like Amazon Redshift, Amazon RDS, Amazon Aurora, Microsoft Azure, Google Cloud, Tencent Cloud, Alibaba Cloud, and Huawei Cloud.
Important features of Navicat for Postgres include:
It has a very intuitive and fast UI. You can easily create and edit SQL statements with its visual SQL builder, and the powerful code auto-completion saves you a lot of time and helps you avoid mistakes.
Navicat has a powerful data modeling tool for visualizing database structures, making changes, and designing entire schemas from scratch. You can manipulate almost any database object visually through diagrams.
Navicat can run scheduled jobs and notify you via email when the job is done running.
Navicat is capable of synchronizing different data sources and schemas.
Navicat has an add-on feature (Navicat Cloud) that offers project-based team collaboration.
It establishes secure connections through SSH tunneling and SSL ensuring every connection is secure, stable, and reliable.
You can import and export data to diverse formats like Excel, Access, CSV, and more.
Despite all the good features, there are a few cons that you need to consider before buying Navicat:
The license is locked to a single platform. You need to buy different licenses for PostgreSQL and MySQL. Considering its heavy price, this is a bit difficult for a small company or a freelancer.
It has many features that will take some time for a newbie to get going.
You can use Navicat in Windows, Linux, Mac OS, and iOS environments. The quality of Navicat is endorsed by its world-popular clients, including Apple, Oracle, Google, Microsoft, Facebook, Disney, and Adobe. Navicat comes in three editions called enterprise edition, standard edition, and non-commercial edition. Enterprise edition costs you $14.99/month up to $299 for a perpetual license, the standard edition is $9.99/month up to $199 for a perpetual license, and then the non-commercial edition costs $5.99/month up to $119 for its perpetual license. You can get full price details here, and download the Navicat trial version for 14 days from here.
Navicat Pricing
: $5.99/month up to $299/license
6. HeidiSQL
HeidiSQL is a new addition to our best PostgreSQL GUI tools list in 2021. It is a lightweight, free open source GUI that helps you manage tables, logs and users, edit data, views, procedures and scheduled events, and is continuously enhanced by the active group of contributors. HeidiSQL was initially developed for MySQL, and later added support for MS SQL Server, PostgreSQL, SQLite and MariaDB. Invented in 2002 by Ansgar Becker, HeidiSQL aims to be easy to learn and provide the simplest way to connect to a database, fire queries, and see what’s in a database.
Some of the advantages of HeidiSQL for PostgreSQL include:
Connects to multiple servers in one window.
Generates nice SQL-exports, and allows you to export from one server/database directly to another server/database.
Provides a comfortable grid to browse and edit table data, and perform bulk table edits such as move to database, change engine or ollation.
You can write queries with customizable syntax-highlighting and code-completion.
It has an active community helping to support other users and GUI improvements.
Allows you to find specific text in all tables of all databases on a single server, and optimize repair tables in a batch manner.
Provides a dialog for quick grid/data exports to Excel, HTML, JSON, PHP, even LaTeX.
There are a few cons to HeidiSQL:
Does not offer a procedural language debugger to help you debug your code.
Built for Windows, and currently only supports Windows (which is not a con for our Windors readers!)
HeidiSQL does have a lot of bugs, but the author is very attentive and active in addressing issues.
If HeidiSQL is right for you, you can download it here and follow updates on their GitHub page.
HeidiSQL Pricing: Free (open source)
Conclusion
Let’s summarize our top PostgreSQL GUI comparison. Almost everyone starts PostgreSQL with pgAdmin. It has great community support, and there are a lot of resources to help you if you face an issue. Usually, pgAdmin satisfies the needs of many developers to a great extent and thus, most developers do not look for other GUI tools. That’s why pgAdmin remains to be the most popular GUI tool.
If you are looking for an open source solution that has a better UI and visual editor, then DBeaver and OmniDB are great solutions for you. For users looking for a free lightweight GUI that supports multiple database types, HeidiSQL may be right for you. If you are looking for more features than what’s provided by an open source tool, and you’re ready to pay a good price for it, then Navicat and DataGrip are the best GUI products on the market.
Ready for some PostgreSQL automation?
See how you can get your time back with fully managed PostgreSQL hosting. Pricing starts at just $10/month.
While I believe one of these tools should surely support your requirements, there are other popular GUI tools for PostgreSQL that you might like, including Valentina Studio, Adminer, DB visualizer, and SQL workbench. I hope this article will help you decide which GUI tool suits your needs.
Which Is The Best PostgreSQL GUI? 2019 Comparison
Here are the top PostgreSQL GUI tools covered in our previous 2019 post:
pgAdmin
DBeaver
Navicat
DataGrip
OmniDB
Original source: ScaleGrid Blog
3 notes
·
View notes
Link
DevArt dbForge Studio for MySQL v9.0.338 Enterprise
dbForge Studio for MySQL is a universal GUI tool for MySQL and MariaDB database development, management, and administration. The IDE allows you to create and execute queries, develop and debug stored routines, automate database object management, analyze table data via an intuitive interface. The MySQL client delivers data and schema comparison and synchronization tools, database reporting tools, backup options with scheduling, and much more.
https://developer.team/database-development/28252-devart-dbforge-studio-for-mysql-v90338-professional.html
1 note
·
View note
Text
Check all character sets & collations in MariaDB/MySQL
Check all character sets & collations in MariaDB / MySQL SHOW COLLATION [LIKE 'pattern' | WHERE expr] select * from information_schema.collations Example: SHOW COLLATION LIKE 'latin1%'; Collation |Charset|Id |Default|Compiled|Sortle -----------------------+-------+----+-------+--------+------ latin1_german1_ci |latin1 | 5| |Yes | latin1_swedish_ci |latin1 | 8|Yes |Yes | latin1_danish_ci…
View On WordPress
0 notes
Text
MariaDB / Modificando particiones de HASH y KEY
Hoy veremos como es la modificacion para las particiones de tipo Hash y Key, espero les sea de urilidad y buen inicio de semana!
Bienvenidos sean a este post, hoy veremos las distintas operaciones para modificar las particiones del titulo. Antes de comenzar a ver como modificar las particiones vamos a crear la siguiente tabla en alguna base que dispongan: MariaDB [base1]> create table articulos ( -> id INTEGER UNSIGNED NOT NULL AUTO_INCREMENT, -> fecha DATE NOT NULL, -> autor VARCHAR(100), -> idioma TINYINT UNSIGNED, ->…

View On WordPress
0 notes
Text
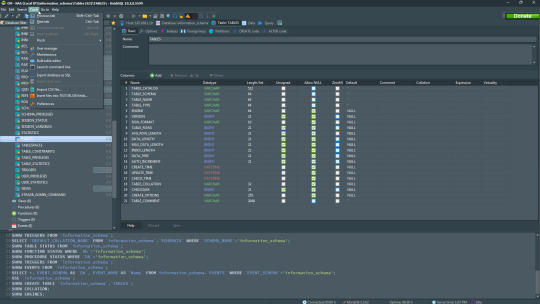
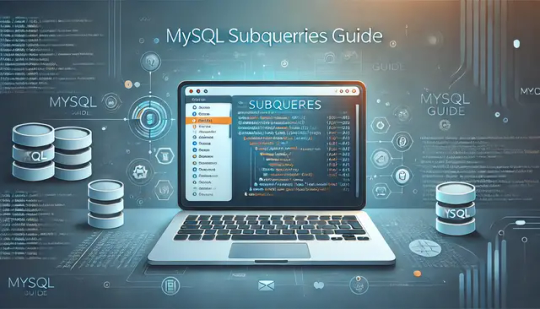
MySQL Subqueries Guide
Subqueries in MySQL are very useful when data manipulation gets complicated. MySQL is among the most powerful and widely used relational databases. Still, retrieving the exact data you need can quickly become challenging, especially if it involves multiple tables or calculations.
Instead of combining several queries and complex joins, you can place a MySQL subquery inside your SQL statements. This approach isolates your operations into smaller result sets, so you can build more flexible and targeted queries.
Let's explore the different subquery types, and learn how to use them in your SQL query with many examples and tips. For demonstration, we will use dbForge Studio for MySQL, which provides features for accelerated code editing, building complex queries, and efficient syntax checks.
Read in full to learn more about MySQL Subquery.
0 notes
Text
Stages of Developing your NFT Market
On the client side, NFT marketplaces work just like normal online stores . The user must register on the platform and create a personal digital wallet to store NFTs and cryptocurrencies.

Stages of developing your NFT market
An NFT trading platform for buying and selling is complex software that is best left to be developed by a development company with relevant experience, such as Merehead. We have been helping companies and individuals with fintech and blockchain projects — from wallets to cryptocurrency exchanges — since 2015. To do this, our company can help you create a nft marketplace development from scratch or clone an existing platform.
Step 1: Open the project
The first step in creating an NFT marketplace is for you and the development team to examine the details of your project to assess its technical feasibility.
Here you must answer the questions:
In which niche will you operate?
How exactly are you going to market the NFT?
What is your main target audience?
What token protocol are you going to use?
What tech stack are you going to use?
What monetization model will you use?
What will make your project stand out from the competition?
What features do you intend to implement?
Other questions…
The answers to these questions will guide you through the development process and help you create specifications for your NFT marketplace. If you find it difficult to answer the questions, don’t worry, the development team will help you: they can describe your ideas in text and visual schematics and prepare technical documentation so you can start designing.
Once the initial concept and specifications are ready, the development team can draw up a development plan to give an approximate timeline and budget for the project. You can then start the design.
Step 2: Design and development
When all the technical requirements and the development plan have been agreed, the development team can get to work. First, you, the business analyst, and/or the designers design the marketplace user interface (framework, mockups, and prototypes) with a description of user flows and platform features. An effective architecture for the trading platform is also created.
UX/UI design . The navigation and appearance of the user interface are very important when developing an NFT marketplace platform development , since first impressions, usability and the overall user experience depend on it. So make sure your site design is appealing to your audience and simple enough to be understood by anyone even remotely familiar with Amazon and Ebay.
Back-end and smart contracts . At this level the entire back-end of your trading platform operates. When developing it, in addition to the usual business logic and marketplace functionality, you need to implement blockchain, smart contracts, wallets, and provide an auction mechanism (most NFTs sell through it). This is an example of a tech stack for an NFT marketplace backend :
Blockchain: Ethereum, Binance Savvy Chain.
Token norm: ERC721, ERC1155, BEP-721, BEP-1155.
Savvy contracts: Ethereum Virtual Machine, BSC Virtual Machine.
Systems: Spring, Symfony, Cup.
Programming dialects: Java, PHP, Python.
SQL information bases: MySQL, PostgreSQL, MariaDB, MS SQL, Prophet.
NoSQL information bases: MongoDB, Cassandra, DynamoDB.
Web crawlers: Apache Solr, Elasticsearch.
DevOps: GitLab CI, TeamCity, GoCD Jenkins, WS CodeBuild, Terraform.
Store: Redis, Memcached.
The front end .
This is the whole outer piece of the exchanging stage, which is answerable for the collaboration with the end client.The main task of front-end development is to ensure ease of management, as well as reliability and performance. This is an example of a technology stack for the front-end of an NFT marketplace:
Web languages: Angular.JS, React.JS, Backbone and Ember.
Mobile languages: Java, Kotlin for Android and Swift for iOS.
Architecture: MVVM for Android and MVC, MVP, MVVM and VIPER for iOS.
IDE: Android Studio and Xcode for iOS.
SDK: Android SDK and iOS SDK.
Step 3: Test the product you have created
In this phase, several cycles of code testing are performed to ensure that the platform works correctly. The QA team performs various checks to ensure that your project’s code is free of bugs and critical bugs. In addition, content, usability, security, reliability and performance tests are carried out for all possible scenarios of use of the platform.
Step 4: Deployment and support
When the nft marketplace development service platform has been tested, it is time to deploy your NFT trading platform on a server (the cloud). Please note that this is not the last step, as you will also need to organize your support team. In addition, you also have to plan the further development of the platform to follow market trends and user expectations.
#development of nft market#nft market#stages of developing nft market#nft marketplace#nft marketplace development
0 notes
Text
This guide will help new users with the installation of MariaDB 10.7 on Amazon Linux 2. MariaDB is a free to use and open source relational database management system originally forked from MySQL. The latest stable release of MariaBD database server as of this article update is version 10.7 with cool new features that can be read from the release notes page. Install MariaDB 10.7 on Amazon Linux 2 The version of MariaDB server available on the OS default repositories is not the latest as per the upstream project. $ sudo amazon-linux-extras | grep mariadb 17 lamp-mariadb10.2-php7.2 available \ 54 mariadb10.5 available [ =stable ] To be able to install the latest MariaDB 10.7 on Amazon Linux 2 we’ll have to add MariaDB official RPM repository. The one that works for Amazon Linux 2 is CentOS 7 repository. Let’s first update and reboot the system sudo yum -y update sudo reboot Step 1: Add MariaDB repository to Amazon Linux 2 Add MariaDB repository to Amazon Linux 2 machine by running the commands below as root or user with sudo privileges. curl -LsS -O https://downloads.mariadb.com/MariaDB/mariadb_repo_setup sudo bash mariadb_repo_setup --os-type=rhel --os-version=7 --mariadb-server-version=10.7 Repository addition output: # [info] Skipping OS detection and using OS type 'rhel' and version '7' as given on the command line # [info] Checking for script prerequisites. # [info] MariaDB Server version 10.7 is valid # [info] Repository file successfully written to /etc/yum.repos.d/mariadb.repo # [info] Adding trusted package signing keys... /etc/pki/rpm-gpg ~ ~ # [info] Successfully added trusted package signing keys # [info] Cleaning package cache... Failed to set locale, defaulting to C Loaded plugins: langpacks, priorities, update-motd Cleaning repos: amzn2-core amzn2extra-docker mariadb-main mariadb-maxscale mariadb-tools Cleaning up everything Before you begin installaton update OS package cache index: sudo rm -rf /var/cache/yum sudo yum makecache Confirm available repositories on your Amazon Linux instance. $ sudo yum repolist repo id repo name status amzn2-core/2/x86_64 Amazon Linux 2 core repository 27317 amzn2extra-docker/2/x86_64 Amazon Extras repo for docker 56 mariadb-main MariaDB Server 80+3 mariadb-maxscale MariaDB MaxScale 4 mariadb-tools MariaDB Tools 14+1 repolist: 27471 Step 2: Install MariaDB 10.7 on Amazon Linux 2 Once you have the repository added and working you can then begin the installation of MariaDB on Amazon Linux 2 machine. sudo yum install MariaDB-server MariaDB-client Make sure there are no dependency issues and agree to installation. .... Dependencies Resolved ====================================================================================================================================================================================================== Package Arch Version Repository Size
====================================================================================================================================================================================================== Installing: MariaDB-client x86_64 10.7.3-1.el7.centos mariadb-main 15 M MariaDB-compat x86_64 10.7.3-1.el7.centos mariadb-main 2.2 M replacing mariadb-libs.x86_64 1:5.5.68-1.amzn2 MariaDB-server x86_64 10.7.3-1.el7.centos mariadb-main 25 M Installing for dependencies: MariaDB-common x86_64 10.7.3-1.el7.centos mariadb-main 81 k boost-program-options x86_64 1.53.0-27.amzn2.0.5 amzn2-core 161 k galera-4 x86_64 26.4.11-1.el7.centos mariadb-main 9.9 M libpmem x86_64 1.3-3.amzn2 amzn2-core 36 k ncurses-compat-libs x86_64 6.0-8.20170212.amzn2.1.3 amzn2-core 308 k perl-Compress-Raw-Bzip2 x86_64 2.061-3.amzn2.0.2 amzn2-core 32 k perl-Compress-Raw-Zlib x86_64 1:2.061-4.amzn2.0.2 amzn2-core 58 k perl-DBI x86_64 1.627-4.amzn2.0.2 amzn2-core 804 k perl-Data-Dumper x86_64 2.145-3.amzn2.0.2 amzn2-core 48 k perl-IO-Compress noarch 2.061-2.amzn2 amzn2-core 260 k perl-Net-Daemon noarch 0.48-5.amzn2 amzn2-core 51 k perl-PlRPC noarch 0.2020-14.amzn2 amzn2-core 36 k socat x86_64 1.7.3.2-2.amzn2.0.1 amzn2-core 291 k Transaction Summary ====================================================================================================================================================================================================== Install 3 Packages (+13 Dependent packages) Total download size: 54 M Is this ok [y/d/N]: y Start and enable the database service. sudo systemctl enable --now mariadb MariaDB service should show as running. $ systemctl status mariadb ● mariadb.service - MariaDB 10.7.3 database server
Loaded: loaded (/usr/lib/systemd/system/mariadb.service; enabled; vendor preset: disabled) Drop-In: /etc/systemd/system/mariadb.service.d └─migrated-from-my.cnf-settings.conf Active: active (running) since Thu 2022-03-03 00:03:20 UTC; 3s ago Docs: man:mariadbd(8) https://mariadb.com/kb/en/library/systemd/ Process: 3222 ExecStartPost=/bin/sh -c systemctl unset-environment _WSREP_START_POSITION (code=exited, status=0/SUCCESS) Process: 3197 ExecStartPre=/bin/sh -c [ ! -e /usr/bin/galera_recovery ] && VAR= || VAR=`cd /usr/bin/..; /usr/bin/galera_recovery`; [ $? -eq 0 ] && systemctl set-environment _WSREP_START_POSITION=$VAR || exit 1 (code=exited, status=0/SUCCESS) Process: 3194 ExecStartPre=/bin/sh -c systemctl unset-environment _WSREP_START_POSITION (code=exited, status=0/SUCCESS) Main PID: 3208 (mariadbd) Status: "Taking your SQL requests now..." CGroup: /system.slice/mariadb.service └─3208 /usr/sbin/mariadbd Step 3: Secure and Test database connection Run the database hardening script provided by the installer. $ sudo mariadb-secure-installation NOTE: RUNNING ALL PARTS OF THIS SCRIPT IS RECOMMENDED FOR ALL MariaDB SERVERS IN PRODUCTION USE! PLEASE READ EACH STEP CAREFULLY! In order to log into MariaDB to secure it, we'll need the current password for the root user. If you've just installed MariaDB, and haven't set the root password yet, you should just press enter here. Enter current password for root (enter for none): OK, successfully used password, moving on... Setting the root password or using the unix_socket ensures that nobodycan log into the MariaDB root user without the proper authorisation. You already have your root account protected, so you can safely answer 'n'. Switch to unix_socket authentication [Y/n] n ... skipping. You already have your root account protected, so you can safely answer 'n'. Change the root password? [Y/n] y New password: Re-enter new password: Password updated successfully! Reloading privilege tables.. ... Success! By default, a MariaDB installation has an anonymous user, allowing anyone to log into MariaDB without having to have a user account created for them. This is intended only for testing, and to make the installation go a bit smoother. You should remove them before moving into a production environment. Remove anonymous users? [Y/n] y ... Success! Normally, root should only be allowed to connect from 'localhost'. This ensures that someone cannot guess at the root password from the network. Disallow root login remotely? [Y/n] y ... Success! By default, MariaDB comes with a database named 'test' that anyone can access. This is also intended only for testing, and should be removed before moving into a production environment. Remove test database and access to it? [Y/n] y - Dropping test database... ... Success! - Removing privileges on test database... ... Success! Reloading the privilege tables will ensure that all changes made so far will take effect immediately. Reload privilege tables now? [Y/n] y ... Success! Cleaning up... All done! If you've completed all of the above steps, your MariaDB installation should now be secure. Thanks for using MariaDB! Confirm you can login as root user with the password set. $ mysql -u root -p Enter password: Welcome to the MariaDB monitor. Commands end with ; or \g. Your MariaDB connection id is 14 Server version: 10.7.3-MariaDB MariaDB Server Copyright (c) 2000, 2018, Oracle, MariaDB Corporation Ab and others. Type 'help;' or '\h' for help. Type '\c' to clear the current input statement. MariaDB [(none)]> SELECT VERSION(); +----------------+ | VERSION() | +----------------+ | 10.7.3-MariaDB | +----------------+ 1 row in set (0.000 sec) MariaDB [(none)]> QUIT Bye The marks the end of our guide on the installation of MariaDB 10.7 on Amazon Linux 2 server.
0 notes
Text
Universal database ide

#Universal database ide mac os
#Universal database ide manual
#Universal database ide software
These can help user build high-quality conceptual, logical and physical data models easily and efficiently. Free multi-platform database tool for developers, database administrators, analysts and all people who need to work with databases. It comes with good usability, has practical functions such like: designs the database structure, performs a reverse or forward engineering process, imports models from the ODBC data source, generates complex SQL/DDL, and prints models. SQL Developer Universal Database Frontend. The DDL Processor processes SQL DDL statements using one of the following methods: Transforming DB2 for z/OS syntax DDL statements to DB2 Universal Database. P圜harm a perfect IDE for professional python developers. Running and debugging Golang is easy with GoLand. It analyzes the codes on the fly and suggests fixes for any bugs.
#Universal database ide software
Navicat Data Modeler is a cross-platform visual database design software developed by PremiumSoft from Hong Kong in China. An SQL query tool, database browser, SQL editor, and database administration tool. DataGrip a database IDE that supports MySQL, PostgreSQL, MongoDB, Oracle, SQL Server, DB2, MariaDB, Cassandra, Vertica, Hive, etc. It is perfect for building, editing, and running queries.
#Universal database ide mac os
MySQL Workbench is available on Windows, Linux, and Mac OS X. With this IDE, you can visually design, model, generate, and manage databases. This work is licensed under a Creative Commons Attribution-NonCommercial-ShareAlike 4.0 International License. This is a unified visual tool for anyone who works with MySQL databases. Otherwise, please bear all the consequences by yourself. It connects to all popular databases and runs on Win, Mac & Linux. Otherwise, you may receive a variety of copyright complaints and have to deal with them by yourself.īefore using (especially downloading) any resources shared by AppNee, please first go to read our F.A.Q. page more or less. DbVisualizer is the SQL client and database tool with the highest user satisfaction. DbSchema is a universal database design tool for out-of-the-box schema management, schema documentation, design in a team, and deployment on multiple. It gives database professionals the tools they need to build, manage and maintain state-of-the-art database technologies. Powered by our patented Universal Storage, for processing both. DbVisualizer is the universal database tool used by developers, analysts, and database admins all over the world.
#Universal database ide manual
To repost or reproduce, you must add an explicit footnote along with the URL to this article!Īny manual or automated whole-website collecting/crawling behaviors are strictly prohibited.Īny resources shared on AppNee are limited to personal study and research only, any form of commercial behaviors are strictly prohibited. The fully-managed, on-demand cloud database service to power your data-intensive. This article along with all titles and tags are the original content of AppNee.
0 notes
Text
Universal database ide

#Universal database ide free
DB Visualizer is a universal tool for developers, DBA & application analysts to browse.
#Universal database ide free
Has a thriving developer community of more than 250,000 monthly active developers. A cross-platform IDE that is aimed at DBAs and developers working with SQL databases DBeaver: A Universal Database Tool. Free multi-platform database tool for developers, database administrators, analysts and all people who need to work with databases. So you can manage many databases through a single IDE (Integrated. SQL Developer Universal Database Frontend. Highly-scalable, massively popular document database service for mobile, web, and server development that offers richer, faster queries and high availability up to 99.999. most powerful IDE (Integrated Development Environment) for C development. Please provide feedback through the GitHub Issue system. An SQL query tool, database browser, SQL editor, and database administration tool. Navicat Premium is an award-winning universal database managing tool that is. Its a list of all SQL editors available for major databases: Oracle, SQL Server, MySQL, PostgreSQL, SQLite, and MariaDB. SQLTools will save you (for sure) a lot of time and help you to increase your productivity, so please consider a donation or become a supporter and help SQLTools become more awesome than ever. SQLTools was developed with ♥ to save us time during our programming journey. Join all these amazing contributors❤️ on this journey. Unable to connect with "Drivers XXXX is not installed"? Check this issue.ĪWS Cloud you want to add a new driver? We have a tool to help you. As a system, database or network administrator, web developer or. I'm looking for maintainers for each driver, if you are interested in maintaining/testing any driver, please contact me. The leading Universal Scripting IDE for all your administrative and web-development tasks. You can read the entire docs in FeaturesĬheck out all the features and their documentation here. Connection explorer, query runner, intellisense, bookmarks, query history.
0 notes