#my guides
Explore tagged Tumblr posts
Visit Tumblr Blog
Explore Tumblr blogs with no restrictions, modern design and the best experience.
Last Seen Tumblr Blogs


Fun Fact
Tumblr has been providing a Korean-language service since 2013.
Text
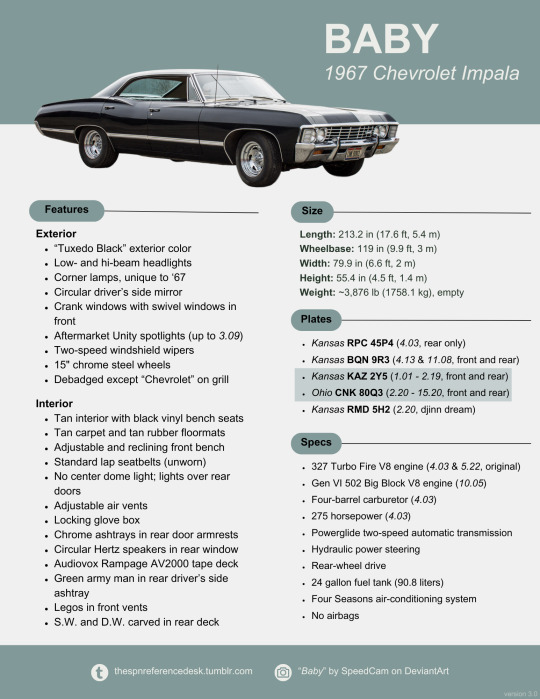
SPN Reference Desk: 1967 Impala Quick Ref Sheet
Full guides and screenshots here.
524 notes
·
View notes
Text
Making Gifs Part 2: Photopea
This is part 2 of my own personal gifmaking guide. Please read Part 1 to learn about how I capture the sequential screencaps to make my gifs.
Once you have your screencaps, open Photopea. They have a very simple guide on how to make animations in their help guide. I will be going into much more detail.
Note: ***Tumblr has a limit of 10mb for the filesize of each gif, and recommends no wider than 540 pixels. If your gif is wider than 540 pixels Tumblr will resize it, and it will cause the quality to be reduced, and also take much longer for the gif to load in your post.***
1. RENAME CAPS:
First things first. Rename all of your caps that you will be using for a gif to have the prefix _a_ on your computer. Select all and right-click on the FIRST file and select Rename (windows) and type _a_. Windows will add the numbers.
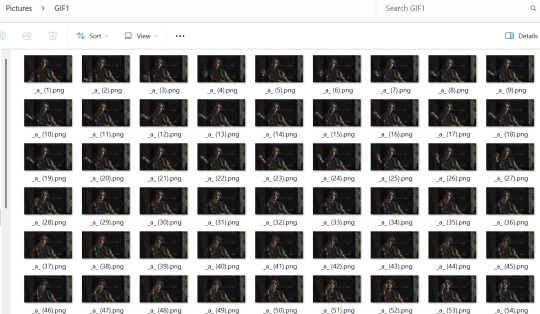
For most gifs, try not to have more than 60 frames as it will make the gif too large to upload to Tumblr. I usually aim for 45-50 frames max for most of my gifs.
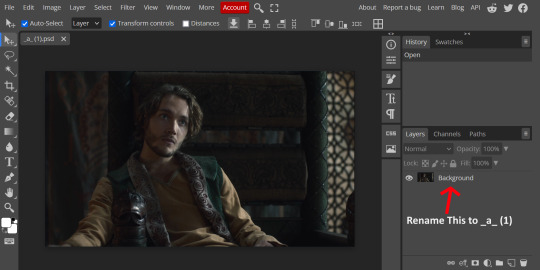
2. IMPORT FRAME #1:
Drag and Drop _a_ (1).png into Photopea. Rename the layer from Background to _a_ (1)
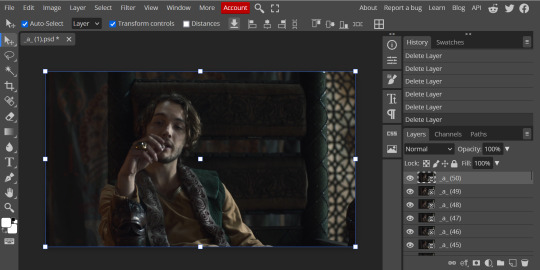
3. IMPORT IMAGES:
Select all the rest of your images from the folder on your computer, and drag and drop ON TOP OF the image (not the layers section). Make sure the file you grab to drag/drop is the next one in the sequence (so _a_ (2).png in this case. Otherwise they will be out of order. If you do it right, you will see the layers section on the right get populated with your caps in reverse order, with 1 at the bottom and the last one at the top.
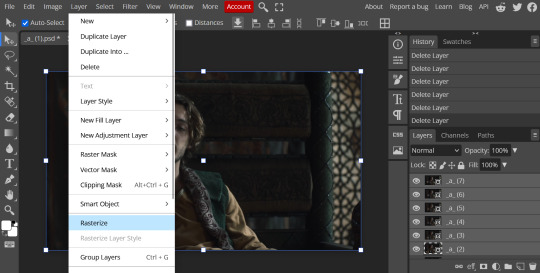
4. RASTERIZE:
Next, select all of the layers (on the right, by holding CTRL and clicking on each layer), go to Layer > Rasterize. They are currently Smart Layers, and if you keep them this way the sharpening will not apply (for some reason, I have no idea why that is)
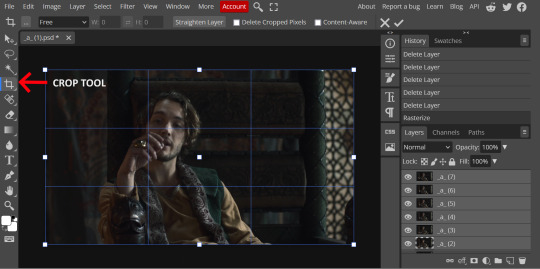
5. CROP:
Next, crop your gif. This tool is on the left menu. You do not have to have all the layers selected for this, it will crop all layers together. Move the blue lines at the edges until the frame is cropped how you like. Be mindful of the character moving in other frames; you may want to check your other layers to make sure nothing important gets cropped off in another frame. Once the blue lines are where you want them, click the checkmark at the top right to finish the crop.
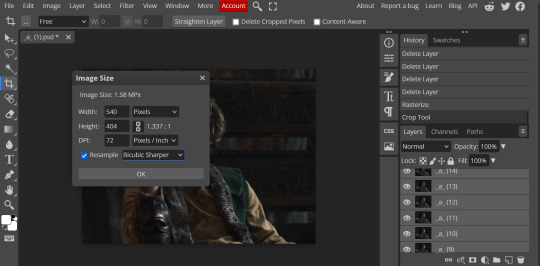
6. RESIZE:
Resize your gif so that it is 540 pixels wide. Go to Image > Image Size in the top menu. Make sure you choose "Bicubic Sharper" as the resample mode. Once this is done, you will see your image is tiny, so go to the Zoom tool (on the left menu, the magnifying glass near the bottom) and select Fit the Area at the top of the screen so you can see what you are doing.
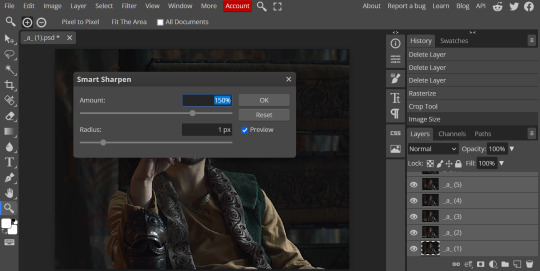
7. SHARPEN:
Next is sharpen. Select all your layers again (on the right), then go to the top menu: Filter > Sharpen > Smart Sharpen. The default settings here are for 150%, and that is good for most things.
8. ADJUSTMENTS
This is the tricky part. You now need to adjust the brightness, contrast, exposure, color balance, and saturation. This will vary from gif to gif how much to adjust these values. I will show how I adjusted this one and you can apply that to whatever gif you are making.
For starters, since this show is SO DARK, you will need to brighten it. There are many ways to do this, but I found the method that works best for me is adjusting the Levels.
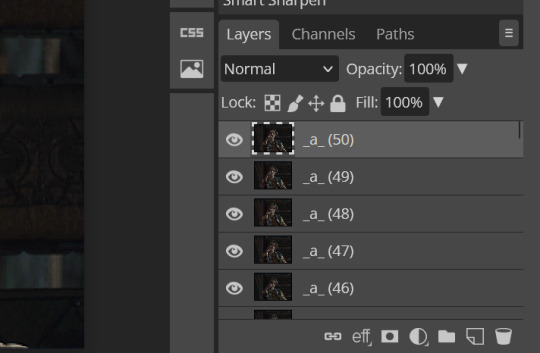
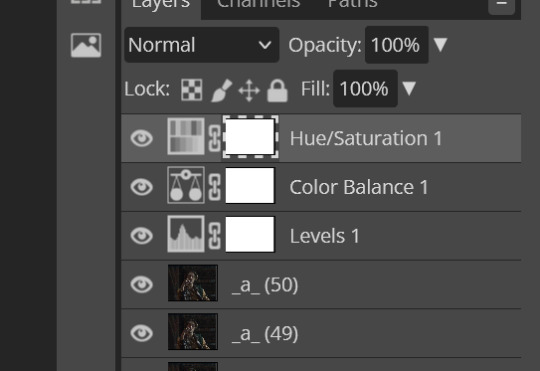
First off, in order to make adjustments, make sure you scroll all the way to the top of your Layers panel and make sure only the TOP LAYER is selected. Otherwise the adjustments will only be applied to whatever is BELOW the selected layer. You want all of them.
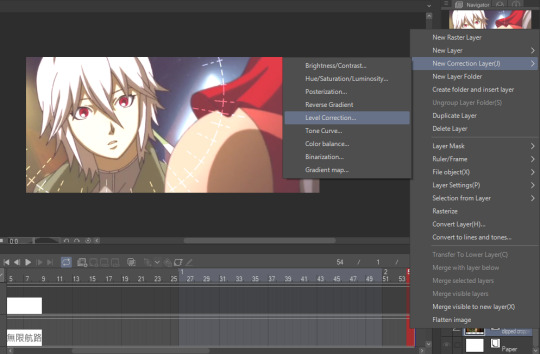
8a. ADJUST LEVELS
Next, go to Layer > New Adjustment Layer to pull up all your adjustments. For this first example we will use Levels, which is the second from the top.

You will see a histogram like this one:
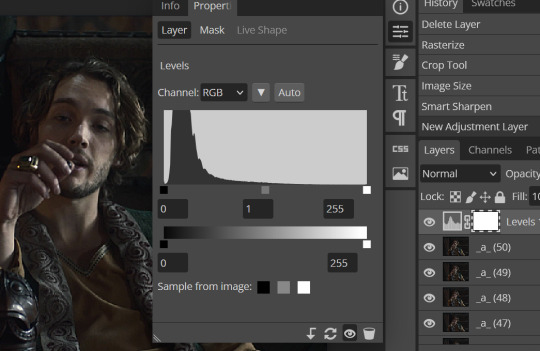
This is a lot of information about the image, but pay attention to where the curve starts and stops. On the left, you see a "0". That is your dark point. This image is slightly washed out so I need to move that adjustment to the right so that the little square is just below where the curve starts. The third number is "255" and this is your bright point. The images are very dark so most of the graph is shifted to the left (dark) so in order to brighten, move the third square (the white one) so that the second square (grey one) is just at the edge of where the curve drops off on the right.
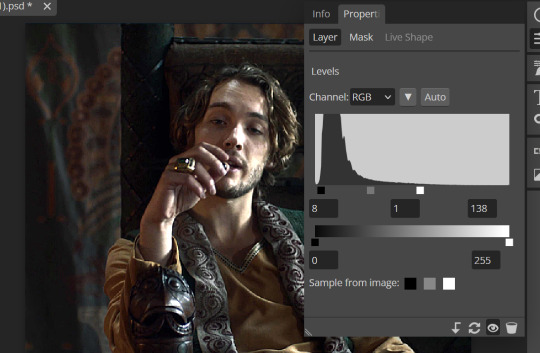
You can now see the numbers changed. Moving the first dark square will enhance your contrast, and moving the THIRD square will enhance your brightness. It is usually not necessary to move the second square, but you can experiment with this by moving things around and seeing how it affects your image. After this, it may be necessary to also increase the Exposure and Brightness if it is still not bright enough, but most of that can be done here.
8b. ADJUST COLOR BALANCE
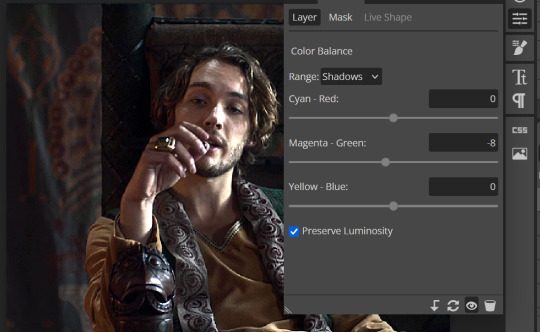
Again go to your Layer > New Adjustment Layer > Color Balance to get this tool. This is a neat one with A LOT of variables, so play around with it to get the colors to look how you want. A lot of the raw video tends to have a bluish or greenish cast to it, so you just move the sliders to get rid of the cast and make the colors look how they are SUPPOSED to.
In this case there is a very slight greenish cast to the pictures so I will adjust that slider to compensate. The Range (at the top) you can select Shadows, Midtones, or Highlights, depending on where the color cast is located. Usually I stick to Shadows but sometimes will use Midtones if the color cast is really bad. Make sure Preserve Luminosity is checked.
8c: ADJUST SATURATION
Layer > New Adjustment Layer > Hue/Saturation. This will brighten up your colors. This tool is VERY COOL in that you can select color families to selectively increase or decrease the saturation of. Under Range you can choose Master, which is all colors, or choose only Red, Yellow, Green, Cyan, Blue or Magenta. The slider at the very bottom (when a single color is selected) allows you to set the range of colors to. I chose Master and increased the saturation of all colors, but be careful as this can make skintones look VERY orange. So select other colors in the Range to adjust single colors only.
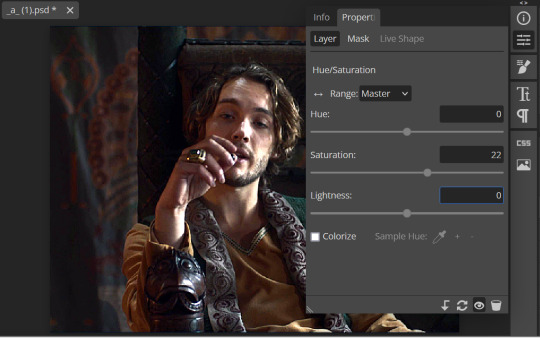
With this tool you can also change the HUE (which is changing the overall colors to a different color, like shifting all the reds to orange) and Lightness (which may or may not be necessary if you did the Levels correctly)
If you need to go back and change something in your adjustment layers, you can do so by clicking on the white box in the Layers section next to whatever you need to adjust.
There are many other Adjustment Layers you can play with, so have fun and experiment!
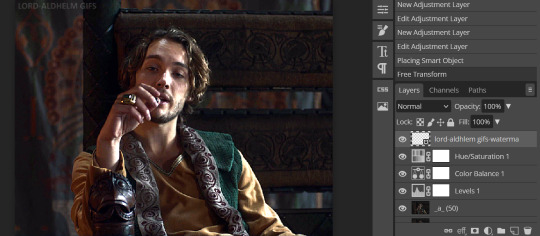
9. ADD YOUR WATERMARK AND TEXT
Next, you can add a watermark if you have a premade file, by dragging and dropping it on the image. Then move it around to where you want it, resize it if needed, and change the opacity if it is too bright. Make sure this layer is the TOP layer.
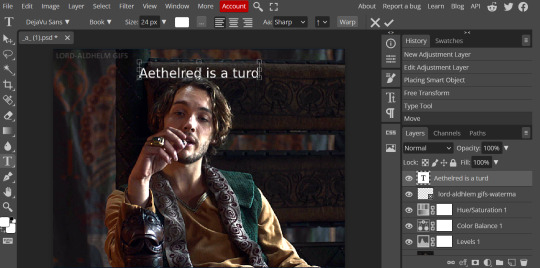
To add text (for subtitles or effects) simply click on the Text icon in the left menu (the T) and click anywhere on the image and start typing. You can change the font, color, size, and style in the menu on the top. Move the text around by using the Select tool (arrow on the left) Again make sure this is the TOP LAYER so that it will be present over the entire gif.
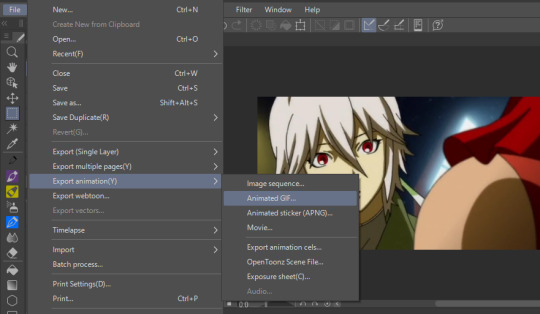
10: EXPORT YOUR GIF
File > Export as > GIF
A pop up dialog will appear and you can change some settings here if you want. I usually don't. Pay close attention to the filesize (at the bottom) and make sure it is under 10mb. Keep the quality at 100%. And most importantly MAKE SURE DITHER is checked! This will prevent compression artifacts from ruining your gif.
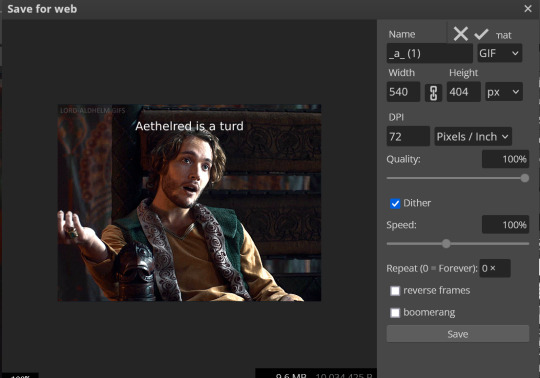
Save the file to your computer and VIOLA! Gif!
Have fun!
#gifmaking#gifs#gif makers#gif making resource#gifmakers#gif making#gif#gifmaking resources#gif making resources#my guides#giffing tutorial#gif making tutorial#photopea#photopea tutorial#photopea resources#photopeablr#photopea gifs#long post
74 notes
·
View notes
Text

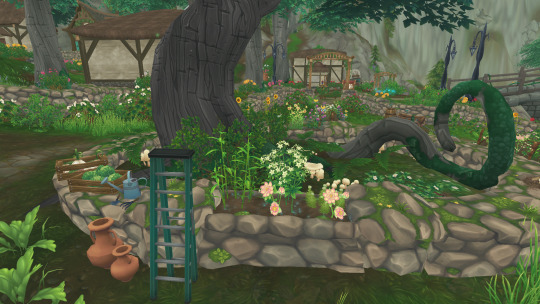

Garden Optimization: Dual Planter Method
Yesterday, I learned that my previous garden optimization was, in fact, not optimized. I based the original post on research I did myself, but looking back it was not the most sound research. Yesterday I saw the list of combinations on the star stable wiki, and this new garden appeared from that.
This garden is almost fully optimized, but there are two interactions that do nothing. This is intended in this method, as this method intends to have an even number of all plants planted at all times. If the even number does not matter to you, replace the jute marked with a * in the 6-planter with rubia.
Now, for 3-pot planters, the layout is as such:
Bee Balm - Flax - Chamomile This activates the BB-F and F-C interactions for Druid's Sorrow.*
*Alternate of the above: Bee Balm - Chamomile - Flax. This replaces one of the Druid's Sorrow interactions with a Lumopetal interaction.
Jute - Rubia - Moss This activates the J-R interaction for Druid's Sorrow, and the R-M interaction for Lumopetal.
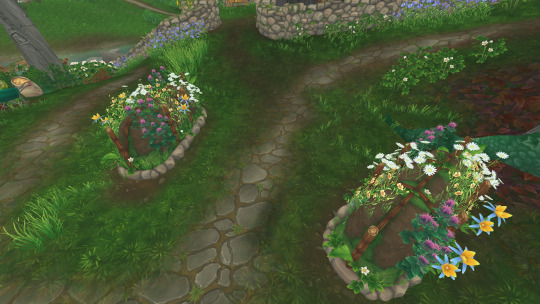
For the 6-pot planters, the names below eachother will mean "across from", and the layout is as such:
Chamomile - Flax - Bee Balm Bee Balm - Chamomile - Flax All of these activate interactions. (BB-F for Druid's Sorrow, F-C for Druid's Sorrow, and BB-C for Lumopetal)
Jute* - Moss - Rubia Moss - Rubia - Jute These almost all activate interactions. (J-R for Druid's Sorrow, and R-M for Lumopetal)
24 notes
·
View notes
Note
Hi! Stumbled upon your blog by chance, and would like to say that I really like your work and find amazing the way your gifs look ♡
In case you're willing to share, could you please show what are the settings you use on Desmume? Most videos on YouTube show settings to make the games look HD, but I think it would be interesting if I could play with more pixelated graphics like in your gifs. Hope this type of question doesn't bother you.
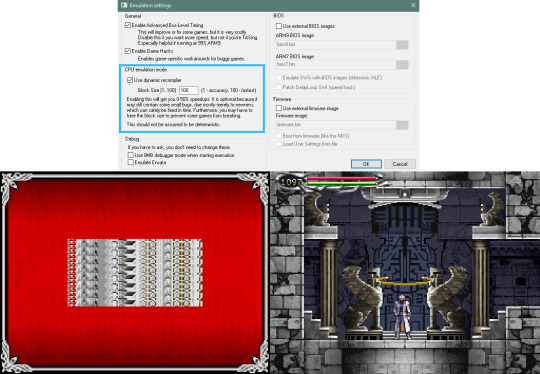
Here are my settings:

Make sure your window size is set to a whole number (2x, 3x) or the pixels might look clumpy. I switch between OpenGL sometimes and I may adjust the textures a little too. I either put no filter or use HQ2xS for smoothing 3D stuff:
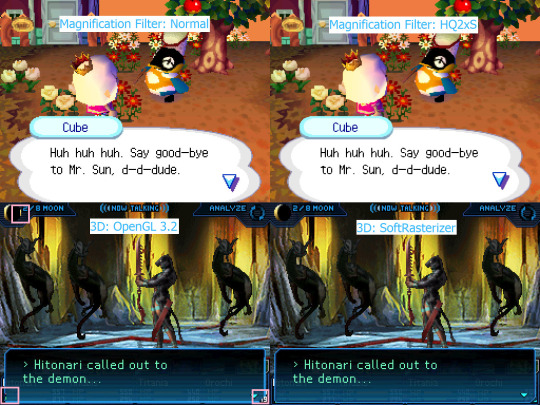
However, some games will have broken text or lines if you put this number too high so decrease it or uncheck:
I hope this was helpful and it's no problem, thanks so much! <33
64 notes
·
View notes
Text
basic web-weaving page template:
Click for clearer quality.
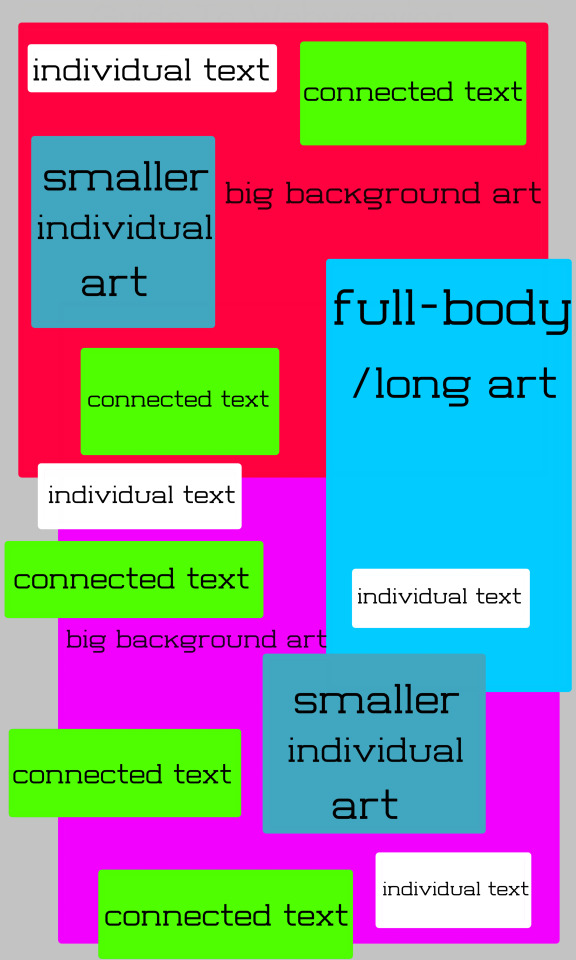
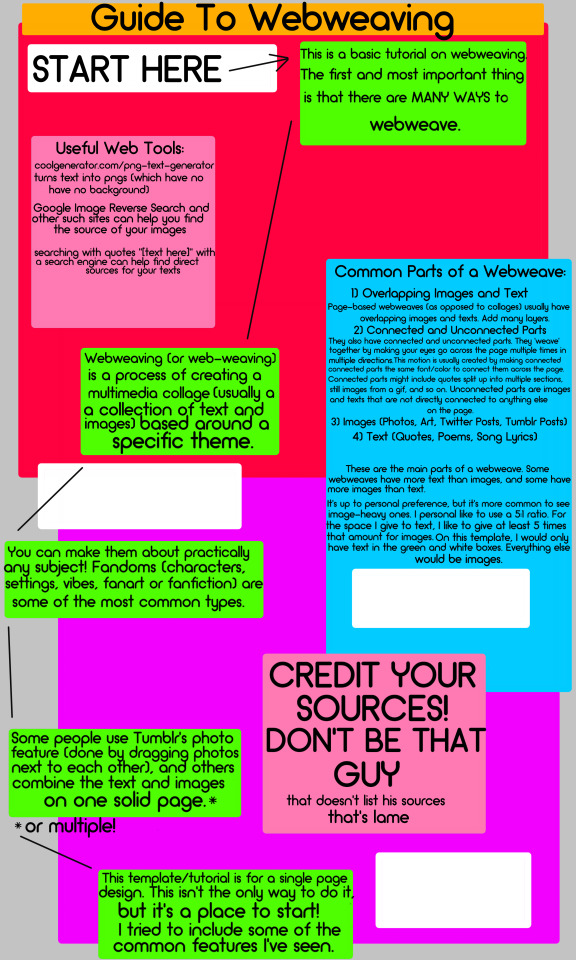


Image 1: template with text Image 2: guide to web-weaving Image 3: template without text Image 4: example web weave here (sources: x x x x x x x x x x x) Image 5: example web weave with template overlay
Text under cut:
"Guide to Webweaving
This is a basic tutorial on webweaving. The first and most important thing is that there are MANY WAYS to webweave.
Webweaving (or web-weaving) is a process of creating a multimedia collage (usually a collection of text and images) based around a specific theme.
You can make them about practically any subject! Fandom (characters, settings, vibes, fanart or fanfiction) are some of the most common types.
Some people use Tumblr's photo feature (done by dragging photos next to each other), and others combine the text and images on one solid page.*
*or multiple!
Common Parts of a Webweave:
Overlapping Images and Text Page-based webweaves (as opposed to collages) usually have overlapping images and texts. Add many layers.
Connected and Unconnected Parts They also have connected and unconnected parts. They "weave" together by making your eyes go across the page multiple times in multiple directions. This motion is usually created by making connected parts the same font/color to connect them across the page. Connected parts might include quotes split up into multiple sections, still images of a gif, and so on. Unconnected parts are images and texts that are not directly connected to anything else on the page.
Images (Photos, Art, Twitter Posts, Tumblr Posts)
Text (Quotes, Poems, Song Lyrics)
These are the main parts of a webweave. Some webweaves have more text than images, and some have more images than text.
It's up to personal preference, but it's more common to see image-heavy ones. I personally like to us a 5:1 ratio. For the space I give to text, I like to give at least 5 times that amount for images. On this template, I would only have text in the green and white boxes. Everything else would be images.
Useful Web Tools:
coolgenerator.com/png-text-generator turns text into pngs (which have no background)
Google Image Reverse Search and other such sites/features can help you find the source of your images
searching quotes "[text here]" with a search engine can helo you find direct sources for your texts
CREDIT YOUR SOURCES! DON'T BE THAT GUY (that doesn't list his sources (that's lame))"
Notes:
The colored blocks are a spatial representation of where things might be on the page. You do not need to create boxes like this, and your images and texts also do not need to be in these exact shapes to follow the template.
#look i know it looks half-assed but rest assured i was putting 100% into it. i am just bad#my templates#my guides#webweaving#webweave
13 notes
·
View notes
Note
Hi! I wanted to know, how do you do typesetting for manga? What sort of tools do you use? I recently discovered a series that has text only translations, and wanted to learn how to typeset so I could combine them with the raw scans.
Hello! It's great to hear that someone else is getting into typesetting! I'm entirely self-taught (didn't even look at guides or anything, I just felt it out and it shows in my earlier work lol) but the nice thing about typesetting is that it's pretty easy to get a feel for. Honestly, Photoshop does most of the technical work; I would say a lot of typesetting has to do with art and visual aesthetics. It's your job to make things look right, and you can get really fancy with it (especially with sound effects).
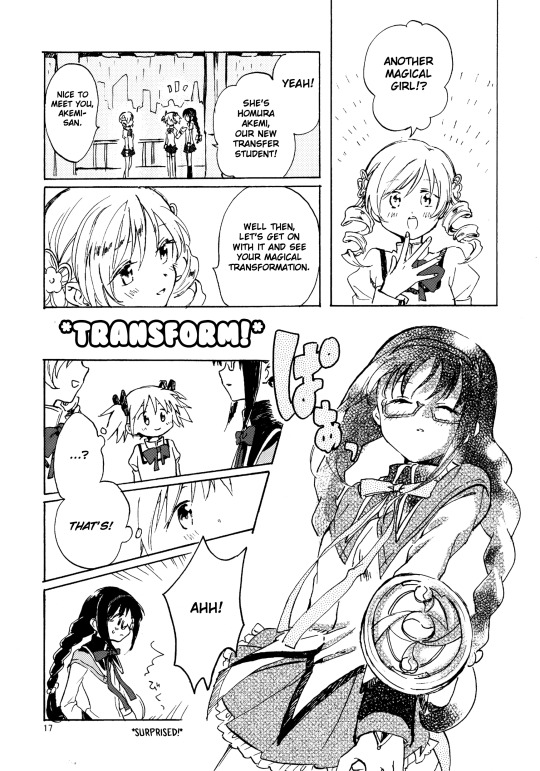
I'm very slowly working on a very long PMMM doujinshi, here's a sample page of my work and what I mean about making things look "right" (in regards to text placement, cleaning bubbles, etc). My personal preference is to break up words as seldom as possible, which is a philosophy even a lot of official typesetters don't share lol (probably because a lot of typesetters value speed over little touches like that).
Anyway, Photoshop will be your best friend! I'll be honest, it's been a hot minute since I pirated my copy and I don't even think the method is valid anymore. From what I understand GenP (Windows) and AdobeZii (Mac) are the new methods of cracking Photoshop. Here are the GenP and AdobeZii subreddits for guidance. Also, if you have a Mac apparently downloading directly from Cmacked is the way to get Photoshop.
Anyway, I really can't get into all the tricks and intricacies I've learned over the years about typesetting. However, I found this AMAZING, comprehensive guide that I would strongly suggest using as a reference. They cover all of the fundamentals as well as a lot of the extras. There's even a few things in here that I wasn't aware of and will definitely be brushing up on!
I've also uploaded my font reference file to Google Docs. All the fonts show up as arial, but I've included screencaps of what they look like. These are all free fonts and can be found/downloaded if you just Google the name. Generally, Wild Words is considered the standard font in manga/doujinshi scanlations (although of course there are variants). It's what I use in all my standard text. All the rest are for sound effects, aside text, emotional text that is meant to be elevated, etc.
I would also suggest at least downloading custom heart and star shapes (or brushes) for Photoshop; there are a bunch of free ones available and those shapes tend to come up in manga speech bubbles a lot.
Oh, and make sure you make a credits page for your releases. Mine are super bare-bones (just white text on a black background for the most part) but you deserve to be credited for your labor! So does whoever translated the manga. Once you get the series up and rolling I would suggest starting to upload to Mangadex (the hub of scanlation where tens of thousands of people can see what you've made). If you need help figuring out how to do that, hit me up again when you get to that point. You'll have to create a group but it's super easy.
Am I forgetting anything else? This is such a near and dear hobby of mine and I feel like there's just so much to cover, lol. Please let me know if you have any other questions!
43 notes
·
View notes
Text
2 notes
·
View notes
Text
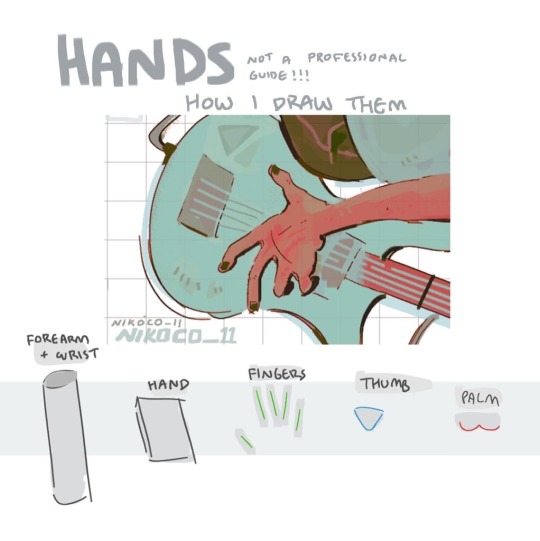


my recipe for drawing hands!
(small note that this is a shortcut that is more abt style and ease than anatomical accuracy. it helps to take time to really properly study hands, makes it easier to bend the rules a bit like this and have it still look good!!)
(learn rules b4 u break them or whatevah)
#qna#tutorial#guide#drawing tutorial#digital art#illustration#drawing#artists on tumblr#my art#clip studio paint
60K notes
·
View notes
Text
turn back
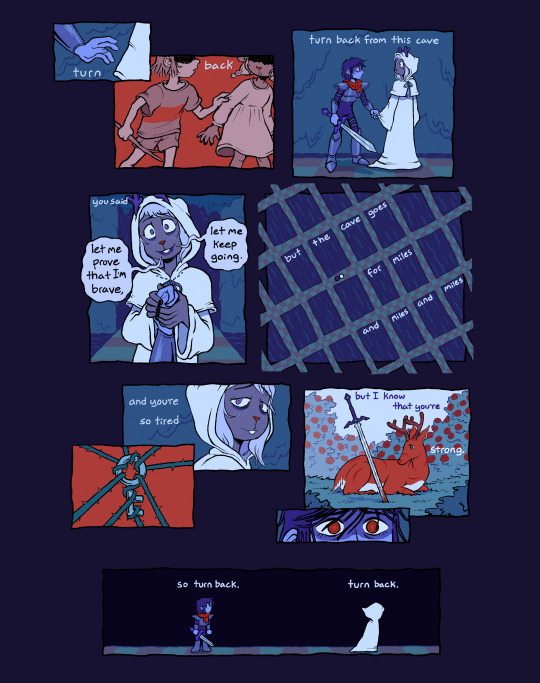
#rly recommend listening to the song as you read. it’s only a minute long#and if you dont recognize it take that as a message that you 🫵 need to play the beginner’s guide#(also fairly short it’s like 1-2 hours)#deltarune#deltarune spoilers#sword route#weird route#snowgrave#noelle holiday#kris dreemurr#kriselle#lyric comic#art tag#this song has been on my main kriselle playlist for like 4 years because i knew it would fit someday.....#still just speculation but i can so easily see this sort of thing happening now more than ever
6K notes
·
View notes
Text
I love how Gerald was trying to keep Shadow from spoiling anything about the future meanwhile literally everything Shadow says and does around Maria is the biggest death flag ever
#in fairness i’m sure both past robotniks just assumed her illness would be what killed her h a#sxsg#sxsg spoilers#sonic x shadow generations#shadow the hedgehog#maria robotnik#ark siblings#sth#comic#my art#doodles#so this was pretty much entirely done 24 hours ago#but ironically was distracted from posting earlier by playing sxsg#and then watching snapcube play it cause her delight is addicting#i’m missing 2 chests and 2 bolts and I wanna see if I can pull it off without a guide haha#anyways now I’m thinking about the fact that maria and gerald probably went back to their time assuming maria would die of her sickness#and how that would change their respective behaviors#i bet gerald would be holding out that maria would still live a bit longer#just cause shadow inadvertently revealed he’s from at least 50 years in the future due to having met black doom before#(which rewatching cutscenes to remember this quote he Did try to play off a little bit with some sort of#‘oh what do you think the alien squid meant by ’this time i’ll beat you’ that’s so crazy’ comment)#so hey maybe it wasn’t a perfect cure but she managed to live another 10-20 years at least?#all the more reason to press harder surely!#meanwhile maria is coming to terms with her mortality at age 14 or whatever she is#frankly I bet she came to terms with it long ago the way she seems to be written#okay back to snapcube
17K notes
·
View notes
Text
A Fic Writer's Guide to the 1967 Impala
Part 1 | Part 2: Interior
Click for the full-size, annotated versions of images! Unlabeled screenshots here; full user manual available here
Due to the number of different Impalas used for the show, Baby will have some minor differences between appearances. This guide points out a few of them. Luckily, these differences are minor and will likely never come up in any written works but fan-artists should still keep an eye out.
Now, buckle up. There's a lot to cover.
Baby’s interior color is SEM Color Coat #15093 “Lt Buckskin.” In real life, this color was not an option on the 1967 Impala and was achieved by spraying the existing interior vinyl with vinyl dye. However, 5.22 shows that this is the Impala’s original interior in the show’s universe, so Dean would have only had to use the vinyl dye to touch up during one of his rebuilds. In addition to the buckskin vinyl, Baby also has black bench seats, tan carpeting, chrome trim, and black accents on the wheel and dash.
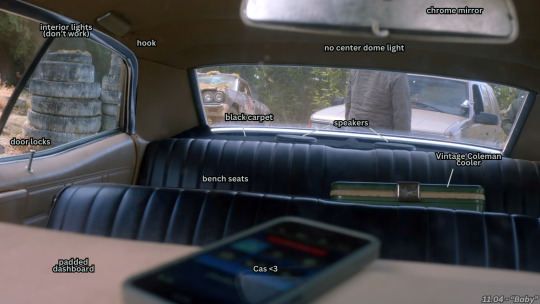
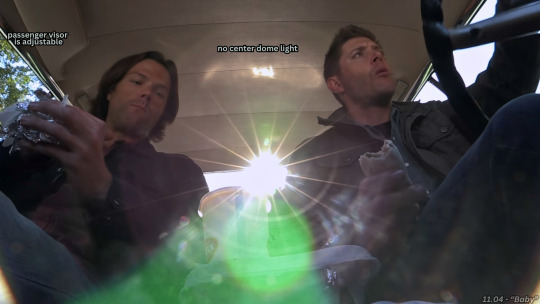
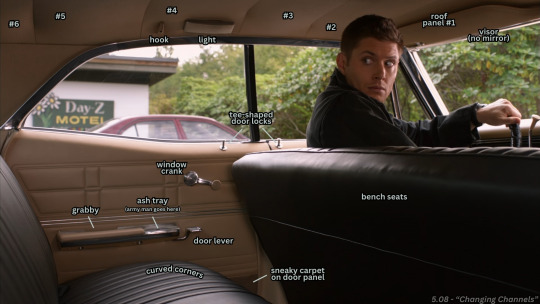
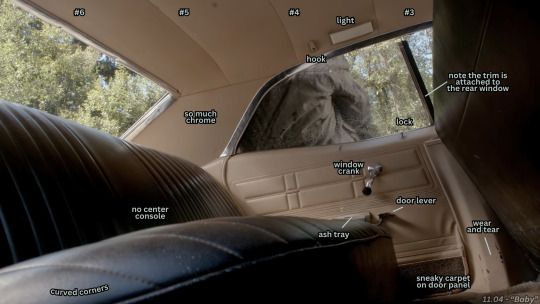
Baby doesn’t have grab handles or a center dome light, though it does have two rectangular cabin lights over the backseat windows, each next to a hook. Whether or not these interior lights work depends in the episode. The headliner has horizontal stitching that breaks it up into six panels. Sam and Dean rarely use the sun visors, but we do see in 11.04 that they are mirrorless and can swivel up and down and pivot to shade the side windows.
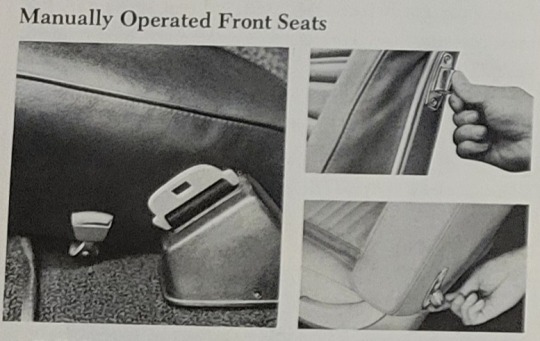
Both the front and back seats are black vinyl (not leather) bench seats with no center consoles. The front bench is manually adjustable via a lever on the driver's side. The seat can slide forward and backward (seen in 10.12) and recline (seen in 1.01). Adjusting the front seat moves the entire bench, including the passenger.
Fun fact: One of the options available for the 1967 Impala was power operated front seats, something I didn't even have on my '07 Hyundai. Power windows were also available, but Baby has neither of these features.
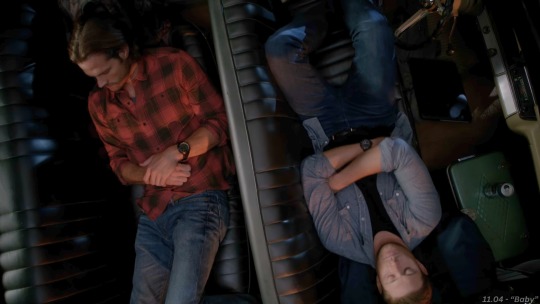
Both the front and back benches are wide if not a bit short length-wise (note that Dean’s hips are basically the same width as the seat). A child could easily lay down completely, a small adult like Claire or Charlie would be a bit curled up, and Sam and Dean can lay out with their knees bent. It is also possible to crawl over the front seat into the backseat or pull someone from the front into the back as we see in 10.04. That said, the cabin roof is not very high (just barely clearing Sam’s head) so expect to hit your head on the roof while in someone’s lap or flailing around in a fight.
Despite seating up to six, there appear to only be four total seat belts. The Impala has adjustable lap belts in the front and back seat rather than modern three-point seatbelts, but Sam and Dean don’t wear them.
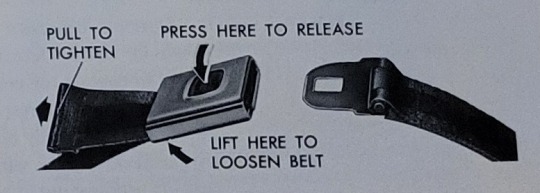
The lap belts consist of two parts, a belt with a buckle that sits in the middle of the front seat and a belt with an “eye” piece that retracts into a retractor on the side of the front seat bench. To fasten the seat belts, pull the eye belt all the way out of the retractor before clicking it into the buckle. Adjust the belt by pulling on the excess strap to tighten it, and lift on the buckle then pull the other section of the strap to loosen it. Unfasten the seat belt by pressing the button on top of the buckle.
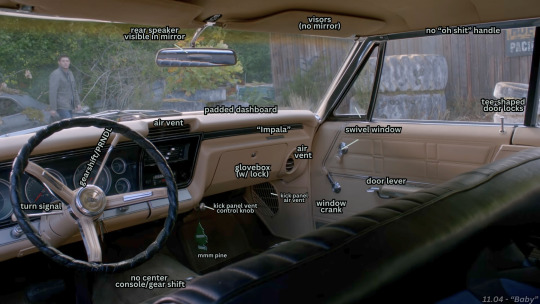
Up front, Baby has a steering wheel, a black instrument cluster, chrome ignition and other switches, an ashtray, chrome mirror, aftermarket tape deck, Four Seasons factory air conditioner, glove box, adjustable air vents, and padded dashboard (to smack your head on since there are no airbags).
Two different types of door lock buttons are used in the cars on the show. The first are shaped like golf tees while the second are straight anti-theft locks. The anti-theft locks don't have a cap that allows the door to be unlocked with a coat hanger or something similar. Push down on the button to lock the doors and pull up to unlock.
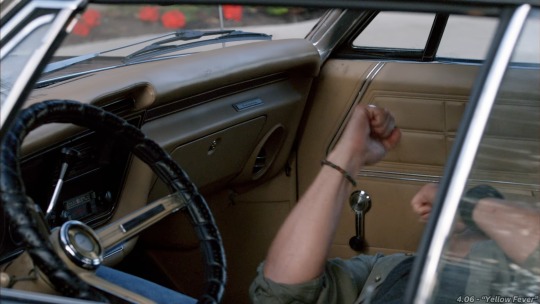
All four doors have a vinyl armrest with a chrome door lever, but the front seat rests do not have ashtrays. There are two different window cranks. The smaller one on top controls the small triangular front window that swivels side to side while the larger one on bottom rolls the main window up and down. Clockwise is up, counter-clockwise is down. Sometimes the knobs on the cranks are buckskin and sometimes they are black which would have been the original color.
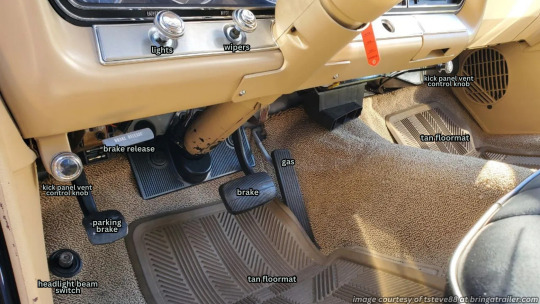
In the driver's footwell is a long rectangular gas pedal, short rectangular brake pedal, square parking brake pedal, and labeled parking release lever. The switch for the high beams is on the floor near the driver's right foot and is controlled by tapping. There are also tan rubber floor mats that vary in style but appear in 11.04 as two individual mats with diagonal grooves.
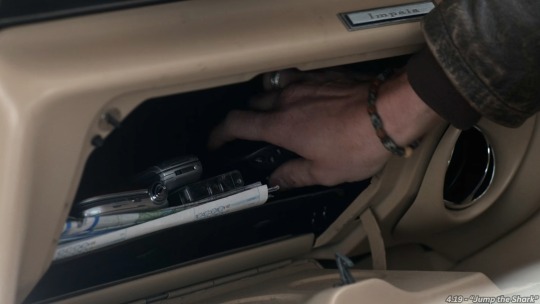
The glove box comes with a lock, and the key for this is separate from the key that opens the door and starts the ignition. When not locked, the glove box can be opened by pressing the button built into the lock cylinder.
Baby's steering wheel is stock with an aftermarket vinyl wrap cover. The correct center horn button for the Impala has a chrome outer ring, gold center ring, and silver inner circle with the Impala logo. Sometimes, such as in 11.04, it’s shown with a Caprice horn.
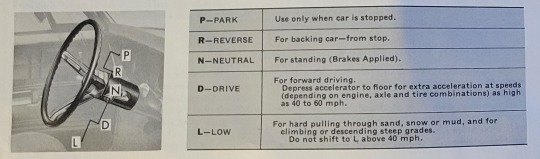
While the '67 Impala was available as a manual, Baby is an automatic (so no "shifting gears"). Its gear shift/PRNDL is mounted onto the right side of the steering column rather than in the center of the footwell. The indicator (reading "Park RNDL") is mounted at the base of the steering column, below the instrument cluster. To shift from Park to Drive, push down on the brakes then pull the shift lever towards you and pull it down three notches. Press down on the brakes then pull towards you and push up to go from Drive to Neutral (one notch), Reverse (two notches), and back to Park (three notches). To shift from Drive to Low, pull the lever towards you again and pull it down one notch.
For anyone who has not driven a car with a shift lever like this, I can only describe it as feeling alarmingly similar to an old-school lawn mower. Whenever Dean is made to drive another car, he might instinctively reach behind the wheel for the gearshift and find it's not there. Someone used to cars with a center console gear shift might do the same while driving Baby, just reaching for the space below the radio instead.
Also on the steering column are a hazard lights button below the gearshift and a turning signal lever on the left. To turn on the flashing hazard lights, push in the button and pull it back out to turn them off. Lift the turn signal lever to signal right and lower it for the left. Using light pressure causes the blinker to turn off and return to neutral when you release it. Pushing the lever all the way into one position or the other leaves the turn signal on until you turn the wheel back to neutral or manually move the lever.
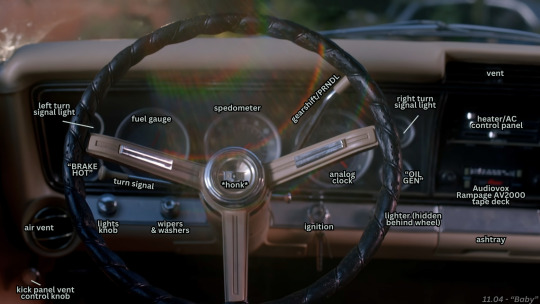
On either side of the steering column, below the instrument cluster, are four knobs. From left to right, these are for the lights, wipers and washer fluid, the ignition, and a cigarette lighter.
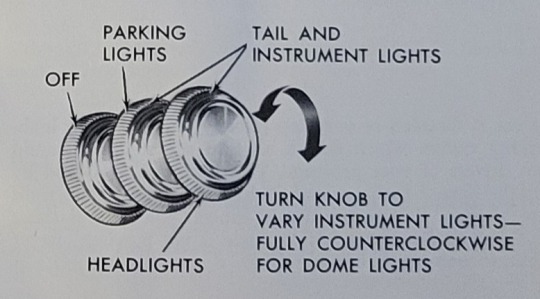
All of the lights on the Impala are controlled by a single light switch knob (below, left). This knob has three different positions: pushed in, pulled out to the first click, and pulled all the way out to the third click. When the knob is pushed in, all lights in the car are off. Pulling the knob out to the first click turns on the parking lights. Pulling all the way out to the second click turns on the low beam (your "normal" brightness). While the knob is pulled out to either the first or second click, turn the knob to adjust the instrument and tail lights for driving in the dark.

The windshield wipers knob is to the right of the light switch. To turn on the wipers, twist the knob clockwise. The first notch is "low" and all the way to the right is "high." Press the knob once to dispense a measured amount of washer fluid or hold it down to keep dispensing until you let go. Pressing the washer button simultaneously turns the knob, so you'll need to turn the wipers back off after.
The ignition key switch is just to the right of the steering column. Once it's inserted, turn the key to the left while pushing in to turn on just the accessories like lights and the radio. To start the car, push down the brake pedal and turn it all the way to the right. As soon as the engine starts up, let go of the key. You don't need to have your foot on the brakes to start the engine. Once it's running, you can press the gas pedal to help prime the carburetor with an additional shot of fuel. Don't pump the gas pedal or you risk flooding the engine.
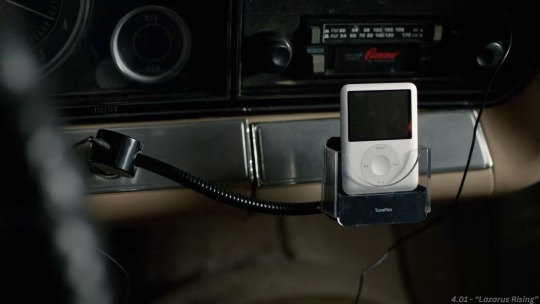
People born after 2000 might be unfamiliar with how to use a car's lighter. The knob is part of a removable piece, about two inches long. First, push the button in and hold it to heat it. After a few seconds, pull the whole piece out. Yes, it can easily get lost. Touch whatever you wish to burn to the glowing orange heating element inside the cylinder. The removable piece is what gets hot, not the plug. This is also where you plug in things like car chargers or Sam's iPod jack.
A recessed instrument cluster sits behind the wheel. The panel consists of three main displays with the left and right sides each having two smaller displays. From left to right, the three main displays are the fuel gauge, the speedometer, and an analog clock.
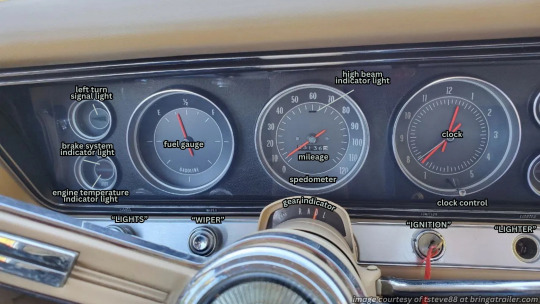
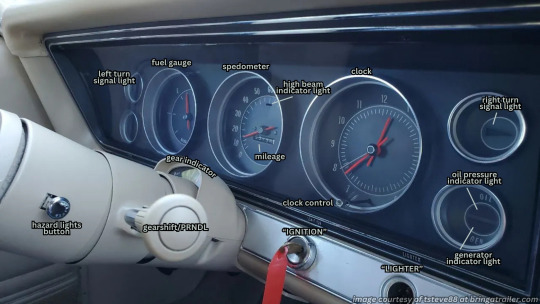
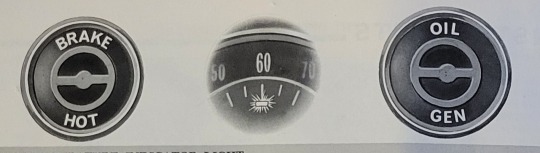
The fuel gauge does not default back to "E" when the engine is off and instead may land randomly somewhere on the dial. The speedometer has a listed top speed of 120 and also features the high beam indicator light as well as the mileage. The analog clock is set by pulling out the knob at the bottom of the clock, turning to set the correct time, and pushing the knob back in.
Of the smaller displays, the upper two are the left and right turn signal lights. The bottom left are the brake system warning light and the engine temperature light. The brake warning light lights up red when the parking brake is applied or while the brake pedal is pressed if there is low brake pressure. The engine temperature light comes on if the engine overheats. On the bottom right are the oil pressure light and the generator indicator light. The oil light comes on if the oil pressure is low, and the generator light comes on if there is an issue with the generating system. All four of these lights come on when starting the car, but should quickly go back out.
The air conditioning and vents are where a few more discrepancies between screen-used cars show up. The 1967 Impala came with several different heat and air options: nothing, a heater only, an optional AC unit mounted under the dash, a Four Seasons air conditioning system, or a fancy climate-controlled option.
Baby has the Four Seasons system, but many of the cars used for filming were not. Only the Impalas with the Four Seasons or the climate control came with the center dashboard vent and the circular air vents near the doors. For visual continuity on the show, production added fake vents to non-AC cars. What gives these cars away as being non-AC cars, however, is that these cars have kick panel air vents and two mounted silver knobs that control them. As a Four Seasons car, Baby should not have these vents or knobs but ultimately does on occasion.
The center dash vent is able to be adjusted up and down by the ridged wheels on the sides. The spherical vents are a ball style and can be turned to position them or spun like a globe to change the style of the vent opening (see below). Two leg vents are hidden underneath the dash and can be opened or closed by turning the outlet like a dial. So if Dean wanted cold air blown on his legs but not on his face while Sam wanted cold air on his legs but not his face, both brothers could open or close their own vents.
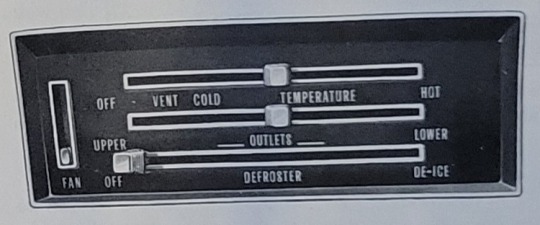
The vertical switch on the left of the AC control panel controls the fan. Up is low, the middle is medium, and down is high. There is no way to turn it off unless the entire system is off. To turn the entire system off, push the topmost horizontal lever all the way to the left. Turning this lever to "Vent" blows outside air without changing the temperature. Moving to "Cold" blows cold recirculated air, moving further right blows cooled outside air, warmer outside air, and then full heat.
The outlets lever controls airflow to the vents mentioned previously. Moving the lever to "Upper" sends air through the dash vents only, moving to "Lower" sends air to the hidden leg vents only, and setting it in between sends air through both.
To use the defrost to clear up foggy windows, make sure the outlets lever is set to "Lower" or somewhere in the middle then move the bottommost lever towards "De-Ice" until it's blowing as hard as you want. To really crank the defrost or for ice, set the outlets to "Lower" only then blast the fan and push the temperature all the way to "Hot."

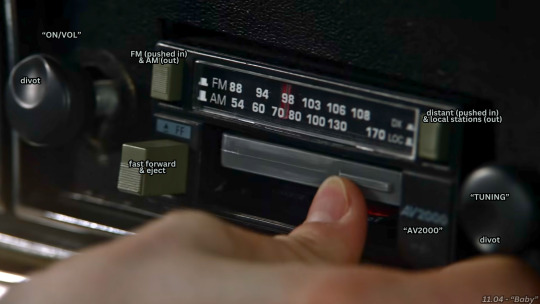
Dean's tape deck is an Audiovox Rampage AV 2000 from the 1990s. The '67 Impala came standard with either an AM or AM/FM transistor radio. The AM had a rear adjustable antenna, but the fixed AM/FM antenna was on the front. Looking at Baby, we can gather that it originally had the AM/FM radio. To switch between AM and FM, you would slide the switch at the top of the radio. The push buttons could be used to set favorite stations. Note that Dean's tape deck does not have this feature, so he would have to memorize his favorite stations in certain regions or just search until he finds something.
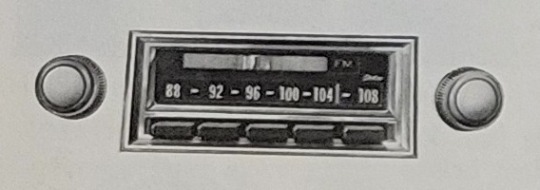
The original radio was switched out at some point for the Audiovox, either by John or Dean. The knob on the left turns it on and controls the volume, and the knob on the left is tuning. The button on the top left switches between AM/FM, the button on the top right lets you switch between local and longer-distance stations, and the bottom button is both the eject and fast-forward Press in part-way to fast forward and all the way to eject. There is no rewind button. To rewind, flip the tape over, fast forward, then flip it back around.
Fun fact: The shot in 11.04 of Dean putting in the tape is re-used from 5.22, so both “Night Moves” and “Rock of Ages” are on Dean’s Kick It In The Ass mixtape.
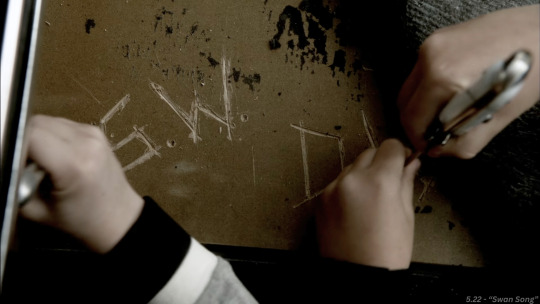
Two aftermarket Hertz speakers are mounted in the rear package tray (though a different speaker can be seen in 4.06). Underneath the tray’s black carpet is where Sam and Dean carved their initials as children. The rear footwell is nearly flush with the rear bench, meaning there is no “underneath the backseat”. There is room, however, underneath the front bench for things to get lost. The rear footwell also has a tan rubber floor mat, and the one seen in 11.04 is one single piece rather than two.
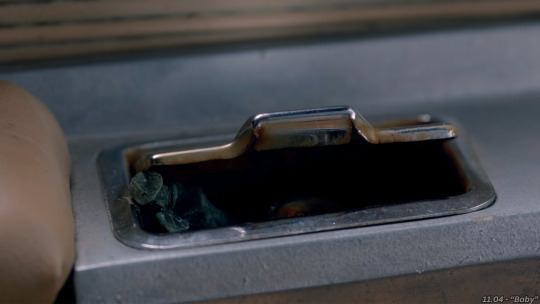
Unlike the ones in the front seat, the rear door armrests each have a lidded ashtray. The rear doors each have a door lock button and a main window crank like the front seat doors. There are no air vents in the backseat, so the AC would need to be cranked to reach anyone back there, potentially freezing anyone up front in the process.
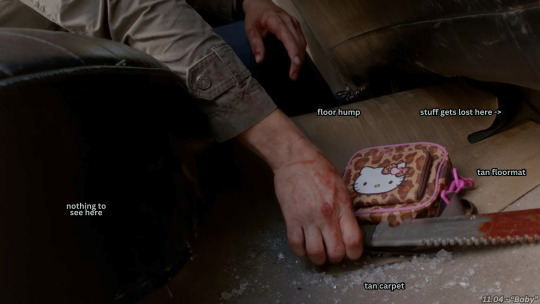
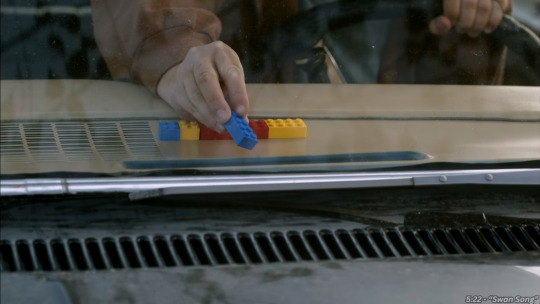
Some of the most important things inside of the Impala are the little personal touches it's accumulated over the years. There's the tape deck, of course, but also the initials carved into the package tray, the Lego bricks in the air vent, and Sam's plastic rifleman wedged in the ashtray. These elements are first seen in 5.22 where Chuck mentions that Dean puts them back every time he's had to rebuild the Impala. Seeing the army man through the window in 5.22 is also what allows Sam to take control of his body back from Lucifer, so both brothers are well aware that Baby's supposed "defects" actually make her even better.
123 notes
·
View notes
Text
Making Gifs Part 1 - Capturing Video
I am making this for @errruvande but I thought maybe others could use this guide to. This is my own personal workflow on how I make my gifs. Everyone has their own way of doing it, and there is no right or wrong way, but I have found this works best for me, with my limited tools and since I do not have photoshop.
Please note I am not an expert lol! There are people out there making far better gifs than me, and many other gifmaking resouces on Tumblr that are probably better than mine.
Keep reading below >>>
So there are two ways that I have found that work for capturing video. If you have the discs like I do, using a program like Videobyte BD-DVD Ripper works really well to grab video clips from Blu-Rays and DVD's. I recommend only using Blu-Rays if you have them. since DVD's are much lower quality.
However I have noticed the videos I captured with this program tend to be dark and have some compression artifacts, even when rip to an MKV with high quality settings. So I use a different method which I feel produces higher quality video captures.
I use Windows Screen Recorder (I have Win11 but this will work for all versions of Windows) with the quality settings set to High. In order to do this, go to Settings > Gaming > Captures and set the following:
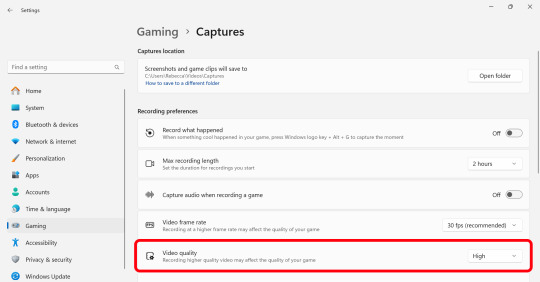
Make sure the Video Quality is set to High, set your Screenshots folder, turn off Audio (you don't need it), and keep the frame rate to 30 fps.
For Windows 11 press WIN + ALT + R to activate the screen recorder. There is usually a bit of a delay so make sure you start a few seconds before the scene you want to capture. And try to keep the length of the capture below about 90 seconds; the shorter the better.
______________________________________________________________
Capturing Sequential Caps
So, for those of you with Photoshop, you can import your video directly into the program and make your gif from there. But I found that Photopea really does not like videos, and will stall and crash if I load a video directly. So I have to capture sequential screencaps to make my gifs.
I use VLC Media Player. There are a few others out there that take sequential caps, but I have not been able to get them to work myself.
Download and install the latest version. Then go to your settings to set up the Sequential Caps function. They have a great guide on their website here but I will reiterate it in this post.
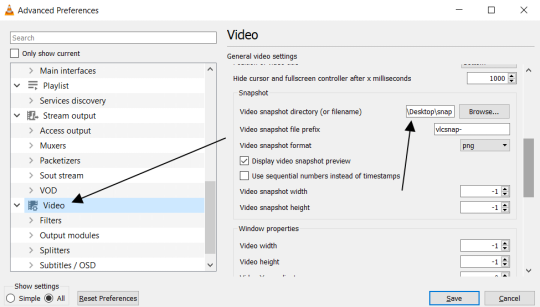
Go To Tools > Preferences and then at the bottom of the screen select the All radio button to show all settings.
Select Video from the left menu. Scroll down about halfway until you see the Snapshot section. Choose the folder where you want the caps to go.
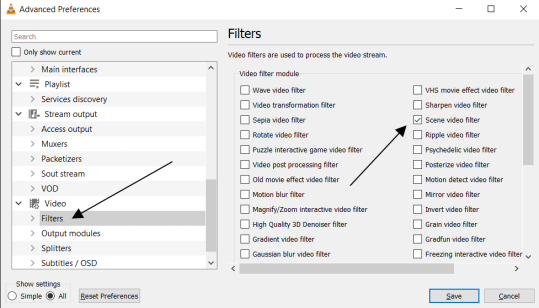
3. Then, under Video on the left, expand the Filters list.
4. Check the "Scene Video Filter" from the list.
5. Then scroll down on the left menu under Filters and click on Scene Filter. This will open up the settings for that particular filter.
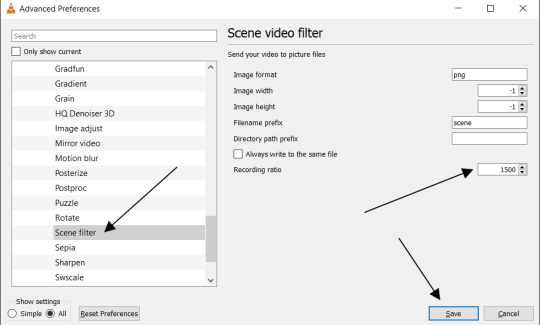
6. Set the Image Format to PNG.
7. Then for the Recording Ratio, change to "1". The Recording Ratio is the frame interval. So for example, if it was set to "300" (with a 30fps video), then it would take one cap every 10 seconds. Setting it to "1" will make it take a cap once per frame.
8. None of the other settings need to be changed.
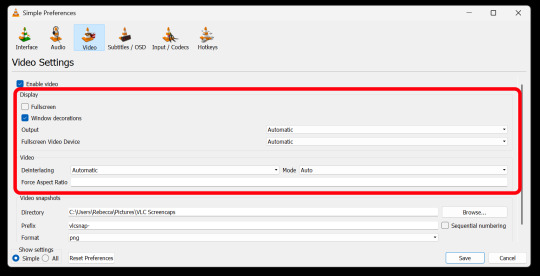
9. One more important setting, otherwise this will not work! Close the menu, and go back to Tools > Settings and leave it on Simple. Go to the Video section and MAKE SURE the output is set to "Automatic". This is important because if it is not on Automatic the Scene Filter won't work!
Then just open your video with VLC. VLC will automatically take the screencaps while the video is playing. If you pause the video, it will stop taking caps.
NOTE: For smoother gifs, change your playback speed to be slower. Go to the top menu > Playback > Speed > Slower (fine). The more you click this the slower the video will playback, and that means more caps will be taken over that time frame. I usually set it to 0.75x, but if you want even smoother gifs for really short clips, you can set it even slower than that.
Your screenshot folder will look like this:

Then we are done with this part and onto Photopea! Which I will go into detail in another post: PART 2
#gifmakers#gifmaking#gif making#gifmaking resources#gif making resources#my guides#giffing tutorial#screencapping#sequential caps#gif making tutorial
59 notes
·
View notes
Text
A small guide to outfit making
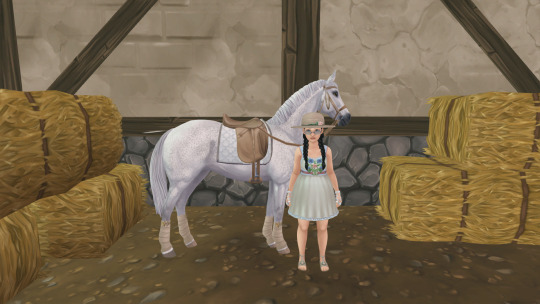
I'll be using this screenshot (which features new baby Deerling!) as an example!
This is a small guide on my process of making outfits!
I number this as a step-by-step, but I do sometimes change the order of steps when picking an outfit - especially 1, 2 and 3 can be reordered towards my current needs.
Pick a base. I usually pick one item to base the outfit around - in this case, the dress. However, when riding a magic horse, I tend to pick the magical form of the horse as a base to start with, leading us to step 2...
Colour palette. This dress gives us a colour palette of white, pink, green and blue. I picked mainly pink and white to continue with, and got my second neutral (light brown) from step 3. I try not to have a too large colour palette - depending on the horse's colour, I'll have 2-3 neutrals, and then 1-2 accent colours. My general rule is: the more shades a horse has, the less neutrals - your horse will usually already have many neutrals in their coat, meaning that unless you take care to match the neutrals to their coat, you are likely to end up making your outfit look cluttered.
Theme. For this outfit, I mainly went with the flowers on the dress. This theme is less notable with the tack, but it led me to the soft pink flowers on the hat and sandals! And would you look at that - pink is in our colour palette!
Combine. Find items within your colour palette and theme. I try to always use a colour more than once in my outfit - if pink is in the palette, this has to come back in several places. If black is in the palette, you can't only have one black item. I also try to keep the location of colours "balanced" - so no using an accent colour for the top half and then only a neutral for the bottom! A favourite of mine here is to match my helmet (or hat, here) to my shoes and/or gloves. For the neutrals, this is where tack (saddles, bridles) usually comes in. Accent colours can mainly be used in the saddlepad, wraps and bows - although you can always be bold and switch these two around! For character outfits, do not discount the effects of makeup here! It can be a nice way to put in some of your accent colour.
Evaluate: Are you happy with the look? Do you like how the colours look on you and your horse or do you want to try (a) different shade(s)? Do certain items blend into your skin or horse too much? This is where the last minute changes can be done, and it can differ from horse to horse even if you are using the same outfit. (For example: when wearing this outfit on Wonderland, a brown Dartmoor, I use white legwraps, because brown blends into her legs too much. With Deerling it's the opposite - which makes brown legwraps the better option.)
14 notes
·
View notes
Note
I think you've gotten a few questions about your process ( apologies! ) But I saw you use CSP to make these gifs - do you cut up the frames from your recordings to do that? Is there a particular way you go about that? I'm interested in making gifs and was a bit curious 🤧♥️ but if you cannot share such secrets I understand!
All right, this finally convinced me to make a guide and I hope this was helpful!! Feel free to send in any questions.
First off, PRO has a frame limit of 24 so your gifs will run very short. EX has no frame limit and right now there's a free trial for users until the 24th.
Make a new canvas that's an Animation. For my gifs, I use a 540 width and adjust the height later. Go to Window and turn on the Timeline so you can see all the cells.
I trim my game recordings into short clips of what I want to gif. Then I insert them like this as MP4 files:

The red line is the current frame you're looking at. The blue lines mark the gif duration at whatever starting and ending frames you choose.
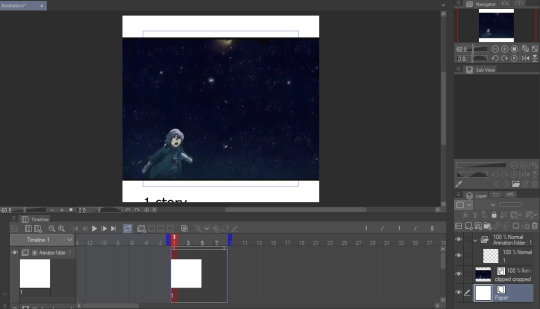
Whatever is inside the blue box will appear as the gif. Personally, I don't like using this and end up fixing the canvas size later. But let's get to actually making our gif first.
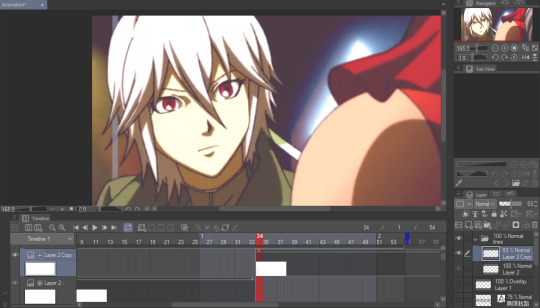
I like to make my gifs 30 FPS or less and I'll be changing it to 25 FPS from here:
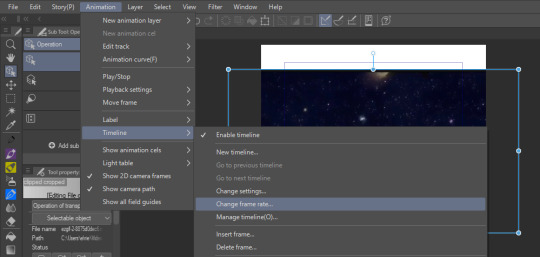
Click on your clip on the Timeline. For this example, I didn't trim my clip exactly where I want it to start so I'll drag it to left where the frame number turns negative and I end up going 4 frames back (or you can just move the first blue line 4 frames ahead):
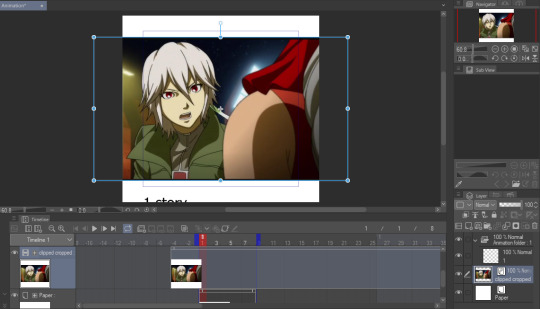
Then I drag the second blue line to where I want my gif to end. Since I want to make the height shorter, I go to Change Canvas Size and fix the dimensions (you can still resize and adjust your clip around too):
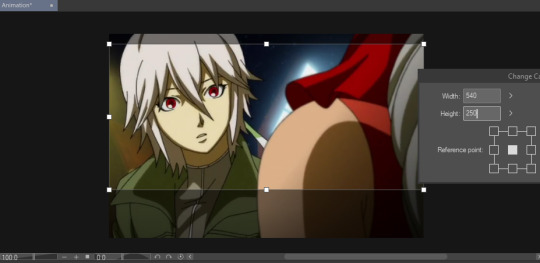
The blue box is gone and we can just use the canvas itself to fit the gif. I ended up adjusting it again and now we just need to save it!
I'm already fine with everything so I won't change the numbers. Make sure the Loop Count is set to Unlimited:

Choose where to save it and wait for it to export. Let's take a look at our finished gif:

Notice how pixelated some of the areas are? That's because we didn't export it with Dithering on so let's redo it:

Look at how much better it looks! Make sure to turn this on or it can make your gifs look way worse.

And that's the basics! If you want to put a color filter, make a new layer and put it above your clip. I use the bucket tool with the color i want and change the opacity and layer type:

And here it is! If your color filter only showed up partway on the gif, that means your layer wasn't present on all your frames so go to the Timeline and drag it to cover the entire length.
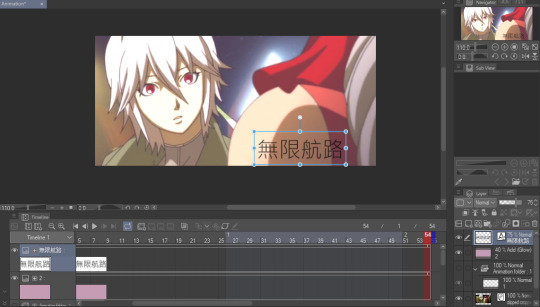
If you want to add a watermark or words, start making a text above your color filter and you can also change the opacity:
You can also add images on the gif with your brushes. Make a new layer above the color filter and apply them:
If you want to fix the colors more, right click your clip layer and it'll make a new layer above with the adjusted colors:

You can also do the 3D white bar effect. I make a new folder above all my layers with a bunch of colored lines. You'll need to erase whatever shows in front of the object and I decrease the opacity to make it easier, then change the color to white. You can adjust which frames each bar will appear by dragging the ends of the Timeline length (arrows will appear). As shown below, I was able to use the same line in frames 1-33 before making a new one at frame 24.
With 2 bars:
And that's all I wanted to cover! There's many editing guides that you can also apply to CSP so don't hesitate to try them out. As I mentioned earlier, you should only use CSP to make gifs if you already have it and don't have better programs to use. I hope this guide helped you out :)
66 notes
·
View notes
Text
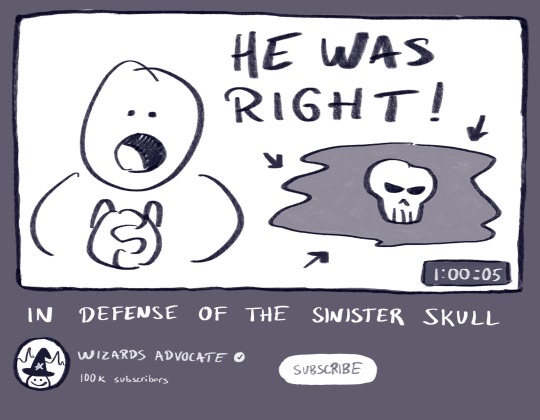
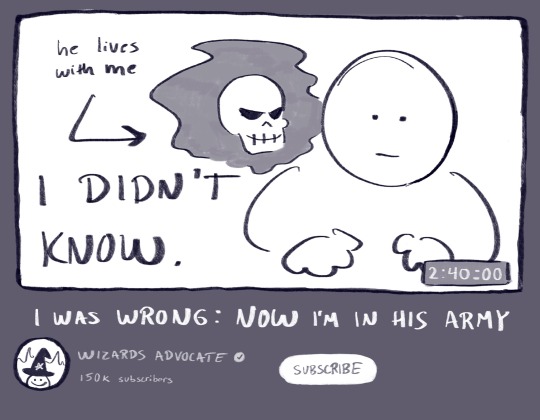
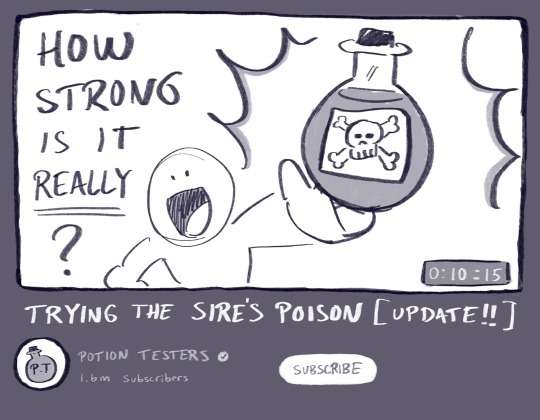
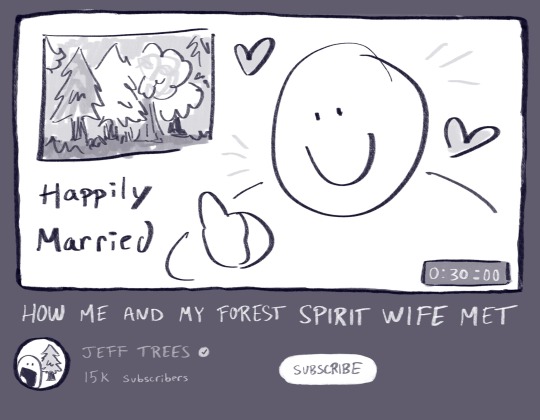
Thumbnails on wizard youtube
#leos art#a learner’s guide to magic#this is a part of my comic series but i havent been posting them here that much so#thumbs up#wizard#comic
49K notes
·
View notes
Text
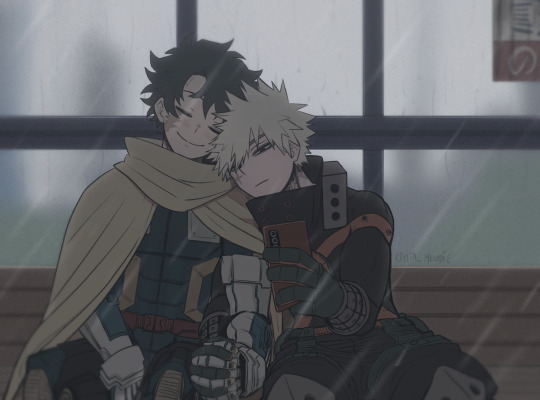
Just this. Just now. Just them.
#a quirkless boy's guide to loving dynamight#QBG twt#dkbk#izkt#bkdk#bakudeku#dekubaku#my hero academia#bnha#katsuki bakugou#midoriya izuku#mha#bakugoukatsuki#fanart#fanfiction#fanfic#chapter 13
4K notes
·
View notes