#npm publish
Explore tagged Tumblr posts
Visit Tumblr Blog
Explore Tumblr blogs with no restrictions, modern design and the best experience.
Last Seen Tumblr Blogs


Fun Fact
Tumblr is used by 21% of adults online aged 18-29 years.
Text
🎯 Want to future-proof your SharePoint projects? Learn how to build SPFx components & publish them to NPM for ultimate reusability. 🚀 Master modular, maintainable SharePoint dev today! #SharePoint #JavaScript #WebDev
#build sharepoint ui#build spfx solution#component based sharepoint#enterprise sharepoint#es6 module sharepoint#gulp sharepoint#hello world web part#javascript module#lerna monorepo#maintainable sharepoint code#microsoft 365 developer#microsoft spfx#modern sharepoint#modular javascript#npm publish#npm sharepoint#nx workspace#publish npm package#publish sharepoint solution#react components sharepoint#react spfx#reusable javascript#reusable spfx#scalable sharepoint development#semantic versioning#sharepoint automation#SharePoint customization#SharePoint customization tutorial#sharepoint developer guide#SharePoint Framework
0 notes
Text
It's official! Our FujoCoded LLC fundraising campaign survey (initial test edition) is out!
If you've backed our campaign and are in the lucky 5% selected for the "test chunk", you should have received our survey in your email. Fill it out, let BackerKit know if anything is wrong, and your rewards will soon be on the way!
For everyone else, please expect to receive the survey within the next couple days once we know everything is set up right. Survey closes on July 7th, after which we'll order all the rewards and get ready to ship them.
...and with this said, come celebrate with us on stream today at 3PM PDT (in ~1 hour)!
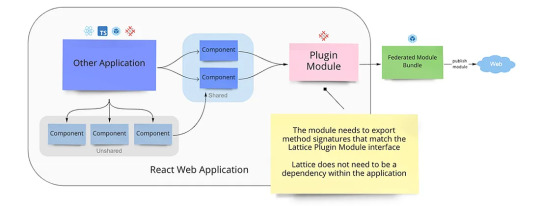
In this edition we'll start our "fujocoded plugins" repository where we plan to upload broad-interests plugins for all modern websites-builders out there! Come see how to publish packages to NPM!

14 notes
·
View notes
Text
Come join my stream!
Today's theme is "tears and anger"! Come learn about Astrolabe, the new editor for @bobaboard and beyond, and support me as I try to fix our configuration issues!
Other than my eternal gratitude for your moral support, you'll learn more about monorepos, how publishing to NPM works, and the intricacies of JavaScript libraries and build systems!
Starting now on Twitch!
16 notes
·
View notes
Text
okay there has to be a oneliner way to make a command line command (npm package script) use environment variables that will either use a .env file or the github actions environment secrets. right? no? maybe no.
sighs. at some point I'm going to publish a template repository for "web extension that's not listed in the extension stores but is signed" and it is going to have to come with a three page long instruction manual. this is all so stupid
4 notes
·
View notes


Text
Engineers have developed a new kind of membrane that separates chemicals within wastewater so effectively that they can be reused, presenting a new opportunity for industries to improve sustainability, while extracting valuable by-products and chemicals from wastewater. Created for use in wastewater treatment, the thin-film composite nanoporous membrane known as a TFC NPM, exhibits an 'unprecedented' capability to separate salts and other chemical components from water, and could lead to more sustainable treatment and management of water in a range of industries. A research paper published today in Nature Water details the membrane's performance and explains how its unique properties, aspects of which are inspired by mussels, could pave the way for more sustainable management of water within industries such as pharmaceuticals, oil and gas, textiles and food processing. The paper is authored by academics from the UK's University of Bath alongside colleagues based in China, South Korea, Singapore, Australia and Belgium.
Read more.
#Materials Science#Science#Membranes#Clean water#Water#Thin films#Biomimicry#Mussels#Polymers#Coatings#University of Bath
16 notes
·
View notes
Text
You can learn NodeJS easily, Here's all you need:
1.Introduction to Node.js
• JavaScript Runtime for Server-Side Development
• Non-Blocking I/0
2.Setting Up Node.js
• Installing Node.js and NPM
• Package.json Configuration
• Node Version Manager (NVM)
3.Node.js Modules
• CommonJS Modules (require, module.exports)
• ES6 Modules (import, export)
• Built-in Modules (e.g., fs, http, events)
4.Core Concepts
• Event Loop
• Callbacks and Asynchronous Programming
• Streams and Buffers
5.Core Modules
• fs (File Svstem)
• http and https (HTTP Modules)
• events (Event Emitter)
• util (Utilities)
• os (Operating System)
• path (Path Module)
6.NPM (Node Package Manager)
• Installing Packages
• Creating and Managing package.json
• Semantic Versioning
• NPM Scripts
7.Asynchronous Programming in Node.js
• Callbacks
• Promises
• Async/Await
• Error-First Callbacks
8.Express.js Framework
• Routing
• Middleware
• Templating Engines (Pug, EJS)
• RESTful APIs
• Error Handling Middleware
9.Working with Databases
• Connecting to Databases (MongoDB, MySQL)
• Mongoose (for MongoDB)
• Sequelize (for MySQL)
• Database Migrations and Seeders
10.Authentication and Authorization
• JSON Web Tokens (JWT)
• Passport.js Middleware
• OAuth and OAuth2
11.Security
• Helmet.js (Security Middleware)
• Input Validation and Sanitization
• Secure Headers
• Cross-Origin Resource Sharing (CORS)
12.Testing and Debugging
• Unit Testing (Mocha, Chai)
• Debugging Tools (Node Inspector)
• Load Testing (Artillery, Apache Bench)
13.API Documentation
• Swagger
• API Blueprint
• Postman Documentation
14.Real-Time Applications
• WebSockets (Socket.io)
• Server-Sent Events (SSE)
• WebRTC for Video Calls
15.Performance Optimization
• Caching Strategies (in-memory, Redis)
• Load Balancing (Nginx, HAProxy)
• Profiling and Optimization Tools (Node Clinic, New Relic)
16.Deployment and Hosting
• Deploying Node.js Apps (PM2, Forever)
• Hosting Platforms (AWS, Heroku, DigitalOcean)
• Continuous Integration and Deployment-(Jenkins, Travis CI)
17.RESTful API Design
• Best Practices
• API Versioning
• HATEOAS (Hypermedia as the Engine-of Application State)
18.Middleware and Custom Modules
• Creating Custom Middleware
• Organizing Code into Modules
• Publish and Use Private NPM Packages
19.Logging
• Winston Logger
• Morgan Middleware
• Log Rotation Strategies
20.Streaming and Buffers
• Readable and Writable Streams
• Buffers
• Transform Streams
21.Error Handling and Monitoring
• Sentry and Error Tracking
• Health Checks and Monitoring Endpoints
22.Microservices Architecture
• Principles of Microservices
• Communication Patterns (REST, gRPC)
• Service Discovery and Load Balancing in Microservices
2 notes
·
View notes
Text

Create a Sitecore JSS React Application and Apply Personalization
Empowering Front-End Development with Sitecore JavaScript Services
Introduction In today’s digital experience economy, Sitecore XP offers a unified platform for personalized content delivery across multiple channels and at scale. Built to support multi-site and multi-lingual environments, Sitecore CMS stands out with its flexibility and robustness.
One of the key innovations for front-end developers is Sitecore JavaScript Services (JSS)—an SDK that allows the creation of rich, component-based web applications using modern JavaScript frameworks like React, Angular, and VueJS. In this article, we’ll walk you through creating a ReactJS application using Sitecore JSS and applying personalization using a Sitecore-first approach.
-Prerequisites Before you begin, ensure you have the following:
-Node.js v14.15.4
-Sitecore 10 installed
-Sitecore JSS 15.0 (configured in Sitecore instance)
-JSS CLI (optional) – speeds up app creation and scaffolding
Step-by-Step Integration: ReactJS with Sitecore
-Step 1: Create a Sitecore Application In the Content Editor, navigate to: /sitecore/content → Create a Tenant, then a Site under that tenant.
Choose Sitecore-first or Code-first approach:
Sitecore-first: Templates and content created in Sitecore.
Code-first: Managed fully by the front-end team via Node.js.
-Step 2: Create a React Application Use JSS CLI to scaffold your React app:
bash Copy Edit jss create my-jss-app react Run npm install to set up dependencies.
Sitecore JSS packages will be added by default.
-Step 3: Configure Site and Hostname In IIS, add the desired host: demojss.dev.local
Add the hostname in your system's hosts file: C:\Windows\System32\drivers\etc\hosts
-Step 4: Setup API Key in Sitecore Login at: https://demojss.dev.local/sitecore
Open Desktop → Content Editor
Generate and assign an API Key to your JSS app.
-Why Sitecore JSS? -Seamless integration with Sitecore CMS
-Supports personalization, multilingual content, and headless architecture
-Empowers React developers with full control over the UI
-Ideal for connected & disconnected development workflows
-Additional Topics Covered Sitecore Serialization via CLI
-Setting up Next.js + Sitecore JSS in disconnected mode
-Sitecore Publishing Targets for multi-environment setups
-Troubleshooting Java Heap Space errors in Solr
-Sitecore Security Disabler & User Switcher tools
-XM Cloud deployment with Vercel and Deploy.io
-Sitecore Marketing Glossary and training resources
-Exploring Sitecore Headless CMS, XP, SXA, and JSS
Need Certified Sitecore Developers? Murmu Software Infotech offers remote Sitecore experts skilled in:
Sitecore XM | XP | SXA | JSS | XM Cloud
Full-cycle development, support & integration
Budget-friendly hiring (hourly/monthly plans)
Contact: +91 9110176498 Email: [email protected] Website: https://sitecoredevservices.com/create-sitecore-jss-react-application-and-apply-personalization/ Mall Decor, Lalpur Chowk, Ranchi, Jharkhand
sitecoredevelopment #sitecorejss #reactjs #xmcloud #sitecorecms #nextjs #headlesscms #murmusoftwareinfotech #remotesitecoredevelopers #sitecorexp #sitecorepersonalization #webdevelopment #digitalexperience #enterprisecms #sitecoreindia
0 notes
Text
Deno 2.3 Introduces Support for Local NPM Packages: A Game-Changer for JavaScript Developers
Deno 2.3 introduces support for local NPM packages, marking a significant milestone for developers working with JavaScript and TypeScript. This latest update to the modern runtime brings a host of enhancements that streamline workflows, boost performance, and deepen integration with the NPM ecosystem. For developers seeking a secure, efficient, and flexible environment, this release opens new doors for local package management and beyond. Let’s explore what makes this update a must-know for the JavaScript community.
Why Deno 2.3 Matters for Developers
The release of Deno 2.3 is more than just a version bump. It addresses key pain points for developers, particularly those working in complex projects that rely on NPM dependencies. By introducing support for local NPM packages, Deno empowers developers to test and iterate on modules without needing to publish them to a registry. This feature alone saves time and enhances the development experience, especially for those managing private or experimental packages.
Beyond local package support, the update includes improvements to compilation, code formatting, and observability. These additions make Deno an even stronger alternative to traditional runtimes like Node.js, offering a zero-config, secure-by-default environment that aligns with modern web standards.
The Power of Local NPM Package Support
One of the standout features of Deno 2.3 is its ability to handle local NPM packages seamlessly. Previously, developers had to publish packages to a registry or rely on workarounds to test locally. Now, Deno allows you to reference a local folder directly, making it easier to develop and debug NPM modules without external dependencies.
This feature is particularly valuable for teams working on monorepos or private libraries. By configuring a local node_modules directory, developers can ensure that their projects remain self-contained and reproducible. Whether you’re prototyping a new feature or refining an existing package, this capability reduces friction and accelerates iteration.
How Local NPM Support Enhances Workflows
Local NPM package support in Deno 2.3 introduces support for local NPM packages by allowing developers to specify a local path in their configuration files. This eliminates the need for constant publishing and republishing during development. For example, teams can now link a local package to multiple projects, test changes in real-time, and maintain control over their dependencies.
Additionally, Deno’s secure-by-default model ensures that local packages adhere to the same permission-based access controls as remote ones. This means you can experiment with local modules without compromising the integrity of your project. The result is a smoother, safer, and more efficient development process.
Enhanced Compilation Capabilities
Deno 2.3 doesn’t stop at package management. The update significantly improves the deno compile command, enabling developers to create standalone binaries with greater flexibility. These binaries now support Foreign Function Interface (FFI) and Node native add-ons, allowing for deeper integration with native libraries and plugins.
Building Leaner Binaries
A key enhancement to compilation is the ability to exclude specific files from the final binary. This feature lets developers reduce the size of their executables, making them more efficient for distribution. For instance, you can exclude development or test files, ensuring that only production-ready code is packaged.
The introduction of the Deno.build.standalone boolean flag further enhances compilation. This flag allows your code to detect whether it’s running in a compiled binary, enabling dynamic behavior based on the execution context. Whether you’re toggling features or customizing error messages, this introspective capability adds a layer of sophistication to your applications.
Cross-Platform Compatibility
With Deno 2.3, compiled binaries are more versatile than ever. The support for FFI and Node add-ons means you can leverage platform-specific libraries without sacrificing portability. This makes Deno an attractive choice for building cross-platform tools, from command-line utilities to desktop applications.
Improved Code Formatting with deno fmt
Code consistency is critical for collaborative projects, and Deno 2.3 delivers with an upgraded deno fmt command. This formatter now supports embedded CSS, HTML, and SQL within tagged templates, ensuring that your mixed-content codebases remain tidy and readable.
New Formatting Options
The update introduces 14 new formatting options, giving developers fine-grained control over their code’s appearance. Whether you’re working with JavaScript, TypeScript, or embedded languages, these options let you tailor formatting to your team’s preferences. This is a boon for projects with diverse file types, as it reduces the need for external formatters.
Streamlined CI Pipelines
Deno 2.3 also extends the --permit-no-files flag to deno fmt and deno lint. This prevents errors when no files are found, making it easier to integrate formatting and linting into continuous integration (CI) pipelines. By reducing false positives, this enhancement saves time and ensures smoother automation.
Boosted Observability with OpenTelemetry
Observability is a cornerstone of modern application development, and Deno 2.3 strengthens its OpenTelemetry support. This update adds event recording, span context propagation, and V8 engine metrics, giving developers deeper insights into their applications’ performance.
Monitoring Made Simple
With expanded OpenTelemetry features, you can capture detailed telemetry data and export it to tools like Grafana or Honeycomb. This makes it easier to diagnose bottlenecks, track user interactions, and optimize resource usage. For teams running production workloads, these capabilities are invaluable for maintaining reliability.
Seamless Integration
Deno’s OpenTelemetry support integrates seamlessly with existing observability stacks. Whether you’re monitoring a serverless function or a full-fledged API, the added metrics and tracing options provide a comprehensive view of your application’s behavior. This aligns with Deno’s goal of simplifying complex workflows without sacrificing power.
Performance and Ecosystem Improvements
Deno 2.3 brings a slew of performance optimizations, particularly for projects with NPM dependencies. Package installation via deno install and deno add is now up to twice as fast when dependencies are cached. This speed boost is especially noticeable in large monorepos, where redundant dependency resolution has been minimized.
Upgraded Engines
The update includes upgrades to TypeScript 5.8 and V8 13.5, bringing new language features and performance improvements. These enhancements ensure that Deno remains at the cutting edge of JavaScript and TypeScript development, offering developers the latest tools to build robust applications.
Better Jupyter Integration
For data scientists and researchers, Deno 2.3 improves the Jupyter notebook experience. Variables, modules, and type definitions are now shared across cells, making it easier to explore datasets and prototype scripts. This enhancement positions Deno as a compelling choice for interactive JavaScript and TypeScript development.
Why Choose Deno 2.3?
Deno 2.3 introduces support for local NPM packages, but its impact goes far beyond this single feature. With improved compilation, formatting, observability, and performance, this release solidifies Deno’s position as a modern, developer-friendly runtime. Its seamless integration with the NPM ecosystem, combined with a secure and zero-config approach, makes it an ideal choice for both new and existing projects.
Whether you’re building a startup’s backend, a personal CLI tool, or a data visualization dashboard, Deno 2.3 offers the tools you need to succeed. Its focus on simplicity, security, and performance ensures that you can focus on writing code rather than wrestling with configuration.
Getting Started with Deno 2.3
Ready to dive into Deno 2.3? Getting started is straightforward. If you haven’t installed Deno yet, you can do so with a single command from the official website. Once installed, explore the new features by creating a project and experimenting with local NPM packages or compilation.
The Deno documentation provides detailed guides on leveraging local package support, formatting options, and observability features. For community support, check out the Deno subreddit or GitHub repository, where developers share tips and discuss the latest updates.
Deno 2.3 introduces support for local NPM packages, delivering a feature that developers have long awaited. Combined with enhanced compilation, improved formatting, and robust observability, this release makes Deno a powerhouse for JavaScript and TypeScript development. By addressing real-world needs with practical solutions, Deno 2.3 empowers developers to build faster, safer, and more maintainable applications.
#Deno#Deno2_3#JavaScript#NPM#LocalNPMPackages#WebDevelopment#JavaScriptDevelopment#NodeJS#Programming#TechNews#DeveloperTools#SoftwareDevelopment
0 notes
Text
IGP EXTENDS TINTED GLASS PERMIT GRACE PERIOD AMID ONGOING SERVICE REVIEWS
IGP EXTENDS TINTED GLASS PERMIT GRACE PERIOD AMID ONGOING SERVICE REVIEWS The Inspector General of Police, IGP Kayode Adeolu Egbetokun, PhD, NPM, has approved an extension of the grace period for the enforcement of the Tinted Glass Permit requirement to the 12th of August 2025, National Association of Online Security News Publishers, NAOSNP can report. This extension comes on the heels of…
0 notes
Text
Publish Your First NPM Package

Lets dive in, how could we publish our own npm package, which can be installed by npm install command.
Read Article : Publish Your First NPM Package
0 notes
Text
프론트엔드 모노레포 빌드에 대한 소고
개인적인 취향이 상당부분 반영되어 있지만 평소 모노레포 빌드/태스크에 대해 가지고 있던 생각을 정리해보았습니다.
1. 프론트엔드 모노레포 빌드/태스크 구조
빌드나 각종 명령어 실행에 있어서 3가지 정도로 나뉠 수 있을 것 같다.
작업 종속성: 분리할 수 있는 작업은 분리하여 실행하거나 병렬적으로 실행한다
작업목적의 차이: 라이브러리냐, 앱이냐? 빌드냐 테스트냐 등에 따라 달라짐
실행환경의 차이: 로컬에서는 빠르게 여러번 실행하고, 서버에서는 최대한 많은 검증을 한다.
작업종속성

패키지 종속성: 패키지만 설치되면 검증 가능한 작업들
타입 종속성: 타입이 빌드되야 검증 가능한 작업들
빌드 종속성: 빌드가 되어야 검증 가능한 작업들
패키지만 설치되면 검증 가능한 작업들로는 패키지 매니저의 lockfile, peerDeps 검증, prettier/eslint와 같은 포매팅과 린팅 작업이 있다.
의외로 타입 검증 작업은 빌드 작업�� 별개로 가능하다. 다만 typescript-eslint와 같이 타입이 빌드되야 린트 검증이 가능한 가능한 경우가 있다.
모노레포에서 테스트는 의존한 패키지의 빌드가 되어있어야 실행가능하다.
작업목적의 차이
패키지 목적: 라이브러리 / 앱 / 환경설정 / 테스트
번들러 목적: 빌드 / 개발서버 / 테스트
작업목적에 따라 실행해야할 작업들이 상이하다. 예를 들어 라이브러리는 ESM/CJS 빌드, 타입 빌드 모두가 필요하다. 앱은 빌드 결과물 1개와 타입체크, 환경설정용/테스용은 타입 체크 정도만 필요하다.
또한 똑같이 번들러 작업이 필요하다고 해도, 빌드, 개발서버, 테스트등 작업 따라 필요한 플러그인이 다르다.
실행환경의 차이

로컬에서 개발하며 실행
리모트에서 검증
개발 환경은 모든 환경을 고려하기보다는 빠르게 실행되어 코딩-빌드-테스트 이터레이션을 여러번 돌릴 수 있게 만드는게 합리적이다. 따라서 특히 개발서버는 ESM 환경에서 실행하는 vite, 마찬가지로 vitest 또한 ESM Native를 사용하는 등 가능하면 ESM Only를 전제하고 패키지를 설정해야 한다.


반대로 리모트(PR 시)는 최대한 많은 것을 검증함이 좋다. 위에서 언급된 작업 종속성에 따라 나누고, 모든 검증 태스크를 돌리자. 다만 리모트 작업에서도 검증과 릴리즈는 달라질 수 있다.
예를 들어 라이브러리같은 경우 검증단계에서는 타입 빌드와 JS 빌드가 각각 나뉘어 실행될 수 있지만, 릴리즈시에는 통합적으로 일어나야 한다.
2. 패키지 매니저
프론트엔드 모노레포에서 첫번째로 생각나는 것은 무엇인가? 난 패키지매니저를 뽑고싶다.
여러종류의 패키지를 운영하며, 각 패키지마다 의존성들을 설치하고 관리하는 기능이 필수적으로 들어가기 때문이다.
그 중에서 yarn을 가장 좋아하는 편이다. 다음 글에 나온대로 잘 설계된 아키텍처와 정확성, 성능이 마음에 든다.
패키지 매니저의 과거, 토스의 선택, 그리고 미래

우선 패키지 매니져로서 기본기는 훌륭하다.
안정적인 lockfile 업데이트
lockfile과 pnp.cjs의 conflict 자동해결
간편한 패키지 패치
NPM script를 위한 휴대용 shell 내장과 스크립트 공유
이외에 각종 검증기능이 달려있다.
Hardened Mode: resolution 체크등으로 install시 보안공격 보호
락파일/캐시 변경 감지
Constraints: 패키지와 필드에 대한 검증
Constraints에서는 대체 어떤게 가능한가?
패키지 금지: 쓰지 말아야 할 패키지를 정할 수 있다
동일한 패키지 버전: 모노레포에서 사용할 패키지 버전을 일관적으로 유지 가능
패키지 버전 범위 통제: 패키지의 버전이 특정 범위에 속하는지 제약을 줄 수 있다
워크스페이스 페키지 강제: 워크스페이스에 있는 패키지는 고정버전이 아니라 워크스페이스 프로토콜을 쓰도록 강제가 가능
피어 디펜던시 누락 검증 및 자동추가: 피어 디펜던시가 누락되었는지 체크하고, 에러를 발생시키거나 자동적으로 devDeps/Deps에 누락된 패키지를 추가
package.json의 필드 제약: 예를 들어 패키지 이름에 prefix가 붙어있어야 하는지 검증가능
이 중에서 일부는 PNPM이나 Syncpack을 사용해야 가능하다는 기능을 잠금해제한다. [yarn berry 공식 설정 / yarn-constraints-rules] 예를 들어 동일한 패키지 버전 + 패키지 버전 범위 통제가 가능하고 (물론 yarn-plugin-catalogs라는 플러그인도 존재한다) 피어 디펜던시 설치도 조금의 노력만 들이면 가능하다.
그럼 PNPM에서 가지는 특징적인 기능적 장점은 SideEffect 캐시정도이다. 이것도 아마 플러그인을 만든다면 해결 가능한 이슈로 보인다.
이외에 앞으로 도입될 auto install, yarn run 오버헤드 감소 등의 로드맵도 기대가 된다.
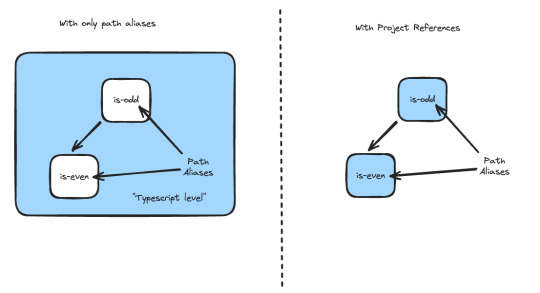
이와 별개로 타입스크립트를 잘 사용하기 위해서는 project reference를 잘 설정하는게 필수인데
에디터 통합: project reference가 잘 설정되어 있어야 workspace root를 에디터로 열어도 패키지의 타입 추론이 가능해진다
적절한 타입추론: App.tsx와 vite.config.ts처럼 환경에 따른 적절한 타입추론을 위해서는 project reference 설정이 필요하다
성능: tsc --build를 통해 빌드하면 토폴로지컬한 증분빌드가 가능하다.
문제는 제대로 설정하기나, 자동으로 설정하기가 어렵다. root, local, package 참조에 따라 모두 설정해줘야 하기 때문이다. 다행히 저도 약간 기여한 @monorepo-utils/workspaces-to-typescript-project-references를 사용하면 해결이 가능합니다. (yarn과 npm만 가능)
현재 남아있는 가장 큰 불만은 Changeset에서 제대로 작동하지 않다는점이다. yarn pack을 먼저 실행하고 publish 하는 방법으로 우회가 가능하긴 하지만..
3. 린트 / 포매팅
파이썬을 사용했을때가 가끔 그리웠던 것 중 하나는 ruff이다. prettier/eslint 분리를 생각할 필요가 없고 에디터에서 거의 즉시 린트와 포매팅이 가능했기 때문이다.
그러한 면에서 Biome가 동일하게 기대된다.

다만 완전히 대체가 가능할지 미지수다. Prettier는 확실히 가능하겠지만, ESLint의 풍부한 플러그인/설정 생태계에 비할바는 아니다.
예를 들어 typescript와 통합에 있어 projectService와 같은 기능이라거나 yaml과 같은 추가적인 lint 기능들이 존재하지 않는다.
따라서 현재로선 lint는 eslint로, formatter는 biome와 함께 쓰는 방향이 합리적이라 생각한다. formatter의 경우도 vue, mdx, yaml, toml과 같은 파일등도 함께 지원해야 한다면 prettier에서 못넘어가지 않을까
4. 빌드
Biome와 동일한 맥락으로 Rolldown이 미래이며, vite에서도 실험적으로는 적용중이지만 안정화에는 1년은 걸리지 않을까?

CSS 후처리 역시 Lighting CSS와의 통합으로 매우 빠른 성능을 달성할 수 있다.
역시 문제는 빌드시 성능 병목인 타입 빌드다. 지���도 일반 빌드는 10초면 끝나지만 타입 빌드는 vite-plugin-dts를 사용하면 1분 넘게 걸린다.
미래에 Typescript Native(Typescript 7.0)가 사용되면 좀 빨라지겠지만 근본적으로 플러그인이 비효율적으로 설계되어 느리다는 생각은 버릴수가 없다.
때문에 vite-plugin-dts-build라는 vite 플러그인을 만들었다. (Type rollup 기능을 제공할 생각이 없어 vite-plugin-tsc-build라고 붙이고 싶었는데 이미 있더라ㅠㅠ)
tsc --build 처럼 증분빌드
분리된 워커에서 병렬 실행
vite의 library mode에서 여러 format이 실행될때 중복으로 실행되지 않음
3번은 직관적으로 이해가 가지 않을 것이다. 부연 설명을 하자면 CommonJS와 ESM을 동시에 지��하려면 각각을 대응하는 package.json export가 필요하며 따라서 각각의 mjs, cjs를 빌드해야 한다. 이때 plugin은 2번씩 실행된다.
타입도 그에 맞추어 ESM버전과 ModuleKind.CommonJS 및 ModuleResolutionKind.Node10를 사용해야 한다. 그래서 dts 세팅을 2번해줘야 문제없도록 export를 할 수 있다.
문제는 위와 같이 세팅이 된 경우 총 4번이 실행이 되기 때문에 락을 걸어 각 dts 플러그인 설정은 한번씩만 실행되도록 보장했다.
추가) Are the types wrong?을 사용하면 타입이 잘 export되었는지 체크가 가능하다.


예를 들어 vite-plugin-dts는 👺 Masquerading as ESM 문제가 있다. (근데 위 문제를 제대로 처리하는 라이브러리들이 생각보다 적은것 같다...)
이외에 TypeScript 빌드를 더 빠르게 만들 방법도 있는데 일반적이지는 않다.
assumeChangesOnlyAffectDirectDependencies: 영향을 받은 파일들은 재검사/재빌드 하지않고, 변경된 파일과 직접 import한 파일만 재검사/재빌드되므로 정확도가 내려간다
isolatedDeclarations: 병렬적으로 타입을 빌드하거나 검사할때 도움이 되지만, 명시적으로 각 타입들을 코드 단위에서 변경하는게 요구된다
5. 태스크 러너
현재 가장 빈공간이 많은 툴이라 느껴진다.
Yarn의 휴대용 shell + Vercel의 Turborepo의 설정이 정말 간결해서 편하다.
Root와 워크스페이스의 NPM script 공유
Turbo Repo의 증분/병렬실행과 Remote caching

복잡한 스크립트가 필요한 경우는 단순히 NPM script에 쓰이는 스크립트가 아니라 JavaScript (혹은 TypeScript)로 쓰인 태스크 매니저를 원하게 될 것이다.
이를테면 Grunt나 Gulp 같은 것들 말이다.

이 중에는 Gulp의 Task 사용법이 가장 합리적이라 여겨진다.
Gulp의 문제라 한다면, Turborepo와 같은 토폴로지/증분/병렬 실행 기능이 부족하기 때문이다. 패키지 단위의 위상적 실행은 원래 지원하지 않았고, 증분에서는 lastRun이라는 함수가 있지만, 프로세스가 꺼지면 정보가 사라진다. 병렬에서는 parallel이라는 함수가 있지만, 내부에서 사용되는 now-and-later라는 패키지의 코드를 읽어보면 실제 병렬이라기보다는 동시성 기능에 가깝다.
Turborepo의 JavaScript interface를 사용할 수 있다면 참 좋겠지만, 불행하게도 Node와의 인터페이스는 존재하지 않으므로 만약 제작하게 된다면 Microsoft의 Rush(lib)를 사용하는게 현실적이지 않을까? Turborepo의 편안한 인터페이스는 빌리더라도 말이다.
모든 워크스페이스의 태스크, vitest와 같은 것들까지 최적의 실행시간을 보장하려면 위임하여 처리할 수 있는 글로벌 워커 풀 / 프로미스 풀이 구현되는 것도 필요하지 않나 싶다.
이 정도가 Frontend Monorepo에서 당장 생각나는 요구사항들 같다. 만약 다른 언어까지 포함된 backend까지 합쳐진 형태라면 bazel 쓰는게..ㅋㅋ
0 notes
Text
wait a second. the gpl requires you to a) license derivative works the same, and b) share source code when distributing. if you distribute an interpreted language like javascript with no build step and don't minify... you are, inherently, distributing the source, right? there's nothing that says you need to link a public git repository or whatever. so if you just, like, email someone a zip, or publish to npm...
okay, let's see:
The “source code” for a work means the preferred form of the work for making modifications to it. “Object code” means any non-source form of a work. The “Corresponding Source” for a work in object code form means all the source code needed to generate, install, and (for an executable work) run the object code and to modify the work, including scripts to control those activities.
You may convey a covered work in object code form under the terms of sections 4 and 5, provided that you also convey the machine-readable Corresponding Source under the terms of this License, in one of these ways...
I guess it hinges upon whether what you are distributing is the "preferred form of the work for making modifications to it." do things like linter config files count as things that must be distributed?
(I guess in the case of a web extension, which is most likely what I would be using gpl code in thanks to the xkit projects, this is all irrelevant. while an xpi file is in fact a zip archive of the potentially entirely unmodified source of your extension, suggesting the recipient rename the .xpi to .zip if they want to extract it and read the source is almost certainly too arcane to count.)
0 notes
Link
0 notes
Photo

New Post has been published on https://codebriefly.com/whats-new-in-angular-20-key-features-and-more/
What's New in Angular 20: Key Features, Differences from Angular 19, and Major Benefits
Angular 20, released in May 2025, marks a significant advancement in the Angular framework, introducing performance enhancements, developer-centric features, and architectural refinements. This post delves into the new features of Angular 20, contrasts them with Angular 19, and outlines the major benefits of upgrading.
Table of Contents
Toggle
Key Features in Angular 20
1. Enhanced Ivy Compiler
2. Improved Developer Experience
3. Better Integration with PaaS
4. New Components and Libraries
5. Enhanced Security Features
Differences Between Angular 19 and Angular 20
Major Benefits of Angular 20
Upgrading to Angular 20
Final Thought
Key Features in Angular 20
1. Enhanced Ivy Compiler
Angular 20 continues to optimize the Ivy compiler, resulting in faster load times and reduced memory consumption. These improvements are particularly beneficial for applications deployed in Platform-as-a-Service (PaaS) environments.
2. Improved Developer Experience
The Angular CLI has been updated with new commands and options, streamlining the development process. Notably, the ng generate command now supports more templates and configurations, facilitating quicker project scaffolding.
3. Better Integration with PaaS
Angular 20 offers improved integration with popular PaaS providers like Heroku, AWS Elastic Beanstalk, and Google App Engine. The new Angular Deploy tool simplifies the deployment process to these platforms.
4. New Components and Libraries
The release introduces new Material Design components, enhancing UI development. Additionally, the Angular Component Dev Kit (CDK) has been expanded with new tools and utilities, aiding in the creation of custom, performant, and accessible components.
5. Enhanced Security Features
Angular 20 includes built-in protections against common web vulnerabilities like Cross-Site Scripting (XSS) and Cross-Site Request Forgery (CSRF). The framework now supports Content Security Policy (CSP), allowing developers to define and enforce security policies effectively.
6. Improved Testing and Debugging
Testing utilities have been enhanced, with improvements to Angular TestBed and new Protractor integration, making it easier to write and run tests.
Differences Between Angular 19 and Angular 20
Feature Angular 19 Angular 20 Standalone Components Default behavior Continued support with enhancements Reactivity Introduction of linkedSignal and resource() APIs Further optimizations in reactivity TypeScript Support Up to TypeScript 5.6 Improved TypeScript support with better type checking CLI Enhancements AI-driven suggestions and automation New commands and options for streamlined development Security AutoCSP for content security policies Built-in protections against XSS and CSRF, with CSP support Testing Utilities Introduction of new testing tools Enhanced TestBed and Protractor integration
Major Benefits of Angular 20
Performance Optimization: The refined Ivy compiler and improved reactivity lead to faster load times and efficient memory usage.
Enhanced Developer Productivity: Updated CLI commands and better TypeScript support streamline the development workflow.
Seamless Deployment: Improved integration with PaaS providers and the Angular Deploy tool simplify the deployment process.
Robust Security: Built-in protections against common vulnerabilities and CSP support enhance application security.
Improved Testing: Enhanced testing utilities facilitate easier and more reliable application testing.
Upgrading to Angular 20
To upgrade your Angular application to version 20, follow these
Use the following npm command to update Angular CLI:
Global Update:
npm install -g @angular/cli
Angular CLI in Your Project:
ng update @angular/cli
Angular Core and Dependencies:
ng update @angular/core
Verify Application Functionality: Run your application and ensure all functionalities work as expected.
Final Thought
Angular 20 brings substantial improvements in performance, security, and developer experience. Upgrading to this version ensures your applications are built with the latest advancements, providing a robust foundation for future development.
If you need assistance with the upgrade process or have any questions, feel free to ask!
Keep learning & stay safe 😉
You may like:
Testing and Debugging Angular 19 Apps
Performance Optimization and Best Practices in Angular 19
State Management and Data Handling in Angular 19
0 notes