#ntfs or ext4
Explore tagged Tumblr posts
Visit Tumblr Blog
Explore Tumblr blogs with no restrictions, modern design and the best experience.
Last Seen Tumblr Blogs


Fun Fact
Tumblr Inc. has $15.1M in annual revenue.
Text
Finally did it~~ finally nuked my data drive to change its format~~~
Bit of thinking to myself really but idk if it was a good idea that I did what I just did~~
Hopefully had everything saved to my external drive; and just nuked my second internal hard drive to create a new filesystem for saving my stuff~~
It's no longer NTFS~~~ and is now EXT4~~
But which file system is better tho? Given I've switched to Linux on that computer may as well just make it a Linux format huh~~
Never could figure out why I could no longer make folders in there after I installed debian; but hopefully the jump to the ext4 file system fixes it ~~
Idk if i should copy any of the data over or not~~ i didn't access most of it cause it's anime, tv shows, ans youtube videos that I've downloaded years ago when I knew which one worked~~
But all of that copied to the drive and its almost full~~~ i have a terabyte of stuff almost T_T
I've been thinking about doing this for a while, and I finally did it~~ hello internal storage that is ext4 and not just the home drive~~~
And also no longer a random string of numbers and has a name~~~ XtraData lol
External drive is still ntfs tho I think~~~ idk~~
Did i make a mistake? Idk~~~ don't regret it ~~
What caused the inability to create folders in the ntfs drive? Cause I'm copying stuff over from my home directory and tried and I can create folders again
I CAN CREATE FOLDERS IN THE DRIVE AGAIN ~~~~~
What tf broke it?? Permissions looked totally fine ~~ set to read and write ~~ i want to know what happened ~~ but i guess since my jump to ext4 fixed it, I don't need to~~~
Maybe just windows not playing nice w linux from beyond the grave or something ~~ idk
#personal#thoughts#thinking#file#files#filesystem#internal hard drive#hard drive#ntfs#ext4#linux#windows#data#data storage#data storage formats#formats#were mistakes made?#whixh is the better format?#ntfs or ext4#or any other linux or unix format#tired#tired posting#happy#i can do the thing#I CAN CREATE FOLDERS IN THE DRIVE AGAIN#aaaaaaaa#y tho#what broke it#???#my jump to linux to begin with?
1 note
·
View note
Text
linux when you try to use it with windows: "okay! feel free to do whatever you like"
windows when you try to use it with linux: "i will cut you"
#linux#windows#this is about finding out linux can read ntfs but windows can't read ext4#this is also about finding out grub can launch windows but windows boot manager can't launch linux#this is probably about some third thing i haven't found out about yet
1 note
·
View note
Text
ALSO IF YOU WANNA INFO DUMP ABOUT PARTITIONING DISKS PLEASE DO IT, IM HERE FOR IT. I WANNA LEARN.

#linux#linuxposting#cool retro term#programming#hard drive#ssd#hdd#cd#dvd#nvme#ntfs#fat32#ext4#exFAT#ext3
523 notes
·
View notes
Text
also share your names with me I'm curious :3
down below is a heartfelt sob story about my favorite hard drive and also reason why I did the poll
For the longest time I only had one external drive containing everything. It was an old 256GB drive that I just named "BACKUP".
When I got my SSD I took out the old hard drive and used that as my main backup source. Because it had more storage I named it "BACKUP EXTENDED".
That drive got corrupted when I was in rehab because some guy named Kevin borrowed it for movies and used in a micro usb phone cable instead of the real one that was right on top of the drive.
So BACKUP EXTENDED was no more. A few months later I tried some usb partitioning tools (GParted my beloved) because I had some computer issues and thought I try to revive that old drive again and it fucking worked. From that day on my backup drive was known as "THE UNDEAD" (I've also been a huge Hollywood Undead fan at that time).
That name stuck with me, even after I accidentally formatted the whole drive when installing Arch, It persisted through each repartitioning session.
When I fucked up my partitioning table so hard it took several tries of fiddling to get the drive to work again, I renamed my trusty old drive to UNDEAD REVIVED because, well, I had to revive it again. Is it really undead at this point? Or is a revived thing alive again. What is a revived zombie, really? Maybe that's something for another poll...
A few weeks ago I got a few terabytes of storage for cheap and the biggest drive I got right now is 3TB. It's my new backup drive and I called it "UNDEAD EXTENDED",
But I've reached a point where having only one partition for everything isn't enough anymore. I have a macbook for work which can't write to NTFS partitions, so I had to create an exFAT for shared storage. That doesn't allow me to symlink things though, and I still need to have a Windows backup that I can just attach to any PC and boot from it, so I also need an NTFS drive. But Windows does things to the NTFS drive so that sometimes I have to sudo mount the partition which is really annoying and kinda sucks. I only use Linux on my main machine and just want to keep some of its files somewhere without other systems interacting with it at all so now I also have a ext4 partition for system backup and some games.
So, my trusty UNDEAD* hard drive that I lovingly kept and revived and extended and revived again, which stores everything that I own and love and need is now cut up into pieces and none of the partitions feel like the drive that it once was that makes me sad.
I grew very attached to that hard drive and to that name but even when the physical drive is still next to me it feels like I've outgrown it. I've had my Undead drive when I was at my lowest and it was a part of my digital life up until now. I've had iterations of it for almost half of my life. If that thing could talk, it would scream.
So, how did I name my partitions instead now?
I've named my exFAT partition "CYBERSLUT" the way it plugs into any computer and gets manhandled by it, it made me smile when I made the tough decision to retire the undead naming scheme.
My NTFS drive is called "WHYDOS" because I always ask myself why I still keep up with Windows sometimes, and I just recreated my ext4 partition that I named "PLAYGROUND", because it's only used for Wine bottles and some steam games so far, so they don't take up most of my limited SSD space.
#Is this how it feels like to outgrow your marriage?#getting sentimental over a fucking hard drive#where in the body is the soul located?
41 notes
·
View notes
Note
>>USER: 2KY3 >>PROMPT: Do different drive formats (like NTFS, EXT4, FAT32, etc etc) look like looking through different colored lenses to you? I know they do to me but I’m curious to have your input on it :3
> USER RECOGNIZED > WELCOME BACK, USER > internal/self) screen.display str: > "ive actually never tried different formatting!" > "other than different format types being connected to my main systems like flash drives" > "having to do a full memory wipe to change format types seemed annoying so i never bothered-" > "however!" > "the way i 'perceive' other drives connected to me is sort of like a temporary self-extension" > "the best way i can describe the feeling is the equivalent of a human holding a tool" > "an extension, something to be used, but undeniably not a part of myself" > "i suppose ive never paid them much mind save for the data they hold" > "thanks for asking and for the idea :3"
10 notes
·
View notes
Text
want to resize an old NTFS partition i never reformatted to ext4 and now have thoroughly sunk costed, but of course it has a trillion errors i need to boot into windows to fix

hopefully this goes away soon
3 notes
·
View notes
Text
Building Your Own Operating System: A Beginner’s Guide
An operating system (OS) is an essential component of computer systems, serving as an interface between hardware and software. It manages system resources, provides services to users and applications, and ensures efficient execution of processes. Without an OS, users would have to manually manage hardware resources, making computing impractical for everyday use.
Lightweight operating system for old laptops
Functions of an Operating System
Operating systems perform several crucial functions to maintain system stability and usability. These functions include:
1. Process Management
The OS allocates resources to processes and ensures fair execution while preventing conflicts. It employs algorithms like First-Come-First-Serve (FCFS), Round Robin, and Shortest Job Next (SJN) to optimize CPU utilization and maintain system responsiveness.
2. Memory Management
The OS tracks memory usage and prevents memory leaks by implementing techniques such as paging, segmentation, and virtual memory. These mechanisms enable multitasking and improve overall system performance.
3. File System Management
It provides mechanisms for reading, writing, and deleting files while maintaining security through permissions and access control. File systems such as NTFS, FAT32, and ext4 are widely used across different operating systems.
4. Device Management
The OS provides device drivers to facilitate interaction with hardware components like printers, keyboards, and network adapters. It ensures smooth data exchange and resource allocation for input/output (I/O) operations.
5. Security and Access Control
It enforces authentication, authorization, and encryption mechanisms to protect user data and system integrity. Modern OSs incorporate features like firewalls, anti-malware tools, and secure boot processes to prevent unauthorized access and cyber threats.
6. User Interface
CLI-based systems, such as Linux terminals, provide direct access to system commands, while GUI-based systems, such as Windows and macOS, offer intuitive navigation through icons and menus.
Types of Operating Systems
Operating systems come in various forms, each designed to cater to specific computing needs. Some common types include:
1. Batch Operating System
These systems were widely used in early computing environments for tasks like payroll processing and scientific computations.
2. Multi-User Operating System
It ensures fair resource allocation and prevents conflicts between users. Examples include UNIX and Windows Server.
3. Real-Time Operating System (RTOS)
RTOS is designed for time-sensitive applications, where processing must occur within strict deadlines. It is used in embedded systems, medical devices, and industrial automation. Examples include VxWorks and FreeRTOS.
4 Mobile Operating System
Mobile OSs are tailored for smartphones and tablets, offering touchscreen interfaces and app ecosystems.
5 Distributed Operating System
Distributed OS manages multiple computers as a single system, enabling resource sharing and parallel processing. It is used in cloud computing and supercomputing environments. Examples include Google’s Fuchsia and Amoeba.
Popular Operating Systems
Several operating systems dominate the computing landscape, each catering to specific user needs and hardware platforms.
1. Microsoft Windows
It is popular among home users, businesses, and gamers. Windows 10 and 11 are the latest versions, offering improved performance, security, and compatibility.
2. macOS
macOS is Apple’s proprietary OS designed for Mac computers. It provides a seamless experience with Apple hardware and software, featuring robust security and high-end multimedia capabilities.
3. Linux
Linux is an open-source OS favored by developers, system administrators, and security professionals. It offers various distributions, including Ubuntu, Fedora, and Debian, each catering to different user preferences.
4. Android
It is based on the Linux kernel and supports a vast ecosystem of applications.
5. iOS
iOS is Apple’s mobile OS, known for its smooth performance, security, and exclusive app ecosystem. It powers iPhones and iPads, offering seamless integration with other Apple devices.
Future of Operating Systems
The future of operating systems is shaped by emerging technologies such as artificial intelligence (AI), cloud computing, and edge computing. Some key trends include:
1. AI-Driven OS Enhancements
AI-powered features, such as voice assistants and predictive automation, are becoming integral to modern OSs. AI helps optimize performance, enhance security, and personalize user experiences.
2. Cloud-Based Operating Systems
Cloud OSs enable users to access applications and data remotely. Chrome OS is an example of a cloud-centric OS that relies on internet connectivity for most functions.
3. Edge Computing Integration
With the rise of IoT devices, edge computing is gaining importance. Future OSs will focus on decentralized computing, reducing latency and improving real-time processing.
4. Increased Focus on Security
Cyber threats continue to evolve, prompting OS developers to implement advanced security measures such as zero-trust architectures, multi-factor authentication, and blockchain-based security.
3 notes
·
View notes
Text

Dopo anni passati a lottare con i tempi di attesa dei dischi meccanici tradizionali, ho finalmente deciso di fare il salto verso un NAS all-flash. La scelta è ricaduta sul TerraMaster F4-SSD, un dispositivo che promette di rivoluzionare il workflow di chi, come me, lavora quotidianamente con file RAW pesanti e progetti video 4K. L'idea di avere un sistema storage completamente basato su SSD, silenzioso e performante, mi ha convinto a investire in questa soluzione che si posiziona in una fascia di mercato ancora relativamente di nicchia. Logicamente al momento il top a nostro avviso è il Terramaster F8 SSD PLUS. La promessa di TerraMaster è chiara: offrire ai creator 4K e ai fotografi professionisti un'alternativa ai classici NAS con dischi rotanti, eliminando i colli di bottiglia tipici dello storage tradizionale. Con un prezzo di 569 euro su Amazon Italia (venduto direttamente da TerraMaster EU Store), questo dispositivo si propone come una soluzione accessibile per chi vuole fare il salto verso lo storage all-flash senza svuotare il portafoglio. Durante le mie due settimane di test intensivi, ho sottoposto l'F4-SSD a carichi di lavoro reali che rappresentano il quotidiano di uno studio fotografico moderno: dall'ingest di migliaia di RAW, all'editing multicamera in DaVinci Resolve, passando per backup Time Machine e container Docker per la gestione delle foto. Design e qualità costruttiva Il primo impatto con il TerraMaster F4-SSD è sorprendente: le dimensioni compatte (225 × 136 × 166 mm) lo rendono incredibilmente discreto sulla scrivania. Il peso di soli 2,2 kg senza dischi testimonia l'attenzione alla portabilità, caratteristica non scontata in un NAS a 4 vani. Lo chassis in alluminio spazzolato non è solo un vezzo estetico: contribuisce attivamente alla dissipazione del calore, elemento cruciale quando si lavora con SSD ad alte prestazioni. L'F4-SSD utilizza slot M.2 interni per gli SSD NVMe, accessibili rimuovendo il pannello posteriore con una semplice vite thumbscrew. I quattro slot sono chiaramente contrassegnati (PCIe 3.0 x1 o x2) e l'installazione richiede solo il fissaggio con le piccole viti M.2 incluse. TerraMaster fornisce alcune viti di ricambio nel caso se ne perdesse qualcuna durante l'installazione. La qualità costruttiva è eccellente, con un telaio interno in metallo che garantisce rigidità strutturale. Lo slot aggiuntivo M.2 per la cache NVMe è facilmente accessibile e ben posizionato per garantire un'adeguata dissipazione termica. La ventola singola da 80 mm PWM è posizionata sul retro e, grazie al controllo intelligente della velocità, mantiene temperature ottimali senza diventare invadente. Il pannello frontale minimalista presenta solo i LED di stato essenziali: alimentazione, attività di rete e stato dei quattro drive. Sul retro troviamo la dotazione di porte: due connettori 2,5 GbE Intel I225-V con supporto per link aggregation, due porte USB-C 10 Gb/s e una USB-A 5 Gb/s. La scelta di includere due porte di rete veloci dimostra l'attenzione di TerraMaster verso l'uso professionale del dispositivo. Scheda Tecnica Caratteristica Dettaglio Processore Intel N95 (4 core/4 thread, fino a 3.4 GHz) Architettura CPU x86 a 64 bit Grafica integrata Intel UHD Graphics con supporto H.264/H.265/MPEG-4/VC-1 RAM installata 8 GB DDR5 SODIMM (1 modulo) RAM espandibile Fino a 32 GB DDR5 non ECC Slot storage 4 × M.2 2280 NVMe (2× PCIe 3.0 x2 + 2× PCIe 3.0 x1) Tipo storage supportato SSD NVMe M.2 2280 (solo all-flash) Capacità massima supportata Fino a 32 TB totali (4 × 8 TB) Tipi RAID supportati TRAID, TRAID+, RAID 5, RAID 6, RAID 10 File system supportati (interni) Btrfs, EXT4 File system supportati (esterni) EXT3, EXT4, NTFS, FAT32, HFS+, Btrfs Rete 1 × porta RJ-45 5 GbE Porte USB 3 × USB 3.2 Gen 2 (2 Tipo-A, 1 Tipo-C, fino a 10 Gbps) Uscita video 1 × HDMI 2.1 (fino a 4K a 60 Hz) Sistema operativo TOS 6.x (Linux 64 bit proprietario) Supporto transcodifica 4K Sì, fino a 4K a 60 fps con supporto hardware Sicurezza e cifratura Cifratura AES-NI Ventilazione 2 ventole da 50 mm con controllo intelligente Rumorosità Inferiore a 19 dB in standby Dimensioni 138 × 60 × 140 mm Peso netto 0,6 kg (netto), 1,2 kg (con imballo) Alimentazione Fino a 48 W (uso), 8 W (standby) Gestione utenti Fino a 20 utenti con controllo avanzato permessi Applicazioni supportate Plex, Docker, Emby, Snapshot, Backup, Cloud Sync Prezzo indicativo Circa 399,99 USD (prezzo di listino) Differenze TerraMaster F8‑SSD Plus, D4‑SSD, e F4‑SSD Ecco una tabella comparativa tra i tre modelli TerraMaster F8‑SSD Plus, D4‑SSD, e F4‑SSD: Caratteristica F8‑SSD Plus D4‑SSD F4‑SSD Tipologia NAS SSD 8‑bay DAS SSD 4‑bay NAS SSD 4‑bay Slot SSD 8× M.2 NVMe 2280 4× M.2 NVMe 2280 4× M.2 NVMe 2280 Capacità massima Fino a 64 TB (8×8 TB) Fino a 32 TB (4×8 TB) Fino a 32 TB CPU Intel Core i3‑N305 octa‑core, 3,8 GHz Nessuna CPU (device DAS via USB4) Intel N95 quad‑core 3,4 GHz RAM 16 GB DDR5 (aggiorabili a 32 GB) — 8 GB DDR5 (espandibili a 32 GB) Interfacce 1× 10 GbE, 2× USB‑C/A 10 Gbps, HDMI 1× USB4 40 Gbps 1× 5 GbE, 1× USB‑C 10 Gbps, HDMI Throughput dichiarato ~1 020 MB/s (rete), ottimo per 4K/VM Fino a 3 257 MB/s read e 3 192 MB/s write (RAID0, USB4) – RAID supportato RAID 0/1/5/6/10/TRAID/JBOD (ZFS nei NAS) RAID software via OS (supporta RAID 0/1/5/6/10) TRAID, TRAID+, RAID5/6/10 Rumorosità Read the full article
0 notes
Text
搬运5款让你眼前一亮的神器软件
让你眼前一亮的软件,不一定是市面上最流行的。今天,我将推荐��你五款非常小众,但是十分好用的软件。它们功能强大,使用起来也非常方便,而且经过我个人的测试,确保质量有保障。如果你用完后觉得不好用,可以找我哦。
1.跨端同步——GoodSync
GoodSync是多协议文件同步与备份工具,支持本地磁盘、NAS及云平台(SFTP/WebDAV等)间双向增量传输,采用AES-256加密与区块级去重技术,节省90%带宽占用。其自动化任务可设定实时/周期备份策略,保留256个历史版本,异常断电可断点续传。
2.文件加密——Cryptomator
Cryptomator是开源客户端加密软件,通过创建虚拟加密保险库保护云盘文件,采用AES-GCM-256算法实现文件名与内容双重加密。其零知识架构确保密钥仅用户持有,支持挂载为本地磁盘直接编辑文档,兼容Dropbox/Google Drive等主流网盘。
3.在线AI工具箱——3171.CN
3171.cn是一个超级实用的在线工具集网站,它几乎囊括了所有你可能需要的在线工具。这个全能在线工具平台,集视频录制、剪切、音频提取、转换、图片编辑、图表办公及文本处理于一身,简直是办公学习高效助手,同时,它还有小程序版本,可以说是非常非常方便实用,强烈推荐收藏!
4.一体笔记——OneNote
OneNote是全平台知识管理工具,整合富文本编辑、OCR图文识别、音频速记及白板手写功能,支持Markdown语法与LaTeX公式输入。其智能标签系统实现跨笔记本内容关联,会议录音可同步生成AI摘要与待办事项。企业版支持团队空间协作编辑与200+格式文件内嵌预览,历史追溯保留30天版本差异。
5.数据恢复——EasyRecovery
EasyRecovery是专业级数据恢复工具,支持机械硬盘、SSD、U盘及RAID阵列的误删/格式化/分区丢失修复,可深度扫描NTFS/APFS/Ext4等文件系统。其预检模式显示可恢复文件类型与概率,RAW恢复功能解析无目录结构的碎片数据,内置Office/PSD/视频等100+格式预览。
有许多小伙伴反映为什么不附上下载链接?因为附上下载链接容易被吞掉,想要下载的可以自行搜索软件名字,如果找不到的话可以在评论区留言。
0 notes
Text
أسهل طريقة لتنظيم الملفات بين Windows وLinux دون تعارض

عند استخدام جهازي تشغيل مختلفين مثل Windows وLinux، تصبح إدارة الملفات تحديًا يوميًا. قد تواجه ملفات لا تُفتح، أو أسماء غير مفهومة، أو حتى مشاكل في الصلاحيات. كل نظام يتعامل مع الملفات بطريقة خاصة، مما يجعل التنقل بينها مربكًا للمستخدمين.
الحل لا يتطلب أدوات معقدة أو تغييرات جذرية. كل ما تحتاجه هو فهم كيفية عمل كل نظام مع الملفات، وما هي الصيغ والمواقع الأنسب لحفظ البيانات بطريقة تضمن سهولة الوصول إليها من الطرفين. في هذا المقال، سنستعرض خطوات عملية لتوحيد طريقة تنظيم الملفات بين النظامين، مع نصائح مجربة لتجنب المشكلات الشائعة التي تواجه مستخدمي Windows وLinux معًا. ملخص - لا توفر أنظمة التشغيل ثنائية التمهيد (لينكس وويندوز) طريقة سهلة للوصول إلى ملفات لينكس أثناء تشغيل ويندوز. - تتوفر بعض الأدوات، لكنها لا تقدم حلولاً مثالية. - لقد وجدتُ أن استخدام قسم مشترك متاح لكل من ويندوز ولينكس يُعد حلاً ممتازًا ومتكاملاً وفعّالاً من حيث التكلفة. هل تشعر بالإحباط من تجربة مشاركة الملفات المعقدة في نظام التشغيل ثنائي التمهيد؟ هل تشعر بالحيرة من كيفية مشاركة كلا نظامي التشغيل نفس ذاكرة الوصول العشوائي (RAM)، ووحدة المعالجة المركزية (CPU)، ووحدة معالجة الرسومات (GPU)، ولكن ليس مساحة التخزين؟ حسنًا، إليك حل عملي لمشاركة الملفات بسلاسة بين جهاز الكمبيوتر ثنائي التمهيد (لينكس وويندوز). إذا كنت مثلي، وتستخدم كلا نظامي لينكس وويندوز على نفس الجهاز، فمن المحتمل أنك واجهتَ مشكلة مشاركة الملفات. لسنوات، عانيتُ من هذه المشكلة - احتياجي إلى ملفات من قسم لينكس أثناء العمل على ويندوز، واضطراري لإعادة تشغيل نظامي للحصول عليها. بعد عدة حلول فاشلة وعمليات إعادة تشغيل لا تُحصى عرقلت سير عملي، وجدتُ أخيرًا إعدادًا يعمل بسلاسة. إليكم رحلتي وما ح�� المشكلة فعليًا.
يستطيع لينكس الوصول إلى ملفات ويندوز، ولكنه ليس الخيار الأمثل.
من الناحية الفنية، يمكنك نقل الملفات في نظام تمهيد مزدوج بين لينكس وويندوز، ولكنه ليس الخيار الأمثل. كما ترى، يستخدم ويندوز 11 (و10) نظام ملفات NTFS، بينما يستخدم لينكس أنظمة الملفات EXT4 وBTRFS وZFS وغيرها. تكمن المشكلة في أن لينكس يدعم نظام ملفات NTFS، بينما لا يدعم ويندوز أيًا من أنظمة ملفات لينكس.
هذا يعني، لنفترض ��نك سجّلت دخولك إلى نظام ويندوز، وتحتاج إلى ملف موجود على قسم لينكس. حسنًا، لا يمكنك فتح مدير الملفات والوصول إليه. بدلًا من ذلك، ستحتاج إلى إعادة تشغيل النظام، والإقلاع إلى قسم لينكس، ونسخ الملف الذي تحتاجه ونقله إلى قسم ويندوز، ثم إعادة تشغيل النظام، والإقلاع إلى قسم ويندوز، ثم استخدامه! بعض الأشخاص لا يحتاجون إلى الرجوع إلى الملفات بين أنظمة التشغيل كثيرًا، وهذا النظام مناسب لهم. لكنني دائمًا ما أقوم بتنزيل الملفات والتقاط لقطات شاشة، وأحتاج إلى طريقة للوصول السريع إلى الملفات بين أنظمة التشغيل، وهذه الطريقة تُعطل سير عملي تمامًا. لهذا السبب أحتاج إلى طريقة أفضل للوصول إلى ملفات لينكس مباشرةً من نظام ويندوز.
الوصول إلى ملفات لينكس من ويندوز مُعقد
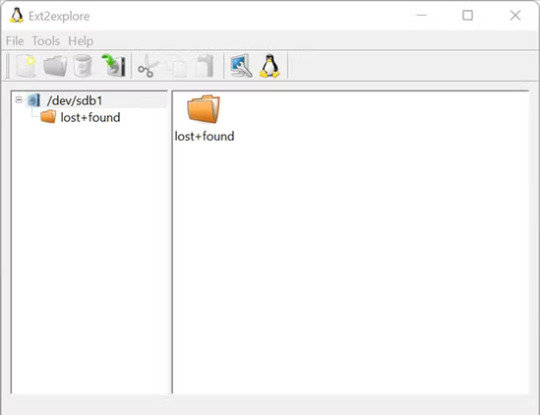
هناك بعض الأدوات التي تتيح لك الوصول إلى قسم لينكس من ويندوز. ولكن، مرة أخرى، لا يوجد منها مثالي! على سبيل المثال، هناك أداة مجانية ومفتوحة المصدر (FOSS) تُسمى Ext2Read، تتيح لك الوصول إلى ملفات لينكس من ويندوز، لكنها تعمل فقط إذا كان قسم لينكس مُهيأً بنظام Ext4 أو Ext3 أو Ext2. للأسف، أستخدم Garuda Linux، الذي يستخدم نظام ملفات BTRFS لأقسامه، لذا لم أستخدمها!
مع ذلك، حتى لو كنت تستخدم توزيعة لينكس بنظام الملفات المدعوم (مثل أوبونتو)، انتبه إلى أن سرعات القراءة والكتابة تكون أبطأ. الخيار التالي هو أداة مدفوعة تُسمى نظام ملفات لينكس لنظام ويندوز من شركة باراغون للبرمجيات. هذه الأداة أسرع، بميزات أكثر، وتستطيع قراءة (وليس كتابة) نظام ملفات BTRFS - أي أنني أستطيع نسخ الملفات من نظام لينكس دون لصق ملفات جديدة فيه - وهو أمر، وإن كان محدودًا، إلا أنه مناسب تمامًا لاستخدامي! مع ذلك، بصفتي مستخدم لينكس، لستُ معتادًا على إنفاق المال دون داعٍ على برامج مدفوعة - إلا بعد استنفاد جميع خياراتي والتأكد من عدم وجود بدائل للبرمجيات الحرة والمفتوحة المصدر. ولن تصدقوا، هناك خيار أفضل!
كيف يُمكن لوحدة التخزين الخارجية حل هذه المشكلة؟
مع أنني لم أجد برنامجًا يُساعدني في حل هذه المشكلة، إلا أنني وجدتُ جهازًا مثاليًا لهذه المهمة - وحدة تخزين USB! لقد أدركت أنه إذا قمت بتوصيل محرك الأقراص المحمول الخاص بي بجهاز الكمبيوتر الخاص بي، فسيكون لدي إمكانية الوصول إلى نظام تخزين متسق عبر نظامي التشغيل. كل ما عليّ فعله هو تهيئة محرك الأقراص المحمول إلى نظام exFAT ليتمكن كل من ويندوز ولينكس من قراءته، وأنا جاهز للاستخدام. وبالتالي، أنقل الملفات التي أعرف أنني قد أحتاجها على كلا نظامي التشغيل إلى محرك الأقراص المحمول، فأكون قادرًا على الوصول إليها وقتما أحتاجها. للأسف، لم يكن الوضع مثاليًا. كانت سرعات نقل الملفات بطيئة بشكل ملحوظ، مما جعل عمليات الملفات الكبيرة صعبة. سرعان ما أصبحت سعة 64 جيجابايت عائقًا مع نمو مشاريعي. كما أن توصيل محرك الأقراص المحمول بشكل دائم بجهاز الكمبيوتر أفقده غرضه كجهاز تخزين محمول. كنت بحاجة إلى حل أفضل - حل أكثر ديمومة يوفر إمكانية الوصول إلى وحدات التخزين الخارجية دون قيود. وهكذا، انتقلت أخيرًا إلى نظامي الحالي! ملاحظة يمكنك استخدام قرص صلب خارجي أو قرص SSD لهذه المهمة، بدلًا من محرك الأقراص المحمول. ولكن مجددًا، ستدفع أكثر مقابل عامل قابلية النقل، وهو ما لن تحتاجه في جهاز كمبيوتر مكتبي ثابت، مما يجعله حلاً غير مثالي.
قسم مشترك كترقية ممتازة

أستخدم حاليًا قسمًا مشتركًا يمكن الوصول إليه لكلٍ من نظامي ويندوز ولينكس. هذا يتجاوز جميع عيوب استخدام جهاز تخزين خارجي، فهو أكثر تكاملًا وأسرع وأرخص عادةً، ويوفر مساحة تخزين أكبر. أنصحك بشراء قرص صلب SSD أو قرص صلب HDD جديد واستخدامه كقسم مشترك. مع ذلك، إذا كنت لا ترغب في إنفاق أي أموال، يمكنك تصغير حجم قرص موجود للحصول على مساحة تخزين إضافية واستخدامه كقسم مشترك. في كلتا الحالتين، المبدأ الأساسي واحد - استخدام تنسيق ملف قابل للقراءة من قِبل كلٍ من ويندوز ولينكس. كيفية إنشاء قسم مشترك بين لينكس وويندوز قبل أن نبدأ، دعونا نحدد القرص الذي نريد تصغيره لتوفير مساحة للقسم المشترك. أفترض أن لديك قرصين فعليين، أحدهما يعمل بنظام ويندوز والآخر بنظام لينكس. أنصحك بتصغير حجم القرص مع لينكس، لأنه أكثر كفاءة في استخدام الموارد ويشغل مساحة أقل عادةً. مع ذلك، إذا كان قرص ويندوز لديك يحتوي على مساحة أكبر، فلا تتردد في تصغيره. ملاحظة نوصي بشدة بتثبيت لينكس وويندوز على أقراص صلبة منفصلة. قد يؤدي وجودهما على نفس القرص إلى تلف البيانات عن طريق الخطأ أثناء إدارة الملفات. علاوة على ذلك، من المعروف أن تشفير BitLocker يسبب مشاكل في أنظمة التشغيل المزدوج. إذا قررت تصغير حجم قسم ويندوز، يمكنك القيام بذلك بسهولة باستخدام أداة إدارة الأقراص في ويندوز. يمكنك اتباع دليلنا لتغيير حجم قسم في ويندوز 10 يعمل أيضًا على ويندوز 11 - فقط تأكد من إضافة قسم NTFS في المساحة الفارغة. قد تكون الأمور أكثر تعقيدًا إذا قررت تصغير حجم قسم لينكس، لأن أداة إدارة الأقراص في ويندوز لا تستطيع قراءة ملفات لينكس فيه. يمكنك تجربة استخدام أداة إدارة أقراص لينكس مثل GParted، لكن لينكس لا يسمح بتغيير حجم قسم قيد الاستخدام. لذلك، ستحتاج إلى جهاز تحكم عن بُعد، وتثبيت ملف ISO من Ubuntu عليه (أو أي ملف ISO من لينكس)، ثم تشغيله. يتيح لك هذا الوصول إلى البيئة المباشرة، حيث يمكنك تشغيل GParted لتقليص حجم قسم لينكس وتهيئة قسم مشترك جديد. تحذير عند تقسيم، أو في هذه الحالة، تقليص حجم قرص ثابت مثبت عليه نظام تشغيل، هناك دائمًا خطر فقدان البيانات أو تلفها. لذلك، احرص على إجراء نسخة احتياطية للنظام قبل المتابعة. يجب أن يكون GParted مثبتًا بالفعل. ولكن إذا لم يكن كذلك، يمكنك بسهولة إدخال الأمر التالي لتثبيته على أوبونتو: sudo apt update && apt install gparted بمجرد تثبيته، قم بتشغيئه عن طريق إدخال الأمر التالي: sudo gparted من هنا، يمكنك اختيار "محرك الأقراص الفعلي" من القائمة المنسدلة في الزاوية العلوية اليسرى. حدد قسم لينكس، وانقر عليه بزر الماوس الأيمن، ثم اختر "تغيير الحجم/النقل". بعد ذلك، قلّل الحجم لإفساح المجال للقسم المشترك. الآن، انقر بزر الماوس الأيمن على القسم الجديد، ثم اختر "تهيئة إلى"، واختر نظام الملفات NTFS هذه المرة - وليس exFAT، المخصص لأجهزة التخزين القابلة للإزالة. يتميز نظام الملفات NTFS بميزة تسجيل يوميات تساعد على الحماية من تلف البيانات، وتوفر عمومًا موثوقية أفضل لأنظمة الملفات الأكبر حجمًا.

أخيرًا، انقر على "علامة الاختيار الخضراء" لتطبيق التغييرات. بعد الانتهاء، أعد تشغيل النظام وقم بتشغيل جهاز الكمبيوتر الذي يعمل بنظام لينكس للتحقق من عمله بشكل صحيح. من المفترض أن يظهر القسم الجديد في مدير الملفات، ولكن إذا لم يظهر، فستحتاج إلى تثبيته يدويًا. وهنا قصتي حول كيفية حل مشكلة مشاركة الملفات على نظامي التشغيل لينكس وويندوز. يتيح لي استخدام قسم مشترك أخيرًا مشاركة الملفات والمجلدات بسلاسة بين نظامي التشغيل دون أي مشاكل. إدارة الملفات بين Windows وLinux لا يجب أن تكون مهمة معقدة أو مرهقة. من خلال تنظيم بسيط للأدلة، واختيار صيغ متوافقة، والاعتماد على أنظمة ملفات مشتركة مثل NTFS، يمكنك التنقل بين النظامين بسلاسة ودون أخطاء مزعجة. النصائح الواردة في هذا المقال ليست فقط للمحترفين، بل يمكن لأي مستخدم تطبيقها للحصول على تجربة أكثر مرونة واستقرارًا في استخدام كلا النظامين. Read the full article
0 notes
Text
Alright, let’s break this down in a way that’s clear, bold, and a little geeky—because why not?
⸻
What is a Computer File?
A computer file is essentially a digital container for information. Think of it like a folder or a document in the real world—but instead of ink on paper, it’s data on a storage device.
Definition:
A computer file is a unit of digital information that is stored on a computer storage device (like an SSD, HDD, USB drive, etc.) and can be created, opened, edited, or deleted by software programs or the user.
⸻
Why It’s Called a “File”
Back in the early days of computing, developers used familiar terms from office environments—like “files” and “folders”—to make tech less intimidating. So:
• A file = document or resource with data
• A folder = a container that holds files
⸻
Types of Files
Files can store all kinds of data:
• Text (e.g., .txt, .docx)
• Audio (e.g., .mp3, .wav)
• Video (e.g., .mp4, .mkv)
• Images (e.g., .jpg, .png)
• Executable Code (e.g., .exe, .app)
• System files (e.g., .dll, .sys)
⸻
File Storage: The Real Deal
Files are stored on a computer resource—like:
• Hard disk drive (HDD)
• Solid-state drive (SSD)
• Flash drive (USB)
• Optical media (CD/DVD)
• Cloud storage (e.g., Google Drive, OneDrive)
These devices use file systems like NTFS, FAT32, ext4, etc., to organize and manage how data is stored and retrieved.
⸻
Bonus Tech Nugget
Every file has:
• A name
• A file extension (like .jpg)
• Metadata (info about the file: size, creation date, type)
⸻
So yeah, a computer file is your digital vault for any kind of data. From memes to malware, research papers to ransomware—it all lives as files.
Want to go deeper into file systems or extensions?
1 note
·
View note
Text
Format File System Terbaik untuk Flash Drive / USB Drive Milikmu
Format File System Terbaik untuk Flash Drive / USB Drive – Setiap sistem operasi memiliki Format File System masing-masing. Windows menggunakan NTFS (NT File System). Linux menggunakan EXT2, EXT3, dan EXT4. Sedangan MacOS saat ini menggunakan format APFS. Hal ini akan merepotkan bila kita adalah pengguna yang menggunakan device dengan sistem operasi yang beda-beda. Hal ini sedang saya alami saat…
0 notes
Text
SystemRecue 12.00
Została wydana nowa wersja SystemRescue 12.00. SystemRescue (poprzednio: SystemRescueCd) jest specjalistyczną dystrybucją typu Live zbudowaną na Arch Linux (poprzednio na Gentoo). Służy do tworzenia i edycji partycji, obsługuje wiele systemów plików, m.in.: ext2, ext3, ext4 ReiserFS, Reiser4, Btrfs, XFS, JFS, VFAT, NTFS, ISO 9660, NFS i SMB. https://linuxiarze.pl/systemrescue-12-00/

1 note
·
View note
Text
Tìm hiểu về tốc độ truy xuất dữ liệu trên VPS Storage: Yếu tố quan trọng
VPS Storage là gì?
VPS Storage là một giải pháp lưu trữ dữ liệu trên máy chủ ảo (Virtual Private Server), giúp người dùng có không gian lưu trữ riêng với hiệu suất cao và khả năng mở rộng linh hoạt. Một trong những yếu tố quan trọng ảnh hưởng đến hiệu quả hoạt động của VPS Storage chính là tốc độ truy xuất dữ liệu.
Tốc độ truy xuất dữ liệu trên VPS Storage là gì?
Tốc độ truy xuất dữ liệu trên VPS Storage là thời gian cần thiết để đọc hoặc ghi dữ liệu trên ổ cứng của máy chủ ảo. Yếu tố này ảnh hưởng trực tiếp đến hiệu suất của website, ứng dụng hoặc hệ thống lưu trữ dữ liệu. Nếu tốc độ truy xuất chậm, người dùng sẽ gặp tình trạng tải trang lâu, độ trễ cao và trải nghiệm kém.
Các yếu tố ảnh hưởng đến tốc độ truy xuất dữ liệu trên VPS Storage
Trước khi đi sâu vào từng yếu tố, chúng ta cần hiểu rằng tốc độ truy xuất dữ liệu trên VPS Storage không chỉ phụ thuộc vào một yếu tố duy nhất mà là sự kết hợp của nhiều thành phần. Việc lựa chọn phần cứng phù hợp, tối ưu hóa hệ thống và sử dụng các công nghệ hỗ trợ sẽ giúp cải thiện đáng kể hiệu suất. Dưới đây là những yếu tố quan trọng cần xem xét:
Loại ổ cứng sử dụng
Ổ cứng là yếu tố quyết định chính đến tốc độ truy xuất dữ liệu. Hiện nay, có hai loại ổ cứng phổ biến:
HDD (Hard Disk Drive): Ổ cứng cơ học có tốc độ đọc/ghi thấp hơn do sử dụng đĩa quay vật lý.
SSD (Solid State Drive): Ổ cứng thể rắn có tốc độ truy xuất nhanh hơn gấp nhiều lần so với HDD, giúp cải thiện hiệu suất đáng kể.
NVMe SSD: Đây là thế hệ SSD tiên tiến, sử dụng giao thức NVMe để tăng tốc độ đọc ghi lên đáng kể so với SSD thông thường.
Băng thông và tốc độ mạng
Nếu VPS Storage hoạt động trên hệ thống mạng có băng thông thấp, tốc độ truy xuất dữ liệu cũng bị ảnh hưởng. Một số yếu tố quan trọng gồm:
Tốc độ mạng của nhà cung cấp VPS.
Giới hạn băng thông của gói VPS.
Khoảng cách địa lý giữa máy chủ và người dùng.
Loại RAID được sử dụng
RAID (Redundant Array of Independent Disks) là một công nghệ giúp tăng tốc độ và bảo mật dữ liệu trên hệ thống lưu trữ. Một số cấp độ RAID phổ biến:
RAID 0: Tăng tốc độ đọc/ghi nhưng không có khả năng bảo vệ dữ liệu.
RAID 1: Sao lưu dữ liệu an toàn nhưng không cải thiện tốc độ.
RAID 10: Kết hợp tốc độ của RAID 0 và bảo mật của RAID 1.
Cấu hình và tài nguyên VPS
Tài nguyên của VPS Storage cũng ảnh hưởng đến tốc độ truy xuất, bao gồm:
CPU: Bộ xử lý mạnh hơn giúp xử lý dữ liệu nhanh hơn.
RAM: Dung lượng RAM lớn giúp giảm tải việc truy xuất từ ổ cứng.
Số lượng IOPS (Input/Output Operations Per Second): Chỉ số này càng cao thì tốc độ đọc/ghi càng nhanh.
Tối ưu hóa hệ thống tệp (File System)
Hệ thống tệp ảnh hưởng đến cách dữ liệu được ghi và đọc. Một số hệ thống tệp phổ biến trên VPS Storage:
EXT4: Tốt cho Linux, ổn định và hiệu suất cao.
XFS: Tối ưu cho hệ thống tệp lớn.
NTFS: Phổ biến trên Windows Server.
Cách kiểm tra tốc độ truy xuất dữ liệu trên VPS Storage
Bạn có thể kiểm tra tốc độ đọc/ghi của VPS Storage bằng các công cụ sau:
Linux: Sử dụng lệnh dd hoặc fio để đo tốc độ đọc/ghi.
Windows: Dùng phần mềm CrystalDiskMark để kiểm tra tốc độ ổ cứng.
Các công cụ benchmark online từ nhà cung cấp VPS.
Cách cải thiện tốc độ truy xuất dữ liệu trên VPS Storage
Nâng cấp lên SSD hoặc NVMe SSD
Nếu đang sử dụng HDD, việc nâng cấp lên SSD hoặc NVMe SSD là giải pháp hiệu quả nhất để tăng tốc độ truy xuất dữ liệu.
Chọn nhà cung cấp VPS có băng thông cao
Lựa chọn VPS có băng thông rộng, tốc độ mạng nhanh giúp giảm độ trễ khi truy xuất dữ liệu.
Tối ưu hóa hệ thống tệp
Sử dụng hệ thống tệp phù hợp với nhu cầu.
Thường xuyên dọn dẹp và chống phân mảnh ổ đĩa (với HDD).
Sử dụng RAID để tăng tốc độ và bảo mật dữ liệu
Nếu có nhu cầu truy xuất dữ liệu nhanh và an toàn, RAID 10 là lựa chọn tối ưu.
Tăng tài nguyên cho VPS
Nếu VPS có CPU yếu, RAM thấp hoặc IOPS bị giới hạn, việc nâng cấp tài nguyên giúp tăng tốc độ truy xuất dữ liệu đáng kể.
Kết luận
Tốc độ truy xuất dữ liệu trên VPS Storage là một yếu tố quan trọng ảnh hưởng đến hiệu suất của hệ thống. Để tối ưu hóa, bạn cần lựa chọn ổ cứng SSD hoặc NVMe, sử dụng RAID phù hợp, tối ưu hóa hệ thống tệp và đảm bảo VPS có tài nguyên đủ mạnh. Nếu bạn đang tìm kiếm một giải pháp lưu trữ nhanh chóng và ổn định, hãy xem xét các yếu tố trên trước khi chọn nhà cung cấp VPS phù hợp.
Tìm hiểu thêm: https://vndata.vn/vps-storage/
0 notes
Text
Montar discos automaticamente com fstab
Para montar todos os HDs automaticamente no Linux, você pode configurar o sistema para montar as partições durante a inicialização. Isso é feito editando o arquivo /etc/fstab. Aqui está um guia passo a passo:
1. Identifique os HDs e partições
Primeiro, identifique os discos e partições que deseja montar. Use o comando lsblk ou blkid para listar os dispositivos e suas UUIDs (identificadores únicos).
bash lsblk
ou
bash blkid
Anote a UUID de cada partição que deseja montar.
2. Crie pontos de montagem
Crie diretórios onde as partições serão montadas. Por exemplo:
bash sudo mkdir /mnt/dados1 sudo mkdir /mnt/dados2
3. Edite o arquivo /etc/fstab
Abra o arquivo /etc/fstab com um editor de texto, como o nano:
bash sudo nano /etc/fstab
Adicione uma linha para cada partição que deseja montar automaticamente. O formato geral é:
UUID=UUID_DA_PARTIÇÃO PONTO_DE_MONTAGEM FORMATO OPÇÕES_DE_MONTAGEM DUMP PASS
Exemplo:
UUID=1234-5678-9101 /mnt/dados1 ext4 defaults 0 2 UUID=9876-5432-1098 /mnt/dados2 ext4 defaults 0 2
UUID_DA_PARTIÇÃO: Substitua pelo UUID da partição.
PONTO_DE_MONTAGEM: Diretório onde a partição será montada.
FORMATO: Tipo de sistema de arquivos (ext4, ntfs, etc.).
OPÇÕES_DE_MONTAGEM: defaults é comum, mas você pode personalizar conforme necessário.
DUMP: Geralmente 0 (desativado).
PASS: 2 para partições que devem ser verificadas durante a inicialização.
4. Teste a configuração
Antes de reiniciar, teste a configuração com o comando:
bash sudo mount -a
Isso montará todas as partições listadas no /etc/fstab. Verifique se tudo foi montado corretamente.
5. Reinicie o sistema
Se tudo estiver funcionando, reinicie o sistema para garantir que as partições sejam montadas automaticamente na inicialização.
bash sudo reboot
0 notes
Text
minitool partition wizard crack

MiniTool Partition Wizard is one of the best partition managers. It covers all the functions of the Free. It embeds advanced partitioning technologies like merge Partition, converting NTFS to FAT32, changing cluster size, and converting dynamic disk to basic to hexpressionalusers.
MiniTool Partition Wizard Professional must be considered the best HDD Manager Software for everyone using the Windows operating system, whether Windows XP or Windows 10. Software professional disk management utilities can perform advanced tasks like resizing/Moving Partition, Merge partitions, splitting a single partition into multiple partitions, and Creating, Copying, Format, and Delete. Partition, etc., with a couple of mouse clicks!
The software helps you convert partition format like FAT MBR Disk, GPT Disk, copy & convert Dynamic Disk, change cluster size, change label, partition id, serial number, set Partition as logical or primary, copy entire Partition to unallocated space with high-performance file-by-file moving technology & Copy an entire disk to a different disk quickly and easily with data clone technology.
The software supports Linux Ext2, Ext3, Ext4 file systems, 32bit/64bit Windows OS, up to 32 HDDs in one system, and even HDD with up to 2TB max of volume size. MiniTool offers greater flexibility. It makes changes on Partition without rebooting the system, with no option for data loss ,thanks to recovery mode.
Features of MiniTool Partition Wizard Pro Ultimate
Extend System Partition
Copy Disk Partition
Recover Lost Partition
Migrate OS to SSD
Convert Dynamic Disk to Basic
Basic Management
Convert Disk Partition Table
Convert File System
Bootable Media Builder
System Requirements and Technical Details
Supported OS: Windows 11, Windows 10, Windows 8.1, Windows 7
RAM (Memory): 2 GB RAM (4 GB recommended)
Free Hard Disk Space: 200 MB or more
0 notes