#rclone Google Drive
Explore tagged Tumblr posts
Visit Tumblr Blog
Explore Tumblr blogs with no restrictions, modern design and the best experience.
Last Seen Tumblr Blogs


Fun Fact
The most popular pages on Tumblr are about Minecraft, GIFs, and David J. Peterson.
Text
Rclone for Windows
Rclone is a powerful command-line tool for cloud storage management that allows users to sync, copy, move, and mount files across a variety of storage services. Supporting over 70 cloud storage providers, including Google Drive, OneDrive, Dropbox, Amazon S3, and Backblaze B2, Rclone is often referred to as the “Swiss Army knife” of cloud storage due to its versatility and extensive feature…
#cloud backup tool#cloud storage management#rclone#rclone backup#rclone encryption#rclone Google Drive#rclone mount#rclone OneDrive#rclone sync#secure file transfers
0 notes
Link
看看網頁版全文 ⇨ Linux傳到Google Drive的檔案打不開,怎麼辦? / How to Open the File Uploaded From Linux in Google Drive? https://blog.pulipuli.info/2023/09/linuxgoogle-drive-how-to-open-the-file-uploaded-from-linux-in-google-drive.html 改用Linux之後,用Google Drive從網頁上傳到Google Drive的Excel檔案會變得無法識別,但是用NextCloud跟RClone同步到Google Drive的Excel檔案,卻能夠像Google試算表一樣開啟。 事情變得越來越複雜了。 ---- # Excel檔案 / Excel File。 - 英文葡萄酒評價資料集的Excel檔案:https://docs.google.com/spreadsheets/d/14fXyJMY_5EqKwL7vMfhxCtP3tHjljl7lh-kDm3q0Has/export?format=xlsx 讓我們先來拿個Excel檔案來看看。 這個是之前在「英文葡萄酒評價資料集」準備的檔案,轉換成Excel的xlsx格式後下載。 之後取得「wine-country - 2020 - blog.xlsx」檔案。 # 從網頁上傳Excel試算表 / Upload Excel from web page。 - Google Drive: https://drive.google.com/drive/ 我們拿這個檔案到Google Drive上傳看看。 傳上去之後,你會發現「wine-country - 2020 - blog.xlsx」看起來只是個普通檔案。 開啟看看,Google Drive表示無法預覽。 附帶一提,我已經開啟了「將上傳的檔案轉換成Google文件編輯器格式」。 但不知何時起,這個功能無法適用於Excel或Word等Microsoft Office檔案格式上。 反而是Open Document Format的odt或ods就能讓Google Drive正常轉換。 ---- # Rclone 圖片來源:https://wiki-rcs.unimelb.edu.au/display/RCS/Rclone+-+cloud+transfers。 接下來我們不用網頁,改用個拐彎抹角的方式來把檔案上傳到Google Drive。 那就是透過Rclone。 Rclone是一個強大的跨平台命令行工具,專門設計用於在不同遠端空間之間進行文件和資料的同步、備份和轉移。 它的名字來自"Remote"和"clone",暗示了它的主要功能,即遠端空間之間的文件複製。 ---- 繼續閱讀 ⇨ Linux傳到Google Drive的檔案打不開,怎麼辦? / How to Open the File Uploaded From Linux in Google Drive? https://blog.pulipuli.info/2023/09/linuxgoogle-drive-how-to-open-the-file-uploaded-from-linux-in-google-drive.html
0 notes
Note
Yo saw your asks to ms-demeanor about PWM solutions and local vs cloud. I feel your pain. Personally, I don't trust my own sysadmin chops enough to rely entirely on self-hosting (big corpo servers have a lot more failsafes and redundancies built in than my rpi does!)
My preferred solution is using KeePassXC on your local computer, and keeping it synced with multiple free cloud providers, e.g. OneDrive and Google Drive desktop, using one of those to sync it to your other devices if you want.
(The encryption on the kdbx file is enough protection, but if you want an extra layer of encryption, use something like Rclone, which can actually create an encrypted folder within cloud providers to keep your stuff extra hidden from Google/Microsoft and mount it like it's a local folder on your device. There's Rclone apps for desktop and Android, and a similar app, ccViewer, for iPhone. Otherwise, Cryptomator does a similar job and I believe is available on all platforms.)
I would consider that but I’d worry about race conditions, if I used it on multiple devices. Last I checked, which to be fair was ages ago, it did not handle that well.
2 notes
·
View notes
Text
What Is a Storage VPS and Why You Might Need One
In a world drowning in data — from high-resolution images and massive video libraries to backup files and system logs — it’s more important than ever to find smart, scalable, and cost-effective storage solutions.
Enter: the Storage VPS.
If you’ve ever asked yourself, “How can I store huge amounts of data affordably?�� or “What’s the difference between a regular VPS and a Storage VPS?” — this guide is for you.
We’re going to break down what a Storage VPS is, how it works, who it’s for, and how you can use it to supercharge your data storage strategy — all without overpaying or overcomplicating your tech stack.
What Is a Storage VPS?
A Storage VPS (Virtual Private Server) is a virtual server that’s optimized for massive disk space rather than high CPU or RAM. It gives you a private, scalable environment with large storage capacity, usually in the range of hundreds of gigabytes to multiple terabytes.
Unlike standard VPS plans — which focus on a balanced mix of computing power and storage — a Storage VPS leans heavily on providing as much space as possible at the lowest price per terabyte.
You can think of it as your own personal data warehouse. It’s ideal for situations where you don’t need intensive computing power but need a place to store a large amount of files, backups, media, or logs.
Why Use a Storage VPS Instead of Traditional Cloud Storage?
You may be wondering why someone would choose a Storage VPS over platforms like Google Drive, Dropbox, or Amazon S3. The answer comes down to control, cost, and flexibility.
Here’s a comparison to help clarify: FeatureStorage VPSTraditional Cloud StorageCost per TBLowerHigherControlFull root accessLimited to provider’s toolsFlexibilityInstall any softwareRestricted by provider featuresScalabilityEasily scalable via VPS upgradesCan get expensive or complexData privacyYou manage the dataProvider-managed servers
With a Storage VPS, you get full access to your server. You can install anything you want, encrypt your data, schedule automated backups, and control how and when your storage is used.
Plus, you’re typically paying a fraction of the cost compared to mainstream cloud platforms — especially when you need multiple terabytes of space.
Common Use Cases for a Storage VPS
Let’s look at some real-world ways people and businesses are using Storage VPS hosting to their advantage.
1. Offsite Backups for Websites or Apps
If you’re running a WordPress agency or managing multiple websites, a Storage VPS can act as a low-cost, secure location to store your offsite backups. You can automate backups using tools like rsync, Rclone, or SFTP, and store them encrypted on your VPS.
This ensures that even if your main server goes down, you have a reliable offsite recovery option.
2. Hosting a Personal Media Server
Want to stream your personal movie, music, or photo collection without relying on third-party platforms? A Storage VPS can be used to run media servers like Plex, Jellyfin, or Emby.
All you need is a basic VPS plan with high storage, and you can stream your media remotely — all under your control, without subscriptions or limits.
3. Cold Storage for Logs and Archives
Developers and IT teams often need to store large volumes of logs, analytics data, snapshots, and backups — data that doesn’t need to be accessed daily but must be available when required.
A Storage VPS provides a perfect solution for this kind of “cold” storage. It’s affordable, accessible on demand, and keeps your primary servers from getting overloaded.
What to Look for in a Good Storage VPS
Not all VPS plans are created equal, especially when it comes to storage. Here’s what to consider when choosing a Storage VPS:
Key Factors
Storage Type: HDD offers the most space for the lowest cost, while SSD is faster but more expensive. Choose based on your access needs.
Data Redundancy: Look for providers that offer RAID storage or at least some level of redundancy and backup.
Network Bandwidth: If you’re uploading or syncing large files, make sure the VPS has at least 1 Gbps network speed.
Root Access: Make sure the provider gives you full root access so you can configure the server however you want.
Location Options: Choose a data center location that matches your needs — whether it's for speed, compliance, or geo-redundancy.
Also, look at the provider’s policies on bandwidth limits and fair use. Some budget VPS plans have hidden limits that can impact performance if you transfer large volumes of data.
How to Set Up Your Storage VPS in 5 Steps
Setting up a Storage VPS doesn’t require advanced server knowledge. Here’s a basic setup roadmap:
Choose a reputable provider offering high-storage VPS plans.
Deploy your preferred OS (Ubuntu or Debian are beginner-friendly).
Secure your server by updating packages, creating secure passwords, and setting up a firewall (e.g., UFW).
Install file transfer tools like SFTP, rsync, or Rclone.
Automate backups or syncs using cron jobs or simple scripts.
In under an hour, you can be up and running with your own remote storage server.
Top Storage VPS Providers in 2025
If you're looking for reliable Storage VPS options, here are a few providers worth considering:
Hetzner
Based in Germany, Hetzner offers high-storage VPS solutions at some of the lowest price points in the industry. Their hardware is robust, and their support is developer-friendly.
Contabo
Contabo has long been a go-to for affordable VPS hosting. Their storage-optimized VPS plans include generous storage along with decent CPU and RAM.
GreenCloud VPS
GreenCloud offers specialized storage VPS plans in multiple global locations. They are especially popular for backup and media storage use cases.
Can a Storage VPS Help With SEO?
Indirectly, yes. Here’s how:
Faster page loads: Offloading large media (images, videos, PDFs) to a subdomain on your Storage VPS can reduce your main site’s load times.
Higher reliability: Storing backups separately means you can recover faster in case of downtime or corruption.
Better scalability: You can store and serve static files from a Storage VPS, reducing the load on your primary web server.
While it’s not a direct ranking factor, improved speed, uptime, and performance can positively influence your search engine visibility.
Final Thoughts: Is a Storage VPS Worth It?
Absolutely — especially if you’re dealing with large amounts of data or need more control over your storage infrastructure.
Let’s recap why a Storage VPS is a smart move:
Lower cost per terabyte than traditional cloud platforms
Full control over your server environment
Easily scalable and customizable
Ideal for backups, media hosting, and file storage
Great for developers, small businesses, and tech-savvy users
Whether you’re a solo creator, an IT admin, or a growing business, a Storage VPS gives you the tools to store, manage, and access data on your terms.
Ready to Get Started?
If you’re ready to take control of your data — and stop overpaying for cloud storage — a Storage VPS might be the perfect fit. Look for a provider that matches your storage and budget needs, and get started today.
Still have questions? Let me know — I’d be happy to help you choose the right setup.
0 notes
Text
Hướng dẫn cấu hình rclone config
Khi bạn chạy lệnh rclone config và gặp thông báo này, có nghĩa là bạn chưa cấu hình bất kỳ remote nào trong rclone. Bạn cần tạo một remote mới để kết nối với dịch vụ lưu trữ đám mây như Google Drive, Dropbox, S3, v.v. [root@125-212-214-97 public_html]# rclone config 2025/04/26 03:45:20 NOTICE: Config file "/root/.config/rclone/rclone.conf" not found – using defaults No remotes found, make a new…
0 notes
Text
أفضل طريقة لعمل نسخة احتياطية تلقائية من جهاز Windows إلى NAS بسهولة
فقدان الملفات بسبب تلف مفاجئ أو عطل في النظام يمكن أن يحدث في أي لحظة، خاصة إذا لم يكن هناك نسخ احتياطي منظم. الاعتماد على وحدة تخزين شبكية (NAS) هو أحد أكثر الحلول فعالية لحفظ نسخة تلقائية من ملفاتك على Windows دون تدخل يدوي. في هذا الدليل العملي، ستتعرف على طريقة إعداد النسخ الاحتياطي التلقائي خطوة بخطوة، باستخدام أدوات مدمجة داخل النظام أو برامج مجانية موثوقة، مع التأكد من أمان بياناتك وسهولة استرجاعها عند الحاجة.
ملخص - ابدأ بتقييم احتياجاتك من النسخ الاحتياطي. هل تحتاج إلى خدمة سحابية، أم خدمة محلية، أم مزيج من الاثنين؟ - يُمكّنك Syncthing من إنشاء نسخ احتياطية محلية سهلة وتلقائية ومجانية. - قمتُ بتكوين Syncthing على جهاز كمبيوتر يعمل بنظام Windows وجهاز NAS الخاص بي لضمان سلاسة التشغيل. لقد سئمت من دفع رسوم التخزين عبر الإنترنت للاحتفاظ بنسخة احتياطية من جهاز الكمبيوتر الذي يعمل بنظام Windows، لذلك قررتُ معرفة كيفية نسخه احتياطيًا إلى جهاز NAS الخاص بي. يسهّل Syncthing عملية النسخ الاحتياطي هذه ويبسطها ويؤتمتها.
هناك العديد من برامج النسخ الاحتياطي
عندما يتعلق الأمر بالنسخ الاحتياطي لجهاز الكمبيوتر، هناك العديد من الخيارات المتاحة. بالطبع، هناك Google Drive وDropbox وOneDrive وغيرها من موفري خدمات التخزين السحابي التي تتبادر إلى الذهن. يُعد Backblaze خيارًا آخر يُفضّله الكثيرون.

هناك خدمات مثل Nextcloud التي يمكن استضافتها ذاتيًا، وDuplicati، وSyncthing، وغيرها. مع ذلك، لا يُمكن مُقارنة Syncthing أو Duplicati بخدمات مثل Google Drive أو Dropbox أو OneDrive. Nextcloud ليس كـ Syncthing.
كيف تختار برنامج النسخ الاحتياطي المُناسب إذًا؟
يعتمد الأمر برمته على المهمة التي تريد إنجازها. إذا كنت ترغب في تخزين ملفاتك في السحابة، فإن Google Drive أو Dropbox أو OneDrive أو Backblaze هي الخيارات الأفضل والأسهل لذلك. هل تحتاج إلى خدمة شبيهة بالسحابة، ولكن مُستضافة منزليًا؟ Nextcloud هو الخيار الأمثل لذلك. ماذا عن نسخ احتياطي لخادم إلى وجهة بعيدة، مثل Backblaze B2 أو IDrive أو AWS؟ Duplicati هو الحل الأمثل. ولا تنسَ rclone الذي يُمكنه تنفيذ مهام مُماثلة أيضًا.
من ناحية أخرى، يختلف Syncthing قليلاً.
Syncthing يُلبي جميع احتياجاتي مجانًا
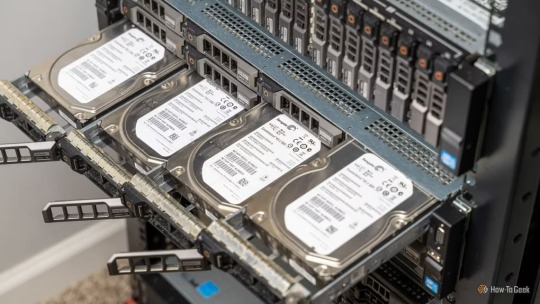
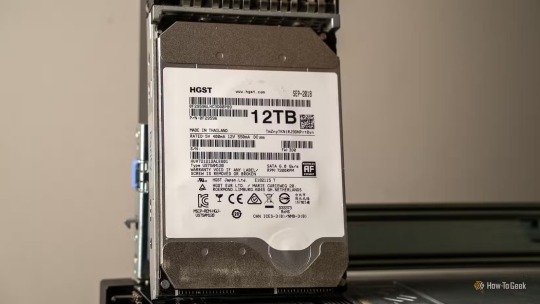
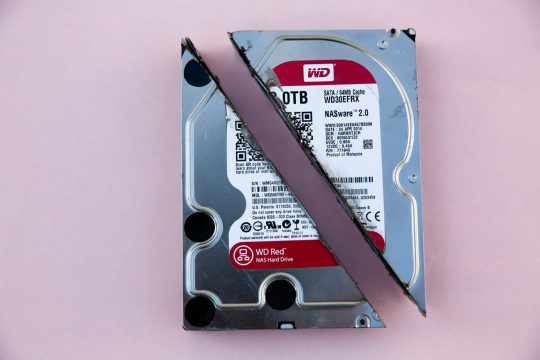
كما ذكرتُ سابقًا، لديّ مساحة تخزين كبيرة في المنزل. أستخدم خادمي NAS، أحدهما بسعة تخزين 27 تيرابايت والآخر بسعة تخزين تُقارب 70 تيرابايت. (للأسف، تعطل أحد أقراص التخزين سعة 4 تيرابايت مؤخرًا، فتقلص حجمه). على مدار السنوات القليلة الماضية، خزّنتُ صوري بصيغة RAW في جوجل درايف، وحدّدتُها للاستخدام دون اتصال بالإنترنت على جهاز الكمبيوتر المكتبي. سمح هذا بتخزين أحدث مجلد عمل محليًا، وتخزين الصور السابقة عن بُعد. كان العمل جيدًا، ولكن مع حجم الصور الذي يقارب 1 تيرابايت، والذي يتزايد باستمرار، أصبح تخزينها عبر الإنترنت مكلفًا. قررتُ نقل الصور إلى جهاز الكمبيوتر لتوفير المال والاستمتاع بمزيد من الخصوصية. كان هدفي هو نسخ صور سطح مكتب ويندوز احتياطيًا إلى خادم Unraid بسعة 27 تيرابايت. أنا مصور هاوٍ، وأُجري تعديلاتي باستخدام Lightroom. عندما قمتُ بإعداد خادم Unraid الجديد لأول مرة، نقلتُ جميع صور RAW إلى الخادم، وثبتُّه على جهاز الكمبيوتر المكتبي الذي يعمل بنظام ويندوز، وعدّلتُ الصور عن بُعد في Lightroom عبر اتصال 2.5 جيجابايت. كان العمل جيدًا، ولكن شعرتُ أن تجربة Lightroom كان من الممكن أن تكون أكثر سلاسة، حيث كنتُ أصل إلى الملفات من الأقراص الدوارة في Unraid، وليس من قرص SSD، لذا كانت سرعات القراءة والكتابة أبطأ. لهذا السبب، أردتُ نقل مجلد العمل الحالي لعام ٢٠٢٥ إلى سطح المكتب ليكون على محرك أقراص NVMe، مع الاحتفاظ بنسخة احتياطية منه على الخادم أيضًا.
جربتُ برامج مختلفة للقيام بذلك.
بدأتُ باستخدام Veeam، الذي أوصيتُ به بشدة. نجح في نسخ سطح المكتب احتياطيًا إلى الخادم، ولكن عندما حاولتُ استعادة البيانات، لم ينجح كما كنتُ آمل. تضررت مكتبة Lightroom الخاصة بي تمامًا. كان بإمكاني قضاء بعض الوقت في معرفة ما حدث وكيفية إصلاحه، لكنني قررتُ تجربة برنامج آخر. جربتُ بعد ذلك برنامج UrBackup، والذي بدا لي أنه يعمل بشكل جيد. نجح إلى حد ما، ولكن ليس بالطريقة التي أردتها. لا يقتصر UrBackup على نسخ الملفات من جهاز كمبيوتر إلى آخر، بل يُنشئ نسخًا احتياطية للملفات ويُجري تغييرات غريبة على النسخ الاحتياطية التزايدية. وهنا صادفتُ برنامج Syncthing. يعمل Syncthing بشكل مختلف عن البرامج الأخرى التي رأيتها، حيث يُبقي أجهزة الكمبيوتر مُحدثة باستمرار عن طريق نسخ الملفات عبر الشبكة. يُمكن إعداده للإرسال فقط، أو الاستقبال فقط، أو الإرسال والاستقبال، وهو ما يُعجبني فيه حقًا. باستخدام Syncthing، يُمكنني الاحتفاظ بصوري بتنسيق RAW على سطح المكتب، ثم يقوم البرنامج بنسخها تلقائيًا بهيكل مجلد مناسب إلى خادمي، وهو ما كنتُ أبحث عنه بالضبط.
أفضل ما في Syncthing هو سعره: مجاني تمامًا.
شغّلتُ برنامج Syncthing على كلٍّ من خادم Unraid وسطح مكتب Windows. ثبّتُ برنامج Syncthing على سطح مكتب Windows، بالإضافة إلى خادم Unraid. في البداية، ظننتُ أنهما برنامجان منفصلان، أحدهما لجهاز المصدر والآخر لجهاز الوجهة. لكنهما في الواقع متطابقان، وكيفية تهيئة كل مشاركة هي التي تُحدد كيفية عمل البرنامج. استخدمتُ مُثبِّت Docker لبرنامج Unraid، ومُثبِّت Windows لجهاز الكمبيوتر المكتبي. عمل كلاهما بسلاسة، وأتاحا لي التشغيل في دقائق. كانت عملية التهيئة سريعة أيضًا. حاليًا، كل ما عليّ فعله هو إعداد Syncthing لنسخ مجلد صور 2025 احتياطيًا من جهاز الكمبيوتر المكتبي إلى الخادم في إعداد أحادي الاتجاه. كما يُمكنني إعداد جهاز MacBook الخاص بي في إعداد ثنائي الاتجاه، بحيث يسحب صور 2025 ثم يرسل أي صور جديدة إلى الخادم في الوقت نفسه. بفضل آلية عمل Syncthing، يُمكن تثبيته على أي عدد من أجهزة الكمبيوتر وتهيئته بطرق مُتعددة لكل جهاز. إنه قوي للغاية، وأنا سعيد جدًا لأنني وجدتُ برنامجًا يُؤدي الغرض الذي أُريده تمامًا: نسخ سطح مكتب ويندوز احتياطيًا إلى خادمي دون تشويش أيٍّ من الملفات، وكل ذلك مجانًا.
إليكم كيفية تهيئة Syncthing
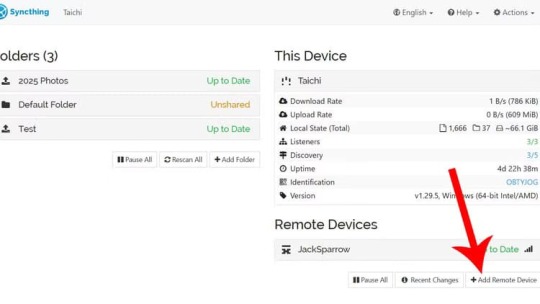
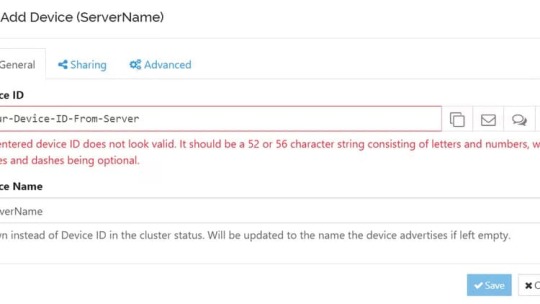
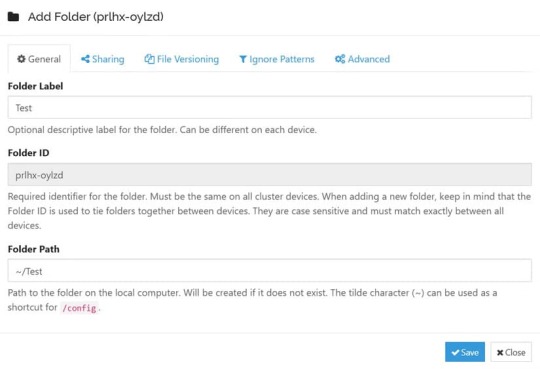
كان إعداد Syncthing بسيطًا للغاية، ولكن لجعله يعمل تمامًا كما أريد، استغرق الأمر بعض التجربة والخطأ. لنبدأ بتهيئة نظام ويندوز. بدأتُ بإضافة الخادم البعيد إلى تثبيت ويندوز. كان الأمر بسيطًا للغاية، كل ما عليك فعله هو نسخ مُعرّف الجهاز البعيد، والنقر على "إضافة جهاز بعيد"، وإدخال المعلومات هناك.
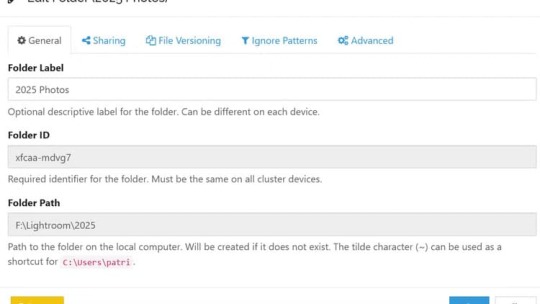
من هناك، نقرتُ على "إضافة مجلد" وأدخلتُ اسمًا للنسخة الاحتياطية، مع الحفاظ على البساطة بتسميته "صور ٢٠٢٥". ثم وضعتُ المسار الكامل للمجلد أسفل الشاشة الأولى.

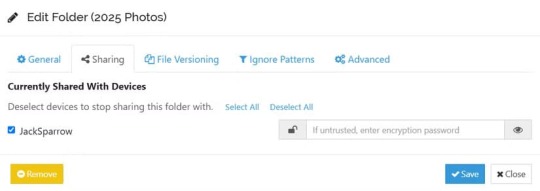
تحت علامة تبويب المشاركة، قمتُ بتحديد خانة خادم الوجهة الذي أعددته في الخطوة الأولى لإعداد مشاركة المجلد بين الحاسوبين. ليس لديّ أي إعدادات لإصدارات الملفات، ولا أي شيء في أنماط التجاهل.
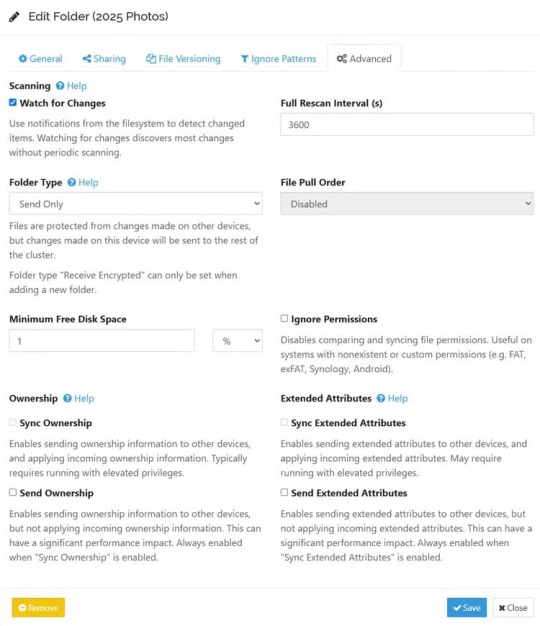
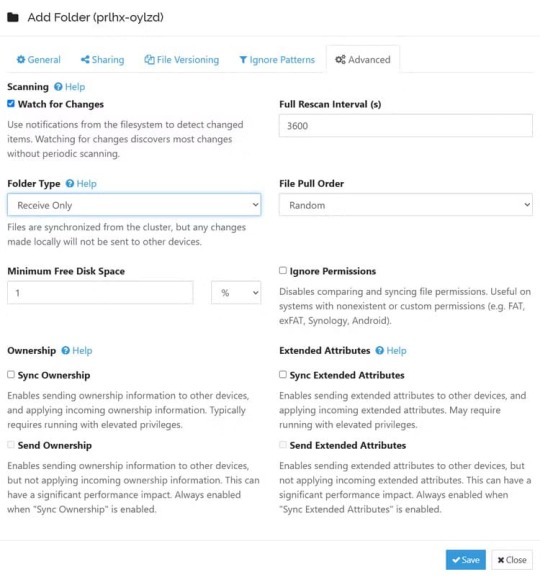
علامة التبويب الأخيرة، "مت��دم"، هي المكان الذي أُعدّ فيه جهازي الذي يعمل بنظام ويندوز للإرسال فقط. هذا يعني أنه في حال تحديث الملفات على الخادم، لن تُسحب إلى سطح مكتب ويندوز. أما في حال تحديثها على سطح مكتب ويندوز، فسيتم دفعها إلى الخادم.
الآن، على خادم Unraid، أفتح واجهة Syncthing، وتظهر نافذة منبثقة تُشير إلى وجود مشاركة جديدة من سطح المكتب. انقر ببساطة على "إضافة"، وستظهر نافذة.

في هذه النافذة، ستُعدّ بعض الإعدادات، تمامًا كما هو الحال في نظام ويندوز. أولًا، اسم المشاركة (الذي يجب ملؤه) ومسار المجلد.
مسار المجلد هو ما أربكني في البداية. على جهازي الذي يعمل بنظام ويندوز، المسار هو F:Lightroom2025. أما على خادم Unraid، فقد اضطررتُ إلى بعض التعقيدات في عملية التثبيت. بالنسبة لحاوية Docker، قمتُ بتثبيت مجلد 2025 على الخادم في /data1/2025. ثم، في Syncthing، قمتُ بإعداده لوضع الملفات من سطح المكتب في /data1/2025. بشكل أساسي، يأخذ هذا جميع الملفات من داخل F:Lightroom2025 ويضعها في /data1/2025، والذي يحتوي على مسار مطلق على خادم Unraid نفسه وهو /mnt/user/Photos/RAW Photos/2025. حاولتُ القيام بذلك في مكان أعلى من ذلك في شجرة المجلدات، لكنه لم ينجح كما أردت. مع ذلك، يعمل هذا الإعداد بشكل مثالي.
أخيرًا، عند تثبيت Syncthing على الخادم، ضبطته على "الاستقبال فقط". ليس من الضروري ضبط سطح المكتب على "الإرسال فقط" والخادم على "الاستقبال فقط"، ولكنني أريد فقط إبقاء الجهازين منفصلين تمامًا والقيام بما يلزم فقط. جهاز كمبيوتر محمول مزود بمنفذ USB وقرص صلب خارجي بجواره وأيقونة نسخ احتياطي. الآن، كلما استوردت صورًا ومجلدات جديدة إلى سطح المكتب، يتم نسخها إلى الخادم بسرعة كبيرة. كمستوى ثالث من النسخ الاحتياطي، سأقوم قريبًا بإعداد هذا الخادم للنسخ الاحتياطي في موقع خارجي في حال حدوث أي مشكلة محلية، مما يوفر لي حل نسخ احتياطي شامل. كل ذلك باستخدام برنامج مجاني. الاعتماد على النسخ الاحتياطي التلقائي إلى NAS يمنحك راحة البال ويضمن بقاء بياناتك آمنة دومًا، حتى عند مواجهة مشاكل غير متوقعة في الجهاز. سواء كنت تستخدم Windows 10 أو 11، فإن خطوات الإعداد سهلة وسريعة، وتوفر حماية طويلة الأمد دون الحاجة لتدخل مستمر. لا تنتظر حتى يفوت الأوان، وابدأ بإعداد النسخ الاحتياطي اليوم. وإذا واجهت أي مشكلة أثناء الإعداد، لا تتردد في الرجوع إلى دليل الدعم المرفق أو مشاركة تجربتك في التعليقات. Read the full article
0 notes
Link
0 notes
Video
youtube
Cloud Backup with Data Encryption using Google Drive, rClone, and Docker
0 notes
Text
📁 Dysk Google bez limitu w PC lub VPS
Kup dostęp do Google Drive bez limitu (np. na Allegro) – albo skorzystaj z konta szkolnego, jeśli takie posiadasz.
Zainstaluj Mountain Duck i skonfiguruj Google Drive jako lokalny dysk w systemie.
🔹 Alternatywa dla Windows/macOS: Cyberduck (darmowy, ale nie montuje dysków).
🔹 Alternatywa dla Linuxa: rclone – darmowe i elastyczne narzędzie CLI do montowania Google Drive jako folder w systemie plików.
#google drive#vps#dysk bez limitu#cloud storage#mountain duck#rclone#cyberduck#linux#windows#pc#chmura#poradnik#tech#hack#storage trick#tumblr tech
1 note
·
View note
Text
Backup files to Google Drive with Rclone
Backup files to Google Drive with Rclone
Backup files with rclone Backup files to google drive using rclone. Before we get right to this, let us break down the keywords first. Backup In information technology, a backup, or data backup is a copy of computer data taken and stored elsewhere. That way, it may be used to restore the original after a data loss event. The verb form referring to the process is known as “back up”. Whereas the…
View On WordPress
0 notes
Text
Dropboxの同時接続端末数制限を突破したい
概要
Dropbox便利ですよね。 何が便利って、真にマルチプラットフォームのクラウドストレージって、これくらいしかないという点です。
Google-Driveは便利ですが、何故かDebianに公式アプリが提供されておらず、サードパーティ製のアプリでなんとかする必要があります。 griveやgoogle drive ocamlfuseなどがあるなかで、自分は一時期rcloneを使って運用していました。 cronと組み合わせることでほぼリアルタイムな動機ができるのですが、API制限に引っかかると同期されないことがあるのが厄介でした。
また一時期はiCloudDriveにもトライしていました。 Apple製品で閉じているときは便利ですが、ubuntuとの連携はほとんど不可能といってよさそうです。
結局Dropboxに戻ってくるのですが、無料プランだと同時接続数に制限があるのが問題です。 今回それを無料のまま解除する指針を得たのでメモしておきます。
突破の指針
まともに全部書くと、どこかから怒られそうなので、指針だけメモしておきます。 下記の事実をよく読みましょう:
有料のDropbox Professionalプランには同時接続端末数制限はない
有料プランには試用期間が設定されている
すでに接続が認証されている端末が3台以上の場合、3台の制限が発生したタイミングで端末の認証が解除されるわけではない
これらを紐付けて考えれば、答えは自ずと出てくると思います。
まとめ
怒られたらすぐ消します。
2 notes
·
View notes
Link
看看網頁版全文 ⇨ 我是如何在Linux桌面端同步Google Drive的檔案 / How Do I Sync Google Drive Files on the Linux Desktop https://blog.pulipuli.info/2023/04/blog-post_520.html Nextcloud Client + Nextcloud + rclone + Google Drive。 這套組合真是複雜。 ---- # 檔案同步架構 / File sync structure。 (圖示來自於:Flaticon) 上次有講到我用Nextcloud掛載Google Drive,這樣可以讓我的Linux桌面版可以將檔案跟Google Drive進行同步。 我們再用上圖來說明一下整個架構。 上圖中左邊的電腦就是我現在使用的Linux桌面端。 Linux是透過Nextcloud Desktop Client跟Nextcloud伺服器進行連接。 中間的伺服器是安裝了Nextcloud的電腦。 Nextcloud伺服器安裝了rclone,透過rclone以掛載的方式連上Google Drive。 而Nextcloud再使用External Storage功能讓使用者能夠存取掛載的資料夾。 # 為什麼還需要Nextcloud? / Why do I need Nextcloud?。 https://rclone.org/drive/。 「既然都有rclone了,為什麼還要用Nextcloud?」我想這應該是很多人的問題,但有這個問題的人,應該也都只是將rclone裝在擁有穩定網路連線的伺服器上,不像我這樣裝在筆電的Linux上。 rclone的確是很好用的網路檔案儲存空間掛載工具,但它使用時必須要有網路連線。 然而,當我帶著筆電東奔西跑的時候,大多情況下我都不能預設它會有網際網路連線。 如果一開始就沒有辦法連線到目標要掛載的伺服器,rclone多半會直接關閉。 原本應該要有檔案的地方,就會因為沒有掛載成功而一片空白。 如果你的系統會仰賴這些檔案,那就更不妙了,可能會導致系統出現問題。 相較之下,Nextcloud用rclone連上Google Drive這種同步架構是一個很好的緩衝區。 它允許我將檔案儲存在本機端,這可以確保我在編輯與儲存檔案時不會受限於網路速度。 此外,它可以等電腦擁有穩定的網路連線時再來同步。 對於不需要急著修改的檔案來說���就讓它放著即可。 # 缺點 / Limitation 但Nextcloud用rclone連上Google Drive這套方案的缺點在於反向同步並不即時。 這是因為Nextcloud不會即時偵測Google Drive有沒有修改。 ---- 繼續閱讀 ⇨ 我是如何在Linux桌面端同步Google Drive的檔案 / How Do I Sync Google Drive Files on the Linux Desktop https://blog.pulipuli.info/2023/04/blog-post_520.html
0 notes
Text
Ubuntu install gosync

Ubuntu install gosync software#
Ubuntu install gosync download#
Ubuntu install gosync mac#
This app is licensed under the MIT License. In addition to Google Drive, you can use RClone to sync cloud storage services like Dropbox, pCloud Drive, Box and OneDrive. Rclone features one-way directory sync, syncing between two different accounts, an encryption and so on. Instead, it’s intended to be a desktop client for cloud storage services generally. Same as CloudCross, RClone isn’t also built specifically as a Google Drive client. 4. RCloneĪgain, RClone is also a CLI-based app so the use of this app might can be a bit daunting for those who don’t familiar to using CLI. The use of CloudCross is a bit complex especially for those who don’t familiar enough to terminal. This app is also available for Windows and macoS. CloudCross allows you to sync all of the local files on your computer or only selected files and folders. CloudCross isn’t also built exclusively for Linux. Instead, you can also use it to sync other cloud storage services like Dropbox, OneDrive and Yandex.Disk. However, this app is not specifically built for Google Drive. 3. CloudCrossĬloudCross is also a CLI-based app like Grive2. This app requires some libraries to run, including libcurl, libgcrypt, yajl 2.x and libstdc++. To upload local files, you can re-run the Grive2 app and it will upload your changes back to your Google Drive.
Ubuntu install gosync download#
Grive2 will download all of the files on your Google Driv account into the the current directory where you run it. It is forked from Grive. Grive2 is written in C++ and interacts with Google Drive through the REST API from Google Drive. Since Grive2 is a CLI-based tool, you have to run it via terminal. Grive2 is a CLI-based Google Drive client for Linux. You can pause it by clicking “Pause/Resume Sync” menu item. Once installed the app, your Google Drive files will be synced to your computer right way without needing to perform anything. At the time of writing, it is not configurable yet. As Himanshu said, GoSync is still far from perfect.
Ubuntu install gosync software#
It’s a GUI based app, written in Python by an Indian developer Himanshu Chauhan. Himanshu released his project as an open source software under the GNU GPL version 2.0. The first unofficial Google Drive client for Linux you can try is GoSync. Here are 6 Google Drive client apps for Linux you can try. In fact, some apps require you to perform some commands on terminal. Not all Google Drive client apps for Linux have a pretty interface like the official app.
Ubuntu install gosync mac#
Luckily, there are plenty of amazing developers who kindly develop unofficial Google Drive clients for Linux so you don’t have to make a switch to Windows or Mac only to sync your Google Drive files. Linux users who use Google Drive - like it or not - have to seek for an unofficial client app to sync their Google Drive files to their computer. As of today, Google Drive hasn’t provided an official client app for Linux and it seems has no plan to so in the near future.
0 notes
Text
Mountain duck tutorial

MOUNTAIN DUCK TUTORIAL OFFLINE
MOUNTAIN DUCK TUTORIAL MAC
This command line tool is missing quite a few features right now, but it's still quite useful already.
MOUNTAIN DUCK TUTORIAL OFFLINE
On some remotes (this option is available for Google Drive and Dropbox remotes, but not for OneDrive for example) you also have the option of downloading the whole remote contents to your filesystem for offline use, and uploading all the files copied to the folder mapped to the remote cloud storage server.įrom the RcloneTray menu you also get quick access to Rclone's ncdu (not to be confused with ncdu itself, this is only for rclone), an interactive, text-based user interface for the console, which allows the navigation of a remote, showing the used space. To indicate when a remote is mounted, the circle shown to the left of the remote name fills up. For some remotes (Google Drive and Dropbox for example) though, it may say "Open in Finder" even though it's running on Linux this is just a display bug and it does open the location using your default Linux file manager. You have the option of mounting any remote you've previously configured using Rclone, from the RcloneTray menu, be it some cloud storage provider, WebDAV, SFTP, etc., as well as opening it using your default file manager. RcloneTray lists all your Rclone remotes in its tray menu, each remote having a separate submenu that varies with each storage service. It also supports mounting these cloud storage services so you can access your files using desktop applications. Rclone can synchronize files from your filesystem from/to cloud storage services like Google Drive, Microsoft OneDrive, Nextcloud, Yandex Disk, Dropbox, Amazon Drive and S3, Mega, pCloud, and others (and having WebDAV, FTP and SFTP support), as well as directly between cloud storage services. Using this Electron tray application, you'll be able to quickly mount Rclone remotes, open the mount location using your default file manager, and perform other operations.Īlso see Rclone Browser (updated fork) for a more complete Rclone GUI.
MOUNTAIN DUCK TUTORIAL MAC
RcloneTray is a GUI for Rclone, the "rsync for cloud storage" command line tool, which runs on Windows, Mac and Linux.
0 notes
Text
Google photos backup linux

#Google photos backup linux update
That way, if you need to change a value, you know which parameter to adjust. Some of these values are the defaults, but we’ve included them here so that we can discuss them. If the destination directory does not exist, it will be created. Subdirectories are separated by the usual “/” forward slash. Also note the colon “:” that is used as a separator between the remote storage name and the directory name. Note the use of “google-drive”, which is the name we gave to this remote connection during the the rclone config sequence.
“google-drive:LinuxDocs”: The destination directory in the remote storage.
“/home/dave/Documents”: The local directory to we’re going to copy to the remote storage.
#Google photos backup linux update
This sets the frequency of update of the statistics to one second. –stats 1s: rclone can provide statistics on the transferred files.This value sets the limit for the number of retries. –low-level-retries 10: A low-level retry tries to repeat one failing operation, such as a single HTTP request.–retries 3: If there are this many errors, the entire copy action will be restarted.–timeout 300s: If a transfer becomes idle for this amount of time, it is considered broken and is disconnected.It sets the time that rclone will try to make a connection to the remote storage. –contimeout 60s: The connection timeout.Checkers monitor the transfers that are in progress., –checkers 8: How many “checkers” to run in parallel.–transfers 30: This sets the number of files to copy in parallel.–verbose: Gives information about every file that is transferred.–update: Skip any files that are on the remote storage that have a modified time that is newer than the file on the local computer.copy: Copy the files from the local computer to the remote storage, skipping over files that are already present on the remote storage.usr/bin/rclone copy -update -verbose -transfers 30 -checkers 8 -contimeout 60s -timeout 300s -retries 3 -low-level-retries 10 -stats 1s "/home/dave/Documents" "google-drive:LinuxDocs" You can call it whatever makes sense to you. Type (or copy and paste) this into a text editor and save it to your computer. We’re using this as a basic form of off-site backup. This is a one-way copy to the cloud it isn’t a two-way synchronization between your Google Drive and your local computer-although rclone can do that. The command we’re going to look at below copies files from your local computer to your Google Drive. That’s great, but it does mean there are a lot of options. The rclone application is very feature-rich. At the “Yes, Edit, Delete” menu type “y” and then press “Enter.”Īt the final menu, type “q” and press “Enter.”
1 note
·
View note
Text
تعرف على أداة rclone على Linux وإمكانياتها المتقدمة في إدارة الملفات
rclone هي أداة قوية ومفتوحة المصدر تُستخدم لإدارة الملفات ونقلها بين مختلف أنظمة التخزين السحابي والمحلي. تعمل بشكل أساسي على أنظمة Linux، وتوفر للمستخدمين مرونة كبيرة في إدارة البيانات. في هذا المقال، نستعرض ما هي rclone، وكيف يمكن استخدامها، وما هي المهام التي يمكنك تنفيذها باستخدام هذه الأداة المتقدمة.
ملخص - كان برنامج Rclone مستوحى من rsync. وهو مصمم لنقل البيانات إلى منصات التخزين السحابي. - يدعم برنامج Rclone أكثر من 90 منصة سحابية، ويمكن تكوينه بسهولة لمزامنة محرك الأقراص المحلي مع التخزين السحابي. - يتيح لك برنامج Rclone نسخ ومزامنة الملفات والدلائل، ولديه مزامنة ثنائية الاتجاه في الإصدار التجريبي. ننصح دائمًا بأننا بحاجة إلى إجراء نسخ احتياطية منتظمة، على وسائط مختلفة، وبنسخة واحدة خارج الموقع. يعد أمر rclone في Linux طريقة سهلة لإنشاء نسخ احتياطية خارج الموقع وصيانتها.
ما هو rclone؟
إذا كنت على دراية بأمر rsync، فسوف يتضح على الفور أن برنامج rclone مستوحى من rsync. يعد أمر rsync أداة تتيح لك مزامنة محتويات دليلين. طالما أن لديك حق الوصول للكتابة إلى الدليل المستهدف، فسيقوم rsync بمزامنة محتويات الدليلين. من السهل أيضًا إجراء نسخ احتياطي محليًا على محرك أقراص خارجي أو محرك أقراص داخلي مختلف، أو عن بُعد على جهاز مختلف مثل كمبيوتر آخر أو جهاز تخزين متصل بالشبكة (NAS). والأمر الرائع هو أنه يتم نقل الملفات التي تم تغييرها أو إضافتها حديثًا فقط، مما يوفر الوقت. كانت الفكرة وراء rclone هي إنشاء أداة مشابهة لـ rsync تقوم بمزامنة دليل محلي مع دليل على تخزين سحابي. إن وجود نسخة من ملفاتك خارج الموقع يجعل نظام النسخ الاحتياطي الخاص بك أكثر قوة. مع rclone، يعد تحقيق هذه النسخة عن بُعد أمرًا بسيطًا للغاية، كما هو الحال مع تحديثها.
تثبيت rclone
استخدم هذا الأمر لتثبيت rclone على Ubuntu. sudo apt install rclone

لتثبيت rclone على Fedora، تحتاج إلى كتابة: sudo dnf install rclone

في Manjaro، استخدم هذا الأمر. sudo pacman -S rclone

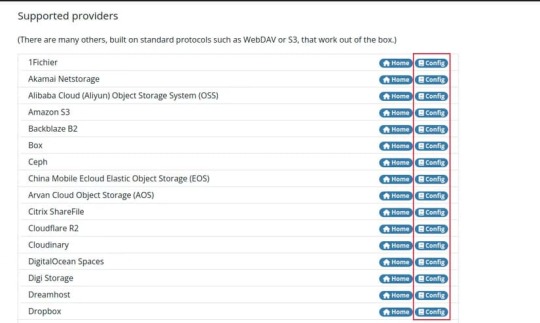
أكثر من 90 منصة سحابية مدعومة
أحد أكثر الأشياء المثيرة للإعجاب في rclone هو العدد الهائل من المنصات السحابية المدعومة. في وقت كتابة هذا المقال، يعمل rclone مع أكثر من 90 عرضًا مختلفًا للتخزين السحابي. بالطبع، ستحتاج إلى إنشاء حساب على المنصة التي ترغب في استخدامها. ستحتاج إلى إخبار rclone ببيانات اعتماد حسابك، حتى يتمكن من تسجيل الدخول باسمك عند مزامنة الدلائل. يتضمن إعداد rclone إنشاء تكوين اتصال للتخزين عن بُعد الذي ترغب في استخدامه. تسمى تكوينات الاتصال "أجهزة التحكم عن بُعد" في لغة rclone، ويمكنك إنشاء العديد منها كما يحلو لك. بمجرد إنشاء جهاز تحكم عن بُعد، يمكنك استخدام اسمه في أوامر rclone لإجراء إجراءات المزامنة للتخزين السحابي الذي يمثله جهاز التحكم عن بُعد. لقد قمنا بإعداد دليل خطوة بخطوة لإعداد rclone باستخدام Google Drive، ولكن لا داعي للقلق إذا كنت تستخدم أحد موفري الخدمات السحابية الآخرين المدعومين. يحتوي موقع rclone على أمثلة لنصوص جلسات تكوين rclone لكل موفري الخدمات السحابية الذين يدعمهم rclone.
تعرض النصوص إجابات نموذجية للأسئلة التي سيتم طرحها عليك أثناء الجلسة التفاعلية التي تقوم بتكوين جهاز التحكم عن بعد الخاص بك.
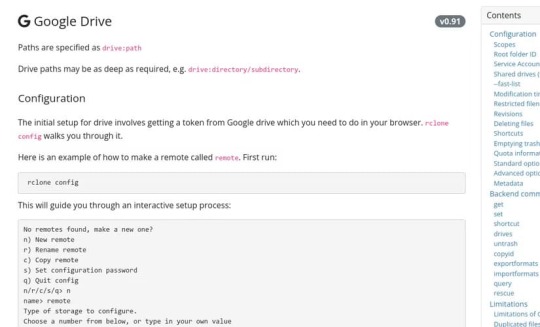
لبدء تكوين جهاز التحكم عن بعد، استخدم خيار التكوين. rclone config

الميزات الرئيسية لبرنامج rclone
مثل برنامج rsync، يحتوي برنامج rclone على العديد من الخيارات التي يمكن استخدامها لضبط سلوكه. ولكن، بشكل عام، هناك ثلاث طرق يمكنك استخدامها. يمكنك إرسال نسخة من جميع الملفات الموجودة في دليل إلى دليل بعيد. إذا كان نفس إصدار الملف موجودًا بالفعل في الدليل البعيد، فلن يتم إرسال الملف. لا تتم إزالة الملفات الموجودة في الدليل البعيد ولكنها ليست في دليل المصدر. يمكنك إرسال ملف واحد إذا كنت ترغب في ذلك، باستخدام الأمر copyto. يمكنك توفير اسم مختلف للملف المنقول، مما يعني نسخه وإعادة تسميته في خطوة واحدة. يمكنك مزامنة الدليل المستهدف مع الدليل المصدر. مرة أخرى، إذا كان نفس إصدار الملف موجودًا بالفعل في الدليل البعيد، فلن يتم إرسال الملف. ومع ذلك، إذا كانت هناك ملفات على الجهاز البعيد ليست في دليل المصدر، فسيتم إزالتها، ما لم تقم بإلغاء هذا الإجراء على وج�� التحديد. بشكل افتراضي، في نهاية المزامنة أحادية الاتجاه، يحتوي كل من الدليلين المستهدف والبعيد على نفس الملفات. هناك إصدار تجريبي من المزامنة الثنائية ينتج عنه أن الدليلين المصدر والهدف يحتويان على نفس الملفات. يجب التعامل مع هذا الخيار بحذر حتى يخرج من الإصدار التجريبي، وحتى في هذه الحالة لا يمكن استخدامه إلا إذا كنت متأكدًا من رغبتك في عكس التغييرات التي تطرأ على الدليل البعيد إلى الدليل المحلي لديك.
أستخدم rclone كل يوم
تعتمد سرعة النقل على سرعة تحميل اتصالك، وأي قيود قد يفرضها عليك مزود الخدمة السحابية أو لا يفرضها عليك. ستكون أول عملية تشغيل هي الأبطأ لأنك مضطر إلى نقل جميع بياناتك إلى السحابة. ستكون العمليات اللاحقة أسرع كثيرًا، لأن التغييرات والإضافات فقط هي التي يتم نقلها، ولكن لا تتفاجأ إذا استغرقت عملية البذر الأولية الخاصة بك يومًا كاملاً، كما حدث معي. كنت أعلم مسبقًا أنني أقوم بتحميل 40 جيجابايت من البيانات، لذا لم تكن مفاجأة كبيرة. لحسن الحظ، نجح برنامج rclone في اختراق كل شيء ونسخه بالكامل - الدلائل والدلائل الفرعية والملفات - إلى ملاذه الآمن الجديد بشكل مثالي. لقد كنت أستخدم برنامج rclone كجزء من روتين النسخ الاحتياطي الخاص بي منذ منتصف عام 2020، ولم يسبب لي أي مشكلة على الإطلاق. توفر لك النسخ الاحتياطية خارج الموقع مستوى إضافيًا كبيرًا من الأمان والحماية لبياناتك الثمينة. إن القدرة على الحصول على هذه الحماية بهذه السهولة أمر رائع حقًا. rclone هي أداة لا غنى عنها لمستخدمي Linux الذين يحتاجون إلى إدارة ملفاتهم ونقلها بين أنظمة التخزين المختلفة بسهولة وفعالية. بفضل ميزاتها المتقدمة ومرونتها، يمكن أن تكون rclone الحل الأمثل للعديد من المهام المتعلقة بالبيانات. إذا كنت تبحث عن أداة قوية لإدارة الملفات، فإن rclone تستحق التجربة. ابدأ في استخدامها اليوم واستمتع بتحكم أكبر في بياناتك. Read the full article
0 notes