#reshade guide
Explore tagged Tumblr posts
Visit Tumblr Blog
Explore Tumblr blogs with no restrictions, modern design and the best experience.
Last Seen Tumblr Blogs


Fun Fact
12.7% of mobile users access Tumblr.
Text

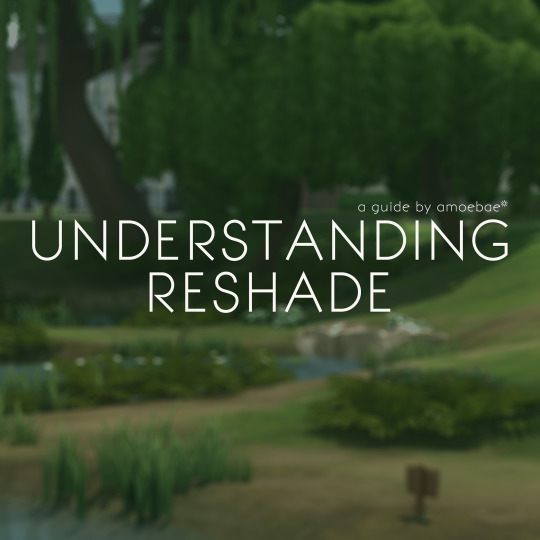
UNDERSTANDING RESHADE - a guide by amoebae
This guide aims to give a general overview of what ReShade actually is, and a working understanding of the difference between the ReShade binary, ReShade shaders, and ReShade presets.
Additionally, at the end of the guide you'll find basic installation instructions, information about how to make a backup of ReShade, how to uninstall ReShade, and a few other helpful tips and tricks, including troubleshooting.
---
I've wanted to make a basic overview like this for a long time. I didn't realise how long the guide would end up! It's text-heavy, no screenshots, no videos.
I initially wanted to write something to solve the problem of people getting confused about the difference between ReShade (the tool) and shaders when they update to a newer version and find their presets might not look quite the same. I quickly realised that required a proper understanding of what ReShade actually is and how its different constituent parts work.
Never one to do things by halves, I got stuck in.
The result is something that hopefully gives a solid grounding in the way ReShade works, so people are better equipped to solve their own problems as they arise.
UNDERSTANDING RESHADE - a guide by amoebae
858 notes
·
View notes
Text
🎨 Why My Presets Are Worth the Investment 🎨
Hey everyone! 💛 I’m thrilled to see how much you love my Presets—and I’d love to share why I’ve chosen to offer them as paid creations while keeping them accessible and fair for you all.
✨ What You’re Getting:
Unique Presets, crafted to stand out from generic filters, with meticulous attention to detail.
Constant Updates, ensuring full compatibility with ReShade and GShade as they evolve.
No Subscriptions Needed: Pay once on my Patreon (for individual presets or a full bundle) and keep them forever—no hidden fees!
🔒 Why Paid? Each preset represents hours of work, testing, and fine-tuning—they’re not just “filters” but a tailored experience for your game. Sadly, renaming a file is all it takes to steal creative work… so this helps protect my effort while letting me keep improving them for you.
💡 Ready to Elevate Your Game? No forced memberships! Find all my presets in my Patreon shop, with the freedom to pick only what you love. It’s a way to support my work without waste—and for me to keep delivering quality content for you.
Huge thanks to everyone who supports and values creativity! 🚀
#The Sims 4#TS4 CC#Sims 4 Mods#ReShade TS4#GShade#PC Gaming#Life Simulation Games#Digital Art#Game Aesthetics#Visual Effects#Color Grading#Virtual Photography#Creative Coding#Tutorial#How To Sims#ReShade Guide#Tech Tutorial#Modding Tutorial#Step by Step#Aesthetic Gaming#Cozy Games#Vintage Games#Dreamy Graphics#Cyberpunk Aesthetic#Fantasy Vibes#Before & After#Satisfying Edit#You Should Know#Pro Tip#Creative Process
3 notes
·
View notes
Text
Sights of Eorzea Live Session #1: External Textures, Lighting & Tone Matching in ReShade
youtube
Session #1 recording is up, and I'm glad I don't earn my bread as a streamer because I suck at it! Still, I hope you find it useful. =)
51 notes
·
View notes
Text
How to removing the blur from IGCS and enhance the eyes in Photoshop.
My first tutorial in English, it may not be the best video in the world, but you have to start somewhere😅. I show how to in Photoshop sharpen a shot after use the IGCS and how to enhance eyes 💖.
youtube
Thank you @obsessedwhyyes for permission to use Elysia as a model ❤️.

#bg3#virtual photography#baldur's gate 3#baldurs gate 3#baldur's gate#bg3 screenshots#baldurs gate screenshots#bg3 photography#photography#tutorial#bg3 photomode#photoshop#larian studios#reshade#guide#baldurs gate#youtube#bg3 video#aritenfromwarsaw tutorial#bg3 tav#bg3 oc#tav bg3#Youtube
48 notes
·
View notes
Text
Reshade Guide: Chromakey
Level: 🌻
In case anyone is interested, Im slowly making little guides to teach some of the techniques I use to up your gpose to the next level! Im not great with video editing so bear with me 😘
123 notes
·
View notes
Text
Huge news! (for me anyway)
Thanks to @mogruith's fantastic tutorials and some digging through the Osiris API, I have learned that I can place young Jaheira/Khalid (and young Jaheira/Rasaad) into ANY ROMANCE SCENE I LIKE!
(or any other cutscene for that matter. and place some of them in any location.)
I know this is such an incredibly niche thing to be hype about but i'm so incredibly jazzed rn. XD


#bjk talks#jaheira#jaheira x khalid#jaheira x rasaad#khalid#rasaad yn bashir#i am going to be a menace with these#ty mogruith for your tutorials!#excited to try out your reshade and freecam guide too :3
15 notes
·
View notes
Text
Transform Your Sims 4 Game with These Visual Mods: Easy Reshade Setup, Lighting & Overrides✨ + CC Links
youtube
Today I'll be showing you some of the best beginner-friendly mods to make your Sims 4 game look stunning! 😍 From ReShade to lighting and visual overrides, these easy-to-install mods will transform your Sims game! You can really customize these things to make your sims game uniquely yours! 😊🤍
Download Here: https://www.patreon.com/posts/114334048
#my youtube video#my youtube channel#myyoutubevideos#myyoutubechannel#mods#gameplay mods#sims 4 lighting#sims 4 visual overrides#sims 4 default overrides#default overrides#sims 4 lighting mods#sims 4 reshade tutorial#sims 4 beginners guide#sims 4 beginner tutorial#sims 4 mods intall#the sims 4 mod install#the sims 4 reshade tutorial#ts4 reshade presets#sims 4 reshade#Youtube
14 notes
·
View notes
Text


HYPERREALISTIC DOOM / REALISTIC DOOM WADS / PRETTY PICTURES!
MODS USED
some of these are very very hard to find because ive spent years curating a list of mods, but,
DHTP NORMALMAPPING (inside brutal doom black ed.)
Droplets
FishEyePostProcess
Flashlight++
Immerse v 104
MBlur v 1.04
NashGore
Relighting v4.0165b
ShaderSuiteGZ
ReShade (click "edit global preproccesor definitions, set the 0s to 1s) (I use a heavily modified copy of body cam zedd for ready or not, just instead of RoN put it in doom.exe)
Hideous Destructor
NOTE: just installing these Wont get get you this effect, many small tweaks to each were needed.
WADS:
After the holocaust by sergeant mark 4 (enter command prompt and type "kill archvile". you'll thank me later.
Going Down (if you find pulverizing your nuts to be a fun pasttime.)
Sacrment.wad (iunno man)
Hellbnd.wad
Whitemare ( you like j.c's the thing? youll love this)
STANDARD SETTINGS
display settings>hardware renderer>Postprossesing>tick on lens distort, bloom, and ampient occlusion.
Ive spent an 8th of my lifetime dedicated to modding doom, from the corona virus on my school pc to now. i hope this list helps you with doom modding, since i have yet to find any vids that give any way to achieve these effects. if you have any trouble with these, shoot me a dm, i am chronically online.
Anyone who wants to run Hdest with a stranger, find me @ doomworld
(EDIT: for each mod to work with eachother, turn OFF extra graphic settings AND render in openGL ONLY.)
#doom#doom modding#realism#hideous destructor#reshade#the thing#gaming#video games#video game#videogames#modding#game modding#DooM#doom mod#games#guide#cool guides#guide to doom modding#modding guide#fagenthusiast
7 notes
·
View notes
Text
I started with no Reshade/Gshade, and no posing tools, and did just fine - and you can/are as well! Just combine various expressions with various emotes and pause them at just the right time! (It's a lot of mashing the 1 button to catch the perfect moment...lol) Use the in-game color filters to make them pop! Find areas with cool lighting! Find photography studios in various houses or apartments (I just found one in my alt's apartment building on accident a couple days ago - someone has already done the work for you in that case!).
You don't need flashy bokeh or whatever - lots of cool effects already exist in game in the environment around you! The Sights of Eorzea Discord has lots of resources on taking good pictures, and also has a nice compendium of cool locations in the world to utilize for interesting shots! If you can't use all the wacky tools others have, you can still take cool shots! You can even edit them in another program afterwards to brighten or darken or add effects, and it doesn't require any photoshop knowledge or the like, unless you want to learn more about those programs - I just usually use my built-in Windows photo editor, or the one on my phone! Never feel limited by what you have access to, or your technical knowledge.
Besides, we all start somewhere, after all! No one was perfect from their very first Gpose shot they ever took... I've surreptitiously gone back and deleted many of my early gpose shots, even, because I looked back and was like "Wow my understanding of lighting was real bad" and I cringe... but like Jake says in Adventure Time:

I'm flipping through el tumbles, and I'm seeing everyone's WoLs, and I am like demn these are some cool Warriors of Light. And I see them with perfect lighting and excellent posing and the colours and I am like I am in love your WoL needs to be loved. I see a picture of a Warrior of Light with perfect bokeh, seeing them just pop out in a field of tasteful blur, and I am like nice. I see another one with just the freshest glam and I'm like what a cool character. I see an image with someone shrouded in darkness and smoke with reds and purples and I am like whew that is sick.
And then there's this.

#gpose#ffxiv gpose#gpose tips#gposers#seriously that discord is amazing#the person who made it has made SO many guides that they share on tumblr too#and plenty are about how to do things without extra tools#you can do it!#I still have old shots that people are shocked to find out weren't done with reshade or the like!#I just didn't want to mess with all that back when I was still new and learning gpose stuff#no matter your reason for not using it...you can still stuff just as pretty or cool or exciting as anyone else
136 notes
·
View notes
Text
Why You Shouldn’t Use GShade
Even after two years, I still see people using GShade and claiming it's a safe program, when it’s really not! There are already some older Tumblr posts about this, but I figured it’s worth refreshing the issue.
So please read this
Around two years ago, GShade’s developer added a code that could forcefully shut down your computer, not because of a bug or security measure, but on purpose. Why? Because he was mad that someone, specifically a 16-year-old made an alternative way to install GShade without using the official updater. Instead of handling it professionally, the dev decided to add a malicious code as "punishment" for anyone trying to modify GShade. That’s malware behavior.
(The first spark) ↓


At that time you also HAD to update Gshade to unistall it. ↓

(Developers "Apology") ↓

Now, you might be thinking, “Okay, but that was patched out, so it’s fine now, right?” Nope. Because the biggest issue isn’t just what he did, it’s the fact that he still thinks he did nothing wrong.
The Problem with Closed-Source Software Like GShade
GShade is closed-source, meaning no one except the developer can see or verify what’s actually in the code. This is a issue when dealing with someone who has already abused their control over the software.
With open-source programs (like ReShade), anyone can look at the code, verify it’s safe, and contribute to improving it. If something shady is added, people can catch it immediately. But with GShade, you have to just trust that the dev isn’t hiding anything malicious. And considering his past actions, that’s a massive risk to take.
Even if GShade is "safe" right now, nothing is stopping the dev from adding another backdoor, data collection, or something even worse in the future. Since no one can see the code, you wouldn’t know until it was too late. And given that he still defends his actions, there’s every reason to believe he’d do something similar again.
“But I’ve Never Had Issues With GShade”
A lot of people say GShade runs better than ReShade or has better effects. That might be true, but no amount of quality or convenience is worth putting your computer at risk. Just because something hasn’t caused problems yet doesn’t mean it won’t in the future. Malicious code can be slipped in at any time, and because it’s closed-source, no one would be able to warn you.
And honestly? You shouldn’t be using software made by someone who has already proven they’re willing to mess with your computer. If a developer intentionally inserts harmful code once, they can do it again.
What Should You Use Instead?
There’s a safe and open-source alternative: ReShade
It’s free and open-source, meaning the community can review the code to ensure it’s safe.
It can do almost everything GShade does, and while it may take some tweaking, it’s worth the effort.
Most GShade presets can be converted to work with ReShade with a bit of adjustment.
There are guides available to help transition from GShade to ReShade Here is one: How To Move To ReShade From GShade
Final Thoughts
At the end of the day, it’s your computer, and you can do whatever you want with it. But if you choose to keep using GShade, just be aware of the risks you’re taking. The dev has already demonstrated that he’s willing to sabotage people’s computers when he feels like it. He still thinks he was justified. And because GShade is closed-source, he has complete control over what’s in the code without anyone being able to check.
So ask yourself: Is that really the kind of software you want to trust?
ReShade is a safer, open-source alternative that doesn’t put you at risk.
Thank you for reading
Here are some links that discusses the whole topic:
Twitter
Reddit
The persons Blog the code was directed at
718 notes
·
View notes
Text
I've made a couple of little updates to my Understanding ReShade guide over on Patreon.
I've included information about setting 3D Scene Resolution to High for TS4 players, clarified about using MSAA/Edge Smoothing, and more info about red errors when the the issue is shaders failing to compile under dx9.
I'm in the process of writing a little guide on how to use either DXVK or dgVooDoo2 to run TS4 (or any other dx9 game) as either Vulkan or dx11, which then allows you to use shaders that don't work under dx9. I have a couple of experiments to do before I finish it, but I'll get it linked in the Understanding ReShade guide, and of course here and everywhere else.
132 notes
·
View notes
Text
i caved and bought the legacy collection out of curiosity
i bought it on steam by the way, no way am I going anywhere near the ea app
random thoughts as i go along:
game loaded up straight away with no issues (what a strange feeling)
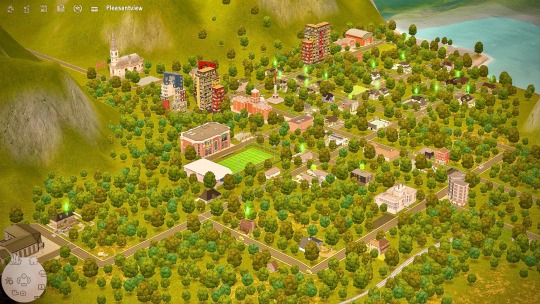
got into pleasantview within 2 minutes (obvs I have no cc installed right now so its gonna be faster anyway)
a bit of a jumpscare to see the game again without reshade ngl
straight into the lothario household. don you look... different without all my defaults
screen resolution defaulted to the right size without me having to change anything by the way, which was nice
turned up all the graphics setting to max and going to visit the goth household as that always gives me lag, even vanilla
this experience is already making me realise I need to cut down my 12gb downloads folder, cos man this is so smooth and fast without all of that in my game
well everything is working perfectly straight out of the box. had no issues with multiple sims on the big goth lot
going to quit and load up again with my ui mods and defaults next (along with hugelunatic's ikea pack as cc)
legacy collection has an entirely different file path by the way, so won't mess with existing ultimate collection installs (i wouldn't have dared to do this otherwise)
okay all my defaults, ui mods and some others are now in (downloads folder is up to 3.64gb now) and everything is working fine still
ikea items as cc don't seem to be fully appearing in the catalog though? that might be a me problem but i dont know
adding in all my cas cc now, along with hood defaults and hood deco cc (downloads folder is up to 6.5gb now). i'm also adding in anything else I can think of like camera mods, user startup cheat etc etc
getting into pleasantview in less than 2 mins still
heading into cas for the first time now...
... and it loaded up within 10 seconds even with ALL of my cas cc? and this is the first time too so I would've expected major lag. normally cas takes about 60 seconds to load in my game
update on the ikea pack as cc... the build items are definitely there, but not the buy for some reason?
biting the bullet and adding in the remaining 6gb of my 12gb downloads folder
all of my cc is now in the game and loading times were about 30 seconds longer than before. still no issues
took darren dreamer to a community lot and there were no crashes/issues/lag. normally going to a community lot is very dangerous for me cos its where I get the most crashes or issues, its why all my community lots are incredibly small lot sizes
also I have the hood deco view set to extra large... normally I have to have it set to extra small just to play in a small household
i dont think I'm being delulu here to say things are running better
next up is adding in all of my mods, then after that I might dare putting in my mega populated uberhood save, and try reshade?
another ikea update: everything is showing up now. it was me being an idiot
so all of my mods are now also in (so my entire downloads folder now) and i haven't been able to trigger any crashes or pink soup yet through normal gameplay? even with extra large hood view from lots
reshade keeps crashing my game on startup... damn, what am I doing wrong
RESHADE IS NOW WORKING (ver 6.1.1)! thanks to this guide
I finally added in my uberhood save (which is packed with hood deco and and has 35 playable families).... and it's working! I also played with a household for a bit and everything was working fine
final update before I go to bed (as its gone midnight here lol)
i now have all of my mods, cc, saves, and reshade installed, and I've yet to have any pink soup or crashes (apart from the crashes when I was *incorrectly* trying to install reshade). honestly... i'm surprised. i dont want to speak too soon obviously, but things seem better. i was just playing in a household with extra large lot view on and that would usually IMMEDIATELY crash my game, but nothing happened. tomorrow i'll actually play for an extended period of time, so i'll be able to tell more for sure then.
i hope this has been helpful to at least a couple of people, and i'll leave with you a shot of my pleasantview newly loaded up in the legacy collection 😅
452 notes
·
View notes
Text
How-To: Soft Studio Gradient Backgrounds
Want a super cheap way to spice up that studio shot? Indirect Lighting has a great visual effect that you can use, and you can block its light source with other furnitures to give you more lighting control!

Check the guide here!
135 notes
·
View notes
Text
How to run The Sims 3 with DXVK & Reshade (Direct3D 9.0c)

Today I am going to show you guys how to install Reshade and use Direct3D 9.0c (D3D9) instead of Vulkan as rendering API.
This tutorial is based on @nornities and @desiree-uk's awesome guide on "How to use DXVK with The Sims 3", with the goal of increasing compatibility between DXVK and Reshade. For users not interested in using Reshade, you may skip this tutorial.
If you followed nornities and desiree-uk's guide, it is strongly recommended that you start from scratch, meaning you should uninstall DXVK AND Reshade completely. Believe me when I say this: it will save you a lot of time, frustration, and make your life so much easier.
For the purpose of this tutorial, I am on patch 1.69.47 and running EA App on Windows 10, but it should work for version 1.67.2 on Steam and discs, too. This tutorial does not cover GShade.
Before we start
Backup your files, even the entire folder (Program Files\EA Games\The Sims 3\Game\Bin) if you want to be extra safe; you will thank yourself later. If you do not wish to backup the entire folder, at least backup the following:
reshade-presets
reshade-shaders
Reshade.ini
Options.ini (Documents\Electronic Arts\The Sims 3)
Keep them somewhere secure, for your peace of mind (and sanity).

Done? Great stuff, let us begin!
Step 1:
If you installed DXVK following nornite and desiree-uk's guide, go to the bin folder and delete the following files to fully uninstall DXVK, we are starting from scratch:
d3d9.dll
TS3.dxvk-cache
dxvk.conf
TS3_d3d9.log (or TS3W_d3d9.log)
Step 2:
If you already have Reshade on your PC, uninstall it using this: https://reshade.me/downloads/ReShade_Setup_X.X.X.exe (replace X.X.X with version number)
Step 3:
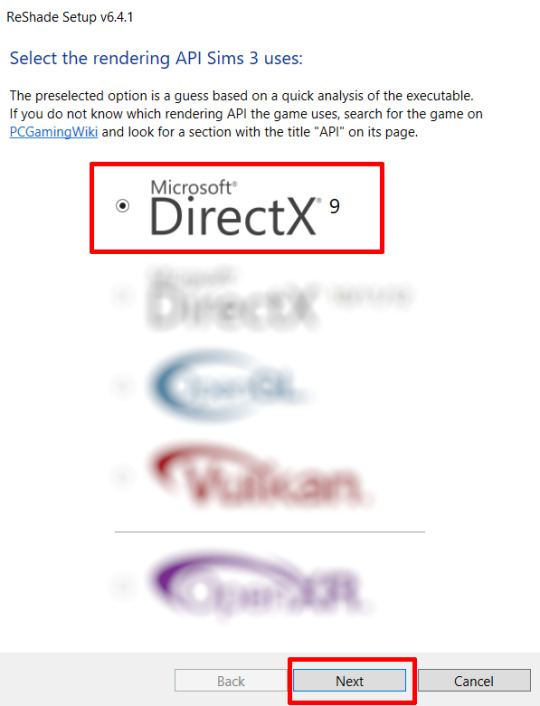
Perform a clean install of Reshade (I am using the latest version - 6.4.1 at the time of writing). Please note that you need a version no older than 4.5.0 or this method will not work. Choose DirectX9, click next.
Once the installation is complete, you should see a "d3d9.dll" file inside The Sims 3's bin folder (Program Files\EA Games\The Sims 3\Game\Bin):
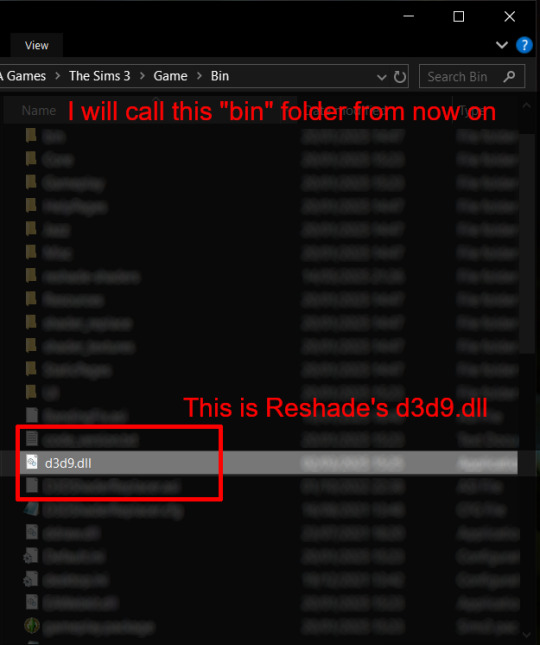
It may all seem familiar thus far. Indeed, this is how we installed Reshade in the past before using DXVK, but here comes the tricky part:
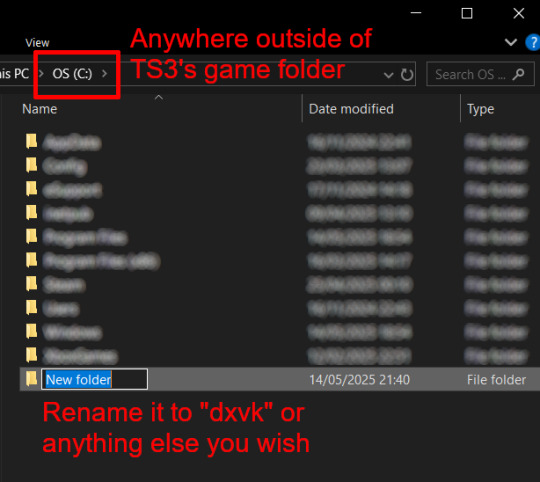
Step 4:
Create a new folder outside of The Sims 3's game folder (I created it on my C drive), name it "dxvk" or whatever else you like. Remember where you saved this folder, we will return to it later.
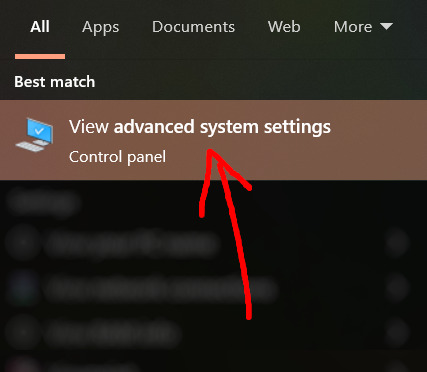
Step 5:
Now we need Reshade to load the next dll in order to chain Reshade with DXVK. Click on the search bar, and type in "View advanced system settings".
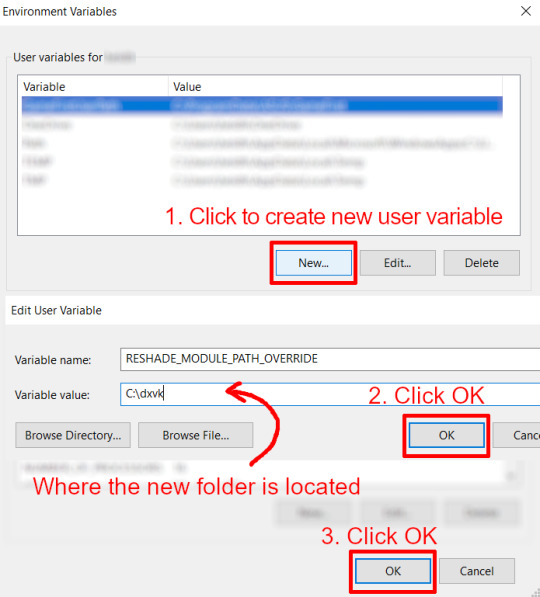
Click on "Environment Variables..."

Under "User variables", click "New..."
In the new pop-up window, find "Variable name:" and type in:
RESHADE_MODULE_PATH_OVERRIDE
for "Variable value:", paste in the directory that leads to the folder we created earlier. Once you are done, hit OK, and then hit OK again to save the changes made.
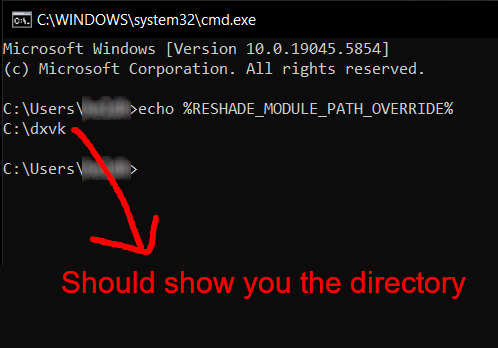
You can use Command Prompt to check if this new environment variable has been registered by entering:
echo %RESHADE_MODULE_PATH_OVERRIDE%
It should return you the folder's location. If not, make sure you have typed in the variable name correctly and confirm the folder's location.
Step 6:
Download DXVK (version 2.3.1) from here: https://github.com/doitsujin/DXVK/releases/tag/v2.3.1 and unzip "dxvk-2.3.1.tar.gz" (I use 7-Zip, but winRAR works, too). Remember to choose x32, and move only "d3d9.dll" to the folder we made earlier.
Now we have two "d3d9.dll" files, one from Reshade (lives in the bin folder), and the other from DXVK (in this new folder, outside of The Sims 3 game folder).

Step 7:
Download "dxvk.conf" here: https://github.com/doitsujin/dxvk/blob/master/dxvk.conf delete everything inside, and enter the following:
d3d9.textureMemory = 1 d3d9.presentInterval = 1 d3d9.maxFrameRate = 60 dxvk.hud = devinfo
Ctrl + S to save the document.
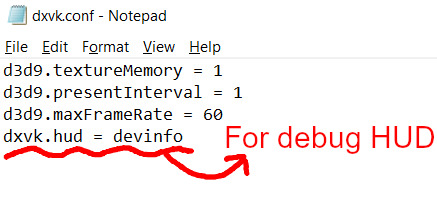
The first 3 lines are taken from @nornities and @desiree-uk's guide.
The last line is only for debugging purposes. Due to the inconvenient location occupied by the HUD (top left corner of your screen), it should be removed once the installation is successful.
Step 8:
Drag "dxvk.conf" into the bin folder, where Reshade's "d3d9.dll", "TS3.exe", and "TS3W.exe" all live.

Step 9:
Now fire up the game and check if both are showing up:

Lastly, check for “TS3.dxvk-cache” in the bin folder:
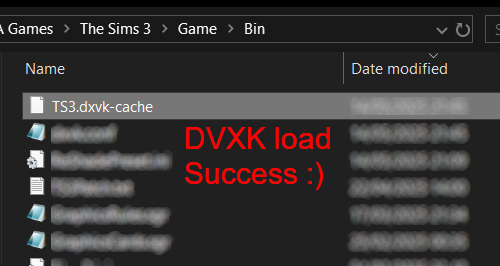
If it is there, congratulations! You have successfully installed DXVK and Reshade utilising D3D9 as API! You can now go to "dxvk.conf" and remove its last line "dxvk.hud = devinfo" and have fun! :)
Hope this tutorial isn't too confusing, the last thing I want is to over-complicate things. If you still need some help, comment down below or send me a DM/ask, I'll try and troubleshoot with you to the best of my ability.
Credits:
@nornities and @desiree-uk for their fantastic guide.
@criisolate for promulgating the usage of DXVK in TS3 community.
reddit user folieadeuxmeharder for helping me troubleshoot and informing me of this workaround.
doitsujin for creating DXVK.
crosire for creating Reshade.
148 notes
·
View notes
Text
STICKY POST: ULTIMATE(ISH) GUIDE(S) TO SIMS 4 CC-MAKING; OR, A COMPREHENSIVE COMPENDIUM OF TUTORIALS, INSTRUCTIONAL MATERIALS, & FELLOW COMPILATIONS OF A LIKEWISE NATURE
In which I list a fuckton of tutorials, guides, and lists of such, each written, curated, and crafted by people far more talented than I.
More will be added as I find them.
---
@teanmoon's CC Guides - Includes tutorials on cloning, uv_1, weights, bump and specular maps, bi-color hair, and a Blender Cheat Sheet. High poly 'creators' have little excuse to churn out high poly, non-optimized garbage when they can lean on bump maps. (I know those can only do so much for more complex meshes, but for objects, texture maps can do SO much heavy-lifting).
@vintagesimstress's CC Guides - Includes tutorials on using Blender to create objects and clothing, especially for people who are just getting started.
@eliavah's uv-1 adjustment tutorial. Haven't tried this myself yet, but after glancing through it, it's something I will surely want to keep bookmarked.
@simlaughlove's CC Tutorials List - Includes many tutorials handily laid out by category on everything from object texturing to CAS morphs.
@thefoxburyinstitute's Nav Page - This blog is nonstop Sims 4 resources for e v e r y t h i n g. READ THIS POST FIRST as a guide on how to actually... nav.
@simsresourcehub's Tags List - What it says on the tin.
Transferring Weights in Blender 3.3.1 - Over at Sims4Studio forums.
@trillyke's List of Tutorials - Good ones!
@sims4tutorials - *GRAND GESTURES*
@katverse's Huge List of Tutorials - Tutorials on eeeverything.
@thatsimslady's Massive List of Tutorials - 31 pages????? Damn.
@kouukie's Sims 4 CAS with Marvelous Designer Tutorial - YouTube video!
@rusticottage's Gifmaking Tutorial - I love Sims gifs tbh.
@cowplant-pizza' Boes' Editing Masterlist - Includes stuff for Reshade, PSDs, PS Actions, and how to use them.
@melonsloth's Deco Sim Tutorial - Using SimRipper
@depthofpixels's Deco Sim Tutorial - Using SimRipper
@azuhrasims' Guide to Posing Sims - Includes how to pose sims, and handy workarounds! Super great for beginners and longtime users.
@radioactivedotcom's Guide to Posing - Includes additional posing resources. NOT for beginners.
@madameriasims4's Add a Flame to Your Basegame Candle - Great for mood lighting and historical gameplay!
@syboubou's Making a Lamp Start to Finish - a video tutorial
MORE BELOW:
Adding Lit DST to Fireplace
New image ref for default overrides
Make an RGB Spec for Objects
Bake a shadow onto your object in Blender
Linking all bedding to a single frame
Cutouts for Doors/Windows/Archways
Making objects see-through/glass
Making lamps light correctly
Give an object transparency (add an alpha)
Make a candle w/ multiple flames
Change LOD viewing distance
942 notes
·
View notes
Text
How to use DXVK with The Sims 3
Have you seen this post about using DXVK by Criisolate? But felt intimidated by the sheer mass of facts and information?
@desiree-uk and I compiled a guide and the configuration file to make your life easier. It focuses on players not using the EA App, but it might work for those just the same. It’s definitely worth a try.
Adding this to your game installation will result in a better RAM usage. So your game is less likely to give you Error 12 or crash due to RAM issues. It does NOT give a huge performance boost, but more stability and allows for higher graphics settings in game.
The full guide behind the cut. Let me know if you also would like it as PDF.
Happy simming!
Disclaimer and Credits
Desiree and I are no tech experts and just wrote down how we did this. Our ability to help if you run into trouble is limited. So use at your own risk and back up your files!
We both are on Windows 10 and start the game via TS3W.exe, not the EA App. So your experience may differ.
This guide is based on our own experiments and of course criisolate���s post on tumblr: https://www.tumblr.com/criisolate/749374223346286592/ill-explain-what-i-did-below-before-making-any
This guide is brought to you by Desiree-UK and Norn.
Compatibility
Note: This will conflict with other programs that “inject” functionality into your game so they may stop working. Notably
Reshade
GShade
Nvidia Experience/Nvidia Inspector/Nvidia Shaders
RivaTuner Statistics Server
It does work seamlessly with LazyDuchess’ Smooth Patch.
LazyDuchess’ Launcher: unknown
Alder Lake patch: does conflict. One user got it working by starting the game by launching TS3.exe (also with admin rights) instead of TS3W.exe. This seemed to create the cache file for DXVK. After that, the game could be started from TS3W.exe again. That might not work for everyone though.
A word on FPS and V-Sync
With such an old game it’s crucial to cap framerate (FPS). This is done in the DXVK.conf file. Same with V-Sync.
You need
a text editor (easiest to use is Windows Notepad)
to download DXVK, version 2.3.1 from here: https://github.com/doitsujin/DXVK/releases/tag/v2.3.1 Extract the archive, you are going to need the file d3d9.dll from the x32 folder
the configuration file DXVK.conf from here: https://github.com/doitsujin/DXVK/blob/master/DXVK.conf. Optional: download the edited version with the required changes here.
administrator rights on your PC
to know your game’s installation path (bin folder) and where to find the user folder
a tiny bit of patience :)
First Step: Backup
Backup your original Bin folder in your Sims 3 installation path! The DXVK file may overwrite some files! The path should be something like this (for retail): \Program Files (x86)\Electronic Arts\The Sims 3\Game\Bin (This is the folder where also GraphicsRule.sgr and the TS3W.exe and TS3.exe are located.)
Backup your options.ini in your game’s user folder! Making the game use the DXVK file will count as a change in GPU driver, so the options.ini will reset once you start your game after installation. The path should be something like this: \Documents\Electronic Arts\The Sims 3 (This is the folder where your Mods folder is located).
Preparations
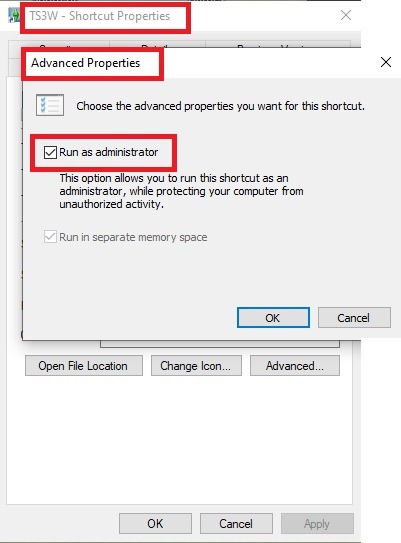
Make sure you run the game as administrator. You can check that by right-clicking on the icon that starts your game. Go to Properties > Advanced and check the box “Run as administrator”. Note: This will result in a prompt each time you start your game, if you want to allow this application to make modifications to your system. Click “Yes” and the game will load.
2. Make sure you have the DEP settings from Windows applied to your game.
Open the Windows Control Panel.
Click System and Security > System > Advanced System Settings.
On the Advanced tab, next to the Performance heading, click Settings.
Click the Data Execution Prevention tab.
Select 'Turn on DEP for all programs and services except these”:
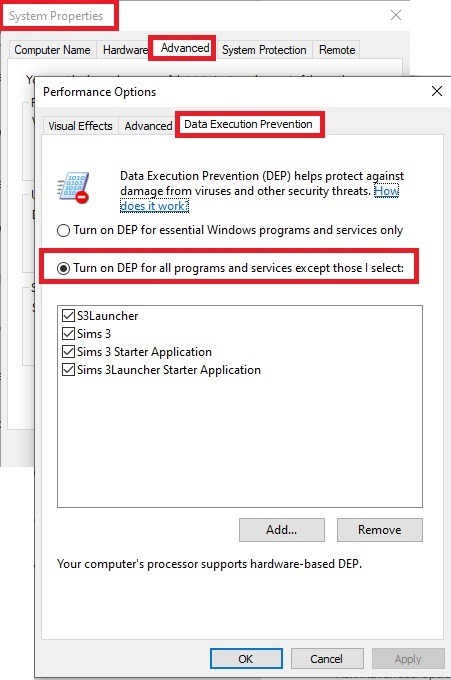
Click the Add button, a window to the file explorer opens. Navigate to your Sims 3 installation folder (the bin folder once again) and add TS3W.exe and TS3.exe.
Click OK. Then you can close all those dialog windows again.
Setting up the DXVK.conf file
Open the file with a text editor and delete everything in it. Then add these values:
d3d9.textureMemory = 1
d3d9.presentInterval = 1
d3d9.maxFrameRate = 60
d3d9.presentInterval enables V-Sync,d3d9.maxFrameRate sets the FrameRate. You can edit those values, but never change the first line (d3d9.textureMemory)!
The original DXVK.conf contains many more options in case you would like to add more settings.

A. no Reshade/GShade
Setting up DXVK
Copy the two files d3d9.dll and DXVK.conf into the Bin folder in your Sims 3 installation path. This is the folder where also GraphicsRule.sgr and the TS3W.exe and TS3.exe are located. If you are prompted to overwrite files, please choose yes (you DID backup your folder, right?)
And that’s basically all that is required to install.
Start your game now and let it run for a short while. Click around, open Buy mode or CAS, move the camera.
Now quit without saving. Once the game is closed fully, open your bin folder again and double check if a file “TS3W.DXVK-cache” was generated. If so – congrats! All done!
Things to note
Heads up, the game options will reset! So it will give you a “vanilla” start screen and options.
Don’t worry if the game seems to be frozen during loading. It may take a few minutes longer to load but it will load eventually.
The TS3W.DXVK-cache file is the actual cache DXVK is using. So don’t delete this! Just ignore it and leave it alone. When someone tells to clear cache files – this is not one of them!
Update Options.ini
Go to your user folder and open the options.ini file with a text editor like Notepad.
Find the line “lastdevice = “. It will have several values, separated by semicolons. Copy the last one, after the last semicolon, the digits only. Close the file.
Now go to your backup version of the Options.ini file, open it and find that line “lastdevice” again. Replace the last value with the one you just copied. Make sure to only replace those digits!
Save and close the file.
Copy this version of the file into your user folder, replacing the one that is there.
Things to note:
If your GPU driver is updated, you might have to do these steps again as it might reset your device ID again. Though it seems that the DXVK ID overrides the GPU ID, so it might not happen.
How do I know it’s working?
Open the task manager and look at RAM usage. Remember the game can only use 4 GB of RAM at maximum and starts crashing when usage goes up to somewhere between 3.2 – 3.8 GB (it’s a bit different for everybody).
So if you see values like 2.1456 for RAM usage in a large world and an ongoing save, it’s working. Generally the lower the value, the better for stability.
Also, DXVK will have generated its cache file called TS3W.DXVK-cache in the bin folder. The file size will grow with time as DXVK is adding stuff to it, e.g. from different worlds or savegames. Initially it might be something like 46 KB or 58 KB, so it’s really small.
Optional: changing MemCacheBudgetValue
MemCacheBudgetValue determines the size of the game's VRAM Cache. You can edit those values but the difference might not be noticeable in game. It also depends on your computer’s hardware how much you can allow here.
The two lines of seti MemCacheBudgetValue correspond to the high RAM level and low RAM level situations. Therefore, theoretically, the first line MemCacheBudgetValue should be set to a larger value, while the second line should be set to a value less than or equal to the first line.
The original values represent 200MB (209715200) and 160MB (167772160) respectively. They are calculated as 200x1024x1024=209175200 and 160x1024x1024=167772160.
Back up your GraphicsRules.sgr file! If you make a mistake here, your game won’t work anymore.
Go to your bin folder and open your GraphicsRules.sgr with a text editor.
Search and find two lines that set the variables for MemCacheBudgetValue.
Modify these two values to larger numbers. Make sure the value in the first line is higher or equals the value in the second line. Examples for values: 1073741824, which means 1GB 2147483648 which means 2 GB. -1 (minus 1) means no limit (but is highly experimental, use at own risk)
Save and close the file. It might prompt you to save the file to a different place and not allow you to save in the Bin folder. Just save it someplace else in this case and copy/paste it to the Bin folder afterwards. If asked to overwrite the existing file, click yes.
Now start your game and see if it makes a difference in smoothness or texture loading. Make sure to check RAM and VRAM usage to see how it works.
You might need to change the values back and forth to find the “sweet spot” for your game. Mine seems to work best with setting the first value to 2147483648 and the second to 1073741824.
Uninstallation
Delete these files from your bin folder (installation path):
d3d9.dll
DXVK.conf
TS3W.DXVK-cache
And if you have it, also TS3W_d3d9.log
if you changed the values in your GraphicsRule.sgr file, too, don’t forget to change them back or to replace the file with your backed up version.
OR
delete the bin folder and add it from your backup again.
B. with Reshade/GShade
Follow the steps from part A. no Reshade/Gshade to set up DXVK.
If you are already using Reshade (RS) or GShade (GS), you will be prompted to overwrite files, so choose YES. RS and GS may stop working, so you will need to reinstall them.
Whatever version you are using, the interface shows similar options of which API you can choose from (these screenshots are from the latest versions of RS and GS).
Please note:
Each time you install and uninstall DXVK, switching the game between Vulkan and d3d9, is essentially changing the graphics card ID again, which results in the settings in your options.ini file being repeatedly reset.
ReShade interface
Choose – Vulcan
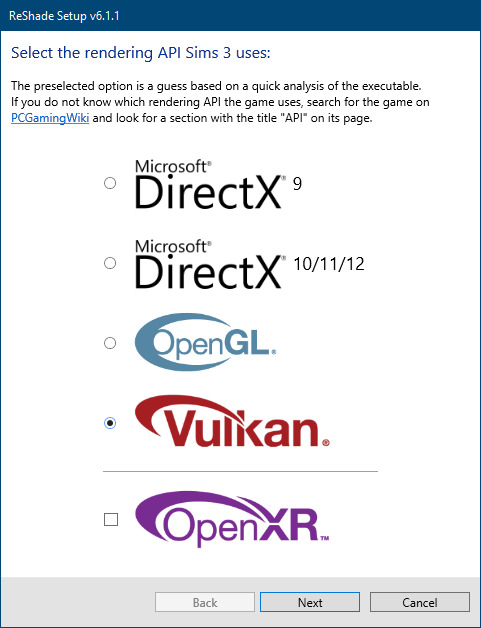
Click next and choose your preferred shaders.
Hopefully this install method works and it won't install its own d3d9.dll file.
If it doesn't work, then choose DirectX9 in RS, but you must make sure to replace the d3d9.dll file with DXVK's d3d9.dll (the one from its 32bit folder, checking its size is 3.86mb.)
GShade interface
Choose –
Executable Architecture: 32bit
Graphics API: DXVK
Hooking: Normal Mode
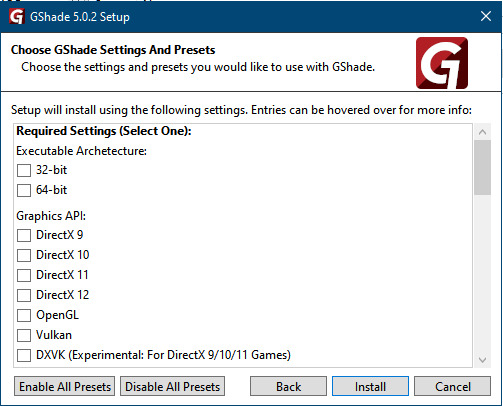
GShade is very problematic, it won't work straight out of the box and the overlay doesn't show up, which defeats the purpose of using it if you can't add or edit the shaders you want to use.
Check the game's bin folder, making sure the d3d9.dll is still there and its size is 3.86mb - that is DXVK's dll file.
If installing using the DXVK method doesn't work, you can choose the DirectX method, but there is no guarantee it works either.
The game will not run with these files in the folder:
d3d10core.dll
d3d11.dll
dxgi.dll
If you delete them, the game will start but you can't access GShade! It might be better to use ReShade.
Some Vulcan and DirectX information, if you’re interested:
Vulcan is for rather high end graphic cards but is backward compatible with some older cards. Try this method with ReShade or GShade first.
DirectX is more stable and works best with older cards and systems. Try this method if Vulcan doesn't work with ReShade/GShade in your game – remember to replace the d3d9.dll with DXVK's d3d9.dll.
For more information on the difference between Vulcan and DirectX, see this article:
https://www.howtogeek.com/884042/vulkan-vs-DirectX-12/
754 notes
·
View notes