#resourcesteaching
Explore tagged Tumblr posts
Visit Tumblr Blog
Explore Tumblr blogs with no restrictions, modern design and the best experience.
Last Seen Tumblr Blogs


Fun Fact
There were a total of 171.5 billion posts on Tumblr in 2019.
Text
What Are Some Effective Ways for Teachers and Homeschoolers to Use Resources and Tools for Teaching Music?
For youthful students, a attractive curriculum have to include Music curriculum for Second grade music curriculum education. Effective music teaching resources as well as tools is able to make a big difference in the knowledge process, whether it is in a usual classroom or at home. The secret to a successful music education knows the range of materials accessible, including music teaching tools and music teaching supplies.
Making Use of Resources and Tools for Teaching Music Creating engaging and successful sessions requires the use of best music theory textbookand resources. Students can learn more interactively and enjoyably with the use of tools like interactive software, instruments, and visual aids. Sheet music, flashcards, along with rhythm instruments is examples of resources that know how to be used to strengthen musical ideas and abilities. Teachers are talented to set up an engaging learning environment by integrating a variety of resources and technique.

Essential Classroom Resources for Teaching MusicFor any teacher of music, having the appropriate music teaching materials is essential. Instruments like drums, recorders, and keyboards as well as accessories like metronomes and music stands might be considered supplies. Furthermore, digital apps and audio recordings are useful resources that offer a variety of approaches to presenting musical ideas. These materials facilitate an engaging and instructive hands-on learning experience.
All-inclusive Resources for Music Teachers Resources for music teachers are made to help instructors provide high-caliber instruction in music. Lesson plans, instructional manuals, and tools for professional development are a few examples of these resources. For music educators, websites, internet forums, and professional associations provide a plethora of knowledge and assistance. Teachers can stay up to date on new teaching techniques and best practices by making use of these resources.
Primary Teachers' Guide to Music ResourcesTeachers in primary schools can profit from specialized music materials created for younger pupils. Music resources for primary teachers can find a variety of age-appropriate games, songs, and activities that teach fundamental musical principles in their music teacher resources. Because these resources are adapted to the developmental phases of young learners, all kids can access and enjoy Music curriculum for third grade education.
Putting Homeschool Music Lessons into PracticeCompared to regular classroom settings, homeschool music lessons necessitate a distinct methodology. Parents can design a structured yet adaptable Music curriculum for fifth grade by using resources and techniques for teaching music. Community music initiatives, educational apps, and internet resources can all offer helpful assistance. Books about music can be used into lessons by homeschoolers to improve comprehension and appreciation.
Music-related books and books for elementary music educationbooks about music are an invaluable tool for educators and learners alike. They provide understanding of the theory, practice, and history of music. Books for primary music education are made especially to match the requirements of the elementary music education books, offering lessons and activities that are organized. These publications can be used as thorough manuals for imparting musical knowledge and abilities.

Creating a Music curriculum for sixth grade for Elementary School The aims and objectives of music education at the elementary school level are described in an music theory books. It contains a sequence of abilities and information that pupils ought to pick up throughout time. A well-thought-out curriculum incorporates a variety of resources and instruments for teaching music, guaranteeing a comprehensive education. Instructors can organize their classes and evaluate students' progress using this curriculum as a guide.
0 notes
Photo

3 Handwriting Activities Using Colored Pencils
Colleen Beck
The OT Toolbox
Handwriting practice doesn't need to be boring! This handwriting activity uses colored pencils with bright and vivid colors to make a colorful activity that seems more like a game than working on handwriting skills like letter formation and pencil pressure.
If you've been following The OT Toolbox for long, then you know that creative handwriting activities are some of our favorite (and most popular) topics on the website. We love to share fun ways to work on the areas that make up handwriting skill, like size awareness, spatial awareness, letter formation, pencil control, pencil pressure, and speed. These are just some of the subareas that go into legible and functional handwriting, but each makes a big difference when it comes to self-confidence in the child who is learning to write with ease.
When you practice handwriting skills in a fun way using out of the box tools (like colored pencils), handwriting practice can boost the child's skill and confidence so they are more likely to carryover individual skills into writing tasks.
Teaching kids handwriting at home can be a struggle for many children, but taking the time to make handwriting efforts fun and creative can really pay off. Self-confidence in handwriting shows in legibility and ease of written work, enabling students to complete classroom assignments while focusing on the task at hand and not how neat of sloppy their handwriting is.
That's why we're excited to share this handwriting activity that uses colored pencils to boost handwriting challenges like letter formation, pencil control, and pencil pressure!
Handwriting Activity Using Colored Pencils
We received two sets of Prismacolor Premier Colored Pencils with a Soft Core, one of the Go! Teach products, and when we opened the tins, we were excited to see the bright and colorful array of colors. The soft core of the colorful lead allows the pencils to write smoothly and softly in a way that creates vivid colors. The soft core of the pencil lead gave me an idea: What a great tool for addressing handwriting skills in a way that slows down pencil speed to enable accuracy!
This is a good way to introduce pencil control when it comes to line awareness. The soft core of the colored pencils also helps with creating a bright pencil stroke that really shows up when shading. This made a nice impact on a pencil pressure activity. You can check out all three of these handwriting activity ideas below in more detail.
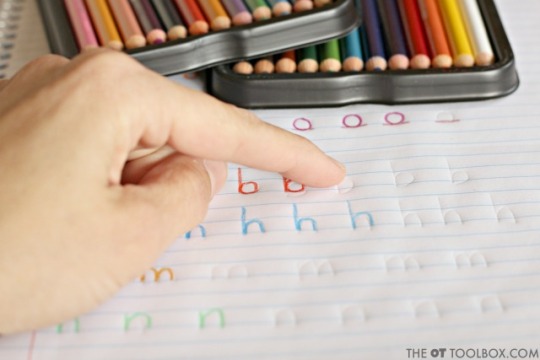
Handwriting Activity to Improve Letter Formation Using Colored Pencils
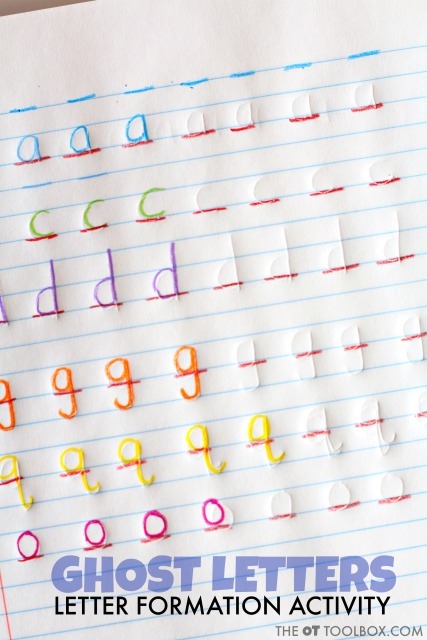
The first handwriting activity that we did was a letter formation task. When kids are learning to write letters, it can be easy to form letters in reverse. This is particularly true with commonly reversed letters like 'b' and 'd', 'g' and 'q'.

When kids are learning letters, it can be helpful to break handwriting instruction up into teaching the various letter families. We've discussed cursive letter families here on the site before, but the printed letters are not much different. There are groups of letters that contain the same pencil strokes, starting lines, and "parts" that allow letters to be divided up into letter families. For example, the letters b, h, m, n, p, and r all have a downward pencil stroke followed by a re-trace back up and a curve over to form the "bump" of the letter.
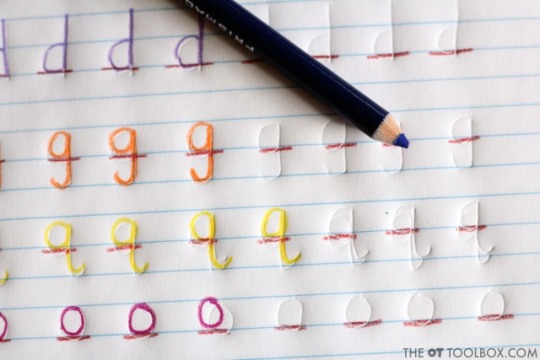
To address letter formation in our handwriting activity, we used a spiral notebook pad. First, I made sure the pages were lined up and then I used a ballpoint pen to write a letter by pressing down very hard. When the top notebook page was turned, I showed my kids how the impression of the letter was intact on the page underneath. We then used our Prismacolor Premier Colored Pencils, Soft Core to write the letter on the "ghost letter". It was fun to feel the letter on the page and then to use the faint guide as a tool for letter formation. To illustrate letter formation and letter families, I grouped specific letters together in a group on the notebook page.
Handwriting Activity to Improve Pencil Pressure Using Colored Pencils
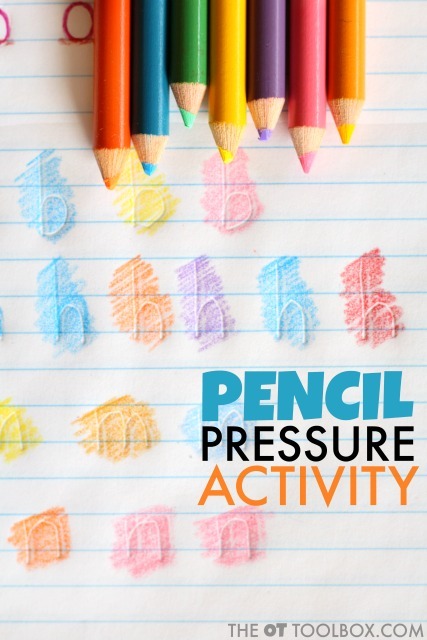
Our second handwriting activity used those same Ghost Letters to address pencil pressure. Pencil pressure is a big topic when it comes to legibility of written work. If a child presses too hard, the paper can tear, letters can become smudged, it's hard to erase completely, and legibility suffers. If a child presses too lightly on the pencil, words can be written so lightly that it's impossible to read. There are many reasons why a child may utilize too much or too little pressure on the pencil. You can read all about these underlying reasons for poor pencil pressure here. To teach kids about pencil pressure, use the Ghost Letter technique of writing letters on a notebook page. When they turn the page of the notebook, they shouldn't be able to see the Ghost Letter on the second page. If they do, they are using too much pencil pressure and are pressing too hard on the pencil. If they don't see the Ghost Letter, they are using a lighter amount of pressure on the pencil.
We illustrated this by using our Prismacolor Premier Colored Pencils to shade on the Ghost Letters that appeared on the second page of the notebook. The bright colors of the soft core colored pencils allowed for a bright color while enabling the Ghost Letter to show through. You can also ask students to write the letters on the top page of the notebook to see if their letters show through to the following page. Typically, a child who writes with heavy pencil pressure will have letters showing through on the second page even when using a pencil (as opposed to a ballpoint pen).

*Note: This activity addresses only heavy pencil pressure. If a child is pressing too lightly on the pencil and writes with a light pencil pressure, the Ghost Letters will not show through on the second page of the notebook.
You can also address pencil pressure using colored pencils when shading. Instruct kids to shade darker or lighter and match an example color. This helps them to understand how hard to press when they recreate the same shade.
Handwriting Activity to Improve Control Using Colored Pencils

One final activity that uses colored pencils is one that can improve pencil control. Pencil control is needed to make the pencil start at the top line and stop at the baseline without overshooting line approximations. Pencil control requires use of visual motor skills. One way to practice line use and pencil control is by completing pencil exercises like this one:

Use a ruler to draw one inch spaces on a piece of paper. Using the colored pencils, ask students to draw random lines connecting the top and bottom lines.

Students can use a single color to form several lines spaced randomly within the writing area. They can then switch colors to add additional colored lines. Continue to draw lines, focusing on starting on the top line and stopping on the bottom line.

The soft core of the Prismacolor Premier Colored Pencils allows for a slower pencil stroke. This can help with accuracy.
Add another component to this handwriting activity by drawing vertical lines so that students practice left to right pencil strokes while focusing on pencil control. All of the activities that we did with our Prismacolor Premier Colored Pencils were a big hit resulting from the bright and colorful selection of colored pencils in the set. There's just something about opening up a fresh set of colored pencils!

3 notes
·
View notes
Photo

3 Good Resources for Arts Teachers Free resource of educational web tools, 21st century skills, tips and tutorials on how teachers and students integrate technology into education https://www.educatorstechnology.com/2019/02/3-good-resources-for-arts-teachers.html?utm_source=feedburner&utm_medium=feed&utm_campaign=Feed:+educatorstechnology/pDkK+(Educational+Technology+and+Mobile+Learning) . . . . . . . #arts #artteachers #resourcesartsteachers #resourcesteachers #reourcesteacher #resources #resource #education #educational #lessons #lesson #startup #startups #start-ups #technology #leader #leadership #inenglish #mobile #entrepreneurlifestyle #talentmatters #entrepreneurs #entrepreneur #motivation #business #career #businesslike #Forbes #innovative #innovation https://www.instagram.com/p/BuPWFvUnc3c/?utm_source=ig_tumblr_share&igshid=1oah27jd2xbqw
#arts#artteachers#resourcesartsteachers#resourcesteachers#reourcesteacher#resources#resource#education#educational#lessons#lesson#startup#startups#start#technology#leader#leadership#inenglish#mobile#entrepreneurlifestyle#talentmatters#entrepreneurs#entrepreneur#motivation#business#career#businesslike#forbes#innovative#innovation
0 notes
Text
Music Teacher
[ad_1] Gob title: Music Teacher Company: Gob description: planning and preparing lessons in relation to individual pupils’ needs and examination syllabusesacquiring appropriate teaching materials and resourcesteaching music theory, aural skills and practical techniques to pupilsentering and prepar… Expected salary: Rs.200000 per year Location: Mohali, Punjab – Chandigarh Job date: Fri, 11 Jan 2019…
View On WordPress
0 notes
Photo

Best ways to Teach Kids to Write
Katie Turner
Preschool Inspirations
The most common comments I’ve heard when people stepped into my classroom are, “Look at all of those children drawing.” “Is your writing center always so popular?” and “My child loves to write, thanks to you.”
Today I’m sharing my favorite activities for teaching children to learn to write — the ones that have been successful for all of my students! Here’s a video of these fun and inviting writing activities, and you can read more about each process below!
The First Step
I used to think that the first step in teaching children to write was to sit them down and have them trace. While some children are absolutely ready for this, it’s because they already have a good foundation. My approach is much different now!

The first step to teaching kids to write begins with large arm movements. This allows children to strengthen their entire arms and even their core. Think about the motions you use when writing on a piece of paper. You are using your arms, crossing your body, and you may even feel it in your abdomen as well.
Children begin this process in two very common positions: writing while lying on the floor or writing on a vertical surface.
Teach Multi-Sensory Writing

I learned about multi-sensory writing while studying some of my Montessorian friends. One day I walked into a preschool classroom that had the most beautiful handwriting I had ever seen. In fact, I didn’t even know it was possible for preschoolers to write so neatly!
When I asked my friend how she did this, she said that she used a multi-sensory method. Maria Montessori taught children to write by tracing the letters first, before handing them a pencil. This made so much sense, and I have seen incredible results with multi-sensory writing techniques. I have also learned that there are lots of ways to do this besides sandpaper letters and sand trays.
One of my favorite multi-sensory writing hacks is with glitter glue. I’ve tried all kinds of glitter glue to do this, and I love the results of Elmer’s glitter glue the most! There are several different colors to choose from, and the glitter is subtle but gives children a nice texture to feel while tracing. Some glitter glues get stuck coming out of the container and make it tricky to make the letters just right. This doesn’t happen with Elmer’s glue. It comes out nice and smoothly, and the glue dries perfectly too.
To make multi-sensory tracing cards, write two numbers (or letters) on a 3-by-5 index card with Elmer’s glitter glue. Allow several hours for these to dry, and then cut them in half.
Then invite the child to trace the number. Teach children to trace from the top to the bottom and have them do it slowly. Put the cards on a binder ring to make them easy & convenient.
Supplies Needed:
· Elmer’s Glitter Glue
· Index Cards
· Binder Ring
Teach Kids to Write with Journals
One of the most inviting ways to teach kids to write is with journals. We make homemade journals with blank white paper. Sometimes lines can be distracting to children, so using blank paper is the perfect alternative. Simply put together 3 to 5 pages of copy paper. Fold them in half and staple the ends to make a journal.

For children who are in the pre-writing stage, you will see them making lines and circle-like shapes. These are all wonderful signs of progress. To help with this, provide circular items that they can trace such as bottle cap lids, small cups, or containers.
Tip: Lots of children naturally tend to hold a pencil or tall crayon up high (as pictured), so encourage them to hold it closer to the tip for better control.
Supplies:
· Blank Journals
· Mr. Sketch Gel Crayons
· Name Rocks

For children who are already learning to write, I start working on something that they all find to be extra special. When children are starting to write, the first word I teach them is their first name. It is one of the most memorable words they will learn to write, and we are setting the stage for kindergarten and beyond.
One of my favorite ways to help children learn to write their names is with a name rock. Each year I have my students go outside and pick out a nice smooth river rock. Then I write their name on it with a marker. We use this Elmer’s Paint Markers, which is perfect for name writing and decorating.
My students love finding their name rocks any time they need help remembering how to write their names. They can even make rainbow rocks!
Supplies:
· Elmer’s Paint Markers
· River Rock
0 notes
Photo

Developing Mark Making and Letter Formation
Jane Medwell
Curriculum Development Study Overview
Conducted over a two-week period, the Curriculum Development Study, led by Professor Jane Medwell of the University of Nottingham, involved exercises with a team of seven early years’ teachers, two university lecturers, and 69 parents to understand the status of handwriting education at home and at school among children 3-5 years old.
The in-depth study unearthed a broad range of insights, including the fact that handwriting is not prioritized in the classroom or at home, with teachers and parents focused on a range of different reading and math related tasks. This unique research was designed to help reverse the current trend. Since handwriting is considered a fundamental learning tool, leading academics warn that the skill must be given renewed focus.
DOWNLOAD HERE
0 notes
Photo

Paper Craft Pop Up Shop for Pretend Play
Kim Byers
The Celebration Shoppe
I have a super fun summer boredom buster idea for you: make a paper craft pop up shop for pretend play! It could be a fruit stand, or lemonade stand, or cupcake stand… anything to get the kids creative and playing.
My way of making this darling stand is super easy. You’ll be shocked how quick and inexpensive it is!
The key ingredient to making this stand is a Elmer’s 36 x 48 Tri-Fold Foam Board and a few other Elmer’s products! Spray Adhesive might just be my new best friend for large scale projects.

Let’s start from the beginning. Using a ruler, mark the interior cut of the board, leaving roughly a foot at the top. Basically you’re cutting the center out of the board.
This area is perfect for your new storefront’s name. I made this board for my sweet eight year old niece, Ashlyn. She loves pretend play!

I bet you’re wondering where I picked up all the paper embellishments for my storefront. You can get so many precut elements, like letter packs and bulletin board theme decorations at your local teacher supply store or craft store. Or, if you have a die cutting machine you can cut out your own.

For instance, the scallop is super easy to find in the teacher section. I cut these, but just get a few colors and layer them. With Elmer’s Spray Adhesive it’s honestly as easy as spray and attach. My only recommendation is to either lay down a large piece of paper or an old towel to spray against, or take the project outside.
After your store front is embellished, you’ll need something to sell! I chose to make paper craft berries for my niece to sell in her pop up shop. Think about a lemonade stand on garage sale day, or a stuffed animal grooming salon for all the stuffies in your house.

The purposes for a Elmer’s Tri-Fold Foam Board can be much more than a school project in the fall. As a matter of fact, let’s look at more paper strawberries and forget there will be any school in the fall! {wink}
0 notes
Photo

Mess Free Glitter Slime Recipe That’s Safe for Kids
Maria Gavin
Kinder Craze
Until I discovered the ultimate three-ingredient glitter slime recipe that uses completely safe materials. Even better yet, this particular recipe doesn’t require any messy food coloring. Do I have your attention? I promise this slime recipe is every bit as amazing as it sounds, and it’s a great summer activity.

Here’s the fastest, easiest, mess-free slime recipe that you will ever need. The fact that it is glittery is an added bonus!
INGREDIENTS
1/2 TBSP baking soda
1 1/2 TBSP contact solution
6 fl oz Elmer’s Glitter Glue
DIRECTIONS
Find a bowl, cup, or plate to mix your slime in.
Pour the entire contents of a 6 oz Elmer’s Glitter Glue into the blow.
Add 1/2 TBSP baking soda to the glue and stir.
Add 1 TBSP contact solution to the glue mixture. Mix with a spoon until slime begins to form and gets firm.
Once slime becomes to difficult to stir with a spoon, take slime out of the bowl and use your hands to finish combining the ingredients.
If slime is too sticky, add 1/4 TBSP contact solution to the mixture. The slime will become significantly less sticky.
MAKING GLITTER SLIME
On this particular summer day, my friend brought her two daughters over for a little slimey entertainment. Making slime was an item on their summer bucket list, so this was a great opportunity to cross that item off the list and help me test out my new favorite recipe!
The first step was to dump an entire 6 oz bottle of Elmer’s Glitter Glue into our mixing bowl. All of the glitter and color for this recipe comes straight from the bottle of glue. This was my first time using Elmer’s Classic Glitter Glue, but I was an instant fan. All of the glitter and coloring stayed right in the glue. I love that I didn’t have to worry about getting stray drops of food coloring or bits of glitter on our fingers, clothes, or my cute little blue table.
My four year old slime assistant did an excellent job of squeezing out all the glue (and the teacher in me loved that it was a great way to strengthen her hand muscles!)

Once the glitter glue was poured into the bowl, it was time to add a few more ingredients. First up, a half tablespoon of baking soda.
Once the baking soda was added to the glue, the girls gave it a quick stir until it was evenly combined in the glue.
Then it was time for the magic ingredient: contact solution! We started by adding just one tablespoon of the contact solution. It only took a few seconds of stirring and we could see the slime actually beginning to form.
A few more rotations of the spoon and we had a firm, sticky slime-like mixture. At this point, the girls had to put down the spoon, reach into the bowl and finish mixing the slime by hand.
Our glitter slime was a little too sticky, so we added another quarter tablespoon of contact solution to our concoction.
The extra contact solution worked like a charm. The slimy bits that had been stuck to the girls fingers were easily removed as they finished kneeding the slime. The finished result was a firm, wet, slimy substance.

My little helpers stretched, squeezed, bent, and manipulated that slime in every imaginable way. They had a blast playing with their slime and I loved how this glitter slime recipe didn’t produce any mess or make me worry about the safety of their skin.

Elmer’s is the only brand of glue that I use in my classroom and it’s no surprise that Elmer’s Classic Glitter Glue was a great kid-friendly base for making slime. I am certain that I will be using this mess-free glitter slime recipe often in the future.
You can learn more about Elmer’s products and discover even more fun inspiration for kid’s crafts the Elmer’s website, as well as Instagram, Facebook, and Twitter
0 notes
Photo

Handwriting Tips Made Fun
Whitney Soboleski
Glitter and Glue 4 K-2
When working with elementary aged students, handwriting can often be a struggle. It's such a crucial skill for students to learn but can often lead to frustration for students who struggle in this area.
With limited time in the school day, it can often be touch to get the chance for students to work on this skill. I'm going to show you some fun, simple, and quick tips that your students will love!
1. Glitter Gel Baggies
Students love this activity and it is a very simple DIY project that you can create right in your kitchen! Once you've made the baggie, students can practice tracing letters, sight words, etc. on them! I like to even write letters and words and place them below the baggie so students know what to trace.

First you will need to get your supplies! You will need Elmer's School Glue. I like to use the glitter glue (if you couldn't tell from my blog name I reaaaaalllyy like glitter). You will also need contact solution. I like to use the Target brand because it is inexpensive and I like any excuse to go to Target. ;) Just make sure the contact solution that you use has borate or boric acid in the ingredients. Finally, you need Baking Soda.
Step 1: Squeeze the entire bottle of Elmer's Glue into a mixing bowl.
Step 2: Add 1/2 tablespoon of baking soda to the bowl.

Step 3: Add 1/4 tablespoon of the contact solution to the bowl.


Step 4: Stir up all of the ingredients until it is evenly mixed.
Step 5: Add the mixture to a baggie and tape up the top of it. Give the baggie to students so they can practice tracing letters, words, and more!

2. Mr. Sketch Scented Markers
What is it about these fun markers that instantly improves students' writing motivation? I mean I get it...when I bring Paper Mate Flair Pens to my staff meetings or PD it instantly makes my note taking 5000% more enjoyable.
Use these Mr. Sketch Scented Markers to give students a little extra motivation to practice handwriting. One of my students favorite ways to practice handwriting is with rainbow writing. If you're not familiar with rainbow writing, students get to use all different colors for some fun and repeated practice!
First, students will choose a color and trace the letter. They will select another color and trace again. Repeat until it looks like a rainbow!

Rainbow writing is a really simple and low prep activity that your students are sure to enjoy with these fun and amazing smelling markers!
3. Tactile Letter Craft
Tactile letters are a fun craft to make and it gets them thinking about the formation of letters. When they are finished making them, they can trace over the letters with their fingers. It's a fun multisensory activity for students! Using a multisensory approach will help students to make connections and improves memory.

To make these, you will need: paper for the letters, pipe cleaners, and Elmer's School Glue, and an X-Acto Knife (for teacher use only)

First, I printed the letters out for each student. You can make them on the computer or write them out by hand.

Students added the Elmer's School Glue to each part of the letter. I like using the clear glue for this project!

Students will glue the pipe cleaner to the letters. They can trim it as needed. Let the glue dry while pushing down on the pipe cleaners.

Next, students will cut out the letters.

When students are finished, I like to use an X-Acto Knife to get out the centers of the letters. Please note, the X-Acto Knife should be used by only the teacher.
4. Trace Letters with an EXPO Marker
One simple activity to give students some repeated practice is by using EXPO Dry Erase Markers on handwriting pages that are in plastic sleeves. Students can practice over and over again and they can easily erase their mistakes and try again!

My Favorite Handwriting Pencils
Once your students have gotten some practice using the activities above, the Paper Mate Handwriting pencils are a great tool for some paper and pencil practice! My students love these brightly colored pencils and their easy, comfortable grip!


0 notes
Photo

Worksheets with Color
Kelly Dixon
Smart School House
Did you know that color can help memory retention in learning? Have you ever noticed how words or math problems are broken apart with different colors in your child’s classroom or in their homework? I recently created some worksheets with color to help my kids prepare to go back to school.
Color is a very important part of emotion, productivity, and learning. Color is the most powerful stimulus for the brain! The right combination of colors is also important, because it can produce higher level of contrast. Contrast attracts more attention and better visibility which improves memory retention. Therefore, special pens can also help your kids at home as well as in the classroom!
When I was a child, I would call these Paper Mate® Flair® Felt-Tip Pens “teacher pens” because my teachers used them. It was SO fun when I got to use a teacher pen in the classroom. It made me feel so official as a child! Kids often respond very well when they get to use something very special in their learning.
Naturally, I love these colorful pens and still use them regularly at home. My kids are allowed to use them because the water-based ink will quickly dry and won’t bleed through paper. They don’t like holes in their paper and I don’t like ink stains on the table! These felt tip pens are a win for the whole family!

Color can ultimately influence a a child’s ability to study and remember important skills. Because my son is going into first grade, he traced the spelling of different colors today. To take it a step further, he got to trace the colors with a coordinating pen! The connection to the spelling and the colored pen will help him remember the words in the future. Plus, it’s way more fun than tracing in pencil.
As my daughter is preparing for second grade, we used color to practice second grade sight words. A black and white rainbow is so dull and boring. But, a colorfully filled sight word rainbow is SO much more fun!

Can you imagine how easily your kiddo would be willing to practice their sight words if they had a large pack of the very best Paper Mate® InkJoy® Gel Pens to use? The gel pens are so vivid and dry extremely fast, preventing them from smudging. After all, the rainbow sight word worksheet would be really hard to complete with smudgy gel pens (no thank you!).

After some spelling and sight word practice, we continued to use our pens for some grid art for kids. For younger kids, this can be challenging, but in a fun way! For this activity, the student needs to replicate the image they see on one side of the page using the grid for guidance. It’s definitely not something they can rush through and their little minds will be challenged each step of the creative way.

Does it have to be perfect?
No!
Should they have fun trying?
Absolutely!
Adding color and fun pens to any school work practice makes the experience better for the student. Activities like these help with problem solving, perseverance, creativity, and non-verbal communication.
Click the links below to download any of the worksheets!
Sight Word Rainbow
Rainbow Grid Art for Kids (Finish the Rainbow!)
Castle Grid Art for Kids (Finish the Castle!)
0 notes
Photo

Eight Classroom Wish List Favorites for Kindergarten Teachers
Amanda Richardson
Mrs. Richardson’s Class
As classroom teachers we spend hundreds of dollars over the years on classroom supplies.
There are many times that we really want that one specific classroom supply that’s a nice-to-have or that we just want extra of because we just know that we will truly need it before December even comes, but instead we choose to buy something else our classroom needs right then.
Let’s face it, there are always things we can use for our classroom but choose to go without. Many times parents didn’t offer to send anything else, but if I asked them by simply putting a classroom wish list up during meet the teacher night, they gladly picked something and donated a little something extra!
MAGNETIC LETTERS I never went one day without using magnetic letters in kindergarten. I used them during whole group as we did word work, small group during guided reading, and always placed them in a literacy station for the students to do word work independently. THESE are my favorites, but you can even find them at the Dollar Tree sometimes! It’s so nice to have several sets of them! GLUE BOTTLES You are probably thinking I’m crazy right about now, but I’m serious. I used glue from a bottle every single year with my kinder kids and here is why–it was GREAT fine motor and self-control practice for them. I modeled and modeled this at the beginning of the year. We would sing a little tune–dot, dot, not a lot. They have to learn eventually and glue sticks just made a sticky mess everywhere when I tried them! Glue bottles are the way to go, in my opinion!
DURABLE TABLE BINS I used the plastic ones with handles for several years, but I just didn’t like how yucky they would get and how easily they would break. My last year in the classroom I splurged on THESE from the bathroom section at Target. Best decision ever!
EXPO INK INDICATOR MARKERS Seriously! Where were these when I was in the classroom still? No more guessing or wasting time hopping back and forth to exchange markers during whole group times of using dry erase boards! They have that amazing clear ink barrel that shows how much ink is left, they come in six fun, bright colors, write in 3 different widths (Think-three markers in one!), are low-odor, and can be found easily HERE on Amazon! Save yourself a headache and add these to your wish list!
BABY WIPES There are a classroom must-have because they made clean up so simple! I never hesitated to give one to a study to have them help wipe a table. I never loved the idea of letting them handle any other type of wipe, but THESE baby wipes were a must!
PLASTIC FOLDERS I never understood the love of plastic folders by teachers until my third year of teaching. That year we used them during writer’s workshop and as our take-home folders. We also cut up our extras and made them into transportation tags for the kid’s backpacks! Best. Thing. Ever. You can snag them HERE instead of chasing them around all of your local stores as they sell out!
MR. SKETCH MARKERS There is another brand of marker that I have always loved and still keep in my home and use daily, but when it comes to anchor charts, there is no better marker than a Mr. Sketch Marker! My first school I ever taught at introduced them to me because they stocked them for us!! Isn’t that incredible?! THESE lasted a while on our anchor charts as we kept them up most of the year.
DATE STAMP We used a date stamp every day of writer’s workshop! At the beginning of the year, I walked around and stamped each child’s writing. Eventually there would be a table manager who would do this. Using THIS date stamp saved so much time for little writers!
What are you must haves for your classroom wish list? I love gathering new ideas!
0 notes
Photo

Domino Number Sense Math Dry Erase Activity
Shaunna Evans
Fantastic Fun and Learning
Using EXPO Ink Indicator markers, a laminated math worksheet, and dominoes, kids can practice basic math skills or scale it for higher grade levels.
We want kids to get plenty of hands-on practice throughout the year, but we don’t want to go through all the paper we’ve got in the first semester of school, right?! That’s why I love using dry erase activities in the classroom and at home. By using dry erase markers kids have the opportunity to practice an activity over and over again until they’ve mastered a concept, and they can play the games they love the most as much as they want to! We’ve partnered with EXPO markers to share this free printable domino number sense math activity and tell you why EXPO markers are a staple for our learning activities.

NEW FEATURE FROM EXPO I’ve used EXPO markers for years. Whether I’m teaching whole group, guiding small groups, or setting up centers, dry erase markers are a part of our daily routines. And now EXPO has introduced a game changer with their newest feature, Dry Erase Markers with Ink Indicator. Yep, you guessed it! Now you can see right into the barrel of your EXPO markers to see just how much ink is left. That means you can tell at a quick glance whether you need to have some new markers on hand. No more surprises! I also love that kids have the ability to see the ink indicator. This gives them a bit of independence in knowing when to switch out markers, too. And how nice to not be interrupted in the middle of small group instruction when someone unexpectedly has a dried-up marker during centers! Definite win!

FREE PRINTABLE DOMINO NUMBER SENSE MATH For this free printable activity you’ll need: - Expo Dry Erase Markers - Dominoes (differentiate the number of dots based on your students’ needs) - Free Printable Domino Number Sense Mat (link at the end of the article) -Laminate this, or add it to a sheet protector like we did. I personally like to use sheet protectors. I leave the holes on them so I can file them in a binder by topic for quick access. Plus when they get too grimy I just slip out the paper and put it in a new sheet protector.
To play kids simply have to select a domino from their set. Again remember to differentiate based on your child’s current abilities. Kids place the chosen domino in the box at the top of the page. Most will then write the number that it is equal to in the center column. Then kids can think of as many numbers as they can list in the space that are less than the number and numbers that are greater than the number on the domino.

EXTEND AND ADAPT Number sense development is an ongoing goal in early childhood, so this activity can be used over and over again throughout the year. You can use dominoes with a higher number of dots as kids become ready. And if kids begin to lose interest a bit, here’s my super easy tip for reigniting their enthusiasm. It’s as simple as changing the color of the marker you set out with the games. Seriously! EXPO dry erase markers come in 6 bold and bright colors. If you start the center with a black set of markers, switch it up on week by leaving out some blue markers. I promise your kids will squeal with delight! For advanced learners you can also have kids write addition or subtraction sentences that will work in each of the columns. This is an extension that will allow you to differentiate in another way to meet the needs of all of your students
0 notes
Photo

Properties of Shapes & Op Art
Tessa Maguire
Tales from Outside the Classroom
Using art to develop students’ understanding of shape properties.
My first graders came to me with a lot of background knowledge on shapes and their properties. I was impressed with the amount of information they retained from kindergarten and from other learning experiences. Because we didn’t need to spend a ton of time on 2-D shapes it was the perfect opportunity to integrate art into our unit to help students continue to develop their understanding of shape properties and to demonstrate content mastery. Working at an arts integration school, it’s important that we not only integrate the arts into our units, but also teach about the style of art we’re working on and artists that could give us inspiration. I’m still relatively new at integrating the arts into our units, instead of just doing crafts and other random projects without a lot of intention, and have a long way to go to make the integration as authentic as it can and should be. In the meantime, though, students are learning about the arts, artists, as well as demonstrating their content knowledge through the arts as often and as meaningful as I can.
I began by introducing the work of M.C, Escher. The North Carolina Museum of Art has a great Escher slideshow that I used to have students explore and discuss his work. We spent a lot of time talking about the precision needed to create his art pieces and the symmetry that is used to create optical illusions. I also did a Google image search on Escher and showed students some of his most well known op art (optical art) pieces. While Escher is well known for tesselations, I thought this project would be a bit easier on my first graders, especially if completed in colors. I introduced students to the 6-inch ruler we’d be using to draw our shapes. I started by drawing a 3 inch line and then explaining to students that we were going to use it to draw a square then asking what size lines we’d need to use to finish the square.

In order to create the optical illusion more clearly, I recommend not using vertical lines, but more slanted ones in order to create the intended visual effect. (Some of my pictures show vertical lines, but right as I started coloring, I realized my mistake, and we started over.) I then continued with a 1″x4″ rectangle and then a 2 inch triangle. Because students hadn’t ever used a ruler before (our standards in first grade do not include measuring with standard units) and had never used it to draw a shape with a specific length, this set of directions took longer and required more on the fly reteaching with students than I had initially anticipated. If you’re doing this project with firsties too, I’d recommend going slower and more sequentially than you might think at first.

Creating the circle was a challenge, but it was a shape we had been covering so I wanted to use it in our project. So, we used our rulers to help. First, we made dots at 0, 1, and 2 inches. Then we made a perpendicular set of dots while keeping the 1 in the same location. We then talked about fractions as we spun our ruler around each quadrant to draw more dots, all while keeping the center dot on the 1. What resulted was a set of dots we could use to help us draw a circle.

And then connect the dots!

We used a square, circle, triangle, and rectangle as these were the focus of most of our shape discussions. However, you can use any shape you’d like. I even had a student recreate the project by tracing pattern blocks. There’s no wrong way.

Once the shapes were drawn lightly using pencils, we went over the lines using a black Sharpie Fine Point Marker. I wanted my students to clearly see the defined line between the inside and outside of the shapes, but in the future, I’d use a black Sharpie Ultra Fine Point Marker as I think that thinner black line would help the illusion stand out more.

The next step was to place the paper landscape and then measure out every inch using a 12-inch ruler. We placed very small and light dots towards the top of the page and then slid the ruler down to do it again near the bottom of the page. The students’ dots were not always lined up as precisely as possible, but that’s part of working with and using a ruler and older students would probably be more precise. Then, the page was turned portrait and students used the ruler to connect the dots and draw lines across the page. The two sets of dots helped students ensure that they were not only drawing lines, but lines that were straight and perpendicular to the page rather than slanted.

Once our piece was drawn, it was time to add color! Even though M.C. Escher created most of his pieces just using black and white, color is needed to make this optical illusion (and makes it easier for students to complete). We discussed complementary colors and chose colors opposite each other on the color wheel. I found a color wheel online and displayed it for my kids as they chose their color. One of my kids did not understand this direction and used analogous colors, which resulted in a different feel in her piece. I used red violet and lime Mr. Sketch Gel Crayons.

This was my first time working with the Mr. Sketch Gel Crayons, though the markers are my absolute favorite! I immediately fell in love! While the scent is not as strong as I’m used to with the marker, the smoothness of the color was awesome. They produce such a strong, rich color and glide across the paper. The Mr. Sketch Gel Crayons gave the visual look of waxy crayons, but it did not leave the paper feeling waxy or with a residue like waxy crayons often do. They’re large and round so they’re not great for coloring precisely, which means they probably were not the best choice for this particular art project, but the bright, rich colors outweighed that for me. With that said, the color didn’t match the tube as much as I would have liked, especially with the purple I chose. But, knowing that, and often not needing a very specific color, it won’t be an issue very often. To help students complete the needed color effect, I directed students to only color outside of the shapes at first. We again discussed precision and the need for working slowly and deliberately.

Once the background pattern is complete, the shapes really stand out!

In order to make sure students really understood what they needed to do to invert the colors, I met with each student individually and demonstrated on their paper to guide them. I was really impressed with the focus and perseverance my students demonstrated as they colored.

To display, I placed the final pieces onto black construction paper. The black background really helps the image stand out, especially since they weren’t placed onto a bulletin board, but rather a wall. I used a silver Sharpie Metallic Marker to write each student’s name on the back of the black construction paper. These are the only thing I’ve found that really stand out on the black.

Did you know that makes repositionable glue? Well, they do! The Elmer’s Re-Stick glue stick is respositionable for 5 minutes so it’s perfect when you’re trying to place something and will maybe need to adjust it.

I did find that the paper didn’t stick as well as I’m used to, so I used extra glue. I wouldn’t recommend this particular glue on a project where the students are going to be using it often (in an interactive notebook for example) but for something that is glued once and done it’s great to have as an option. The optical illusion really stands out when the page is looked at on the side.

My students loved working on the project and really loved looking at their own and others’ finished projects! The students who chose complementary colors and have rich, deliberate coloring had the best outcomes.


Read more about Tessa and her classroom hacks at Tales From Outside the Classroom!
0 notes
Photo

Gorgeous Black Glue Galaxy Craft
Rachel Nipper
I Heart Crafty Things
If you’re looking for a fun activity to keep the kids busy indoors the next couple weeks before school starts look no further! This black glue galaxy craft is not only a gorgeous art project but it will keep kids busy and happy for hours.
Now is the perfect time to stock up on Elmer’s School Glue when you are out doing your back-to-school shopping. Elmer’s School Glue is perfect for making arts and crafts projects year-round and the 4 oz. bottles help making small batches of black glue and slime a breeze.

Supplies Needed:
· Elmer’s School Glue
· Black acrylic paint
· Mixed media paper
· Skewer or stick for stirring
· Watercolors
· Elmer’s glitter Glue Pens
· Galaxy Template (optional)
Project Tutorial Steps:
1. Start by mixing together your black glue. To do this, use a bottle of Elmer’s School Glue that is about 75% full. Open the lid and squeeze in a generous amount of black acrylic paint. Put the lid back onto the school glue and then shake, shake, shake the bottle of glue for several minutes to incorporate as much of the black paint as possible.
2. Then remove the glue lid and give the mixture a stir using your skewer or stick. The end of a paintbrush works well for mixing too.

3. Before you begin tracing the template, test out the glue first on a napkin or separate piece of paper. Create some lines to experiment with the flow and spread of glue. Once you’re happy with the way the glue flows, download the free galaxy template and print out whichever galaxy picture you’d like to use on your mixed media paper.
4. Using a steady hand, trace the lines of the black glue galaxy craft with black glue. Don’t worry if the lines are not perfect or the glue pools a little, as this adds to the overall effect of the piece.

5. Leave the black glue to dry overnight. This step is important because if you paint your picture prior to the black glue drying your watercolors will mix with the black paint.
6. Once the black glue is completely dry, paint your picture with your watercolors.
7. After allowing the watercolors to dry, grab your Elmer’s Glitter Glue Pens. Use the different glitter glue pen colors to add details to your black glue galaxy craft such as a ring around your planet, extra bling in sections of your planets, stars and even colorful shooting stars.

8. After allowing the watercolors to dry, grab your Elmer’s Glitter Glue Pens. Use the different glitter glue pen colors to add details to your black glue galaxy craft such as a ring around your planet, extra bling in sections of your planets, stars and even colorful shooting stars. These Elmer’s Glitter Glue Pens are amazing because they are easy to use and you achieve the look of glitter without any of the mess!
I recommend layering several different colors of the glitter glue together when creating the ring around your planet as it creates a colorful galactic-looking swirl around the ring.

YOUR BLACK GLUE GALAXY CRAFT IS FINISHED!
Do you love this black glue art technique as much as we do?
0 notes
Photo

All About Me Pop-Up Cards
Linda Kamp
Around the Kampfire

ALL ABOUT ME POP-UP CARDS
Helping your students get to know one another is an important part of the first days of school. Here’s a new take on a tried-and-true first week activity that all students enjoy. This simple All About Me pop-up card is easy to make and makes a fun partner activity for students to compare things about themselves with a new friend. It’s virtually no-prep, which makes it ideal for your first writing center activity too.
Keeping tasks and activities simple is always a good thing when introducing center routines. As you teach your expectations, be sure to provide a variety of writing tools and paper in your center and teach students how to use them responsibly. One of the go-to tools my students always choose is colored pencils. I like Prismacolor Premier colored pencils because the core is sturdier which keeps them from breaking. They sharpen easily and quickly too. I definitely don’t want students spending their time sharpening instead of writing!
Making the Cards
TO MAKE THESE ALL ABOUT ME POP-UP CARDS YOU’LL NEED:
Prismacolor Premier colored pencils
a black Sharpie marker
1 sheet of construction paper
1 index card (cut off about 2 inches from the bottom to form a square shape)
Elmer’s Washable School Glue Stick

My second graders prefer colored pencils over crayons because they have more control while coloring the smaller pictures they tend to draw.
Making the Pop-Up Box

Teach Your Students to Make the Pop-Up Card:
Fold a sheet of construction paper in half.
In the fold, cut two snips, each about 1 inch long. A bit longer is OK too.
Open the paper and push out the box.
Make a crease at the top and bottom of each cut to form a box.
Next, have students open up the page then draw and write all about themselves.
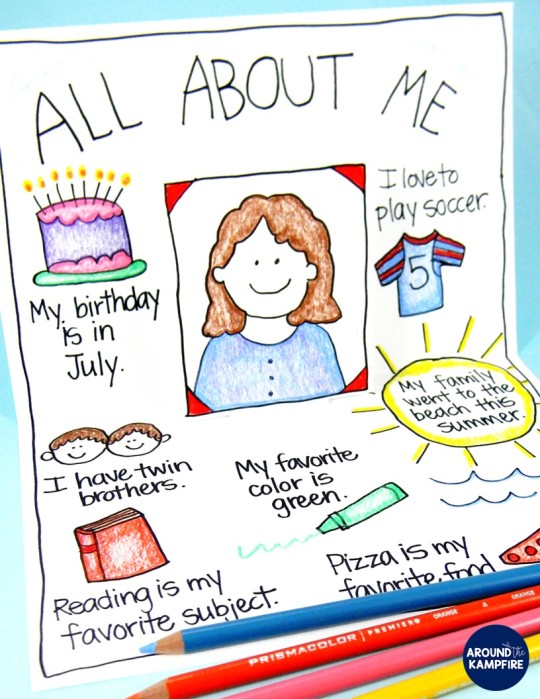
Guide your students to include things like their age, siblings, favorite foods, school subjects, and colors.
Include Self-Portraits
Give each student an index card to draw their self-portraits. I cut about 2 inches off of the bottom of the index card so it would fit nicely into the card when folded.

Glue the self-portraits to the front of the pop-out box to complete the cards. And that’s it! You can display the cards too, for a fun back to school bulletin board!
If you like this idea, why not share? Be sure to pin it on Pinterest or share on Facebook with your teacher friends!

Happy teaching and have a wonderful school year, friends!
0 notes
Photo

Grab Those Gumballs Sight Word Game
Emily Yerty
Polka Dot Please
Reading sight words quickly is one the best ways to help little readers grow!
It takes a lot of repetition to learn these important words, so I am always trying to think of creative ways to practice! Grab Those Gumballs is fun for kids to play and simple for teachers to prep! It is the ideal activity for early finishers, centers, morning tubs, or even inside recess!

To make your “gumballs” you will just need some colorful ping pong balls and a black Sharpie Fine Point marker. Use your Sharpie marker to write one sight word on each ball. Once you have all your gumballs ready, drop them in a clear container. I used a big fishbowl, but clear food storage containers work great too!

To get started, kiddos will need the container of gumballs and a way to record the gumballs they picked. You can print an editable Grab Those Gumballs recording page. Kiddos absolutely love using Mr. Sketch Scented Markers to color in the gumballs they picked. These markers have a thick barrel that's easy for kids to grasp. You can download the editable recording page here and add your own sight words!

To play, kiddos reach in and grab a gumball. They read the word and color the matching gumball. They can take turns pulling out gumballs and putting them back in after each turn.


If you want to save some paper, you could give your kiddos a dry erase board and some EXPO Markers. I like this option for inside recess and morning tubs when I don’t know exactly how many copies I will need. Once the kiddos pull out a gumball, they write the word on their boards with their markers. We love all of the color choices included with the EXPO 2-in-1 Double Sided Dry Erase Markers! When it’s time to clean up, just erase your boards!

To update your activity, you can add more gumballs as you learn new sight words! Kiddos will love playing this game again and again!
0 notes