#rresource
Explore tagged Tumblr posts
Visit Tumblr Blog
Explore Tumblr blogs with no restrictions, modern design and the best experience.
Last Seen Tumblr Blogs


Fun Fact
130K people were victims of a chain letter scam that affected Tumblr in May 2011.
Text


Halloween/Horror fonts #3; 8 fonts + Kpop songs; cr
Listen to my Friday the 13th mix!
Like or reblog if download it, please!
Run!
Freaky Story
Movie Monster
Monstafaller
Curse of the Zombie
Vampire Zone
Unfinished Scream
Ghostober
#chaoticresources#rresource#font#fonts#halloween fonts#horror#terror#halloween#minha fonte#meu#tw: blood#tw: body horror
82 notes
·
View notes
Text
Template #010 by dailyresources
— WhatsApp Template
Please do not repost / redistribute or claim as your own.
Please, like or reblog if you download.
You may edit as much as you like, it is fully customizable.
This is a free template. PSD File.
Credit is very much appreciated.
Photos by pexels.
Any issues, don’t hesitate to contact me!
Available in day mode or night mode.
Fonts: Helvetica.
Enjoy ❤
Link Day Mode: [payhip] Link Night Mode: [payhip]
Support me on [ko-fi]
#templates#whatsapp template#template psd#free template#photoshop template#dear indies#chaoticresources#allresources#rresources#yeahps#social media template#my creations#*#*mine
173 notes
·
View notes
Text


PEGGY CARTER ICONS
12 versions of a Peggy Carter icon (300x300);
please like/reblog if using;
credit is appreciated, but not necessary;
all icons are under the cut, but they can also be found in my icons page.
#*#*icons#marvel#mcu#marveledit#peggycarteredit#ch: peggy carter#agent carter icons#peggy carter icons#peggy carter#agent carter#captain carter#rresources#marveladdicts#marveldaily#womenofmcu#usereme#userelysia#userpegs#usertreena#uservalentina#userrin#useralien
48 notes
·
View notes
Note
Hi! Do you mind sharing your coloring tutorial or tips? especially for the animation ones, they're so good! your gifs are crisp and HD
hi, anon. tysm! 🫶 i don't mind at all since i’ve gotten more than a few requests from before, ig it's time to give it a go. (more) details are under the cut. 😁

before we start, i want you to take note of the following things that will be helpful in the process of making/coloring gifs.
if you want to get the know-how on making gifs, @redbelles did us a solid and gave us this comprehensive guide that will save me the time for explaining lmao. 😅✌️
make gifsets without skipping frames. keep frame delay 0.05 and 0.06 for less than 25 frames. anything more or less is too fast or too slow. additionally, it's also important to note that if you're dealing w videos that are faster than 30fps you change the frame delay to 0.04.
gif using the the new dimensions (in this tutorial i used the dimensions of 540px x 510px since it's all about big gifs now 🙄).
use the standard sharpening settings (smart sharpen, amount 500%, radius 0.3px, remove gaussian blur and tick more accurate) also note the sharpening settings for 2d as you've specifically requested.
you can use action that will convert your gif back to frames and set your timing to 0.05 with a single click. basically photoshop will follow out all of these time-consuming steps for you! just download the action and double click it. it should now be added to your list of actions. to see your actions, go to window > actions. find the folder that says "GIF ACTION" and select the lines that says "CLICK HERE" and voila! ps will do all the hard work for you.
the coloring on your gifs will look good if you have a good base so try not to skip on video qualities. use high quality copies like 1080p or 2160p (4k ones are good) the higher the gb the better. it makes coloring so much easier and reduces grains.
*cracks knuckles* let's start!
for 2d animation's sharpening settings, it usually varies so i just move the amount around and see what looks or works better for a specific gif. i used amount: 189 and radius: 0.2 for this ponyo gif. anything can work between 189 to 350 for me but i maintain the radius at 0.2. again, you can just play the amount around until you find the one that looks good for your gif.

when i’m making gifs. i look for that notorious contrast between the light and dark parts. i think it gives life to the gif- so exposure, levels and curves are best to achieve that. for curves, just go to layer > new adjustment layer > curves. this layer is going to help brighten up the gif in certain areas, and darken others. select the white eyedropper. click the lighter part of the gif like the white/light part of the ship.
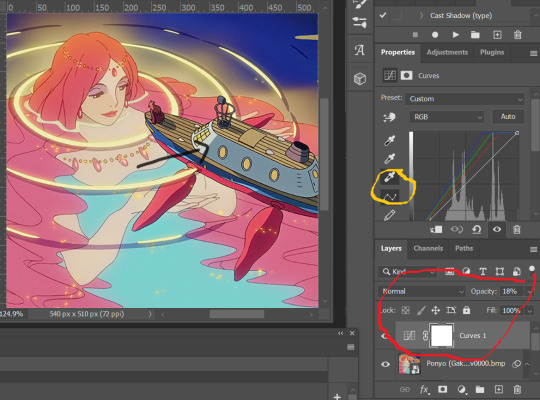
next, select the black eyedropper and click on a black/dark area of the gif (refer to the arrow bc i don't know which part of the ship is that called lmao).
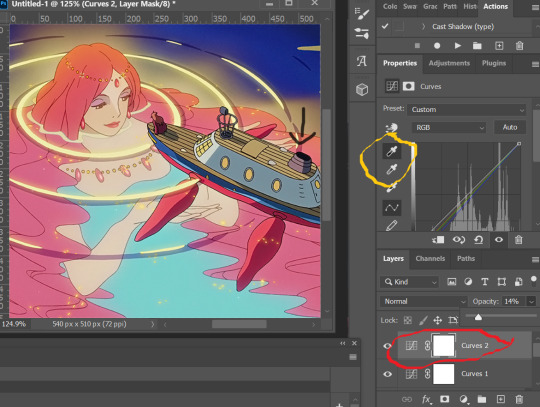
you can skip the black eyedropper if you're already satisfied w the result of the white one.
color balance and selective color are your two best buddies. they’re great when you’re trying to change some tones or specific colors of the gif, like the skin tone which is very tricky.
using selective color is pretty simple, here’s a really useful guide:
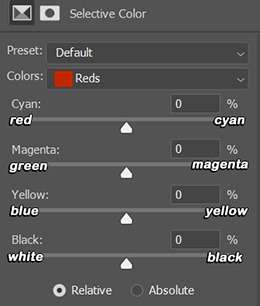
if you pull any of the tabs to the right, it increases the amount of color (cyan, magenta, yellow and black), and reduces the amount of opposite color (red, green, blue and white).


i also use the blacks and whites in selective color especially if the gif is saturated w colors to tone down some parts and make shadows more visible (idk if this is still making sense 😅).

in working with color balance, i use midtones and highlights sparingly. it's really helpful in removing or balancing out a certain tone.

here's my save setting ⬆️
idk why but ps puts the default frame delay to 0.07/0.03 so open your gif in ps again and don't forget to change the delay to 0.05.

and we're done!

i sometimes go back and forth and do some tweaking until i’m satisfied with the result. this is how i color and i know it’s not perfect but i learn by constant practice. there’s really no standard in coloring so you can make yours the way you like it. just enjoy- until you get the hang of it and it becomes less daunting (or something like that). i hope this helps. if you have more questions, my askbox is always open 😊.
#completeresources#usergif#userpayton#usersugar#rresources#yeahps#itsphotoshop#userbells#dailyanimatedgifs#usercharl#usersavana#Chaoticresources#hisources#ps help#tutorials#ask replies#anon
186 notes
·
View notes
Text
PSD #243 Download here Like or reblog if you download Like my content? Support me on ko-fi! ☕💖
#psd#psds#rresources#completeresources#dailyresources#hisources#makersleague#ihaveresources#allresources#pastel#*#photo
73 notes
·
View notes
Text

WELCOME TO DAILYTHEMES!
We are a source blog focused on themes, pages, posts about themes help, html and codes. This blog honors all the theme and page creators, the credits are all for them!
We track #dailythemes — tag us!
#signal boost#themes#pages#dailyresources#hisources#rresources#completeresources#finesources#allresources#evansyhelp#userbru#resourcemarket#ihaveresources#theme hunter
64 notes
·
View notes
Text

WELCOME TO DAILY-ICONS!
We are a source blog focused on icons edits, dash icons, tutorials about icons and more! This blog honors all icons makers, the credits are all for them!
We track #dailyiconsedit — tag us!
#signal boost#iconedit#iconsedit#dailyresources#iconfrenzy#hisources#rresources#completeresources#fineresources#allresources#evansyhelp#userbru#perfectopposite#usermiia#usergiady#icons
39 notes
·
View notes
Text

♡ Every lake belongs to the quietness desired by the swans ♡
Here’s psd n. 438 . I hope you like it!
♡ ♡ ♡ ♡ ♡ ♡ ♡ ♡ ♡ ♡ ♡ ♡ ♡ ♡ ♡ ♡ ♡ ♡ ♡ ♡ ♡ ♡ ♡ ♡ ♡ ♡ ♡ ♡ ♡ ♡ ♡ ♡
♡ Please like / re-blog / follow if download.
♡ Don’t claim as your own,if you use it credit me.
♡ ♡ ♡ ♡ ♡ ♡ ♡ ♡ ♡ ♡ ♡ ♡ ♡ ♡ ♡ ♡ ♡ ♡ ♡ ♡ ♡ ♡ ♡ ♡ ♡ ♡ ♡ ♡ ♡ ♡ ♡ ♡
[DOWNLOAD at Deviantart] ♡
[DOWNLOAD at Google Drive] ♡
[ for MORE PSD] ♡
♡ ♡ ♡ ♡ ♡ ♡ ♡ ♡ ♡ ♡ ♡ ♡ ♡ ♡ ♡ ♡ ♡ ♡ ♡ ♡ ♡ ♡ ♡ ♡ ♡ ♡ ♡ ♡ ♡ ♡ ♡ ♡
#urbanflower#chaoticresources#resources#rresources#itsphotoshop#yeahps#moodboard#urban flower#psd#filter#red#green psd#rpg#rpg resource#rp psd#dailyresources#quirkyresources#psd download#allresources#completeresources#hisources
37 notes
·
View notes
Text
i am feeling acute distress
#blogipede#brainipede#<- made a new tag#everything is so. and it keeps. and i feel very.#the rresources are like. distress is common!#okay cool cool how do i stop being distressed about this please its very terrible#why am i so scared…
1 note
·
View note
Note
How did you learn how to make gifs?
A million different tutorials and lots of trial and error lol. I still consider myself a total beginner and i'm learning new things all the time, but if you're interested in learning gifmaking here are some tutorials that have been really helpful to me:
Beginner's guide to photoshop by @rresources
Gifmaking for beginners by @hayaosmiyazaki
Giffing 101 by @redbelles (super comprehensive and includes a few videos showing the process)
How to make hq gifs by @cal-kestis
Giffing tutorial by @cillianmurphy
Gif tutorial by @kylos
Channel mixer by @aubrey-plaza (life-changing for coloring difficult scenes)
@chaoticresources and @completeresources and @usergif are general photoshop/editing resource blogs
Everyone has their own process in making gifs and i've also been using a mix of different tutorials. I've tried a few different video player/screencapping programs and imo mpv player is the best. Most people use photoshop (source blogs should have links where to get it) for making gifs and edits but i've heard photopea is a good alternative though i haven't tried it.
My biggest advice to anyone wanting to learn giffing is having patience (it takes a LOT of time) and trying to learn one step at a time, because at least to me it felt completely overwhelming and confusing in the beginning when i was trying learn the whole thing at once while not having even downloaded anything before. It's best to start from the very basics and it gets easier and less confusing when you make progress!
24 notes
·
View notes
Note
omg i love your gifs so much, they always look amazing. i have a question if you don't mind, what are your sharpening settings?, your gifs look so smooth and have amazing quality. mine look grainy
Hiya nonnie, thank you soooo much darling! <3333 So I've got asked this a lot & I have a standard response (please don't be disappointed):
More details under the cut, coz this got longer than I thought.
Moral of the story: I use the standard sharpening settings, but I'd say, pay attention to the colouring as well, as that can mask some of the graininess that oversharpening can introduce.
I can't stress on colouring enough (and maybe I'll die gatekeeping it lol) - it's a game changer. It honestly doesn't get talked about as much, which is a shame really.
Linking some awesome colouring tutorials:
https://www.tumblr.com/arabellas/750386240321454080/hi-i-hope-its-okay-to-ask-i-love-your
https://www.tumblr.com/arabellas/746043238726746112/about-the-tutorial-just-one-about-dark-scenes-in
https://www.tumblr.com/arabellas/744683449531678720/do-you-have-a-coloring-tutorial-your-gifs-are-so
https://www.tumblr.com/rhaenyratargaryns/743626191546761216/hi-i-love-ur-buffy-gifs-so-much-they-always
https://manny-jacinto.tumblr.com/post/645393544481243136/coloring-tutorialtips-for-gifs-by
You can find many more tutorials in the #gif tutorial tag. And do follow handles like @pscentral @psresourcess @rresources @usergif @clubgif who repost tutorials for beginners and experts. Additionally, the links I’ve added in my main answer—those users have plenty of other well-endorsed tutorials to make you freak out on Photoshop :)
Happy giffing and welcome to the content creator community <3
2 notes
·
View notes
Note
Hello! Do you take requests?
I am hoping to have this item converted from 4to2?
The Sims Rresource ID1623833
Thanks for your suggestion! Converting Sims isn't my area of expertise, and I won't be able to do this one. I primarily focus on converting careers from The Sims 4 to The Sims 2.
While I don't take specific requests, I do appreciate ideas and may create them if they inspire me.
Thanks for understanding!
0 notes
Photo
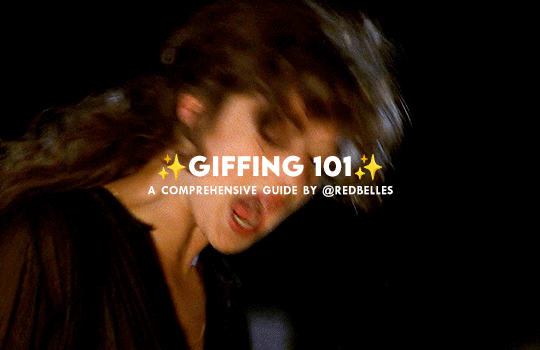
hello and welcome! this is my spin on a comprehensive giffing tutorial that not only covers the basic mechanics of how to gif, but also goes into the tips, tricks, and general photoshop information i’ve learned since i started giffing and now wish i could beam into my past self’s brain. this tutorial will walk you through everything from start to finish, help explain what not to do and why, and hopefully give even experienced gifmakers some new information!
note: this tutorial is very long and image-heavy, and is best viewed on dash
WHAT YOU’LL FIND IN THIS GUIDE
software needed
sourcing + storing footage
giffing: methods + step by step process
actions
coloring
text: subtitles, fonts, etc.
saving: timing, settings, exporting
posting: captions, tags, scheduling
resources
✨ NOTE: CURRENT AS OF 05/25 ✨
1. SOFTWARE
photoshop
there are tons of programs out there you can use to make gifs, including photoshop dupes like photopea and gimp, but this tutorial is going to focus solely on photoshop
i run photoshop 2025 on a macbook pro, but any ps version recent enough to have the video timeline will work. windows users will be able to follow along as well
you can snag photoshop (and lightroom) for $10 USD/month directly from adobe
adobe also offers discounts/free programs through universities, so be sure to look into that if you’re a student
or you can check here and here for other ways to snag it
vpn
just get one. seriously.
most reliable vpns (nordvpn, proton, mullvad, etc.) regularly have sales to make them more affordable
if you really can’t afford one, there are some free options; just be extra careful about which one you pick
if you don’t have a vpn, your internet service provider will be able to see what you’re t*rrenting/downloading and may take action against you— anything from cease and desist notices to throttling your internet speed or even terminating your contract with them
note: make sure your vpn is active and working correctly before you start t*rrenting or downloading anything
qbittorrent
safe, reliable free t*rrent client with a clean interface that is fairly intuitive
note: make sure you bind your client to your vpn to prevent any accidental data leaks; not all clients let you do this, but qbittorrent does
jdownloader
a download manager that is super useful for direct downloads (ddls)
keka
mac archive/extraction program you can use to open ddls acquired through jdownloader
winrar
windows archive/extraction program you can us to open ddls acquired through jdownloader
4k video downloader
free application for downloading hq youtube videos
mpv
free video player that takes sequential screenshots
capable of playing .mkv files (most large t*rrent and ddl files use this format)
cheat sheet of mpv keyboard shortcuts
works with both mac and windows
installation guides (courtesy of @kylos): mac and windows
note: install builds specified below for best results
mpv on mac
different builds allow it to work with 1080p, 2160p, sdr, and hdr files
1080p sdr build list
note: older mpv builds (ex: 0.29.0) no longer work on apple silicon macs that have updated to the sonoma operating system and beyond. if you have updated, delete your old sdr mpv build, download the latest build, and update your config file to match the example below. mpv will duplicate caps the first cap at the beginning of your screenshot sequence, but the rest of your caps should be fine

if you have an intel mac and have upgraded to sonoma, because of backend gpu issues, you will experience significant issue capping with mpv; using a duplicate finder (tutorial by @laurabenanti here) works as a partial fix, but there will still be some skipped frame/choppiness issues. i recommend looking into vlc or gomplayer as an alternative to mpv
2160p hdr build
note: the hdr build will not work for 1080p files— it will take duplicate screencaps. it also takes duplicate screencaps of your first cap only when used with 2160p files, so be aware of that
i recommend naming your builds so you don’t accidentally open a file with the wrong build

mpv on pc
assuming your computer can handle hdr, the standard build should work with all files
available for 64-bit and 32-bit systems (see windows installation guide linked above)
note: be sure you watch out for duplicate frames at the beginning of your screenshot sequence
a big shoutout to @jacksamiras for helping my mac-only ass make sure i had all the facts straight for pc users!
2. FOOTAGE
how to acquire files
a current and comprehensive guide; updated regularly
where to acquire files
ext.to: well-organized t*rrent site with a wide selection of files
1337x: t*rrent site with a solid variety of files
watchsomuch: t*rrent site (minion-themed, unfortunately) with a huge selection of movies and shows, though many of the links are old and/or underseeded
hdencode: ddl site with a excellent array of hq movies and shows
nima4k: german ddl site with ultra hq file options
yts: t*rrent site that specializes in extremely small file sizes; generally not ideal for giffing, but it can be a good way to find files you really can’t find anywhere else
digital-digest: a great place to find lossless hd trailers
thedigitaltheater: another place to find lossless hd trailer
storing your footage
external hard drives are the most practical option; for ease of use make sure you get a drive that is compatible with your computer (mac vs. pc) and has decent reviews— you want to make sure it’s not going to crap out on you in six months or something
shared drives/cloud storage (guide by @usergif) also work if you can’t afford hard drives or don’t want to bother with them
quality
⚠️ ALWAYS GIF FROM 1080p AND UP ⚠️
anything below 1080p (720, 480, 360) is going to be noticeably fuzzier and lower quality
sometimes things like older music videos only exist in low quality, but for movies and tv shows, it’s always going to be worth it to find a file that 1080p or better
in most cases, the higher the file size, the better. a 2 gb file is going to be significantly less hq than a 10 gb file. for example:


2160p isn’t necessary, but if you know you’re going to be making really big gifs (540x450 and up) or doing a lot of intense blending or coloring, the extra size and quality will really help
sdr vs. hdr
sdr is standard dynamic range, while hdr is high dynamic range
note: not all computers are capable of displaying hdr files correctly
most newer computers (ex: all macs from 2018 onwards) have native support for hdr files, but do some googling to make sure your machine can play them before you download any
below is an sdr screencap (left) next to an hdr screencap (right) that is not being displayed correctly

[source]
the washout that occurs with hdr files isn’t always a machine issue; it can also occur if you cap hdr files with an incompatible screencapping setup
using the correct build in mpv (2160p build for macs, the standard build for pcs, both linked above) will allow you to capture hdr screenshots while preserving the original color profile — no washout!
upscaling
what is upscaling? upscaling is the process of increasing the size and detail of a digital image, making it sharper and clearer with (in theory) little to no loss in visual integrity
many older movies are now upscaled into 4k, and while it can be tempting to grab a large upscaled file, be aware that upscaling can drastically affect a film’s color profile
for example, each of the following gifs have been sharpened using the same settings, and have no coloring on them:


as you can see, the upscaled 2160p and 1080p gifs have areas of extreme contrast, and are very yellow. the non-upscaled 1080p file, despite its lower quality, maintains the original color profile and contrast balance
how you feel about upscaling and the resulting quality vs. color tradeoff ultimately comes down to personal preference, but it’s definitely something to keep in mind as you’re selecting a file
3. GIFFING PROCESS
methods
there are four main methods for giffing: screenrecording, video extraction, files into stack, and DICOM files. both files into stack and DICOM files involve taking consecutive screencaps to load into photoshop rather than importing the video or opening it directly in photoshop, which is how screenrecording and video extraction work
there are pros and cons to each method, and all of them work at the end of the day, but i think there’s a clear winner in terms of both ease and quality. here’s a quick run down of each method
screenrecording
pros: least intimidating method, fairly quick
cons: huge loss in quality, it’s becoming increasingly difficult to record footage from sites like netflix, hulu, etc. as they get better about detecting recording programs like quicktime player and giphy capture (i.e. you end up with a black screen when you try), higher fps rate of screenrecording compared to footage fps creates issue with gif playback
fps issue: to get the smoothest playthrough, you need to load in every frame. however, if you do that, you end up with a gif that lags dramatically due to the frame rate difference. to combat this lag, you have to manually sort through and delete every duplicate frame created from the fps difference. if you don’t load in every frame (ex: every other frame), you won’t have to manually delete anything, but your gif will be noticeably choppy
video extraction
pros: takes less time/computing power than opening an entire movie/episode in photoshop
cons: some quality is still lost, extraction programs like handbrake can be difficult to use, rendering extractions still takes much longer than screencapping
files into stack
pros: no quality loss, much faster than extraction method
cons: caps load into photoshop in reverse order, 2160p caps take a very long time to load compared to 1080p caps
DICOM files
pros: no quality loss, caps load in correct order, load times significantly reduced from files into stack method (1080p caps load instantaneously and 2160p caps load in seconds)
cons: photoshop actions designed for use with files into stack must be tweaked for use with DICOM method
to illustrate the difference in quality, each gif below has been sharpened with the same settings, set to the same frame delay, and has no coloring on it


as you can see, the choppiness/lag in the screenrecorded gifs is very evident when compared with the screencapped gif. the screencapped gif is also smoother and crisper, with truer color and no artifacts or blockiness. the video extraction gif is a closer match in terms of quality, but it still has banding and blockiness in some areas, and a slight blur compared to the screencapped gif
now that you’ve seen the differences, on to screencapping! as you may have guessed from the pros and cons lists above, “load files into stack” and “load multiple DICOM files” are almost identical processes, but crucially, DICOM files* load much more quickly into photoshop, and they don’t load in reverse order. the speed difference is especially nice when you’re working with 2160p caps, which take absolutely forever to load in the with files into stack method
* .dcm files; designed for medical imaging, they store information differently than .png or .jpeg files and are used to transmit large images and associated data quickly and losslessly
i recently switched to working with DICOM files, so that’s what i’ll be showing you how to use below!
process
1. open file in mpv + stake screencaps
i like to take a lot of caps so that i can be super picky about choosing exactly what i want to have in the gif, but my computer has the horsepower to handle that. if you don’t think yours does, consider being more precise in your initial scene selection and/or stopping at 50-55 total caps
note: how to take screencaps with mpv player is covered in the installation guides linked above


2. trim caps + rename from .png to .dcm
if i’m using the hdr build (like i am here), i remove any duplicate caps from the beginning. then, regardless of which build i’m using, i trim any extra caps from the end to ensure that only caps from the scene i want to gif are left in the folder before i turn them from .png to .dcm files. it’s a simple process on mac: select all > right click > rename
see here for a guide to batch renaming extensions on windows


3. open photoshop + load multiple DICOM files
unlike “load files into stack” you’re loading you entire screencaps folder in for “load multiple DICOM files”; this is why it’s a good idea to trim your caps before you load the files in


4. crop

click on the crop symbol in your toolbar, then select w x h x resolution in the drop down menu and enter the dimensions you want for your gif

basic tumblr dimensions for width (height is up to you)
one gif: 540px
two gifs in a row: 268px each
three gifs in a row: 177px, 178px, 177px

note: it’s worth it to leave a gutter of extra pixels (i leave 5px for both width and height) in your cropping dimensions to prevent edge lines from showing around the perimeter of your gifs
i’m making a 540x350 gif for this tutorial, so the dimensions for my crop are 545x355; i’ll size the canvas itself to 540x350 after i’ve made the gif
additionally, make sure “delete cropped pixels” is unchecked so that you can move the gif around on the canvas if you need to
feel free to adjust the crop box as much as you want before you actually hit the checkmark to finalize it, but make sure you crop once and only once. resizing after you have already cropped will wreck the quality and introduce a lot of fuzziness to your gif. if you don’t like the way the crop turned out, undo it and try again

after you’ve cropped, go ahead and zoom in so you can get a better sense of what you’re doing. i tend to work at 200%, since that’s the best approximation of how the gif will display on tumblr
5. create video timeline
make sure you have the video timeline pulled up in your workspace. if yours isn’t visible, go to window > timeline to add it to the space
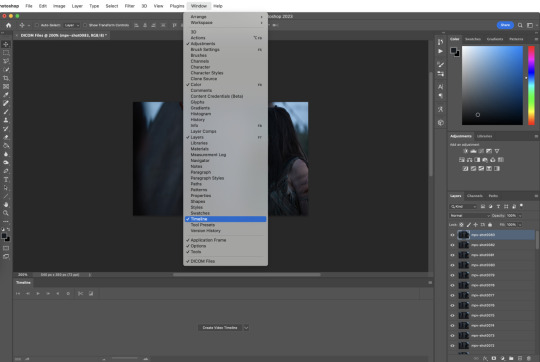
click “create” video timeline in the timeline bar


this will convert your caps to static video layers; we have to do some more work to get a playable animation
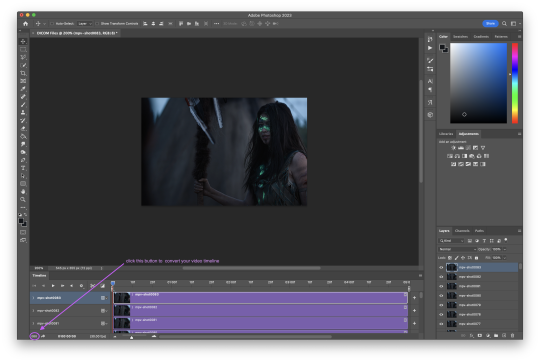
6. convert video timeline
click the frame animation in the lower left hand corner of the timeline bar. this will convert your video layers to a frame animation
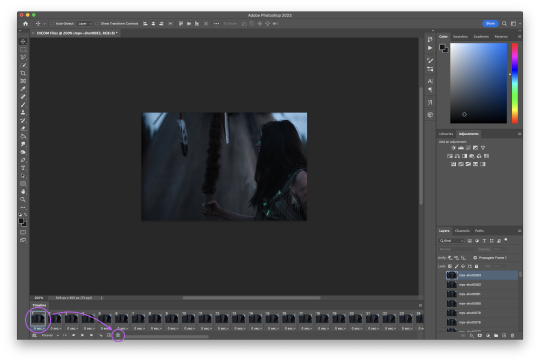
7. make frames from layers
now click the menu button in the upper right hand corner of the timeline bar and select “make frames from layers”; be sure to leave “new layers visible in all frames” checked


now all your frames are visible in the timeline
8. delete frame
with all the frames visible, you can see that the first frame is 5 seconds while all the other frames are 0 seconds. delete that 5 second frame using the trash can icon in the timeline bar. if you don’t delete this frame, your gif will have a ton of lag at the beginning and/or end up with duplicate frames when you export it
9. convert frame animation
click the video layer symbol in the bottom left hand corner of the timeline bar (where the frame animation button was in step six) to convert your frames back to video layers


they move now! but we want to be able to edit the gif as a whole instead of in individual layers
10. select all layers

11. convert to smart object
so we’re going to turn those video layers into a smart object; the smart object will act as a container that keeps everything neat and tidy while we sharpen and color, and will also preserve the original image, allowing us to edit non-destructively
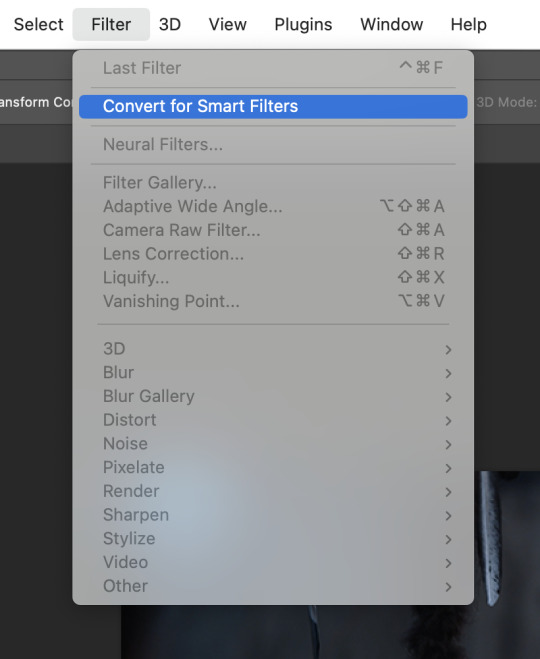
hit filter > convert for smart filters
if this is the first time you’ve made a gif, this is a good place to stop and check that everything is working the way it should. play your gif to make sure there’s no lag or any other issues

if your gif only plays once and then stops, go to the timeline menu and select “loop playback”

if there’s some other issue, go back through steps 5-11 and make sure you’ve followed them exactly
12. smart sharpen
sharpening adds back in that nice, crisp clarity that’s lost when the screencaps are cropped and resized to fit tumblr dimensions. there are a ton of different sharpening settings out there, but people generally sharpen in two distinct steps using “smart sharpen”
here is my process:
for the first step, go to filter > sharpen. select “custom” from the preset dropdown. click the gear icon and make sure “use legacy” and “more accurate” are both checked, and then select “gaussian blur” in the “remove” dropdown. finally, set the following values for amount and radius:

13. smart sharpen
my second smart sharpen follows the exact same process as the first—“use legacy” and “more accurate” are both checked—but with different values entered in for amount and radius:

note: like a lot of giffing, sharpening settings come down to personal preference, but be aware that oversharpening can lead to areas of extreme contrast in your gif, and an overall sort of staticky, almost crunchy effect
14. resize canvas + check playback
finally, resize the canvas to remove the 5px gutter we left back when we cropped


you can adjust how long the gif is using the sliders on the video timeline

now look at that! you’ve got a basic gif that’s ready for coloring and text!
note: you might have noticed that i haven’t talked about timing yet, and that the gif is playing way more quickly than the original footage was— don’t worry, we’ll deal with that later, and for good reason
4. ACTIONS
so fourteen individual steps for a gif sounds like a lot, right? but photoshop has a function that takes those steps and runs them for you. behold: actions!
actions are automated processes in photoshop that can drastically speed up certain tasks. steps 5-13 in the giffing process i just outlined are automated in this action*, which means you can load your files into photoshop and have a basic gif ready to go in just a couple seconds
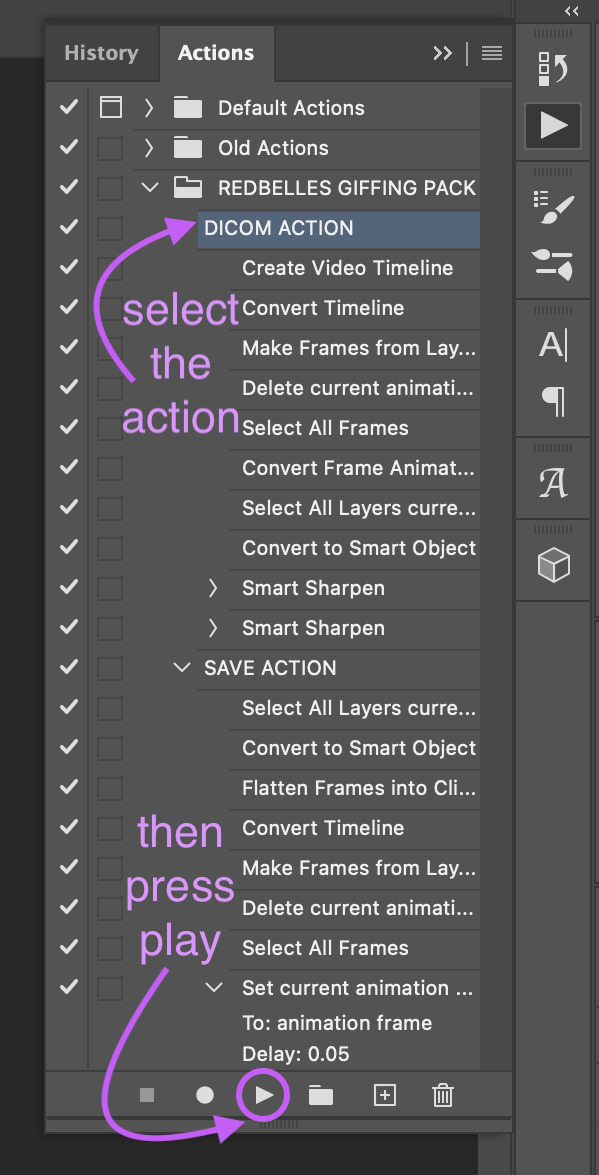
all you need to do is download the action and open it in photoshop, where it will automatically be added to the actions panel. select the one labeled “DICOM ACTION,” press play, and voilà!
*my action is a modified version of this life-changing action by the one and only rizz (@anyataylorjoy) updated for use with DICOM files and shared with her permission! rizz’s genius save action is also in both of the links above; we’ll discuss that more later
actions aren’t just limited to the actual process of animating a gif, though. you can create custom actions for excruciating fun things like frame by frame coloring (tutorial coming... idk, someday. maybe.) or creating glitch effects
if that sounds like something you’re interested in, here’s a handy official guide on how to create your own actions and some others on how to managing/saving actions if you decide you want to share one
5. COLORING
after nearly four five six years of giffing, i can say with 100% total confidence that there are a million different ways to go about coloring. whether you’re just starting out or you’ve been relying on psds, the best advice i can give you if you want to develop your own style is honestly just to play around with the different adjustment options in photoshop and see what you like and what works for you
of course, that’s easier to do if you have a basic understanding of what each adjustment layer does, so to that end:

brightness/contrast
adjusts the tonal range (the levels between an image’s darkest and lightest points) of an image. brightness slider affects highlights and contrast slider affects shadows
levels
adjusts the tonal values of an image by modifying the level of highlights, midtones, and shadows
curves
adjusts as many values for brightness and/or color as you want across the entire tonal range of an image
note: curves can be used to impact the entire rgb spectrum, or can be used to change r/g/b in isolation
see here for a more in-depth explanation of the curves tool
exposure
adjusts exposure levels across exposure, offset, and gamma. exposure controls highlights, offset controls midtones, and gamma controls shadows
vibrance
adjusts the color intensity of an image via two different options: vibrance and saturation. saturation evenly increases the saturation of all colors in the image. vibrance adjusts the level of saturation of all colors but in a more selective manner, focusing on colors with the lowest base saturation
note: vibrance is less like to oversaturate skin tones than saturation
hue/saturation
allows the adjustment of hue, saturation, and lightness of either the entire image or a specific range(s) of color in an image
note: using saturation across the entire image (the “master” slider) will reduce the overall tonal range of an image and can result in dullness
color balance
adjusts the mixture of colors in an image across either highlights, midtones, or shadows
black and white
adjusts color values to produce grayscale images, with both preset and custom value options
note: using a black and white gradient map instead of the black and white adjustment tool itself often results in a smoother gif
photo filter
adds a single color filter to the image
channel mixer
adjustment option that modifies a targeted (output) color channel using a mix of the existing (source) color channels in the image. color channels are grayscale images representing the tonal values of the color components in an image (rgb or cymk)
note: when you use the channel mixer, you are not adding or subtracting colors to/from a specific color component (see: selective color). instead, you are adding or subtracting grayscale data from a source channel to the targeted channel
color lookup
a set of premade filters/styles to apply to an image
invert
inverts the colors of an image to create a photo negative effect
posterize
reduces the number of brightness values in an image to create a flat, poster-like appearance
note: not typically used in gif making
threshold
adjusts grayscale or color images and converts them to a high contrast black and white images via a specified level as a threshold. all pixels lighter than the threshold are converted to white, while all pixels darker than the threshold are converted to black
note: not typically used in gif making
selective color
adjusts the amount of a primary color in an image without modifying the other primary colors in the image
note: the “absolute” option adjusts the color in absolute values, while the “relative” option adjusts the existing amount of a given color by its percentage in total
gradient map
converts the grayscale range of an image to a gradient color fill, with both preset and custom gradient options available
note: gradients can be manually adjusted, and checking the “reverse” option inverts the colors of the gradient
okay! now that that’s out of the way, here are three narrated examples of how i color:
1. prey (2160p sdr)

[video link]
2. the punisher (1080p)

[video link]
3. house of the dragon (2160p hdr)

[video link]
my general coloring process
step one: lighten
i start with one or two curves layers to see if i like what the rgb “auto” option gives me; if i don’t, i switch to lightening via exposure
if i know from the outset that a scene will need aggressive color correction, i’ll use a curve layer set with the white point eyedropper instead of the auto option; this brightens and color corrects the entire gif based on a selected pixel
step two: darken blacks
it sounds counterintuitive, but as you lighten the scene, you need to make sure you’re not washing it out
i start adding contrast back in by adding +1 black in blacks in a selective color layer below my lightening layer(s)
i often follow that up with a levels layer set to “increase contrast +1” above my lightening layer(s)
if you feel that the “increase contrast +1” layers has made the blacks too intense, you can try a black point layer in levels instead
note: the above/below method is a personal preference based on how the adjustment layers interact with each other
step three: lighten
adding contrast back in can make the gif a bit darker than i’d like, so i typically add another lightening layer after i’ve adjusted the contrast
i generally use the curves “auto” option to balance things back out
i will sometimes use the white point method here (seen in the videos when i zoom to 3000%) either alone or in conjunction with auto curves layers
step four: color adjustments
this step varies the most: in the videos, you’ll see me adjust cyan (prey), take out yellow (the punisher), and amplify red while removing yellow and green (hotd)
if very aggressive color correction is needed, i tend to use channel mixer. otherwise, i use selective color first and then hue/saturation if needed. i do not tend to use color balance
update: explanation of why i avoid color balance here
step five: final tweaks
if a gif seems flat: i increase the blacks in neutrals using selective color to add extra depth
if a gif seems dull: i increase vibrance, or in extreme cases, vibrance and saturation
note: be very careful when using saturation— it can wreak havoc on skin tones
psds
if you don’t want to color manually for whatever reason (don’t have time, struggling with the scene, want to experiment, etc.) psds that others have shared are always an option
psds are adjustment layers that other gifmakers have put together and shared so you can apply them to your own gifs
note: psds are almost always scene-specific (and often file-specific), so you’ll likely have to tweak them to make them work for your gifs
check the resources section at the end of this guide for some places to find psds
6. TEXT
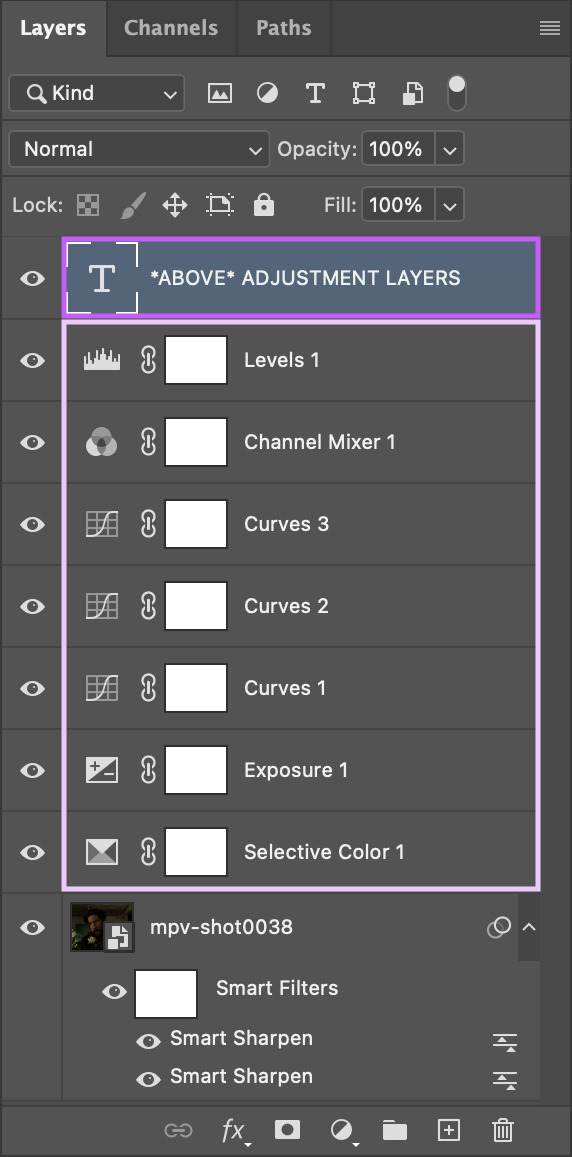
the most important thing about any text layer is to make sure that is above all of your adjustment layers. if your text is below any adjustment layers, it will end up looking wonky and distorted
subtitles
first things first: pick a font that is easy to read. i use arial rounded mt bold, but alte haask grotesk, arial, myriad pro, etc. are all good options as well. for subtitles, sans serif fonts are almost always much easier to read than serif fonts
after you’ve chosen a font and loaded it into photoshop, select the text tool and click and drag to create a text box instead of just clicking once to create a text layer. this will help you keep your subtitles perfectly aligned across multiple gifs

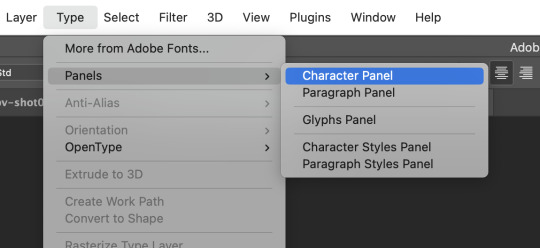
type out your text, then click the character option to adjust your type settings. if you can’t see the character option, from the main menu bar go to type > panels > character panel. this will also work to bring up the paragraph panel
these are the character settings i currently use for my subtitles:
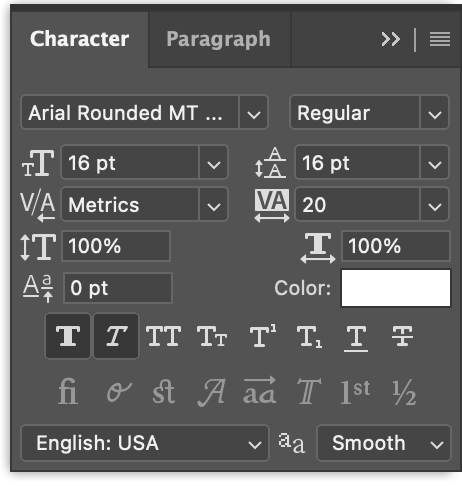
note: the text size can vary from set to set. if you end up changing it, be sure you change the line spacing (the little vertically stacked As directly to the right of the text size dropdown) to match
using either the top text bar or the paragraph panel, make sure your text alignment is set to “center” instead of “left” or “right”
now we need to make the text stand out against the gif. we’ll do this by adjusting the blend options. with your text layer selected in the layer panel, go to layer > layer style > blending options

i personally use drop shadow, stroke, and outer glow for my subtitles:


after you’ve got your text settings the way you want them, press v to select the move tool, then click the three dots in the top toolbar to pull up the “align” menu
select “canvas” from the “align to” dropdown in the menu, then use the center and bottom buttons to center your text at the bottom edge of your gif. the extra space in your text box may provide enough of a buffer to separate your text from the edge of the gif, but if not, simply move the box upwards until you’re happy with the placement

note: if you’ve used a text layer here instead of a text box, the position of your text will be based on individual glyphs instead of the uniform edge of the text box. this means that lines with the letters g, j, p, q, or y will be positioned differently than lines without those letters, which can ultimately mess up the placement of your subtitles across your gifs. save yourself some hassle and use a text box

to make sure the text box ends up in the same place on all your gifs, go to layer > duplicate layer to copy them exactly on to your other gifs


note: be sure to double check the drop shadow on any duplicated layers, since photoshop sometimes changes the angle of the drop shadow to 90° on the new duplicated layers
additionally, if you’re working with multiple speakers, make sure whatever colors you pick for them don’t make the text difficult to read
you can download a base version of my subtitle settings here
other text
you have a lot more options for non-subtitle text: crazy fonts, cool coloring, effects, etc. don’t be afraid to experiment! a good place to start is the layer style tab. go to layer > layer style and you’ll see these options:

we used a few blending options for subtitles (drop shadow, stroke, outer glow) but now you can play with color overlays, gradients, and even patterns
check out the resources section at the end of this guide for font websites, fancy text tutorials, and more
7. SAVING + EXPORTING
timing
now we’re (finally) ready to talk about timing. the frame delay you want to use is 0.05. this timing most closely matches the natural playback speed of (non-animated) footage. anything else is going to be noticeably too fast (0.04) or too slow (0.07). witness:


there are really only two exceptions to this:
animated footage, which can run at a faster frame rate than non-animated footage and may work with 0.04 timing
gifs that have < 15 frames (ex: trailer footage)— you might be able to get away with something like 0.06 in that case, but it will still look a litle slow
most other tutorials have you set your timing as part of the process of animating your gif, but i didn’t. why not? because photoshop absolutely loses its goddamn mind when it comes to gif timing
it will create duplicate buffer frames if you change the default frame timing at all at literally any point except as the very last step before you export your gif. this means that if you change it as part of your process before the “convert to smart object” step, you’ll get those duplicate frames and end up with lag in your gif. it will also automatically reset your timing to 0.07 if you export from a video timeline state. gee, thanks photoshop!
the way most people deal with this 0.07 bug is by exporting the gif, opening the exported .gif file in photoshop, and manually resetting the frame timing to 0.05 before exporting again. however, that’s a lot of work, so aforementioned giffing queen rizz @anyataylorjoy did us all a solid and created an action that will convert your gif back to frames and set your timing to 0.05 with a single click. her save action is bundled together with my DICOM action in the link back in the “actions” section
note: managing your timing like this does mean that when you’re working with your gif photoshop before you run the save action, it will play much faster than it will once you’ve exported it
to export your gif, go to file > export > save for web (legacy)

before you jump in to exporting your gif just yet though, there are some things to consider
upload limits
the current tumblr upload limit is 10mb, which is great for gifmakers— it leaves plenty of space for experimenting with big gifs, crazy colors, and fancy effects like blending and transition
and yet: it’s ridiculously easy to go over that limit! make sure to check your file size before you export your gif to confirm that you’re below 10mb so you don’t run into any upload issues

if your gif is over the limit, try shortening the length of the gif. that’s hands down the best way to decrease the size, but you can also try adjusting your coloring. the brighter and more vibrant a gif is, the larger the file size generally is, so those are good areas to try tweaking if you really don’t want to cut the gif down. high contrast, especially in black and white gifs, can produce large file sizes as well
save settings
your save settings will affect how your gif appears when it’s exported and posted outside of photoshop. there are basic settings everyone has to use (ex: loop forever), but some will ultimately come down to personal preference, so it’s worth knowing what the differences between the settings actually amount to
selective vs. adaptive
selective: creates a color table favoring broad areas of color and the preservation of web colors. this color table usually produces images with the greatest color integrity. selective is the default option
adaptive: creates a custom color table by sampling colors from the predominant spectrum in the image. for example, an image with only the color green and blue produces a color table made primarily of greens and blues. most images concentrate colors in particular areas of the spectrum
dither: diffusion vs. pattern
diffusion: applies a random pattern that is usually less noticeable than pattern dither. the dither effects are used across adjacent pixels
pattern: applies a halftone-like square pattern to simulate any colors not in the color table
note: using “adaptive” instead of “selective” and/or “pattern” instead of “diffusion” will result in larger file sizes
i personally use selective + diffusion for nearly every gif i make, not only because the file sizes are consistently smaller, but also because i think that combo produces the cleanest results. i find that the grid pattern creates is very noticeable/distracting, and that the color clarity from selection almost always beats out the custom tables from adaptive
bicubic vs. bicubic sharper
bicubic: slower but more precise method based on an examination of the values of surrounding pixels
bicubic sharper: a good method for reducing the file size of an image based on bicubic interpolation with enhanced sharpening. this method maintains the detail in a resampled image. if bicubic sharper oversharpens some ares of an image, trying using bicubic
i really don’t like oversharpened gifs, so i exclusively use bicubic
lossy
lossy reduces file size by permanently removing some of the original data
lossy used to be a viable way to decrease the size of gifs before tumblr changed the upload limit to 10mb; now gifs with lossy are visibly fuzzy, making them look lower quality no matter what kind of footage was actually used
if you are using lossy to add a film grain effect to your gifs, use the filter > noise > add noise option instead
note: the best way to achieve a grain effect is simply to use hq footage; larger hq files often have a grain to them that is lost as the files are compressed to smaller sizes
here are the rest of my save settings:
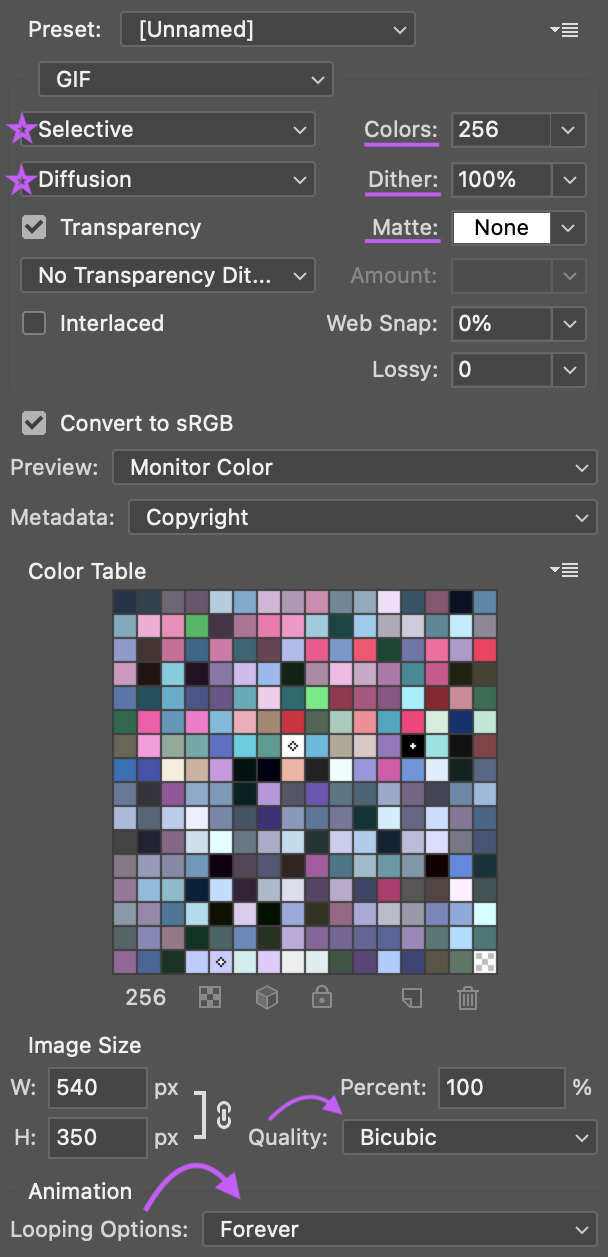
note: the default option under “metadata” includes contact info, so i highly recommend changing that
you can see how a gif will play directly in the export panel, but you can also view it a new browser tab by clicking “preview”; this will open the gif in a new tab in your default browser
when you’re happy with how the gif looks outside of photoshop and have checked that it’s under the 10mb upload limit, go ahead and export the gif
8. POSTING
basics
before we talk about anything else: make sure you are putting your gifs in a photo post. the new editor we’re all forced to use now does a whole bunch of behind the scenes bullshit to gifs (rip legacy editor 💀) and you definitely don’t want to make things any worse by using the wrong post format
if you find yourself struggling with the new editor @wolfes has your back: they’ve put together a comprehensive guide to using/troubleshooting the new editor for gifmakers. everyone say thank you, v!
save in + post from drafts
alright, so you’re ready to post your gifset— while it’s temping to just slap the gifs on a new post and publish immediately, it’s actually a really good idea to save the set as a draft first and make sure the gifs look good once they’re uploaded. sometimes tumblr makes the colors look wonky or wrecks the quality or does other stupid tumblr things, and it’s so much less frustrating to notice that before a set is posted than to see something you want to fix after it’s already out in the wild
if you want some feedback on a draft before you post it, you can click the three dots in the upper right hand corner of the post to open a private preview you can share with others

note: the link will work as long as you have the preview open
once you’re sure tumblr hasn’t messed with anything, it’s time to format the rest of the post
captions
the finishing touch on a set, captions can be anything from basic film/show info to relevant quotes to straight up memes. here’s some general info to help you figure out how you want to format yours
html symbols
edit tumblr posts using html by @hayaosmiyazaki
tumblr html text primer by @gustavlindstrom
gradient text: generate your gradient here, copy the html code here and remove “;” from your text, then paste the semicolon-free text into the html editor on tumblr
note: be aware that the new editor has radically changed how gradient text is processed and displayed. sometimes it works, sometimes it doesn’t. sometimes you can see it on dash but not on individual blogs, and sometimes only the first letter is in color and everything else is black
inspiration credit
if your set was inspired by someone else’s, credit your insp. source(s)
it’s a really basic part of tumblr/gifmaker etiquette that gets ignored way more than it should
there’s obviously a lot of creative drift on a site as big as tumblr and it’s not always possible to pinpoint an exact inspiration source (especially for more popular gif trends), but as a creator it can be really disheartening to see someone swipe something directly from you without saying anything
tl;dr shout out what inspires you!
not sure how to go about crediting someone? here’s a handy guide on inspiration credits from @usergif
tagging
it’s super important to remember that only the first twenty tags on your set will be used in tumblr’s search/tag algorithms!
if you’re not sure where to start, go ahead and check out some popular sets in the fandom(s) you’re creating for and see what tags are on those sets— that’s a great way to figure out which tags are active and what kinds of things you’ll see in them
here are some typical tag categories for fandom sets:
— general tags
media/fandom name: #hotd, #stranger things, #disney
character names: #yennefer of vengerberg, #alina starkov, #ginny baker
ship names: #zutara, #kanthony, #buckynat
— edit tags
#filmedit or #tvedit
#[fandom/media]edit - #swedit (star wars), #nmcuedit (marvel netflix), #tlouedit (the last of us)
#[character name]edit - #rhaenyraedit, #karenpageedit, #batmanedit
#[ship name]edit - #literatiedit, #joenickyedit, #kastleedit
#[actor name]edit - #austinbutleredit, #emmadarcyedit, #pedropascaledit
— source blogs
these are blogs that focus on reblogging a specific type of content (old films, pop culture, etc.) and they’re a great way to get your gifset seen by more people
typically track a specific tag in order to find relevant content
general rule: make your set is the kind of thing a source blog is interested in before tagging them
your set may be reblogged immediately, may go into a queue, or may not be reblogged at all (the members didn’t see it, think it doesn’t fit the blog’s theme, etc.) — just be patient and try to find source blogs that align with what you’re making
examples: chewbacca (#chewieblog), junkfoodcinemas (#junkfooddaily), classicfilmblr (#classicfilmblr), dailywoc (#dailywoc), bob-belcher (#userbbelcher), optional (#useroptional)
— user tags
user tags are unique tracked tags for individuals rather than source blogs!
gifmakers will often have their tracked tag (if they have one) in their blog description/about page
ex: i track #userbells

general rules: you don’t have to be mutuals with someone to tag them, but it’s good etiquette to be following them, and to only tag them in things they seem interested in
after you’ve tagged for exposure, there are a couple more things to consider:
— content warnings
it’s generally considered polite to tag for major content/eyestrain warnings
ex: tw flashing, tw blood, etc.
there are a variety of ways to tag for content warnings - #cw blood, #blood tw, # // blood - just pick one style and be consistent with it
warnings don’t have to be in your first twenty tags (since these tags are used to filter out posts instead of find them) but just having them on the post is helpful for anyone who happens to have a content warning blacklisted
— a tag for organizational use
i typically save the last of my twenty tags for my personal “creations” tag so that i (and anyone searching my blog) can easily see everything i’ve giffed
i use * as my tag and have it as one of my sidebar links for easy access
other examples i’ve seen include “mine: gifs”, “my edit”, etc.
best times to post
despite the ongoing tiktokification of tumblr, the hellsite still doesn’t have the kind of dashboard/feed algorithms that other social media sites do. that said, it can still be helpful to post at specific times to boost how many people see your gifsets
according to union metrics, most reblog activity on tumblr happens between 7pm and 10pm eastern time
however, if you’re giffing something that’s just been released—a new trailer/episode/season/movie—then the best time to post is as soon as you possibly can. tumblr users these days unfortunately prioritize reblogging whatever sets get out there first. that’s great if you can get those sets made quickly, but it can seriously suck if that’s not the case
if you want to hustle and make “new content just dropped” sets as soon as the footage is out there, go for it. if not, don’t put any pressure on yourself to do that; it’s totally fine to gif at your own pace
verify that your set is visible on your dash
as soon as you post, go to your dash and make sure that you can actually see your set on your dash— sometimes tumblr just straight up eats posts, and if you can’t see your set, no one else can either
if your set isn’t visible on your dash, it’s likely either gotten caught in the (terrible and useless) nsfw filter or tumblr is just being stupid
to fix this:
check the post by loading/posting each gif individually to see if one (or more) of them is causing the set to break
change the gif(s) responsible by adding/removing frames, tweaking coloring, etc.
if the gif(s) are still breaking the set, you might have to wholesale replace the gifs with different scenes or post the set without them
verify that your set is in the tags
the other thing you need to check is whether or not your set is showing up in the tags
sometimes a set will be visible on your dash but won’t actually appear in any of them tags. to make sure your set is showing up, check one of the tags by going to the /tagged/[tag] page
if it doesn’t show up, here are some general tips:
wait 5-10 minutes: sometimes tumblr just takes a minute to register the set
edit/remove any links: tumblr doesn’t place nice with links general, and with external links in particular. removing the “s” from https in your links can often fix things, but if that doesn’t work, remove the link entirely
try deleting and retyping the tags
try this image trick from @yellenabelova
delete the set and repost from scratch
for a much more comprehensive guide on what to do if your set isn’t in the tags, check out this very extensive solutions flowchart by @momentofmemory
9. RESOURCES + GENERAL TIPS
giffing communities
find some buddies to gif with! giffing is super fun, but it can also be finicky and frustrating, and having people to brainstorm/complain/share things with is honestly so helpful. some of the most fun i’ve had giffing has been sitting around commiserating on a call with rizz or lia or m, or whining at kumi or neve over text chat
some places to start if you’re looking for communities to join:
creatorhub*
@villainelle’s giffing discord (send an ask for a new link if expired!)
the gifmakerhub discord, run by @wolfes
*the creatorhub link is best accessed on desktop, as it will take you to a submission box:

reblog yourself
this is a big one! time zones are a thing, and on top of that, it’s almost impossible to get a reblog in this economy. boosting your own sets is a really good way to make sure more people see them, and also to just take a minute and be proud of what you’ve made!
resources
general photoshop resources
@chaoticresources
@completeresources
@rresources + bonus beginner’s guide
@hisources
@evansyhelp
tutorials
anti white-washing by @haldi-archived
anti red/orange-washing by @aubrey-plaza
channel mixer by @aubrey-plaza
multiple gifs on one canvas by @nataliescatorccio
blending by @nataliescatorccio
fade transition by @anyataylorjoy
coloring dark scenes by @sluttyhenley
transition tutorial by @wolfes
glitch effect by @sarah-snook
gif overlays by @ezrabridgerr
general coloring by @the-borgias
general coloring by @magnusedom
rainbow coloring by @rhodeys
text effects by @unadulteratedloathings
shuffle texts by @cal-kestis
animated handwritten text by @mxrisacoulter
comprehensive subtitle guide by @clubgif
fonts
— where to get fonts
dafont
befonts
ifonts
dafont free
google fonts
— identifying fonts
what the font
what font is
font squirrel
identifont
— font recommendations
@yourfonts
font tag from @anya-chalotra
favorite font combinations from @usergif
font packs from @liohnelmessi
font tag from @itsphotoshop
typography and font pairing guides from @momentofmemory
how to pair fonts by @awildling
psds
@dailypsd
@colour-source
@psdland
+ bonus anti white-washing psd by @evansyhelp
sharpening settings
action pack by @throwing-psds
action pack by @maziekeen
action pack by @daenerys-stormborn
settings from @anya-chalotra
and finally:
don’t stress
that is honestly my most important piece of advice. if you find yourself chasing notes, getting frustrated with low engagement or terrible like-to-reblog ratios, frazzled trying to make sets for new content as quickly as possible— just take a breath. take a step back if you need to. gif what you want to when you want to
giffing is a hobby! it should be fun! don’t let the numbers ruin it for you <3

feel free to send me an ask if you have any questions! previously answered questions are in my giffing help tag
i hope this tutorial helps! if it did: please reblog it!
(and if it really helped, consider throwing me a bone on ko-fi or commissioning something from me? area woman unfortunately very broke)
happy giffing ✨
#completeresources#rresources#usergif#userrizz#userpayton#userkd#jokerous#userriah#userchelsea#userneve#resources#tutorials#gif tutorial#re: gif tutorial#*#@tumblr formatting gremlins let me live challenge#please i am begging#anyway if you see a typo no you don't
3K notes
·
View notes
Text

PEGGY CARTER ICONS
14 versions of a Peggy Carter icon (300x300 & 100x100);
please like/reblog if using;
credit is appreciated, but not necessary;
all icons are under the cut, but they can also be found in my icons page.


#*#*icons#marveledit#peggycarteredit#peggy carter#agent carter#captain carter#marveladdicts#dailymarvel#womenofmcu#rresources#dailyresources#peggy carter icons#agent carter icons#userpegs#userelysia#usereme
45 notes
·
View notes
Photo
hi! so an anon asked how i make my text see-through on gifs so here’s a quick tutorial! you need basic knowledge of making gifs. i use photoshop 2023 and i’m using a mac.
step one: color/sharpen your gifs as you wish! resize to what’s needed (in this case, 540x540). then add your text layer. make sure your text is white (#ffffff is the hex code). the font i used is here.
step two: add your drop shadow! to do this i go to the text layer in my layers panel and use control click which opens a bunch of options. i then go to the first, “blending options...” and click the drop shadow box on the left. these are my settings. once your done, click “ok”.

step two: i then go back to my text layer and duplicate it. so i do the same thing and do control click. then go to the option “duplicate layer”. a box will pop up and if you want to rename the layer, you can. so my original is “text tutorial” and the new layer is “text tutorial copy”. then hit “ok”.
step three: now go to the original layer “text tutorial”. you’ll see it highlighted below.
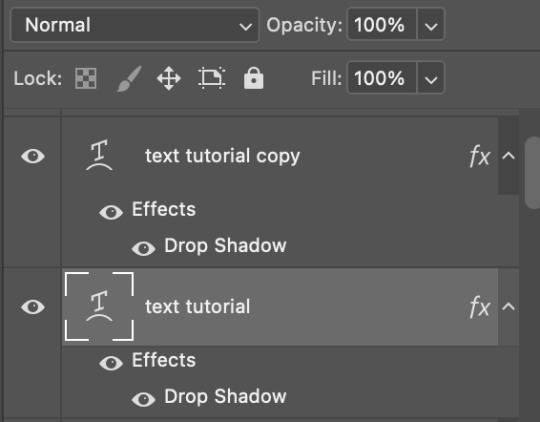
where it says “normal” those are your blending modes. with the layer highlighted, scroll to the bottom and change it to “exclusion”. “difference” will also work! it doesn’t look like anything changed because the duplicated layer is still on top.
step four: now go to your duplicated layer “text tutorial copy” and highlight it. now change the color of your text to the color you want. for this i chose #ff008a. then change the blend mode to “linear burn”.
for every gif, i’ll change the blend modes on the second layer depending on the colors of the gifs or just what i like best. the one i use the most is “color” but i like to play around with the others.
bonus things: to get the white outline effect, i duplicate the exclusion layer, and move it to the top of the two layers. then i change the blend mode back to normal. after that, i add stroke the same way i added drop shadow. these are my settings:

then change the fill to 0% and change opacity to around 50% or whatever looks best. i then move the text to the right to give it that effect.

to give the text that warped look i highlight my text layers by clicking on the top layer, clicking shift and then clicking the last layer and then going here. make sure your on the text tool.

you can then change the style to what you want. these are my settings.
hope this helps! let me know if you have any questions!
#completeresources#rresources#allresources#userrobin#usermorgan#omgari#userdean#usershale#usernanda#userautie#supervalcsi#imperiuswrecked#usermahroash#userrainbow#userfern#usergiu#usercim#*tutorial
332 notes
·
View notes
Photo
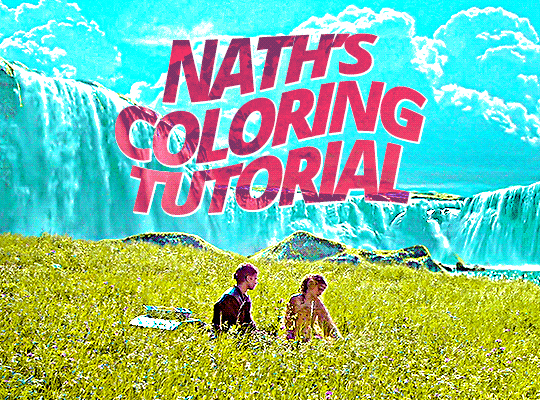
A lovely anon asked for a coloring tutorial and here’s is it! My photoshop is in spanish so I added a translation in some parts that I felt it was necessary (the other stuff is pretty much in the same place) but if you have questions let me know!! (image heavy!!)
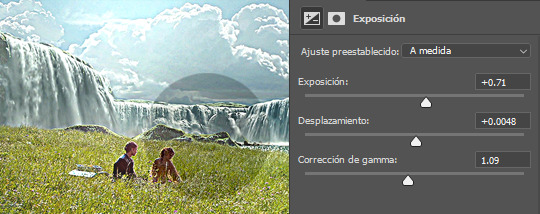
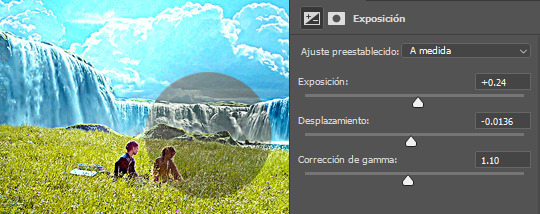
First, I choose my scene > delete the unnecessary frames > sharpen my gif, you know, the basics, this tutorial is pretty good explaining it! Then, I start with an exposure layer, I feel you can play with values more than a curves or brightness/contrast layer (which is useful when you work with dark scenes). This scene is not too dark so I didn’t do much
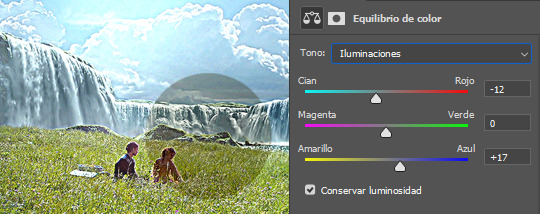
After that, I use a color balance layer. Most scenes have either a yellow or a blueish filter, so depending on the scene you have to play with the numbers. If it’s a yellow scene, try to add more blues, if it’s a blue scene, add more yellows (and the same if it has a different filter). In this case my scene has a soft yellow filter, so I added more blues. If I see the filter is too difficult to work with color balance I use a curves or a channel mixer adjustement! these are good tutorials explaining how those works

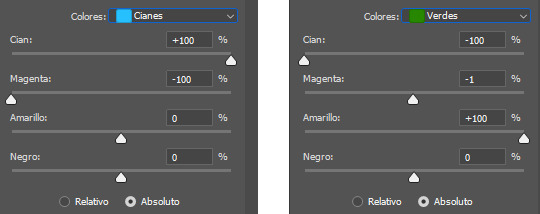
Now it’s time to make the colors pop! and i start with a selective colors adjustement. I set it in absolute because the change is more ~radical~, if you are going for a softer look, set your selective color to relative (that part at the end). In this case, the predominant colors are blue and green so I play with them:
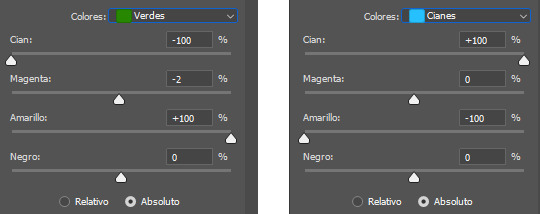
Here’s how it looks now! as you can see, the sky is more blue and the grass looks more greenish

You can end the coloring there if you want, but I’m too extra so I add a vibrance layer to make the colors pop more. Adding a vibrance layer can make the skin look orange so I advice to check this tutorial explaining how to fix it

Then I add other exposure layer to add more contrast in the gif so it doesn’t look ~plain~
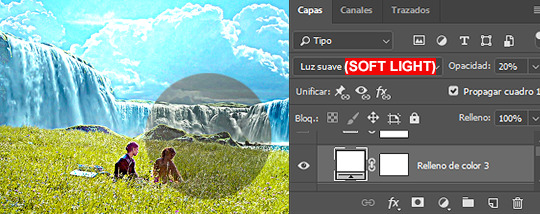
This is optional and I usually do it when I work in dark scenes but I like to add a white layer, set it in soft light and play with the opacity depending of how light I want the scene
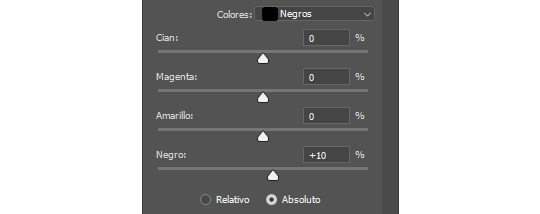
Now, a new selective color layer again! I wanna make the sky more cyan and the grass more ~lemon green~ so here are my settings:
Here’s how it looks now, it make a BIG difference
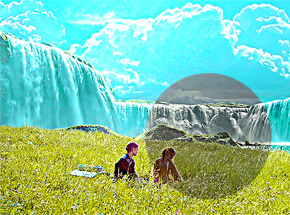
Optional but I like to add other vibrance layer if the scene let me do it (which means is not grainy/the colors are well defined)

And finally, I add a levels layer to add more contrast on my gif. I set this one in 50% (forgot to add it to the screencapture sorry lol)

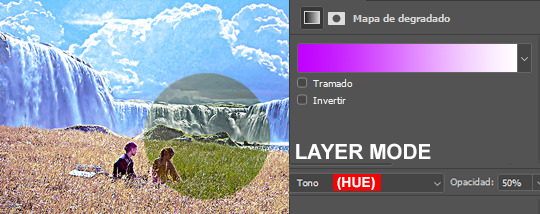
And that’s it! That’s the basic coloring. Of course you can play with layer modes or other adjustements! I like to do it depending of the ~vibe~ I’m looking for my gifs, here’s for examples of what I do when I’m in the mood of experimenting 1. Gradient map, set it to hue 50%
2. Hue/Saturation, in this case I’m playing with the yellows, set it in normal 50%

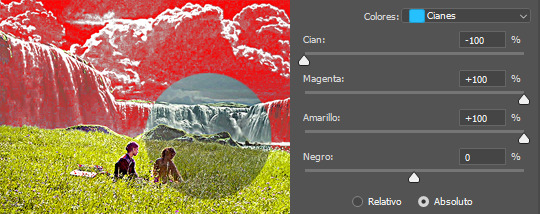
3. Selective color, modifying the cyans
4. Gradient layer, the layer mode is color 100%
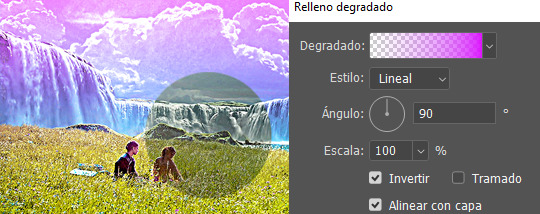
Keep in mind that every scene is different, so what works for this gif It could look bad in others and that’s why it’s important to experiment! Depending of how vibrant/colorful you want the gif to be you can add more or less adjustements
And that’s it! if you have a question feel free to send me an ask and I’ll gladly explain it :)
#completeresources#allresources#dailyresources#makersleague#tutorial#coloring tutorial#rresources#gif tutorial#photoshop tutorial#reblogresources#is this clear?? i hope so fjdshjs i tried my best anon#also idk who to tag sorry sdhfd#ps help
282 notes
·
View notes