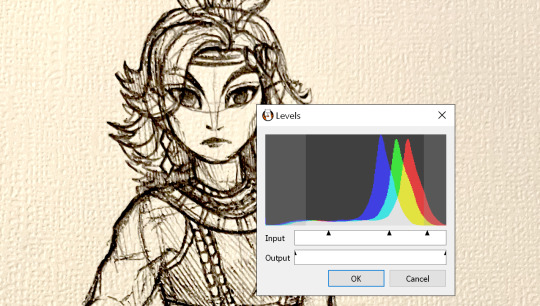
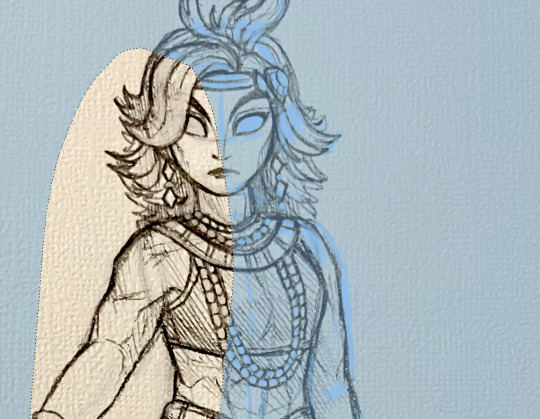
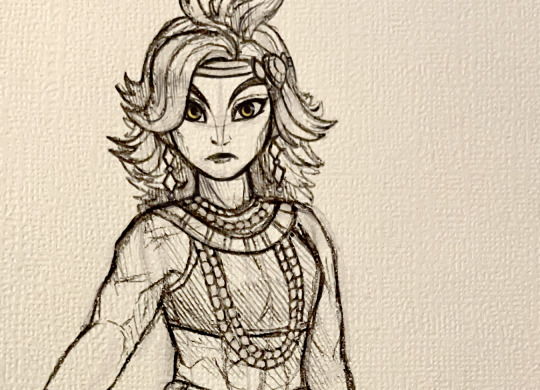
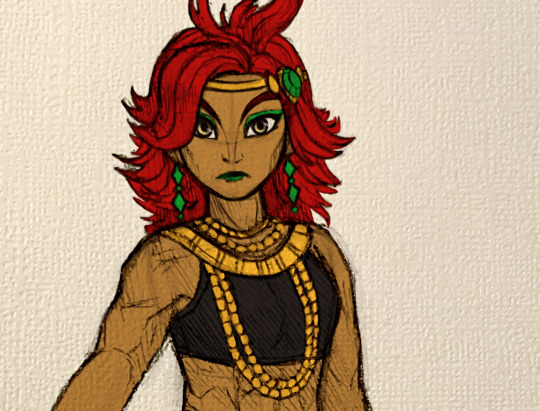
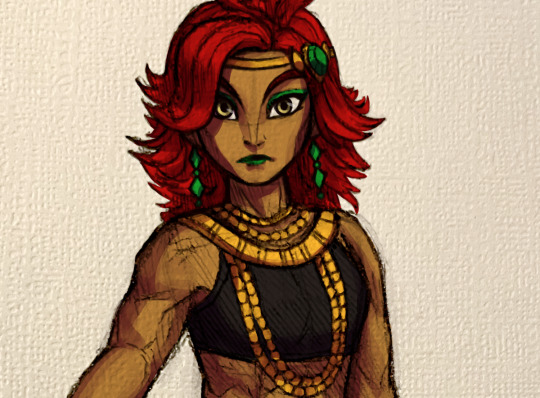
#scanned this from my sketchbook and colored digitally
Explore tagged Tumblr posts
Visit Tumblr Blog
Explore Tumblr blogs with no restrictions, modern design and the best experience.
Last Seen Tumblr Blogs


Fun Fact
Tumblr’s website traffic is steadily declining.
Note
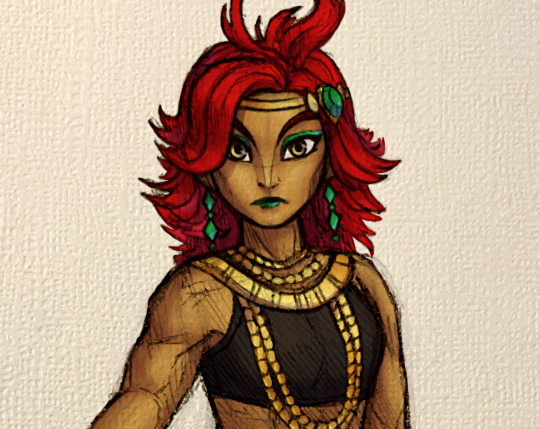
If ever someone incorporated major physical traits into the human designs of the neighbours of WH, I wanna see avian poppy!!! (ie a person with a human base but has bird wings for arms)
This one took a while to get to, but I have not forgotten!
It was fun thinking about what this kind Poppy would look like! Not sure what kind of avian creature she’d be called (i only know harpies), but I had fun making her. Is this what you had in mind, I wonder? Had to look up scarlet macaws for the coloring lol

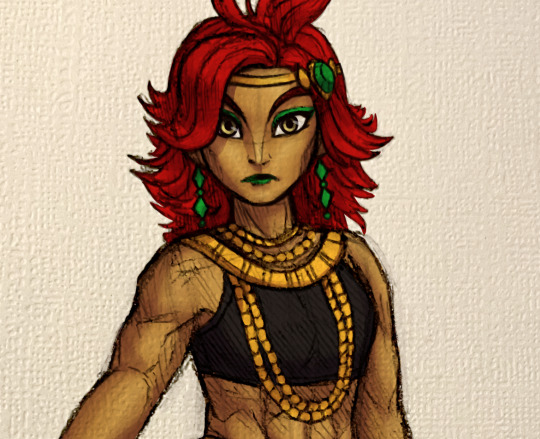
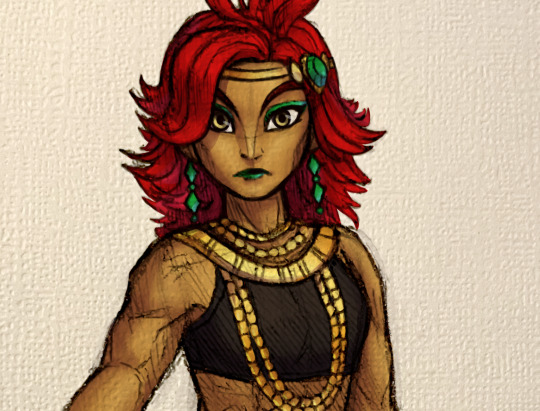
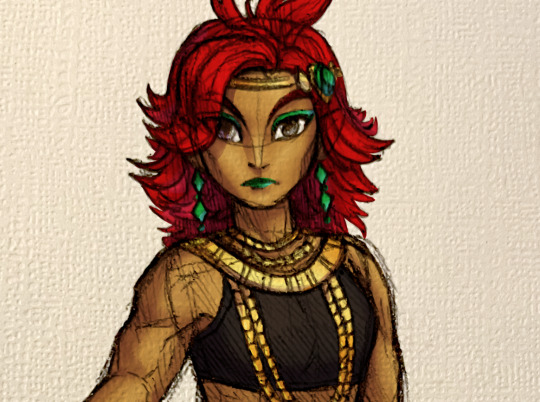
Edit: some closeups


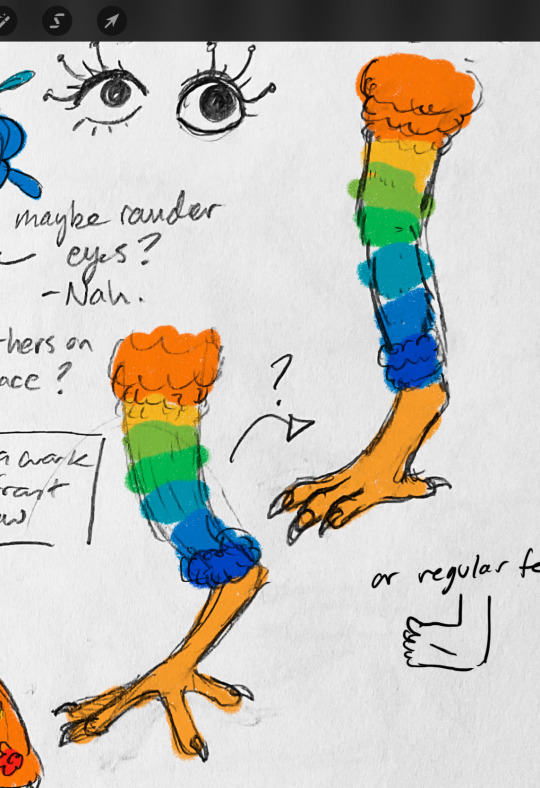
#scanned this from my sketchbook and colored digitally#my art#sketch#ask#welcome home#welcome home arg#fanart#poppy partridge#she’s very pretty if I do say so 🙂↕️🙂↕️
211 notes
·
View notes
Text
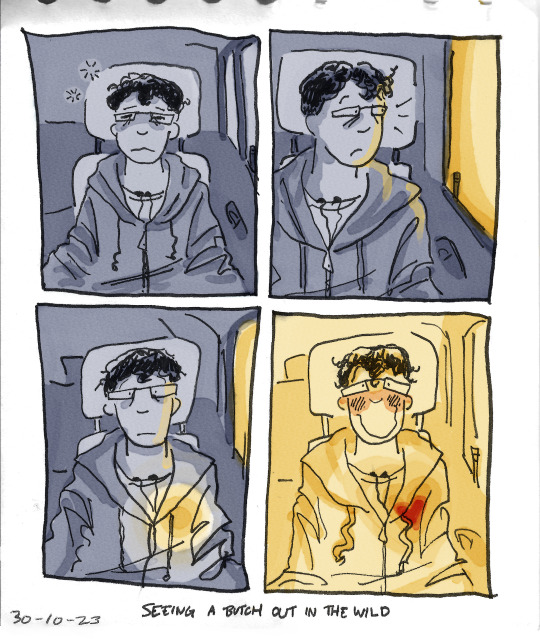
seeing a (fellow) butch out in the wild
#cherryart#butch#lesbian#scanned from my sketchbook and colored digitally ^_^#something so beautiful about queer visibility
6K notes
·
View notes
Text

The Trojan Roomies (Lalia, Cat, Jeremy, Jean)
#tsc#tsc2#the sunshine court#lalia Dermott#Catalina Alvarez#cat alvarez#Jeremy knox#jean moreau#all for the game#aftg#art#fanart#drawing#usc trojans#illustration#YES this is a scanned in sketchbook piece that i colored digitally#i am forcible seperated from my tablet rn bc i am on a trip!#it is sm fun but I do miss art desperatly#getting withdrawls. . . and with all the aftg the game news rn#anyways enjoy
168 notes
·
View notes
Text

Willy from Stardew Valley, I've been playing the game a lot on my break (I'm fairly new to SV + late to SV train). He's my fav. I was idly sketching stuff in my sketchbook, scanned this in, cleaned and added some color digitally.
1K notes
·
View notes
Text
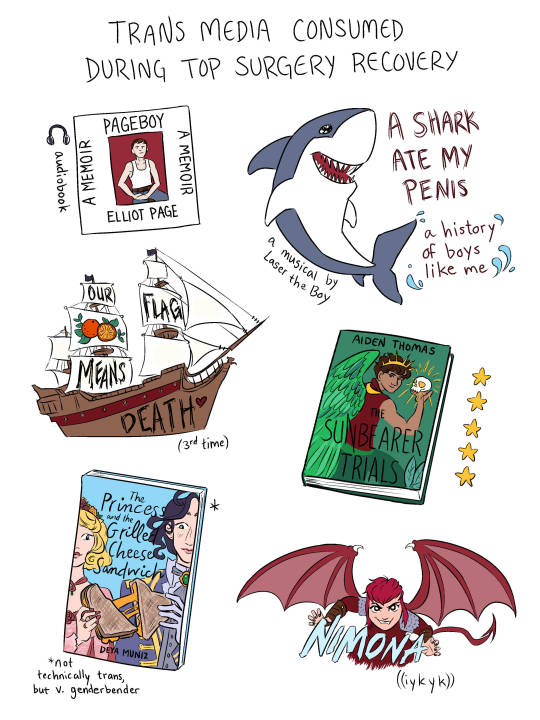
another page from my top surgery recovery sketchbook, scanned & hastily colored digitally 4u. this is an incomplete list because I ran out of space 😅
more top surgery recovery sketchbook pages here
#top surgery#trans#transmasc#lgbtq#trans media#gender#genderqueer#nonbiary#queer#elliot page#a shark ate my penis#ofmd#our flag means death#the sunbearer trials#aiden thomas#the princess and the grilled cheese sandwich#deya muniz#nimona#nd stevenson#laser the boy
3K notes
·
View notes
Note
OKAY SO-
First of all I wanna say that I love everything about your comic so far. The story has amazing pacing and the writing of the characters is on point (at least what I would consider to be) and fun, the panel layout of the pages is interesting and easy to read and compliments the flow of everything, and the art- ffs the ARRRRTTTT
I love it a lot and I have a couple questions (if you don't mind answering- you don't have to)
so I was curious what program you use and what kinda brushes, cus like the inking is so solid and like crisp (I can't put the mafia hand emoji)- but your sketches have a soft brush that loooks like it might be a lower opacity maybeee-
Also, specifically when it comes to your rendering, when it comes to lighting and non-solid-black shadows do you use a lower opacity layer or just paint it with a selected colour? IT'S JUST CUS THE WAYYYY Your colours come out they work so well together, and like as an artist that has a vague idea of what makes something look good I struggle with shading and lighting a lot. And the way you colour just makes everything come together so well and realistically?
again you don't have to answer any of the questions you don't feel comfortable with and I hope your having a good day and giving your back and drawing hand a well deserved break ^^
Hello! Thanks for this ask! Sorry it took so long for me to answer it!
The program I use is Photoshop, which I don't recommend, and the brush I use when inking is usually "Amazing Cartoon Nib" from Kyle T Webster's Megapack!
The sketches that I've posted, if these are the sorta sketches you're referring to, are actually not digital at all! I use a Pentel Twist-Erase mechanical pencil in a Strathmore 5.5 x 8.5 recycled sketchbook, and then scan those sketches from my phone using the Scanner Mini app in Black And White mode!
If you mean sketches like these though, that's also a Kyle's Megapack brush! "Animator Pencil 2016"!
My color situation is crazy, I'll just, uh, show you what I mean with my phone camera (since I super duper don't know how to take a screenshot on a PC):

(Sorry about my screen, I need to give it a wipe)
For the shadows I use a gradient map (green to red) on top of a 90% dark grey + greyscale "Rendering" layer, in which I carve out the shadows and lighter areas. Then I put a flats layer with a 45% dark grey layer mask over that. The lighter a scene is, the brighter I can make that flats layer. So yeah, that part's kinda a low opacity?
The lighting layer is pretty self-explanatory. Instead of ever lowering the opacity on anything with the slider, I use layer masks as a way to mess around with how strong I want that lighting to be without ever making anything super destructive and permanent. I highly recommend the use of gradient maps and layer masks when making comics!
Also, if you're wondering about that Flats Copy 2 layer above "Flats Copy," that's actually just what I do to color characters that are at certain distances. Blue for background, green for mid-ground, purple for foreground. 70% grey layer mask for that one.
You can see me do this in real time sometimes when I do comic streams on the first and last Sunday of every month! Those are available for all Headless Ko-Fi members!
30 notes
·
View notes
Note
Do you have any tips for beginner artists? Also I love your art style
Reference lots! There's no 'learning how to draw', only learning how to study and reference things you want to draw. Even experienced artists are constantly pulling up references and tools to assist them in their process, it's not all drawing from imagination, there's research involved!
And keep in mind that no matter the style of the work you're studying and learning from, the core foundations of drawing - composition, structure, perspective, anatomy, lighting, and color - will usually always be present in some way. Learn to identify those foundations, even if you're not actively trying to learn them directly, because that identification process is part of referencing.
Keep your old art! Always! You don't have to save every absent-minded doodle or scribble, but any time you create a piece of art that feels significant to you, hold onto it! If you have sketchbooks full of old drawings that are taking up space in your home and you can't justify keeping, scan what's inside / take photos and store them digitally! Don't let hindsight after you've improved tarnish the joy you had making it! It just gives you something wonderful to look back on so you can see how much you've grown (even when you feel like you haven't; if you cringe looking at your older stuff, that means growth HAS happened! And that's good!)
As for specific learning tools, there's no single "one size fits all" approach to improving your craft. It's more like a patchwork quilt that you have to weave yourself from all the things you reference and get inspired by over years of trial and error. For myself, that quilt looks something like this:

That said, this is my quilt, for you, it'll look very different! Maybe online tutorials are a much bigger patch, or maybe some of the patches seen here are completely absent from others (and alternatively, maybe there are patches that I DON'T have that another person might!) The point of it though is to get across that getting better at art and "learning how to draw" isn't achievable through one single means.
I've said this in previous posts, but this is why I try to stay away from the blanket advice "just practice", because it doesn't truly convey how to practice properly - if you're exclusively practicing the same stuff every day, then there's a lot of other elements you don't even realize you could be missing out on that could benefit you. It would be like trying to become a world-class chef just by cooking omelettes all day - you'd be really good at cooking omelettes, but if you want to learn how to cook a perfectly-seasoned medium rare filet mignon, knowing how to cook omelettes isn't going to contribute to that at all.
I know all of that is both specific and vague, but I hope it can help you find your direction in your learning! Ask yourself what art you like, what you really want to learn, and how the art you like can help you learn it. Don't just look at an art piece and go "cool", really look at it and learn to identify the foundations within it, find the "why" in your praise. It can and will benefit you in your own art journey along the way because the better you get at analyzing the world around you, the better you get at analyzing your own work and where it can improve, and most importantly, how you can improve it ヽ(・∀・)ノ
75 notes
·
View notes
Text

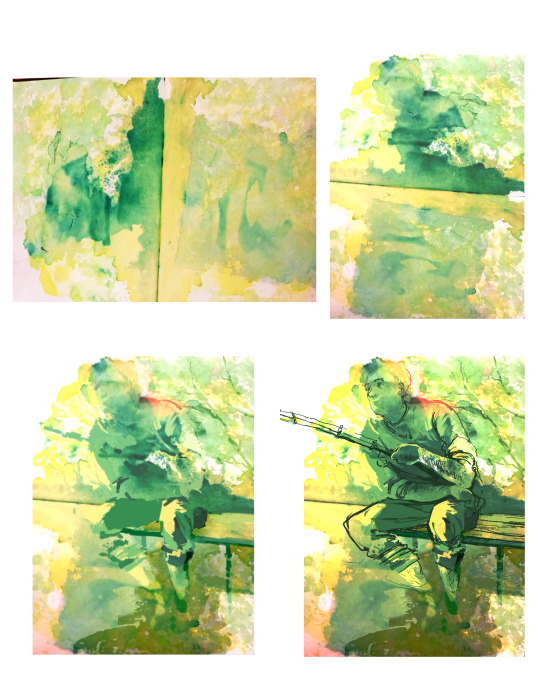
Finished a drawing that I have been working on for days!
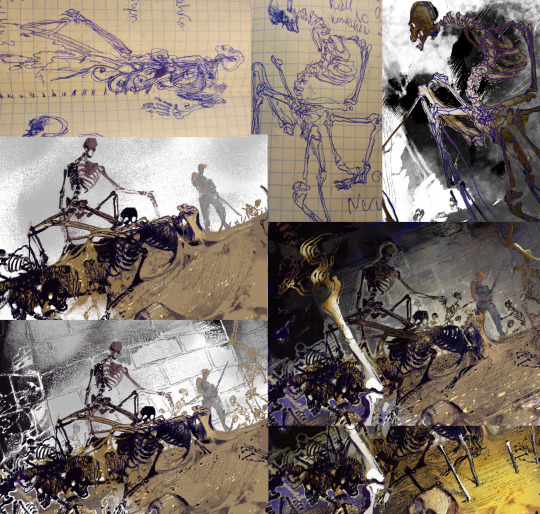
I had the idea of this a few weeks back. but it sat there with red and blue sketch done and green was only in the pose layout. about 3 days ago I decided to pick it up again. so I finished the front row, Rilley was a after thought. they where originally going to be on the enemy side because of what happens at the end of Everhood2. but for most of the game they are good so I put them on the allies side.
next was the "enemy or friend?" row this row has ones that started out friendly and became hostile or vice versa. after that was just enemies from various areas (2 being the limit but the microscopic realm and death mountain mimics are a exception) I put the shade in the middle of all the enemies, since they are nicknamed 'the root of all evil' after all. I was going to put that claw like machine that you fight at death mountain but changed my mind since 1. I couldn't find a clear sprite of the whole machine and 2. I am bad at drawing mechanical machinery! so I switched it out for the mind dragon.
I don't know if I'll color it or not. But if I do color it it will be traditionally colored since digital will take a long time. (Also can't scan it since the sketchbook is bigger than my scanner)
#everhood 2#traditional art#I won't tag all the characters that are even in this huge drawing#everhood fanart
18 notes
·
View notes
Note
can you explain the process of the digital colored sketches you did? especially Seera, cos HOT DAMN she looks good
I sure can! Talking about the artistic process is fun :) I've learned a lot from other artists, so it feels nice to pass it on!
Have pen and paper. Textured is more fun, though you can add a texture to it digitally afterward. I used a dollar store sketchbook and a ballpoint pen.
2. Draw. Start by sketching the anatomy really lightly, then add features and build up the lines slowly. Only use pressure when you're confident these are the lines you want! (This took a lot of practice, but once I got it, it felt magical) For the hatching lines, do it lightly, and use crosshatching sparingly. I think it looks cool to change the direction of hatching for different parts of the drawing, so I shaded the hair vertically and clothing diagonally.

3. Scan it or take a photo. I ended up drawing her head too big, so I took the photo at an angle to lessen that a bit. Make sure you don't cast a shadow on the paper (unless you want to).
4. Import into an art program. I used FireAlpaca, which is free! Mess around with levels to increase the contrast, and lower the saturation a smidge to ease the yellow tint.
5. On a new layer, with a opacity-sensitive brush, cover up any lines/details you don't want. I decided to redo the pupils, so filled them in completely. But since I didn't want it to be too neat, I didn't bother to cover up every line perfectly.

6. Select a random patch of empty paper and copy it. Paste this sample around the place, clipped to your edits layer, until everything is covered. Matching the texture looks a lot cleaner than just matching the colour.

7. Add a bit of new linework. It's a good idea to darken the eyelashes and brows. Put your sketch layer in a Group with all your edits, then set that Group to Multiply. This allows you to easily add colours on the layers below it.
8. Shading! Put all your flats into another Group, and then clip a layer to it. My colour of choice is violet. It looks pretty cool as is, but I then set the shading to Multiply and adjusted the opacity. Use a blurring brush as wanted, but don't go too hard with it.

9. Add highlights. For skin, I generally use white or a very soft yellow, set to Soft Light or Overlay. I also added a bit of cyan to her green makeup and accessories.
10. I added a shadow behind her because I could. Just copy the Group with all the flat colours, merge it together, make it one colour and position it. And that's about it.
Here's with and without the lineart edits for comparison:
(Here's original post with the full work)
7 notes
·
View notes
Text
I just realized that basically everyone I’m friends/mutuals with nowadays wouldn’t have seen my first few comics… woahg… I’m feeling nostalgic so I just wanna talk about them a little. pages included as well!
I had Freedom (Flurry’s story), Sightless (characters I will not name bc their names are embarrassing now, they were basically Proto-Grace and Fervid though), Unhappy Ending (Stefan) and The Emotion Eater. The longest one was TEE by far (I think I got almost 40 pages on before abandoning it) but I don’t think any of the others got past 10 pages </3 whoops.
These were all stories I started very spontaneously, no outline or script or anything, pure spur-of-the-moment inspiration. I thought I was pretty prepared because I had the full plots in my head, but I didn’t know how to execute them at ALL in reality. Setup? Who’s she? Oh, also I was making three of these literally all at the same time which is probably why I got tired and stopped HAHAH taught me a lot about project management Freedom is by far the one I’d like to actually revisit as a comic one day, it was the one I put most effort into (it was digital & full color while the others were done traditionally) and I’m still attached to the story and setting. My Flurry…
I won’t share the others in full here because they make no sense even if I were to try and explain what’s going on LOL, but here are all the pages of Freedom! (Drawn in 2019 and 2020 I believe) (you gotta click em to read)


I hadn’t even read comics at ALL this point aside from like, one or two issues of Bone, I didn’t know what was convention and I think it shows through the questionable page layouts, speech bubbles, flow etc… things are also moving so fast hahaha.
Formatting and writing wise these suck booty… but tbh I think they’re so cute anyways TwT <3 younger me was trying her best!! And I think it’s clear how much I liked these characters and drawing them… I really like looking at my old art of Flurry it’s like seeing baby pictures
Here are a few pages of Sightless, the best quality scans I have actually LMAO (I can’t believe I was subjecting my friends to this and didn’t realize /lh)
The “I’m a they” KILLS ME oh my goodness LOL


I don’t have any pages of TEE or UE easily accessible unfortunately, I’ll have to look through my old sketchbooks and see if I can find em sometime…
Anyways! Nice little trip down memory lane… I really have been wanting to make comics for quite a long time huh… I’m doing it now and even better than before! Younger Flurry can you hear me…
10 notes
·
View notes
Note
Hey, what pens do you use to draw? And do you start with a pencil sketch before you start using the pen or do you jump right into using ink?
Hey! I use all kinds of pens actually: gel pens and fountain pens most often. I've written about my favorite gel pens some time ago, btw. Recently I've started using oil-based ballpoint pens a lot though, both for sketching and doing cleaner line art. It's a bit tricky, because they don't work well with alcohol-based markers, but I think I'm starting to get used to it. I love how the lines they produce look softer, similar to pencils, so it's very easy to do a colorful lineart with smooth gradation.
Normally I do a rough sketch of the basic shapes with a light colored marker or oil/gel pen, rarely pencil. I don't like using pencils at all tbh, so I try to avoid it as much as possible. If it's something complex and I'm not sure I can handle this w/o lots of erasing, I prefer doing a rough sketch either on a separate piece of paper with a pen or digitally, and then transfer it into the sketchbook/other paper through light table. I hope someday I'll be able to jump right into drawing with ink and not regretting every single line I do, but it's a loooong way to go from now 😅
For fun, here are some sketches/lines I have left done with different mediums: 1 is colored pencils + fountain pen, 2 - markers + gel pen, 3 - oil-based ballpoint pens.
Warning: unedited scans!
151 notes
·
View notes
Text
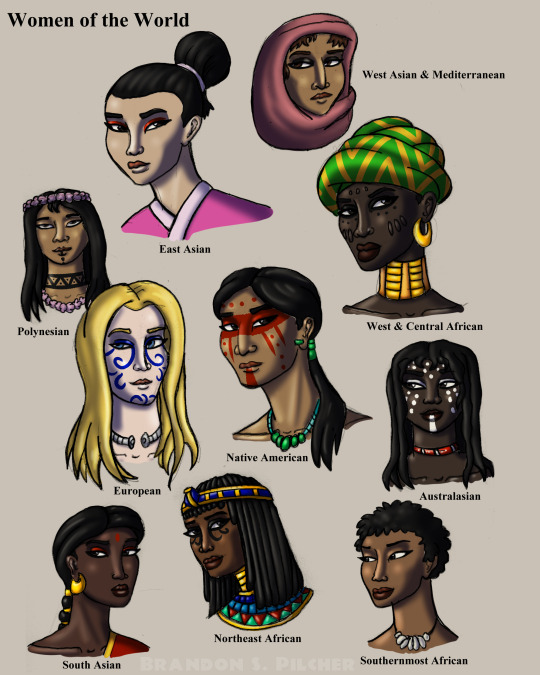
Women of the World
This started out as a page’s worth of quick pencil drawings in my sketchbook to showcase my ability to draw women from different parts of the world. However, I decided to scan the page into my computer and color it digitally since that would lead to less messy results than using traditional media like paint, colored pencils, or markers.
#women#women of color#black women#diversity#multicultural#multiracial#international#bipoc#african#asian#native american#european#polynesian#australian#aboriginal#indigenous#indian#dark skin#light skin#digital art#art
6 notes
·
View notes
Text
SCUMSUCK's wishlist.
first posted on fedi for the snowflake challenge #7, then edited to my site...
Non-tangible items:
I am a hungry hungry buttslut for art, fic, and other creations with my characters. 🙏🥺 Here's a gallery with some stuff I've gotten.
I am a hungry hungry anal masochist for comments 😼 I think the sorta comment I'd like right now is a quote I can put in the work description, like "This shit made me watch wrestling and now I'm gay" - t. John Cena.
I am very demure and modest when it comes to anon messages 💅 One of the things I miss most about the cesspool of tumblr, is getting enough questions about my silly scoutspy characterizations to create, well, my own characters out of them! Anons that stroke my shaft are a great way to get me to churn my brain and make something creative like the 300 scsp doodles or 500 headcanon posts of 2018, as opposed to sending me something blunt like "draw linguini's feet".
Forbidden fourth wish: I wish that one day someone could find scans of that YinYang monster x Vincent Valentine FF7 doujinshi that was my favorite as a wee lad! It was called "Meteo Daiou" by New Technical Punk-FF (Isuzu Suzuki). The last evidence of its existence is on this archived Sodasexy page. My life is a repeating circle. Even the scanner says this is GROSS and put it in their squick section. But Maggie age 8 liked it a little too much! Goth dude getting somno-bung by a hungry monster informed the rest of my yaoi career.
Physical items:
I like usable items that leave little waste.
Bar soap in natural, mild flavors. I got that dang eczema and anything that's too fragrant will turn me into the stay puft marshamallow man.
Books! I tend towards nonfiction, biographies, and art + photography books. Right now I'm looking at Devin Townsend's biographies...
Small pieces of usable art from indie artists, like paper stickers and washi tape! I like to put them on my sketchbooks to tell them apart.
A Brock Lesnar #69 football jersey.
Looseleaf tea! I like to try all sorts of new flavors. I can't do floral mixes, but I do like black, green, red, and white tea.
A good metal fountain pen! I've found a couple of brush pens I like. I guess it's time for me to get into stiffer tips.
Some drawing/writing ink! I like to try all sorts of new colors, especially for lineart and ink washes.
A shed or trailer to store our art.
A screen printing room and set-up that is safe from the weather and cats stepping everywhere.
A pigment printer so I can make even more vibrant stickers and art reproductions! I guess I've heard good things about Epson Ecotanks and the Canon Pixma Pro-200/300/400 lines.
An upgraded computer that can load 40 chunks in minecraft's view distance, and use big digital brushes without lagging.
I guess some big ol' terabytes of hard drives to archive my work.
More materials for our fence (wood pallets, metal fences...)
8 notes
·
View notes
Text
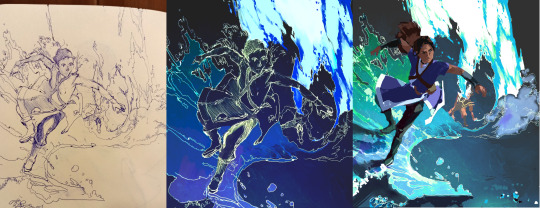
@youandthemountains asked in the tags if I’d be willing to share my artmaking process, so for anyone else interested: I frequently jump between mediums, so for better or worse, I’ve never had a set process. But I’m happy to walk through the steps I took to create my last piece and show the tools I used. Also, because I never want my creations mistaken for generative AI, I’ve gotten in the habit of documenting the work (perhaps excessively!) so I have plenty of WIP photos to share:
(More below the cut)
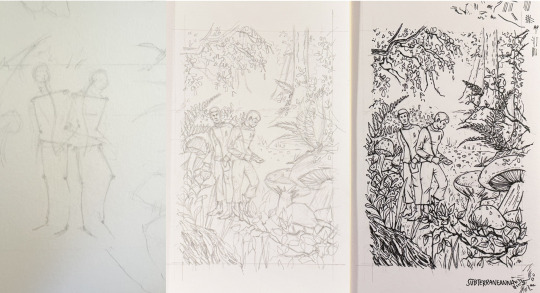
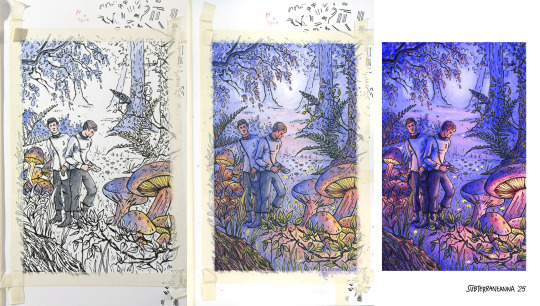
My current sketchbook is made of cold-pressed 100% cotton paper with a nice toothy vellum surface that’s great for wet and dry media. Usually, when working with ink, I start directly sketching with a pen or marker. But achieving reasonable character likeness was important here, and I didn’t want to mess it up, so I did a light pencil sketch first. I then inked it with a fountain pen and erased the pencil marks once dry. And because the pen was loaded with waterproof ink, it was safe to paint over with watercolor. As I was painting, I noticed the paper had a slight yellow tint which worked well with the warmer light sources but muddied the blues and purples. I wanted the color to be more vibrant, so I scanned the piece, digitally painted in some deeper values, and did a little color correction to bump up the cooler tones. I’m glad I did because the improved contrast made the bioluminescent parts pop.
I didn’t have a plan when I made this piece, and in hindsight, I wish I had done a little more line weight variation, but I’m still happy with how it came out. I think Spock’s pose is appropriately awkward. And the fact that he and McCoy seem to be sticking to their typically squashed 4:3 aspect ratio positioning despite the wide-open forest feels right.
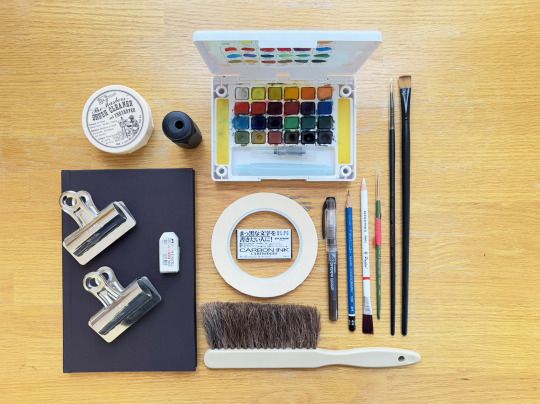
These are the supplies I used, most of which work as a travel kit for plein-air painting and sketching (I ditch the longer paintbrushes and use the travel brush with a built-in water well [disassembled in the watercolor kit]):
Not all of my projects are as simple as the last one. For instance, the Sub Rosa painting I did last year was a big production that combined concept work, painting, graphic design, lighting design, and even some cosplay! A certain level of realism was needed to pull off a convincing romance novel cover, so good reference photos were crucial. But I wasn’t interested in re-painting a still shot from TNG footage. I wanted a completely original composition and pose with lighting that was far more dramatic than the scene it was parodying. So, I set up studio lights, dressed as Dr. Crusher, and took several hundred photos whipping my wig around with a high-powered fan blowing (I'm not posting those pics 😅). I then sifted through them for light and shadow details that eventually informed the painting you see. Unfortunately, I hit a major snag when I realized I couldn’t find a single photo of Gates McFadden in similar lighting. And if the painting didn’t instantly read as her, the whole thing would be a bust. I didn't think it'd be that much of a challenge, but I failed so many times. When I got the lighting right, the likeness was lost. When I got the likeness right, the lighting looked disconnected from the rest of the painting. I wrestled with this for months. NGL a few angry tears were shed at one point, and many evening walks were spent sulking over whatever the hell anaphasic energy light was supposed to look like reflected on skin (if you look closely at the episode footage, there’s no actual green light on Beverly while Ronin’s in his non-corporeal state). Things finally clicked somewhere around the 10th (?) version I painted, and while the lighting’s still a little wonky, I’m playing it off as supernatural artistic license.
Thank you @youandthemountains for asking about my work and for all of your kind words! I always read the tags people leave; they're a big motivation to keep making more fanart!
9 notes
·
View notes
Note
your art is so wonderful! its so expressive and colorful and joyful and never overworked. your compositions also really blow my mind! if youve ever recorded any timelapses or if you ever would like to elaborate on your process ever, i would love to see it + would pay money to. have a good day!
Hi! I apologize that it took me so long to get to this ask! Thank you so much for this incredible and kind compliment!! :') <3 I enjoy having fun with compositions and everything else and I'm glad you like what comes out of it!
Thank you for being interested in process! I haven't been answering for so long because I couldn't come up with a good answer... I have never recorded any timelapses and don't intend to in the nearest future. Also every time the process looks differently, haha..
But I compiled potentially interesting pictures (for free) - under cut :)
one fun thing I do quite often is that I begin something on paper and then complete digitally. Doodling in textbooks and sketchbooks was the beginning of many stuff
This Seri process is one of my favorites, he was born from leftover green food coloring that I splashed and smeared over pages. Then I begin my favorite game of searching for shapes and letting them "grow" naturally from what there is.. if that makes sense.
From those little monsters that were born during classes then appeared compositions, because having some starting point is helpful to me, even if it gets completely lost eventually.
I don't have a scan and use the imperfection of phone pics for my advantage, sometimes it creates additional texture or interesting colors after little bit of editing.

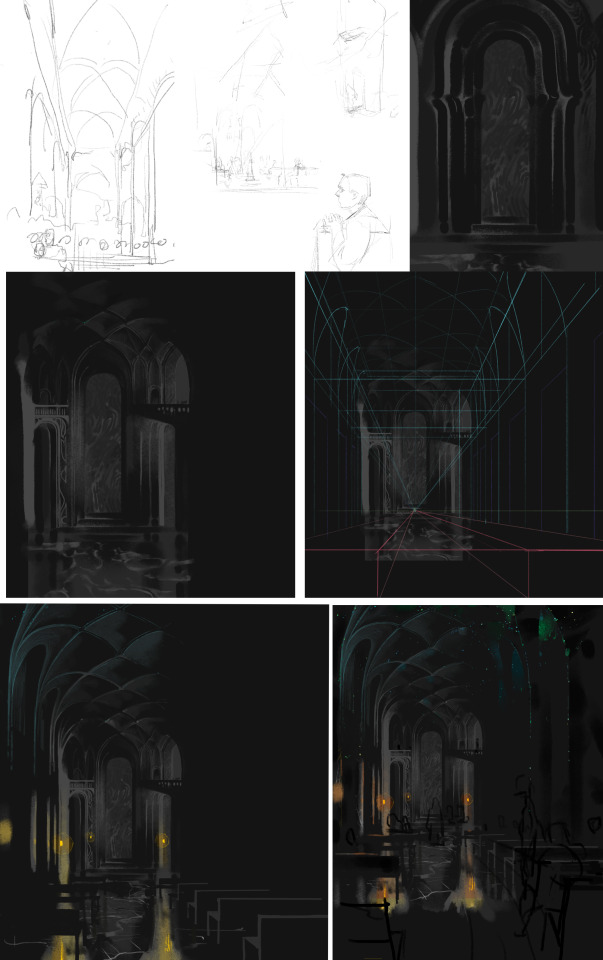
This one took longer than most of other works. (dont go after me for unrealistic architecture)
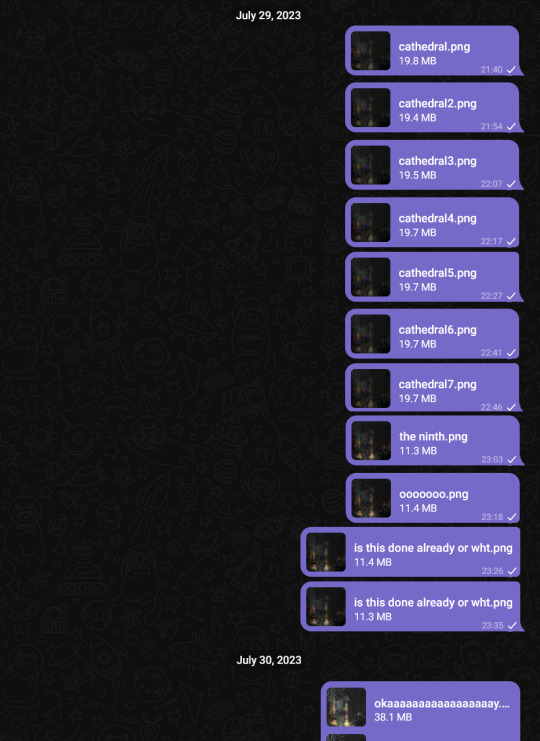
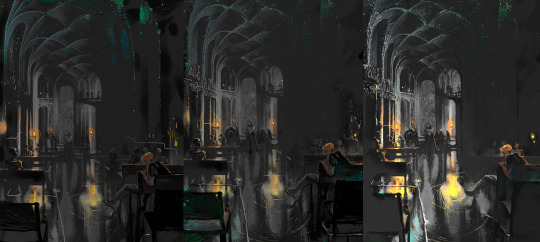
I was struggling to come up with compostition for the cathedral so again beginning with a doodle of a random arch helped. and in the end there's an infinite "yeah now it's finally done" *spends a couple of hours more*. on screenshot these are all versions I thought would be final and I sent them to look at on my phone and immediately went to fix something else :P
Beginning from a detail isn't a classic way to build a composition, and usually it's reasonable to start from defining big shapes, and that's what I do often. There are just different approaches of creating compostitions that I like using. Starting from a piece and shaping the rest from there helps me find something I maybe wouldn't have thought of doing otherwise. But it's very important to always hold a big picture in mind of course! After looking at a piece of doodle for a while, I have an approximate picture in mind of how I want to use it.
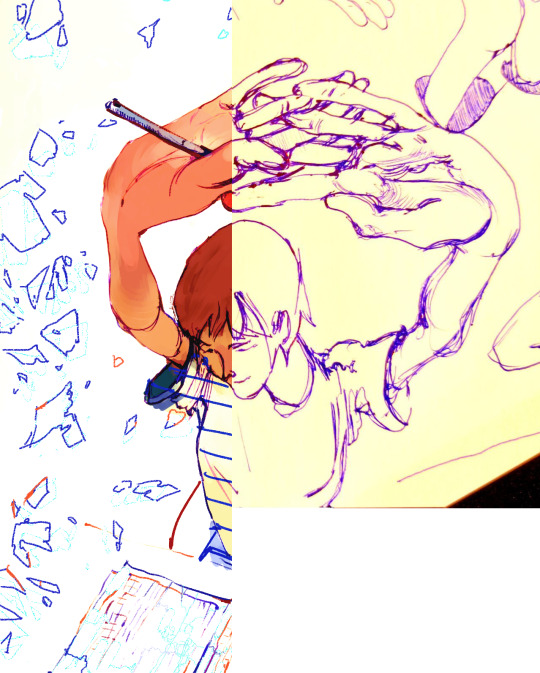
With digital doodles I usually do lineart immediately without sketching it first, then I can edit or erase it or blend with colors. Have fun and be yourself is the only rule
thank you again <3 I hope it was helpful!
34 notes
·
View notes
Text
I’m really happy I’m getting back into taking pictures from my sketchbook and uploading them on here. As someone who likes to include a visual with asks to thank the sender, this lets me build up a stash of doodles so I can have them ready to go.
Digital is way better for coloring, but it’s a much slower process, and I just get so Art blocked trying to use it straight-on. On paper I typically have four or five images ready to be photo scanned for posting.
Both of these mediums have benefits and downsides, and it’s just something I wanted to talk about. :)
So if you see that I sent a picture of a sketch instead of something from procreate, please don’t feel like I’m trying to cop-out. Some ideas come better to me on paper, and that medium switch allows me to do what’s the best end-product for you, and a healthier workflow for me.
10 notes
·
View notes