#sims4 tutorial
Explore tagged Tumblr posts
Visit Tumblr Blog
Explore Tumblr blogs with no restrictions, modern design and the best experience.
Last Seen Tumblr Blogs


Fun Fact
The Tumblr app for Google Glass was released on May 16, 2013.
Text
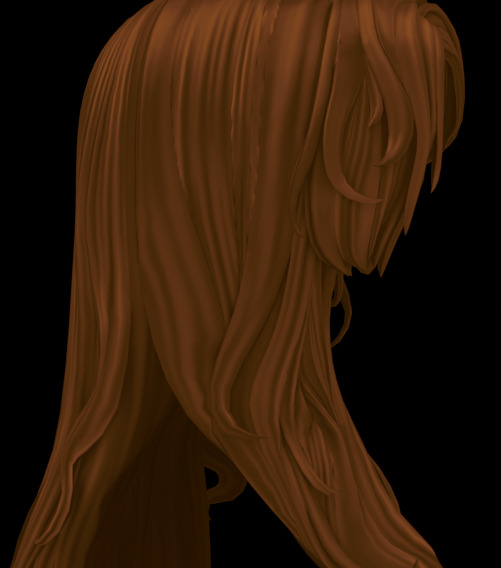
Hair texture tutorial.
Hello!
While I'm doing a new hairstyle, I wanted to share one topic that has been on my mind for a long time. I finally figured out a more or less easy way to create textures, and I really, really want to share it. I'm not going to explain the basics, so I expect that you already understand basic concepts like uv, and are familiar with baking ui in blender and know shader nodes basics (please, enable node wrangler...)
Also you'll need this add-ons for better uv manipulation and uv-packing
FIRST STEP - UV
To begin with, we need a hair model, preferably one you’ve created yourself. However, game hairstyles also partially fit these requirements, since they're colored in a similar way. I’m basically trying to replicate something close to the Maxis pipeline using the tools and methods I have.
The model should be unwrapped and shouldn’t have overlapping UV islands. If you used hair curves, your UVs are probably already rectangular. Just rotate and resize them as you normally would when applying game textures.
You can place some UV islands in the head’s texture space, where the hairstyle overlaps the mesh. You can also check the game textures for reference. There’s usually plenty of space used by the hair textures, not just that tiny rectangle in the top-left corner.
This is how my UV looks like:
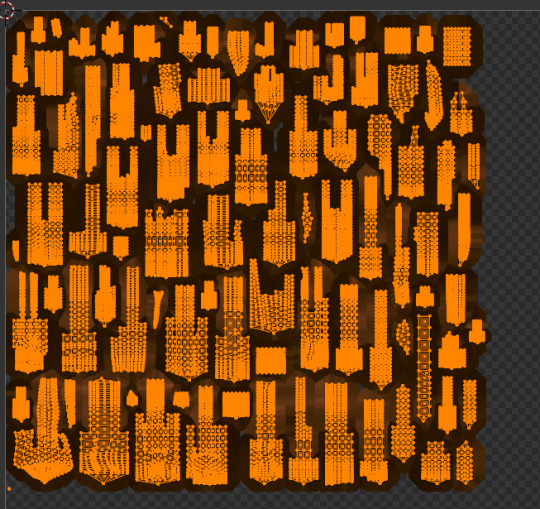
To achieve this result, you can use free add-ons for uv packing such as UV-packer.
I prefer hand modeling over using curves, so my UVs look a bit different. I used the UV manipulation add-on I mentioned earlier to get them this way, but that’s not the topic for today.
IMPORTANT: All UV islands should be as straight as possible and oriented vertically. Otherwise, this method won’t work. This is crucial because the noise texture stretches vertically to imitate hair strands. It’s too time-consuming to handpaint them, and honestly, no one really does that.
SECOND STEP - Material setup
I - Go to the Shading tab. We’ll set up a small procedural node material.
If you’re not familiar with the shader editor or how nodes work, I recommend watching a few blender tutorials on the basics first. Othervise my instructions may be confusing for you.
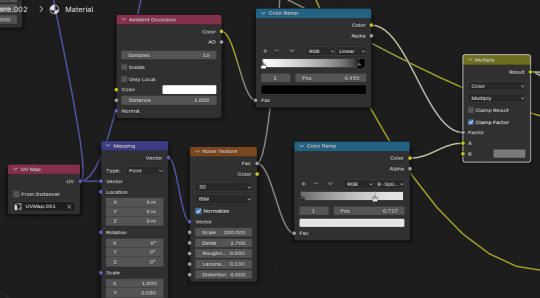
You’ll need two nodes to start with: Ambient Occlusion and Noise Texture. Above, you can see an example of what you should get using this setup.
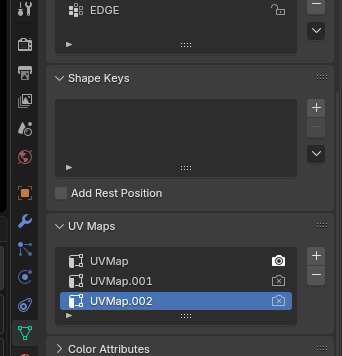
Use a UV Map node with your hair UVs. Usually, it’s called uv_0, or just UVMap if you haven’t renamed it yet. (I have multiple UV sets in my project because I was experimenting a bit.)
To get the correct mapping for the noise texture, connect the UV Map node to a Mapping node, and make sure you stretch the texture along the Y axis. This is exactly why your UV islands need to be aligned vertically, so the strands flow in the right direction.
I usually set the Noise Texture scale to 100–200 to get a nice strand-like effect.
Plug the Ambient Occlusion node into a Color Ramp to reverse the colors and adjust the contrast. Do the same with the Noise Texture. I recommend it to tone down the strong contrast a bit.
If you have the Node Wrangler add-on enabled (which I highly recommend), you can press Ctrl+Shift and click on a node to preview its output.
Use the result from the Ambient Occlusion Color Ramp as the Factor (think of it like a mask in Photoshop) in a MixRGB (color mix) node. Then, plug the result from the Noise Texture Color Ramp into the A socket, and set the blend mode to Multiply (again, just like in Photoshop).
You can control how dark the ambient occlusion appears by adjusting the color in the B socket of the color mix node.
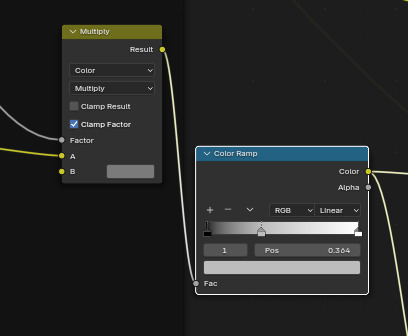
After, I plug result into color ramp again to adjust contrast.
II (optional) - gradient.
Though not necessary, I do it to add a little variation to tones. You may skip it.
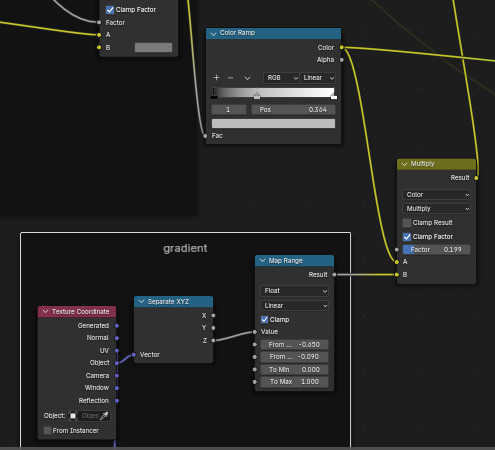

It makes little difference - but don't make mixing factor too high or it will be too dark later.
III - Principled BSDF and lighting setup for baking.
Although stretched noise texture with occlusion works wonders, hair wouldn't be hair if it didn't have shine. This “shine”, although it can be painted, is in most cases just baked-in highlights.
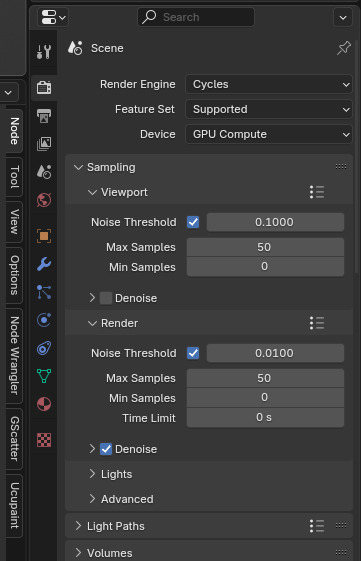
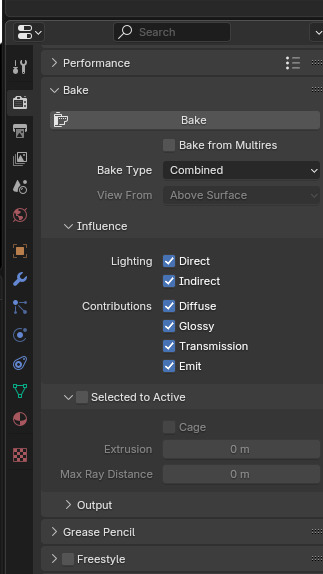
First, change the render engine to cycles and set following options:
You don't need too high amount of samples.
You'll need a little scene setup. If you have any lights, delete them.
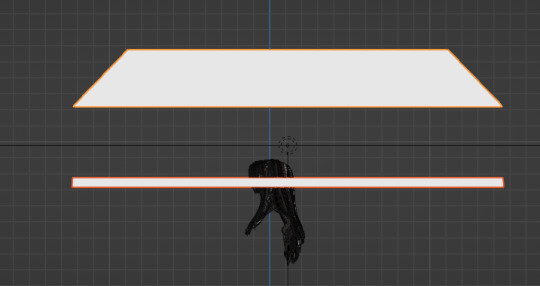
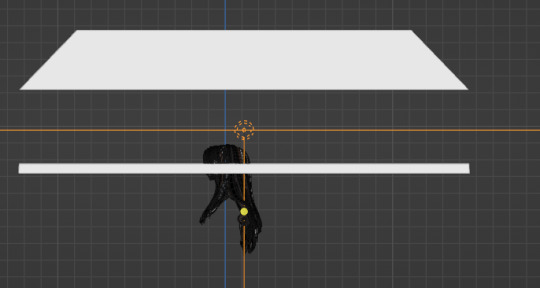
Then, create two cylinders and delete top and bottom side. in the modeling make something like in the screenshot. Sometimes one cylinder above is enough.
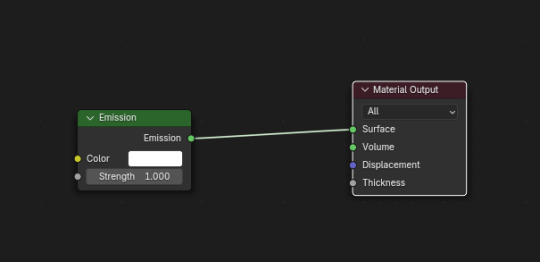
Create material for them and use simple emission node. This cylinders are necessary for that gloss effect hair does have.
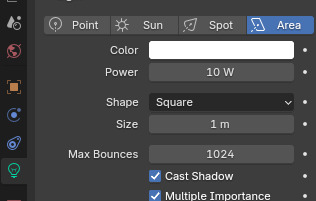
Create area light and scale. Put it above head - and set power around 10, not too strong.
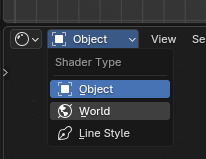
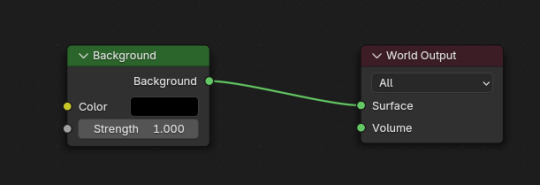
In left top corner of shader editor switch to the world. Set it to black.
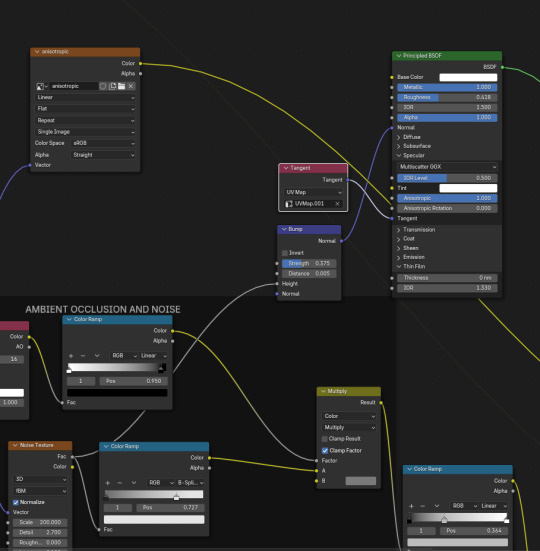
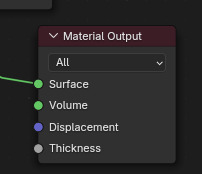
Go back into object shader editing. Select your hair in edit mode. Create Principled bsdf and empty image texture ( 1024*2048 or 2x bigger). Remember noise texture? Create bump node and plug it into height. Copy the values below to make effect subtle. Plug bump node to normal.
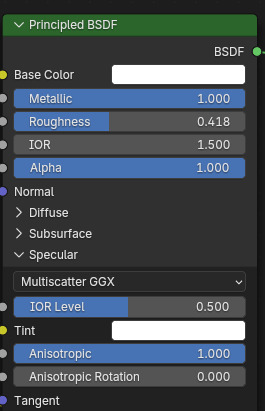
In principled bsdf, set metallic 1, roughness around 0.4. Open specular tab and put anisotroptic to 1. Create tangent node, change to Uv map, choose your map and plut tangent node into tangent.
Don't forget to plug principled bsdf into Material output node!!
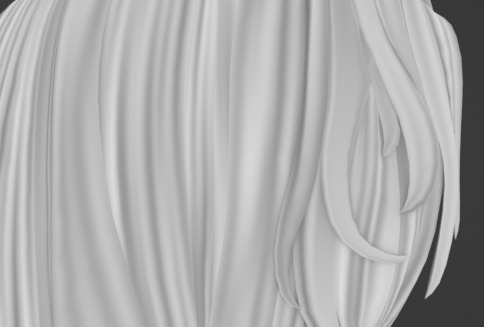
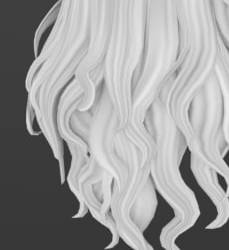
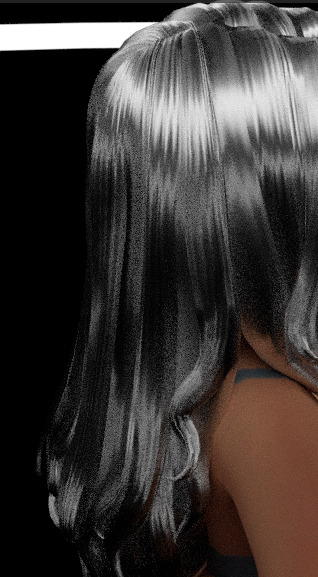
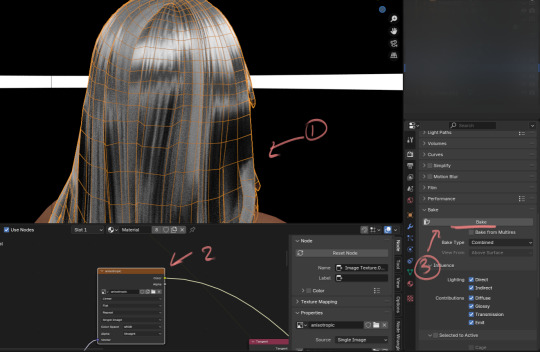
Phew, setup is done! Go into render preview and enjoy results!

It should look like this:
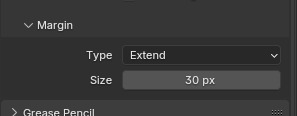
Now we have to bake this. it's easy - go into render tab again, scroll down and open bake menu. Open margin menu and set 8 px at least - or more (just cut later to hair area). Change magrin type to extend.
Now, select your object - and select Uv map you're baking to. In shader tab, select blank texture you had created before. Go into render tab again, and in the baking menu press bake. Now wait - and voila!

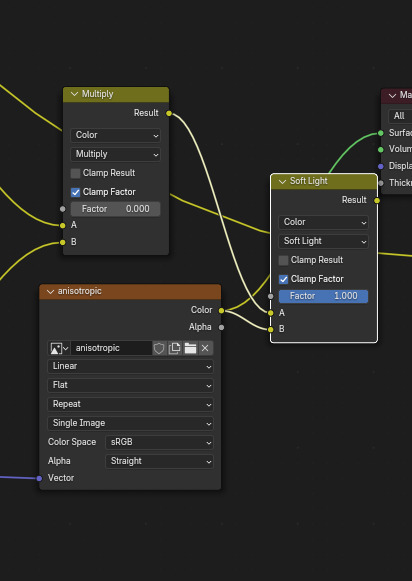
Now go back into the shader editor and plug the texture into the color mixing node into B. Plug into A procedural texture we're done before. Set mode to Soft light.
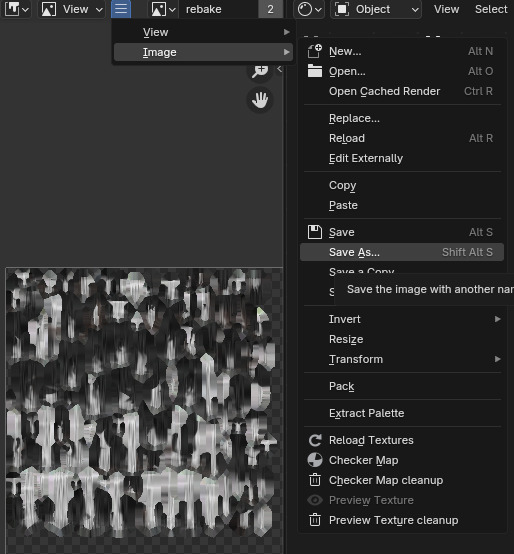
Now, since you know how to bake I won't explain it over again - create new blank texture with same resolution and bake result to it.
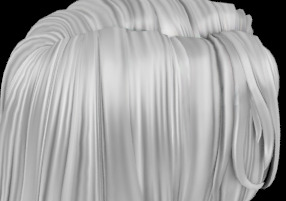
Save the texture and color it in any graphic editor you have with gradient maps. You may adjust texture contrast we're created before, but that's all.
You're done!
Here, in part 2, I will explain how to color this grayscale texture.
76 notes
·
View notes
Text

IF YOU CAN'T ENABLE CC 🌸
Sul sul ^^
After today updates, I wasn't able to enable CC again. It doesn't matter how many times I closed and launched the game.
So I remembered that this had already happened to me before.
If you're going through the same problem, this is how you can fix it:
🌸🌸🌸🌸🌸🌸🌸🌸
HOW TO ENABLE CC AGAIN:
1- On the game home page, in the bottom right corner of the screen, you can see what the current game version is. After today's update, mine was: 1.108.318.1020. Launch the game and check the number that appears for you.
2- In your game folder (Documents>Electronic Arts> The Sims 4) you'll find a file called "GameVersion". There will be a number.
The number in that file has to match the current game version number.
When I opened mine, it was "1.107.151.1020". So I just updated it to "1.108.318.1020" and saved. Then when I launched the game I could enable CC again.
Note 1: There's a "space" before the number in "GameVersion" (as if it were a paragraph). Keep that space. Change the numbers exactly where they are.
Note 2: If you prefer, before changing the number, make a backup copy of "GameVersion" just in case. It won't harm your game, but it's better, just to prevent and make it safer.
💎 If you want a tutorial video, I made one about it some time ago. You can watch it here :)
🌸🌸🌸🌸🌸🌸🌸🌸
ALSO IMPORTANT AFTER UPDATES:
Remember to delete "localthumbcache". You can find the tutorial here.
🌸🌸🌸🌸🌸🌸🌸🌸
I'm currently checking my CC to see if they're still working.
If anything, I'll let you know :)
I hope it helps you if you're having any problems :)
Happy Simming ^^
3K notes
·
View notes
Text

Create Your Own Main Menu for The Sims 4 - Tutorial
Hey folks!
This tutorial will walk you through creating your own main menu override for The Sims 4 based on my custom repository.
_________
What is required:
JPEXS Free Flash Decompiler
Sims 4 Studio
Raster graphics editor (e.g. Photoshop, Gimp, Photopea)
Your Own Main Menu repository
_________
Step 1: Download and unzip the Your Own Main Menu repository
It's available on my Patreon page for free.
_________
Step 2: Prepare your custom images
There are two images that you need to customize:
SimMattically_YourOwnMainMenu_MainBG.pngThis is the main background image, where you want to put the desired graphic.Size: 1440px x 1200px
SimMattically_YourOwnMainMenu_BarBG.pngThis is the second background for the navigation bar on the right.Size: 480px x 1200px
Prepare your own images based on these templates. Do not change the size of the images.
Tips: If you're using a more complex background, such as a screenshot from your game, I recommend blurring the Bar_BG with a Gaussian Blur (~60px). Additionally, I suggest adding a white overlay with ~50% opacity and a 5-pixel wide white bar on the left edge with ~10% opacity. This helps improve the readability of the navigation bar buttons and adds an extra layer of detail to your menu design.

The repository also contains the optional file "SimMattically_RefreshedMainMenu_ScenarioButton.package" from my other mod, which replaces the Scenario button icon with a semi-transparent white version. It's up to you whether you want to use it.
_________
Step 3: Import the images to the .GFX file
Firstly, open JPEXS Free Flash Decompiler and then open my SimMattically_YourOwnMainMenu_Template.gfx with it.


Select "No to all" when prompted.

On the left, choose "images" and scroll to the bottom where you will see the images you just edited in their original form. Right-click on each and select "Replace." Select the custom images you prepared in step 2.


Save the file.
_________
Step 4: Import the .GFX file into the .package file.
Open Sims 4 Studio, then click on "My Projects" and open SimMattically_YourOwnMainMenu.package. Select "Scale Form GFX" (the one with the "gameentrylauncher" description) and click on "Import." Select the modified .GFX file and import it. On Windows OS, you need to switch from .binary to all file types to see the file.


Save the .package file via File -> Save As... Give it a custom name and place it in The Sims 4/Mods folder.
That's it! Enjoy!
_________
IMPORTANT INFORMATION/TERMS OF USE:
Main menu overrides can become outdated with some game updates, causing them to break the game. You will have to remake your custom main menu with a new, updated template in this case. Always make sure you are using the latest available template and that it's not outdated.
Since these mods can break the game, I do not advise sharing your custom main menus with other players. You are free to do so, but be aware that since you're relying on this repository to create your own version, you most likely won't be able to update the mod and resolve issues for other players on your own, so you take responsibility for breaking their game.
If you decide to share your version with other players, please credit my repository and link to my Patreon post.
Do not put your custom main menu based on this repository behind any paywall or early access. I made this repository and tutorial free for everyone, so keep it fair.
I do not take responsibility for people misusing this repository or breaking your game with incorrectly modified files. I do not provide support for custom main menu overrides created by other creators using this repository.
_________
#sims#thesims#thesims4#sims4#sims 4 mods#sims 4 custom content#simblr#s4cc#ts4#main menu override#sims tutorial
317 notes
·
View notes
Text
A small but very useful tutorial
written with the help of chatGPT
Why Use Upscayl?
Upscayl is a great tool for improving textures and reference images. Whether you are working on character skins, environmental textures, or UI elements, this program helps to:
Increase image resolution without losing quality
Reduce pixelation and enhance details
Improve the clarity of textures for a more realistic look
How I Use Upscayl (look at the photo)
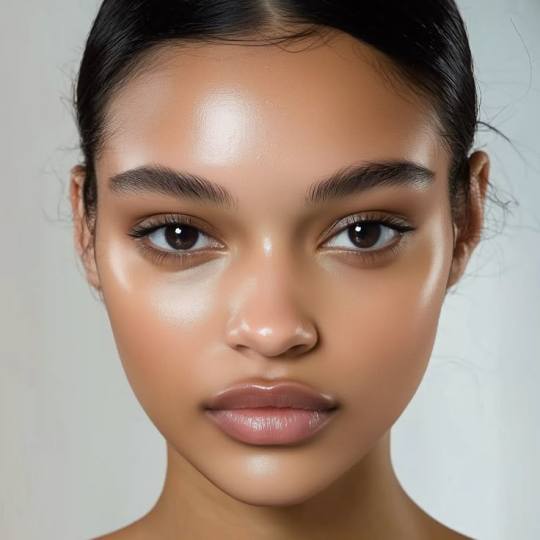
Finding or Creating a Reference Image I start with an image that I want to enhance. This could be a low-resolution texture or a reference image for a new design.
Adding Noise for Testing To demonstrate how Upscayl improves images, I intentionally added noise to a mask texture. This allows me to compare the before and after results more clearly.
Processing the Image in Upscayl I import the noisy texture into Upscayl and choose an appropriate AI model. The program processes the image, enhancing its details and removing unwanted noise.
Examining the Results After running the texture through Upscayl, the difference is clear: the texture appears sharper, more detailed, and free of noise, making it more suitable for in-game use.
Enhancing Existing Game Textures
Apart from improving references, Upscayl is also useful for enhancing in-game textures, such as character skins. If a skin looks too blurry or low-resolution, running it through Upscayl can significantly improve its appearance without having to manually repaint details.


#sims3#sims#ts3#simblr#s3#sourlemonsimblr#sls#sims4#the sims#sims 2#tutorial#not sims#sims tutorial#cc tutorial
115 notes
·
View notes
Text
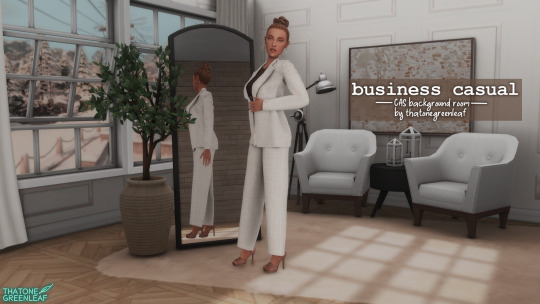
~business casual CAS background room~ (with mirror!) + tutorial!

-
A bunch of you have asked, so here it is! You can watch my tutorial on how to make your very own CAS background room with a mirror right here!
(and you can also download the room I made while filming this tutorial below!)
♥ Download the package file and put it right in your Mods folder! (up to 5 folders deep)
♥ You can only have one CAS background/room in your game at once, remove any other before putting this one in!
♥ Reflections need to be set to low, medium, or high but not OFF in your game's graphics settings for the mirror to be functional.
♥ Base Game Compatible!
♥ DX11 and DX9 compatible!
-
Follow me on twitch!
Support me on patreon!
DOWNLOAD "BUSINESS CASUAL" CAS BACKROUND ROOM ON SIM FILE SHARE!
WATCH THE TUTORIAL ON HOW TO MAKE YOUR OWN HERE!
-
TOU: do not redistribute, reupload, or claim my cc/CAS rooms/presets as your own! recolour/convert/otherwise alter for personal use OR upload with credit. (no paywalls)
♥ built using littledica's original CAS room files ♥
stuff I'm using here: reshade | cas lighting | (send an wcif if you want anything on the sim!)
#sims 4#ts4#sims4#thesims4#maxis match#maxis mix#s4cc#sims 4 cc#sims 4 custom content#cas background#sims 4 cas#cas room#ts4 cas background#sims 4 cc tutorial#cas background tutorial#cas background with mirror
374 notes
·
View notes
Text

CAS UNDERWEAR OVERRIDE TUTORIAL!

faq/before you begin: This is a tutorial for personal use ONLY. If you use this tutorial DO NOT reupload your overrides unless it the original creator gives you permission to do so. reuploading a creator's custom content IS theft. I do not condone stealing cc from hard working creators, so please only use this as a tutorial for yourself! to get started, you will need: ꣑ৎ sims 4 studio ꣑ৎ the underwear you want to make your default ꣑ৎ and patience ( ,,◕ ̫ ◕,, ) this tutorial is aimed towards people who have never used ts4 studio before! so if it seems too hand holdy im sorry, i just want to make sure everyone can understand! If you don't understand something, please don't feel shy about reaching out! either through a dm or an ask! i'll be happy to help!
start by downloading TS4 studio. The process is fairly simple, but if you get stuck here's a great tutorial you can follow!
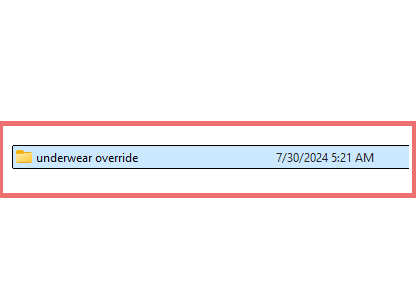
once you have it all installed, you'll want to make a folder on your desktop. This is just for organization purposes, to make digging for the files easier later on:
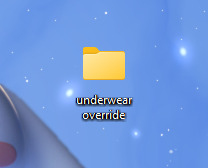
here's an example of what i named my folder! for simplicity's sake though, i'll be referring to the desktop folder as the "underwear override" folder, but you can name yours whatever you want! Just make sure its on your desktop~ ( ˶ˆᗜˆ˵ )
────୨ৎ────────୨ৎ────────୨ৎ────────୨ৎ────
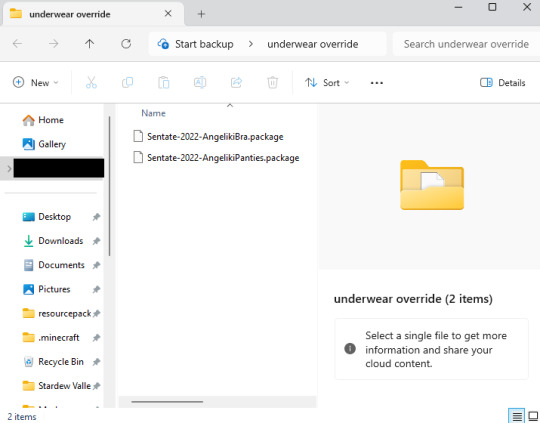
next you'll want to find the underwear you'd like to make a default replacement. I'm using the Sentate's Angeliki set (bra and panties) from their midnight collection found HERE. (Also a gentle reminder, this is for PERSONAL USE only. Sorry i keep repeating this, i'd just hate for people to use this tutorial for bad 。°(°.◜ᯅ◝°)°。 )
any underwear SHOULD work, unless the underwear you pick has 3D pieces. I wish i could explain why, but i honestly have no clue. Im a noob at this haha. Just make sure your mesh isn't 3D!
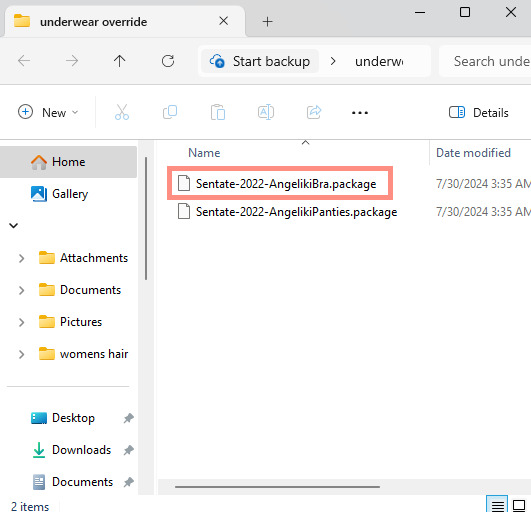
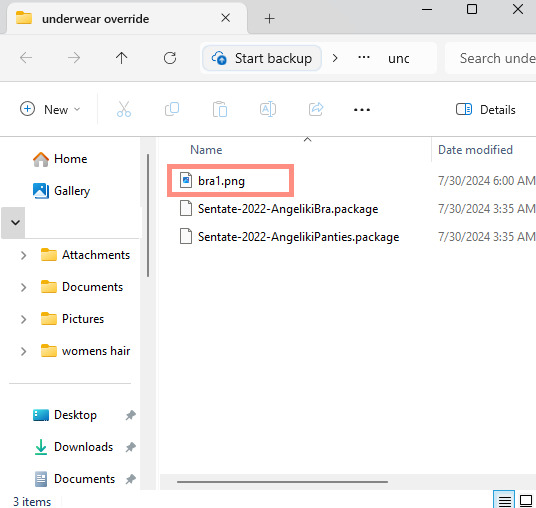
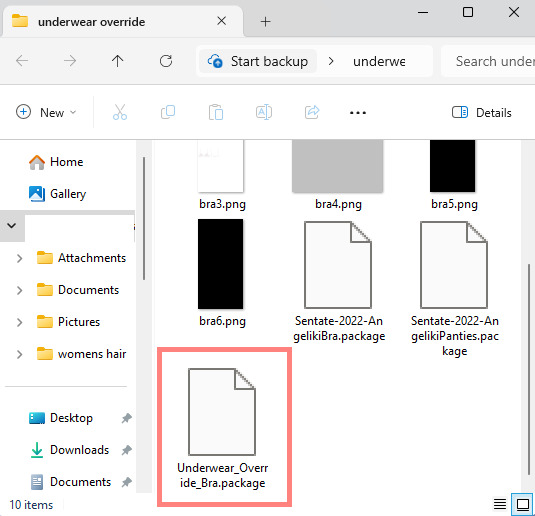
once you have the undies of your choice secured, go ahead and place both into the "underwear override" folder on your desktop! (photo below)
────୨ৎ────────୨ৎ────────୨ৎ────────୨ৎ────
now it's time for the fun part! You'll go ahead and open sims 4 studio, once in there, you'll want to click where it says "my projects" (photo below)
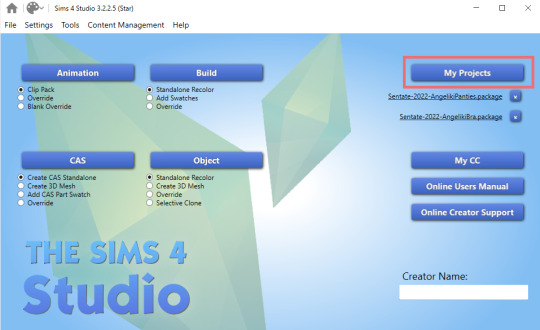
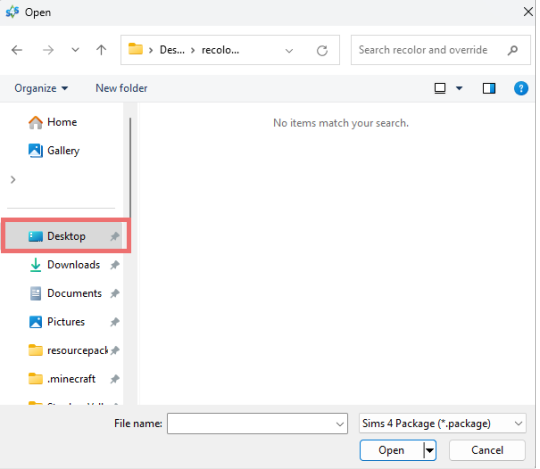
Once you do that, your files should all pop up. It doesn't matter where it takes you, you'll just want to find the "desktop" section of your file menu! Then, you'll find the "underwear override" folder and open that~ Now you'll just go ahead and open the package that you want. I'm going to start with the bra, but the process for the underwear is exactly the same! so it doesn't matter which one you choose to do first ദ്ദി ˉ͈̀꒳ˉ͈́ )✧ (photo below)
────୨ৎ────────୨ৎ────────୨ৎ────────୨ৎ────
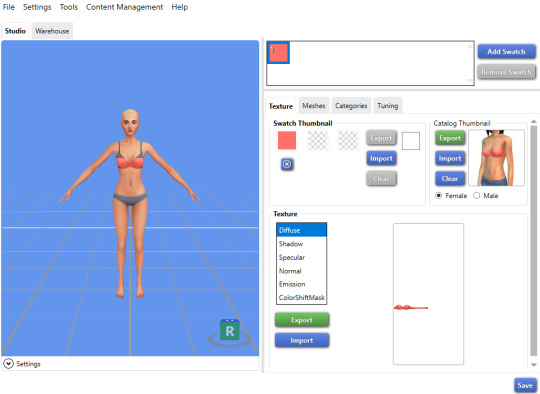
if you did it right, your screen should look similar to mine! ¡¡¡( •̀ ᴗ •́ )و!!! (photo below)
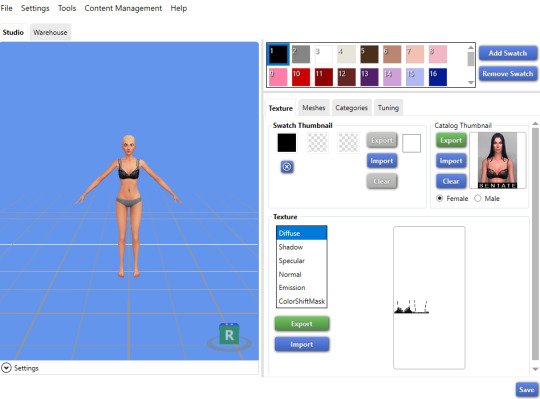
now, you'll just want to select the swatch you'd like at the top! (if you've never used the sims 4 studio before, you can use your mouse wheel and the right mouse button to control the camera in the blue area with the weird bald sim lol- that way you can see the swatch you're picking a bit better! (photo below)
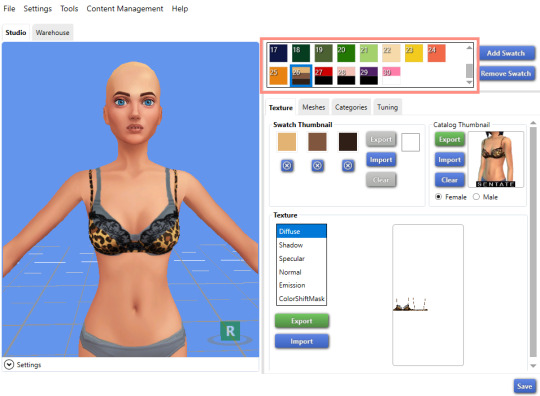
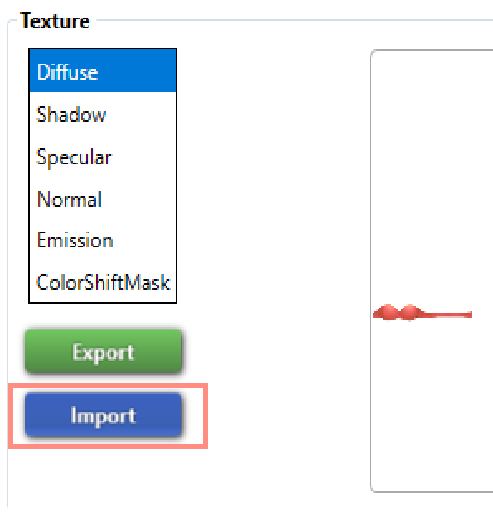
now that you have the swatch you like, in the texture setting, diffuse should already be selected. You'll want to go ahead and click "Export", then name the file "bra1". If you did it correctly, it should save as a PNG! (photo below)

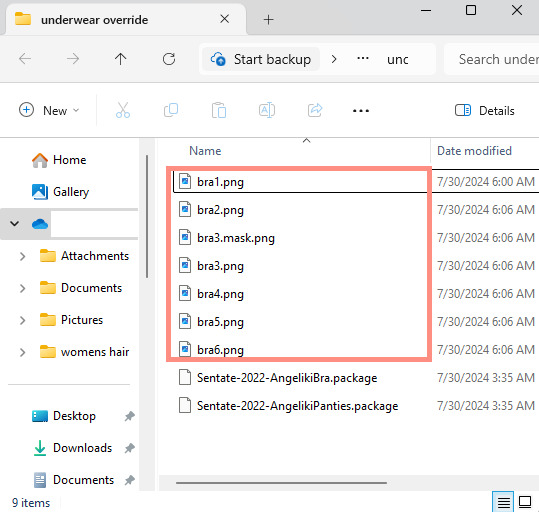
then, you'll want to go down the line of textures (shadow, specural, normal, emission, colorshiftmask) and continue to number them (EX: shadow is bra2, specural is bra3, ect ect) til your folder is full with each texture! It should look like this if you've done it right! (photo below)
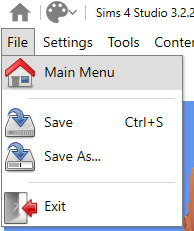
after you're done with that. You'll go ahead and click "File" and "main menu" in your sims 4 studio! (no need to save!) from here, you'll go ahead and select "Override" under the CAS section on the main menu then click the CAS button at the very top. (photo below)

the menu here might look confusing if you've never used sims 4 studio before, but just copy the way mine looks to make the process a bit easier! At the top drop down menus, you'll want to select "Gender: female, Age: Adult, Part Type: Clothing Top, Game Pack: base game" This should narrow down the menu a bit! (photo below)

then, you'll scroll til you find THIS exact bra. This is the bra the sims 4 uses as their default, and we're overriding this, so please be sure to select the exact one! (photo below)

once you select it, click "next", and it should take you to your files once more. You'll want to name THIS file something unique, that way there's no conflicts! I suggest something like: "Underwear_Override_Bra" just so you know which one you're working on, and you also know that this is an override (๑˃́ꇴ˂̀๑)
once you've named your package at the bottom, go ahead and click enter, and the studio should open back up~ (photo below)

now, you'll want to repeat the same export process from before, but use import instead! Then, you'll import the pngs the same way you saved them. (EX: diffuse is bra1, shadow is bra2, ect). Once you've done that, you should immediately see the textures change (photo below)
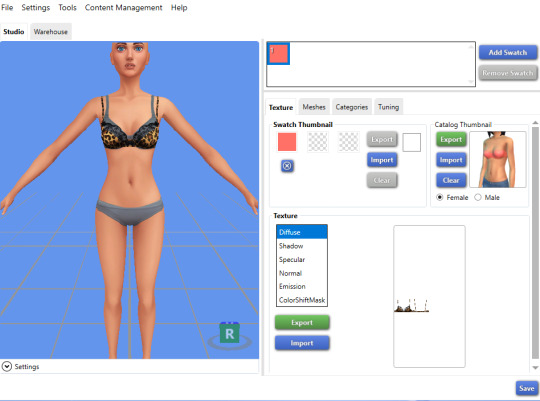
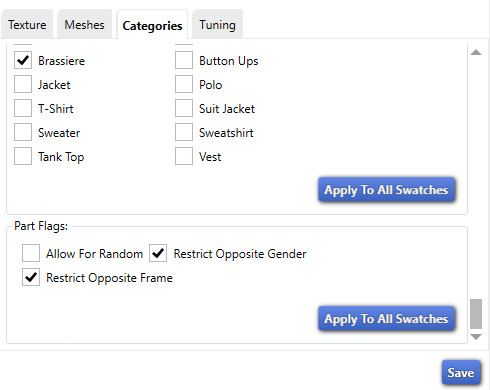
now that your textures are changed, you'll want to make sure to catagorize it properly, just to prevent your male sims from getting a bra when you take their shirt off as well. If you for some reason want your male sims to have an unremoveable bra, feel free to skip this step! if not, then you'll want to click the "catagories" tab right beside "meshes"
once there, you'll scroll all the way to the bottom til you hit "Part Flags", then you'll check "restrict opposite gender" and "restrict opposite frame" (i'm not sure if these mean the same thing, but i just checked both to be extra sure!) (photo below)

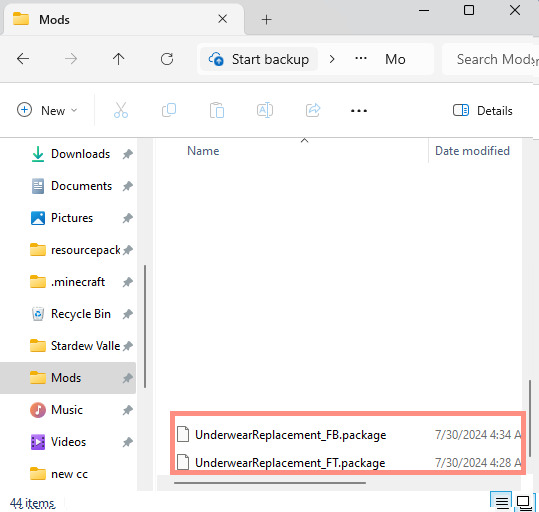
once you've finished replacing all the textures and catagorizing the override, you'll go ahead and click the save button at the bottom right hand corner, then open your "Underwear Override" folder. You should have your "Underwear_Override_bra" package now saved! yay! All that's left to do is repeat these steps with the panties of your choice, then drag both package files into your mods folder just like you would any other cc! (photo below)
(mine are named differently because i already made my own recolors + default replacements ( 〃..).. i'll try and upload a recolor tutorial later today for anyone curious!)
but now, you're done! all that's left to do is open your game and see your overrides in cas! If you did everything correctly, the undies should just appear when you take your sim's clothes off (⁄ ⁄•⁄-⁄•⁄ ⁄)
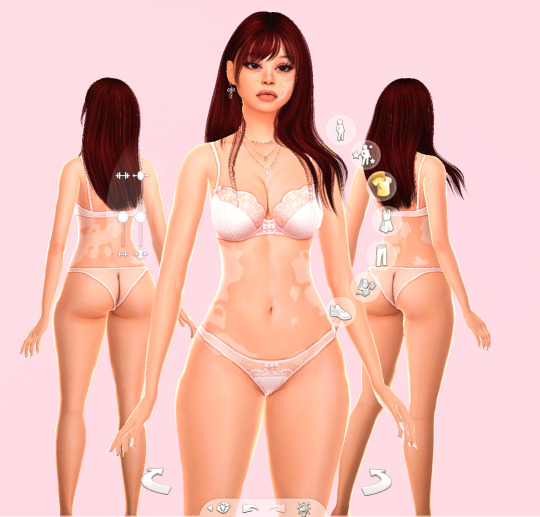
heres how mine turned out! (˵ •̀ ᴗ •́ ˵ ) ✧ im super proud of them!
it took me a few hours to get this tutorial together, so im a bit loopy signing off. If this is completely incomprehensible and confusing im so sorry, again if anyone has questions please do send an ask or message me! i'll do my best to answer any questions :) and also please remember; DO NOT REUPLOAD ANYONE ELSES CUSTOM CONTENT! this is for PERSONAL USE!
thank you for reading! (。•̀ᴗ-)✧
#the sims 4#ts4#sims4#maxis match#maxis mix#s4cc#sims 4 cc#ts4 cc#sims 4 custom content#cc tutorial#cc rec#cc cas#sims 4 cas#sims tutorial
93 notes
·
View notes
Text
🐹Does not include tutorial on creating sims 4 animation on blender (links will be attached at the end of post) 🐹This tutorial is for creating objects that animates on idle, i.e. does not require interaction. 🐹If you're interested in creating a spinning object (e.g. fan), there's an easier method HERE ( •̀ ω •́ )✧
⬇️⬇️Long post (15pics)⬇️⬇️


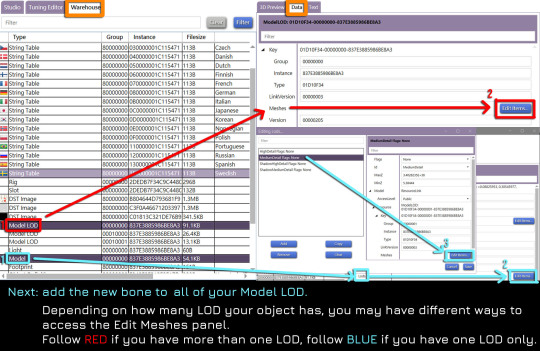

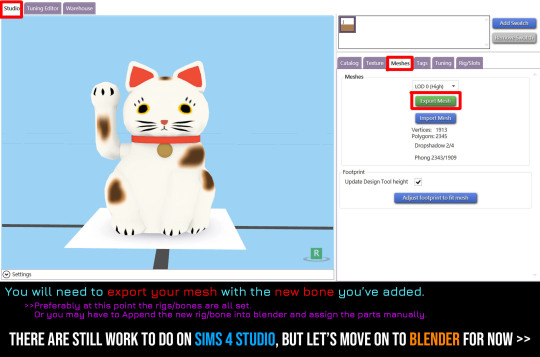


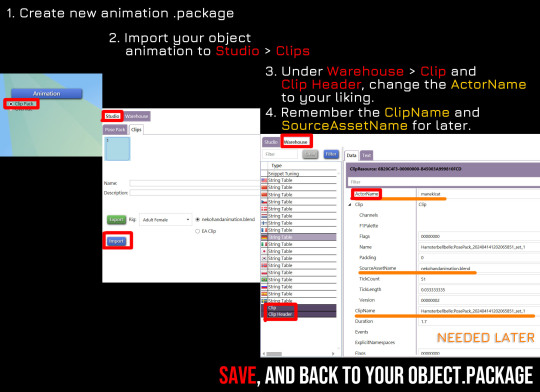


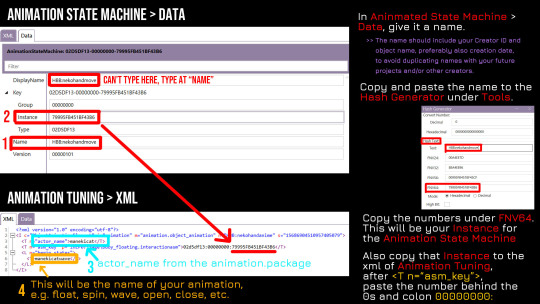
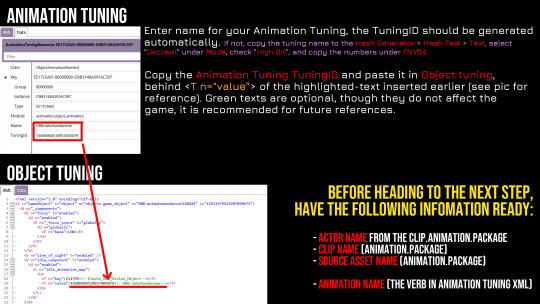

🐹Make sure whatever changes you made to one LOD, remember to change the other LODS too.👍
[DOWNLOAD - ASM/Animation tuning]
Other useful links:
The Sims 4 Tutorial - How to Create Custom Poses
One way of making animated objects tutorial
How to animate objects Video tutorial
Creating animated objects on interaction
The animated objects shown in this tutorial:
Holographic Holiday Tree
Animated Maneki-Neko
88 notes
·
View notes
Text
This is not a render! How to get beautiful scene lighting with no Blender!
#sims 4#simblr#ts4#my sims#sims 4 screenshots#sims 4 tutorial#tutorial#lighting#show us your builds#sims 4 tips#sims 4 screenies#sims 4 screencaps#sims community#weird sims#the sims community#show us your sims#showusyoursims#sims4#occult sims#sims 4 story#how to#sims 4 build#ts4 build#defiant-tutorials
13 notes
·
View notes
Text
how to organize & update your mods folder by bellaserenegaming
in this video i go over the following:
how to turn off automatic updates in ea
how to categorize your mods folder
how to keep your mods folder organized after a patch update
how to update your mods folder
how to get rid of broken/outdated cc
mods, programs & helpful websites mentioned below
mods:
better exceptions
mc command center
ui cheats
more columns in cas
cc wrench override
first impressions
control any sim
programs:
sims 4 tray importer
helpful websites:
scarlet’s realm: the mod list
cas.
sentate jumpsuit
sentate heels
18 notes
·
View notes
Text
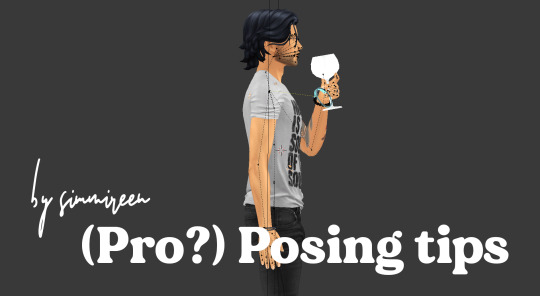
(Pro?) Posing tips
It doesn’t matter if you are a beginner or if you already have made your way into blender. As a posemaker myself, I know how hard it is to make a realistic pose - here a few tips you have to think of when making poses, to get your pose to the next level.
(I use shibuisims sunflower rigs for my poses, but in base they work the same as the rigs you export from sims4studio, they only have some handy IK controls)
At first: take your time for details. The base of my poses are mostly done very quickly, but it’s all in the details. Fingers, face, mouth, hips. Take your time for the details. Details can make or fail a pose.
Simripper double textures If you make poses for your own story or edit, you mostly make them with your own textures (through simripper) right? But if you want to also send them to the community to download and use, don’t get rid of the original rig textures bij importing your own sim textures. By toggling off and on the textures under your rig in the scene menu, you can see how poses look on your own sims, but also on the ‘default sim rig texture’.
Elbows and shoulders and relaxation. I think I can best show this in pictures. If holding something we almost never raise our elbows unnatural high. They mostly are more ‘relaxed’ to our body. Lower the elbows! (It’s always good to have a little space for thicker sims ofcourse).


Can you see the difference? Hands I think these are the hardest to do. I still struggle with them sometimes. But the best thing to get the best hands is to have a reference OR make the hand yourself in relaxing state. I see it mostly in a pose in an ‘idle’ state that hands are cramped or straightened. Unless you want this in your pose, try to make a hand in relaxed state.
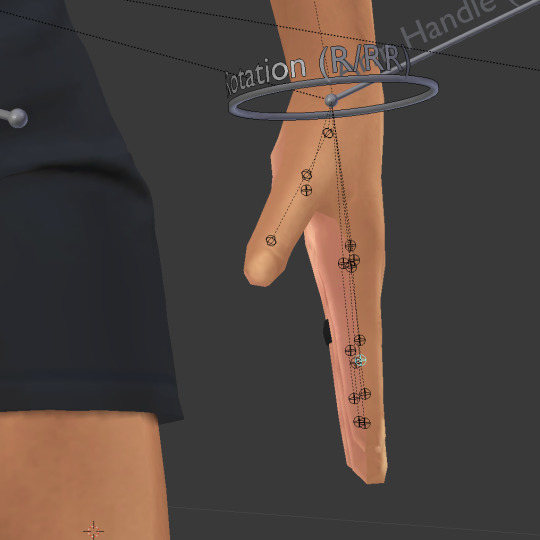
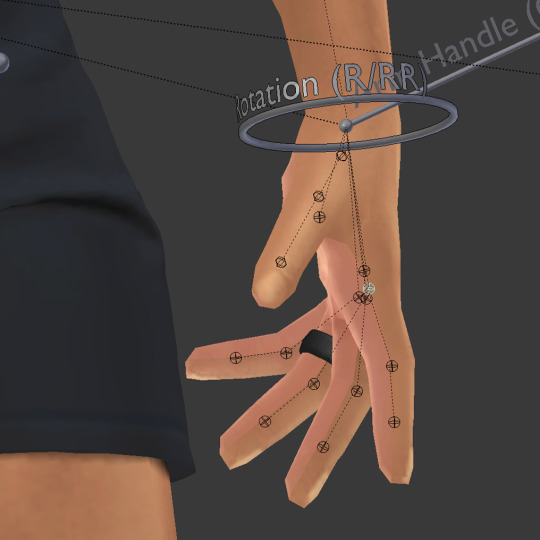

Straightened, cramped or relaxed?
Shoulders I hope every posemaker that makes poses for already a while know this, but I think it's the most important step in starting making poses. Please, start your arm movements (mostly if you want to raise the arms) in the b_R_clavicle or b_L_clavicle joints.


Shoulders are important!
Weight It’s so important in realistic poses to add our gravity. I think this mostly checks out for holding other sims, piggyback poses etc. If you take someone on your back, your back struggles too right? It's heavy! Try to lower that b_ROOT_bind just a little more as what you expect to do in a pose. Don’t forget gravity always pulls us down!

Only a very small distance from the ground is needed sometimes.


Gravity holds our arms down too in 'relaxed' state.
Stiffnes Maybe we can add this to weight aswell, but as humans ourselves, if we are standing ‘idle’. We never stand right up with a straight back, feet perfectly straight next to each other. It’s the same if we sit on a chair, most of us hang a little to the back or to the front. Try to add that in your pose, if you do that - it’s immediately a less stiff pose!
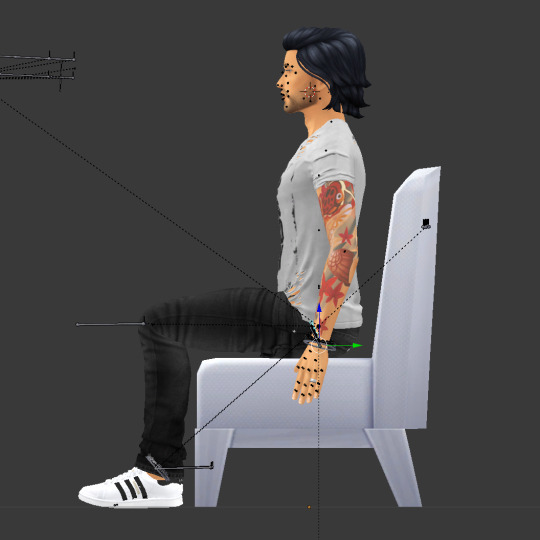

It's only a slight bend in the back joints, but it already looks more natural.
Just remember, you learn by doing and watching. So I hope I can add some more insights to you, as a posemaker for a few years now, to make your poses even better and more realistic. Ofcourse, sims rigs have their limitations, but that's what makes them sims, right? You can find some more simmireen tips on posepack consistency for sharing your poses here
@ts4-poses
#sims4#sims4tutorial#sims 4 poses#ts4poses#ts4 poses#thesims4#ts4cc#simmireen#ts4-poses#posemaker#sims4poses#posepack#ts4#tutorial#posemakingtutorial
371 notes
·
View notes
Text
does anyone have/know of a good tutorial for making cc clothes?? there’s so many pieces that’s i’ve seen on pinterest and from my personal style that i’d love to see as cc but i have no idea how to make it happen
#sims4#sims 4#ts4#the sims 4#maxis match#sims4cc#ts4cc#ccfinds#simblr#ts4 cc#sims 4 cc#sims 4 mm cc#the sims 4 cc#cc help#tutorial#s4cc#sims 4 clothes
21 notes
·
View notes
Text

Hello! In this post I will share some tips I have to help you on your custom content making journey. These are more general rather than creating a specific item, but I may make another part in the future!
Things covered: learning curve of blender, free resources, learning your computer, using references

1️⃣ There’s no need to pay for anything
The only money I have spent on anything related to TS4/custom content is for some of the expansion packs. Every resource I have used I have only had to pay with time. Blender, Sims 4 Studio, and Sims 4 Tray Importer are all free! And for Photoshop, a good free alternative I use is Photopea, which is just a web version. Another good alternative is GIMP, which is an application.
There are applications like Substance Painter and Marvelous Designer, but I would only recommend those if you have a genuine interest in 3D modeling outside of TS4.
And in terms of finding tutorials, scouring the internet will always lead to some result. A good tumblr page is @thefoxburyinstitute, which has many sections based on your level of experience. Adding “reddit” to the end of a search helps too!
2️⃣ You can export anything from Sims 4 Studio as a reference (mod or EA object)
For an EA item, In S4S, go to Tools -> Browse Game Content -> then select the category you need a ref. If it’s a mod, click on My Projects and find the package you want.

From here, you can export the mesh, images, or any textures you need without having to create a new package for it! Best used when you have already created your own package and just need one aspect of the object.
If you want to append in Blender, go to File -> Append (works with any .blend file exported from S4S), then find the location of whatever you exported. Go to the Object folder, find anything labeled s4studio_mesh_number, then append. I just append all of them, then delete ones I don’t need.

Also, in the Scene tab, make sure the cut box is blank for the reference you imported! S4S will confuse this with your mesh if not, as the cut number determines which mesh will replace the EA one.
3️⃣ File management is important!
The more you create, the more random things you’ll download on your computer. You need to be aware of where you’re downloading things from, duplicate files, how much storage it’s taking up, etc. I recommend the Sims 4 Mod Manager by GameTime. Back up your files often and learn how your computer works because every device is different! Below is how I organize my CC (could use some improvement), but use whatever keeps you organized.

4️⃣ Learn Blender outside of Sims 4 CC
There have been so many times when I’m so frustrated about Blender that I have to take a step back and focus on a different hobby. The first time that happened years ago, I decided to learn how to make simple models in Blender, and not only did I enjoy it, but I also learned so much that can be applied to CC! Below are some tutorials that I watched.
Blender 3D Beginner Tutorial by 3DGreenhorn
A simple room tutorial.
3D Isometric Bedroom by artbytran
Another simple room tutorial, but with more cute details.
Creating Stylized Low Poly Characters by lacruzo
How to make a low-poly character and texture paint on it (I used this tutorial to texture paint on a hair clip!)
Intro to Creative Web Development by Andrew Woan
Okay I know the 5 hours is daunting, but only (lol) the first 2 hours are Blender. This video goes more into the technological aspect and making models optimized for video games/web (ahem TS4). After the 2-hour mark, it's all coding, which is not needed for CC making.
5️⃣ It takes time/consistency
As a person who only makes CC once every other month or so, it’s mostly muscle memory and consistent practice that makes someone feel confident in their CC making abilities. Remember how as a kid typing was the slowest thing ever, and today you’re (hopefully) better? It’s cause you kept practicing over a long period of time.
The first time I opened Blender to make poses was in 2021, and 4 years later, there’s so much that I have learned from others, and 10x more that I don’t know due to the endless possibilities of what can be created. But hey, I’m confident enough that I made this post of tips, right? Take small steps, the end goal is to make something you or others enjoy.
Thanks for reading this if you’ve come this far, and here are two pages I recommend reading to help you on your CC journey! :D
Internet safety regarding TS4 by crazy-hazy-sims (pls read this) Custom Content Creation by simlaughlove
8 notes
·
View notes
Text
youtube
Speed Mesh #10 - Mya Hair:
Haven't uploaded a speed mesh in years, but when I saw a lot of interest in them I decided to give it another go! This hair is not currently available for download, it's part of a collection coming in September. Hope you find the speed mesh helpful - I included timestamps in the description so you can see what I'm doing in each part!
#r#youtube#ts4#s4#ts4cc#ts4mm#s4cc#s4mm#ts4 youtube#s4 youtube#ts4 speedmesh#ts4 mesh#ts4 tutorial#sims tutorial#maxismatch#sims4#thesims#Youtube
106 notes
·
View notes
Text

𝑻𝒉𝒆 𝑼𝒍𝒕𝒊𝒎𝒂𝒕𝒆 𝑮𝒖𝒊𝒅𝒆 𝒕𝒐 𝑭𝒊𝒏𝒅𝒊𝒏𝒈 𝑹𝒆𝒄𝒐𝒎𝒎𝒆𝒏𝒅𝒆𝒅 "𝑻𝒉𝒆 𝑺𝒊𝒎𝒔 𝟒" 𝑪𝑪 𝑾𝒆𝒃𝒔𝒊𝒕𝒆𝒔 [𝟐𝟎𝟐𝟑]
Are you a dedicated "The Sims 4" player searching for top-notch custom content (CC) to enhance your gameplay? You're in the right place! This guide will lead you through the most popular platforms for quick access to a wealth of CC. From staying current with trends to pinpoint searches, I've got you covered.
♡𝙒𝙖𝙩𝙘𝙝 𝙑𝙞𝙙𝙚𝙤 觀看完整影片 𝙃𝙀𝙍𝙀 .ᐟ.ᐟ.ᐟ
𝒅𝒐𝒘𝒏𝒍𝒐𝒂𝒅 𝒍𝒊𝒏𝒌𝒔 ↴
⎚ ᴛᴜᴍʙʟʀ|ᴄᴄ ғɪɴᴅs Maxis Match CC World / MM Finds / MM Outfitters / Warmsol's CC Finds / Maysie Moon / Boey's CC finds / Llama CC finds / SimsTrouble CC Finds / Plumbie's CC Finds / HazelMine's CC Finds / Angel TS4 CC Finds / Oshin CC Finds / SimBys CC Finds / Mandy CC Finds / Nolan Sims CC Finds
⎚ ᴘᴀᴛʀᴇᴏɴ|ᴘɪɴɴᴇʀ The Sims Resource / Simmerthings / Kataraesimmer
⎚ ᴘᴀᴛʀᴇᴏɴ|ᴄᴄ ᴄʀᴇᴀᴛᴏʀs|我私心愛的12位創作者(◍3◍) HuiEn / Joliebean / Serenity / Miiko / TwistedCat / Northern Siberia Winds / PoyoPoyo / Obscurus-Sims / Caio / Madlen / Simstrouble / Jius-Sims
⎚ ᴄᴄ ᴄᴏᴍᴘɪʟᴀᴛɪᴏɴ sɪᴛᴇs SnootySims / The Mods Babe / We Want Mods
⎚ ᴄᴜʀsᴇғᴏʀɢᴇ|ɪᴛs ᴛᴜᴍʙʟʀ The Official Mod Hub
⎚ ᴛʜᴇ sɪᴍs ʀᴇsᴏᴜʀᴄᴇ|ᴄᴄ ᴄʀᴇᴀᴛᴏʀs ANGISSI / asan333 / cosimetic / David_Mtv / S-Club / Nords / OranosTR / Anonimux Simmer
✧˚. Exploring Patreon's Most Popular Creators and Their 50 Outstanding CC Collections 我最愛的50位CC創作者推薦&必備50款衣服套件包 - 𝘾𝙝𝙚𝙘𝙠 𝙃𝙀𝙍𝙀 & 𝙃𝙀𝙍𝙀 ♡

✴︎ sɪᴍᴛᴜʙᴇ|sɪᴍʙʟʀ|sɪᴍᴛᴇʀᴇsᴛ|sɪᴍᴛʀᴇᴏɴ ✴︎
#featured#ts4cc#CC Finds#ts4ccmm#ts4#sims4#the sims 4#s4cc#s4mmcc#sims 4 cc#the sims 4 custom content#sims 4 custom content#sims cc#s4ccmm#s4ccfinds#ts4ccfinds#s4 custom content#ts4 tutorial#sims 4#ts4 tutorials
76 notes
·
View notes
Text
~business casual CAS background room~ (with mirror!) + tutorial!
-
A bunch of you have asked, so here it is! You can watch my tutorial on how to make your very own CAS background room with a mirror right here!
(and you can also download the room I made while filming this tutorial below!)
♥ Download the package file and put it right in your Mods folder! (up to 5 folders deep)
♥ You can only have one CAS background/room in your game at once, remove any other before putting this one in!
♥ Reflections need to be set to low, medium, or high but not OFF in your game's graphics settings for the mirror to be functional.
♥ Base Game Compatible!
♥ DX11 and DX9 compatible!
-
Follow me on twitch!
Support me on patreon!
DOWNLOAD "BUSINESS CASUAL" CAS BACKROUND ROOM ON SIM FILE SHARE!
WATCH THE TUTORIAL ON HOW TO MAKE YOUR OWN HERE!
-
TOU: do not redistribute, reupload, or claim my cc/CAS rooms/presets as your own! recolour/convert/otherwise alter for personal use OR upload with credit. (no paywalls)
♥ built using littledica's original CAS room files ♥
stuff I'm using here: reshade | cas lighting | (send an wcif if you want anything on the sim!)
#sims 4#ts4#sims4#thesims4#maxis match#maxis mix#s4cc#sims 4 cc#sims 4 custom content#my cc#cas background#sims 4 cas#cas room#ts4 cas background#sims 4 cc tutorial#cas background tutorial#cas background with mirror
244 notes
·
View notes
Text

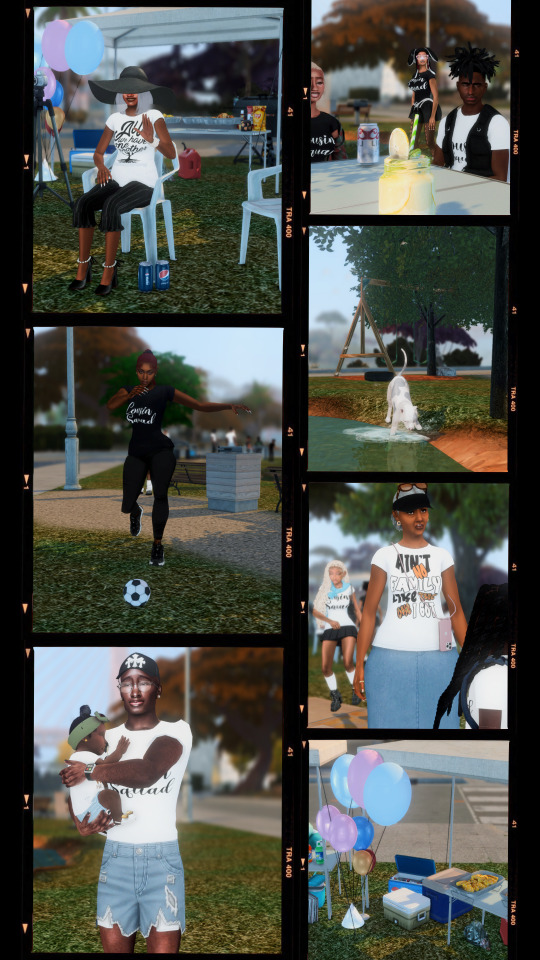

The Love family hosts their second annual Family Reunion at the San Sequoia lake!
A tutorial video is in the works on How to host the perfect family gathering in the sims 4, more specifically the perfect family reunion! Stay tuned by following here on simblr and subscribing to my YT✨

#sims4#sims 4 gameplay#sims community#simblr#my sims#sims 4 challenge#sims 4 custom content#sims 4 cc#sims 4 cas#sims 4 mods#sims 4 build#sims 4 screenshots#the sims community#the sims#sims 4#sims 4 clothes#sims 4 poses#the sims 4#sims 4 tutorial#how to sims 4#ts4 legacy#sims 4 story#ts4 gameplay#sims 4 family#thesims4#do the sim thing legacy challenge sims 4
18 notes
·
View notes