#step-by-step Linux setup
Explore tagged Tumblr posts
Visit Tumblr Blog
Explore Tumblr blogs with no restrictions, modern design and the best experience.
Last Seen Tumblr Blogs


Fun Fact
Tumblr Inc. has $15.1M in annual revenue.
Video
youtube
Hands-On Guide: How to Install and Set Up Ubuntu and CentOS on VMware
Overview:
Setting up Ubuntu and CentOS on VMware is a crucial skill for DevOps professionals who want to create isolated environments for testing, development, and automation workflows. VMware allows you to run multiple virtual machines (VMs) on a single system, enabling you to experiment with different Linux distributions without altering your primary operating system. In this hands-on guide, we’ll walk through the steps to install and configure both Ubuntu and CentOS on VMware, covering the key settings and best practices for optimizing performance in DevOps environments.
VMware: Getting Started
Step 1: Install VMware Workstation
To begin, you’ll need VMware Workstation or VMware Player installed on your system. Here’s how:
- Download VMware: Visit the official VMware website and download either VMware Workstation or VMware Player depending on your preference. Workstation is a paid tool with advanced features, while Player is a free option that’s perfect for basic VMs. - Install VMware: Run the installer and follow the setup wizard. Once installed, launch VMware.
Step-by-Step: Installing Ubuntu on VMware
Step 1: Download Ubuntu ISO
- Go to the [official Ubuntu website](https://ubuntu.com/download) and download the LTS (Long Term Support) version of Ubuntu, ensuring you have a stable version for long-term usage in your DevOps workflows.
Step 2: Create a New Virtual Machine in VMware
- Open VMware Workstation or VMware Player and select “Create a New Virtual Machine.” - Choose the ISO image by selecting the downloaded Ubuntu file, then click Next.
Step 3: Allocate Resources
- CPU: Assign at least 2 CPUs for smooth operation. - RAM: Allocate at least 4GB of RAM for optimal performance. You can assign more if your system allows. - Storage: Provide at least 20GB of disk space, especially if you plan to install DevOps tools.
Step 4: Installation of Ubuntu
- Start the VM, and Ubuntu’s installation wizard will appear. - Follow the prompts: choose language, keyboard settings, and select Install Ubuntu. - Choose installation type (erase disk if it’s a fresh VM) and configure time zones, user account, and password. - After installation, update your system by running: ```bash sudo apt update && sudo apt upgrade -y ```
Step 5: VMware Tools Installation
Installing VMware Tools improves VM performance, enabling better integration with the host machine.
- In VMware, go to the VM menu and select Install VMware Tools. ```bash sudo apt install open-vm-tools open-vm-tools-desktop -y sudo reboot vmware-toolbox-cmd -v ``` Verify VMware Tools Installation:
```bash vmware-toolbox-cmd -v ```
Step 6: Post-Installation Setup for DevOps
- Install Basic DevOps Tools: ```bash sudo apt install git curl vim ``` - Enable SSH Access: ```bash sudo apt install openssh-server sudo systemctl enable ssh sudo systemctl start ssh ```
Step-by-Step: Installing CentOS on VMware
Step 1: Download CentOS ISO
- Visit the [official CentOS website](https://www.centos.org/download/) and download the CentOS 7 or 8 version (or CentOS Stream, depending on your preference).
Step 2: Create a New Virtual Machine in VMware
- Open VMware and choose “Create a New Virtual Machine.” - Select the CentOS ISO image and proceed to the next step.
Step 3: Allocate Resources
- CPU: Assign at least 2 CPUs. - RAM: Assign at least 4GB of RAM for smooth operations, especially if you’re installing enterprise tools. - Storage: Allocate 20GB or more, depending on your intended use case.
Step 4: Installation of CentOS
- Start the VM, and the CentOS installation wizard will load. - Choose your language and keyboard settings, then proceed to the installation screen. - Configure disk partitioning (choose automatic for simplicity). - Set up a root password and create a user account. - Follow the prompts to install CentOS. Once done, reboot the VM.
Step 5: Install VMware Tools
For better performance, install VMware Tools:
- In the VMware menu, select Install VMware Tools.
- Update Your System: ```bash sudo yum update -y ``` - Install open-vm-tools: ```bash sudo yum install open-vm-tools -y ``` - For graphical environment: ```bash sudo yum install open-vm-tools-desktop -y ``` - Start the vmtoolsd Service: ```bash sudo systemctl enable vmtoolsd.service sudo systemctl start vmtoolsd.service ``` - Verify Installation: ```bash vmware-toolbox-cmd -v ```
Step 6: Post-Installation Setup for DevOps
- Install EPEL (Extra Packages for Enterprise Linux) and Basic DevOps Tools: ```bash sudo yum install epel-release sudo yum install git curl vim ``` - Enable SSH Access: ```bash sudo yum install openssh-server sudo systemctl enable sshd sudo systemctl start sshd ``` - Verify installed tools: ```bash git --version curl --version vim --version ```
Best Practices for Installing and Setting Up Ubuntu and CentOS on VMware
1. Resource Allocation: Ensure you allocate sufficient CPU, RAM, and storage based on the workloads. For most DevOps tasks, assign at least 2 CPUs and 4GB of RAM for optimal performance. More demanding workloads may require additional resources.
2. Snapshots: Regularly take VM snapshots before major changes or installations. This allows you to revert to a stable state if something goes wrong during configuration or software testing.
3. VMware Tools Installation: Always install VMware Tools after setting up the OS. This ensures seamless mouse integration, smoother graphics, and better performance, reducing potential bugs and lag in your virtual environment.
4. Partitioning: For better performance and management, use custom partitioning if needed. This helps in allocating different parts of your virtual disk to `/`, `/home`, and `/var` partitions, improving system performance and flexibility in future updates or installations.
5. Automated Backups: Set up automated backups or export your VMs periodically. This practice is particularly important if your VMs store critical configurations, applications, or databases.
6. Networking Configuration: Ensure that your virtual machines are correctly configured to access the internet and your local network. Consider using NAT or Bridged Network options, depending on your networking needs. NAT works well for internet access, while Bridged is ideal for networked environments.
7. Security Considerations: Configure firewalls and SSH access carefully to secure your VMs from unauthorized access. Set up strong user permissions, enforce password complexity, and enable SSH keys for secure remote access.
8. Regular System Updates: Frequently update both Ubuntu and CentOS systems to ensure they are protected from vulnerabilities. Use the following commands to update packages: - For Ubuntu: ```bash sudo apt update && sudo apt upgrade ``` - For CentOS: ```bash sudo yum update ```
9. Monitor Resource Usage: VMware allows you to monitor CPU, memory, and storage usage. Use these tools to ensure that your VMs are not consuming excessive resources, especially in shared environments.
10. Test Environments: Use VMs as sandbox environments to test and experiment with new DevOps tools like Docker, Kubernetes, Jenkins, or Ansible before deploying them in production.
Conclusion:
By installing and setting up both Ubuntu and CentOS on VMware, you gain the flexibility to experiment with DevOps tools, test automation workflows, and learn Linux system administration in a safe and isolated environment. This hands-on tutorial provides you with the foundation to run and manage your Linux VMs effectively, setting you up for success in DevOps tasks ranging from development to deployment automation. Follow along in this video as we guide you step-by-step to mastering Linux installations on VMware for your DevOps journey.
#youtube#Install VMware Workstation#Step-by-Step: Installing Ubuntu on VMware#ubuntuGetting Started with Linux Installation and Basic Setuplinux tutorial for beginnersopen sourcelinux terminaldistrotubeubuntu is badlin#vmwareubuntuHands On Guide: How to Install and Set Up Ubuntu and CentOS on VMwarevmware workstationcentos 7download and install vmware works#Linux Install and Setup OverviewInstall and Setup VMware Workstation Pro 17Installing Ubuntu on VMware Workstation Pro 17Installing CentOS o
1 note
·
View note
Note
I saw you mention your plex server! As a fellow lover of toys, what is your home server setup and what all do you use it for? :o
i literally JUST started setting it up so right now for testing purposes i have the server running off of my main office PC and i only have a couple movies and shows on it. i currently have Thunderbolts*, Umamusume beginning of a new era movie, Wicked, Gravity Falls S1&2 and Umamusume S1&2 in the library for feature testing. the umamusume movies and episodes are particularly nice for subtitle testing.
i SHOULD at some point today be getting a cheap GMKtec mini PC delivered that I plan to install Linux on and hook up an external HDD to in hopes that it’ll become my primary Plex media server. assuming i can get the setup working properly, and potentially even figure out file transfers from my PC to the server over local network, then my next step in the future after we’ve made full use of the current HDD is to get a large capacity HDD enclosure and just fill it with terabytes of free space to use indefinitely.
118 notes
·
View notes
Text

Welcome back, coding enthusiasts! Today we'll talk about Git & Github , the must-know duo for any modern developer. Whether you're just starting out or need a refresher, this guide will walk you through everything from setup to intermediate-level use. Let’s jump in!
What is Git?
Git is a version control system. It helps you as a developer:
Track changes in your codebase, so if anything breaks, you can go back to a previous version. (Trust me, this happens more often than you’d think!)
Collaborate with others : whether you're working on a team project or contributing to an open-source repo, Git helps manage multiple versions of a project.
In short, Git allows you to work smarter, not harder. Developers who aren't familiar with the basics of Git? Let’s just say they’re missing a key tool in their toolkit.
What is Github ?
GitHub is a web-based platform that uses Git for version control and collaboration. It provides an interface to manage your repositories, track bugs, request new features, and much more. Think of it as a place where your Git repositories live, and where real teamwork happens. You can collaborate, share your code, and contribute to other projects, all while keeping everything well-organized.
Git & Github : not the same thing !
Git is the tool you use to create repositories and manage code on your local machine while GitHub is the platform where you host those repositories and collaborate with others. You can also host Git repositories on other platforms like GitLab and BitBucket, but GitHub is the most popular.
Installing Git (Windows, Linux, and macOS Users)
You can go ahead and download Git for your platform from (git-scm.com)
Using Git
You can use Git either through the command line (Terminal) or through a GUI. However, as a developer, it’s highly recommended to learn the terminal approach. Why? Because it’s more efficient, and understanding the commands will give you a better grasp of how Git works under the hood.
GitWorkflow
Git operates in several key areas:
Working directory (on your local machine)
Staging area (where changes are prepared to be committed)
Local repository (stored in the hidden .git directory in your project)
Remote repository (the version of the project stored on GitHub or other hosting platforms)
Let’s look at the basic commands that move code between these areas:
git init: Initializes a Git repository in your project directory, creating the .git folder.
git add: Adds your files to the staging area, where they’re prepared for committing.
git commit: Commits your staged files to your local repository.
git log: Shows the history of commits.
git push: Pushes your changes to the remote repository (like GitHub).
git pull: Pulls changes from the remote repository into your working directory.
git clone: Clones a remote repository to your local machine, maintaining the connection to the remote repo.
Branching and merging
When working in a team, it’s important to never mess up the main branch (often called master or main). This is the core of your project, and it's essential to keep it stable.
To do this, we branch out for new features or bug fixes. This way, you can make changes without affecting the main project until you’re ready to merge. Only merge your work back into the main branch once you're confident that it’s ready to go.
Getting Started: From Installation to Intermediate
Now, let’s go step-by-step through the process of using Git and GitHub from installation to pushing your first project.
Configuring Git
After installing Git, you’ll need to tell Git your name and email. This helps Git keep track of who made each change. To do this, run:

Master vs. Main Branch
By default, Git used to name the default branch master, but GitHub switched it to main for inclusivity reasons. To avoid confusion, check your default branch:

Pushing Changes to GitHub
Let’s go through an example of pushing your changes to GitHub.
First, initialize Git in your project directory:

Then to get the ‘untracked files’ , the files that we haven’t added yet to our staging area , we run the command

Now that you’ve guessed it we’re gonna run the git add command , you can add your files individually by running git add name or all at once like I did here

And finally it's time to commit our file to the local repository

Now, create a new repository on GitHub (it’s easy , just follow these instructions along with me)
Assuming you already created your github account you’ll go to this link and change username by your actual username : https://github.com/username?tab=repositories , then follow these instructions :


You can add a name and choose wether you repo can be public or private for now and forget about everything else for now.

Once your repository created on github , you’ll get this :

As you might’ve noticed, we’ve already run all these commands , all what’s left for us to do is to push our files from our local repository to our remote repository , so let’s go ahead and do that

And just like this we have successfully pushed our files to the remote repository
Here, you can see the default branch main, the total number of branches, your latest commit message along with how long ago it was made, and the number of commits you've made on that branch.

Now what is a Readme file ?
A README file is a markdown file where you can add any relevant information about your code or the specific functionality in a particular branch—since each branch can have its own README.
It also serves as a guide for anyone who clones your repository, showing them exactly how to use it.
You can add a README from this button:

Or, you can create it using a command and push it manually:

But for the sake of demonstrating how to pull content from a remote repository, we’re going with the first option:

Once that’s done, it gets added to the repository just like any other file—with a commit message and timestamp.
However, the README file isn’t on my local machine yet, so I’ll run the git pull command:

Now everything is up to date. And this is just the tiniest example of how you can pull content from your remote repository.
What is .gitignore file ?
Sometimes, you don’t want to push everything to GitHub—especially sensitive files like environment variables or API keys. These shouldn’t be shared publicly. In fact, GitHub might even send you a warning email if you do:

To avoid this, you should create a .gitignore file, like this:

Any file listed in .gitignore will not be pushed to GitHub. So you’re all set!
Cloning
When you want to copy a GitHub repository to your local machine (aka "clone" it), you have two main options:
Clone using HTTPS: This is the most straightforward method. You just copy the HTTPS link from GitHub and run:

It's simple, doesn’t require extra setup, and works well for most users. But each time you push or pull, GitHub may ask for your username and password (or personal access token if you've enabled 2FA).
But if you wanna clone using ssh , you’ll need to know a bit more about ssh keys , so let’s talk about that.
Clone using SSH (Secure Shell): This method uses SSH keys for authentication. Once set up, it’s more secure and doesn't prompt you for credentials every time. Here's how it works:
So what is an SSH key, actually?
Think of SSH keys as a digital handshake between your computer and GitHub.
Your computer generates a key pair:
A private key (stored safely on your machine)
A public key (shared with GitHub)
When you try to access GitHub via SSH, GitHub checks if the public key you've registered matches the private key on your machine.
If they match, you're in — no password prompts needed.
Steps to set up SSH with GitHub:
Generate your SSH key:

2. Start the SSH agent and add your key:

3. Copy your public key:

Then copy the output to your clipboard.
Add it to your GitHub account:
Go to GitHub → Settings → SSH and GPG keys
Click New SSH key
Paste your public key and save.
5. Now you'll be able to clone using SSH like this:

From now on, any interaction with GitHub over SSH will just work — no password typing, just smooth encrypted magic.
And there you have it ! Until next time — happy coding, and may your merges always be conflict-free! ✨👩💻👨💻
#code#codeblr#css#html#javascript#java development company#python#studyblr#progblr#programming#comp sci#web design#web developers#web development#website design#webdev#website#tech#html css#learn to code#github
104 notes
·
View notes
Text
I feel like the last year has been a great push for me to slowly detach myself from giant companies and ensure what I do is in my control and ownership
Finally switched over to linux permanently
switched to firefox
enabled adblocker, sponsor blockers, and tracker removers
disabled autoplay and the recommendations sidebar on YouTube (highly highly encourage, though I still keep the homepage open so I can choose when to browse new suggested content rather than it pestering me)
downloaded all my tumblr posts and now host them parallel on my website (stuck here until we find some decentralized way of doing social media right)
cleared out 99% of my online storage to now be on multiple hard-drive backups
downloaded locally all my music
removed myself from basically every data tracking social media platform except this and YouTube
And now currently I'm trying to consolidate all my feeds into just an RSS reader.
It takes a long time and a lot of planning, but its very rewarding to take control over what you want to see, how you see it, how its formatted, ect. I find these are my steps to an easy transition off a certain service:
Download all your data and back it up. Now your account can be deleted at any time with no remorse.
Find browser extensions that enhance and modify the experience to what you might need. Use that to tangibly guide your preferences. Go ahead and remove the app on your phone if its there.
Research every alternative service and try them out. Begin moving certain activity exclusively to the alternative. Take time getting used to it and see if its better to try more alternatives.
Completely jump ship, delete the account, move all feeds or settings over.
Its an ongoing process but there's still probably a few more years of this to go through. Future plans are:
Completely remove all prior emails and self host a new one
Get off Discord entirely except for running the wiki server. It sucks that Discord is so prevalent. Probably move to various forums. Maybe look into some sort of forum management software such as how RSS feeds tame articles and videos into one place.
Setup adblockers directly into my router so ads won't even appear on phones.
Setup my phone to just straight up also run linux. There's a few mobile-designed linux platforms to look into until I decide.
53 notes
·
View notes
Text
One year of using Linux: Some personal thoughts/ramblings
Okay, more like 1.5 years based on my chat history with some of my friends, but I started using Linux as my main operating system sometime after Microsoft announced EOL for Windows 10.
Although I had some prior experience with Linux Mint, I began with Kubuntu as my "daily driver" since a friend of mine spoke highly of it. I am a KDE Plasma lover and Ubuntu is already a highly popular (and supported) Linux variant.
I used it for an entire year and enjoyed it quite a bit! I was able to play every game I had on my original OS, and some of them ran a bit faster than before. I like that updating my system was consistent and reliable, even if I had to do it more often than I did back on Windows (it's also easier to update my machine knowing that it won't randomly make it worse like Windows does).
A month ago, I got a new computer (technically used, but better specs than the old one) and decided to try Manjaro this time around. I was getting a bit tired of Snap and the way that most programs always felt a bit outdated, but I was scared of going all-in on Arch, so I thought Manjaro would be a good stepping stone. It has it's own variants of issues, but I haven't had too much of a problem with it. I still gotta move all my files, though...
Anyways, some thoughts and feelings in bulleted list form:
Krita has some weird quirks on my machine, even when I use the official AppImage from the website. On a multi-monitor setup, the menus for resizing the canvas will appear completely offscreen and require me to use the Super+Arrow Key command to snap it back onto my monitor. Also, the canvas tends to behave weird when alternating between pen and mouse input (i.e. the cursor preview not moving, or the selection commands not functioning until the mouse is moved off of and back onto the canvas). It doesn't stop me from using the program, but it does get a bit annoying.
Spectacle my beloved. Such a good screenshot tool and I like that I can tweak the screenshot more easily compared to the Snipping Tool on Windows 10.
On Kubuntu, it was kinda frustrating to have Firefox constantly be outdated due to using the Snap version. This was part of why I decided to try out Manjaro.
I love that Manjaro preinstalled Yakuake and a couple of other programs that I often used back on Kubuntu. They know what we want <3.
Manjaro doesn't play nicely with turning the screen off when the computer is idling. The screen either dims but doesn't turn off (leaving only the cursor visible), or it does turn off but crashes the KDE Plasma shell, requiring me to reboot it in the terminal. I'm not sure how to fix this, but my system does have an update to run this morning. Hoping it fixes that 🤞.
Troubleshooting issues feels a bit hard when problems and solutions can be scattered across multiple places. This is an issue I've noticed with several open-source projects, where something can be spread across a forum, an issues page on a repository, and a wiki. I wish there was an easier way to search for and ask for help, so that there's less duplicate questions.
Overall, Linux has been a very stable and enjoyable experience to use, and less unwieldy than what I was anticipating. Even then, I don't think I'm quite ready to recommend it to people who aren't familiar with computers and using a command line. I hope that more people adopt Linux, even if it's because of how Windows is... changing.
So yeah! Pretty nice, pretty customizable. Sometimes has issues but I find workarounds most of the time. I hope that the community around open source software can grow and improve, especially hoping to have a wider range of people with different skill levels and walks of life.
#linuxposting#linux#kde plasma#hoping its ok to tag various linux things like this since they are discussed here
9 notes
·
View notes
Text
Make Your KDE Plasma 6 Look Sleek, Elegant, and Professional

If you're a fan of KDE Plasma 6 and want your Linux desktop to look clean, polished, and professional — you're in the right place. Whether you're running Fedora 42 KDE, KDE Neon, Manjaro Linux KDE, or openSUSE Tumbleweed, this transformation works perfectly on any distro running KDE Plasma 6 and above.
With just a few tweaks (or a single command), you can make your desktop look as beautiful as it is powerful.
Why Go for a Sleek and Elegant KDE Look?
KDE Plasma 6 offers deep customization, but sometimes the default setup feels too busy or clunky. By applying a carefully crafted layout with professional themes, icons, and widgets, you can boost both the aesthetic and your focus.
This setup gives your Linux desktop a modern, sleek, elegant, and professional look — but faster, more flexible, and open-source.
Final Result Preview
Check out how your desktop will look after the transformation. Sleek, clean, and elegant!
View the final look →
youtube
Step-by-Step Customization Tutorial
Want to do it yourself? We’ve got your back with a detailed guide that walks you through every step.
Watch the tutorial here →
youtube
Auto Customization DEMO
Don’t want to do all the steps manually? Watch the single-command tool in action!
Watch the Auto-Customize Demo →
youtube
Download the Resource Pack
Everything you need — icons, themes, widgets, layouts — ready to go!
🔗 Get it from Pling
Single-Command Auto Customization
Apply everything in one go. Just run the command and enjoy your new KDE Plasma 6 look.
➡️ Get it here:
Ko-fi
Payhip
Gumroad
Patreon
Full Documentation
Want to customize at your own pace? Follow the full written guide for your distro.
📖 Available here:
Ko-fi
Patreon
Gumroad
Payhip
Ready to give your KDE Plasma 6 desktop a professional makeover?
Download the resources, run the script, or follow the guide — and enjoy a Linux experience that looks as good as it performs.
#KDEPlasma6#LinuxDesktop#LinuxCustomization#KDETheme#Plasma6#LinuxAesthetic#FOSS#openSUSE#ManjaroLinux#FedoraLinux#KDE plasma 6.4#Fedora 42#Youtube
7 notes
·
View notes
Text
Getting Undertale running on linux in 2024: a guide for those that cannot be assed on debian-based distributions
Step one: TRY.
this is for the humblebundle downloads only, unfortunately. i don't have + can't test the steam version. unzip. get into the folder. try good ol ./UNDERTALE on the runnable-looking thing. if that doesn't work, try chmod +x UNDERTALE and chmod +x game/runner for good measure and repeat.
if you managed that and it runs, congratulations!! YOU WON. otherwise:
Step two: SCREAM.
You probably got cryptic messages about stuff not being found when you caN SEE THEM RIGHT THERE. it's okay. it's an old game on an old engine. it's 32-bit. the messages don't help with diagnozing that but if it's THAT sort of message IT'S THE 32-BIT BULLSHIT. continue to step three.
Step three: 32-bit libs the easy part.
sudo apt install lib32z1 . try to run it again. restart if no change. now you're probably met with something MUCH more helpful and specific, like:

don't give up you're getting closer!!
Step four: 32-bit libs the bug-squashing part.
this one is annoying but you only have to do it once per machine i love you
okay, first, setup your machine for the 32-libs with
sudo dpkg --add-architecture i386 sudo apt update
^ you won't need to repeat this ever again. you're good. NOW. hunt down where the files you want are in your package directiories, depending on the distributions. I was missing libstdc++.so.6. it was in the package libstdc++6. notice the pattern. it's lowercase[number after 'so'] if you're on debian or ubuntu you'll probably only have to plug this pattern in and you're GOOD.
sudo apt install libstdc++6:i386
^ the colon part is important! that's the 32 bit bit.
wait for the install to finish, try to run the executable again and hunt down the next library . rinse and repeat until undertale kicks in and RUNS. THat's it!!! you're done, hopefully!!
the libraries I was personally missing were: libXxf86vm.so.1, libGL.so.1, libopenal.so.1, libXranr.so.2 and libGLU.so.1. I installed them from the packages libxxf86vm1:i386, libgl1:i386, libopenal1:i386, libxrandr2:i386 and libglu1:i386. all were conforming to the pattern earlier.
step five: undered. tal <3
okay now how to tag this when in two years I want to play undertale again on a new machine.
#undertale#tech#uhhh#linux#debian#ubuntu#im mostly just savinv this on a searchable blog for next time I want to explode over thishfakjhsfl
25 notes
·
View notes
Text
how to connect to wi-fi services in pokemon gen 4 (DPPT/HGSS)
it's still possible to access the wi-fi services of the gen 4 games after the official shutdown of nintendo's wii/ds wi-fi in 2013 due to fan efforts by changing your DNS settings in-game - this is called the DNS exploit. this is popularly used in gen 5 which really has no complications, but in gen 4 it's a bit more complicated because the games are So old that they can't connect to the internet through modern routers due to fancy modern internet encryption. the connection either needs to have no password, or have WEP encryption, which most modern routers do not support. i had some people asking me how to do this so here's a post lol
first, it should be noted i use the pkmnclassic service, and i think you should too. this gives you access to old mystery gifts as well as pretty much every other wi-fi feature. their website also allows you to view pokemon currently uploaded to either gen 4 or 5's GTS through your browser. once you get your wi-fi set up properly, connecting to the internet will be easy, but that setup comes first. below i am going to list all the options i am currently aware of and able to explain
option 1 - phone hotspot (easy/convenient, doesn't work for every type of phone)
some phone hotspots are able to use old WEP type encryption, or be password-less. if you have access to a phone hotspot, it's worth taking off the password if it lets you and trying to connect to the gen 4 wi-fi with it before trying any other method, since if it works it's super convenient, just turn on the hotspot any time you want to do something online in gen 4 and turn it back off when you're done. unfortunately this depends on the type of phone and what OS its on and i don't have a list of what phones or OSes are compatible, so good luck lol. mine personally is not, and i have a fully updated iphone
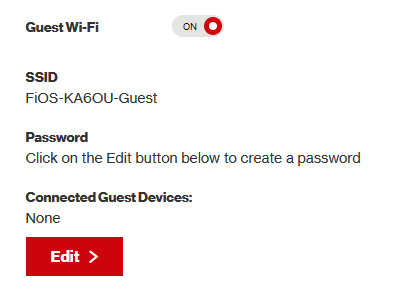
option 2 - guest wi-fi (a little less convenient but still easy if you have access to router settings)
in the same vein as phone hotspots, guest wi-fi hotspots can also work, and this is what i personally use myself. the catch is you have to have access to your router settings, so if you're a young person using a parents' router without access to those or some other situation like that, you may have to ask for assistance every time you want to turn this on/off, which could be a dealbreaker for some unfortunately. but if you're able to do that, simply make your guest wi-fi password-less and turn it on when you want to connect to gen 4 wi-fi and turn it back off when you're done. since these settings pages are so different per internet provider, i can't really give a guide on how to do that here, though mine through verizon fios is pretty straightforward. some guest wi-fi may not work for this but i think most should
option 3 - use an old router that supports WEP encryption (probably inaccessible for most, but only has to be set up once and then you're done)
i've done this in the past but i had my dad's help with the process, i cannot walk you through buying an old router lol. but yes if you purchase an old router and set that up you can have password protected gen 4 wi-fi permanently
option 4 - save backup + emulation through melonds (works pretty much 100% of the time if you have a hacked 3DS and some sort of PC)
MelonDS is a really great DS emulator that you can find here for windows/linux/mac: https://melonds.kuribo64.net/downloads.php
the basic idea is that you can backup your save file/game with a hacked 3DS using Checkpoint or TWLSaveTool (outside the scope of this guide but this is easy to do and you can walk through the steps here) and then run it through melonds, which can bypass all this WEP/encryption hell for you and simply connect to the internet. of course this is not very convenient if you have to constantly back up your saves to do wi-fi stuff but it's better than nothing if you have no other option.
unfortunately setting up the wi-fi can be a pain, and you also need DS BIOS files to run everything properly, which i cannot provide myself for legal reasons but they uh... aren't that hard to find lol, and you can back them up from an actual DS if you have access to the necessary tools for that.
if you use a windows PC, feel free to use my version of melonds which already has all the wifi shit set up, you'll just need to provide your own bios files under emu settings (it's a bit old but it works great for this purpose): https://drive.google.com/file/d/1DQotaqFuBwXz1KYdQWiwxghtn3faLgj-/view?usp=sharing
edit: just found out right after posting this that the most recent version of melonds might work out the box without having to do any particular wi-fi setup? so feel free to try it instead of my version if you like

if you are using linux/mac or don't want to use my version, you'll have to use the melonDS FAQ/google to figure it out, i'm sorry!
by the way yes, this means even if you don't have a gen 4 cart and solely play over emulator, you can trade/battle/etc with people who are playing on DS - they connect to the same servers!
okay and NOW once you have one of those options set up, you can actually connect to wi-fi in game by doing the following:
(these screencaps are from my capture card, i am doing this on an actual DS, but you can also do this with melonds if you're using that option)
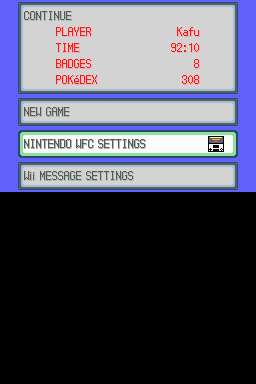
step 1: navigate to "NINTENDO WFC SETTINGS" in the menu where you press continue on your save file, in-game. in gen 4 you need to do it here and not in your DS settings.
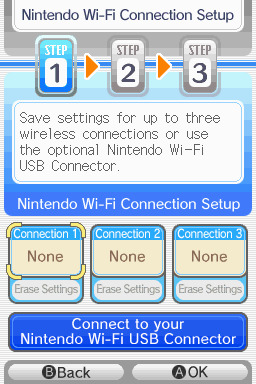
step 2: tap "Nintendo Wi-Fi Connection Settings" and pick any of the three connections here to start the set-up. if you already have some here, i'd click "erase settings" underneath to start from scratch.

step 3: search for an access point and pick your desired access point from the list that comes up, and put in a password if needed (this assumes you have set up your wifi properly at this point)
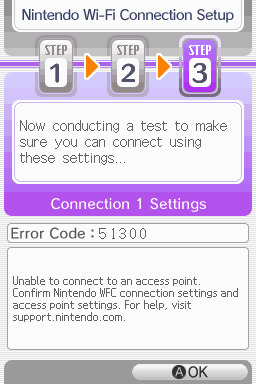
step 4: it will attempt a connection to the internet, and may or may not throw an error. regardless, the error doesn't really matter, you can just hit "OK" whether it's successful or not

step 5: go back into your new connection (the box that previously said "None" should now say "Ready") and scroll down until you see the option "Auto-obtain DNS" - change this to "No"
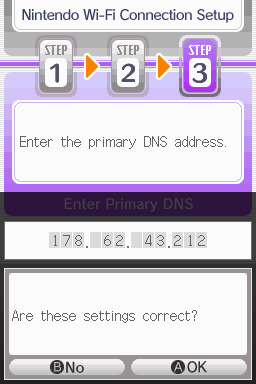
step 6: change the primary DNS to pkmnclassic's DNS, which is 178.62.43.212 - in layman's terms this will essentially let you connect to their servers instead of nintendo's, which are obviously down. as for the secondary DNS, either leave it at 0.0.0.0 or change it to the same DNS as the primary
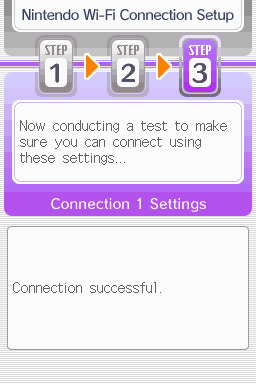
step 7: now would be a good time for a connection test. tap "Test Connection" in the top right. there should be a successful connection. assuming there is a successful connection, congrats! save your settings and enter your game as normal. you'll need to go to the basement of any pokemon center and pick up your pal pad, then try entering the wi-fi club (middle NPC at the counter) to test it in-game and get your friend code.
if there isn't, try a few more times or get closer to your access point - sometimes it's not you, the service can just occasionally be spotty. if you keep getting errors, you can use this site to look up what the error code might mean. if you still can't solve the issue, you may have to try a different method of connection as listed above.
sorry i couldn't be more in depth but frankly i'm not an expert on this stuff either, i'm just doing my best. there are a couple other options for doing this, like taking the password off your modern home wi-fi, or bridging your connection to an old laptop/computer, but the first is particularly dangerous so i didn't want to include it in the list and the second is completely out of my league, i just know people have done it before
good luck feel free to ask questions but no promises i'll have answers. if you need troubleshooting help i'd recommend pkmnclassic's discord over me, they have channels for that stuff (yes i hate troubleshooting stuff moving to discord and not forums as much as the rest of you but it can't be helped lol)
81 notes
·
View notes
Text
Theres something about PC gaming. Like its got a reputation for being the most expensive at the highest levels but:
A. If you are poor and want to play games, its easier to justify a machine that do other stuff like send emails and do homework with
B. The ability to build your own PC means choosing your cost. This can be shelling out thousands or putting some shitbox potato together out of whatever parts you can afford and making an extremely cursed setup that still WORKS.
C. The ability to self repair. If you are poor, that means if something breaks, replacing the whole thing might not always be possibile but with a PC you can at least save money by switching out parts for cheaper, functional ones. Or hell, just maybe you are fed up with Windows and decide to swap to Linux. Thats not an option you get for consoles.
D. PC also has the largest library of playable games. Even if you cant afford the equipment to play the latest AAAA 500 gig game, theres still decades of other games you can play. Which is why games like the original half life still has active community servers in countries where throwing together whatever spare PC parts you can is much more feasible than acquiring a console. Piracy is also the most accessible on PC, so if you're a broke teenager, all you need to do is learn how to torrent things and boom you have access to way more games than your wallet will allow.
E. PC gamers are queer as hell. Like games like Fallout New Vegas and Team Fortress 2 have running jokes about how their audience is either bigoted or queer and theres a reason for that. These games are primarily played on PC. For me, and many other PC gamers, we came from very poor families in areas not very friendly to LGBTQIA+ peoples so finding communities where you can be yourself can be the first step to coming to terms with who you are, and naturally a lot of people who have these experiences usually end up learning how to code and donning "The Programming socks" or going into STEM when they can afford school. So for real, if you think your space is suddenly being "invaded" by these queer people, take a good long look at the people you've interacted with online over the years and realize they've been there all along.
19 notes
·
View notes
Text
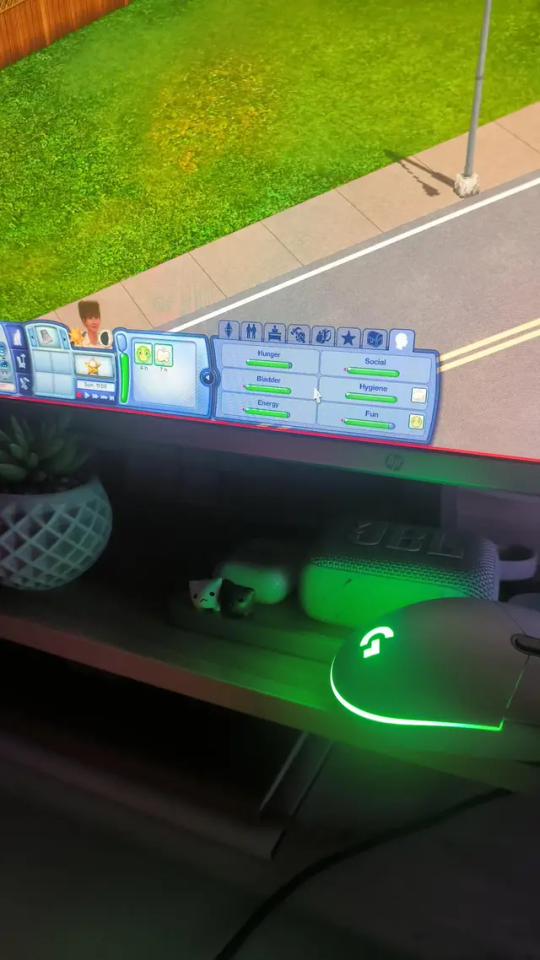
How To Make a Mood Mouse


I posted this on Reddit yesterday, and it seemed like everyone loved it! So I wanted to put together a tutorial for anyone who wants to try it out!
I saw a reddit post last year that never left my mind. Someone had made the mouse lights sync with their Sims mood! I knew right away that I needed to do that, and after some digging, I found the same mouse (I think) from that post!
But no seemed to know how or even if it would sync with a specific part of the screen. I even messaged the original redditor, but they haven't been active for some time now. So I wasn't sure if it would actually work or not.
But, one year later, I finally gave in and bought the mouse nonetheless! Whether it worked or not, I needed a new mouse, and I couldn’t pass up this opportunity.
After some trial and error... it syncs! It's not perfect (it turns slightly blue when the bar drops low, but not low enough to trigger yellow), but still, I'm so happy with it!
See how you can do it under the cut!
So, how can you make your mouse sync with your Sim mood?
I only know how this works with Logitech mouse, but I believe there might be other options out there! The key is having a mouse that supports LightSync and comes with a companion app.
This tutorial is specifically for Logitech devices, but if you're using a different brand, you might be able to adapt the steps to work with your setup!
I also have no idea if this can work on mac or linux.
_____________________
What You Need
º Lightsync Logitech mouse - I'm using Logitech G203, since it was cheaper and has great reviews!
º Logitech G HUB app
_____________________
Open the Logitech app — it should automatically detect your mouse. But before you click on the device, make sure to click the "sun-like" icon.
You will have to disable Dynamic Lighting for Windows.

It will prompt you to access Windows settings, so click on the blue link in that message.

Once you're in Windows settings, just turn off "Use Dynamic Lighting on my devices."

Go back to the Logitech app and click on your mouse. On the left side of the app, click the sun-like icon again.

In the top right corner, click on "Desktop Default," then select "Manage Profiles."

In that new page, below "Games & Applications," click on "Add Game or Application."

This will open File Explorer, and you’ll need to locate your TS3W.exe file. The exact folder depends on where you play the game (Steam, EA, 🏴☠️), so the path may vary. You can search online for the correct Bin folder based on your version.
If you have a shortcut to the game anywhere, just right-click it and select "Open File Location". This will take you directly to the folder. Then, simply copy the path and paste it into the File Explorer pop-up of the Logitech app, and select TS3W.exe.
I already have TS3W configured, so for demonstration purposes, I’m going to use TS3.exe instead.
Click on the profile to select it. The cursor will probably be very slow, so you'll need to adjust the DPI, either directly on your mouse or through the app.

Go back by clicking the upper left corner. Always make sure you’re on the correct profile (TS3W). The app can be a bit stubborn and will automatically switch to Desktop if you open anything outside the app.
So, always double-check the profile name in the upper left corner.
With the TS3W profile open, go to Presets > Effects and open the dropdown menu. From there, select “Screen Sampler” and click on it.

Before reconfiguring anything, let’s open the game!
With the game running on a save file, press the Windows key to bring up the taskbar and open the Logitech app. It will probably have switched back to the Desktop profile, so be sure to change it back to TS3W.
Then, click on “Edit” below the Screen Sampler effect.

Now, a blue rectangle will appear in the app. This rectangle lets you select the part of the screen you want the mouse lighting to sync with. You can resize it and move it over to the mood bar of your Sim.

This part can be a bit tricky. You’ll need to go back and forth between the game and the app until you find the perfect position where the mouse lighting syncs perfectly with the color.
I recommend turning testingcheats on so you can lower your Sim’s moodlets and check if all the colors display correctly on the mouse.
Every time you switch between the game and the Logitech app, it will ask if you want to keep using the TS3W profile—always click Yes so you don’t have to change it manually each time.

The position below works best for me right now. There’s a point where the mouse turns blue because the color isn’t quite green or yellow yet, but it only happens with that very specific mood, so it doesn’t bother me much.

Mess around with that little blue square until you find the perfect position. Unfortunately, it can’t get any smaller, which would really help. But if you use Tiny UI Fix for The Sims 3, the target area will be much bigger, and I believe it will work even better!
You shouldn’t place the blue square too high on the mood bar because once the green bar drops, the mouse will start picking up gray. It should be positioned so that, when the mood bar turns yellow, the green is low enough to avoid being detected.

The taskbar might be in the way, but don’t worry, the mouse won’t pick up that color.
I've noticed that, with the default blue UI, it's much more difficult to make this work. The mood bar isn't straight, it gets thinner at the bottom, so I've noticed that it starts picking blue in a lot of points, specially when the mood bar is green. Since it picks the color from the whole square, it might be blending those colors and it doesn't stay green for long if the green area is small. I made it work once tho, so it isn't impossible!
So, now let's see it in action!
It’s not perfect, but it’s such a cool effect that I don’t mind the quirks. Hope this helps if you’re trying it out too!
Happy Simming!
5 notes
·
View notes
Note
hello! anon looking for advice on ethical AI gen. i've got a pretty decent comp setup (nvidia on my laptop and i thiiiink my desktop?) and i'm fairly ok tech-wise, so i'd love to set up something local. :) any guides or advice would be very appreciated- thank you for your time!
Hi!!!!
First off, welcome aboard! It's always a lot of fun to have more interested and creative-minded folks playing with these toys! I love the super-specific-fetish-porn that dominates the genAI scene, don't get me wrong, but it's always nice to see people interested in exploring these tools in other ways too!! (Not to say you shouldn't make super specific fetish porn; goodness knows about a third of my generations are!)
Now, I did a little write up about how to get yourself started locally here:
I'm a big believer in the InvokeAI interface, in part because it's easy to set up and update, and in part because I find the in-painting to be the most precise and comfortable.
However, the reality is, Automatic1111 is the "standard choice" in terms of interfaces for local generation, and most tutorials will assume either that you use it, or that you are familiar enough with your own UI to be able to "translate" the guide.
Invoke is very much a "second line" option, behind A1111 and ComfyUI, but it's the one I am most familiar with as it had robust Linux support the soonest, and I'm a horrible little linux gremlin.
Now, you specify that you're doing alright techwise, so I'm going to get a little technical about specs.
Most of the tech demands for image generation come down to the amount of memory in your video card. I have an 8GB memory video card, which means I can run up through about Stable Diffusion 2.1, but not something more extreme like Flux.
More VRAM means more models you can run at all. More power means those models run faster.
It's generally claimed that you need 6GB of VRAM to get going, but there are Stable Diffusion 1 models that will run on 4GB, because that's what I was running 2 years ago when this tech dropped and it worked Okay Enough.
Your Laptop may have a video card with that kind of ram, especially if it's a gaming laptop, but most people use desktops to run genAI for a reason haha. It's a lot cheaper to get that kind of memory and power in a desktop format.
If you don't have enough VRAM, though, don't worry. You can generate using your processor and regular RAM too! It will, however, be much MUCH slower. Currently, my videocard generations take about 1 second per "step" for a 1024x768, and I usually run at around 25 steps. Processor generations take me a whopping 40 times that long, so a single image takes around 15 minutes.
What I'm getting at here is, if you can run on your video card, you really really want to run on your video card.
If your desktop can run generations but your laptop can't, you may also want to look into setting up remote access to your desktop via your laptop, so you can generate on the desktop but interface on the laptop on the go!
Generally, people set this up as a "headless" system, where the desktop is not generating graphics for the OS at all. This will maximize the power available for image generation. However, I have never set up a headless windows terminal, and I have literally no idea how, so I can't really point you in the right direction there, beyond telling you the keyword to search is "headless windows terminal."
3 notes
·
View notes
Text
Linux Life Episode 87
Hello everyone and welcome to my ongoing piddling about in my corner of the world of Linux. Well this month I have been playing around with Wayland and trying to work out whether I am ready to switch to it.
I admit that I recently switched back to X11 when using KDE Plasma 6.2 as several tools don’t work well in it under Wayland.
When in X11 I use Cairo Dock as a program launcher which does have a version that allegedly works with Wayland but the team of Cairo Dock admit its alpha and is buggy. Indeed it worked for a while then it started messing up shortcuts. Also in X11 I can move the bar up above the main KDE panel so I can still see the icons and switch tasks etc.
In X11 it works fine. In Wayland it is just too basic and the coders of it are in no hurry to create a full version until Wayland setup some standards regarding key bindings etc.
Which I guess is fair enough but annoying.
When it comes to collecting screenshots I normally use Shutter. I have tried others such as Flameshot and others but they seem to have issues when grabbing certain screenshots such as Steam games and Shutter just works.
However under Wayland. Shutter has been hacked to work but will only allow you to grab the desktop only and none of the other options are available.
So I have been using X11 to allow Shutter to continue to work.
Maybe I’m a bit old fashioned but I like to have things that work. Also OBS Studio works with Wayland but apparently has issues when selecting input sources and areas.
In time they may fix this but at this time it doesn’t quite work as it should.
So I admit if I am using KDE Plasma I won’t be using the Wayland version.
Taking a slight side step ...
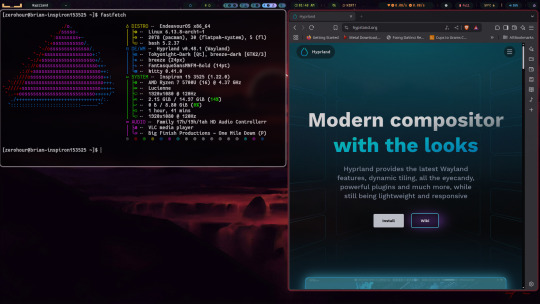
I have recently decide as I was noodling about in the Wayland compositing wibble I decided to try Hyprland.
Well I must admit at first I really didn’t get on very well with it and to be honest while I could open a few windows and I managed to use ghostty as my terminal.
However after a bit of a play I didn’t know how to close all the open windows and had to faff around just to get the slightest thing open.
So I was about to give up. However I decided to look up the wiki and it gave a few preconfigured options. I admit I downloaded and installed the JaKooLit dot files.
I must admit that it has actual made Hyprland useful and with a bit of playing I finally managed to get most things working and yes it can be fun and it’s pretty fast but I really don’t see me using it regularly.
It has allowed me to capture screenshots using certain keys so Hyprland has solved my requirements and Shutter is not needed using it but until OBS Studio issues in Wayland are sorted I will have to go back to KDE Plasma 6 X11 if I want to capture video.
I really didn’t understand Hyprland when i first started but I admit that the preconfig has made it useable once you get used to the quirkiness. I am even willing to live without a dock.
Hopefully OBS Studio will manage to get around its issues and who knows I might even switch to Hyprland and stop using KDE Plasma.
I’m sure someone will advise me better Hyprland tricks but for now I have it working and it is not bad. In time I could get used to working with Hyprland. Once you get the hang of it, it is quite fast and useable.
Wayland is good but not quite 100% there. Not far its about 95% workable, it just needs the last few things to get working.
Well that’s enough waffle for now ... Until next time ... Take care.
3 notes
·
View notes
Text

Leveraging XML Data Interface for IPTV EPG
This blog explores the significance of optimizing the XML Data Interface and XMLTV schedule EPG for IPTV. It emphasizes the importance of EPG in IPTV, preparation steps, installation, configuration, file updates, customization, error handling, and advanced tips.
The focus is on enhancing user experience, content delivery, and securing IPTV setups. The comprehensive guide aims to empower IPTV providers and tech enthusiasts to leverage the full potential of XMLTV and EPG technologies.
1. Overview of the Context:
The context focuses on the significance of optimizing the XML Data Interface and leveraging the latest XMLTV schedule EPG (Electronic Program Guide) for IPTV (Internet Protocol Television) providers. L&E Solutions emphasizes the importance of enhancing user experience and content delivery by effectively managing and distributing EPG information.
This guide delves into detailed steps on installing and configuring XMLTV to work with IPTV, automating XMLTV file updates, customizing EPG data, resolving common errors, and deploying advanced tips and tricks to maximize the utility of the system.
2. Key Themes and Details:
The Importance of EPG in IPTV: The EPG plays a vital role in enhancing viewer experience by providing a comprehensive overview of available content and facilitating easy navigation through channels and programs. It allows users to plan their viewing by showing detailed schedules of upcoming shows, episode descriptions, and broadcasting times.
Preparation: Gathering Necessary Resources: The article highlights the importance of gathering required software and hardware, such as XMLTV software, EPG management tools, reliable computer, internet connection, and additional utilities to ensure smooth setup and operation of XMLTV for IPTV.
Installing XMLTV: Detailed step-by-step instructions are provided for installing XMLTV on different operating systems, including Windows, Mac OS X, and Linux (Debian-based systems), ensuring efficient management and utilization of TV listings for IPTV setups.
Configuring XMLTV to Work with IPTV: The article emphasizes the correct configuration of M3U links and EPG URLs to seamlessly integrate XMLTV with IPTV systems, providing accurate and timely broadcasting information.
3. Customization and Automation:
Automating XMLTV File Updates: The importance of automating XMLTV file updates for maintaining an updated EPG is highlighted, with detailed instructions on using cron jobs and scheduled tasks.
Customizing Your EPG Data: The article explores advanced XMLTV configuration options and leveraging third-party services for enhanced EPG data to improve the viewer's experience.
Handling and Resolving Errors: Common issues related to XMLTV and IPTV systems are discussed, along with their solutions, and methods for debugging XMLTV output are outlined.
Advanced Tips and Tricks: The article provides advanced tips and tricks for optimizing EPG performance and securing IPTV setups, such as leveraging caching mechanisms, utilizing efficient data parsing tools, and securing authentication methods.
The conclusion emphasizes the pivotal enhancement of IPTV services through the synergy between the XML Data Interface and XMLTV Guide EPG, offering a robust framework for delivering engaging and easily accessible content. It also encourages continual enrichment of knowledge and utilization of innovative tools to stay at the forefront of IPTV technology.
3. Language and Structure:
The article is written in English and follows a structured approach, providing detailed explanations, step-by-step instructions, and actionable insights to guide IPTV providers, developers, and tech enthusiasts in leveraging the full potential of XMLTV and EPG technologies.
The conclusion emphasizes the pivotal role of the XML Data Interface and XMLTV Guide EPG in enhancing IPTV services to find more information and innovative tools. It serves as a call to action for IPTV providers, developers, and enthusiasts to explore the sophisticated capabilities of XMLTV and EPG technologies for delivering unparalleled content viewing experiences.
youtube
7 notes
·
View notes
Text
Q4OS – I setup for myself Linux with Trinity
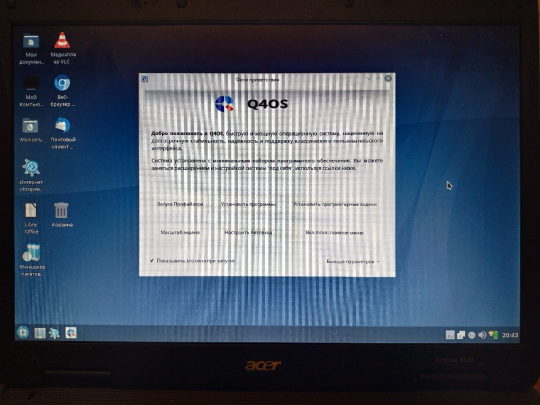
I setup a Linux for myself. For not powerful system. With my Acer Extensa. It has two cores with 1.5 ghz. And 4gb of ram. I select in result – Q4OS. As light Linux. For not powerful systems. With its own graphic environment. It is easier, lighter. It has a name Trinity. Firm development from system’s authors. Special for this purpose – to system not to require lots of resources. And it is very good for me.

With author`s website you to download distributive. It is written with flash as a boot. One little moment, check carefully. There are, also, Live CD images. It is for run system from device. Like flash or compact disk. And, there are for setup, install. So, for install, you need this version to download. I was not accurate and first, download Live Cd. And, I see – I cannot find option to install. But, you can run system at once! I was surprised. I see what is it. And, I start to understand, what is it all about.
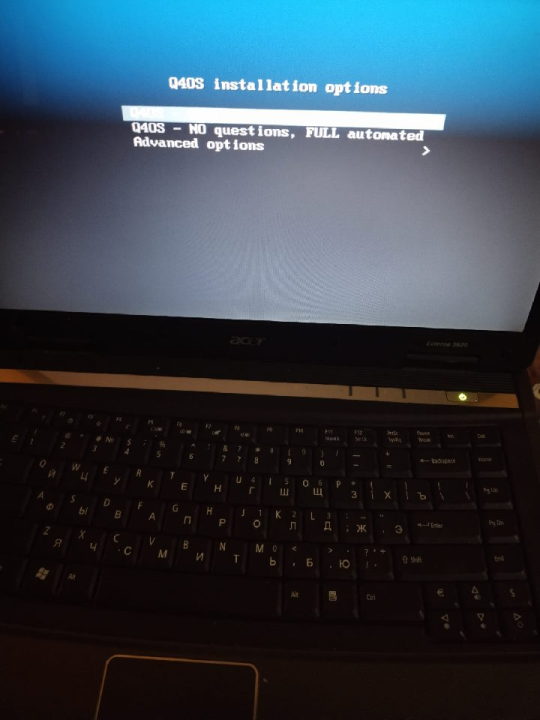

Installation process. It is simple and easy. Nothing tricky. Nothing hard. This is good. Installation is friendly to the user. We are moving with steps of installation. And after - system, at last, launching. It is, already, installed. It is good to check updates. What is here. All is automatically checked by itself. It has a name packages for Linux. Lists with packages. You just need to start a certain purpose program. This means network is required. Without internet you cannot to do updates.

And, later, with manager packages. You start it and see what it can show you. So, it has lots of different. I am not expert with Linux. I take it as a probe. I setup for myself a whole pack, preset for packages. Little game. It is Chocolate Doom with some pack. So, this is not only Chocolate Doom. And, also, some files included. To have all included. So, it includes FreeDoom. And this is comfortable! So, you can start to play at once. To play. Levels for FreeDoom are unique. Even, its own graphics. But, mainly, it is same Doom.
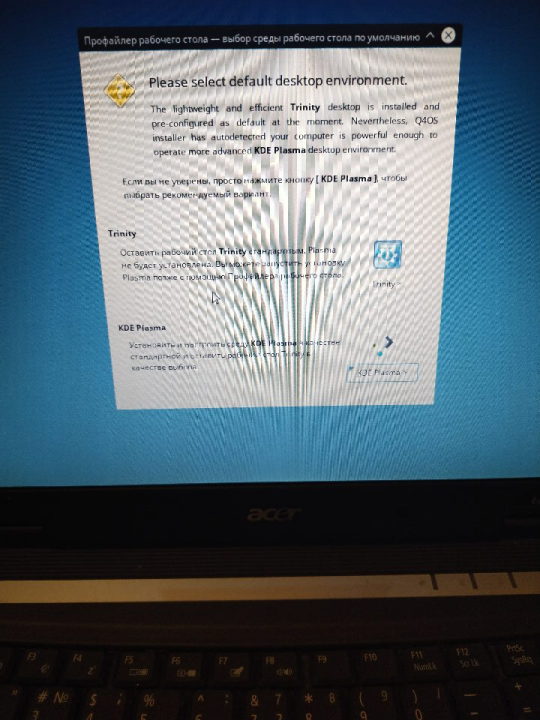
Once again, I am not expert with Linux. And, better say, I try to try this with my own. But funny thing it is. Installer is looking like it is MS DOS. So, it has such install line. And, system itself. It reminds Windows. Level Windows Xp or even like Windows 98, maybe. Such background, similar color. And windows forms.

Interesting moment! Visually, I like a lot this Trinity scheme for desktop. About functions it is very good. I am very surprised. There are lots of things here. And main - there package manager. Using it to update. And install. And this is comfortable. For start – it is good way.

Visual side looks like something Windows 98 with plus. I like a lot this visual side. Functions are good. And now it is my first launch. I little about to play Doom. I visit websites with browser. First launch was successful! And positive!

iron (hardware) and programs. From time to time i restore computers, retro computers. Try retro soft. Check some programs. And write about all of these.
Dima Link is making retro videogames, apps, a little of music, write stories, and some retro more.
WEBSITE: http://www.dimalink.tv-games.ru/home_eng.html ITCHIO: https://dimalink.itch.io/
#os#retro computer#q4os#linux#try linux#light linux#boot cd#live cd#install os#windows 98#windows xp#chocolate doom#free doom#ms dos#simple install#trinity#soft#operating system#old computer#something new#simple linux#first launch#welcome#packets#manager#not powerful pc#pc#computer expiriments#new soft#penguin
3 notes
·
View notes
Text
Installing Kali Linux on a USB Stick: A Step-by-Step Guide
If you want a portable, powerful cybersecurity toolkit you can carry in your pocket, installing Kali Linux on a USB stick is the perfect solution. With Kali on a USB, you can boot into your personalized hacking environment on almost any computer without leaving a trace — making it a favorite setup for ethical hackers, penetration testers, and cybersecurity enthusiasts.

In this guide, we'll walk you through how to install Kali Linux onto a USB drive — step-by-step — so you can have a portable Kali environment ready wherever you go.
Why Install Kali Linux on a USB?
Before we dive into the steps, here’s why you might want a Kali USB:
Portability: Carry your entire hacking setup with you.
Privacy: No need to install anything on the host machine.
Persistence: Save your settings, files, and tools even after rebooting.
Flexibility: Boot into Kali on any system that allows USB boot.
There are two main ways to use Kali on a USB:
Live USB: Runs Kali temporarily without saving changes after reboot.
Persistent USB: Saves your files and system changes across reboots.
In this article, we’ll focus on setting up a Live USB, and I'll also mention how to add persistence if you want. and if you seek knowledge about kali linux you can visit our website any time
Website Name : Linux Tools Guide
What You’ll Need
✅ A USB drive (at least 8GB; 16GB or more recommended if you want persistence). ✅ Kali Linux ISO file (download it from the official Kali website). ✅ Rufus (for Windows) or Etcher/balenaEtcher (for Mac/Linux/Windows). ✅ A computer that can boot from USB.
Step 1: Download the Kali Linux ISO
Go to the Kali Linux Downloads page and grab the latest version of the ISO. You can choose between the full version or a lightweight version depending on your USB size and system requirements.
Tip: Always verify the checksum of the ISO to ensure it hasn't been tampered with!
Step 2: Insert Your USB Drive
Plug your USB stick into your computer. ⚠️ Warning: Installing Kali onto the USB will erase all existing data on it. Backup anything important first!
Step 3: Create a Bootable Kali Linux USB
Depending on your operating system, the tool you use may vary:
For Windows Users (using Rufus):
Download and open Rufus (Get Rufus here).
Select your USB drive under Device.
Under Boot selection, choose the Kali Linux ISO you downloaded.
Keep the Partition scheme as MBR (for BIOS) or GPT (for UEFI) based on your system.
Click Start and wait for the process to complete.
For Mac/Linux Users (using balenaEtcher):
Download and open balenaEtcher (Get Etcher here).
Select the Kali ISO.
Select the USB drive.
Click Flash and wait until it's done.
That's it! You now have a Live Kali USB ready.
Step 4: Boot Kali Linux from the USB
Restart your computer with the USB plugged in.
Enter the BIOS/UEFI settings (usually by pressing a key like F12, Esc, Del, or F2 right after starting the computer).
Change the boot order to boot from the USB first.
Save changes and reboot.
You should now see the Kali Linux boot menu! Select "Live (amd64)" to start Kali without installation.
(Optional) Step 5: Adding Persistence
Persistence allows you to save files, system changes, or even installed tools across reboots — super useful for real-world usage.
Setting up persistence requires creating an extra partition on the USB and tweaking a few settings. Here's a quick overview:
Create a second partition labeled persistence.
Format it as ext4.
Mount it and create a file /persistence.conf inside it with the content: cppCopyEdit/ union
When booting Kali, choose the "Live USB Persistence" option.
Persistence is a little more technical but absolutely worth it if you want a real working Kali USB system!
Troubleshooting Common Issues
USB not showing up in boot menu?
Make sure Secure Boot is disabled in BIOS.
Ensure the USB was properly written (try writing it again if necessary).
Kali not booting properly?
Verify the ISO file integrity.
Try a different USB port (preferably USB 2.0 instead of 3.0 sometimes).
Persistence not working?
Double-check the /persistence.conf file and make sure it's correctly placed.
Conclusion
Installing Kali Linux onto a USB stick is one of the smartest ways to carry a secure, full-featured hacking lab with you anywhere. Whether you’re practicing ethical hacking, doing security audits, or just exploring the world of cybersecurity, a Kali USB drive gives you power, portability, and flexibility all at once.
Once you’re set up, the possibilities are endless — happy hacking! 🔥
2 notes
·
View notes
Text
How to enable UFW Firewall in Arch Linux
Learn how to enable and configure the UFW Firewall in Arch Linux to enhance your system's security. Step-by-step guide for installation, setup, and basic usage.
youtube
2 notes
·
View notes