#text attribute in HTML
Explore tagged Tumblr posts
Visit Tumblr Blog
Explore Tumblr blogs with no restrictions, modern design and the best experience.
Last Seen Tumblr Blogs


Fun Fact
Kazakhstan’s Minister of Communications and Informatics has blocked the Tumblr site because it contained 60 sites of terrorism, extremism, and pornography in 2015.
Text
Hot take digital accessibility is actually not that hard to do well if you're writing good HTML in the first place
#literally 90% of it is just using the correct html element for the thing youre doing#if you use a <label> with a for attribute instead of a <p> to label your text box#the screen reader can tell that its a label for that text box#you don't have to do anything fancy#inaccessible websites = skill issue#web development#web design#digital accessibility#rambles
0 notes
Text
How to credit GIFs
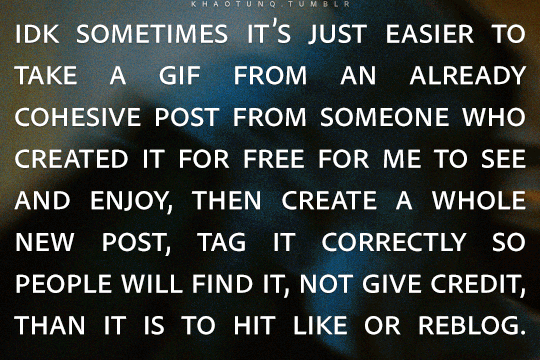
I know there are other posts around this hellsite of how to do this, but because @khaotunq made this amazing post, I wanted to remind some of you of how to include a GIF that credits the original post/creator even if the GIF does not appear in the GIF options.
Option #1:
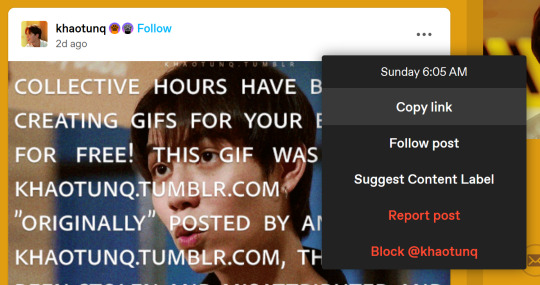
Step #1 - If you know which GIF you want to use, find the post its from, and click the three little dots to bring up the menu. Click "Copy Link"
Now, in your own post, click the "GIF" button

Step #2 - When the next box appears, paste the link you just copied in it.

Step #3 - The GIF should appear, so click it, and it will insert the GIF with credit to the original post and creator.

HOWEVER, it will only insert the first GIF in the post, so if you want a different GIF in the post, you have to make a small change.
Option #2:
Step #1 - Do everything in Option #1. EVERYTHING! Now, once you have inserted the GIF into your post, it will be the first GIF in the original post as stated in Option #1.
Step #2 - Click the wheel at the top of your post

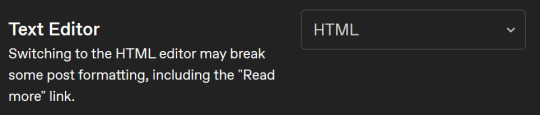
Step #3 - Once you do that a menu box will appear, and where it says "Text Editor," switch from "Rich text" to "HTML"
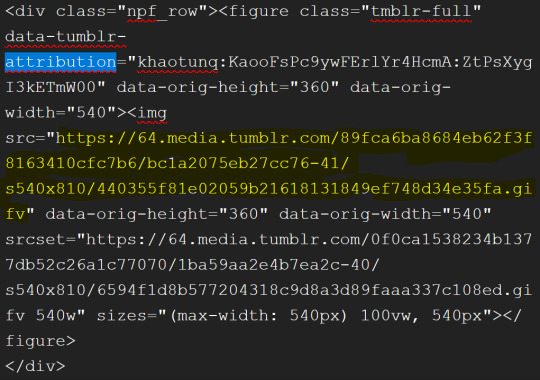
Step #4 - It might look scary now, but have no fear! Hit "Ctrl +F" to find what you need! Type "attribution" and it will locate the GIF for you.
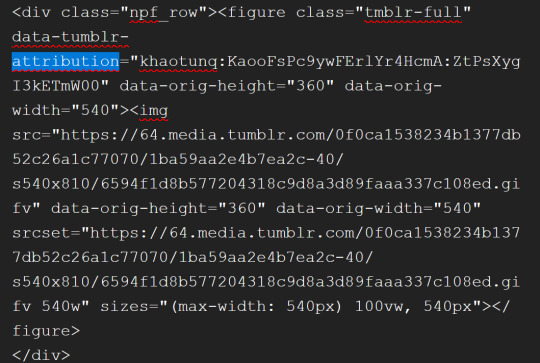
Step #5 - After "attribution" is the GIF's link that you copied earlier in quotes. Look for it!

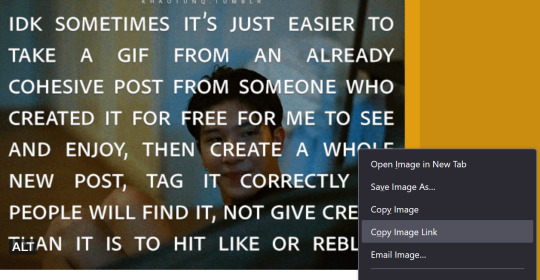
Step #6 - Now, in another window, go back to the original post with all the GIFs and find the GIF you want. Once you see it, right-click on the GIF, and when the menu pops up, select "Copy Image Link"
Step #7 - You will paste that new link into your post in the same spot the other link was within the quotes. In other words, replace the highlighted yellow part with the new link.
Step #8 - Click the little wheel at the top again and select "Rich text" to switch back to your normal viewing mode.

The new GIF will appear!
It seems overwhelming, but once you get the hang of it, it's easy peasy. And if you think this process is too time-consuming, remember that this is nothing compared to how much work GIF makers put into creating these GIFs for us.
Tumblr is actually very user-friendly with some practice, so do our community a favor and be friendly to the people who put in the effort.
#bl things#myspace taught a lot of us how to be tiny little code changers#bl community#be kind and attribute
326 notes
·
View notes
Text
.。*♡゚ A/n: totally not trying to learn html (which technically isn't a programming language, for what I had read), and well, if Idia was teaching me I would learn everything so quickly tbh. Or not. He would start explaining and I would have the sudden urge to kiss him, oh well it happens ig

"Uh... I think I have an error in my code." You break the silence, tone soft as the computer screen lights up your eyes just the right way for Idia to lost himself in the reflex. He love your eyes, your concentrated face, the way you stick out your tongue without realizing.
And he loves the way you timidly look to him, as if he has all the answers to your questions - which, about this subject, he have, by the way.
"Ah~ your closing array is missing a closing slash. Here, Yuu-shi." He pointed your error with a soft tone, blue nail hitting the screen, and a surprised pout grew on your lips.
He wanted to smother you in his arms, to pick you up and hold you till his arms fell off and his corpse rot - that was how bad he yearned for you, your skin, you smell. He breathes really hard to refrain from doing it, though. You wouldn't want that. He was just a mere R card, a lonely gamer, a-
"Thank you, Idia. You're the best." You giggle to yourself, feeling yourself warm under his eyes and lousy smile. Unbeknownst to you, the only things that were going through his head were about you.
Your smile, the way your eyes lightened up, your laughters and giggles, the messages you passed each other in class (when he was there in person), your secret handshake. Idia loved you. He loved your very dearly.
He loved you so much that he could cry.
"Uh... it's no big deal," yet his hair was getting hotter, rosey tone starting to burn brightly. "Don't forget the closing stash, and everything should work properly. This programming language is not that used anymore, but most can learn useful things learning it anyway. I think."
Idia had half of his mind to know that he was rambling again, talking so fast that he could make Eminem cry. But he couldn't stop when you looked at him with such big eyes filled with curiosity and wonder, taking notes of everything he was saying.
He noted then that you had hello kitty stickers on your page. A few drawings that Ortho made of him, Idia and you; that almost killed him right then and there.
"Ah... HTML uses elements, tags, and attributes to organize text, images, links, and other multimedia elements. It can be combined with CSS for styling and JavaScript for interactivity."
#twst idia shroud#yandere idia shroud x reader#idia shroud x reader#idia shroud#idia x reader#idia x mc#yandere idia#twst idia#twisted wonderland idia#yandere idia x mc#yandere idia x reader#idia x yuu#idia x you#yandere idia x yuu#yandere idia shroud x yuu#yandere idia shroud x mc#yandere idia shroud
97 notes
·
View notes
Text
Day 3 [Table In HTML]
Day 1 [Introduction To HTML]
Day 2 [Multimedia Elements In HTML]

Line by line explanation:
Defines a table,
border : This attribute adds a simple border to the table.
style : Used to add some styling to the webpage. Can be used with any tag.
Border spacing: Adds space between table cells.
Text-align : Aligns the text in the table.
Contains the header section of the table.
Represents a table row
Represents a table column
Holds the body of the table → main data (menu items).
Used for individual data cells in the table.
<table> <thead> <tr> <th> Column Head 1 </th> <th> Column Head 2 </th> </tr> </thead> <tbody> <tr> <td> Row 1 Data = Column 1 </td> <td> Row 1 Data = Column 2 </td> </tr> </tbody> </table>
Final Output

------------------------------
Hope it helps :)
#code#codeblr#css#html#javascript#python#studyblr#progblr#programming#comp sci#web design#web developers#web development#website design#webdev#website#tech#html css#learn to code#school#study motivation#study aesthetic#study blog#student#high school#studying#study tips#studyspo#website development#coding
9 notes
·
View notes
Text
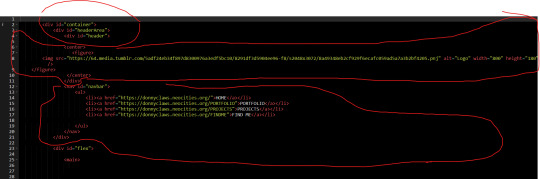
How to Include Any GIF and Make it Attributed
(When GIF Search Fails)
So, you want to include a cool GIF in your post, but the GIF search can't find it, even when you paste in the blog link. Or it's not the first GIF on the post.
Here's how you can manually attribute any GIF.
This is the code you need to paste in the HTML editor, with the bold values replaced for your GIF:
<div class="npf_row"><figure class="tmblr-full" data-tumblr-attribution="BLOGNAME:EMBEDCODE:TINYURL" data-orig-height="YYY" data-orig-width="XXX"><img src="IMAGELINK" data-orig-height="YYY" data-orig-width="XXX" srcset="IMAGELINK XXXw" sizes="(max-width: XXXpx) 100vw, XXXpx"></figure> </div>
Spoiler alert, my sample GIF code is:

For example:
Original GIF Post

1. I think it's easier to do this at the Archive version of the post. The Dash URL is: https://www.tumblr.com/catnipster69/742522018223865857/episode-10x17-the-werther-project So the Archive URL is: https://catnipster69.tumblr.com/post/742522018223865857/episode-10x17-the-werther-project
BLOGNAME
2. In this case, the blog name is catnipster69.
IMAGELINK
3. Right-click the GIF you want, and choose Inspect (I'm using Firefox on the Mac). The image info is highlighted, including the URL (IMAGELINK) and the Height (YYY) and Width (XXX). Double-click to copy the URL and note the height and width.

The IMAGELINK is: https://64.media.tumblr.com/bb8af2e018bbcae2c9d98a635d62b7f9/a71ee1dc9ce83755-7b/s540x810/22b3f901fc453dcd3ab546e53683059306041997.gifv
YYY is 422
XXX is 540
EMBEDCODE
4. Way up at the top right of the page, click the Embed button:

5. Copy the Embed text into a text editor:

6. The interesting bit is in bold (the EMBEDCODE):

The EMBEDCODE is: zTy22yYiZilmbgDRmty9HA
TINYURL
7. Still on the Embed page, right-click anywhere and choose Inspect (or choose Tools > Browser Tools > Web Developer Tools).
8. In the Search HTML field, search for tmblr.co. This should highlight a big block of gobbledygook:

9. Double-click the block and copy it to a text editor.
10. Search for the tmblr.co URL. The interesting bit is in bold (TINYURL):

The TINYURL is: ZYTx4ifDzzTk8y01
Phew!
Paste the GIF Code in the HTML Editor
11. When creating a new post, change to the HTML editor:

12. Paste in your code:

13. Check the Preview:

Final GIF
16 notes
·
View notes
Text
MortuuM: a Jcink board responsive skin

MortuuM is a multi-sale skin optimised for Google Chrome, Safari and Firefox.
LIVE PREVIEW ✱ KO-FI LINK
Basic features: → Full responsiveness for different screen resolutions, including mobile screens; → Fully customised Jcink HTML Templates (forum rows, topic rows, post rows, main profile, members list etc.); → Sidebar containing basic navigation sections; → Light/dark mode toggle; → Font-size toggle; → CSS variables for fonts, group colours (currently up to 6), background images; → Main profile includes a premade attributes and a virtues system. It also includes FizzyElf’s automatic thread tracker; → Guidebook webpage, including text styles so you can mix and match for your own templates; → Basic templates (announcements, face claim, 3 thread templates); → Full installation guide in PDF.
Before purchasing, please review my policies. You can also contact me via Discord (deathspells) if you happen to stumble on any issues.
After purchasing, you’ll get: the full XML to be uploaded to Jcink’s Admin CP; a JSON file containing the profile fields; an installation guide (PDF); policies file (PDF); text files containing some additional coding for the skin (i.e. basic templates).
14 notes
·
View notes
Text
Is there an actually complete guide to AO3's limited HTML somewhere? I know for a fact that some features work but only under slightly weird rules.
For example, if you're using the <a> tag to form an anchor to refer to later, you HTML will end up looking like <a name="Anchor" rel="nofollow" id="Anchor"> when it's done auto-correcting in the Preview. If you type in <a name="Anchor"> or <a name="Anchor" id="NotAnchor">, it will autocorrect to that, but if you type <a id="Anchor"> it will correct to an <a> tag whose only attribute is rel, or <a rel="nofollow">. (The rel="nofollow" attribute has no practical effect for most users' purposes.)
I know that AO3 will autocorrect any incompatible HTML to compatible HTML, but I don't know what the compatible HTML is, and the above <a name="Anchor"> example demonstrates that some things are compatible but don't look compatible unless you do them right!
This is especially confusing because the editor will autocorrect some HTML as soon as you switch from the HTML editor to the Rich Text editor - but it won't correct everything. I've attempted to do slightly funky things with styling that seemingly worked just fine in the editor, but vanish when I preview the chapter.
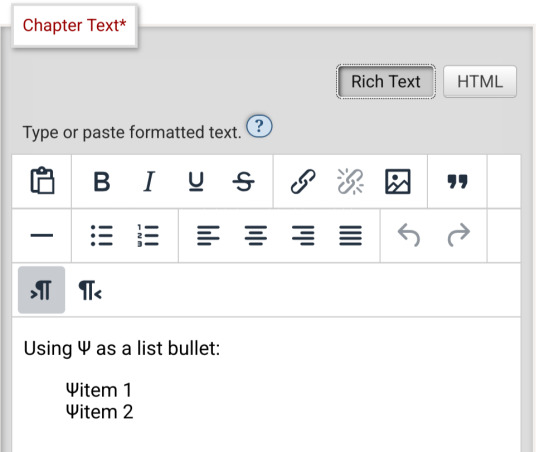
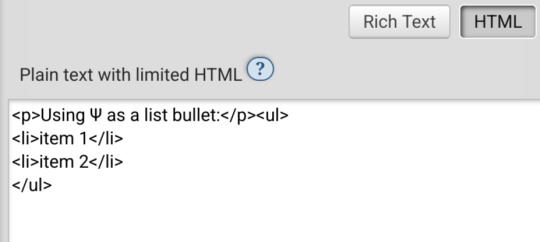
For example, here I am trying to use using the Greek character Ψ as a list bullet. When I originally typed it into the html field, I used the actual character Ψ. As soon as I switched to rich text and then back to html, it had autocorrected to Ψ, which is the escape character for Ψ. (For those who don't know, escape characters are a special code to tell the browser that this is NOT supposed to be code. <p> is an html tag; < p > will literally render "< p >".) So, it accepted the style attribute and the list-style-type, but it forced it into an escape character. So far so good.
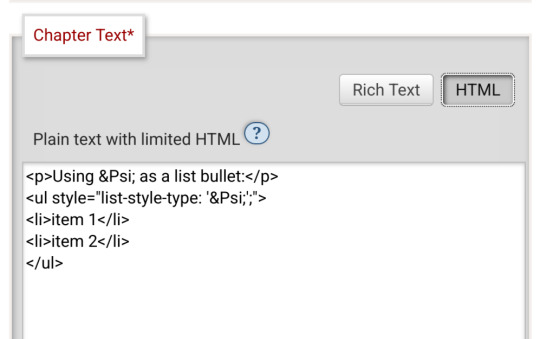
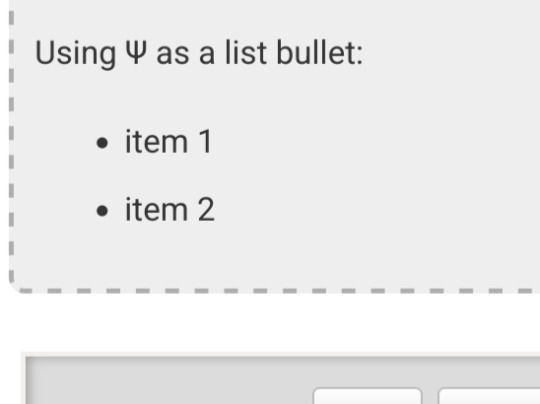
Until I click preview. Now the custom bullet is gone, replaced with the standard circle. If I click edit again, the code has removed the CSS attribute that changed the bullet... and also replaced the escape character Ψ with the character Ψ.
Weird.
#ao3#otw#html#ao3 formatting#ao3 html#I do not mind the lack of a clear standard at all#OTW is a nonprofit full of overworked staff and volunteers#and complete documentation is very hard#I just wanna be able to nerd more effectively#Can anyone direct me to the part of the open-source code that dictates HTML autocorrection? Is that a thing I can examine?
19 notes
·
View notes
Text
semi-useless computer terminology
if you've used html sometimes when adding a file to a page you have to add the "type" attribute, and it would be something like "text/css", "text/javascript", "image/png" or something like that
this is a MIME (Multipurpose Internet Mail Extensions) type, though it's apparently more modern to just call it "media type". unlike Windows, the browser does not use the file extension of a file to determine what kind of file it is. The MIME type is often inferred from the extension and contents of the file, but it can be specified manually, such as the "type" attribute as mentioned, and also through javascript.
MIME types are also used on Linux to determine which program opens which file type.
it's a "Mail Extension" because it was originally used to determine what kind of content is being sent over the mail, but it's more often used for what kind of content is being sent over HTTP/S today.
12 notes
·
View notes
Note
Question from someone just starting with creating and then posting art to Tumblr, do you think I should be watermarking my pieces?
I’ve always disliked watermarks as they naturally tend to dissuade people from interacting with art in a natural manner; it depends very heavily on the size and placement of the mark, obviously. BUT, often times an artist will overzealously obscure their work with identification and it has a somewhat repulsive effect on the average viewer - a wall has been erected between the viewer and the art, in a sense. Watermarks, to me, exist to prevent very specific situations from unfolding with your work - almost all of those reasons seem to be financially motivated, like preventing strangers from printing your art out at home or reposting without attribution. Situations that could affect your ability to profit off of your work.
Admittedly, much of my perception about this issue was inspired by an article included in the book “Context” by Cory Doctorow, wherein he writes about how he’s benefitted from “thinking like a dandelion”, which is an idea that was inspired by conversation the author had with Neil Gaiman — I’ll try and summarize the parts of the point that are more relevant to visual arts; since portions of the allegory refer more specifically to certain qualities of written media.
He begins with, “Mammals worry about what happens to each and every one of their offspring, but dandelions only care that every crack in every sidewalk has dandelions growing out of it. The former is a good strategy for situations in which reproduction is expensive, but the latter works best when reproduction is practically free — as on the Internet.”
So how do you “think like a dandelion” then?
“Your work needs to be easily copied, to anywhere whence it might find its way into the right hands. That means that the nimble text-file, HTML file, and PDF (the preferred triumvirate of formats) should be distributed without formality — no logins, no e-mail address collections, and with a license that allows your fans to reproduce the work on their own in order to share it with more potential fans. Remember, copying is a cost-center — insisting that all copies must be downloaded from your site and only your site is insisting that you — and only you — will bear the cost of making those copies. Sure, having a single, central repository for your works makes it easier to count copies and figure out where they’re going, but remember: dandelions don’t keep track of their seeds. Once you get past the vanity of knowing exactly how many copies have been made, and find the zen of knowing that the copying will take care of itself, you’ll attain dandelionesque contentment.”
The rest of the allegory more specifically applies to written work, but I’ll link it here for the sake of posterity. Essentially: every wall or pre-requisite that you establish before allowing a fresh set of eyes to fall upon your work actually may deter people from engaging with the work and sharing it with others. Signatures, subtle watermarks that are “baked” into the work, or maybe like.. a well-placed QR code that links people back to you — all of those would be my suggestion for someone who wants to leave a lasting, linking thread between a given work and it’s artist. If the right person sees your art and connects with it, there SHOULD be a way for them to follow that thread back to you and discover more; but if you over-prioritize demonstrating ownership over your work, you’re likely to drive those coveted genuine connections away.
On the other hand, if your primary goal is to sell prints or other products, brazenly watermarking your work will protect your bottom line from the kind of low-level art-scraping that drives all those shady redbubble shops and etsy stores that sell stolen works on cheap t-shirts and hankies. For me, art is a primarily social interest in which I prioritize the sharing of culture and ideas. I don’t want financial factors to take precedence and alter how/why I created something; it feels like I’d have to take much of myself out of my art in order to make it palatable for consumer spaces.
You should determine your priorities and then strive to make art that fulfills those priorities without compromise. I think you’ll find that self-satisfaction manifests readily at different points in the midst of that process.
#my asks#hope this helps! I’m against watermarking my own stuff bc I’m not really concerned about someone trying to steal/sell my weirdo works#in spite of that: I’ve had several people ASK to buy stuff from me on occasion; I’m always glad to facilitate that personally#but yeah as a result I’m obviously not moving boxes of prints of anything#and this is what works for me right now - my mind may change on it later if my life and priorities change#it’s an everongoing process
22 notes
·
View notes
Note
Hello, wanted to say I read and loved the demo. Very well done. I just had a few questions, would love to know what Twine Template you use, especially at the beginning. Where you have the character creator, I love that the box around your selection changes to say/match what you chose. Such as depending on what skin color I choose it changes to signify that. Would love to know if you would share how you did that. I look forward to future updates! Best of luck.
Thank you! 🤍
I'm using the default template for SugarCube, if I remember correctly. Glad that you liked the box effect, it was my solution to reducing the number of passages whilst still allowing the validation of user input in character creation.
I did it through a combination of HTML tags and SugarCube native macros. Technical stuff under the cut:
Here is an example for eye color:
<fieldset class="charbox"><legend id="chareyes" class="chartxt">$p.appearance.eyes</legend> <div class="charoptions">Your eyes are: <<link "hazel">><<set $p.appearance.eyes to "hazel">><<replace "#chareyes">>$p.appearance.eyes<</replace>><</link>> <<link "brown">><<set $p.appearance.eyes to "brown">><<replace "#chareyes">>$p.appearance.eyes<</replace>><</link>> [rest of the options removed for brevity]</div> </fieldset>
The fieldset and the legend HTML tags together form a single box, a so-called legend, which I declare per attribute such as name, skin color, etc. You need a fieldset to make legend work iirc, but legend is where that text is displayed and it is positioned on the box frame by default. Important here is to give a unique ID to the legend tag ("chareyes" in this case), as we are interested in manipulating the text shown in it depending on our box.
In the sample above, the options I present for the eye color are listed within the Twine <<link>> tags. For these links there is no target passage to go to. Instead, you can see it is coded to do two things upon clicking the respective option. One, setting a game variable to the selected color.
<<set $p.appearance.eyes to "brown">>
Two, triggering a replace command to change the value shown in the legend to the description of the selected eye color according to the variable we have set in the same line. This is the bit you are asking about:
<<replace "#chareyes">>$p.appearance.eyes<</replace>>
Replace triggers without changing passages, so this way you can adjust multiple variables on a single "page". You'd obviously need to adjust the corresponding CSS classes to make it look the desired way, but the mechanics are serviced with just this idea above.
Hope this helps!
12 notes
·
View notes
Text
Over on BlueSky, people are throwing fits over artists not using alt tags CORRECTLY. They add artists who don't meet arbitrary standards to block lists. It's fucking absurd.
I showed someone the actual Web Content Accessibility Guidelines. Produced by an actual organization who understands both web and accessibility needs. And they just complained they didn't understand it, and refused to elaborate. They kept insisting it was made for "programmers". They'd clicked through to a secondary page and got scared by the fact that there were extremely basic HTML examples. Literally just img tags with an alt attribute. There was full, plain english to go along with it. It boiled down to "Decorative images do not require alt text, especially if context is already provided alongside the image". It gave 4 examples of this. And the person just kept saying they didn't understand any of it. And they came to ME acting as if they were some sort of authority.
Anyway, here's the resources:
WCAG Alt Text Guidelines
Alt Text Decision Tree
Unrelated, but don't forget to consider contrast ratios
3 notes
·
View notes
Text
Since the release of HTML5 in 2008, tags such as <b> (bold), <i> (italic) have been softly deprecated for the benefit of users of screenreaders*; instead, it is preferable to use the semantic tags <strong> and <em> (emphasis) respectively, with style defined in CSS. If for some reason they aren't appropriate, it's still preferable to use CSS style attributes within a <span> container to ensure that your text will be interpreted correctly in modern (and future) browsers.
That's why the only tone tag I accept is '/span'. /span
* also to clarify the division between content (HTML) and style (CSS)
2 notes
·
View notes
Note
Hello! I hope I don't bother you again. I have two questions for you (I think there are more). I'm writing a zosan fanfic and I came up with the idea of putting "titles" in what happens in the "chapters" separated by the divider, like the titles of anime episodes (very One Piece with spoilers about what happens in the episode), I would like to know what do you think of this idea? I have images of what these titles would look like if you want them for better visualization. 2- Is there a skin work on ao3 that imitates these "titles", as if they were chapter titles of a book (but without having to have several chapters as I want to make a oneshot)?
hello! yes, I think that sounds like a neat idea. you should go for it!!
I don't watch one piece so I hope I'm visualizing it right. if I got it wrong, feel free to send me a picture.
anyway. are you trying to do something like this?
if this is what you're going for, you can try this code out! I also created a pastebin for this one, so you can just copy paste to your own workskin.

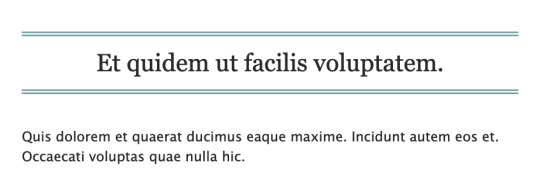
so here, we're creating the lined-title css class. you can just add it to your <p> tags in the html when you want to apply them. e.g.
<p class="lined-title">TITLE</p>
feel free to play around with border-style and the border-color (or any other attribute). you'll want border-style:solid if you just want one single line, for example.
you can also check AO3's FAQ on what colors and fonts you can use. fun fact: border-style:double is the same css they use to add those double lines in the FAQ!
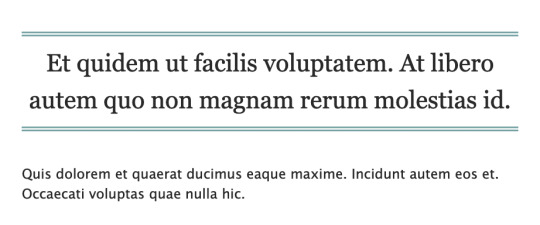
note that this will span the entire width of the page. so if you have a short title, it'll look like this on desktop:
if you don't want it to span the whole page, we could try this instead (also included in the pastebin link):

which will result in this:

however, we can't manipulate the spacing between the text and the lines in this one. on the other hand, it has text-decoration-style:wavy which the first option doesn't have!
for custom scene dividers, you can also check out these guides:
How to Make Customized Page Dividers by La_Temperanza
Dividers & how to style them by skinofthesoul
Rainbow Paragraph Divider by benwvatt
bonus: inspect element
also, are you familiar with inspect element yet? if you are, great! you can just skip this. otherwise, if you're still getting the hang of working with workskins and aren't used to editing css, you can try this:
right click on the text you want to change on AO3, then click "inspect" or "inspect element" (not sure what it's called in browsers these days; on firefox, it's just "inspect"). this will bring up a bunch of developer tools and it kinda looks like this:

it might look different depending on the browser.
but here on the side, you can see the html on top and css at the bottom. as you can see in the screenshot, we are inspecting the title and we can see the different css rules for the title.
if you want to play around with the css, you can just change them from this panel and it will automatically reflect on the page. these changes are not permanent so it's a good way to test different styles without having to go through the cycle of updating the workskin and refreshing the fic page.
if this is your first time trying this out, it might look overwhelming, but it's very helpful if you get the hang of it. but of course, you don't need to learn how to do this to style your fics. :D
9 notes
·
View notes
Text
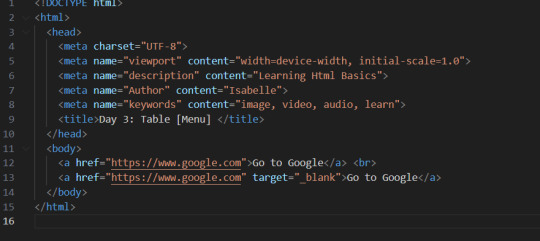
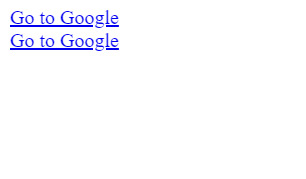
Day 4 [Link Tag In HTML ]
Introduction To HTML
Day 2 [Multimedia Elements In HTML]
Day 3 [Table in HTML]
Line By Line Explanation:
: Anchor tag (used for links)
href = It stands for Hyper Text Reference. You paste the URL of the link here
Text between the tags : What the user clinks
The first link will open google in the same tab. If you want the link to open in a new tab, then you use the target attribute.
Target="_blank" : Opens the link in a new tab
Final Output
____________________
Hope it helps :)
#code#codeblr#css#html#javascript#python#studyblr#progblr#programming#comp sci#web design#web developers#web development#website design#webdev#website#tech#html css#learn to code#school#study motivation#study aesthetic#study blog#student#high school#studying#study tips#studyspo#website development#coding
13 notes
·
View notes
Note
Ur website so cool!! ❤️❤️ Do you have by any chances coding tips? Been trying to make my own website for a while but adhd won't let me concentrate a second when it comes to learning coding
Thank you! And 100% It is deceptively approachable but also time consuming, I'm familiar enough with html from a highschool class where we did need to write code out by hand, and then soft practice with coding toyhou.se profiles and futzing around with free code snippets. Largely though I don't think you need to know everything or to write everything by hand, you just need to frankenstein code pieces together (As long as they're free ofc).
I used this first, it's fucking insanely handy and lets you make a simple layout with sidebars, navigation, header, footer and a body base ect, and then just generate and copy the code. The html itself also has greyed out little notes about what parts do what!
I'll be real the rest of it after that is just me googling what I want to do or googling html snippets bc I forgot them. So like html image link with size attributes ect ect, how to make a html image gallery. I don't use one site exclusively but w3schools.com has a bunch of common ones and also has a little live code editor in its tutorials.
Like I still get greatly stumped for hours bc code's kinda sensitive and one or two characters out of place will break sections of it especially when ur just frankensteining. Trying out little segments in live code editors is really helpful because you can kinda break it apart and diagnose the issue before putting it into your site html.
Also if it helps this is kind of how I break it down in my brain as another ADHD-er. so fuckign sorry for how this looks im doing it in snipping tool. But code bits love to live in cages even if it all looks the same, iit would also help if you clean your code up mine is pretty horrid but you just want to familiarize yourself with the little "Sections" ig that's where doing things by hand would help because you would 100% know what each chunk is for but yk yk.
CSS is a different beast I barely understand. The parts of code where it starts stacking on top instead of being horizontal is css and it's basically how you do fancier things to your code, it's linked to stuff you already have down. So like changing the background in the body text box or something, you can only do so much in there. Css targetting the body text box is where you can level it up. Again the sadgrl layout builder has notes so you're not completely blind in there. There's also 100% so many resources to explain what all these words mean, my mmethod is incredibly avoidant I don't know what flex is I haven't needed to fight her yet ect ect.

Sorry if this is confusing this is just my hack and slash understanding atm. Be humbled by code I've spent too long trying to fix up hysterical margin issues just because I had a random apostrophe somewhere or because I tried to spell it colour and not color ect.
33 notes
·
View notes
Text
Notes de mise à jour
🌟 Nouveautés
De la même manière qu'avec le GPTBot d'OpenAI, nous nous sommes employés à éviter que l'outil Common Crawl ne vienne mettre son nez dans les contenus Tumblr.
Sur le Web, nous avons ajouté l'attribut rel="author" dans le code HTML des en-têtes des billets affichés sur le tableau de bord. Cet attribut précisant que le contenu affiché appartient à son auteur, il contribue à améliorer l'accessibilité du site pour les utilisateurs de lecteurs d'écran ou d'autres outils similaires.
Dans les pages de recherche sur le Web (/search), le champ de recherche est à présent placé au centre de l'écran plutôt que sur le côté.
Pour les utilisateurs expérimentant le nouveau design des en-têtes de reblogs dont nous vous parlions la semaine dernière, les avatars sont maintenant de retour dans l'en-tête des billets de blogs multi-auteurs lorsque l'option "Afficher les portraits des auteurs" est activée.
Sur le Web, il est désormais possible de bloquer directement un blog à partir d'une contribution reçue dans votre boîte de réception, et ce, soit à partir du blog principal, soit via un blog supplémentaire (s'il était destinataire de la contribution).
Nos équipes ont apporté des ajustements aux formats de nombres localisés, et ce, dans toutes les langues proposées.
Sur le Web, les utilisateurs non connectés qui parcourent la vue intégrée d'un blog se verront parfois invités à s'inscrire ou se connecter après un certain laps de temps.
Nous expérimentons l'affichage du carrousel "Vous avez tout vu !", mais, cette fois-ci, à destination des utilisateurs ayant activé l'option "Meilleurs contenus en premier".
🛠️ Correctifs
Correction d'une anomalie qui pouvait indiquer un nombre incorrect de souscriptions rattachées à un blog.
Correction dans l'éditeur de billets sur le Web d'un problème qui faisait que les diaporamas placés après un bloc "Afficher davantage" ne s'affichaient pas correctement.
Diverses améliorations ont été apportées à l'en-tête des billets au format compact (notamment lorsqu'ils sont affichés en format grille dans la page Explorer). Les noms de blog à rallonge, les badges et les boutons "S'abonner" ne provoquent plus de retour à la ligne en milieu de mot, et chaque élément reste correctement aligné dans l'en-tête.
Correction dans Safari d'un bug qui pouvait faire apparaître un ● à côté du menu Blogs.
Dans l'éditeur de billets sur le Web, nous avons progressé dans la correction d'anomalies pouvant survenir lorsque les actions Annuler/Rétablir étaient utilisées en cours de rédaction. La stabilité de leur fonctionnement a été notablement accrue.
Correction sur le Web d'un problème qui pouvait afficher des avatars vides dans les questions anonymes.
Correction sur le Web d'une anomalie qui affectait les modes d'édition HTML et Markdown : l'utilisation de la commande "Tout sélectionner" pouvait parfois sélectionner également du texte situé en dehors de l'éditeur.
Correction d'un bug dans la fonction Recherche qui affectait les requêtes commençant par "#" et proposait des résultats comportant textuellement le terme saisi plutôt que des résultats relatifs au tag en question.
🚧 En cours
Davantage d'éléments du nouveau design des activités de la section Trafic sont progressivement déployés pour les utilisateurs de l'application Android.
Nos équipes continuent leur travail de mise à jour du Centre d'aide. Si vous constatez des articles prêtant à confusion ou obsolètes, n'hésitez pas à nous le signaler ! (Notez cependant que la version française est toujours un peu en décalage avec la version anglaise, et qu'à ce titre, il se peut que certains articles ou éléments de l'interface ne soient pas encore traduits au moment où vous lisez ces lignes.)
🏴☠️👒
🌱 Prochainement
Vos retours concernant le récent redesign des reblogs ont été bien entendus par nos équipes, et elles vous remercient ! Ces dernières les ont maintenant bien à l'esprit alors qu'elles travaillent actuellement aux prochaines évolutions.
Vous rencontrez un problème ? Écrivez-nous (en anglais) et nous reviendrons vers vous aussi vite que possible !
Vous souhaitez nous faire part de vos commentaires ? Rendez-nous visite sur le blog Work in Progress et participez aux discussions de la Communauté !
18 notes
·
View notes