#these are made without avisynth so the quality is whatever
Explore tagged Tumblr posts
Visit Tumblr Blog
Explore Tumblr blogs with no restrictions, modern design and the best experience.
Last Seen Tumblr Blogs


Fun Fact
Tumblr was created by web developers David Karp and Marco Arment.
Text
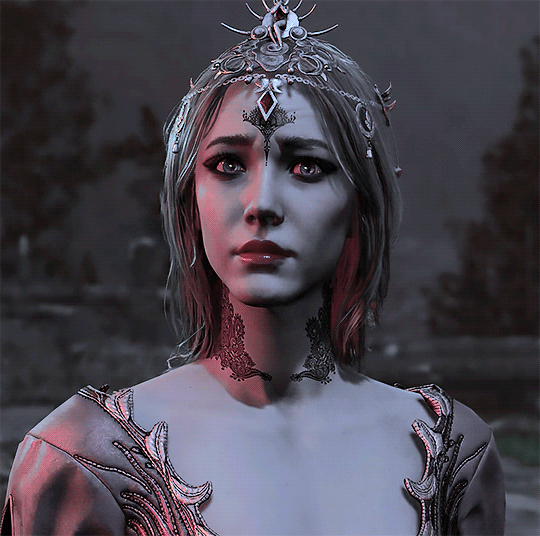
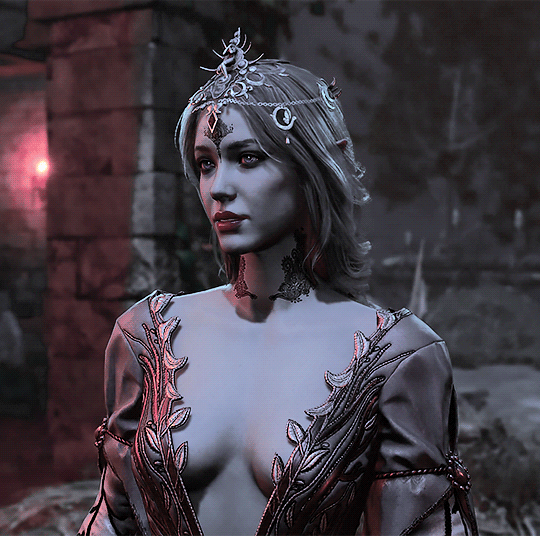
#oc: selanna orleitryn#mine#i'm trying new colorings#these are made without avisynth so the quality is whatever
4 notes
·
View notes
Text
An anon asked for a tutorial on how I make gifs, so here we go!
I believe that everyone with a decent computer can learn how to make gifs.
The programs I use are
Vapoursynth
Photoshop
Topaz denoise (a lot of people don’t use this)
This is the gif I will be making in this tutorial!

Step 1. Find what you want to gif!
Download the video you want to gif in the best quality you can find. This is where ts files are really good! Personally I don’t really mind giffing only 1080p videos, but better the quality, better the gif!
Step 2. Crop it using vapoursynth!
Using vapoursynth is a whole tutorial in itself. You can still make gifs without vapoursynth (or avisynth as some people use). You can just crop the gif in photoshop to the size you want. Vapoursynth is just good at doing so without losing a lot of the quality!
The width for tumblr posts are 540px (one gif), 268px (two gifs) and 177px for the outer gifs and 178px for the middle gif, when making three gifs!
This site has everything you need for vapoursynth!
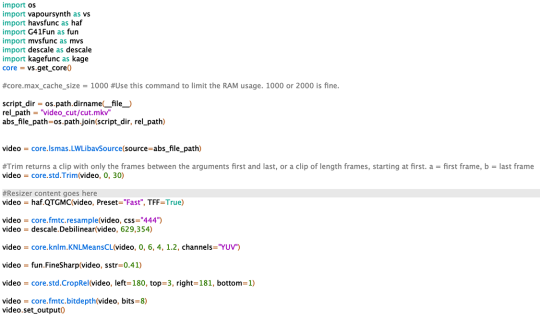
I don’t really have any set settings. I switch it up a lot, but these are my settings for this gif!
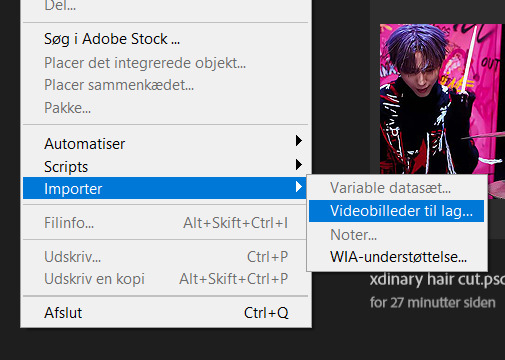
Step 3. Import gif to photoshop!
(My photoshop is in Danish, but it should be the same place in any other language).
You do this by going files > import > video frames to layers
Then you choose the video you got from vapoursynth (if you didn’t use vapoursynth, you just choose the part of your original video you wanted!)
Now we have a basic gif!

Step 4. Colouring!
Now the fun part comes! We colour the gif! This is where your gif truly becomes your gif! Every content creator has their own style of colouring and it really just takes time to find what you really like! Just do whatever you like!
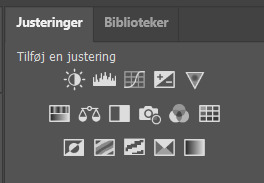
These are the ones you use for colouring! Just play around!
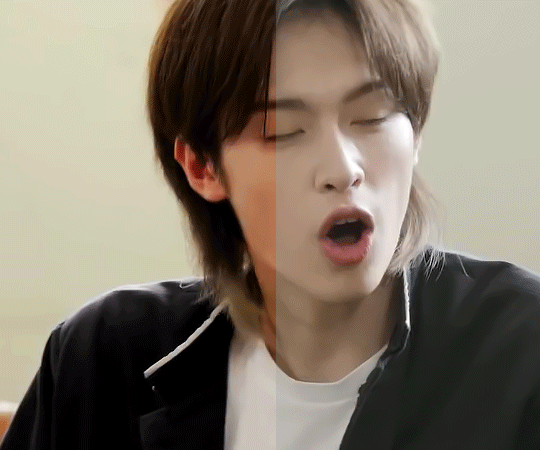
Here we have the gif with colour! I’m not going to do a colouring tutorial, because colouring is really just up to the person making the gif!
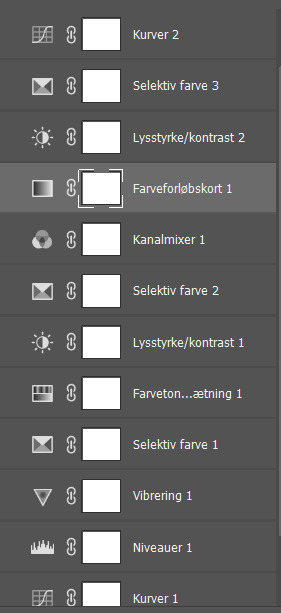
These are the adjustments I’ve used on this!
Again, sorry for the Danish!
Here are some of my psds (tho I always make a new one every time I do a gifset)! I feel like there’s a lot to learn through looking at other people’s psds! Just have fun with it!
Step 5. Sharpen (and topaz)
I more or less always sharpen the same way on every gif (depending on how sharp it already is).
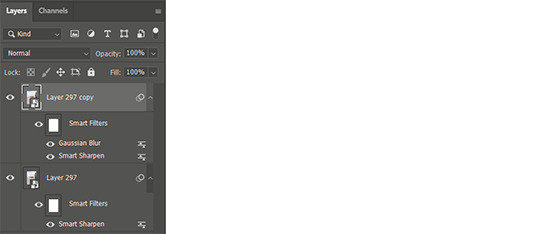
To sharpen you have to make sure you’re working as a smart object! You have to make the frame animation into a timeline and the layerss into a smart object!
Timeline:

Smart object: Select all layers > filter > convert to smart
(or select all layers > right click > convert to smart)
It has to look like this

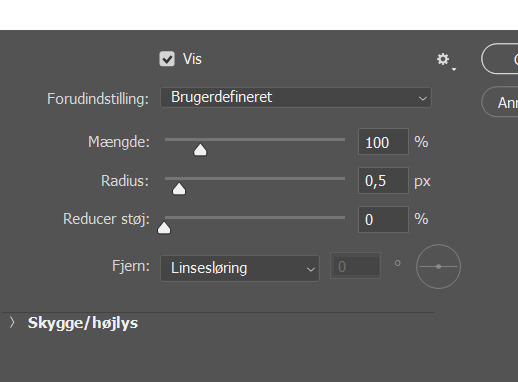
To sharpen you go to filter > sharpen > smart sharpen
These are my settings:
Then I go to topaz denoise! I don’t really have any set settings for this, I just do whatever feels right in the moment. Topaz denoise is also a whole other thing, but it’s easy once you figure it out! I made a video on how to use Topaz here (to help someone who asked)
youtube
Because I don’t like my gifs way too sharp, I always add a blur at 20-30% opasity!
Step 6. Save the gif!
Before saving the gif, make sure everything is as you want it to be! You also have to remember to set the frame delay! I usually go for 0.05 or 0.06!
To save go to files > export > save for web
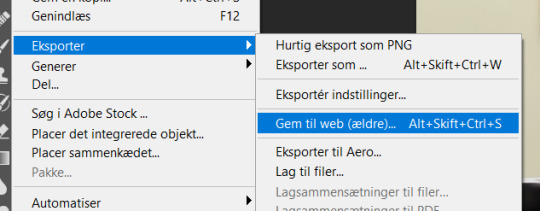
These are my settings!
And there you have it! A finished gif!
If you are more of a visual video learner, here is a video I made of my giffing like over a year ago for a challenge!
youtube
My colouring has changed a lot since then tho! I also didn’t sharpen and use topaz in photoshop (I used a lot in vapoursynth)
I hope this was at least a little helpful! ^8^
#*m.gif#maja talks#ps tutorial#resources#ps resources#photoshop#I am not good with words but here we are
57 notes
·
View notes
Text
gif tutorial ♡ by @tifaa
Lately I’ve had a few questions about how I make my gifs, so under the cut is a small tutorial about how I make them! If I forgot something or you have any questions, please just send a message or an ask. It’s also best to view this on desktop because mobile with mess with the quality ; - ; ♡
I’m going to show you the process of how I turned the gif on the left into the one on the right. (Please ignore the middle one for now!) Basically, turning a gif with absolutely no editing into a coloured, sharpened, and smooth gif!
1. Downloading Videos
I use 4k Video Downloader to get videos from YouTube.
☆ The most important thing is to download videos in the highest quality possible (I personally never gif a video that is below 1080p)
2. Preprocessing
This is optional, but I do see a big difference between gifs that I have preprocessed and ones that I used to make using only photoshop. It doesn’t take that long and you get a really smooth result, so I definitely recommend it!
Vapoursynth download + tutorial (make sure you download the one that’s titled ‘VapourSynth64Portable(200616).zip’). Since it’s quite complicated to download for Mac, I recommend trying Avisynth instead. I may do a seperate turotial on VS, but since the one I linked is in a video format rather than text, I found it really easy to follow compared to other written tutorials I had found!
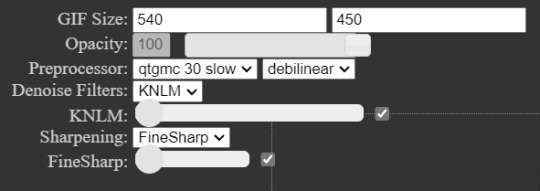
These are my VS settings:
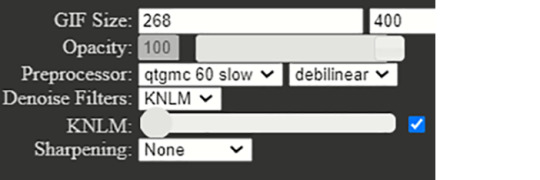
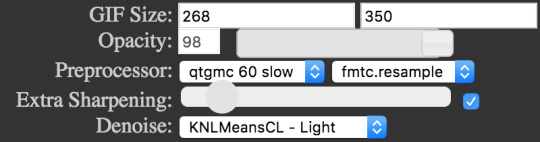
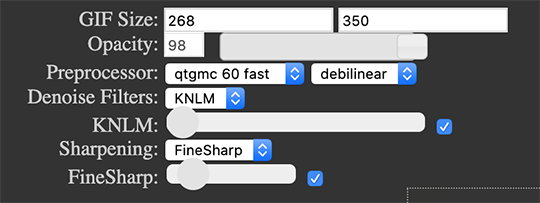
☆ GIF Size will change depending on how many gifs you want to make per row:
1 gif per row: 540px
2 gifs per row: 268px
3 gifs per row: 177px
You can change the height to whatever size you want, but I wouldn’t recommend going over 540px.
☆ Preprocesser is how many frames per second you want your gif to be. qtgmc 60 slow gets you the smoothest possible gif. As for the second setting, I always use debilinear. You can find more information on these here!
☆ KNLM is a denoising filter that basically smoothens your gif and makes it less grainy! You can also choose to utilize the sharpening setting here, but I prefer to do that in Photoshop!
Once you have chosen your desired settings, you can paste the output script that’s on the right-hand side into the VS Editor resizer.html window. (Please refer to the video tutorial〜)
3. Importing into Photoshop
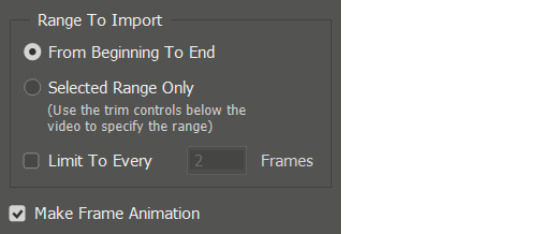
To open the video in PS, go to file > import > video frames to layers (the preprocessed clip will be located in the ‘output’ folder). These are my import settings:
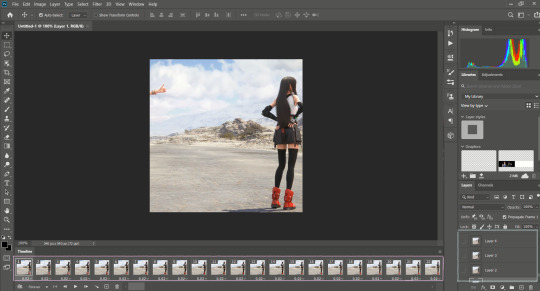
Your workspace will now look something like this: ( I’ve highlighted the frames in pink and the layers in blue, so you can remember!)
Now, delete any excess frames from the timeline if you have any (eg. frames that include a different scene). Then, select all of your remaining frames and click on this little button on the top right-hand side of the timeline:

From this menu, go to > convert to video timeline. Now, look at the layers on the right-hand side of the screen. If you deleted excess frames at the beginning, you should now delete the corresponding layers (that is, all of the layers without the eye symbol next to them).
To be able to colour and sharpen the gif, we have to convert it into a Smart Object. To do this select all of your layers and go to > filter > convert for smart filters.
4. Colouring Now, you can colour your gif however you’d like! There isn’t necessarily a right or wrong way to do this, but some settings I’d recommend trying out to begin with are colour balance, selective colour, levels, hue/saturation. To apply these settings go to > layer > new adjustment layer.
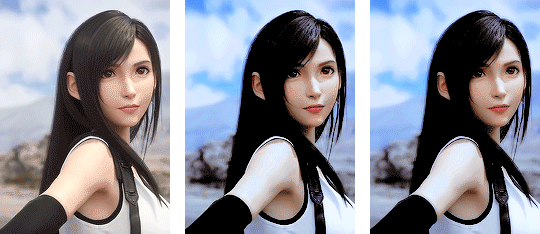
☆ Below is are some examples of this lovely scene of Tifa ♡ The first one is a base gif (no colouring at all), and the second one is what it looks like once I’ve coloured it. We’ll get to the third one soon, don’t worry!
5. Sharpening
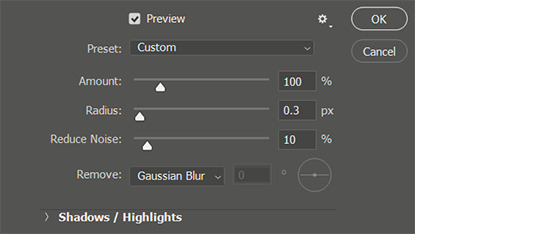
Click on your Smart Object in the layers tab and go to > filter > smart sharpen. These are my settings:
☆ The next step is optional, but it’s just a preference for how I like my gifs (it just makes them really smooth and removes a lot of the noise)!
Once I have sharpened my gif, I duplicate the sharpened later (right-click on the layer and select ‘duplicate layer’ from the menu). Then I add a gaussian blur filter to the duplicate layer (filter > blur > gaussian blur) and set the radius to 1.3.Your layers should now look something like this:
You can see the result is the third gif from the above step. Nice and smooth, right〜?
6. Saving your gif
To save our gif, we have to convert it back into a frame animation.
To do this, select all of your layers and press the little bars icon above the timeline (the one we used to convert our frames into the video timeline from before!), and select convert frames > flatten frames into clips. Now, select all of the visible layers (the ones with the eye symbol shown), and from the same menu as last time, convert frames > make frames from clips. Again, from the same menu, go to convert to frame animation.
To set the speed of your gif, select all of your frames and click on the little number icon below it (it should say something like 0.03), then click ‘other’. Here you can set the speed. I usually put it somewhere between 0.02 - 0.04 depending on the scene, so just try out which speed you prefer.
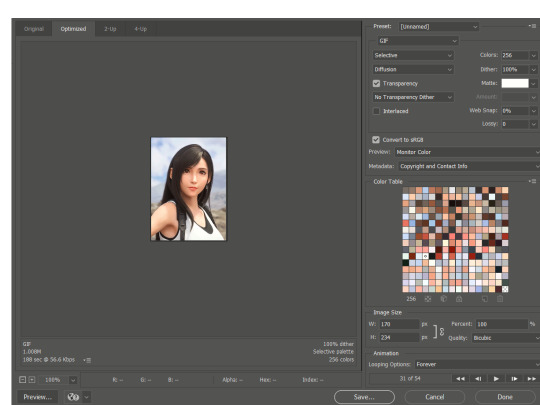
Now, we can finally save the gif: file > export > save for web (legacy)! These are my output settings.
☆ To make sure that your gif plays more than once, you must have looping options (near the ‘save’ button’) set to ‘forever’ ! ! !
Again, this is just the way I make gifs, so there are many other tutorials out there that may be more suited to your preferences! You can find some examples of my gifs here.
☆ I’ve never made a tutorial before, so I really hope that it helps you even a little bit! Please please do ask if you have any questions, either by dm or inbox! ♡
#gif tutorial#yeahps#itsphotoshop#wehearttutorials#completeresources#anon who requested please let me know if you see this!#i hope it's OK!#♡♡♡#daily gaming#videogamewomen#videogameedit#gamingedit#gamingnetwork
71 notes
·
View notes
Photo

One of the most frequent asks I get is “how do you make your gifs?” Previously I had just linked my FAQ where I have some resources on how to gif listed, but I figured to (hopefully) stop receiving the same ask over and over, I’d just make a tutorial on how I personally gif!
* Please note that everyone has different giffing styles and settings preferences, so the following is just how I make my gifs. Other people are likely to do things differently!
This post will be a comprehensive guide that includes details about DOWNLOADING VIDEOS, USING VAPOURSYNTH TO MAKE GIFS, USING PHOTOSHOP TO MAKE GIFS (+ a blurb on TOPAZ), and COLORING.
This post was last updated on July 30, 2020. Keep reading to get started!
DOWNLOADING VIDEOS
I use a number of sources to download videos/get video clips, depending on the origin of the video. In general, I try to gif from videos that are at least 1080p - the higher, the better. It’s almost impossible to make gifs look high quality if they don’t originate from a high quality video! Below are the sources I use:
TS files: kpop24hrs (you need an account), kpopexciting, occasionally torrent links from Google or download links from Twitter (search the group name + date in YYMMDD format + .ts)
Youtube videos: 4K Video Downloader
Vlive videos: Soshistagram
Twitter videos: Twitter Video Downloader
Instagram videos: Dredown
Long videos: If I don’t have the space (or patience) to download a certain video, or if it’s not a downloadable video (e.g. Fanship, paid online concert, etc.) then I screen record with Quicktime Player
(Side question: what’s a TS file? A TS file is essentially a very high quality video that you can find for live show performances and aired music show interviews! TS files are generally 60fps, so they’re how gifmakers can make those super clear and smooth live performance gifs. If a TS file is available for what you want to gif, use it.)
USING VAPOURSYNTH TO MAKE GIFS - OLD AND NEW VERSION
05/2020 update: I have re-installed Vapoursynth to its latest version, so I am including updated instructions/screenshots for both the old version (that I downloaded ~mid-2018) and the latest version.
After I’ve downloaded my video, I use Vapoursynth to crop, resize, sharpen, and denoise gifs. Vapoursynth is like Avisynth in that both programs can be used to crop and resize gifs without losing video quality, but VS has the added capabilities of sharpening and denoise. VS is the reason I don’t need to use Topaz on any of my gifs! You can install Vapoursynth here.
First you drag your video file to the Vapoursynth app installed on your computer. You’ll be prompted to enter a start timestamp in HH:MM:SS format (so if you want the video to start 5 seconds in, you would enter 00:00:05). Then you put the encoding duration also in HH:MM:SS format (if you want the video to be 8 seconds long, you would enter 00:00:08). Generally I’ll look for the exact moment I want to gif and enter the start timestamp 1 second earlier and have the encoding duration be between 3-5 seconds.
After you’ve entered this, a resizer.html window will automatically pop up. Below are screenshots of examples of my normal settings for my performance gif 4sets (ex. here or here) for both the old and new versions of Vapoursynth.
Old version:
New version:
Below is an explanation of the parts:
GIF Size | The gif widths (the first number) recommended for Tumblr:
1 gif per row: 540px
2 gifs per row: 268px
3 gifs per row: 177px
You can use any height, but these are the ones that I tend to use:
1 gif per row: 243px or 300px most frequently, but sometimes I’ll do 220px/201px/400px/450px/540px depending on how large or small I want them
2 gifs per row: 350px
3 gifs per row: 300px, occasionally I’ll do 375px or 400px if it’s a very long video (e.g. some fancams)
Opacity | Don’t worry about this; it just changes how you view the video in the window.
Preprocessor | This refers to how the video will render! Super important because you’ll be given the option of 60 vs. 30 - these numbers refer to frames per second. For live performance gifs, I always use qtgmc 60 fast (slow in theory gives you better quality gifs but I’m far too impatient for that). For all other gifs, I do not use any preprocessing method. A basic rule is that if you’re using a TS file, you should preprocess it because it’ll de-interlace the file. If you’re using an mp4 or mkv or any other file, you don’t need to preprocess.
Extra Sharpening/Sharpening | Pretty self-explanatory. You can move the slider up or down depending on personal preference! I try to keep the sharpening low unless the video quality is especially bad. In the new version, I use FineSharp over VCFreq because I find the latter a little harsh for my tastes.
Denoise/Denoise Filters | Will help remove noise from gifs. In the old version, I almost always used the Light setting unless the video is super grainy, and then I might have chosen Medium instead. In the new version, I use KNLM at its lowest setting. I’ll only bump it up if the original video is quite grainy.
Once you’ve configured all your desired settings, you can copy & paste the output in the resizer.html window to your Vapoursynth editor file and enter the beginning and end frames.
The editor file for the old version:

The editor file for the new version:
To make the gifs in the old version, just save the file and then wait until everything finishes processing! In the new version, you have to go to Script > Encode video, and then under the gif preset click ‘start.’ Wait until it finishes encoding. On my laptop, this takes anywhere from 20 seconds to 3-4 minutes, so sometimes you have to be patient. This is the end of the Vapoursynth portion of gifmaking.
USING PHOTOSHOP TO MAKE GIFS
To create gifs in Photoshop, go to File > Import > Video Frames to Layers and then select your video file/output file from Vapoursynth (output.mov). These are my settings to create the frame animation:

Once your frames have been imported, you can delete frames and add a coloring psd on top of all your layers.
Photoshop is also where you adjust the timing of your gif. In general, these are my settings:
30fps: 0.04/0.05
60fps: 0.02/0.03/occasionally 0.04 if I want it to be super slo-mo
Honestly, just use whatever timing setting that looks good to you! Some prefer faster gifs, others prefer slower, so just do what you like and things will be okay.
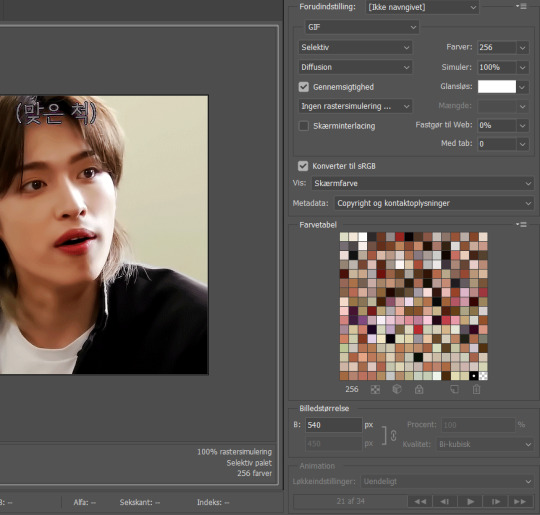
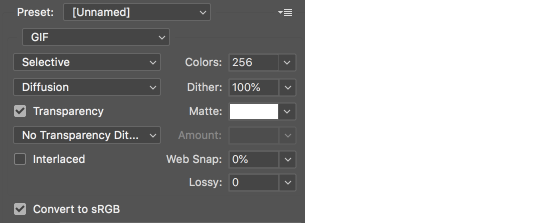
Save through File > Export > Save for Web (Legacy) with these settings (you can play around with selective vs. adaptive or diffusion vs. pattern; they all have slightly different looks, but 256 colors is a must):
Make sure your gif is under 8mb - to decrease a gif’s size, I usually delete frames and/or use selective color to increase the black percentage for whites, neutrals, and blacks.
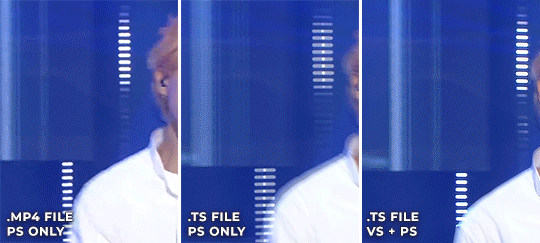
After you save, you’ll have your gif! Below is the same moment giffed in different ways to illustrate how much a difference that file type + giffing style can make. You can tell that the TS file is higher quality and less grainy than the mp4 file, but it really isn’t unless you use Vapoursynth that the gif becomes super sharp and smooth. This is because if you import a TS file straight into Photoshop, it will only import at 30fps because the video itself is interlaced. You have to run it through a de-interlacer (like VS) to actually get a 60fps clip.
With regard to TOPAZ*, I mentioned above that because Vapoursynth has sharpening and denoise functionalities built into the program, I no longer use Topaz. However, if you do not have access to Vapoursynth, then I highly recommend downloading Topaz (download links can be found through quick searches on Tumblr) and using Denoise and Clean to adjust your gifs. A warning: Topaz can take a long time to process and many gifmakers have a love/hate relationship with it, so be prepared for that. The way you apply Topaz is to select all your frames and layers, then do Filter > Convert to Smart Filters. Add the Topaz/smart sharpen adjustments, then Flatten Frames Into Layers. Once that has happened, hit Convert Frames > Flatten Frames to Clips and then Convert Frames > Make Frames from Clips.
COLORING
I get questions a lot on coloring and the truth is that coloring is an art - I by no means consider myself an expert, but I do experiment a fair amount with different settings and layers so I at least have a decent understand of what’s possible when it comes to coloring.
A few tips I’ll give:
Everyone has different coloring preferences! Whatever coloring you like may not be what others like, and that’s okay. Don’t be afraid to experiment!
PSDs are good for learning how to color - download premade ones and look at how other people made them: what layers did they use? in what order did they put them? what blending mode? at what opacity? These are all questions you’ll need to ask yourself when you create your own PSDs. (Remember not to edit others’ PSDs if they do not allow it, and given them due credit when necessary. Also don’t claim as your own!)
Tips to bring out idols’ natural tan/unwhitewash: increase vibrance, decrease brightness + increase contrast, use selective color and decrease cyan and increase black on the reds channel, use a gradient map that goes from a black/dark red to light pink/coral and change the blending mode to soft light or decrease opacity of the layer to 20-40%.
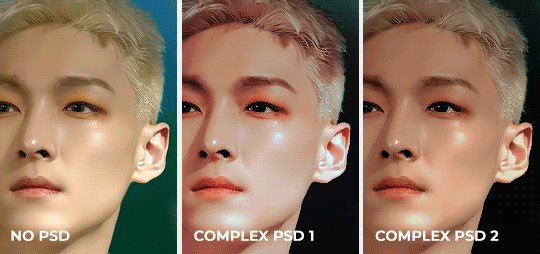
Below are some examples to show how much a difference coloring can make. I’d consider a basic PSD one that has less than 10 coloring layers/doesn’t make much change to the actual coloring of the gif besides lighting adjustments. More complex PSDs generally have 15 or more layers (the ones I used below in have 16-25+) and drastically change the colors in the original gif. You can also mix PSDs too - for a lot of my performance gifs, I’ll first add a basic PSD that increases the contrast of a gif to make the skin glow, and then I’ll add an additional PSD that adjusts colors and other various lighting aspects.

You can see just how much of a difference coloring makes:
Don’t be afraid to experiment with different layers/styles! Everyone has individual preferences for how they like their gifs to look, and in a sense, coloring is the main way you can make gifs “yours.”
FINAL NOTES
Giffing is hard and requires a lot of patience - you definitely won’t be able to make amazing gifs right when you start! Even though I’ve been giffing for close to a year now, I still dislike many of the gifs I make and think that I can definitely improve. Don’t be afraid to reach out to other gifmakers for advice and help - 99% of the time, they’ll be happy to answer your questions!
I have posted a sped-up version of my gifmaking process here that you can also use as a resource!
Please let me know if I’ve missed something, and feel free to reach out if you still have questions. Good luck!
910 notes
·
View notes
Note
ah thank you 😭💗 i'd love that!! but only if you want/can 😔💕
I’d love to! If it can help you improve in any way then I am totally down to help you out, just tell me if there’s something you don’t understand and I’ll try to break it down to you!!
Okay then, I’ll begin explaining the basics first then I’ll break my way of giffing down to you. For starters:
Video version: https://www.youtube.com/watch?v=zT_XPPDQEak&feature=youtu.be
1. You have to have Photoshop. I use PS CS6 but since i don’t really know if you have Photoshop or not, I’m just going to explain my style with the kind of PS i use. If you don’t have Photoshop I suggest you search for some trustworthy links and get yourself one because giffing without it is…well, it isn’t impossible but it’s unlikely that they’ll end up coming out as HQ as you want them to.
2. You don’t actually have to have this one, but it’s what I and some of (if not all) of my giffer friends use and it’s called Avisynth. I’m not sure if you’ve heard of it or not but it’s a, I call it an extension but it’s called something else I just can’t remember what it’s name is. It’s important because it can give you an extra sharp look on your gifs like the one’s mine have and make it into focus but it’s also essential for making performance gifs so I will highly suggest you consider it or something like Vaporsynth but giffing without it is also possible.
3. Video quality is seriously important when you’re gifing, almost as important as having PS if you’re on a goal to achieve HQ gifs. Most videos are released in either 720 pixels or 1080 pixels but recently 2160px has come in but it’s not as used so you don’t have to worry about it right now unless you’re giffing fancams or sometimes MVs that are released in 2160 like ASTRO’s All Night or NUESTs Love Paint. But I have to stress you download your videos in 1080px or if there’s none 720px, don’t settle for anything less than that unless you ABSOLUTELY have to.
Okay, now I’ll explain how I gif my videos using the information above that i’ve briefly talked about, I’ll try to break down my style of giffing here but remeber majority of my gifs rely on my coloring and psds rather than my sharpening or something like that.
For starters when I’m giffing a video, say an episode of a group: the video is always downloaded in the highest quality regardless of how long it can take (some videos can end up being 1GB or higher so be careful about your space as well because PS can slow down from your computer being too full and if you’re in a rush that won’t be good for you.) and then I pick the scenes I want to gif.
When I know what I want to gif I input it into Avisynth ‘normalweb or normalwebrange’ this will make sense once you get an Avisynth but for now it’s like a cmd action that takes you to Resizer that will now help you sharpen your gif and pck the dimensions you want it to come in. For dimensions there’s all kind of sizes (268 by 350, 540w by 250 or higher height, etc.) but it’s all up to the kind of gifs you want to make, I’ll link some so that you understand what I mean.
While I’m in avisynth’s resizer (it opens on a web browser so you have to set it on which browser you’re most comfortable with. I use Chrome if you want to try it) I set my dimensions and increase the extra sharpening to 25 or 30 and then I copy the code at the bottom and close the page. I’ll try to explain this part since I know I haven’t made much sense.
When you open the folder where your avisynth is supposed to be (There’s another tutorial for putting avisynth in your computer if you want) there should be several windows batch files that go like ‘normalwebm’ or ‘normalwebm32′ etc. I use the webm32 because it captures more frames but the choice, in the end, is yours. The normalwebm32 should redirect you to the browser settings to Avisynth either by you or by the program itself and it’ll open a page called resizer where you can resize your gif, choose the placement and sharpening. The size of the gif is up to you so you can put whatever kind of dimensions you want, choose the placement and also set your own extra sharpening. At the bottom of the extra sharpening, there should be a white page with words like a code on it, those words should change each time you change something about the placement or sharpening and in some cases the speed but it’s best reserved for performance gifs. You need to copy that entire code and make sure you’ve left nothing out and then close the page. Avisynth will then redirect you to another app called Avspmod that will help you cut out the unnecessary parts of your gifs you don’t need or want. You can also preview it so you can check how it looks. After that you need to Ctrl+S and the script, basically what you’ve been doing will be saved and after closing the app, it should begin getting processed by another app called VirtualDub that will do all the work for you and then you would need to go to a folder where your avisynth is and look for somewhere called vdub and there you will find another app called VirtualDub. You need to click on it and it’ll show you your gif but in video format. Don’t worry, this is okay and is should come out moving as a video but with no sound and should be classified as a .avi. This part I’ll demonstrate it to you later with a video but this is how you do it.
After doing all of that and converting your video into a gif, you just need to input it into PS by a script which you’ll find in the File at the top left corner of PS. You’ll need to browse and find where your gif was transformed into and select the frames you need and then they’ll be loaded into PS as a single file.
From here, I can’t explain it with words, therefore, I’ll record how I do it and put it in this ask. I know I didn’t do much to help and probably made it worse but trust me, it’ll make sense once you can see examples of it.
#if you can give me a day until tomorrow morning I can show all of this to you#tumblr is refusing me to put a keep reading link so i'm really sorry#i can also lend you some of my psds but i'd suggest you learn how to tweak them soon cause you'll discover your own style soon#i promise i will help you just give me one day!#ask#anon#anonask#*gifhelp
2 notes
·
View notes
Note
can you ever make a gif tutorial?
i can anon idk how qualified i am to make one but i’ll give it a shot anyways!
so for starters i have a mac + photoshop cs5 so a lot of this tutorial will be based on what you do for that, but i’m sure u could do the same thing on pcs (actually pcs have it a lot easier than macs like more programs available so i highly recommend, if u have a pc, finding a tutorial that is based around pcs) and other photoshops too!1. Finding/downloading your video~so for normal mp4 videos on youtube i use this website. it’s pretty useful it can download from actually a wide variety of sites like naver (up till 1080p!) ~for v app videos i use this site~ts files i find on twitter or kpopexciting. for w1 related stuff though, i HIGHLY recommend this twitter account. most of their ts files are already in 60fps formatting so if u dont want to download avisynth for the 60fps extraction, you don’t have to! ~the higher quality files you find the better! i find that it tends to go mp4~honestly finding the right high quality video is a HUGE part of making gifs look nice2. Extracting your video~there are many many many ways to extract your video but I highly recommend downloading avisynth! There are ways to download it for pc and now for mac as well!! avisynth is beautiful because it doesn’t really reduce the quality of your video to the extent that photoshop does, plus it can extract 60fps from ts files. some gifs ive made through avisynth (x x x ) if you’re interested in avisynth further, tumblr user @/brandinator is a good place to start! if you want to know more regarding how to use it and a different tutorial through that, let me know! ~Before I got avisynth I used VLC player for ts files but I had to basically screenshot each frame individually. Some gifs I’ve made through this method ( x x x compare x with x (avisynth) for comparison purposes, it’s the same music broadcasting show so the same video quality; i feel that avisynth has a greater advantage when it comes to griddy backgrounds/flashing lights in live performances) ~I think pcs can use kmplayer? id look into that if you have a pc~for normal mp4 videos I just use photoshops ‘import video frames to layers’ option (under file in the menubar)! you can use avisynth as well to preserve quality but I almost feel like that takes up too much time (for me) since ps can get frames to layers in a couple of seconds whereas avisynth can take many many minutes. I think it’s self explanatory but basically you find the video you want to extract, find where u want ur gif to start, and for photoshop cs5, you hit the ‘shift’ key and let the part u want giffed in the video play. when youre done u lift the shift key and hit ‘ok’ (idk if it differs for different versions of ps)
3. Coloring/Sharpening/Cropping/Etc~now this is the step that I can’t really give a tutorial on because honestly it varies for everyone! but i feel that this is the step that a lot of ppl need guidance with (me included) because it is the hardest step, probably because it is so ‘up in the air’ for lack of a better word? there is no one right way of doing it the possibilities are literally endless but I think i will give u some tips~Coloring: ~most important rule: don’t whitewash ur gifs!! ~other than that, the world is yours. ~honestly have fun with this part! coloring is something that i haven’t fully learned yet ~i tend to play around mainly with exposure, levels and selective color. ~my main goal when i color is to get a ‘realistic’ view of how the person may have looked ~this usually means that i do whatever i can to get rid of video filters ~for generic gifs i think it’s important to find what your goal is when you are coloring ~do you want something realistic looking? negative space? coherent color schemes? ~you can also download psds other ppl have made (i dont do this myself) and use those! ~caution: changing the colors too much can result in super grainy gifs if you aren’t careful~Sharpening: ~ah yes my biggest enemy: sharpening ~first things first, i sharpen my gifs using smart sharpen + topaz ~settings for my smart sharpen are 500%; 0.4 ~check the box that says ‘more accurate’ and i personally remove ‘gaussian blur’ ~caution: more sharpening = more grain ~sadly i am super duper duper dependent on topaz (a plug in) for sharpening ~people use topaz denoise, and/or topaz clean ~on topaz denoise i adjust clean color all the way to 0, ~then i adjust ‘overall strength’ and ‘reduce blur’ to whatever looks nice in the preview ~idk how to use topaz clean even though I have it, because it refuses to work ~to apply topaz you have to hit ‘flatten frames into layers’ ~some gifs i’ve made with topaz (x x x x) ~there are ways to make it look nice without topaz but i’ve forgotten how after i got it ~id duplicate the frame then use smart sharpen and ‘gaussian blur’ under ‘blur’ ~then adjust the opacity level in some way lasldf idr ~some gifs ive made through this method (x x x x) ~last but not least i’ll bring up avisynth again. avisynth is nice at preserving video quality ~a lot of ppl i know say they don’t even sharpen gifs out of avisynth~Cropping: ~it’s super important to follow tumblr dimensions otherwise gifs come out looking grainy! even when they’re not !4. Saving the gif~personally the save settings I use are “Selective/Adaptive” ; “Diffusive”; Dither: 100%; 256 colors5. Pray ~a lot of the time when you’re giffing, gifs won’t come out the way you want it (i’m sure for every gifset i’ve uploaded on tumblr, there’s a gifset that i started making and never finished because it looked really bad). idk sometimes it feels like photoshop has its own will, sharpenings wont always work the same way each time, video quality won’t be the way you want it, i’m honestly still very experimental right now I don’t have ps figured out at all. so yeah…sometimes all u can do is that when u hit that save for web button (that ruins everything alskf) that ps doesnt mess it up too bad
this is a super generic guide! let me know if you need more information!
3 notes
·
View notes
Note
(1) thank you for being honest about your feelings. i know words of one person may not help much, but i truly do admire the things you put out for this fandom. however, if it’s to the point where it causes you to feel negative things, then i would want you to find something that will make you genuinely happy. i think whatever we create, our happiness should come first no matter what. creating something should be born from happiness, i think. you say that you “can’t even make a simple live stage”
but there are many people, such as myself, who can’t even make gifs in general. that’s exactly the reason why i find that it’s amazing for you to do so. i’m sure creating gifs must take an insane amount of time and patience, something that many cannot sacrifice or do. with my utmost honest words, i truly respect your work + you entirely. i hope you’ll find peace very soon with your creation + i’m sending abundant love your way, bee. may you find true happiness, my friend.
(p.s. i know i just sent you a superrrrr long ask and i probably should of sent it to you as a message. i’m sorry about that! please don’t feel inclined to reply, i seriously just wanted to let you know how much you and your happiness matters. okay, i’m going to go dash off now!)
-----------------------------------------------------------
what i’m feeling is mostly frustration at this point. i’ve been making gifs for 3 and a half months and for that whole time i’ve been trying so hard to get one (1) program to work on my laptop and for whatever reason, each time i try something else in it is broken. so it must be something i’m doing wrong, right? i see everyone else making gifs and they’re using that program without any problem, so it MUST be me being a dumb bastard that cannot work a simple program
and the thing is, i know how to use it, i’ve fixed things that are broken in the scripts for the program, but it still wont do what the program was built to do, so what am i doing wrong? looking at it objectively, i’m not doing anything wrong because i’ve followed every tutorial to the letter, but how can that be if i’m using avisynth like everyone else is and this is the outcome of me doing the exact same thing everyone else is doing. what is me stupid brain not seeing or doing? why wont avisynth crop? why is saving what looks like a perfect gif in the app as a shitty low quality full sized video?
i’d made peace with the fact that i cant make live stage gifs until last week when we had the incident. i’ve been on here preaching about no matter what everyone’s work is amazing and to keep going and i’m my own biggest hypocrite because all i really do is whine about how i’m not good enough
0 notes
Text
How to Upscale Video Content to 4K, 8K, and Beyond
For the past three months, I’ve been working on what I’ve named the Deep Space Nine Upscale Project (DS9UP). The goal of DS9UP is to create a new, much-improved version of the show by applying modern processing techniques to the original DVD source before using AI-based software to create a higher-resolution version of the show. It’s had me thinking about upscaling and upscalers in general. Upscaling isn’t a feature we talk about much, but how your TV handles it (or, alternately, how you use the capability on a PC) can have a significant impact on how you experience content.
The word “upscale” generically means “to improve the value or quality of something.” In the video and PC space, it’s almost always a reference to increasing the effective resolution of a piece of content. There is typically an understood difference between upscaling and native resolution. If you upscale a 1080p video into 4K, it means you are taking a 1080p input and using a combination of hardware and software to create a larger image. This upscaled image will not be identical to a native 4K signal, but it should offer a better picture than what was previously available on your 720p or 1080p television.
Keyword: “should.” Video scalar quality in TVs can vary widely between different product families. In some cases, you might be better off using a GPU to drive a picture than relying on the TV’s native rescaling capability, while other TVs have excellent upscalers. Manufacturers rarely disclose their upscaling hardware choices, but higher-end TVs should have improved upscaling capabilities. If you have a UHD Blu-ray player paired with an older or lower-quality 1080p or 4K TV, you might even get better results by running all video signals through the Blu-ray player rather than the television. Generally speaking, a good TV upscaler is considered to be as good or better than a GPU.
How the Scalar Sausage Gets Made
The most basic function of a video scaler is to take whatever image it receives — 480i, 720p, 1080p — and stretch it across the entire screen. Without this functionality, a 1080p signal would take up just a fraction of a 4K television’s display. This simple resizing is typically done by taking each individual 1080p pixel and creating four pixels out of it (remember, 4K is four times the pixels of 1080p).
But many TVs and Blu-ray players do more than just perform a simple 1:4 mapping. They also use video processing techniques to extrapolate what details ought to be present in the scene. How well this works depends on the type of content being
Image by DisplayNinja
In the image above, you can see how the upscaled 4K is much more nuanced than the simple 1:4 mapping in the second grid from the left. If you’re having trouble seeing the difference between the 1080p upscale and the native 4K, look at the left-side blocks in the very first row and the right-side blocks in the very last row. The native 4K image resolves into distinctly different colors than the 1080p image in R1C2 (That’s 1st row, 2nd column), R1C3, and R8C8. As the amount of available horsepower in televisions has improved, the quality and sophistication of their integrated upscalers have grown as well. Some modern TVs have sophisticated sharpening algorithms to reverse the blur created by upscaling and interpolation algorithms good enough to almost match the precision of a native 4K signal.
How does all this look with real content? A 2017 Rtings article can help answer that question. The first image below is from a 4K set displaying 1080p in upscaled 4K, while the second is native 1080p.
Image by Rtings
If you have trouble seeing a difference between the two images, open both of them in a new tab and focus your eyes near the center of the image. See the house with a brown roof near the center of the image, with three windows facing approximately south-southwest and a fourth pointed east? (All directional cues based on north being “up”, not the direction of the sunlight). Look at that specific spot in both images, and the roofs in the buildings immediately adjacent. The difference should jump out at you. In this case, even using TVs that date back to 2015, the 1080p upscale to 4K is better than the 4K image.
Image by Rtings
If you have an older TV or a budget 4K model, there’s one obvious method of improving your TV’s upscaling: Buy a better television. Unfortunately, it’s impossible to predict how well this will work without knowing exactly what you own now and what you plan to purchase to replace it. The older your current TV, the better the chances that a new set will deliver upgrades in all respects, but many of those improvements may have nothing to do with the way your upscaler handles <4K content.
If you aren’t happy with your current TV, can’t replace it at the moment, and happen to own a high-end Blu-ray or UHD player, you can also try running content through its upscaler rather than relying on the television to handle it. In some cases, a top-end UHD Blu-ray player may deliver a better experience than an entry-level 4K TV from a few years back. If you’re still using a DVD player to feed a picture to a mediocre 1080p or 4K panel when/if you play DVDs, and you can swap over to a high-end Blu-ray / UHD Blu-ray player instead, I’d try it. It may or may not help, but it definitely won’t hurt. What you’re trying to do here is route the signal through the upscaler that’ll give it the best quality kick.
Still need a higher-quality picture? You’re in luck.
Real-Time AI Processing
I haven’t tested the most recent Nvidia Shield myself, but there’s a demo you can actually play with on Nvidia.com to apply the effect the TV offers. Here’s a screenshot of the effect. I’ve positioned the slider over the lizard’s eye because it’s the easiest place to see the upscaler’s impact:
Left: Regular upscale Right: Nvidia Shield
Still not clear? Here’s an enlarged version of the same screenshot.
The image on the left is a traditional upscaler, the image on the right is Nvidia’s Shield when asked to scale up 720p or 1080p content to 4K (content below 720p is not supported for upscaling, at least not yet). The AI component of the upscaler obviously improves the overall image quality. In my experience with applications like TVEAI, this is a fair representation of the improvements that can be achieved.
Third-party reviews of the Shield agree. Slashgear writes that when it works, the effect is “fairly astonishing.” So far as I’m aware, the Shield is currently the only set-top or 2D box offering this kind of functionality.
Video Upscaling via Third-Party Software
Finally, there’s the option to use a third-party upscaler, like Topaz Video Enhance AI. I’ve made extensive use of TVEAI as part of the Deep Space Nine Upscale Project, and can confirm that the application is capable of yielding stunning results. One major limitation of TVEAI, however, is that it currently only supports Intel and Nvidia platforms for GPU-accelerated processing. CPU processing is available, but likely too slow to be all that useful.
Thanks to AI-based upscaling, historic sci-fi canards like the “Enhance” function are now a reality. It’s a truism in video encoding that no application on Earth can put data back where it never existed, and that’s still true today. The reason we can now “enhance” images to improve their clarity is that AI-based applications are capable of analyzing a video field and estimating what detail would exist if the image were in higher quality already.
One of the typical ways to train a video-enhancing application like TVEAI is to provide the neural net with the same image or video in both high and low quality. The neural net is then tasked with finding a way to make the low-quality source look as much like the high-quality source as possible. Instead of trying to teach a computer what lines and curves look like by providing painstaking examples, we’ve developed the ability to make the computer do the work of teaching itself. That’s why “Enhance” has gone from a complete joke to a plausible reality in a matter of a few years.
You may need to zoom to see subtle differences, but this isn’t an upscale comparison. It’s a comparison of performing my upscale work in separate applications and steps (left-side) versus ingesting the entire video workload into Topaz Video Enhance AI using the AVFS virtual file system and performing the entire operation at once. If you’re thinking “Wow, that’s a tiny difference, who would even care?” well, you may be right — but I wasn’t kidding when I said I was going to use the highest-quality source possible.
Applications like Topaz Video Enhance AI can cost several hundred dollars and they don’t run in real-time — the RTX 2080 appears capable of 90-110 frames per minute when upscaling 640×480 video to 2560×1920. The result of using these applications, however, is a vastly better picture than you’ll see from any other source.
DVD source on the left, upscale on the right.
I suspect we’ll see AI video processing and upscaling become more important over time as Intel, Nvidia, and AMD introduce their next-generation graphics processors. There’s an awful lot of old content orphaned on bad-quality source, and building specialized AI processors to fix it will likely consume some silicon for all of the concerned parties over the next few years.
Finally, I’ve embedded the current version of DS9UP’s opening credits for the show below. This is new footage that hasn’t appeared in a previous DS9UP article. There is no audio in this clip and you’ll need to raise the resolution to 4K, but I’ve created this file based on the DVD source with modifications in AviSynth, DaVinci Resolve, and Topaz Video Enhance AI.
youtube
Compare that to the actual credits ripped from the DVD and uploaded to YouTube by yours truly:
youtube
This is what the credits look like if you watch them on the source DVDs. The improvements from this version to my own are not small.
Upscalers are amazing and only getting better. That’s true no matter how you consume content or what technology you use to do it. Depending on the shows you like and how much time you want to sink into the project, there are tremendous improvements to be had… or you can just wait a few years, and buy a better TV. You can read more about DS9UP at the links below.
Now Read:
Deep Space Nine Upscale Project Update: Variable Frame Rate DVDs Can Burn in Hell
Deep Space Nine Upscale Project Update: ‘Sacrifice of Angels’
Upscaling Star Trek: Deep Space Nine Using Topaz Video Enhance AI
PCMag: The Best TVs for 2020
from ExtremeTechExtremeTech https://www.extremetech.com/extreme/310029-how-to-upscale-video-content-to-4k-8k-and-beyond from Blogger http://componentplanet.blogspot.com/2020/05/how-to-upscale-video-content-to-4k-8k.html
0 notes
Note
Hi~~ I'm really sorry to bother you! But I saw your gifs in my dash and they're so pretty! I don't even stan wanna one but I just went through your gif tag for so long cause they're so nice 😍 Would you ever share your sharpen / action / topaz or coloring settings or tips? 😊
ahh omg anon thank you so much for your kind words! you’re so sweet<333333333333 i’m really flattered rn alkdjl. sorry it took me forever to respond! wanted to get on a computer and i just got on one.
i think i’ll just share generic tips! From each stage of the giffing process. i still have so much i can improve with in giffing, so i’m sorry if i give you super wrong advice ahhh but i hope this helps a little?it got super long so it’s under the read more!!
Downloading Videos
make sure it’s the highest quality video you can get. 1080p is your friend. ok honestly, when i’ve giffed, i havent really noticed a difference in quality between 2k/4k and 1080p? maybe im doing it wrong but honestly the only thing ive noticed is that 2k/4k just slows down my computer drastically and takes up way too much space on a computer that already has like zero space to begin with. so i tend to stick with 1080p.
Also! if you can get 60fps, thats also nice bc it helps your gifs look smoother.
yaknow how i said 1080p is your friend? well ts files are your best friends/family. if you can torrent them or download the, your gifs will look super pretty. i highly recommend this for live performance gifs. you can find ts files for a lot of shows, but again, since my computer has <0 space i tend not to download ts files for 1-2hr shows bc that’d kill my computer.
kpop24hrs and kpopexciting are two places i go for those live perf ts files! kpop24hrs tends to have more i feel (it’s where i go when i want to gif my rookie groups that dont have too much attention on them)
you can also find torrents on twitter, if you search the right things
Extracting Videos
ok for this, if you have a pc (so like not a mac) i HIGHLY recommend looking into avisynth. there’s this tumblr account named brandinator who i’ve heard gives really awesome tips for avisynth and made it really easy for people to get avisnyth.if youre like me and your stuck with a mac, or if you just want to stick with photoshop then you can read the rest of this
i have photoshop cs5? so my tips are generally based around that.
for youtube videos (so basically mp4/avi format) i use photoshop’s video extraction feature. file—>import–>video frames to layersif your photoshop is like mine for whatever reason and it doesnt want to recognize mp4 files, then what i do is changed the .mp4 extension to a .avi extension (and its super easy to do on mac….i dont have a pc so idk how different that is) the quality doesnt really change either with that simple changing of the ending it sorta just tricks photoshop i guess lol idunno
when youre on the ‘video frames to layers’ window, make sure you don’t hit the ‘limit to every _____ frames’ bc that makes it lose the smoothness quality of gifs. maybe back when the gif limit was like 1mb that would have been important, but we live in a world of luxury now. so for smoother looking gifs, make sure that box is unchecked. other ppl (pc users i think) tend to use other video extraction softwares. i cant remember the name, but all i remember is that for macs, that software cant extract frames so its useless for us. i think it was kmplayer? not sure. like you can download kmplayer on mac but it doesnt have the same features rip.for ts files, i use vlc player (since ps can’t open it) and sit there and capture each and every frame lol.
Actually Giffing
here’s where things get a bit interpretive
(im assuming you know how to make a gif since you’ve asked for specific things like sharpening and stuff)
for coloring,
ive found that not changing the lighting too much of the video youre giffing leads to higher quality stuff…but i also hate not changing the lighting too much which is why a lot of my gifs turn out grainy hahah (my coloring is really centered around how to make the person in the gifs look the most ‘natural’? so that usually involves trying to take out video filters). but yea the gifs in which i didnt change too much with coloring, tended to be my most high quality gifs.
i don’t use other peoples psds and make my own everytime for each gif, and i only usually just adjust ‘curves’ and ‘exposure’ yea.
if there’s an ugly color background that you want to make look more white, when youre in ‘curve’s, go to each color (red green and blue) and drag the little line thing in the top right corner a little to the left. idk what is actually happening there and why it only really addresses the bg but thats a good way to try to make your bg whiter without actually whitewashing the gif.
for sharpening
lol sharpening, my enemy. its what i struggle with the most
i use .4 at 500% for smart sharpen
and then for topaz i make sure clean color is at 0 first of all, and i mess around with ‘overall strength’ and ‘reduce blur’ until i get the quality that i wanted. i nvr go higher than .07 strength.
but an important thing for sharpening i think is deciding when you want to crop the picture? do you crop it before or after the sharpening/topaz? i dunno honestly, but for me ive found that cropping first, and then applying sharpening settings leads to the highest quality (or maybe thats what im used to so it turns out better).
oh yea i dont resize, i crop instead. i’m not sure if that does anything but when i was first starting i found that resizing made my gifs look more blurry…? and that cropping was nicer to my gifs? i’m not sure if that does anything though lol maybe cropping is worse who knows, but its something ive stuck with ever since ive started
save settings
i’ve recently switched over to diffusion! but sometimes that doenst work out so i use the pattern one. i play around with adaptive/selective to see which one looks better or takes up less space haha
last but not least: pray
i spend a lot of my time praying that my gif will come out good haha bc even if you think you did everything right, once you hit that ‘save for web’ button, it’ll look like the ugliest thing in the world it’s really frustrating. like even when i make a gifset from the same video using the same everything (coloring, sharpening, save settings) one gif will look like trash and the other one will be like the best thing ive ever giffed so its like?? pray
#anon#replies#anon i just realized my theme really isnt that pretty if you oepn it on a read more and it actually totally screwed up the entire formatting#oh my god
0 notes