#tutorial masterpost
Explore tagged Tumblr posts
Visit Tumblr Blog
Explore Tumblr blogs with no restrictions, modern design and the best experience.
Last Seen Tumblr Blogs


Fun Fact
Tumblr has 4 main sources of revenue.
Text

As a thank you for so many new followers, here's a brand new edition of my editing resources masterposts ✨ (you can find the previous editions here). Make sure you like or reblog the posts below if they’re from other blogs to support their creators! A friendly reminder that some of these are free for personal use only, so be sure to read the information attached to each resource to verify how they can be used.
Textures & Things:
Collage Kits from @cruellesummer that I find myself using basically every single day
Taylor Swift Wax Seals from @breakbleheavens that I also use literally every day
Rookie Magazine Collage Kits (1, 2, 3, 4, 5, 6, 7, 8, 9, 10)
Scribble Textures & Cross-Outs (1, 2, 3)
GIF Overlays (1, 2, 3)
Film Grain & Noise Textures (1, 2, 3)
Paper Textures (1, 2, 3, 4, 5, 6, 7, 8)
PNG Overlays (Paper, Flowers, Clouds, Stickers, Lips, Vintage Paper, Misc. Symbols)
Halftone, Scan Line, & VHS Noise Textures (1, 2, 3, 4)
VHS Tape Textures by @cellphonehippie
Misc. Texture Packs (1, 2, 3, 4, 5, 6, 7, 8)
Photoshop Effects (Halftone Text Effect, Chrome Effect, Glitch Effect, Ink Edge Effect, Photo Morph Effect)
Fonts:
Badass Fonts (free fonts designed by womxn 🤍)
Open Foundry Fonts
Free Faces
Uncut Free Typefaces
Some Google Fonts I Like: Instrument Serif, DM Sans, EB Garamond, Forum, Pirata One, Imbue, Amarante
Some Adobe Fonts I Like: New Spirit, Ambroise, Filmotype Yukon, Typeka, Big Caslon CC (TTPD Font!)
Some Pangram Pangram Fonts I Like: Editorial Old, Neue World Collection, Eiko, PP Playground
Fonts In The Wild (font-finding resource)
Tutorials & Resources:
Comprehensive Rotoscoping Tutorial (Photoshop + After Effects, great for beginners!) by @antoniosvivaldi
Rotoscoping & Masking Tutorial (After Effects) by @usergif
Texture Tutorial for GIFs by @antoniosvivaldi
Color Control PSD by @evansyhelp (to enhance, isolate, or lighten specific colors)
Cardigan Music Video PSD by @felicitysmoak
Picspam Tutorial by @kvtnisseverdeen
Moving GIF Overlay Tutorial by @rhaenyratargaryns
GIF Overlay Tutorial (+ downloadable overlays!) by @idsb
Icon & Header Tutorial by @breakbleheavens
GIF Blending Tutorial by @jakeperalta
Split GIF Tutorial by @mithrandirl
Guide to Coloring Yellow-Tinted Shots by @ajusnice
Slow Motion After Effects Tutorial (useful for GIFs!)
Gradient Map Tutorial by me!
Misc:
How to Make Your Own Textures by @sweettasteofbitter
How to Report Tumblr Reposts of Your Work by @fatenumberfor
Tips for Accessible Typography
921 notes
·
View notes
Text

🧡 Tuesday Tips #2 🧡
What Are RSS and Atom Feeds?
The Small Web movement is about reclaiming personal control over the internet, moving away from the corporate, ad-driven platforms that dominate the online space today. One of the biggest advantages of using RSS or Atom is that you can follow nearly any type of content from all over the web—blogs, news websites, YouTube channels, podcasts, even academic journals! As long as the site provides an RSS or Atom feed (which many still do), you can add it to your reader and automatically get updates when new content is published. You have full control over the flow of information, making it possible to keep up with your favorite creators and websites without being tracked or bombarded by irrelevant content suggestions (Facebook, I’m looking at you).
RSS and Atom feeds are a perfect fit for curating personal content feeds in this movement. You can even follow your friends across the small web as well! It’s like having your own personal news feed of all your friends, except there’s no corporation deciding when, how, or if you’ll even see their posts. You curate your own personalized feed, and using either RSS or Atom ensures that no algorithms can ever manipulate what you see.
So what exactly are RSS and Atom feeds? Both RSS and Atom are web feed formats used to publish updates from websites. They allow you to subscribe to blogs, news sites, podcasts, or any site with frequent updates so you can get all the latest content in one place, typically through an RSS reader.
RSS (Really Simple Syndication): One of the oldest and most popular formats for delivering content updates to users. Websites publish RSS feeds in XML format, which feed readers then display for you.
Atom: A more recent alternative to RSS, designed to address some limitations of the original RSS format. Atom feeds use XML like RSS but have a different structure and were developed to offer more features and flexibility.
Both formats serve the same purpose: they help you get content updates automatically.
Can Your RSS Reader Read Atom Feeds?
The good news is that most modern RSS readers support both RSS and Atom formats. This means you don’t have to worry about whether a website offers an RSS or Atom feed—most readers will be able to handle both seamlessly.

RSS & Atom Feeds vs. Big Tech Social Media News Feeds
Most social media platforms do not display posts in chronological order. Instead, they use algorithms to determine what content to show you based on your behavior—what you click on, like, or share. These algorithms analyze vast amounts of data and prioritize content that’s most likely to keep you engaged for as long as possible. This manipulation works to increase user engagement and, ultimately, profit for these companies, but it also has a profound impact on what we see and believe. Here are a few examples:
Echo Chambers and Polarization Algorithms tend to show us more of what we already like and agree with. Over time, this creates echo chambers—digital spaces where we are surrounded by similar viewpoints. When people only see content that aligns with their own opinions, it reinforces their beliefs and prevents exposure to different perspectives. This phenomenon can fuel political polarization, as users become more entrenched in their viewpoints, leading to heightened social division.
Amplification of Emotional and Sensational Content Algorithms are designed to promote content that triggers emotional responses, particularly outrage or fear, as these emotions tend to generate more engagement. This is why sensationalized news and emotionally charged political content often appear at the top of feeds. For example, Facebook’s own internal studies, revealed in the 2021 Facebook Papers, showed that its algorithm was amplifying divisive, angry content because it kept users engaged longer. This is particularly harmful when it comes to false narratives, as these stories are more likely to be shared when they evoke strong emotional reactions, leading to widespread public deception.
Surveillance and Data Harvesting Another corrupt aspect of Big Tech’s manipulation is the way these companies harvest vast amounts of user data to further refine their algorithms and maximize ad revenue. Companies track every click, scroll, and interaction to build a detailed profile of each user. This information is sold to advertisers or used to tailor the content in your news feed to keep you hooked. Beyond mere advertising, this data can be used for more insidious purposes, such as political manipulation. More broadly, Big Tech can shape the course of social movements by giving disproportionate visibility to certain voices or downranking others. This power can be used both to promote grassroots campaigns, but also to suppress dissenting voices.
Surveillance Capitalism This term describes how Big Tech companies monetize personal data by surveilling users and creating predictive models of human behavior. By using data harvested from news feed interactions, tech companies can sell detailed user profiles to advertisers, who use these insights to target individuals with precision ads. This economic model, built on constant surveillance, makes it nearly impossible for users to avoid being tracked online. Surveillance capitalism turns user behavior into a commodity, violating privacy in the pursuit of profit. Worse yet, this behavior-modifying system can be used to influence not just what we buy, but how we think and act.
The “Filter Bubble” Effect The term “filter bubble,” refers to the personalization algorithms used by Big Tech to show you only content that aligns with your previous preferences. This isolation of information creates a self-reinforcing loop where users are insulated from viewpoints that challenge their assumptions. This leads to a distorted reality in which everything we see online confirms our existing beliefs, regardless of whether those beliefs are factual. For instance, someone interested in a certain political ideology will be fed more and more content supporting that viewpoint, while dissenting or critical information is filtered out, creating an illusion that everyone shares the same perspective.
RSS & Atom feeds offer a stark contrast to Big Tech news feeds in several key ways:
No algorithms.
No tracking.
No targeting.
No data harvesting.
No distractions.
You’re in full control the content you consume without external corporate influences and manipulation.
RSS and Atom feeds allow you to escape the grasp of these algorithms, trackers, data harvesting, as well as corporate and political agendas. When you use an RSS reader, no one is tracking what you’re reading or recommending content to you based on targeting you and your activity. You can browse in peace, knowing you’re not being manipulated by a hidden algorithm. Using RSS and Atom feeds gives you complete control over the content you consume. Instead of relying on a platform to decide what’s relevant or interesting to you, RSS and Atom empower you to curate your own digital experience. Isn’t that great? You can subscribe to as many or as few feeds as you like, organize them into categories, and stay informed on your own terms to the content and people that matter to you most.
TIP: As you subscribe to multiple RSS feeds, organization becomes key. Most RSS readers allow you to categorize feeds, grouping them by topic or priority. For example, you might have separate folders for news, tech blogs, personal interest websites, or even specific topics like web development. Organizing your feeds ensures that you never miss important updates while keeping your content stream manageable.
...........................................................................
Choose Your RSS Feed Reader
Browser Extensions:
If you’re looking for a list of user-friendly, privacy-focused, fully free and actively updated open-source RSS feed readers for (primarily) Firefox and Chrome-based browsers, you’ve come to the right place. Let’s dive right in! ........................................................................... FEEDBRO Feedbro is an RSS feed reader that is compatible with both Firefox and Chrome browsers. It offers a user-friendly interface and has features such as feed filtering, sorting, and a built-in search engine. > Get it for Firefox > Get it for Chrome > Get it on Microsoft Edge ........................................................................... SMART RSS Smart RSS allows you to follow new posts on your favorite websites exposing RSS and Atom feeds in a three pane view, providing background loading of new articles and allowing you to organize sources into folders. > Get it for Firefox > Get it for Chrome ...........................................................................
Android & IOS Apps:
Mobile apps are notorious for tracking and harvesting user data, possibly even moreso than pc given the modern smart phone’s ability to record audio, video, and keep track of your location in real time. Here is a list of free, open source, privacy-focused RSS feed reader apps for both Android and iOS so you can enjoy your favorite RSS feeds on the go. ........................................................................... FEEDER Feeder is a fully free/libre feed reader. It supports all common feed formats, including JSONFeed. It doesn’t track you. It doesn’t require any setup. It doesn’t even need you to create an account! Just setup your feeds, or import them from your old reader via OPML, then get on with syncing and reading. > Get Feeder on Google Play (Android) > Get Feeder on F-Droid (Android) ........................................................................... Flym News Reader While no longer being updated, Flym News Reader is still an excellent news reader for Android. Flym News Reader is a simple, modern, totally free (no ads) and opensource project which keeps you inform by fetching your websites/blogs and displaying them in a mobile-optimized way. > Get Flym on Google Play (Android) > Get Flym on F-Droid (Android) ........................................................................... Fiery Feeds Fiery Feeds is a powerful and highly customisable feed reader and read-it-later client that syncs with most services. It features article view modes, feed management, flexible layouts, smart views, color themes, and more! While I wasn’t able to uncover if it was open source, the developer does have a good privacy-respecting policy here. It’s one of the better alternatives for IOS. > Get Fiery Feeds for IOS ...........................................................................
Other PC Software:
So, it looks like you’re on the hunt for the perfect RSS feed reader. Luckily, there are a ton of great open-source options out there that are user-friendly, privacy-focused, free, and actively updated. Let’s dive in! ........................................................................... QuiteRSS First up, we have QuiteRSS. This RSS feed reader is available for Windows, Mac, and Linux, making it a great option for those who use multiple operating systems. The interface is simple and intuitive, with a clean layout that’s easy to navigate. To add a new feed, simply click on the “Add Feed” button and enter the URL of the feed you want to subscribe to. You can learn more about their features here. Pros: • QuiteRSS is lightweight and doesn’t use up a lot of system resources. • Available for multiple operating systems. (Windows, Mac, and Linux) Cons: • Some users have reported issues with syncing across devices. > Download QuiteRSS ........................................................................... FEEDREADER For those who want a simple, no-frills RSS feed reader, there’s FeedReader. This reader is available for Windows and Linux. The interface is clean and easy to use, with a basic layout that won’t overwhelm users with too many options. Pros: • FeedReader has a built-in browser, making it easy to view articles without leaving the app. • Available for multiple operating systems. (Windows and Linux) Cons: • Some users have reported issues with syncing across devices. > Download FeedReader ........................................................................... Tiny Tiny RSS Another great option for those who want a privacy-focused RSS feed reader is Tiny Tiny RSS. This reader is self-hosted, which means you’ll need to have your own server to run it on. However, this also means that you have complete control over your data and can ensure your privacy. Adding a new feed is as simple as clicking on the “Add Feed” button and entering the URL. Pros: • Tiny Tiny RSS supports plugins, allowing you to customize it to your needs. Cons: • Setting up a self-hosted RSS feed reader can be daunting for users who are inexperienced with self-hosting their own servers. Best avoid Tiny Tiny RSS if you are unfamiliar with this process. > Tiny Tiny RSS Installation Guide ........................................................................... Feedly Last but not least, we have Feedly. This RSS feed reader is available for Android, iOS, and web, with a paid version available for those who want even more features. Feedly is known for its clean, modern interface that’s easy to navigate. Pros: • Feedly integrates with a ton of other apps and services, making it easy to save articles to read later or share them on social media. Cons: • Some users have reported issues with the free version being limited in features. > Sign Up For Feedly ...........................................................................
Getting RSS feed URLS
In order to subscribe to a website’s RSS feed and add it to your feed reader, you will first need to get the RSS URL (aka link or web address) to the feed you want to follow.There are a few ways to do this, so if you’re totally new to RSS, let’s start with the easiest way first.
First, you’ll need to know what website or blog you want to subscribe to. If you’re not sure, try searching for it in Google.
Once you’re on the website or blog, look for the orange RSS feed icon. It looks like this: Sometimes it’s located in the top right corner of the page, or at the bottom of the page.
Click on the RSS feed icon. This will take you to a page with a lot of code on it. Don’t worry, you don’t need to understand any of this code!
Look at the address bar in your web browser. This is the URL for the RSS feed. Copy this URL.
If you’ve chosen an RSS Reader from the options previously discussed, open your RSS reader. This could be an app on your smartphone, browser extension, or a website or program on your computer.
In your RSS reader, look for an option to add a new feed. This option might be called “Add Subscription” or “Add Feed”.
Paste the URL for the RSS feed into the field provided in your RSS reader. Then click “Add” or “Subscribe”.
Congratulations! You’ve successfully subscribed to an RSS feed. Now you’ll be able to read new articles from this website or blog as soon as they’re published.
What if there is no RSS feed icon on a website I want to follow?
Unfortunately while many websites are RSS compatible, many websites do not offer RSS directly as a subscription option (ex. Youtube, certain blogs, etc). In this circumstance, it gets a little trickier if you aren’t very tech savvy. Have no fear! I will walk you through the process.
The easiest solution if you are not tech savvy is to use the Get RSS Feed URL extension below for your web browser. This extension will automatically grab the rss feed of the page you’re currently visiting (if it has an rss feed available), and then you can simply copy and paste it from your extension to your reader if your RSS reader is on PC. If your RSS reader is on mobile, however, you can use your PC to create a list of all the feed URLs you want to follow, email the list to yourself, and the copy/paste each url from your list by accessing your email from mobile.
> Get RSS Feed URL for Firefox > Get RSS Feed URL for Chrome
If you are a bit tech savvy, however, there is a more straightforward way to get RSS URLs that is much faster.
If you are on PC, check the source code: If you can’t find the RSS icon, you can check the source code of the website. Right-click on the website and select “View Page Source” or “Inspect Element”. Look for the “” tag with the type “application/rss+xml”. The URL located in the “href” attribute is the RSS feed link. Copy and paste the link into your preferred RSS reader.
One other thing you can try is experiment with adding each of the following to the end of the URL of the page you want to follow: /feed /feeds /rss /rss.xml /atom.xml .atom In most cases where an RSS feed is available, adding one of these options to the end of the page’s URL will bring up the page’s RSS feed. This method is hit or miss but always worth a try as it often comes up successful.
For example, if you wanted to subscribe to my status updates (located at https://status.cafe/users/thecozycat) you would add https://status.cafe/users/thecozycat.atom into your RSS feed reader. Or if you wanted to subscribe to my website activity feed (located at https://smallweb.thecozy.cat/activity/feed/), you would add https://smallweb.thecozy.cat/activity/feed/ into your Feeder app. Now, you’re probably asking, how do you know which one is the right one? You will need to test each of the six options in your web browser by trying each of those options at the end of the url you want to add to your feed. If it’s wrong, you’ll likely get an error page. If it’s right, you’ll see a page with code on it OR your browser may prompt you to download the feed file. That’s how you know you’ve got the right one.

How to Make a Website RSS-Compatible
If you’re building a website and want to offer RSS feeds:
WordPress: By default, WordPress generates an RSS feed at yourwebsite.com/feed. You can also customize it using plugins like RSS Post Importer.
Static Site Generators: Static site generators like Jekyll and Hugo support RSS feeds natively, allowing you to create them automatically as part of your build process.
Custom Websites: For custom sites that don’t offer automatic RSS or Atom feed functionality, you can create an XML file that complies with RSS or Atom feed standards, which includes your website’s content updates.
The RSS feed is essentially an XML file that contains metadata about your website’s posts and updates. This file is structured in a specific format so that RSS readers can interpret and display your content.
Example of a Basic RSS File:
<?xml version="1.0" encoding="UTF-8" ?> <rss version="2.0"> <channel> <title>Your Website Title</title> <link>https://yourwebsite.com</link> <description>Your website description goes here</description> <item> <title>Post 1 Title</title> <link>https://yourwebsite.com/post-1</link> <description>Summary of your post goes here</description> <pubDate>Mon, 01 Jan 2024 12:00:00 GMT</pubDate> </item> <!-- Repeat the <item> block for each new post --> </channel> </rss>
Step 2: Modify the Feed for Your Site
Replace the text between the , , and tags with details about your site.
Each tag within the block corresponds to a single blog post or update. Add or remove these as necessary.
Ensure the reflects the correct format as shown in the example above.
Step 3: Save and Upload Once you’ve created your RSS file, save it as rss.xml (or another name you prefer, like feed.xml). Upload this file to the root directory of your website so that users can access it via https://yourwebsite.com/rss.xml.

Making Your Feed Public
Now that your RSS file is live, you’ll want to let people know they can subscribe. Add a link to the RSS feed URL on your website, usually in the header, sidebar, or footer (though, you can place it wherever you like). Many sites use an orange RSS icon, which is easily recognizable.
Keep It Updated
Since this is a static feed, you’ll need to manually add new posts to the RSS file as you create them. Simply update the feed XML file with new <item> blocks whenever you add new content, then re-upload the file.

Big Tech and RSS/Atom Restrictions
RSS and Atom are incredibly useful, though you’re probably wondering: if it’s so great, why aren’t more people aware and using it? Personally, and this is just my belief due to what I’ve witnessed with big tech censorship over the years; it is by design that it is not often spoken about anymore. Big tech (and/or “big brother”) companies want everyone to stay stuck in their own information silos, because it is much easier for them to control narratives and the information you consume there, as well as have more control over your private data for their own capitalistic gains. Those who control the flow of information ultimately control the minds of the masses, and that control can make them a heck of a lot of money.
Unfortunately it is big tech websites such as Facebook that block people’s access to retrieving RSS/Atom feeds from their websites, because if they allowed you access to their RSS/Atom feeds from outside of their website, then they wouldn’t be able to contain you to their controlled information silos, track you, or profit off of you using your data. It’s against their own best interests to allow you this freedom, as keeping you contained to their walled gardens allows them to continue their data harvesting monopolies. So that is probably the biggest downside about RSS and Atom feeds when it comes to big tech social media platforms, is that if the information you care most about comes from your loved ones whom are contained within the walled gardens of these big tech social platforms, you won’t be able to retrieve RSS/Atom to create feeds from your friends there.
Not all social platforms are like this, however. You will just have to experiment with retrieving the feeds from different platforms to discover which big tech platforms have blocked RSS access and which ones haven’t.
Conclusion
I think that covers all the bases! The reason for this article, while a bit lengthy, I feel it is important to teach those who may not be tech-savvy in simple terms that are easy to understand. I think it is important for everyone to know how to use RSS and Atom, and create their own feeds independent of Big Tech social media platforms. Especially in this day and age where Big Tech has so much control and grasp on the information we consume and our private data is so heavily abused, there has never been a better time to start using RSS and Atom feeds. Aside from TheCozy.Cat being my own personal space, I also want it to double as my personal contribution to helping folks break free from their relationships with corrupt corporate entities.
If you have any questions or suggestions to add to this post that could make it even better, leave me a comment letting me know! As I receive feedback, I will make adjustments accordingly to make this article as simple as possible for those who are just getting started with RSS/Atom feeds.
And as always, if you found all this information useful, be sure to bookmark this page so you can easily find it again. Consider sharing it with your friends as well so they too can discover how to curate their own RSS and Atom feeds!
This post was originally shared from my small web blog here.
-----------------------------------------------------------------
Love the Small Web movement? Want to see it thrive? Help us grow on social media! Every follow, like, comment, and share helps spread the word and brings more people into the movement. 💜 Your support makes a difference—thank you!
➔ FB Page: https://www.facebook.com/thesmallweb/ ➔ FB Group: https://www.facebook.com/groups/thesmallweb/ ➔ X: https://x.com/SmallWebLove/ ➔ Tumblr: https://www.tumblr.com/communities/thesmallweb/ ➔ Website: https://smallweb.thecozy.cat/
#rss#rss feed#tutorial#masterpost#small web#indie web#webcore#web revival#neocities#old web#early internet#internetcore#2000s web#decentralizedfuture#decentralized social media#decentralization#blog#old internet
81 notes
·
View notes
Text
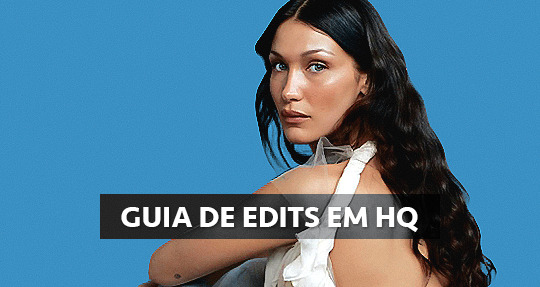
GUIA COMPLETO DE COMO EDITAR FOTOS EM ALTA QUALIDADE (HQ)!
oiê, bem vindos(as)! à pedidos, estou trazendo um tutorial bem abrangente sobre como editar fotos no geral para icons, headers, etc., em alta qualidade. neste guia/tutorial trarei dicas, truques e informações gerais sobre o que é preciso para editar em hq. lembrando que o conteúdo deste guia é sobre como eu edito, a maneira que funciona comigo e meu progresso e aprendizado ao longo de quase 12 anos editando icons, ou seja, o que contém neste guia pode — e deve — ser adaptado à sua maneira e ao software de sua preferência. aproveitem e se divirtam!
nota: este tutorial está bem longo, então, se possível, veja este guia pelo pc/notebook!
O QUE VOCÊ VAI ENCONTRAR NESTE GUIA
softwares necessários com links para download;
onde e como baixar as fotos para as edits;
métodos de edição e passo a passo;
como melhorar a qualidade de uma foto;
como salvar a foto corretamente para postar;
dicas de actions e outros resources.
clique em “continuar lendo” para ver o tutorial.
1. SOFTWARE
photoshop
eu recomendo fortemente o uso do photoshop cc na versão mais recente, ou outra versão com camera raw ou filtros neurais suportada pelo seu pc ou notebook.
você também pode usar o photopea como alternativa (eu particularmente prefiro o photoshop pois acho que as edits ficam com mais qualidade). se você preferir o photopea, algumas dicas desse guia poderão não funcionar devido à falta de algumas funcionalidades que o photopea não oferece (ex: camera raw, galeria de filtros, filtros neurais e outros).
eu uso a última versão do photoshop (atualmente, a versão 25.5.1) e uso a versão paga (obrigada adobe pelo desconto de estudante!!!!!), mas vou deixar alguns links para você baixar o photoshop gratuitamente caso você não seja estudante e/ou não tenha condições para assinar um plano.
atualmente eu uso um mac mini 2014 para editar, mas sempre usei windows, então, as dicas e os links valem para os dois sistemas operacionais.
links
macos: 1, 2 & 3.
windows: 1, 2, 3 & 4.
2. BAIXANDO AS FOTOS
galerias de fotos
muitos artistas têm fansites com galerias de fotos e você pode achar facilmente digitando no google: “nome da pessoa + gallery”.
o artista que eu quero não tem galeria própria e agora? tranquilo, ainda temos galerias de fotos de famosos variados como hqdiesel, hqsource, hq-pictures e até mesmo o theplace.
em último caso você pode usar o gettyimages e usar um removedor de marca d’água ou um site como o gettyimages downloader.
instagram
para artistas estrangeiros que tenham apenas instagram e/ou não tenham fotos em galerias de imagens, eu recomendo o instagram pessoal da pessoa.
você poderá fazer o download das fotos com extensões de navegadores como o image downloader for instagram (para firefox e google chrome), ou sites como o saveig, o snapinsta ou o igdownloader.
eu recomendo baixar pela extensão do navegador, pois ela baixa a foto direto do site do instagram no computador, diferente dos sites que você precisará ir foto por foto, copiar o link e colar no site para fazer o download.
mas, caso a extensão esteja indisponível, com algum erro ou pare de funcionar, o site é uma excelente alternativa (só precisa ter mais paciência).
nos sites para baixar fotos do instagram, geralmente eles dão a opção para você escolher o tamanho da foto. você deve sempre selecionar a resolução maior da foto (acima de 1000px é o melhor).
pinterest
em casos extremos de artistas low profile, sem instagram, sem aparições públicas, sem galerias de fotos, nadica de nada, eu recorro ao pinterest.
porém, é preciso ter muito cuidado ao fazer download de fotos do pinterest, porque são muitas fotos repetidas e muitas com baixíssima resolução e qualidade.
se você for baixar fotos do pinterest, escolha a foto com maior resolução (imagens maiores que 500px já são ok para editar icons), e depois de baixar a foto, eu recomendo fazer um tratamento na foto para melhorar a qualidade dela, como vou ensinar.
3. EDITANDO
3.1 importando a foto no photoshop
apertando ctrl+o ou cmd+o uma guia vai abrir no programa, onde você vai até a pasta onde a foto foi salva. selecione a foto e clique duas vezes nela para abrir.
3.2 cortando a foto nas dimensões desejadas
muitos tutoriais de edições de icons sugerem que você copie a imagem e cole ela em um documento novo já do tamanho da sua edit, mas eu não recomendo essa opção, pois ao redimensionar a foto com a ferramenta de transformar (ctrl+t), ela dá poucas opções para manter a qualidade da foto e se você não souber o que cada opção faz, poderá perder a qualidade da imagem. então, eu sempre faço o recorte na própria foto para não alterar muito a qualidade dela.
aperte a letra c no teclado para abrir o atalho da ferramenta de corte. (se o seu photoshop for alguma versão do cc, eu recomendo que você marque a opção para usar o modo clássico de corte, assim fica mais fácil e você tem um controle maior sobre a ferramenta!). para fazer essa alteração é simples, vá no ícone de engrenagem, clique e marque a opção “usar modo clássico”.
para fazer icons, você deverá cortá-lo usado dimensões quadradas, ou seja, 1x1, e para headers 15x5. você pode mudar as dimensões na caixinha da ferramenta de corte.
3.3 redimensionando a foto
nessa parte você precisará prestar atenção, pois ao redimensionar a foto, você poderá perder ou ganhar um pouco mais de qualidade na foto, e para isso você usará uma opção chamada reamostrar (ou resample se seu photoshop estiver em inglês). deixe a opção marcada para usar as definições.

3.4 explicando as definições do reamostrar e qual definição usar de acordo com o resultado que você quer


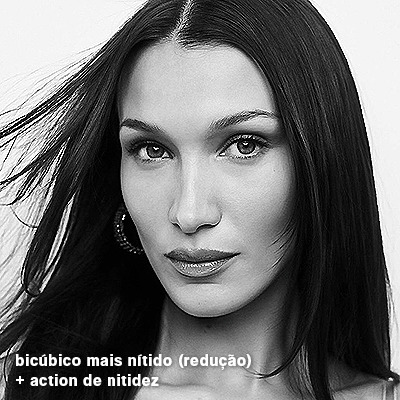
bilinear: a melhor opção para redimensionar gifs, mas para fotos não é tão bom pois dependendo da foto algumas partes ficam nítidas, outras mais suaves e se você for aplicar action de nitidez, pode ficar com um aspecto de “craquelado” com as bordas granuladas, o que eu pessoalmente acho que fica um pouco estranho.
bicúbico mais suave (ampliação): como o nome já diz, ele deixa a foto mais suave, ou seja, os pixels “craquelados” e granulados da foto ficarão mais suaves. é uma ótima opção tanto se você for aplicar actions de nitidez ou actions mais desfocadas e mais suaves.
bicúbico (gradientes suaves): pode parecer a mesma coisa do bicúbico mais suave, mas esta opção além de suavizar a imagem, cria um “desfoque iluminado” nas transições das cores da foto. é a melhor opção para fotos sem muita qualidade e principalmente se você for usar actions suaves e desfocadas, sem muita nitidez.
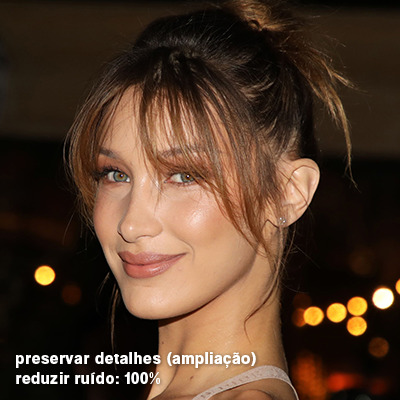
bicúbico mais nítido (redução): acentua os pixels e as arestas nítidas da foto, ou seja, essa definição redimensiona a imagem mas preserva a nitidez da foto. se você usa actions de nitidez que não tem desfoque nas configurações, essa é a melhor opção de reamostra. (mas cuidado, se sua imagem ficar muito nítida com essa definição, você precisará usar outra opção. caso contrário, quando você aplicar a action, a edit poderá ficar muito exagerada e/ou com aspecto áspero.)
preservar detalhes (ampliação) com redução de ruído: esse em especial é ótimo para quando você precisar redimensionar uma foto para deixá-la maior sem distorcer tanto a imagem. você pode ajustar a redução de ruído para deixar a foto mais suave, sem perder muita qualidade. (obs.: essa opção não deve ser usada para redimensionar imagens muito pequenas, por exemplo de 200x200 para 400x400, ou a imagem vai ficar muito distorcida. ela deve ser usada quando a diferença de pixels não é muito grande, por exemplo, você cortou a foto e ela ficou no tamanho 370x370, aí sim você pode redimensionar para maior sem perder muito da qualidade. então você pode ir ajustando a qualidade com a porcentagem da redução de ruído).
pelo mais próximo (arestas sólidas): essa é uma opção traiçoeira, pois não fica bem em quase nenhuma imagem (a menos que seja um pixel art). essa definição redimensiona a imagem e mantém os pixels nítidos, ou seja, a foto fica menor mas tudo nela que tem aspereza vai prevalecer. é muito usada para redimensionar pixel art, pois preserva as bordas ásperas. pode ocorrer de ficar boa em uma foto aleatória mas não será possível aplicar action, ou a imagem ficará exagerada.
3.5 aplicando a nitidez depois de redimensionar
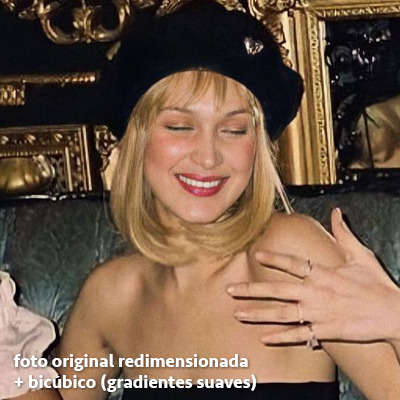
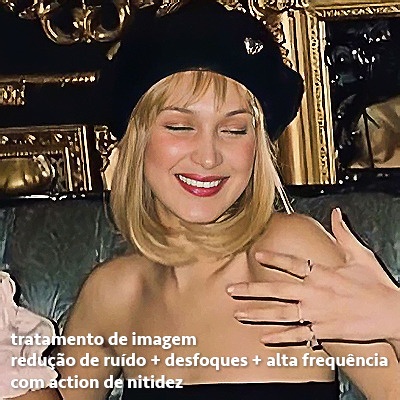
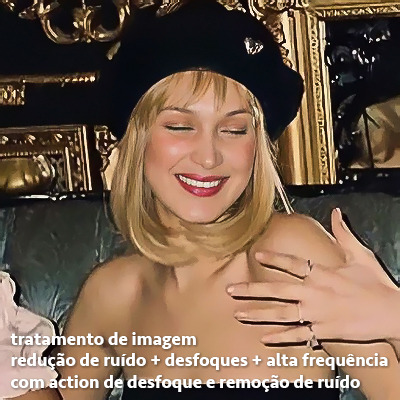
depois de escolher a foto, baixar, redimensionar de acordo com o estilo da action da sua escolha, está na hora de aplicar.
eu fiz duas versões para mostrar como fica com cada tipo de action:

assim, os dois icons tem uma alta qualidade usando actions diferentes, graças a remostragem ideal para cada tipo de action :)
4. TRATAMENTO DE IMAGEM PARA MELHORAR A QUALIDADE
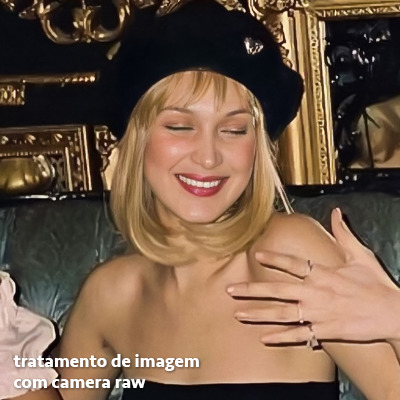
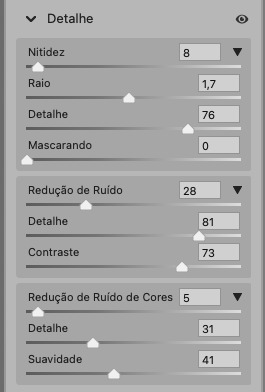
nesta parte, é muito importante que você tenha baixado uma versão do photoshop com neural filters e/ou com o camera raw, mas caso você não tenha, tudo bem também, vou ensinar como fazer uma melhoria na foto de três jeitos: com camera raw, com neural filters e com desfoques. a melhor forma vai depender de quão ruim está a qualidade da sua foto. em geral, apenas fazendo ajustes no camera raw você já tem um ótimo resultado na maioria das fotos.
camera raw
se seu photoshop tem o filtro do camera raw, ele vai estar em filtro > filtro do camera raw...
tudo que iremos fazer será na aba de “detalhe”, ali você deve dar mais atenção ao ajuste de redução de ruído, pois é ele que vai remover o ruído da imagem e melhorar a qualidade dela.
vá mexendo nas configurações de redução de ruído até que a foto fique mais suave. ajuste também o detalhe e o contraste da redução de ruído.
essa parte será mais no olhômetro mesmo, pois as configurações vão variar de foto para foto, mas eu recomendo muito você mexer também na nitidez para não deixar a foto tão desfocada, mas nada muito intenso para não interferir na action que você irá usar.
eu mexo também na redução de ruído de cores, porque dependendo da foto, algumas cores estarão saturadas ou com muito ruído. só cuidado para não colocar um número muito alto, pois esse ajuste pode tirar a saturação da sua foto e deixá-la apagada.
enfim, aqui está uma comparação da foto original com o tratamento feito com o filtro do camera raw e depois já com a action de nitidez aplicada:
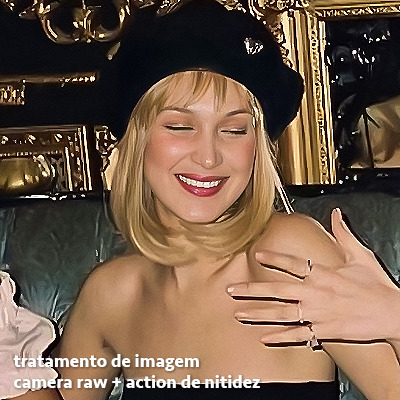
e essas foram as configurações que usei nessa foto em específico:
como eu disse antes, as configurações irão variar de foto para foto, a depender da qualidade de cada uma e de quão ruim a foto está, mas com essa configuração básica, você já vai conseguir melhorar algumas fotos.
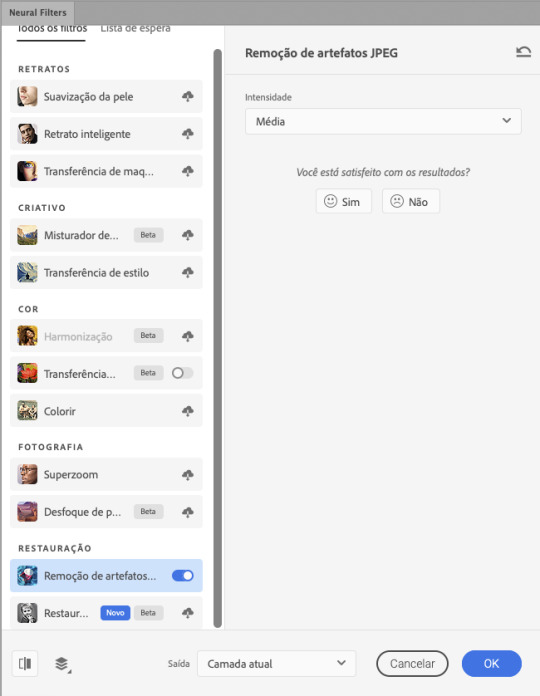
neural filters
se a versão do seu photoshop vem com neural filters (ou filtros neurais), ele estará em filtro > neural filters...
irá abrir uma janela com vários filtros mas o que a gente irá usar vai estar em “restauração”, com o nome “remover artefatos jpeg”. se precisar, faça o download do filtro.
eu recomendo usar a intensidade sempre média, a menos que a foto esteja muito ruim, aí você usa a intensidade alta. mas em geral, a intensidade média ou baixa já dá conta do recado.
a saída deve sempre estar na camada atual, ou seja, na camada da foto selecionada.
assim:
e aqui está uma comparação da foto original com o tratamento feito com o neural filter e depois já com a action suave com desfoque aplicada:

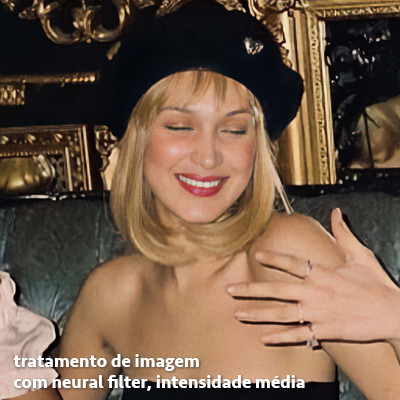

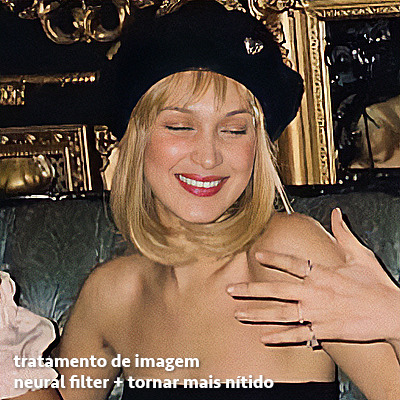
a opção do neural filter é uma ótima alternativa ao camera raw, o único contra é que ele deixa a foto com uma textura áspera, e quando você usa uma action de nitidez eles ficam muito visíveis e acaba não ficando muito legal.
porém, um bom jeito de contornar isso é adicionando ruído na foto. eu uso o efeito de granulação do camera raw para adicionar ruído no icon (você também pode adicionar o ruído em filtro > ruído > adicionar ruído..., mas eu prefiro o camera raw pois ele dá mais opções para ajustar o granulado do jeito que eu preferir).
no primeiro icon abaixo, dá para perceber a textura áspera que o neural filter deixa depois de melhorar a foto e adicionar nitidez; já no segundo icon eu mostro como eu adicionei o ruído e contornei esse defeito.

as configurações de ruído que usei no camera raw foi 12 de granulado, 35 de tamanho e 20 de aspereza.
lembrando que, se você for usar uma action de desfoque e/ou remoção de ruído, não será necessário adicionar a granulação, pois a própria action já vai suavizar a textura do neural filter (a menos que você queira adicionar o ruído, claro).
redução de ruído + desfoque
caso a sua versão do photoshop não tenha nenhuma das opções de camera raw ou neural filter, caso você use um photoshop mais antigo, photoshop portable ou prefira usar o photopea, essas alternativas podem ser úteis.
mais uma vez, irei me basear no olhômetro, de acordo com a foto e irei ajustando as configurações de acordo com o que eu quero e acho necessário.
vamos começar com a redução de ruído! ele está em filtro > ruído > reduzir ruído...
na janela de redução de ruídos você verá alguns ajustes que são: intensidade, preservar detalhes, reduzir ruído de cores e tornar detalhes nítidos e vou explicar cada um para que você possa saber ajustar eles de acordo com sua foto:
intensidade: o número de 1 a 10 irá definir a intensidade da luminescência, a intensidade do filtro e o quanto da imagem você quer preservar ou extinguir, sendo 1 o mínimo da intensidade do filtro e 10 o máximo;
preservar detalhes: o número digitado irá definir a porcentagem de detalhes a serem preservados. quanto maior o número, maiores serão os detalhes mantidos na foto, como ruídos, manchas e outras aberrações da foto;
reduzir ruído de cores: o número digitado irá definir a intensidade e reduzir o ruído cromático, ou seja, vai reduzir as aberrações cromáticas, como por exemplo, fotos que distorcem as cores. preste atenção na porcentagem inserida, pois quanto maior o número, menos saturação sua foto terá e poderá ficar com aspecto de foto envelhecida;
tornar detalhes nítidos: o número digitado vai definir a porcentagem de nitidez para restaurar pequenos detalhes da foto. quanto maior a porcentagem, maior vai ser a intensidade dos detalhes da foto. preste atenção na porcentagem inserida, pois se a intensidade da nitidez for muito alto, vai afetar a sua action, seja ela de nitidez ou de desfoque.
sendo assim, para a foto usada eu fiz estes ajustes:
obs.: se você for um usuário mais avançado do photoshop, poderá explorar a opção avançado, que possui as configurações básicas para melhorar a foto e também as configurações para remover ruído das cores primárias (vermelho, amarelo e azul) individualmente. mas, mesmo se você não for um usuário expert, eu recomendo você dar uma olhada nessa opção e explorá-la, mexendo nas configurações e ir ajustando e aprendendo, pois o resultado poderá ficar ainda melhor nos ajustes avançados.
aplicado a redução de ruído, vamos partir para o desfoque! eu estarei usando o desfoque inteligente antes do desfoque de caixa. você vai achá-lo em filtro > desfoque > desfoque inteligente...
na janela que abrirá, você verá os ajustes: raio, limiar, qualidade e modo. vou explicar eles:
raio: vai determinar o tamanho da área que será considerada para o desfoque. quanto maior o número, mais detalhe serão preservados;
limiar: vai determinar a diferença dos pixels entre si antes de serem alterados pelo desfoque.quanto maior o número, maior será a área em que o desfoque será aplicado;
qualidade: vai determinar a qualidade e intensidade do desfoque. ao escolher a opção mais alta, mais partes da foto o desfoque atingirá;
modo: vai determinar o traçado das linhas de bordas que o filtro identificar. o modo normal aqui é o ideal, pois os outros modos “somente arestas” e “sobrepor arestas” irão identificar somente as bordas da imagem.
sendo assim, esses foram os ajustes:
após o desfoque inteligente, partiremos para o desfoque de caixa! ele está em filtro > desfoque > desfoque de caixa...
(você também poderá usar o desfoque gaussiano a depender da foto, mas para esta em questão, o desfoque de caixa funcionou perfeitamente)
a intensidade do desfoque de caixa, assim como do desfoque gaussiano, é medida em pixels e o mínimo é 1 pixel, e para icons é uma intensidade forte, então eu coloco o número mínimo (1, no caso) e depois de clicar em OK e aplicar o desfoque, vou em editar > atenuar desfoque de caixa... e ajusto a porcentagem de acordo com a foto. nessa foto deixei a porcentagem em 33% e ficou ótimo.
no entanto, infelizmente, por não ser o melhor método para melhorar a qualidade de uma imagem, ela ficará um pouco desfocada demais. mas podemos contornar isso usando o filtro alta frequência para devolver um pouco da nitidez e detalhes na foto. você encontrará esse filtro em filtro > outros > alta frequência...
o filtro de alta frequência, assim como os desfoques, é medido através de pixels e quanto maior o número, mais detalhes passarão despercebidos, ou seja, menos detalhes e menos nitidez sua foto terá. eu recomendo em torno de 2px se você quiser mais detalhes e em torno de 5px se você quer mais suavidade.
a primeira vista esse filtro parecerá estranho e distorcido, mas dará tudo certo, você só precisará mudar o modo de mesclagem. para isso vá em editar > atenuar alta frequência e mudar o modo de mesclagem para “sobrepor” ou “luz indireta” se você quiser que fique mais suave. se preferir, poderá também ajustar a opacidade para os detalhes ficarem mais ou menos intensos.
assim:
assim fica o resultado sem o filtro de alta frequência e com o filtro:

sendo assim, fica a seu critério usar o filtro ou não.
aqui está a comparação das fotos com o tratamento de redução de ruído + desfoque com e sem o uso das duas actions:
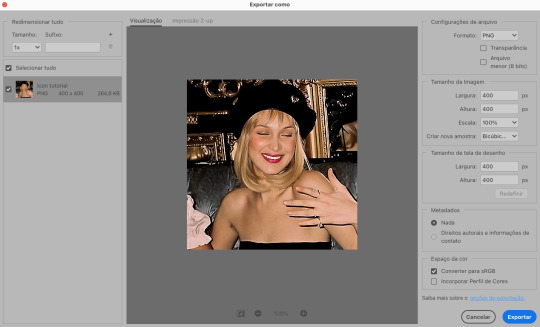
5. SALVANDO A EDIÇÃO
e chegou a melhor parte: salvar a edição para postar!
seja a edição um icon, uma header, ou qualquer outro gráfico estático (edições não animadas), a melhor opção é sempre, sempre, SEMPRE, salvar no formato PNG!
o formato jpg ou jpeg não preserva a qualidade original como o formato png preserva. então, sempre escolha esse formato ao salvar suas edições estáticas!
a melhor forma de salvar uma edição em alta qualidade é exportando ela. sendo assim, vá em arquivo > exportar > exportar como...
em “configuração de arquivo”, selecione o formato PNG e desmarque a opção “transparência” se sua foto não é uma imagem com fundo transparente; em “tamanho da imagem” deixe como a altura, a largura e a escola como estão, apenas mude a opção em “criar nova amostra” para BICÚBICO AUTOMÁTICO; e em “espaço da cor” marque a opção CONVERTER PARA SRGB, porque assim, independente da calibração do seu monitor, a foto ficará com as cores originais e não sofrerá alteração.
assim:
no entanto, se você tiver um pc ou notebook lento, ou apenas não tiver paciência para salvar sua edit em exportar, você pode salvar no modo normal, indo em arquivo > salvar como... OU arquivo > salvar uma cópia..., no entanto, se você for usar essa opção, não esqueça de marcar a caixinha para “incorporar o perfil de cores srbg”, essa opção geralmente fica na parte de baixo da janela que abre quando você vai salvar a edição.
6. ACTIONS & RESOURCES
para facilitar pra vocês, todos as configurações de filtros usados neste guia, estarão disponíveis para download em uma pasta de action. para fazer o download é só clicar aqui: ★. já a dupla de actions usadas (a de nitidez & a de desfoque suave) estarão disponíveis para download na lista de dicas abaixo.
dicas de actions de nitidez – premium & gratuitas (free)
lovie potion by @loviestudio [premium]
action #26 by @harupsds [premium]
action #25 by @harupsds [free]
01 action by @harupsds [free]
cherrie by @loviestudio [free]
action #11 by @miniepsds [premium]
face action by @miniepsds [premium]
crispy by @nebulies [free]
scarlett by @l-agallerrie [free]
eight action by @peachcoloring [premium]
bubblegum by @hisources [free]
kendall by @hisources [premium]
hekate by @hisources [premium]
sharpen by @l-agallerrie [free]
#01 action by @buntterflies [free]
dicas de actions “suaves” – premium & gratuitas (free)
teddy bear by @loviestudio [free]
action ten by @peachcoloring [premium]
caelestis by @miniepsds [premium]
fleuriste by @hisources [free]
angel by @loviestudio [free]
action #13 by @harupsds [premium]
action #12 by @harupsds [premium]
wild action by @hisources [free]
outras actions – premium & gratuitas (free)
denoise action effect — remove o ruído das fotos sem perder muita qualidade by @loviestudio [premium]
photopea quality action — action para melhorar a qualidade da foto no photopea by @loviestudio [free]
exclusive hq actions — um conjunto com as actions que foram usadas neste tutorial by @girasois, @loviestudio [free]
denoise and sharpen actions — conjunto de actions para melhorar a qualidade da foto automativamente by heavnsent
7. BÔNUS: DICAS EXTRAS
a adobe cc learn tem muitos tutoriais que você pode dar uma olhada e aprender muito mais sobre o photoshop e outros programas da adobe!
o youtube é outra fonte incrível para você aprender edição no photoshop, lá você encontra tutorial para quase tudo de edição de fotos e muito mais! se você entende inglês, eu recomendo muito os canais piximperfect e brendan williams tutorials.
para fonte de inspirações, o tumblr é o lugar certo! se jogue nas tags para se inspirar e nos blogs de photoshop para ver muito mais tutoriais e muito mais resources.
o blog @looksgreat infelizmente não é mais atualizado, mas você ainda pode encontrar muitos tutoriais sobre quase tudo de edição, e o melhor, todos os tutoriais são em português!!
ainda recomendo outros tumblr brasileiros de resources e tutoriais: @miniepsds, @harupsds, @peachcoloring, @gmfioart, @colour-source, @l-agallerrie, @wasirauhlpsds, @hisources, @opulenceps, @sunshinepsds, e @loviestudio; e no deviantart: jungrainsoul, rockjealous, heavnsent, aureangels e rohdossantos.
8. CRÉDITOS E INFORMAÇÕES
crédito colorings
off hearts + whimsy by @miniepsds ♡
informações
antes de tudo eu gostaria de pedir desculpas pelo tamanho deste guia, mas eu quis abranger o máximo de dicas possíveis para vocês e deixar o tutorial super completinho.
em segundo lugar eu gostaria de agradecer todo o carinho de vocês, isso me motiva muito a continuar. obrigada, de coração!
enfim, é isso! minha ask estará sempre aberta para dúvidas, sugestões, pedidos e mensagens fofas (sempre com educação e respeito, claro)!
#tutorial#photoshop tutorial#tutoriais#tutorials#resources#hq tutorial#tips#useful#ptbr#adobe photoshop#photopea tutorial#tutorial tips#dicas#dicas de edição#dicas de actions#guia completo#guia#guia de edição#guia de edits#edits tutorial#edit tag#masterpost#long post#editing tips#icon tutorial#header tutorial#hq edits
168 notes
·
View notes
Text
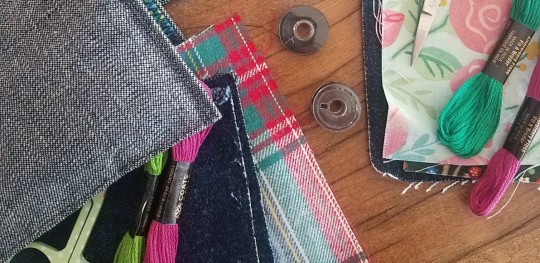
Fast Fashion to Slow Fashion :: a DIY guide to up-cycling and mending clothing on a budget.
For those of us living on a small income, buying from sustainable fashion brands is often out of reach. I would like to point out that *buying new but ecological garments isn't the only way to cultivate a slow fashion wardrobe*. Here are a few options for transforming *upcycling* your clothing, thus making fast fashion into slow fashion:
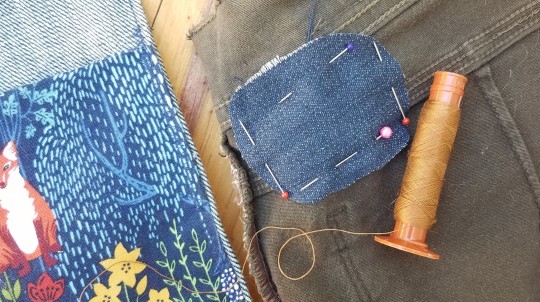
Mend and repair :: patch hand-me-down sweaters, fix holes in leggins from target and other department stores. By giving items a longer life, and preventing unnecessary garbage, fast fashion items become slow fashion! Here are two tutorials I have written on how to mend a torn belt loop on jeans and patch leggings.
Up-cycle clothing that doesn't suit your style :: when preparing for a trip back home and wondering how to acquire some nicer clothing for the trip a friend of mine gifted me a big bag of clothes. Almost all of them were items that we could call "fast fashion" and nearly all also had stains or rips that needed mending. By fixing and adapting these items and then going on to wear them for several years longer, I am keeping them out of the cycle of buy then trash.
Tailor items that don't fit you :: Taking in clothing is quite simple and there are lots of tutorials on how to hem pants and skirts or take in a size or two. I recently made a tutorial on how to take out a skirt, or make a skirt bigger by adding panels.

At some point, we must face the fact that a t-shirt is totally worn out and cannot be used for clothing any longer. In such cases here are a couple of crafts to utilize the fabric and other items from the scrap pile:
Create a Quilt :: if you find yourself with a pile of beautiful & memory-filled scraps -- transform them into a quilt as I have done in this post.
Make Twine :: Longer scraps of fabric, especially those from stretch materials like leggings or jersey cotton t-shirts can be made into a thing rope also known as fabric twine. I wrote a tutorial on how to make twine out of fabric scraps.
<<Best of luck in all your crafting endeavors!>>
#upcycled fashion#slow fashion#fashion tutorials#mending#mending 101#mending references#mending masterpost#cottagecrafts#upcycle#repair culture#low waste#zero waste#wasteless crafts
522 notes
·
View notes
Text
Mixing Stuff Masterpost for Vocal Synth Users
i'll say a few things here and there on how i approach mixing based on a set of guidelines i've been giving thru learning. i won't go 100% and i encourage you research further on your own as everyone has a different perspective of certain concepts. whats important is that you understand the concept so that you are able to interpolate on it with your own liberties. yeah. please read the links before looking at my commentary or you won't understand what im saying.
Some DAWs, Their Guides, & Some Freebies: One of the first things you should do is pick a DAW and learn how to use it and its functions to streamline your mixing process.
Free DAWs: The Best Available in 2023 by Produce Like A Pro
Audacity / DarkAudacity (i like darkaudacity): has a section of the site dedicated to tutorials on using Audacity!
Reaper: has a 3 hour course FREE course on mixing!
FL Studio: has a demo version you can pretty much use forever with a few.........exceptions. I won't be linking any cracked versions though. Here's a manual for this program since many people use it!
Free VST Plugins by Bedroom Producers Blog
37 Best Free Mixing VST Plugins by hiphopmakers
ORDER IN THE COURT!: The order of plugins is more important than you think. These links should also introduce some terms we use in the audio production world (like "gain staging" or "EQing")
WHAT'S THE BEST EFFECTS CHAIN ORDER FOR MIXING? by Icon Collective:
The Order Of Things: Audio Plug-ins by AskAudio
Plugin order is viewed from "top to bottom". BASICALLY... most like to gain stage -> EQ -> compress -> saturate -> MORE EQing -> whatever else at this point, but i do my process a bit differently. don't be afraid to bend the rules a little bit. but the guidelines are there for a reason.....based on what they do
Basics: I'll link to some tutorials to elaborate on what was listed by Icon Collective's list.
Gain Staging: Gain Staging Like a Pro by Sweetwater
Saturation: Saturation in Mixing – Instant Warmth, Glue and Fullness with One Plugin by Tough Tones (soundgoodizer fans make some fucking noise i guess)
EQ: SUBTRACTIVE VS ADDITIVE EQ (WHEN TO USE EACH & WHY) by Producer Hive
Compression: THE COMPLETE GUIDE TO AUDIO COMPRESSION by Icon Collective + Audio Compression Basics by Universal Audio
Modulation: Modulation Effects: Flanging, Phase Shifting, and More by Universal Audio
Time Based Effects: Reverb Vs. Delay: Complete Guide To 3D Mixing by Mastering.com
Audio Busing/Routing/Sending Tracks: Your guide to busing and routing audio tracks like a pro by Splice
Limiters: 10 BEST LIMITER PLUGINS FOR MIXING AND MASTERING by Icon Collective
Sidechaining: Sidechain compression demystified: what it is and how to use it by Native Instruments (i dont know anything about this lol)
Automation: Mix Automation 101: How to Automate Your Sound For a Better Mix by Landr (p.s learn how to write automation in your respective programs)
Last note: great. these are the main things you should focus on understanding in mixing. now you are FREE my friend!
youtube
Bonus: Tempo Mapping in Reaper (if you want to learn how to midi songs with bpm changes!!!)
#vocal synth#tutorial#masterpost#mixing#utau#vocaloid#synth v#synthesizer v#cevio#voisona#neutrino#mixing tips#audio production
134 notes
·
View notes
Text
im looking into ways of backup up/archiving tumblr blogs so i can help with that effort, but if tumblr shuts down, i have to ask: where do we go?
theres really not any good alternative social sites for fandom to migrate fully. twitter has been going to shit for a while and from my brief attempt at using it, looks kinda unusable. amino used to be great for fandom but the app has barely been usable since kik bought it. ao3 is amazing but not exactly a social site in the same sense.
if tumblr goes... where do we go? will a new site pop up, do we think? fandom has died so much already, id hate to watch it be killed fully by something like tumblr shutting down.
#micah originals#if i can figure out how any of these archive sites im finding work ill make a tutorial post so everyone can get in on helping preserve the#1D fandom on here and all the masterposts and gifs and art thats been posted over the years
8 notes
·
View notes
Text
All about Modding Genshin
So, I create genshin skins usable as mods in the game (I'm Anilyan on gamebanana).
The modding community is huge, and has been growing since people started realizing that there are no dangers in doing that, and that everyone can learn. There are lots of clickbaity info out there that make people scared of having fun, believing in bans or thinking that skins are cheating when they don't even change game files and have nothing to do with cheating software.
I was one of the people that started helping provide more SFW mods (and I even have a discord server focused on that for people who have questions and/or would rather avoid nsfw stuff). And it has been a joy seeing others value my work and also learn blender and a bunch of stuff just for the sake of turning designs they like into a reality. So, I think I'm quite qualified to do this post.
TL;DR: No one has ever been banned for using fan skins, in a massive modding community. They are PC-only and easy to use, no private servers required.

What can mods do?
What are Genshin mods? There are many types of mods, but this is exclusively about skins, specifically, 3Dmigoto skins. They don't change game files or cheat the game - instead, they are just a visual overlay not too dissimilar from changing the brightness of your screen - and despite being somewhat limited, they are what allow us to not get our accounts banned.
Can I...? No you can't add primos, no you can't change attacks/skills or their values, no you can't change animations, no you can't get artifacts more easily, etc. You can do those things on private servers, and there are mods that are less limited than 3Dmigoto mods (like melon mods), but those things can give you problems, so use at your own risk, and ask about them in more appropriate servers, not this one - this discord has nothing to do with that. That said, other mods that count as a visual overlay, like making certain UI elements invisible, can still be achieved with 3dmigoto. Either way, the whole Kaveh Destroyer of Worlds episode has nothing to do with skin mods or 3Dmigoto.
How do I revert back to not using mods? There is no such thing as "reverting back" because the game is not actually being changed. Refer to the safety/banning section for more details. Every time you want to see skins in your game, you have to run a certain program before launching the game, otherwise you won't even see it. So if you want to stop seeing mods completely, just never run that, and delete the folders that contain the program and the mods since in that case they will just be cluttering your pc.
What do you need to use mods?
Do I need to play on pc, or mods work on playstation/mobile? Sadly, no. I've only seen one video that seemed to be on playstation but I have no idea of how that was achieved or if it's using 3Dmigoto. Either way, skins are pc only. If you want more details on the possibility of mods for mobile (don't get your hopes high), here: general-questions
So I don't need a private server to use skin mods? Yup, you don't need a private server, skins work perfectly in the official server ^~^
Anything else that I need? You will need to turn off the Dynamic Character resolution, and please watch the entirety of the tutorial I put in this post because it's an updated one, and that will be relevant,
Will I get banned? Is it safe?
Will I get banned for using skins in my official accounts? Like I said, 3Dmigoto doesn't really do things like cheating - the only broken rule is the fact that this counts as a 3rd-party software, but in about 85000 people using mods in the main discord server alone, literally no one has been banned (and most of them mod in the official server, not in private servers). And this has been going for well over a year. Hoyoverse knows about the existence of mods, but they seem pretty indifferent so far, and either way it would be difficult for them to ban people when mods don't change game files, even though mods can be detected.
Can other people in co-op see that I'm using mods and report me? No, because it's just a visual overlay on your side, the characters are not actually wearing another skin/glider. The only way people would know would be if you shared screenshots or recordings with your UID visible. If 2 people with mods co-op, each will see the mods that they picked for the characters, not the mods chosen by the other person. So if they took screenshots and showed them, they would only be denouncing themselves, not the other person.
What if Hoyoverse changes their stance? If they do, they will just issue temporary/short bans, not a permaban. That's what sometimes happens to HSR players and we don't even know if they are banned for using mods or for issues with the anti-cheating system mistakenly accusing people. Either way, the developers of HSR are more strick and people still don't have issues. And the modding community is so large that, if hoyo wanted to ban everyone permanently, they would lose a massive chunk of players. It would be a huge loss for them.
How to use and update/fix mods?
I'm convinced. How do I use mods? Follow this tutorial (embedded below): https://www.youtube.com/watch?v=hAsb__3uK3o&ab_channel=Snowlit It's one of the most updated videos, so I recommend it over older ones, or you will struggle with some issues that arose with game patches.
Where can I ask for help if I find issues? If you are having difficulties, I suggest going to the AGMG discord server (invite: https://discord.gg/agmg - you need to prove you are using mods or trying to access other channels) and ask there in the channel dedicated to help you. You can also join my own discord server, focused on SFW mods, and we have help channels there too.
Why are so many mods broken? It's possible that those were all broken with the game updates. A script to fix them/update mods tends to release a few days after the patch is around, you can just run it in your Mods folder and it will fix all mods inside at once. Look for the version of this tool for the current patch: https://gamebanana.com/tools/15654.
This has already happened several times, so it's not reasonable to expect modders with tons of posts to update each of them when you can just easily fix it yourself and all at once. Only ask for fixes when there are things broken that can't be solved by you, or that require modding knowledge or access to the blend file - and even then, the modders have a right to refuse.
A good way to know if there is a widespread solution that works on multiple mods is to keep up with the announcements in the main discord server AGMG. The best places to check if a widespread solution was already made are either the announcements in the main modding server, AGMG (invite above) OR go to the gamebanana genshin modding section » Tools » Other/Misc (https://gamebanana.com/tools/cats/1239)
I've run the fix but the mods are still broken, what should I do? Most issues you will encounter are in the video I recommended. Either way, these are some frequent problems:
You can't have more than one active mod for a certain character in your Mods folder, unless they are merged (you know that they are merged if you have a merged.ini). This happens because, since we can't cheat the game, we can't add skin slots, and all mods will try to load over the same official skin of a given character - therefore, if you have more than one, they will conflict. Apart from merging, if you don't know how to do that yet, you can also put some mods you downloaded in a separate folder (so, not your Mods folder), or just write DISABLED in the start of the name of the folder with a mod you want to inactivate.
If some parts of the model are not loading properly, try going inside a domain with the modded character. Any mod can have that issue, it's just a loading problem that GIMI sometimes has, but going in a domain tends to reset it.
All mods are broken for you? Did you try disabling the Dynamic Character Resolution in the settings? Because that is required to use mods.
I found this mod where the character floats and/or changes underwater, but it's not working. You are probably not getting the appropriate files to track the character state or offset it, or are not putting them in the right place. Here is a step-by-step guide with pictures of literally all you need.
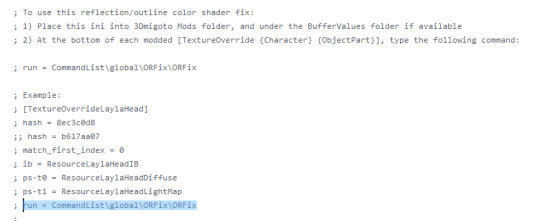
My mod shows a green reflection in the character menu, how do I fix it? You need to add this ORFix.ini file into the BufferValues folder inside your Mods folder: https://github.com/leotorrez/LeoTools/blob/main/releases/ORFix.ini. If that doesn't solve the trick, that's because the mod creator forgot to also add the line instructed in that link, basically how the picture below shows, but you can do it yourself. This is necessary for all characters released during and after Sumeru.
youtube
Pricing and commissions
Why are there so many mods behind paywalls? Actually, there are no mods behind paywalls. Except paywalls put up by scammers and thieves that steal mods that were free. Or that they thought that were paid, but those great heroes didn't even bother to check that all genshin mods can be a maximum of 1 month on patreon before being released for free. They all end on gamebanana or, like I said, in the main modding discord server. So before you subscribe to a patreon selling mods, make sure that you can't find the mod in those platforms I mentioned, and if that is the legitimate creator, subscribe only if you want the mod in early access and/or to support the creator. Because even if you don't become a member, you will still be able to get the mod soon.
Can I see my OC's in Genshin as a mod? Yes, with limitations. Your OC would work as a skin that overrides a certain character, in outfit/body, hair and iris. It won't be an actual new character. Besides, since we have limitations to avoid cheating, we can't add new animations or abilities, and that includes being unable to change the face and eye shape (the iris can be changed, just not the external shape, eyelids, etc). As for the height of a character, that can be changed but comes with certain downsides, like the weapons not being attached to the hands, the animations still looking the same, the camera being stuck at the original level, and the worst offender for me is the face stuck in the same expression and with a bad shading. So take all of that into consideration when picking what character to override, and deciding if it's worth to change the height of a certain character or going immediately for one with the correct height and facial shape.
How can I commission an OC/skin? I suggest going to the main discord server AGMG, verifying/proving that you are using mods in order to access all channels, then head to the commissions-area and see who has commissions open. If you don't want to commission anyone, you can still try your luck in the requests channel in that server, since some people accept free requests and even more if they have a bounty (which is cheaper than a commission).
How to create mods
Where do I start if I want to make my own mods? That depends on what stage are you starting, and if you have any skills that you can reuse for modding.
For example, if you are an artist, you have advantages at texturing, and if you are a 3D modeler or at least know a bit of blender, that will make the modeling easier (yes, genshin mods require blender, so if you are familiar with another software, you will have to learn this one).
It also depends on what your goal is: If you want to do full custom skins and all by yourself, that is more work, but some modders specialize in only one aspect of modding and work in collaboration with other modders. For example, I started as only being a texture artist, and now I also do full custom models, but the weights for my mods are always made by someone else.
Recommended order for absolute beginners: texture mods, small model changes and kitbashing, bigger ports or more ambitious kitbashing, and then custom modeling. If you want, you can do weapon mods too, they are technically simpler than characters.
Are there tutorials that I can follow? Of course ^^ I am making my own written tutorials, some of which you can already find in the Resources folder of this discord. I also compiled a brief list of where you can find videos to follow, here.
Keep in mind that most of these tutorials are about modding genshin, and don't teach you in depth how to model, even though you can still learn a bit from there. But I recommend that you do your own search on how to model things in blender if you aim to do custom models. Keep also in mind that many things that look 3D, in genshin, are actually details painted over textures, so don't go overboard with polygon count. Either way, the guides there are varied and will help with most issues you might find.
What content creators need to know
I'm a content creator. Is there any risk? Don't try to use mods as an official Genshin content creator, since they have your UID and Hoyoverse doesn't officially support mods. Other than that, your account is not at risk unless you show your UID in videos/screenshots, and even then, the chances of someone reporting you are very very slim.
Also, don't post anything that includes the word "mod" in the title, because youtube (and twitch?) flag them and you can have your videos taken down due to it being assumed that you are using a private server - even if that is not the case.
AND DON'T FORGET TO ALWAYS CREDIT MODS. Either way, the risk would be only for the video/channel in question, not for your genshin account.
How do I correctly credit mods? I'm glad you asked, because people often mess up/don't credit/credit the wrong person and reposters - I see my mods poorly credited every single day xD. Always check if a mod exists on gamebanana, and if not, check the main modding discord server AGMG. Why? Because sometimes people repost videos and credit the source of the video, but the person who edited didn't make the mod and often doesn't credit the actual creator(s). (((Blumiekei is the absolute worst offender))) In the discord server, the message posting a mod in the mod-reposting channel is usuall by one of the authors and includes the others, and on gamebanana, you can see what each author contributed with in the sidebar. You should at least say their names when featuring mods, and I highly recommend that you include the link in some way too, even though I understand that not all platforms allow it.
Why should I credit mods that are just ports from other games, that's just laaaaazy... You clearly don't know the work that goes even into a port, so let me enlighten you - using my Inazuma Ganyu as an example: You can see in the 4th picture here that the final textures have shadows that were not in the original, and the image quality is much better. That's because I painted all of that manually - and it took me over a day just for the textures. Then add the time for placing the model, potentially adjusting proportions of individual parts to be more like the canon genshin bodies, bring back some elements from the original genshin character, merge the textures for everything because genshin can only have one texture per group (Body, Dress and Head), adjust the UV's as a consequence of that, then also make the lightmaps and alpha channel so that the game knows what should behave in terms of shadows and outline like fabric, skin or metallic parts, and FINALLY it's time for weights. That are often a nightmare because, due to the limitations of 3Dmigoto in order to not activate the anti-cheat, we can't add bones or new rigging, so we have to work around by transferring weights from the official genshin model. And in the case of this Ganyu, she doesn't originally have long sleeves, so that's a whole other headache that very few modders manage to achieve properly (me not included, the weights of this mod were made by mimo4e since she is one of the very few that is capable).
And if this is too much text for you and you won't bother knowing the work that goes into a port, don't make assumptions either. If it's good enough for you to use/feature, it's good enough for you to credit.
I've seen a mod with the wrong/no credits. What should I do? You can actually list it in the reports channel of my discord. That way, it's easier for the mod author to know (even if they are not there, we can likely find them), and everyone else with an account in the platform where the video/screenshot was posted can also help by asking the person who posted the videos to fix the credits. Some try to delete messages asking for credits, but if there are many people asking for that, they usually get tired and learn their lesson. Usually. Hopefully. I've seen good and bad outcomes at this point.
#genshin#genshin impact#mods#3D#genshin skins#genshin mods#tutorial#genshin fanart#anilyan#masterpost
50 notes
·
View notes
Text

Edited the masterpost image to be a title image for when I eventually figure out how to get images on a03
Edit: ima start moving stuff now :DD
I am so flippin new to this site so if anyone has 2 cents on how to make this look better or be categorized better or anything, Help me XD
#rune factory 5#rune factory#rf5#aashi doodles#some tutorials are telling me i need to have the link from a hosting site rather internal from my computer so gonna see if tumblr works#ill figure this out soon i think#edit: holy shit it worked!#good thing i have this masterpost oh my god this is gonna be a game of dancing around to get stuff on there :OOO
18 notes
·
View notes
Text
hmm im thinking about actually making the archive but i dont know if it will turn out exactly the way i thought and im scared , ,
#but i think its not that difficult to make it work#just tag and start reblogging some stuff#like tutorials flags graphics some songs or someone intro masterpost others archives n others#rq community#radqueer safe#pro radqueer#radqueer community#radqueers please interact#radqueer 🍓🌈#rq safe#radqueer please interact#radqueer 🌈🍓
6 notes
·
View notes
Text
Skip T. Tutorial Masterpost

Skip T. Tutorial is a concept for a dating simulator tutorial character. He's a poorly drawn silly guy that isn't meant to be taken very seriously. Behind that, he's a sentient AI that's been placed in charge of running the game and creating a perfect experience for the player. Which causes No Problems Whatsoever.
Posts with Skip are tagged "yippee i love flop posting about the sillies"
Skip's Route
Part 1, 2, 3, 4, 5, 6, 7, 8, 9, 10, 11, 12, 13, 14, 15, 16, 17
Bonus
Extras
Piano
I Think I Like Boys
Birthday
Tom Cardy
Rabbit Hole
No Mouth
Cheerleader
Unlockable Outfits part 1, part 2, part 3, part 4, part 5
Welcome to the club
Holding Hands
Normal Soup
Evil Skip
Valentine's Day
i can't delete it
box
changing appearances
coin opperated boy
As of now, Skip's route is FINISHED. However, I am working on a separate path in that route.
#ryan likes talking#yippee i love flop posting about the sillies#skip t tutorial#ocs#masterpost#ryan draws shit
5 notes
·
View notes
Photo
Signal boosting
websites:
Animation World Network
Animation Backgrounds
Animation Magazine
Animation & CGI
Animator Island
Anime News Network
Cartoon Brew
Character Design References
On Animation
Reference! Reference! (free database for animation)
11 Second Club (monthly character animation competition)
tumblr blogs:
animationart
animationforce
animationtidbits
aspiretoanimate
calartscharacteranimation
disney-moments-sketches (Allen Ostergar’s blog, animator at Walt Disney)
drawingforsuckas
fuckyeahconceptart
storyboardresources
theanimationarchive
theartofanimation
wannabeanimator
resources/tips:
Animation schools: 1 / 2 (Top 50 USA) / 3 (Top 100 international)
Which animation school is right for you? (Ringling vs. CalArts)
Don’t want to/ can’t afford art school? you’ve got other options.
Animation Mentor: The online animation school
Art school exercises!!
51 Great Animation exercises
20 things you can expect as a traditional (2D) animation student that they never tell you
A Survivor’s Guide to Life Inside an Animation Studio
Animation basics: The art of timing and spacing
Animation Notes From Ollie Johnston
Animated chart of the basic principles of animation
10 Second tip: Always Anticipate
book: Animation: Learn How to Draw Animated Cartoons by Preston Blair
book: A System for Planning and Timing Animation by Glen Keane
book: Timing for animation by Harold Whitaker and John Halas
book: Gesture Drawing for animation by Walt Stanchfield
Basic 3D Animation Terminology
Digital pencil test!!
Keys to Emotion in Animation
Lessons from Disney’s Zootopia
Model Sheets central
The importance of Acting in Animation by Segio Pablos
Printable exposure/dope sheet
Phoneme Chart
Recommended reading for animation students and enthusiasts
The 5 Types of Animation
The Know-How of Cartooning
The Unofficial Truth about The Animation Industry
Why Disney Sends Its Animators To Life Drawing Classes
Walk/Run Cycles reference
What is Pixar looking for in Animators? (scroll down)
Portfolio Advice for The Disney Animation Internship
What is Rigging?
3D Rigging Terminology
3D Modeling Terminology
tutorials:
Animation for Beginners: Where do I start
Animation Physics (Video tutorials on physics for animation artists)
Animation tutorial part. 1 AKA “the secret of animation”
Appealing Poses in Animation
Background & Movement in TV
Blinking tips
Breakdown tutorial (middle frame between to keys)
Drawing & Composition for visual storytelling
Drawing for Animation
Drawing a Likeness
Animation fundamentals + tutorials
Filmmaking: Composition and Framing
Getting Shape Change
How to animate using photoshop
How to animate Characters in Perspective
How to Animate Head Turns
How to Draw Gesture
OpeenToonz tutorials masterpost
Overlapping Action and Drag
Portfolio tips / Making A Successful Portfolio
Lyp Sync tutorial
Line of action
Basics of good cartooning 1-12 by Sherm Cohen
Squash & Stretch tutorial
Squash and Stretch 2
Storyboarding tutorials by Sherm Cohen
The Illusion of Life: 12 Principles of Animation
Tilt, Flow & Rhythm
Underlying Structure When Animating Expressions
TVPaint tutorial: Uploading and Coloring Scanned Animation
supplies (traditional animation):
10 Essential Art Supplies for the Traditional Animator
How to Use a Light Table for Animation
Making a Simple Animation Lightbox
Peg bars, Animation Disk & Desk
softwares:
free
Blender (3D creation suite. It supports the entirety of the 3D pipeline: modeling, rigging, animation,etc)
Emofuri (animate using .psd files)
Google Sketchup (
Live2D ( animation/drawing software
OpenToonz (Studio Ghibli’s open source animation software)
Pencil2D (create traditional hand-drawn animation (cartoon) using both bitmap and vector graphics)
Renderman (Pixar’s free 3D rendering software)
Sculptris (Free digital sculpting tool by the makers of Zbrush
SculptGL (Online modelling program)
Synfig (2d animation using a vector and bitmap artwork)
paid
Zbrush (digital sculpting sw by Pixologic)
Mudbox (digital sculpting sw by Autodesk)
Cinema 4D (digital sculpting sw by Maxon)
TVPaint (2d animation)
animation studios:
Aardman (Bristol, UK)
Blue Sky Studios (Greenwich, USA)
Dreamworks (Glendale, USA)
Fox Animation (USA)
Imagination Studios/CN (Burbank, USA)
Industrial Light & Magic (San Francisco, USA)
Laika (Hillsboro, USA)
Luma Pictures (USA / Melbourne, Australia)
Nickelodeon Animation (Burbank, USA)
Pixar (Emeryville, CA)
Rise FX (Berlin, Germany)
Studio Ghibli (Tokyo, Japan)
Sony Picture Imageworks (Vancouver, Canada)
Sony Pictures Animation (Culver City, CA)
Walt Disney Animation (Burbank, CA)
Weta Digital (Wellington, New Zealand)
inspiration: worth watching short films
Coda by and maps and plans
Contre Temps by the Contre Temps Team
Duet by Glen Keane
DOG ENVY by Olivia Huynh
Fallin Floyd by il Luster
French Roast
Gravity by Ailin Liu
In Between by Gobelins
Jinxy Jenkins and Lucky Lou by Michael Bidinger and Michelle Kwon
My Big Brother by Jason Rayner
Night Light by Qing Han
Nephtali by Glen Keane
Nocturne by Kari Casady
Historia de un Oso by Gabriel Osorio
Home Sweet Home by home sweet home the film
One Bright Dot by Clément Morin
Stickboy by Giant Ant
SOAR by Alyce Tzue
Tsunami by The Animation Workshop
Thought of You by Ryan Woodward
Vagabond by The Animation Workshop
5 Gobelins Shorts That Pay Tribute To Women Animation Pioneers
#animation#masterpost#animation masterpost#animation softwares#softwares#art school#animation school#portfolio#supplies#tutorials#animation tutorials#animation tutorial#animation reference
67K notes
·
View notes
Text
☆ Hey Guys Welcome To My Slime Tutorial
[ A Slime Rancher AU, in which Lloyd and Pixal venture out to the Far Far Range, aiming to become successful slime ranchers. While coming across new faces, trying to tame uncooperative slimes, and uncovering the story of the man who owned the ranch before them, they realize that life is a lot different than they thought. ]
Anything related to Hey Guys Welcome To My Slime Tutorial will be tagged with #slimeau
Fanfic! (Link TBA)
Story important art will be linked here, along with ref sheets and the like!
0 notes
Text
I have hacked the mainframe (Inspect Element) (UPDATED FOR HALLOWEEN BOOP WAR)

MAX - 1000
LOL - 1500
OMG - 2000
WOW - 4000
*-* - 5000
WHY - 6000
PLZ - 7000
AAA - 7500
;_; - 8000
0_0 - 8500
T_T - 9000
MAX - ~9200? (Hard to tell, I've overshot this twice already)
BOO - 9500
TUM - 10000 given
BLR - 10000 received
How to Super Boop
On desktop, hover your mouse over the Boop button for around 5 seconds, and it will do 2 spins.
Once the button is done spinning, click on it and you can send a Super Boop!
EVIL BOOPS can be accessed by allowing the animation to play 3 times before clicking
One way to get Super Boops on mobile is using a web browser to access tumblr. Use "Desktop Site"/"Desktop Mode", then click and hold the button to send the boop. That'll convert it to a Super Boop button. It seems pretty inconsistent though.
For all clicking enthusiasts, do click this too, trust me, it's just as satisfying
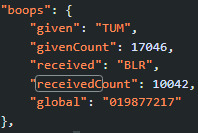
Omg thanks everyone for the boops, I've been butterfly clicking the boop button for so many different people for the past 6 hours and I'm exhausted
I'm pretty sure this is also my most engaged post on any platform I've ever used, thanks for all the RBs and likes <3 <3 <3
If anyone's crazy enough to try reaching 10k without an autoclicker, here's what I did
Ok, one more tutorial for the boops before I go to bed for real.
How do I check my exact given and received boop count?
NOTE: You'll need to refresh the page to update the counters, unless there's another method to check the live count
Chrome
Go to your dash ("home" tab).
Press f12, or right click and select "Inspect Element"
In the window that pops up, click on "Sources" then "dashboard" under "www.tumblr.com" (Pic below for reference)
In the window showing the code, press Ctrl+F and type in either "givenCount" or "receivedCount".
Ta da! (Pic below for reference)
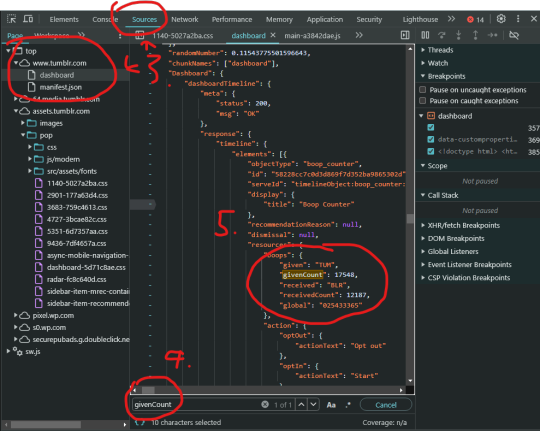
Firefox
Go to your dash ("home" tab).
Press f12, or right click and select "Inspect Element (Q)"
In the window that pops up, click on "Debugger", then "Sources" and "dashboard" under "www.tumblr.com" (Pic below for reference)
In the window showing the code, press Ctrl+F and type in either "givenCount" or "receivedCount".
Enjoy formatting (Pic below for reference)
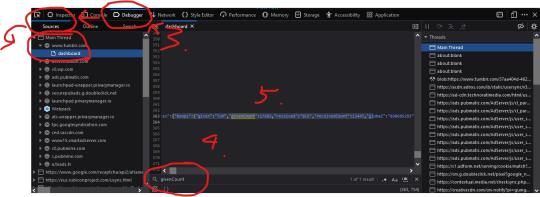
Gonna take a break from Tumblr for now, my fingers are in shambles and I'm pretty sure I can hear the mouse clicks echoing around inside my skull. Thanks to everyone for making this random Singaporean guy's day, mbrine signing out! ❤
Here's a link to A vetted Palestinian family fundraiser masterpost by @/el-shab-hussein and A masterpost on how you can help Palestine
Happy April Fool's Day!

October 31st changelog:
Removed "bait links", now the link actually says where it directs to
Updated some info regarding tiers
12K notes
·
View notes
Text
My Fat Art Resources Masterpost
Dropbox link with scans of Morpho: Fat and Folds (highest quality ive found)
Archive.org link to scans of Morpho: Fat and Folds
How to draw fat bodies by @ strawberrylind
Tips on drawing big people by @ gubbins-turtledove
Fat bodies tutorial by @ wxrmandfxzzies
Drawing fat simple by @ necronatural
Chubby guide by paggiart (twitter link) (tumblr link)
Guide to drawing fat bodies by @ scwibbs
Double chins by @ officialspec
How I draw fat people by @ iwasarob0t
Stylized fat bodies by @ hometownrockstar
How I Draw Fat Furries by @ mushpuppies
#kitty purrs#fat tag#fat art#art references#fat positvity#body positivity#ref#fat art resources masterpost
3K notes
·
View notes
Text

very much yes
another free digital art program, Inkscape (that's how I was introduced to vector art)
Can't afford art school?
After seeing post like this 👇

And this gem 👇
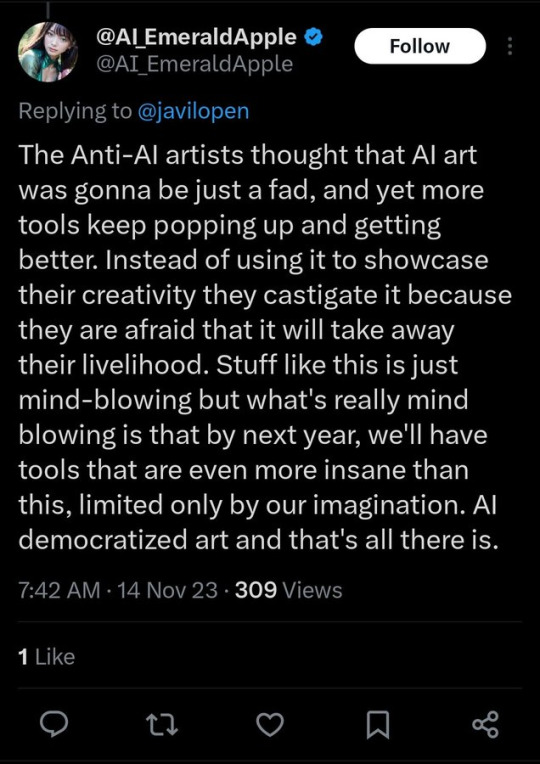
As well as countless of others from the AI generator community. Just talking about how "inaccessible art" is, I decided why not show how wrong these guys are while also helping anyone who actually wants to learn.
Here is the first one ART TEACHERS! There are plenty online and in places like youtube.
📺Here is my list:
Proko (Free)
Marc Brunet (Free but he does have other classes for a cheap price. Use to work for Blizzard)
Aaron Rutten (free)
BoroCG (free)
Jesse J. Jones (free, talks about animating)
Jesus Conde (free)
Mohammed Agbadi (free, he gives some advice in some videos and talks about art)
Ross Draws (free, he does have other classes for a good price)
SamDoesArts (free, gives good advice and critiques)
Drawfee Show (free, they do give some good advice and great inspiration)
The Art of Aaron Blaise ( useful tips for digital art and animation. Was an animator for Disney)
Bobby Chiu ( useful tips and interviews with artist who are in the industry or making a living as artist)
Second part BOOKS, I have collected some books that have helped me and might help others.
📚Here is my list:
The "how to draw manga" series produced by Graphic-sha. These are for manga artist but they give great advice and information.
"Creating characters with personality" by Tom Bancroft. A great book that can help not just people who draw cartoons but also realistic ones. As it helps you with facial ques and how to make a character interesting.
"Albinus on anatomy" by Robert Beverly Hale and Terence Coyle. Great book to help someone learn basic anatomy.
"Artistic Anatomy" by Dr. Paul Richer and Robert Beverly Hale. A good book if you want to go further in-depth with anatomy.
"Directing the story" by Francis Glebas. A good book if you want to Story board or make comics.
"Animal Anatomy for Artists" by Eliot Goldfinger. A good book for if you want to draw animals or creatures.
"Constructive Anatomy: with almost 500 illustrations" by George B. Bridgman. A great book to help you block out shadows in your figures and see them in a more 3 diamantine way.
"Dynamic Anatomy: Revised and expand" by Burne Hogarth. A book that shows how to block out shapes and easily understand what you are looking out. When it comes to human subjects.
"An Atlas of animal anatomy for artist" by W. Ellenberger and H. Dittrich and H. Baum. This is another good one for people who want to draw animals or creatures.
Etherington Brothers, they make books and have a free blog with art tips.
As for Supplies, I recommend starting out cheap, buying Pencils and art paper at dollar tree or 5 below. For digital art, I recommend not starting with a screen art drawing tablet as they are more expensive.
For the Best art Tablet I recommend either Xp-pen, Bamboo or Huion. Some can range from about 40$ to the thousands.
💻As for art programs here is a list of Free to pay.
Clip Studio paint ( you can choose to pay once or sub and get updates)
Procreate ( pay once for $9.99)
Blender (for 3D modules/sculpting, ect Free)
PaintTool SAI (pay but has a 31 day free trail)
Krita (Free)
mypaint (free)
FireAlpaca (free)
Libresprite (free, for pixel art)
Those are the ones I can recall.
So do with this information as you will but as you can tell there are ways to learn how to become an artist, without breaking the bank. The only thing that might be stopping YOU from using any of these things, is YOU.
I have made time to learn to draw and many artist have too. Either in-between working two jobs or taking care of your family and a job or regular school and chores. YOU just have to take the time or use some time management, it really doesn't take long to practice for like an hour or less. YOU also don't have to do it every day, just once or three times a week is fine.
Hope this was helpful and have a great day.
#doing art#fallacies#fantasy vs reality#important#masterpost#artificial intelligence#truth#reference#tutorial#practical#perspective
105K notes
·
View notes
Text
art tutorials / books i like masterpost
ppl ask me for advice and while i always have a lot of Thoughts about art that i like to share. maybe being told "just have fun and be yourself" can be frustrating when you want actionable advice so:
these are books i love that have taught me a lot, i own physical copies and still reference them all the time. (these arent expensive or hard to find but i'll include pdfs anyway)
Dynamic Figure Drawing by Burn Hogarthe (pdf)
The Art of Animal Drawing by Ken Hultgren (pdf)
Exploring Color by Nita Leland (pdf)
and i am being completely dead serious when i say you should try the tutorials from ed emberley's books. yes even if you're a whole adult who has gone to art school. (everybody who tells me "your art is so shaped" this is where i get that shit from !!! he knew what he was talking about!!) this one is my favorite
also these books that i've learned a lot from that aren't literally "how to draw" books:
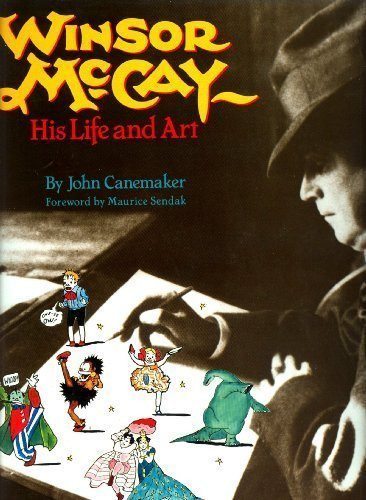
and i say this all the time but imo just doing a lot of observational drawing / drawing from life is the thing that will level you up the fastest. it's an awesome thing to be inspired by the art you love but if that's all you do you will never get out of the trap of comparing yourself to others. most importantly be gay and never give up
#not art#anyway hope somebody gets something out of this!! thats all i got#like its true that you should have fun and be yourself / there are no rules. but tbh i was pissed off as a child when ppl told me that.
653 notes
·
View notes