#webhook url
Explore tagged Tumblr posts
Visit Tumblr Blog
Explore Tumblr blogs with no restrictions, modern design and the best experience.
Last Seen Tumblr Blogs


Fun Fact
The KCSC sent more than 20K requests to delete posts related to prostitution and porn to Tumblr from January to June 2017.
Text
The Ultimate Guide to Webhooks (including what a webhook url is)
Learn what a webhook URL is, how webhooks work. Full guide: https://softwareengineeringstandard.com/2025/07/03/the-ultimate-guide-to-webhooks-including-what-a-webhook-url-is/ #webhookurl #webhooks #devtools #tunnelmole #opensource
https://softwareengineeringstandard.com/2025/07/03/the-ultimate-guide-to-webhooks-including-what-a-webhook-url-is/
#webhook url#url#webhook#api#tunnelmole#testing#nodejs#integration#automation#opensource#devtools#cloud#ci#webdevelopment
0 notes
Text
blog admin work my beloathed
#got the other blog Up#need to like. do shit to it before i openly say Where It Is#aka adding in the blocked blogs and filtered content lmao#a visor for a visor (ooc)#gonna maybe give the url to a couple ppl tonight just to test like. webhooks n stuff#and hopefully have it up with the formal announcement tomorrow
0 notes
Text
WhatsApp Cloud API Setup For Botsailor
Integrating the WhatsApp Cloud API with BotSailor is crucial for businesses seeking to enhance their customer engagement and streamline communication. The WhatsApp Cloud API enables seamless automation, allowing businesses to efficiently manage interactions through chatbots, live chat, and automated messaging. By connecting with BotSailor, businesses gain access to advanced features like order message automation, webhook workflows, and integration with e-commerce platforms such as Shopify and WooCommerce. This setup not only improves operational efficiency but also offers a scalable solution for personalized customer support and marketing, driving better engagement and satisfaction.
To integrate the WhatsApp Cloud API with BotSailor, follow the steps below for setup:
1. Create an App:
Go to the Facebook Developer site.
Click "My Apps" > "Create App".
Select "Business" as the app type.
Fill out the form with the necessary information and create the app.
2. Add WhatsApp to Your App:
On the product page, find the WhatsApp section and click "Setup".
Add a payment method if necessary, and navigate to "API Setup".
3. Get a Permanent Access Token:
Go to "Business Settings" on the Facebook Business site.
Create a system user and assign the necessary permissions.
Generate an access token with permissions for Business Management, Catalog management, WhatsApp business messaging, and WhatsApp business management.
4. Configure Webhooks:
In the WhatsApp section of your app, click "Configure webhooks".
Get the Callback URL and Verify Token from BotSailor's dashboard under "Connect WhatsApp".
Paste these into the respective fields in the Facebook Developer console.
5. Add a Phone Number:
Provide and verify your business phone number in the WhatsApp section.
6. Change App Mode to Live:
Go to Basic Settings, add Privacy Policy and Terms of Service URLs, then toggle the app mode to live.
7. Connect to BotSailor:
On BotSailor, go to "Connect WhatsApp" in the dashboard.
Enter your WhatsApp Business Account ID and the access token.
Click "Connect".
For a detailed guide, refer to our documentation. YouTube tutorial. and also read Best chatbot building platform blog
3 notes
·
View notes
Text
What is Argo CD? And When Was Argo CD Established?

What Is Argo CD?
Argo CD is declarative Kubernetes GitOps continuous delivery.
In DevOps, ArgoCD is a Continuous Delivery (CD) technology that has become well-liked for delivering applications to Kubernetes. It is based on the GitOps deployment methodology.
When was Argo CD Established?
Argo CD was created at Intuit and made publicly available following Applatix’s 2018 acquisition by Intuit. The founding developers of Applatix, Hong Wang, Jesse Suen, and Alexander Matyushentsev, made the Argo project open-source in 2017.
Why Argo CD?
Declarative and version-controlled application definitions, configurations, and environments are ideal. Automated, auditable, and easily comprehensible application deployment and lifecycle management are essential.
Getting Started
Quick Start
kubectl create namespace argocd kubectl apply -n argocd -f https://raw.githubusercontent.com/argoproj/argo-cd/stable/manifests/install.yaml
For some features, more user-friendly documentation is offered. Refer to the upgrade guide if you want to upgrade your Argo CD. Those interested in creating third-party connectors can access developer-oriented resources.
How it works
Argo CD defines the intended application state by employing Git repositories as the source of truth, in accordance with the GitOps pattern. There are various approaches to specify Kubernetes manifests:
Applications for Customization
Helm charts
JSONNET files
Simple YAML/JSON manifest directory
Any custom configuration management tool that is set up as a plugin
The deployment of the intended application states in the designated target settings is automated by Argo CD. Deployments of applications can monitor changes to branches, tags, or pinned to a particular manifest version at a Git commit.
Architecture
The implementation of Argo CD is a Kubernetes controller that continually observes active apps and contrasts their present, live state with the target state (as defined in the Git repository). Out Of Sync is the term used to describe a deployed application whose live state differs from the target state. In addition to reporting and visualizing the differences, Argo CD offers the ability to manually or automatically sync the current state back to the intended goal state. The designated target environments can automatically apply and reflect any changes made to the intended target state in the Git repository.
Components
API Server
The Web UI, CLI, and CI/CD systems use the API, which is exposed by the gRPC/REST server. Its duties include the following:
Status reporting and application management
Launching application functions (such as rollback, sync, and user-defined actions)
Cluster credential management and repository (k8s secrets)
RBAC enforcement
Authentication, and auth delegation to outside identity providers
Git webhook event listener/forwarder
Repository Server
An internal service called the repository server keeps a local cache of the Git repository containing the application manifests. When given the following inputs, it is in charge of creating and returning the Kubernetes manifests:
URL of the repository
Revision (tag, branch, commit)
Path of the application
Template-specific configurations: helm values.yaml, parameters
A Kubernetes controller known as the application controller keeps an eye on all active apps and contrasts their actual, live state with the intended target state as defined in the repository. When it identifies an Out Of Sync application state, it may take remedial action. It is in charge of calling any user-specified hooks for lifecycle events (Sync, PostSync, and PreSync).
Features
Applications are automatically deployed to designated target environments.
Multiple configuration management/templating tools (Kustomize, Helm, Jsonnet, and plain-YAML) are supported.
Capacity to oversee and implement across several clusters
Integration of SSO (OIDC, OAuth2, LDAP, SAML 2.0, Microsoft, LinkedIn, GitHub, GitLab)
RBAC and multi-tenancy authorization policies
Rollback/Roll-anywhere to any Git repository-committed application configuration
Analysis of the application resources’ health state
Automated visualization and detection of configuration drift
Applications can be synced manually or automatically to their desired state.
Web user interface that shows program activity in real time
CLI for CI integration and automation
Integration of webhooks (GitHub, BitBucket, GitLab)
Tokens of access for automation
Hooks for PreSync, Sync, and PostSync to facilitate intricate application rollouts (such as canary and blue/green upgrades)
Application event and API call audit trails
Prometheus measurements
To override helm parameters in Git, use parameter overrides.
Read more on Govindhtech.com
#ArgoCD#CD#GitOps#API#Kubernetes#Git#Argoproject#News#Technews#Technology#Technologynews#Technologytrends#govindhtech
2 notes
·
View notes
Text
TradingView to Tradovate Automation: A Quick Guide
Trading in the modern world is increasingly about speed and efficiency, and automation is key to achieving this. If you're using TradingView for charting and analysis and Tradovate as your trading platform, you might be wondering how to connect the two for seamless, automated trading. In this short guide, we'll walk you through the basic steps to automate your trading from TradingView to Tradovate.
Understanding the Platforms
TradingView is a powerful charting platform that offers real-time data and a wide range of tools for technical analysis. It's a favorite among traders for its ease of use and extensive community.
Tradovate is a modern futures trading platform known for its commission-free trading model. It offers powerful tools for futures traders, including advanced charting and algorithmic trading capabilities.
Why Automate Trading Between TradingView and Tradovate?
Automation helps eliminate human error, execute trades faster, and take advantage of trading opportunities without being glued to your screen. By linking TradingView and Tradovate, you can automate your trading strategies, ensuring that trades are executed according to your pre-defined criteria.
Setting Up Automation: Step by Step
Create Your Trading Strategy in TradingView: Start by developing a trading strategy in TradingView using Pine Script. This could be anything from simple moving averages to more complex algorithms.
Integrate with Tradovate Using Webhooks: TradingView allows you to send alerts via webhooks. In your alert setup, you can input the webhook URL provided by Tradovate. This URL triggers the execution of trades based on your TradingView alerts.
Configure Tradovate to Accept Orders: Set up your Tradovate account to accept automated orders. This might involve configuring API settings and ensuring that your account is correctly linked to receive the orders from TradingView.
Test the Setup: Before going live, thoroughly test the automation in a simulated environment. Make sure that your strategy works as intended and that orders are executed correctly.
Conclusion
Automating your trading between TradingView and Tradovate can significantly enhance your trading efficiency and effectiveness. By following the steps outlined above, you can seamlessly integrate these two platforms and start automating your trading strategies today.
3 notes
·
View notes
Text
Tumblr notifs in Discord
Tumblr labs has a discord hook, so if you're like me and have a bunch of different tumblrs and would like notifs for all of them in the same place, you're in luck!
Here's how you can set it up.
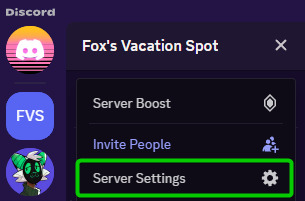
First, you'll need a Discord server where you want to receive the notifications. You can make a server with only you in it if you don't have one already.
Click your server title, then click Server Settings.
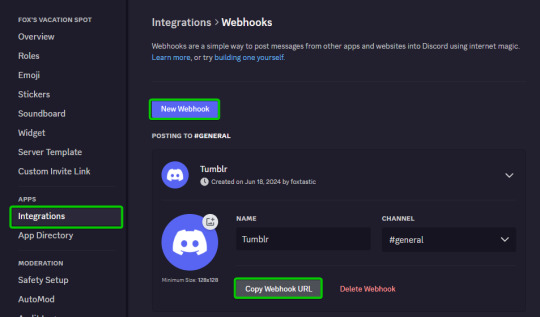
3. Under APPS, open Integrations.
4. Click "New Webhook".
5. Name it whatever you want, and set the channel where you want to receive the notifications.
Note: You only need one webhook if you'll be putting all of the notifications from all blogs into a single discord channel. Notifs from each blog will be labeled by name so it's not an issue.
6. Login to the tumblr you'd like to hook up to Discord, and go here: Labs
7. Toggle on "Enable Tumblr Labs" and "Tumblr to Discord Webhooks".
8. Go to your blog-specific settings page(same place where you can change your blog theme).
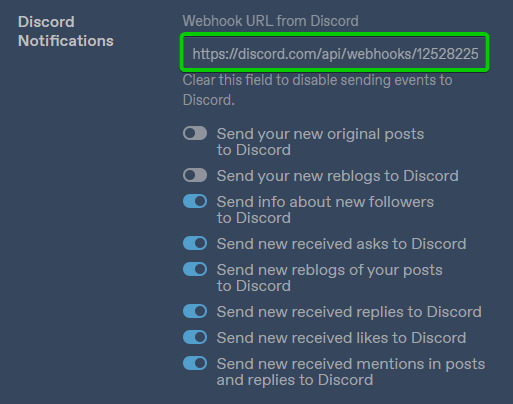
9. Scroll down to Discord Notifications. Here you can select what types of notifications you want sent to discord.
10. Copy and paste your webhook url from Discord into the blank.
11. Do steps 10-12 for all tumblr blogs you wish to add to your notifications. Now bask in the glory of not missing rp replies no matter which blog you're logged into!

2 notes
·
View notes
Text
to be reblogged but: I answered all of my asks!
so check your url in my blog if you didn't receive a notification because you can't trust the general tumblr tagging system nor your activity page (I @ mention people when answering so I always suggest the webhook to avoid missing things)
#because if i don't see a like or a response I cannot know if you've seen it and I hate the idea of you sending an ask and thinking I#ignored it while you wait for a response that I already posted
3 notes
·
View notes
Link
3 notes
·
View notes
Text
Using ContactFormToAPI with Zapier, Make & Webhooks for Powerful Automations
In today's fast-paced digital environment, every second counts. If you're still copying contact form entries into your CRM or marketing tool manually, you're wasting time and missing leads. With ContactFormToAPI, you can send contact form data to any API, and when combined with Zapier, Make, and webhooks, your automation possibilities are endless.

What is ContactFormToAPI?
ContactFormToAPI is a no-code platform that lets you forward data from any website contact form directly to any REST API. Whether you're using WordPress, Webflow, Wix, or a custom-built site, it works universally.
Key features:
Connects to any form builder (CF7, Elementor, Gravity Forms, etc.)
Sends data to CRMs, spreadsheets, email platforms, and custom APIs
Requires no coding knowledge
Easy setup with endpoint URLs and tokens
Why Automate Contact Form Submissions?
Automating contact form submissions means:
No more missed leads due to manual errors
Instant notifications to your sales or support team
Data syncing to CRM or marketing platforms in real-time
Better user experience and faster follow-ups
The goal is simple: turn a basic contact form into a business asset.
How ContactFormToAPI Integrates with Zapier
Zapier is one of the most popular no-code automation tools that connects 6000+ apps.
Step-by-Step: Integrating ContactFormToAPI with Zapier
Step 1: Create a Zapier Webhook
Go to Zapier → Create a new Zap
Choose "Webhooks by Zapier" as the trigger
Select "Catch Hook"
Step 2: Copy the custom webhook URL from Zapier.
Step 3: Paste this URL into your ContactFormToAPI setup as the target API endpoint.
Step 4: Submit a test form to send data.
Step 5: Map fields inside Zapier and connect them to any app (e.g., Gmail, HubSpot, Google Sheets).
Example Zap:
Trigger: Contact form submitted
Action: Create a new row in Google Sheets
Result: Instant record of all leads in your spreadsheet
This connection turns your form into a real-time workflow engine.
Using ContactFormToAPI with Make (Integromat)
Make, formerly Integromat, is another powerful automation tool that offers advanced logic and multi-step workflows.
Steps to Connect ContactFormToAPI with Make
Step 1: Create a scenario in Make
Add the HTTP module
Choose "Webhook" and click "Custom Webhook"
Copy the generated URL
Step 2: Paste the webhook URL into ContactFormToAPI.
Step 3: Submit your form for testing
Step 4: Map incoming fields and add steps (e.g., send email, update CRM, notify Slack)
Why Use Make?
Better for complex workflows
Visual editor makes multi-step logic easier
Supports routers, filters, conditions
Make is ideal if you want to create a branching workflow or chain multiple apps.
Webhooks: Real-Time, Code-Free Integrations
Webhooks are lightweight HTTP callbacks that allow real-time communication between your website and APIs.
Why Use Webhooks with ContactFormToAPI?
They’re fast
They don’t require third-party tools
Perfect for developers or direct integrations
Works with custom APIs or SaaS tools that accept POST requests
Example: Send contact form data directly to your CRM's API endpoint using a webhook.
Real-Life Use Cases
Use Case 1: Send Form Data to HubSpot CRM via Zapier
A marketing agency connects ContactFormToAPI → Zapier → HubSpot. Every contact form submission becomes a new contact in the CRM.
Use Case 2: Notify Sales Team in Slack via Make
A SaaS startup sends form data → Make → Slack, where each new submission generates a custom notification.
Use Case 3: Sync With Google Sheets via Webhook
A freelancer uses ContactFormToAPI to send all lead data directly to a Google Apps Script endpoint that logs entries in a spreadsheet.
SEO and Marketing Benefits of API-Based Automation
Automating form submissions isn’t just technical—it’s strategic.
SEO & Marketing Advantages:
Faster lead response times improve conversions
Better data organization helps with segmentation and remarketing
Instant analytics integrations help track campaign ROI
Reduced bounce rate from more responsive follow-ups
When your contact forms are deeply integrated into your marketing stack, you're not just collecting leads—you're activating them.
Final Thoughts
If you're serious about optimizing your website for conversions and efficiency, using ContactFormToAPI with Zapier, Make, and webhooks is a game-changer.
Whether you run a startup, manage clients, or handle enterprise operations, this trio empowers you to:
Connect your contact form to any API
Save time and avoid manual errors
Scale your business processes without hiring a developer
FAQs
Q1: Is ContactFormToAPI secure? Yes. It uses HTTPS and supports tokens for authentication, keeping your data protected.
Q2: Can I use it with Contact Form 7 in WordPress? Absolutely. It supports all popular form builders including CF7, Gravity Forms, Elementor, WPForms, etc.
Q3: What if my API requires custom headers or authentication? You can configure custom headers, API keys, bearer tokens directly in the ContactFormToAPI dashboard.
Q4: Do I need coding knowledge? No. All integrations are no-code and set up within minutes.
Q5: Is it better than using direct plugins for every service? Yes, because it avoids plugin bloat and works with any API, making it future-proof and scalable.
0 notes
Text
VPS N8N - Giải pháp tối ưu để triển khai workflow tự động hóa hiệu quả
Trong thời đại chuyển đổi số mạnh mẽ, các doanh nghiệp đang ngày càng chú trọng đến việc tự động hóa quy trình nhằm tiết kiệm thời gian, nhân lực và chi phí vận hành. Một trong những công cụ tự động hóa nổi bật hiện nay là n8n, nền tảng workflow mạnh mẽ và mã nguồn mở. Để tối ưu hiệu suất và độ ổn định khi triển khai n8n, lựa chọn VPS N8N là một hướng đi thông minh và hiệu quả. Vậy VPS N8N là gì, và tại sao ngày càng nhiều lập trình viên, marketer và doanh nghiệp lựa chọn hình thức triển khai này? Hãy cùng tìm hiểu chi tiết qua bài viết sau.
VPS N8N là gì?
VPS N8N là hình thức triển khai nền tảng n8n (Node-Node) trên máy chủ riêng ảo (VPS). Nói cách khác, thay vì sử dụng phiên bản n8n cloud (có giới hạn tính năng và tài nguyên), bạn có thể tự quản lý, tùy biến và mở rộng hệ thống workflow theo ý muốn khi sử dụng VPS.
N8N là một công cụ mã nguồn mở cho phép bạn kết nối hàng trăm ứng dụng với nhau để xây dựng các luồng công việc tự động (workflow automation) như: gửi email, quản lý dữ liệu CRM, xử lý đơn hàng, API calls, phân tích dữ liệu, v.v. Khi kết hợp với một VPS ổn định, hiệu suất cao, bạn hoàn toàn có thể xây dựng hệ thống automation mạnh mẽ mà không phụ thuộc vào bên thứ ba.
Ưu điểm của việc sử dụng VPS N8N
Hiệu suất ổn định và mở rộng linh hoạt
So với việc sử dụng dịch vụ cloud n8n miễn phí hoặc có giới hạn, triển khai n8n trên VPS giúp bạn chủ động về tài nguyên như CPU, RAM, băng thông. Bạn có thể dễ dàng nâng cấp VPS khi cần xử lý lượng workflow lớn hoặc tích hợp nhiều ứng dụng cùng lúc.
Toàn quyền kiểm soát và bảo mật cao
Khi cài đặt n8n trên VPS, bạn có toàn quyền cấu hình hệ thống, bảo mật dữ liệu và xử lý logic theo cách riêng. Điều này đặc biệt quan trọng đối với các doanh nghiệp xử lý dữ liệu khách hàng nhạy cảm hoặc cần tuân thủ các tiêu chuẩn bảo mật nghiêm ngặt.
Tiết kiệm chi phí dài hạn
Thay vì phải trả tiền theo từng workflow, request hoặc user như các nền tảng automation trả phí khác (Zapier, Make...), sử dụng VPS N8N chỉ cần chi trả phí thuê VPS hàng tháng, có thể từ 3 – 10 USD/tháng, tùy cấu hình. Đây là giải pháp tối ưu chi phí cho startup, freelancer hoặc doanh nghiệp vừa và nhỏ.
Tuỳ biến không giới hạn
N8N hỗ trợ viết custom node, webhook và tích hợp API. Khi chạy trên VPS, bạn có thể triển khai thêm các thư viện, cài đặt ứng dụng phụ trợ (Redis, PostgreSQL, etc.) hoặc tích hợp sâu với hệ thống nội bộ doanh nghiệp.
Cài đặt N8N trên VPS có khó không?
Trên thực tế, quá trình cài đặt VPS N8N khá đơn giản, đặc biệt với những người có kiến thức cơ bản về server. Dưới đây là các bước triển khai cơ bản:
Chọn nhà cung cấp VPS: Bạn có thể lựa chọn các nhà cung cấp uy tín như Vultr, Linode, DigitalOcean hoặc các đơn vị Việt Nam như Azdigi, Tinohost.
Cài đặt Docker hoặc Node.js: N8N có thể chạy độc lập hoặc qua Docker container.
Cấu hình n8n: Khai báo thông số môi trường (ENV), webhook URL, đăng ký tài khoản bảo mật, backup định kỳ.
Truy cập giao diện n8n: Thông qua IP VPS hoặc domain riêng.
Nếu bạn không có thời gian hoặc kỹ năng kỹ thuật, bạn có thể thuê các đơn vị chuyên cài đặt VPS N8N trọn gói, chỉ mất khoảng 1 – 2 giờ triển khai.
Ứng dụng thực tế của VPS N8N trong doanh nghiệp
Marketing automation: Kết nối với Google Sheets, Facebook Lead Ads, Email API để tự động hoá chiến dịch.
Bán hàng: Đồng bộ dữ liệu giữa CRM, phần mềm kế toán và chatbot.
Chăm sóc khách hàng: Gửi phản hồi tự động, xử lý ticket nhanh chóng.
IT DevOps: Theo dõi hệ thống, gửi cảnh báo, tự động backup dữ liệu.
Kết luận
VPS N8N là một giải pháp mạnh mẽ, tiết kiệm và linh hoạt cho bất kỳ ai đang muốn xây dựng hệ thống workflow tự động hóa chuyên nghiệp. Việc lựa chọn triển khai n8n trên VPS không chỉ giúp tối ưu hiệu suất mà còn giúp bạn có quyền kiểm soát toàn diện, nâng cao bảo mật và giảm chi phí đáng kể.
Nếu bạn đang tìm kiếm giải pháp tự động hoá linh hoạt, dễ mở rộng và tiết kiệm trong dài hạn, hãy bắt đầu với VPS N8N ngay hôm nay!
Thông tin chi tiết: https://vndata.vn/vps-n8n/
0 notes
Text
How to Get a Public URL for Your Linux Virtual Machine with Tunnelmole
Expose your Linux virtual machine to the internet with a secure public URL using Tunnelmole! Open source, free, and works on any Linux VM. Read more: https://softwareengineeringstandard.com/2025/07/04/how-to-get-a-public-url-for-your-linux-virtual-machine-with-tunnelmole/ #linux #virtualmachine #opensource #devops #tunneling #programming #cloud #nodejs #webhooks
https://softwareengineeringstandard.com/2025/07/04/how-to-get-a-public-url-for-your-linux-virtual-machine-with-tunnelmole/
#linux#linuxvirtualmachine#vm#virtualmachine#opensource#javascript#typescript#python#programming#coding#devops#cloud#tunneling#webhooks#nodejs#selfhost#networking
0 notes
Text
SEO Depends on Site Health—And That Includes Cron Monitoring

When it comes to SEO, we often focus on content creation, keyword optimization, link building, and user experience. But beneath all of that lies a foundation that’s often ignored: site infrastructure and automation reliability. One of the most critical but overlooked components is cron job monitoring.
Cron jobs are automated tasks that power many behind-the-scenes SEO operations. When they silently fail, your site may still appear to function, but your SEO could be taking a serious hit. That’s why monitoring cron jobs with tools like WebStatus247 isn’t optional—it’s essential.
🛠 What Are Cron Jobs and Why Do They Matter for SEO?
A cron job is a time-based task scheduler in Unix-like systems. Web servers use cron jobs to automatically execute scripts at specific intervals—every hour, day, week, or custom frequency.
Here’s how they directly impact SEO:
Sitemap Automation: Keeping your sitemap updated and notifying search engines ensures faster indexing.
Cache Management: Clearing expired cache files helps maintain site speed.
Broken Link Checks: Regularly removing dead links improves crawlability and user trust.
Scheduled Content Publishing: Timely content updates signal fresh activity to search engines.
Image Optimization: Automatically resizing or compressing new uploads to maintain fast load times.
Without cron jobs doing these tasks, your site can gradually lose technical integrity—hurting everything from crawl budgets to page speed scores.
⚠️ Real-World Scenarios Where Cron Job Failures Hurt SEO
🔄 Sitemap Never Updates
Let’s say your sitemap.xml file hasn’t updated in weeks because the cron job failed. Google doesn’t know you’ve added 20 new blog posts. These pages stay unindexed—missing out on traffic, impressions, and ranking potential.
🧱 Broken Links Go Undetected
You have a cron job that runs a script to identify broken internal links. One day it silently fails. You continue publishing content, unaware that dozens of pages now link to 404 errors. Google starts lowering your site's quality score.
⏳ Sluggish Load Times
Your database cleanup cron job fails. As junk data builds up, your queries slow down and page load speed drops. This affects your Core Web Vitals, which are now a direct ranking factor in Google.
🕒 Missed Content Scheduling
You queue up posts for the next week—product updates, blog articles, promotional pages. But the publishing cron job crashes. Your audience sees no updates, and Google sees an inactive site.
✅ Why You Must Monitor Cron Jobs—Not Just Set Them
Setting up a cron job isn’t enough. They can:
Fail due to coding errors
Be interrupted by server issues
Get blocked by firewalls or security plugins
Conflict with other scripts
Be disabled during hosting migrations
And most importantly: they don’t usually alert you when something breaks. This is where WebStatus247 steps in.
🧩 How WebStatus247 Helps With SEO-Focused Cron Monitoring
WebStatus247 Cron Job Monitoring gives you full control and visibility over your automation stack. Features include:
🛑 Failure Detection: Get notified if a scheduled task doesn’t run or crashes.
📅 Custom Monitoring Intervals: Track hourly, daily, or even by-the-minute jobs.
📬 Real-Time Alerts: Receive instant alerts via email or SMS when things go wrong.
📈 Logging and Dashboards: View detailed logs to troubleshoot quickly and prevent repeat issues.
🔒 Secure Status URLs: Use simple HTTP or webhook pings for status confirmation.
By integrating this tool, you make sure your SEO tasks—especially technical SEO jobs—run like clockwork.
🔍 Technical SEO + Cron Jobs: A Perfect Pair
SEO experts and digital marketers know that technical SEO is just as critical as content. Google rewards websites that are fast, accessible, and technically sound.
Monitoring your cron jobs means you're doing the following:
Maintaining sitemap freshness
Avoiding broken or outdated links
Ensuring content freshness
Improving uptime and stability
Keeping page speed fast and lean
If you run backups, link audits, caching tasks, or image optimization via cron, these all contribute indirectly—but powerfully—to your SEO edge.
🧠 Final Thoughts: Don't Let Silent Failures Kill Your Rankings
SEO isn’t just about what's visible—it's also about the systems that support your site. If your background tasks aren’t monitored, they can quietly fail, and your rankings may drop before you even realize there’s a problem.
✅ WebStatus247 ensures that never happens.
0 notes
Text
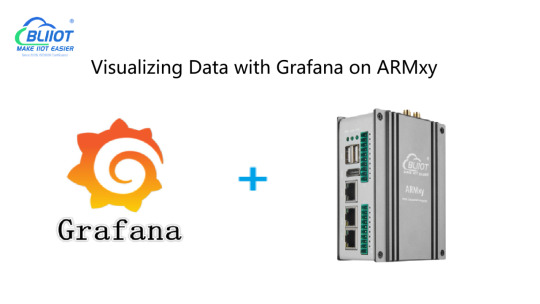
Unlocking Industrial Insights: Visualizing Data with Grafana on ARMxy
Introduction to Grafana
Grafana is an open-source visualization tool widely used for monitoring and analyzing data. It supports multiple data sources like InfluxDB, Prometheus, and MySQL, making it ideal for industrial applications. With customizable dashboards and robust alerting features, Grafana empowers users to track real-time data, visualize trends, and make informed decisions.
Why Use ARMxy with Grafana?
ARMxy Edge IoT Gateway devices are powerful, compact solutions ideal for data collection and processing at the edge. Combining Grafana with ARMxy devices offers a robust system for visualizing industrial data without relying on cloud services. This setup reduces latency, enhances security, and ensures data availability even in offline conditions.
Step 1: Install Grafana on ARMxy
To install Grafana on your ARMxy device, follow these steps:
Update System Packages
Install Grafana Grafana can be installed via official repositories:
Start and Enable Grafana Service
Access Grafana by opening http://:3000 in your browser. Default credentials are admin/admin.
Step 2: Connect Data Sources
For example, to connect an InfluxDB instance:
Navigate to Configuration → Data Sources.
Select InfluxDB and enter the database URL.
Provide authentication credentials and database details.
Click Save & Test to confirm the connection.
Step 3: Build Dashboards
With the data source linked, follow these steps to visualize data:
Go to Create → Dashboard.
Click Add a New Panel.
Select your data source and define the desired metrics.
Customize the graph’s appearance and set alert thresholds if needed.
Save the dashboard for real-time monitoring.
Step 4: Implement Alerts
Grafana’s alerting feature can notify maintenance teams about potential equipment failures or abnormal conditions:
Go to Alerting → Notification Channels.
Add preferred channels like Email, Slack, or Webhooks.
Define alert rules for specific data conditions.
Conclusion
By combining Grafana with ARMxy Edge IoT Gateways, you can create powerful, localized data visualization solutions that enhance monitoring, improve response times, and reduce reliance on cloud platforms. This setup is ideal for industries seeking efficient, real-time insights with flexible deployment options.
0 notes
Text
Why Developers and Marketers Love Direct Mail APIs for Campaign Automation
In an age dominated by digital noise, direct mail marketing has made a powerful comeback—this time fueled by technology. Developers and marketers are increasingly turning to Direct Mail APIs to automate personalized, data-driven physical mail campaigns. These APIs bridge the gap between digital interfaces and physical customer engagement, making offline outreach as measurable and scalable as online marketing.

This article explores why marketers are adopting direct mail APIs, their benefits, use cases, and how these tools redefine campaign automation for ROI-focused teams.
What is a Direct Mail API?
A Direct Mail API (Application Programming Interface) is a digital interface that enables developers to programmatically send physical mail—such as letters, postcards, brochures, and catalogs—via third-party mailing services. These APIs integrate with CRM systems, marketing automation platforms, and eCommerce platforms to streamline offline customer communication workflows.
Why Developers Love Direct Mail APIs
1. Easy Integration with Tech Stacks
Developers appreciate APIs that integrate seamlessly with modern SaaS tools like Salesforce, HubSpot, Shopify, and Zapier. Most direct mail APIs offer RESTful architecture with SDKs for languages like Python, PHP, Java, and Node.js.
2. Scalability for High-Volume Campaigns
With direct mail APIs, developers can automate batch sending of thousands of personalized letters or postcards in a single call. This scalability is invaluable for large enterprises managing multi-region campaigns.
3. Workflow Automation
Developers use direct mail APIs to set event-based triggers—such as cart abandonment, renewal reminders, or subscription milestones—to dispatch personalized physical mail without human intervention.
4. Error Handling and Webhooks
Modern APIs support advanced features like webhooks for delivery status, error handling, tracking, and debugging. This allows developers to create resilient workflows with full visibility into the mail lifecycle.
Why Marketers Love Direct Mail APIs
1. Campaign Personalization at Scale
Marketers can personalize content, images, and offers based on CRM data—similar to email marketing but through a tangible medium. APIs allow for variable data printing, making each piece of mail unique.
2. Multichannel Marketing Integration
Direct mail can now be part of a unified omnichannel strategy. APIs make it easy to trigger a postcard after a user opens an email, clicks an ad, or visits a store.
3. Enhanced Tracking and ROI Attribution
APIs allow marketers to track direct mail effectiveness via UTM links, QR codes, PURLs (Personalized URLs), and call tracking. When paired with analytics tools, it provides measurable ROI data.
4. A/B Testing and Optimization
Thanks to APIs, A/B testing of creative elements and offers in direct mail is now possible, just like in digital campaigns. Marketers can analyze engagement metrics and iterate campaigns based on real-world responses.
Use Cases of Direct Mail APIs
E-Commerce: Sending automated thank-you cards, reactivation offers, and abandoned cart reminders.
Financial Services: Dispatching compliance letters, account statements, and loan approval notices.
Healthcare: Mailing HIPAA-compliant appointment reminders, test results, and wellness tips.
SaaS: Re-engaging dormant users with custom postcards and win-back offers.
Education: Sending enrollment letters, alumni newsletters, and fundraising appeals.
Security and Compliance Benefits
Reputable Direct Mail APIs are GDPR, HIPAA, and SOC 2 compliant. For developers handling sensitive data, this ensures legal and ethical handling of personal information.
Top Direct Mail API Providers
Lob
PostGrid
Click2Mail
Postalytics
Sendoso
Each of these providers offers comprehensive documentation, sandbox environments, and real-time tracking capabilities, making them ideal for modern development and marketing teams.
Conclusion
Developers love Direct Mail APIs for their programmability, reliability, and scalability. Marketers love them for personalization, ROI attribution, and omnichannel strategy execution. Together, they create a synergy that elevates traditional direct mail into a dynamic, data-driven marketing tool.
Whether you're building high-volume campaigns or refining customer journeys, direct mail APIs offer a competitive edge in an increasingly crowded digital world.
youtube
SITES WE SUPPORT
Automated Mailing APIs – Wix
1 note
·
View note
Text
0 notes
Text
Integrating Direct Mail API with Your CRM: A Step-by-Step Guide

In an era of omnichannel marketing, integrating direct mail with your CRM system allows your business to deliver personalized, tangible messages at scale. By connecting a Direct Mail API to your CRM, you can automate print campaigns just like emails—triggered, tracked, and customized. This step-by-step guide will walk you through the integration process, benefits, and best practices for using a Direct Mail API with CRMs like Salesforce, HubSpot, Zoho, and more.
Why Integrate Direct Mail with Your CRM?
Automation at Scale: Trigger direct mail campaigns based on customer behavior or data changes.
Improved Personalization: Use CRM data (name, address, preferences) to generate tailored mailers.
Increased Engagement: Physical mail cuts through digital clutter and boosts response rates.
Enhanced Campaign Tracking: APIs allow real-time tracking and analytics.
Sales Alignment: Automatically send follow-up letters or postcards based on pipeline stages.
Step-by-Step Integration Guide
Step 1: Choose the Right Direct Mail API
Before integration, evaluate key features:
API documentation quality
CRM compatibility
Webhook support
Print and mail services (postcards, letters, checks, etc.)
Real-time tracking
GDPR/CCPA compliance
Popular APIs:
Lob
PostGrid
Click2Mail
Postalytics
Sendoso (via Zapier)
Step 2: Map CRM Data Fields
Identify which CRM fields will be used for your direct mail campaigns:
Contact name and address
Segmentation tags
Trigger events (e.g., new signup, abandoned cart)
Custom attributes (e.g., subscription plan, purchase value)
Step 3: Connect CRM to the API
Use native integrations, middleware (like Zapier/Make), or custom scripts.
Examples:
Salesforce + Lob API: Use Apex code or a Zapier connection.
HubSpot + PostGrid: Integrate via webhook triggers.
Zoho CRM + Postalytics: Use Zoho Flow for automation.
Step 4: Design Your Direct Mail Template
Use HTML templates or drag-and-drop editors from the API provider. Leverage:
Merge tags (e.g., {{first_name}})
QR codes or personalized URLs (PURLs)
Brand-compliant visuals
Step 5: Test Your Workflow
Test with internal contact data
Review print previews
Check webhook responses
Track delivery and event logs via API dashboard
Step 6: Launch and Monitor Campaigns
Once tested:
Schedule or trigger live campaigns
Monitor open, delivery, and response metrics
Adjust templates based on performance
Best Practices for CRM + Direct Mail API Integration
Ensure Address Validation: Use an address verification API before sending.
Segmentation is Key: Create micro-targeted segments.
Compliance First: Use secure, compliant systems to handle personal data.
A/B Testing: Experiment with designs, messages, and offers.
Post-campaign Analysis: Sync back response data to your CRM.
Use Cases by CRM Type
Salesforce: Trigger renewal letters for subscription products.
HubSpot: Follow up with direct mail postcards after email bounces.
Zoho: Send loyalty mailers to high-LTV customers.
Pipedrive: Auto-send printed thank-you notes after deals close.
Conclusion
Integrating your CRM with a Direct Mail API enables a new level of offline automation that’s timely, relevant, and measurable. With the right setup, businesses can bridge the digital-physical gap and create memorable customer experiences at scale.
youtube
SITES WE SUPPORT
API To Automate Mails – Wix
0 notes