
Statistics
We looked inside some of the posts by adelars-safekeep and here's what we found interesting.
Average Info
Notes Per Post
9K
Likes Per Post
7K
Reblog Per Post
2K
Reply Per Post
85
Time Between Posts
28 days
Number of Posts By Type
Text
10
Note
3
Photo
4
Last Seen Tumblr Blogs


Fun Fact
Tumblr Inc. is using 66 technologies for its website.
Text
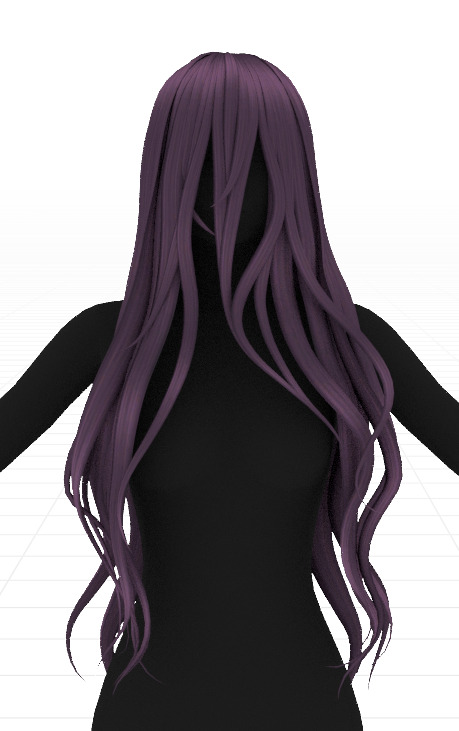
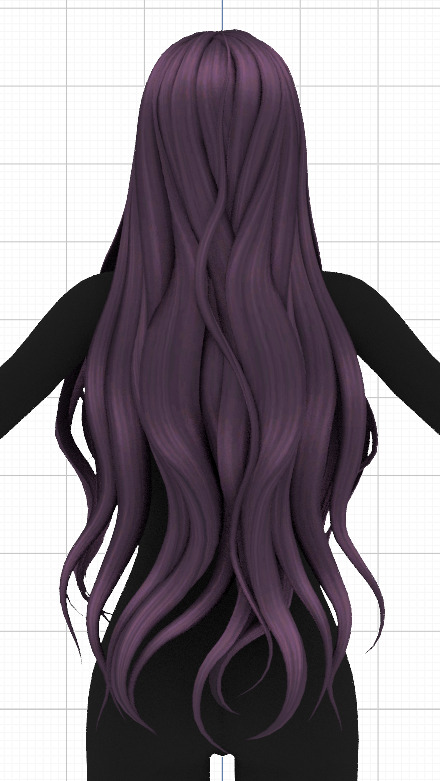
It has been so long since I posted any wip! This is the hair i was working on for Halloween (along with other stuff). It was supposed to be a test for a blender add-on I got, but it turned out to look so good I really want to give it to you guys. I regret not updating blender earlier or looking for add-ons, this one really does make it much easier to create hairs! It's not free, unfortunately 😖 but it was worth it for me, it will make the hair making process much easier (and fun!) than what it was! To me, the best part is that I finished meshing the curves and solidified them as meshes and when i went to check the poly count it was 10k. FOR THE ENTIRE HAIR. COME ON.
I'm making this post because i believe real artists don't gatekeep! Here is the link of the video and download, in case you're interested. Posting the video link because of the promotional code ^^
*** IMPORTANT ***
This add-on is magical and i can prove it since I'm staring at sims4studio now with THAT hair (in the post above) imported with the hat chops and it's at 10k vertices and 14k polys and i didn't make a singular effort to reduce it yet. And if you work with hairs you know how this sounds like sorcery.
ANYWAY I have stuff to say. This add-on creates a thing in your mesh called COLOR ATTRIBUTES. I don't know exactly what they're for (because my blender knowledge is restricted to making cool crystals and custom content for the sims 4) but SIMS4STUDIO CANNOT READ THEM. FOR LIFE. They will cause various errors that will make you spiral forever because they're extremely UNCLEAR. I found them by accident so, if you bought the add-on and is now making beautiful hairstyles and struggling to make them to sims4studio, here is the culprit:

Located in: DATA. Delete every other color attribute besides "color0" and your hair will import to s4s normally!
771 notes
·
View notes
Note
hello and happy new year! ceci, do you happen to have or could you please make a tutorial on creating teeth if it's not a big hassle? i wanted to make a very particulat teeth shape for my sim, but apparently i do something wrong because the result morphs the whole face in a weird way
gurl the "happy new year" is beating my ass rn, not this exposing the state of my inbox...... 😭😭😭
but ok more seriously, I'll get on with the tutorial 😳
Step 1
first, we're going to use s4studio to create our package. we're going to clone the EA teeth to use as our base.

open s4studio and select "create 3D mesh" under "CAS"
click the blue "CAS" button
Step 2

select "Face" from the Part Type dropdown menu. this will make only the teeth files show up.
we're interested in both "yuTeeth" and "yuTeeth_Snaggle", but select yuTeeth first! (you can hover over each picture to see the names too)
click next, and save your package file as whatever you want.
Step 3

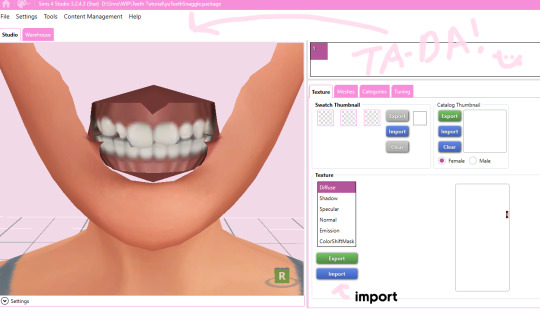
zoom in close to the model with mouse wheel until you can see the teeth, to make sure everything is correct, then go to the "meshes" tab on the right side
export your mesh and save it where you can find it.
note: if you've never used s4s or blender before, make sure your blender location is set up correctly in the s4s settings. otherwise, the sims4studio tools won't show up in blender & we won't be able to edit our cut numbers later.
Step 4
now that we have our mesh, we need to edit it in blender. I'm currently using version 4.2. the controls are different in different versions, so feel free to ask me about it if you're using another version and something isn't working right.

open your mesh in blender. press the N key to get rid of the side panel and Numpad 5 to make the view better/less disorienting. you can zoom in and out with the mouse wheel, and move around by holding the mouse wheel and moving the mouse.
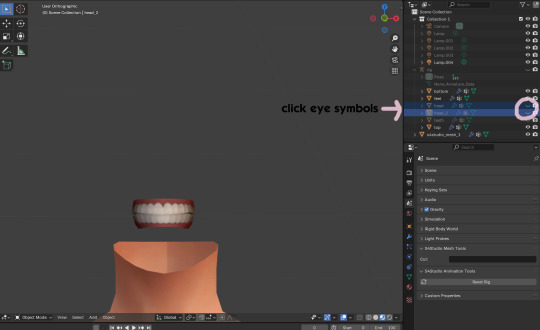
look to the right panel where "rig" is listed. click the arrow to expand the list so you can see all parts of the rig.
click the eye symbols next to "head" and "head_2" to make them invisible so you can easily see the teeth!
Step 5
there are many ways of editing teeth, of course, but what i'm going to show you is basically how to frankenmesh them. this is a good way of creating subtle variety in MM style, without it being overly difficult! we're going to combine the regular and snaggle teeth as an example.
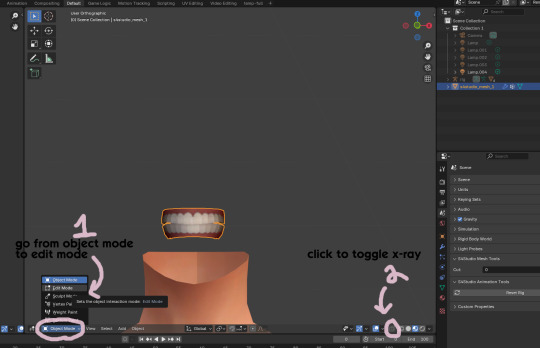
go from object mode to edit mode by clicking the menu at the bottom and selecting "edit mode"
afterwards, click the symbol on the bottom right to toggle "x-ray" so you can see all your vertices when editing.
Step 6

left click in the gray space to deselect all. there will be no orange left anywhere on the mesh.
then, hover over the top teeth and press the "L" key over a vertice (the small black dots) to start selecting the top half only. you should only have to select a couple vertices until everything on the top half is highlighted orange. you can change your view by holding down the mouse wheel and moving the mouse.
Step 7

now, press "X" key to bring up the delete menu.
click "vertices" to delete the parts of the mesh we've highlighted. only the bottom half of the teeth will be left behind. if there's any floating parts left over, highlight those with L and delete them the same way.
Now, repeat Steps 1-3 with "yuTeeth_Snaggle". when you have that mesh exported and saved where you can find it, continue to the next step.
Step 8

go back into object mode. you must be in object mode to append meshes.
go to file -> append to bring up another window

double click your snaggle mesh you just exported
double click "object"
double click "s4studio_mesh_1"
click "append" (if the window didn't close already) and the snaggle mesh will be added to your current mesh!
Step 9
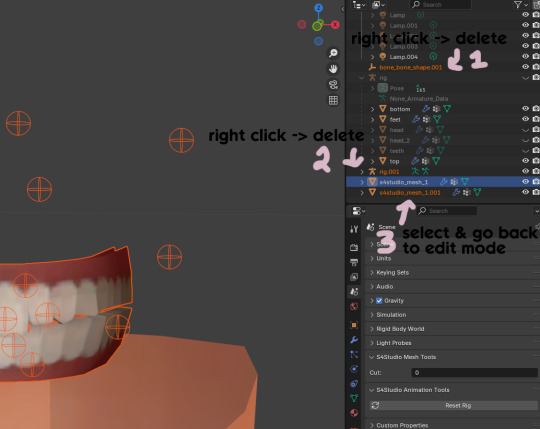
you will see several new mesh parts in the list on the right. right click over "bone_bone_shape.001" and click delete to remove it, since it's just a duplicate.
do the same thing with "rig.001" to delete it as well
select the mesh part you just appended- which is "s4studio_mesh_1.001" to select it and go back to object mode (you can also rename it now by double clicking it if you want)
Step 10

repeat what we did in Steps 6-7 to remove the bottom teeth of the snaggle mesh. you may need to be more careful since these teeth are less straight & overlap more. take your time, and if you make a mistake, you can press CTRL+ Z to undo. you can also click the eye icon next to our first mesh part to hide it so you can see better.
when you're done deleting, unhide the first mesh part to see how it looks together. you now have the top teeth from yuTeethSnaggle and the bottom teeth from yuTeeth on the same mesh! you can mix and match many teeth parts this way.

I decided to rename my mesh parts to top & bottom to keep them organized. you can click the eye symbols to hide either one and see how each part looks. when you're ready, select the top teeth mesh part and return to edit mode.
Step 11
some of EA's meshes have very few polys, so they can be hard to edit, especially if you want to move individual teeth. but, teeth are so small that they don't need/shouldn't have too high of a poly count. having every single tooth be super detailed is overkill, so it's a good idea to only increase polys in the specific areas you want to edit. for this example, i'm going to mainly focus on the front teeth.

select the front teeth by right clicking + dragging over the area you want to select, and it will highlight orange.
go to "edge -> subdivide" to increase the polys in the selected area only, which will give you more to work with. DO NOT SUBDIVIDE TOO MUCH! once should be plenty for this.
Step 12
now for the fun part- actually editing the teeth to be unique! you don't have to do this if you only want to mix & match EA parts, but it's neat to toy around with, even if you just do tiny edits. there's a variety of ways to do this, and I like to do a mixture, but for this example I'm going to use proportional editing.
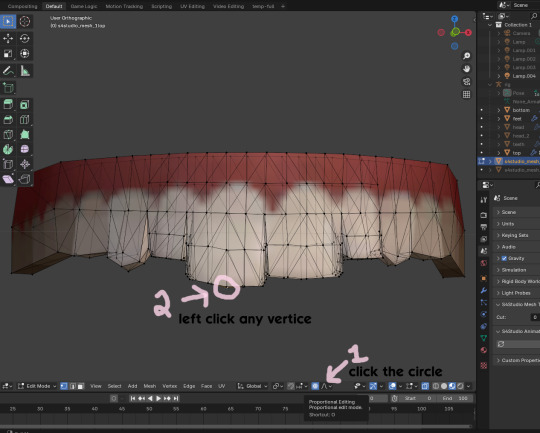
click the circle button to turn on proportional editing
left click any vertice you'd like to edit
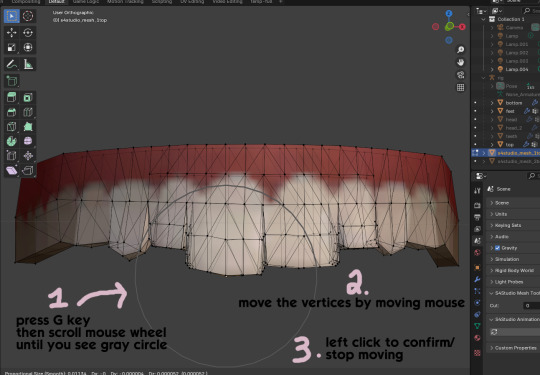
press the G key (move tool) and scroll the mouse wheel forward until the gray circle appears on your screen. this circle represents the influence of editing- the bigger the circle, the wider range of vertices will be moved around that point. the smaller the circle, the smaller/more detailed the change.
move the vertices around by moving your mouse. you'll see right away how it moves. play around with it by using a combination of scrolling the wheel back and forth and moving the mouse.
left click to confirm/stop moving the vertices. you can undo using CTRL + Z if you need to. keep repeating this step by selecting vertices, pressing G, and moving them around how you want. you can also use proportional editing with the S key (scale tool) to make areas bigger or smaller. in blender 4.2, you can also click the tools on the top left side of the window if you want to mostly use your mouse, but I usually use the keyboard.
when you're done editing your mesh and you're ready to test it out, save your file before moving to the next step. keep a copy to the side so you have something to come back to later if you want to change anything!
Step 13
now we're going to prepare our mesh to be game-ready. some of the most important aspects of that is ensuring a) the mesh part is correctly named and b) the "cut" number is correct. if these things are off, the game won't know how to read it, and we'll get odd bugs like missing heads or our mesh just not showing up at all. we currently have two mesh parts and teeth only need one, so we'll fix that first.
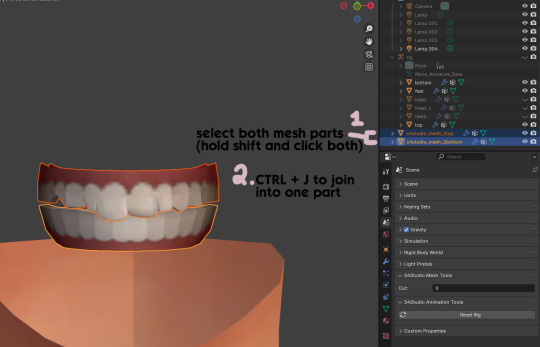
first, go to object mode and select both mesh parts by holding shift and clicking each one.
press CTRL + J to join them together into one part.
Step 14
another thing we need to do is remove doubles so our mesh doesn't look weird or have any odd shadows in-game. in blender 4, it's "merge by distance", but in earlier versions it's just "remove doubles". you should do this when you're done editing, because it'll be difficult to edit after this step. I always do it after I merge all my mesh parts & am about to import for testing. I also double check the cut numbers after this to be sure they're right.
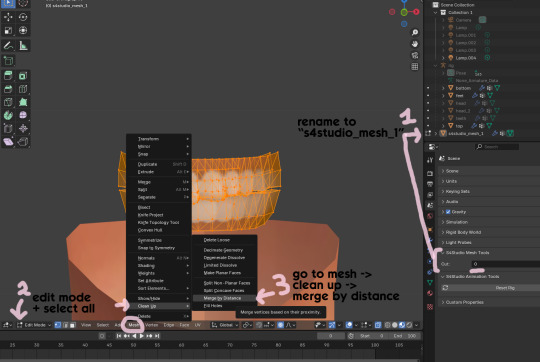
rename your combined mesh part to "s4studio_mesh_1" and ensure the cut number is 0.
go to edit mode and select all by pressing the A key
go to mesh -> clean up -> merge by distance
unhide the "head" and "head_2" parts of the rig you hid in Step 4
save your mesh as a new file name so you don't overwrite your working mesh, in case you want to go back and change something
Step 15
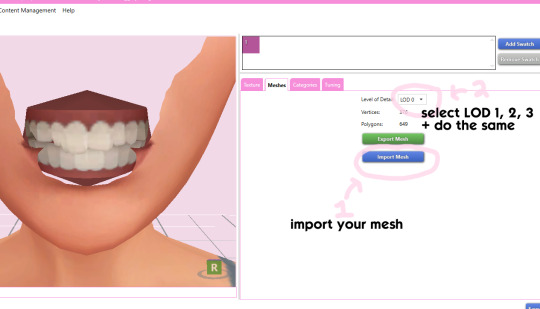
go back into your package in s4studio and import your new mesh
if you like how it looks & are done editing, select LODs 1, 2, and 3 in the dropdown menu and import your mesh there too. these are normally different meshes, but since EA based teeth are so insanely low poly, there isn't much point making individual LODs for them. but it's not that difficult to make them if you want to- if anyone wants a quick tutorial for that, let me know!
Step 16
you can stop here if you want- the teeth will take on the texture of your defaults if you used the yuTeeth package as a base. however, since we've used the Snaggle teeth on top, I think an adjusted texture might look better. I always use the textures by @ice-creamforbreakfast for my teeth, so head over there and grab their defaults if you haven't already! then grab the "uneven teeth" package file and open it in s4s.
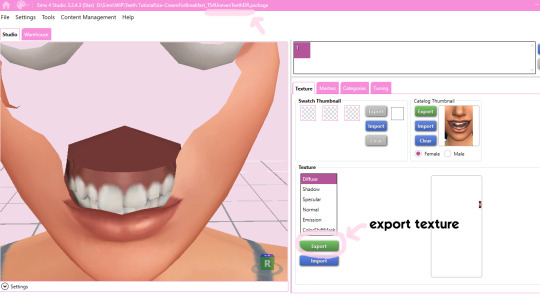
export the texture from the uneven teeth package file as dds
go back to your package file and import it! (and don't forget to credit ice-cream if you post your teeth publicly ;3)
Step 17
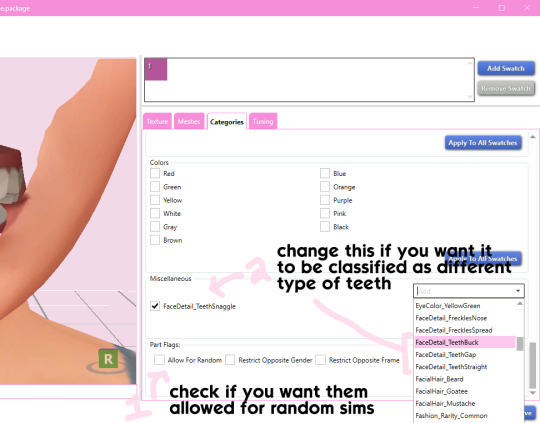
lastly, go to categories tab and scroll to the bottom. if you want your teeth to be enabled for random sims, check the box
if you want the teeth to be considered a certain type (like buck teeth), change the miscellaneous to that type. if it doesn't matter or you're not sure, just keep it as TeethStraight.
Finally, save your package and you're done! :)
66 notes
·
View notes
Photo
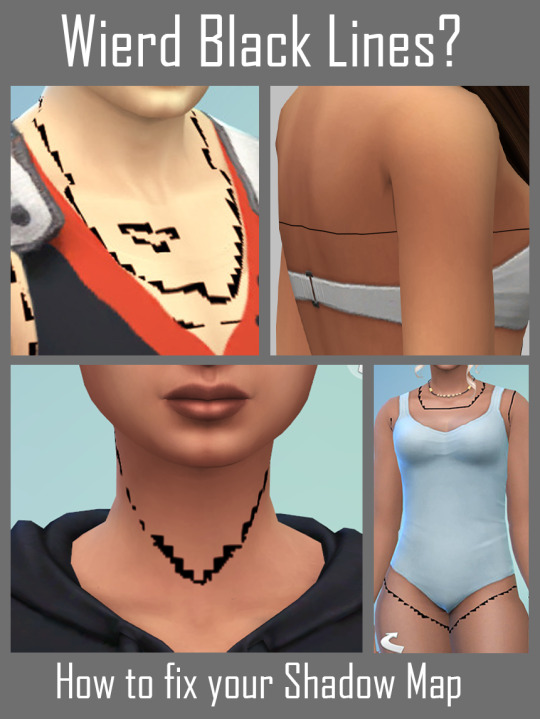
Shadow Map Tutorial
In this brief tutorial, I will explain how to make a shadow map that prevents these black lines/pixels and subsequently will fix the issue @grimcookies discussed about the crunchiness that happens with an incorrectly made shadow map. This is happening because the shadow map is probably a PNG – it must be in DDS file format with a proper alpha layer.
Shadow Map Tutorial
This is really basic but I hope it is helpful to someone! 😉😀
570 notes
·
View notes
Note
I've been trying to find the basegame water textures to make them recolourable for ages as part of a Willow Creek override project... Whatever textures make the majority of BG water the colour it is, I haven't found them yet. As resident game file spelunker, do you have any idea where I might find them?
It would be so much easier to explain quantum physics to a toddler than to properly explain how I dug that up, but I'm relatively sure that instance image C3F4FE6A681E27FC is the main water texture from Willow Creek.
What I can also tell you is that instance image FE5402FC42703FB4 is the overlay the game uses for fallen leaves on water during the colder seasons.
How to find them (without selling your soul) » open the .world file of the water you want to grab » search "world water manifest" for its instance number » search that instance number in game file cruiser » get the model data for this water and grab its diffuse texture's instance number in the data/text panel » put that number into game file cruiser to get your water texture !--keep in mind water is compiled through overlays. You might need to swap out more than one texture--!
I'll leave this up in case anyone else needs to know
21 notes
·
View notes
Note
hello karina! i was wondering which method you use to cut out your sims in photoshop, if you don't mind me asking? your edits are so gorgeous and your cutouts are always so smooth! have a nice day :)
hello! :)
I use the magic wand tool to select the background, and then i use the refine edge tool to make the selection a little better. Sometimes i erase things manually with my old little mouse when these aren't good enough though, but they usually are.
Also (thanks to @flukysims!) i learned about this wonderful mod that lets you change the background color while in cas, and sometimes i use it in a bright color (almost brat green for example) to make things easier to select, just make sure that it's a color that isn't on your sims.
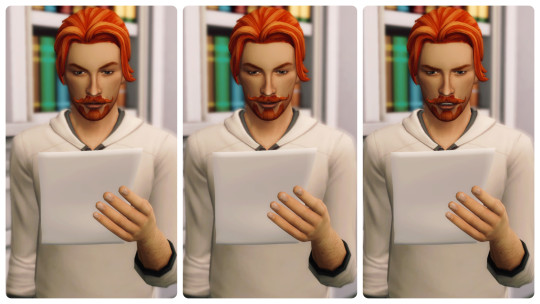
Here's an example of a selection i did using only the magic wand with 40% tolerance in a green background (1). As you can see, it does a a pretty good selection, and you don't even need to refine the edges (2).


and here's one with a white background (1), i used the magic hand tool again with 40% tolerance, but the selection was a little bit jagged (2), so i used the refine edge tool and the eraser to smooth it a bit (3).


These were the refine edge tool settings i used. You'll have to experiment with it, mostly the last three sliders. Make sure to open your image in 100% zoom so you can see what each of them does. because it depends on the size of the image you're using (the size of this last screenshot was 1240x900 px). I like to take screenshots with SRWE because it's easier to make a clean selection when there's more details. It isn't a necessary thing though! i just like to obsess over tiny pixels for no reason lol
I also recommend checking @nolan-sims editing section of her resources page here. I love how she edits her photos, and i'm grateful to have stumbled at that page when i did, i learned a lot from there!
Hope this helps, feel free to ask if something isn't clear. Have a nice day you too!
54 notes
·
View notes
Text
Small guide on CAS Poses
Last updated: 25. July 23
This will be a tutorial on how you can organize your CAS poses. I will give you an overview of which traits have which animations and I will show you how you can change the trait the CAS pose replaces.
━━━━━━ ・❪ ☾ ❫ ・ ━━━━━━
Q: What are CAS poses? A: CAS poses are used to take pretty screenshots in CAS. They replace the normal animations that play when you select any trait. This works for all ages of Sims and also pets, but it does not work for occult forms, as you cannot change traits while in occult form.
Pose by @catsblob

Which CAS traits use which animations
First I will be listing all CAS traits with the name of their animation from Sims4 Studio. Some traits share the same animation, therefore you can't have animations for all of them.
You can find the Google spreadsheet here: https://docs.google.com/spreadsheets/d/1eYwZzo_tBA-vhxFXz4ANd0n075Ls_cEbfiQlaM0QNtU/edit?usp=sharing
━━━━━━ ・❪ ☾ ❫ ・ ━━━━━━
How to organize your CAS poses
I wrote down the name of the CAS traits in front to make sure i don't use the same ones multiple times and kept the original name of the CC.
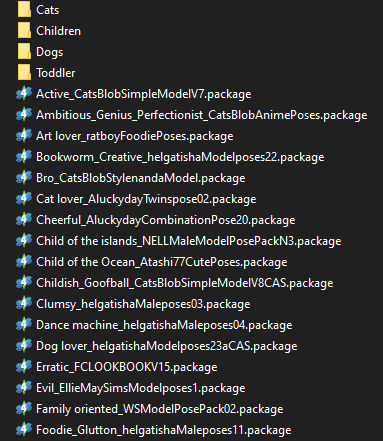
It's also nice to write down which traits you still can use for CAS poses (I crossed the traits out as I don't own the packs yet):
━━━━━━ ・❪ ☾ ❫ ・ ━━━━━━
How to change which CAS trait poses use
Most pose creators offer 1 or 2 CAS traits for their CAS poses, but if you already have poses installed for those, you can easily change that to any other CAS trait.
Requirements:
S4 Studio
The CAS pose you want
The trait you want to use
1. Download and install S4 Studio 2. Download the poses you want
3. Open up your downloaded pose and go into the warehouse tab.
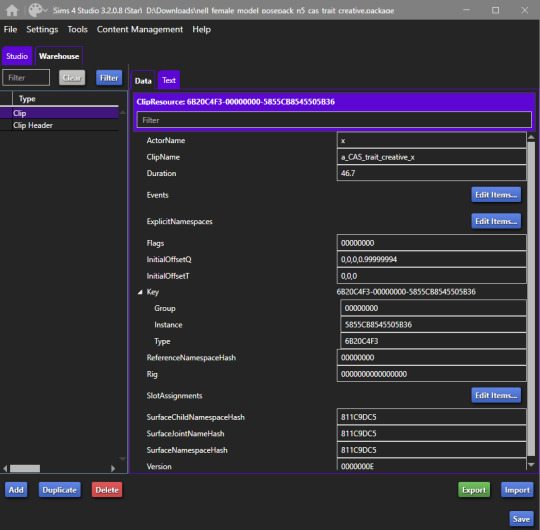
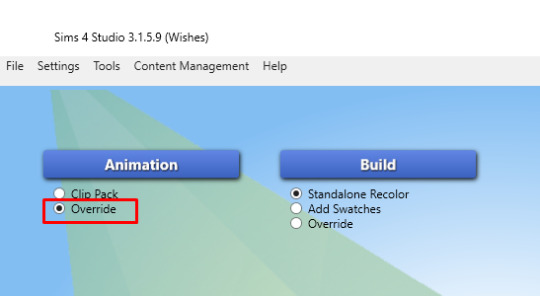
4. Open a second S4 Studio, select “Override” under “Animation” in the main menu.
5. Select the animation name according to the spreadsheet of which trait you want to replace. I will just use the trait "Proper" for adults, so I select "a_CAS_trait_proper_x"
6. Save the file as whatever, you only need it for values and not the file itself. This is your Source. Then also go into the warehouse tab.
7. Now you need to copy over the values in "ClipName" and "Key-Instance" from the source file to the animation you want to change the traits in. They text after "Key" will change automatically later.
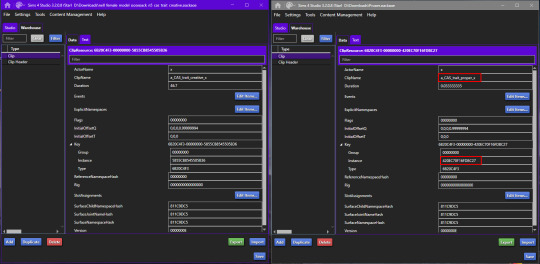
8. Now do that for both Types "Clip" and "Clip Header".
9. The Warehouse should now look exactly the same for both files.
10. Rename the animation files to however you organize your animations. I will add "Proper_" as a prefix for my package (see "How to organize your CAS poses" above).
11. Done!
━━━━━━ ・❪ ☾ ❫ ・ ━━━━━━
Bonus: My favorite CAS pose creators
@catsblob @helgatisha @nell-le @ratboysims @roselipaofficial @a-luckyday
━━━━━━ ・❪ ☾ ❫ ・ ━━━━━━
@maxismatchccworld @sssvitlanz @emilyccfinds
380 notes
·
View notes
Text
How To: Auto Height for Shoes
Haiii! As promised, here is the tutorial to make it so your custom shoes no longer require a shoe slider!
Thank you to the bestie who took the time to pick through Madlen's package file to figure out how it worked. And of course, thank you to Madlen who did the majority of the work figuring out how to make this possible in the first place!
♥ Tut below cut ♥
~~~
Set Up Your Blend File:
We're going to add a plane that will act as the mesh for the SlotRay which will allow for you to adjust the height of your shoes!
Open your blend file that contains the shoes your wish to adjust. In the 3D View, press Shift + S and in the menu, select “Cursor to Center” In the 3D View, press Shift + A and in the menu, hover over “Mesh” then add a plane.
Now size this plane down as small as you can get it. You don’t want this plane visible in game.
Double check to make sure the plane has not moved from the center!! Your sim won't be centered in game if it has! If you see that it's moved:
Press "Shift + S" and click "Cursor to Center".
Then Select your plane and press "Ctrl + Shift + Alt + C", click "Origin to 3D Cursor".
Press "Ctrl + Shift + Alt + C" again and click "Geometry to Origin".
Navigate to the “Object data” tab and under “UV Maps” add a new one then name it “uv_0”.
Next, navigate to the “Scene” tab and under “S4Studio CAS Tools” set the cut number.
Depending on how many cuts your shoes have, you’ll want to adjust this number. For example, if your shoe has 3 cuts (0000, 0001, 0002) then this plane would have a cut number of 0003. Since my boots only have one cut, I will put the number as 0001. Now select your shoes and enter Edit mode. Select a face/vertice/edge on the very bottom of your shoes. Look to the panel on the left side of the screen (if it’s not open, press “N”). Under “Transform”, note down the number next to “Z” After that, save your blend file under another name so you can distinguish which is which. I’ll name mine “Boots_3_Height Cut”
youtube
~~~
Add a New Cut to your Package File:
We're going to add an additional cut in your package file for the new plane!
Open Sims 4 Studio, make a new package file for your shoes and import them. Go to the Warehouse tab and select your LOD 0, it will be the geometry with the largest file size. Sometimes you have to close then reopen the package to see the geometry. Duplicate this geometry and in the box that pops up, change the last character of the “Group”. It can be any number or letter as long as it’s not the same as the duplicated geometry. On the duplicated geometry, note down the Group, Instance & Type values. Find the “Region Map” and next to “Entries” click “Edit Items”. Add a new entry and in the “Layer” box, type the number you used for your cut. Since I used the cut number 0001, I will type 1. Keep the “Region Type” as “Base” and move to “Models” then click “Edit Items”. Add a new Model entry and paste the Group, Instance & Type values you noted down before. Save and close each box. Find your “CAS Part”, this is your swatch.
If you have additional swatches, it is a good idea to remove them and add them back once you are finished with this process.
Scroll down until you find the “Lods”.
Click “Level: 0” and next to "LOD Models", click “Edit Items”. Add a new entry and paste the Group, Instance & Type values again. Save & close each window and return to the Warehouse.
youtube
~~~
Adjusting SlotRays:
We are now going to edit the SlotRays for the new cut which will adjust the height of the sim for your shoes!
Return to the new duplicated Geometry and in the “Data” tab, find the “SlotRay Intersections” and click “Edit Items”. Add a new entry and find the “OffsetFromIntersectionsOs” box.
You'll want to change ONLY the middle coordinate number. That will be the height of the sim.
You want to take the “Z” coordinate that you noted down from blender and replace middle coordinate number. If the number you wrote down is negative (i.e -0.01234) make it positive (i.e 0.01234).
In the “SlotHash” box, change the value from “00000000” to “FEAE6981”. This is the hash for the b__ROOT__ bone in the Sim's Rig.
Save and close the dialogs then return to the warehouse. Next, reimport your mesh and save your package file. You can now test your shoes in game!
youtube
Please keep in mind:
You have to do this for every LOD of your mesh
You can freely replace the mesh of your shoes and adjust the height since the cut with the plane has the SlotRay data
Animations may be off since EA hasn't made the game to support taller sims
CAS windows may move slightly if your sim is using poses/animations where they are leaning to the side. This won't affect gameplay
I recommend using Helgatisha's Stand Still in CAS mod to make sure your sim is absolutely centered
Hope this helped :)
2K notes
·
View notes
Text
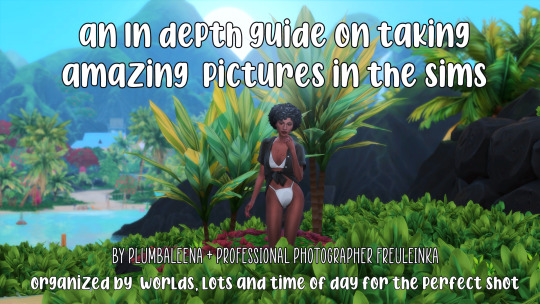
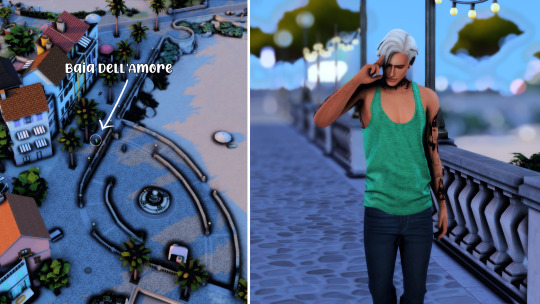
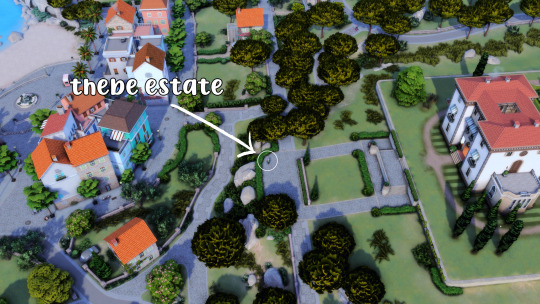
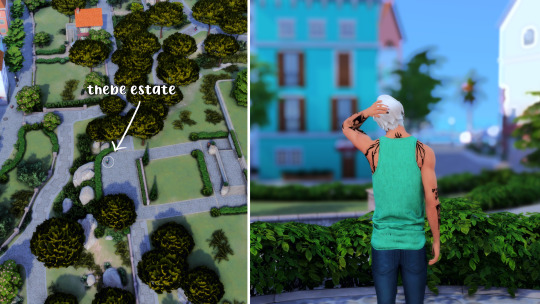
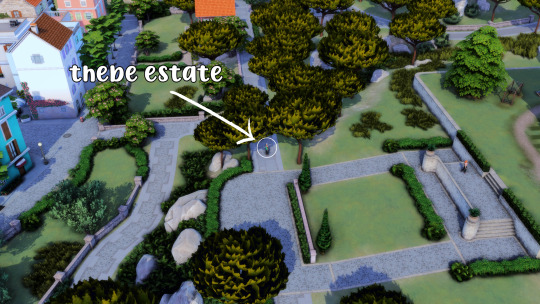
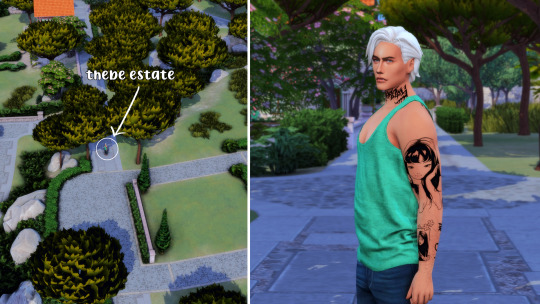
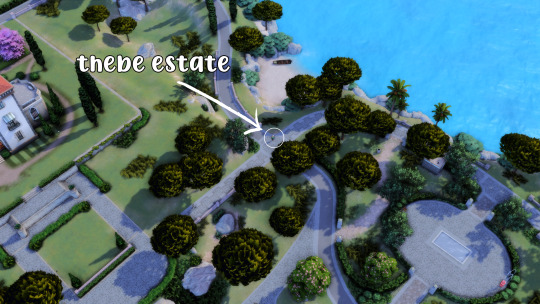
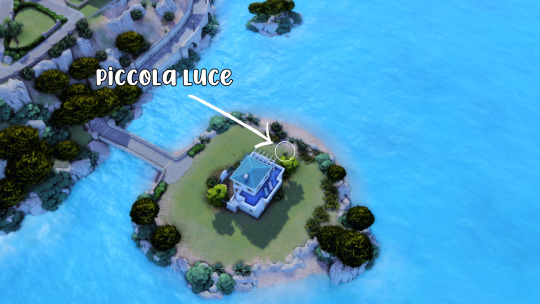
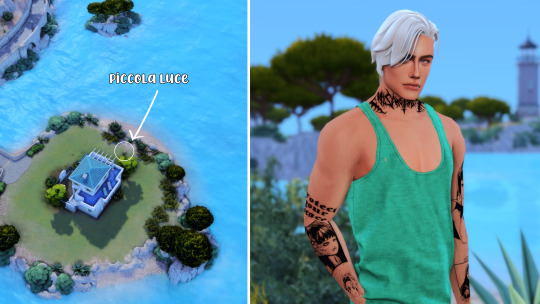
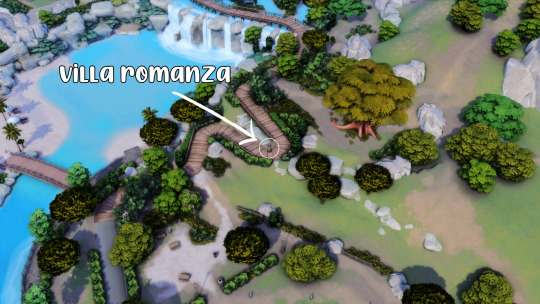
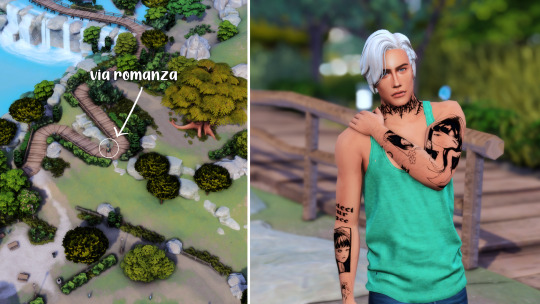
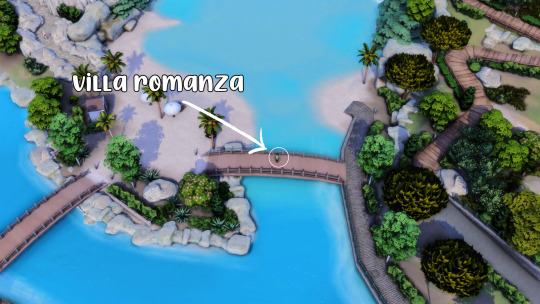
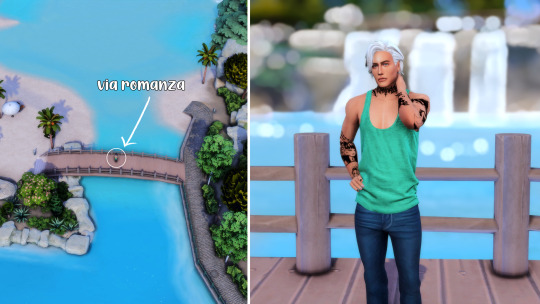
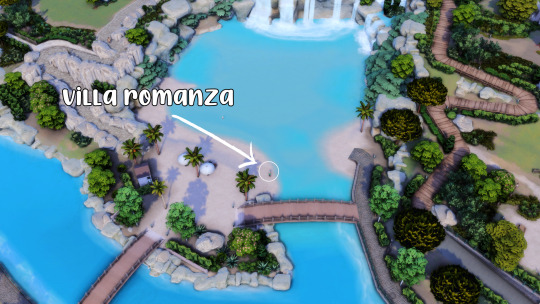
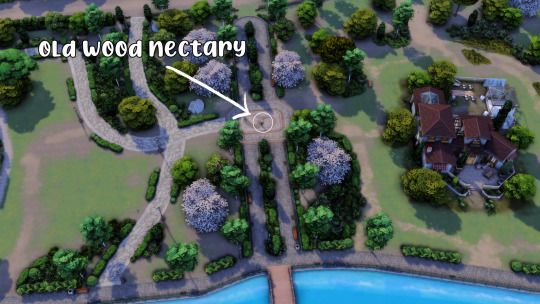
An in depth guide on taking amazing pictures in the sims
Ever see other simmers and wonder "where the heck did they take that perfect shot"? Well, we've got you covered. I've teamed up with my dear friend K, who's a professional photographer and we have scouted the island of Sulani and gorgeous vineyards of Tartosa to bring you the PERFECT spots to get the exact picturesque location to "wow" anyone. Whether you're taking maternity, engagement, or even profile images, with our guide you'll always find the best spots.
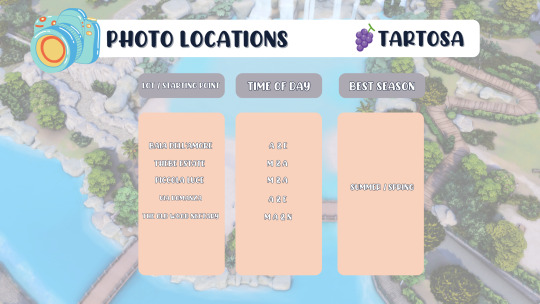
We continue our journey with the gorgeous world of Tartosa.
Click HERE for Sulani
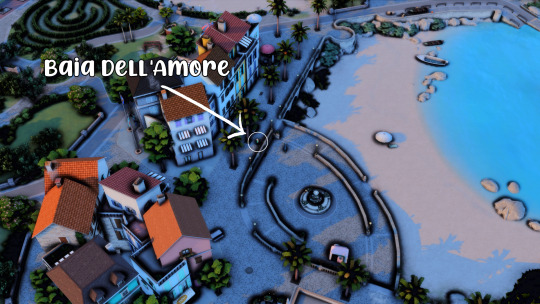
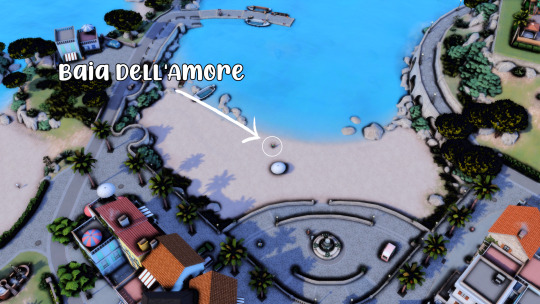
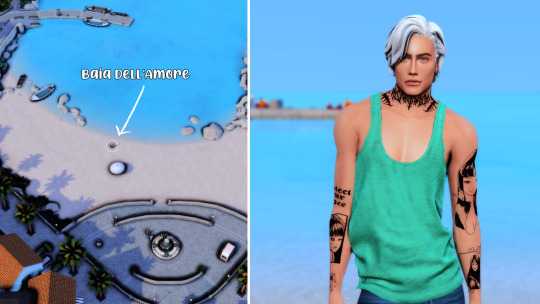
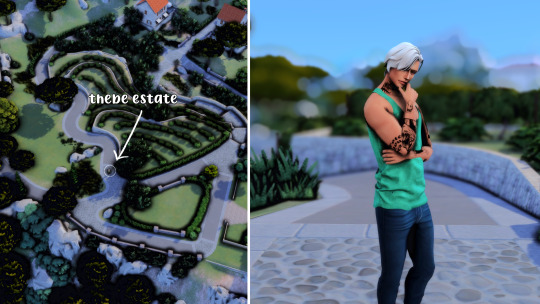
How does this work? Simply look at the world key we have provided and it'll tell you which lot/location to start at, then use the images below to determine exactly where to place your sim for the perfect shot.
Mods/guides we HIGHLY recommend when posing your sims /
preset / how to pose your sims with ww / pose player mod / teleport any sim / ui cheats / mccc
World map names /

Tartosa Key /


CLICK HERE TO SEE SULANI'S BEST PHOTO LOCATIONS
36 notes
·
View notes
Text
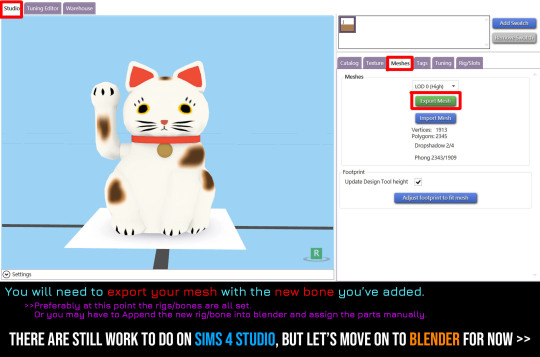
🐹Does not include tutorial on creating sims 4 animation on blender (links will be attached at the end of post) 🐹This tutorial is for creating objects that animates on idle, i.e. does not require interaction. 🐹If you're interested in creating a spinning object (e.g. fan), there's an easier method HERE ( •̀ ω •́ )✧
⬇️⬇️Long post (15pics)⬇️⬇️


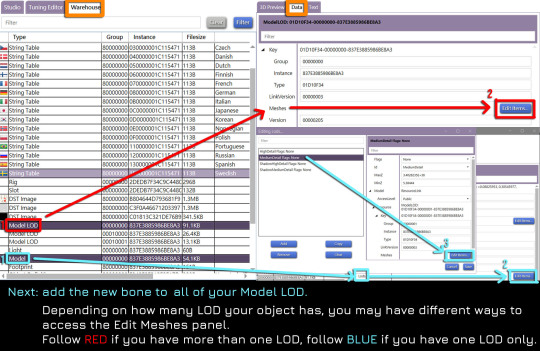


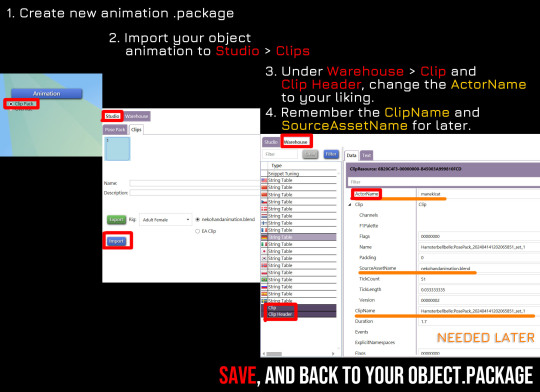


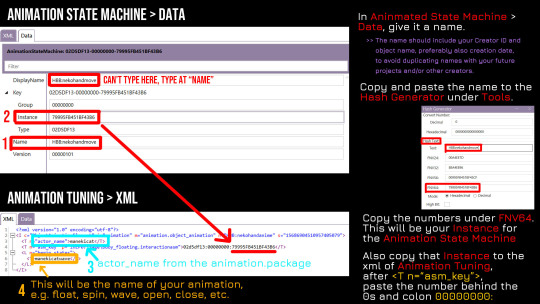
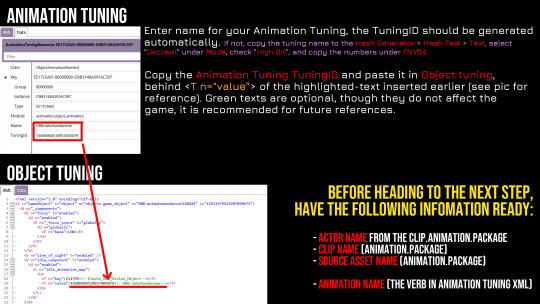

🐹Make sure whatever changes you made to one LOD, remember to change the other LODS too.👍
[DOWNLOAD - ASM/Animation tuning]
Other useful links:
The Sims 4 Tutorial - How to Create Custom Poses
One way of making animated objects tutorial
How to animate objects Video tutorial
Creating animated objects on interaction
The animated objects shown in this tutorial:
Holographic Holiday Tree
Animated Maneki-Neko
86 notes
·
View notes
Photo

Tutorial: How to fix under arm glitches
Under arm glitches are often caused by incorrect weight paint. Read Weight transfer in Blender and Tutorial: How to do a SMOOTH weight transfer first to understand the process of weight transfer.
Your new mesh and the base mesh you’re transferring weights from are not identical. Weight value on some vertices that works on the base mesh don’t necessary work on your new mesh when the sim moves.
Keep reading
675 notes
·
View notes
Text
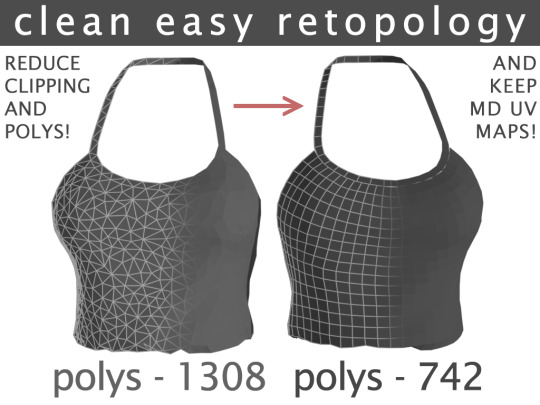
Retopologizing MD Meshes (old)
EDIT-
tutorial is deprecated, update to the newest MD version and use the remesh function, or just put your mesh straight into zbrush, do zremesh and then re-do the UV in blender.
Hey! Here’s a long tutorial on how to get great low-poly topology on meshes from Marvelous Designer WHILE keeping the original UV (the UV you get if you just use the mesh straight from MD).
For this workflow, you’ll need:
Marvelous Designer (paid)
ZBrush (paid)
Maya 2016 Extension 2 or newer (student version is free!)
Blender (free)
Before I get started with the steps, I want to make sure I give full credit to this tutorial here by Alex Mann, which is where I found the workflow. You can watch that if you prefer a video tutorial and if you’re also more proficient with Maya.
Also, this guide assumes you know how to use blender. Knowledge in Maya+ZBrush isn’t really needed, but you need to have them installed and maybe be able to use basic functions in the programs. In this tutorial, I’ve cut down on the steps in Maya, just because I find it easier to use Blender for things (personal preference).
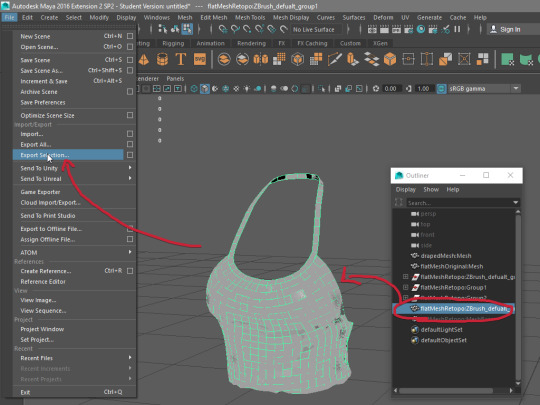
STEP ONE
First, export your normal Marvelous Designer mesh, and name it ‘drapedMesh’. When exporting, Unified UV coordinates should be checked, and scale ‘m’ should be used. Make sure you export as tris (the default setting), exporting as quads won’t give as good as results (I think).
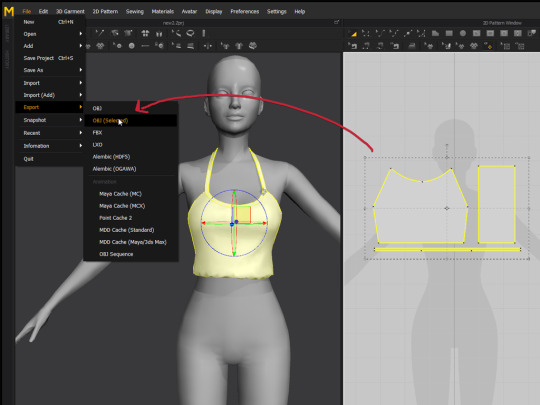
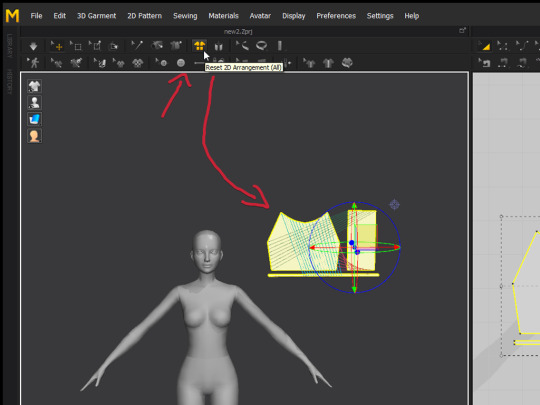
Then reset 2d arrangement of your clothing, so it’s flat. You can also move it to the right so it’s not in the way of the avatar but this may cause issues (or it may work). Then, export in the same way (export selected), and name it ‘flatMeshOriginal’.
STEP TWO
Next, open up Maya- I use Maya 2016. And after, import the draped and flat meshes you just exported from MD. The camera controls if you don’t know them, you have to hold alt and then use the buttons on your mouse.
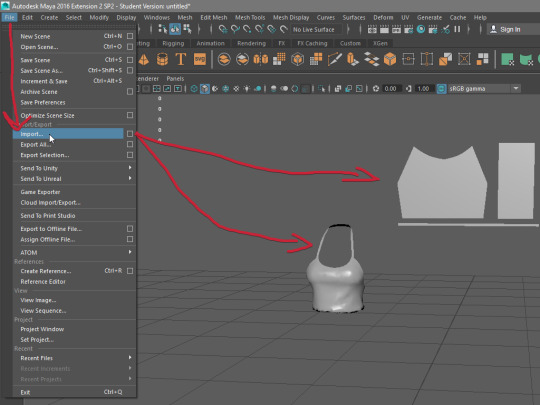
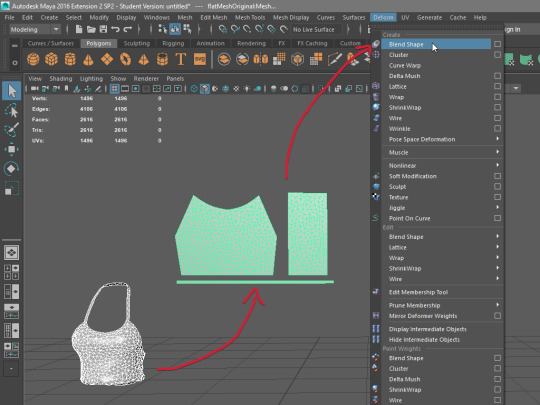
With the two imported, select the ‘draped’ mesh and then the flat mesh, go to ‘Deform’ at the top, and click ‘Blend Shape’. This will pop up in the attribute editor to the right.
STEP THREE
It’s time to retopologize! Open ZBrush, and import your flat mesh, and then drag your mouse in the 3d window to place the model into view (only drag it out once). Immediately after, click edit mode (or press T), and then click the ‘scale’ button to zoom in on the mesh.
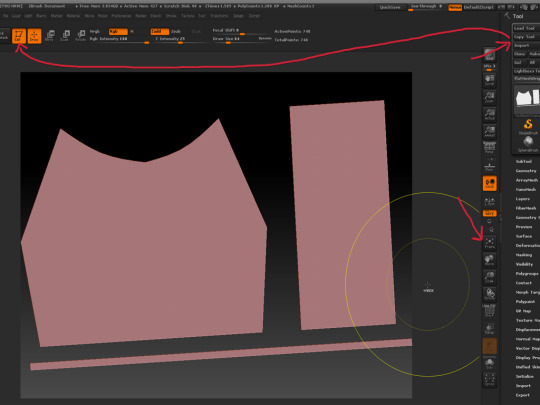
Turn polygon view on, then go to the geometry tab on the right, and click ‘ZRemesher’. Then, change the ‘Target Polygon Count’, the default is on 5, which is too high, so we need to change it.
This number is in THOUSANDS, so 1 = 1 thousand. It’s suggested to change it to 0.75, which works most of the time for tops, but sometimes you may need to set it higher (1, 1.25, 1.5 etc) for full body outfits or more detailed clothing.
This value affects how many polygons in thousands it will have, 0.75 is 750 polygons (which will be roughly the final polygon count for the top). Anyway, once you’ve picked a value, hit the ZRemesher button.
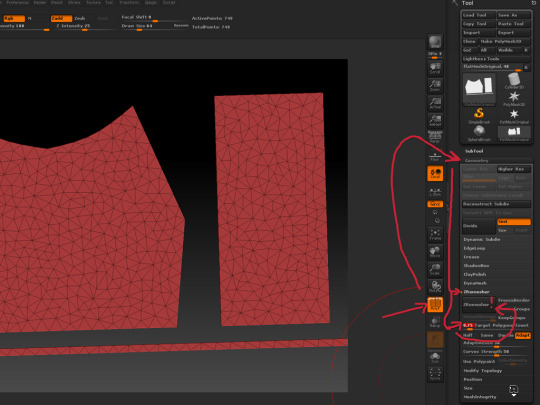
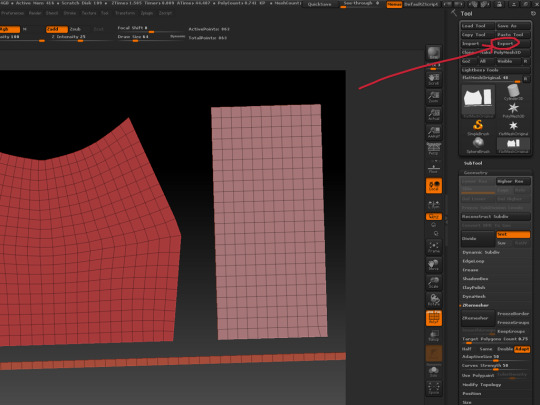
As you can see, ZRemesher produces a really nice topology on the meshes. Finally, you want to export it and name it as ‘flatMeshRetopo’. Now, you’re done with ZBrush!
STEP FOUR (conditional/optional)
If there’s a problem in topology, you’ll have to fix it before you carry on. This may happen on more complex meshes. I don’t have any examples of this, but just keep it in mind. You might also want to clean up any tris if there are still some left over.
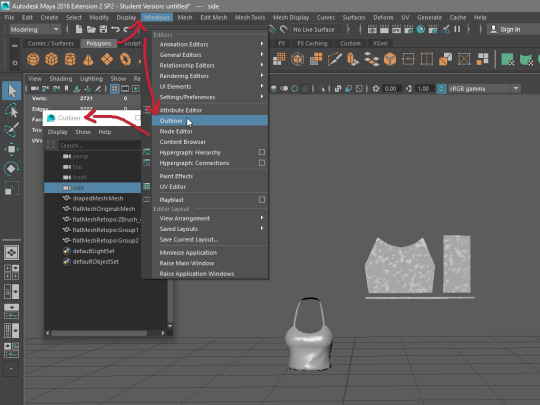
STEP FIVE
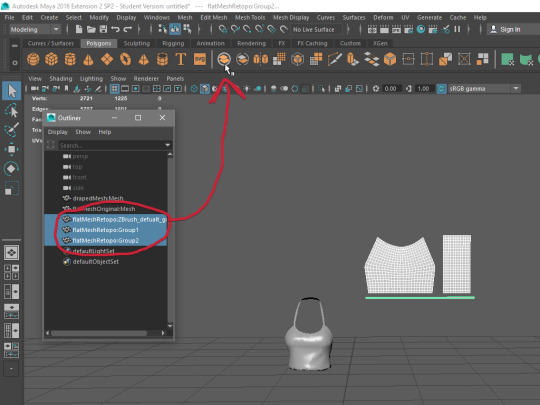
We have to get our new low-poly mesh set up in Maya. Import your retopo’d flat mesh, and ignore any error if one pops up. Then, go to ‘Windows’ on the top bar, and open the ‘Outliner’ window. To hide this, you can just minimise and then later open it back up/maximise it from the bottom of the screen.
Then, in the outliner, select all the meshes that were imported from ZBrush, for me there were only 3 as there are only 3 pattern pieces in my MD mesh. If you have 8 pieces, there’ll be 8 meshes. With these selected, hit the merge button at the top.
STEP SIX
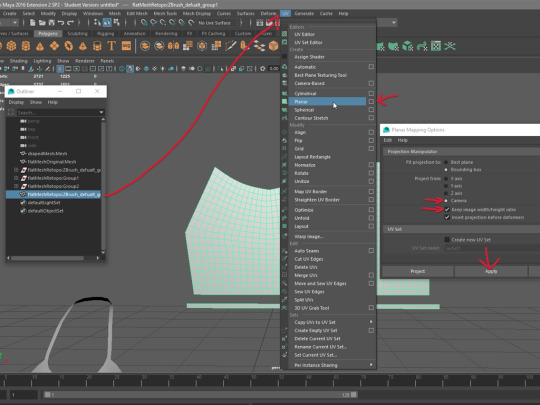
Next, we have to get that clean UV layout. Select your combined mesh, then go to ‘UV’ at the top and then SHIFT-click the ‘Planar’ option. Make sure you have ‘Project from:’ on ‘Camera’ and that you have ‘Keep image width/height ratio’ checked. Next, hit apply.
Also, when you do this step, try to have your camera looking at the mesh straight-on, as I believe this part just captures the mesh from the camera’s perspective and makes that the UV.
STEP SEVEN
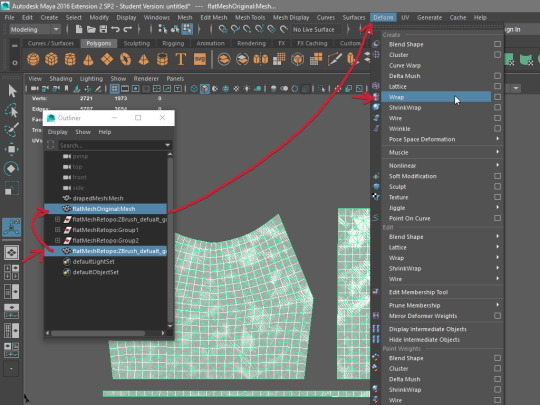
Now, we will make our low poly mesh fit around the draped mesh. Select your low-poly ZBrush flat mesh, and then the high-poly MD flat mesh, go to deform and then wrap.
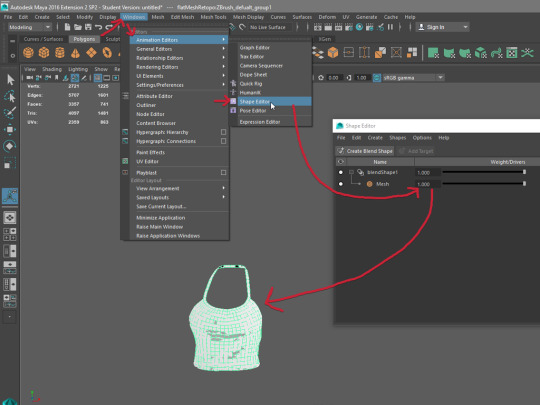
To make it wrap around now, go to ‘Windows’ at the top, ‘Animation Editors’ and then open the ‘Shape Editor’. Afterwards, set the Mesh Weight to ‘1’ (or move the 2nd slider all the way to the right). This will make your lowpoly (and high poly) mesh wrap around the draped mesh.
Lastly, select your low-poly ZBrush mesh that is now wrapped around, and export selection to a .obj- and save that on your desktop or somewhere (ready to be imported into blender!!). Once you’ve done this, you are done with Maya (woo!).
STEP EIGHT (conditional/optional)
If you import your new mesh into blender (which you’ve just exported), and it shows up as flat and one weird solid changing colour, you may need to put the mesh back into maya, select it and go to ‘Mesh Display’ at the top, then try unlocking the normals (‘Unlock Normals’) and then importing to blender again. If that doesn’t work, try locking the normal and importing into blender.
I’m only saying this because it’s happened to me once (not sure how), so it could happen to someone else.
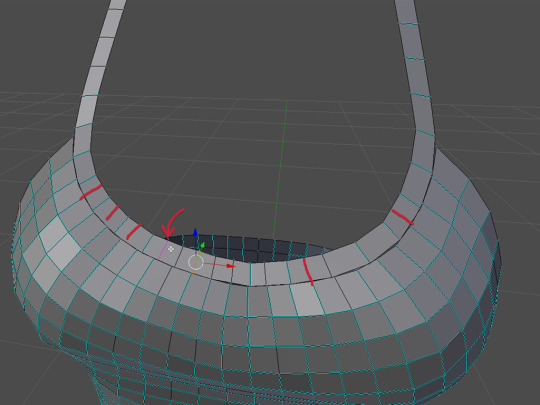
STEP NINE
Lastly, you have to do the final touches. Import your new low-poly mesh into blender, and merge the vertices where the patterns meet up. Select two vertices and press alt+m to merge.
Sometimes, you may need to merge 2 vertices on one side to one vertex on the other, this will create a tri but that’s okay.
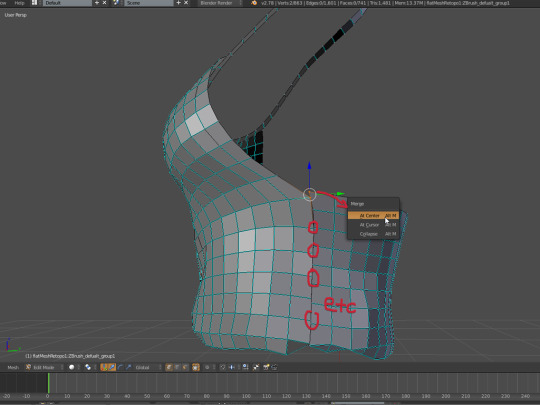
If there is a part you need to join that obviously doesn’t have enough verticies (such as this neck strap for my top), you may need to add edge loops. You can do this by pressing ctrl+R, and then clicking in the middle of the quads. This will add another edge (and increase polys) so that you can move without losing as much detail.
Also, you may want to go to the ‘tools’ tab on the left, and change the shading to smooth, to get a better idea of what your mesh will look like ingame.
STEP TEN
Now it’s up to you to finish your clothing!
FOR SIMS 4 -
I recommend @owl-plumbob’s tutorial for instructions on weight transferring, UV1 transferring and vertex painting (getting your mesh ready for ingame).
And I also recommend any of @theslyd‘s tutorials if you want to make your cc more high quality.
EXTRA
Feel free to contact me on tumblr, or go to my ask page if you have a problem. I’m welcome to help anybody with any issues (if I know how to fix them ;p).
If you need a video tutorial of this, because you prefer that, then as I linked earlier, use this video. This is where I got the original steps from but I changed them slightly so I suggest if you follow the video, to have this tutorial opened as well.
An alternative way to this method is this. I literally found this today and I haven’t tried it, but it looks like it might be quicker, however it still requires Maya. Just keep in mind, in the video they retopologize it by hand in Maya where you may want to retopo it in ZBrush (I would). Anyway, I’m thinking of trying this and if it’s good, I may make another tutorial on that.
If you don’t like this method/it’s not working for you, you can try -
This free alternative using a program called ‘Instant Meshes’ linked by @theslyd
This ZBrush-only workflow (however the UV maps produced aren’t perfect).
Also this thread talks about both these other methods in some more detail.
Just do anything other than exporting from MD in quads (as this is super high poly and the topology isn’t even perfect) or decimating the mesh a lot (this RUINS the topology).
Anyway, that’s the tutorial. Sorry it’s so long, I’m sure you could compress it into 100 words but I get carried away easily, and I wanted to make it totally noob-proof, for people who have no clue how to use maya or zbrush- I wanted to make the tutorial I wanted a couple months ago ;)
790 notes
·
View notes
Text
i know it's a silly question coming from someone who can edit and troubleshoot cc, because i imagine it's actually easier than what i know how to do
but, uh... how do i make a recolor without including the mesh? hlep
i feel exactly like when i skipped some math classes in high school, and as a result, i understood more complicated stuff later on, but some things that were easier are unknown and intimidating to me to this day lol
(i know how to add swatches to someone's cc but i don't know how to make a separate cas item that needs someone else's mesh)
52 notes
·
View notes
Text
moving My Documents Sims 4 folder to another hard drive (win 10)
via The_Only_Zac on reddit
Move your Mods folder to your external hard drive by clicking and dragging it from Documents\Electonic Arts\The Sims 4\ to the external drive while holding shift. Ensure that the popup that appears says "Moving files," not "Copying files." Once this step is complete, you should not have a Mods folder in your Electronic Arts\Sims 4 folder but you will have one on your external hard drive. If you want, you can rename it to something else to make your life easier (eg "Sims 4 Mods" rather than just "Mods").
Press the Windows Key and X at the same time, and click "Command Prompt (Admin)". Paste in the following command:
MKLINK /J "%UserProfile%\Documents\Electronic Arts\The Sims 4\Mods" "[insert path to mods folder on external hard drive here]"
Make sure you replace [insert path to mods folder on external hard drive here] with the actual path to where you copied the mods folder onto your external drive (eg. "F:\Gaming stuff\Sims 4 Mods").
3. Go to Documents\Electronic Arts\The Sims 4\Mods in the file explorer. If you see all your mods, that should mean it worked. Run TS4 and check the options menu to make sure your mods are showing as installed, but do not load any of your saves before checking or else they could become corrupted.
If all goes well, this should create a symbolic link in your EA\TS4 folder that points to the folder on your external hard drive. If you have any more questions, let me know. 👍
EDIT: Since there are a lot of questions, here’s some additional info that might help.
• Do not include the brackets [ ] in the path to your mods folder, but do put it in quotes “”, like this:
MKLINK /J "%UserProfile%\Documents\Electronic Arts\The Sims 4\Mods" "F:\Gaming stuff\Sims 4 Mods"
• If your “My Documents” folder is stored in OneDrive you will need to change the first part of the MKLINK command so it matches where your documents folder is. I don’t use OneDrive, but this should work:
MKLINK /J "%UserProfile% \OneDrive\Documents\Electronic Arts\The Sims 4 Mods" “Insert/path/to/external/drive/Mods/folder/here”
However, this might not actually work because OneDrive is stored in the cloud and it doesn’t like to have symbolic links to non-cloud folders, like your hard drive.
• If you get an error saying “The system cannot find the path specified” when you try to make the link, then you probably have a typo in the path to the folder on your external drive. You can open up your desired folder in File Explorer and copy/paste the path from the address bar into the command prompt to make sure you get it right, but if it has spaces in it then you need to make sure to put it inside quotation marks (“ “).
moving a folder to external drive
2 notes
·
View notes
Text
Tutorial: Camera Position Hotkeys in TAB Mode
Does this sound familiar? You want to take several screenshots from the exact same angle be it for a story, a lookbook, or a CC preview. You tab into free camera mode, take your screenshot, tab out, change poses, tab into free camera mode, and struggle to remember/find the exact camera angle again. Lather, rinse, rage-quit repeat. I did struggle with that. I looked and asked around for a solution, even if it was yet another mod that did what EA failed to do. One day someone dropped a hint, there was a way to set the camera postion, but they didn’t tell how. I used all my google-fu skills and finally found out how to do it. It’s a lifesaver. A fair warning: If you’re anything like me, you’ll use it whenever you take screenhots from now on, just because you can.
Here’s how you can take a picture series like this.
Or this.
1. How to set hotkeys
Press TAB to switch into free camera mode.
Set-up your shot. If you’re happy with it,…
Press CTRL+ 5-8 (top row, not numpad) to save the camera angle.
You can save 4 different camera positions. They’ll be assigned to that hotkey until you overwrite them. Although key 4 is said to be usable as camera hotkey, too it doesn’t work for me.
2. How to use the hotkeys
Press TAB to switch back into free camera mode.
Press key 5-8 and the camera will move back to the saved position. Voila!
Tip: As long as you’re in game mode zoom out as far as you can before re-entering TAB mode. This way all faded-out objects will be visible in TAB mode again. Hit TAB, then your hotkey and enjoy a little tracking shot.
Have fun taking your screenshots! Maybe @thefoxburyinstitute finds this worth sharing? I have a feeling this feature is so unknown, it’s almost like an easter egg. It took me almost three years until I found out.
2K notes
·
View notes
Photo
📝 Tutorial: Tag your CC objects using titles like a PRO ✨
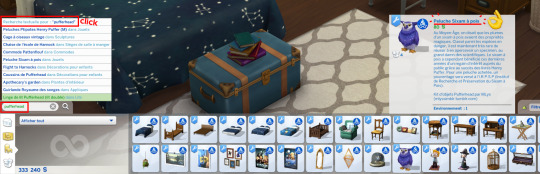
This short and easy peasy tutorial will teach you how to hide text in the title of an object in the catalog. Why? As you may know, a lot of CC creators “tag” their items by including their name and/or the set name in the titles of their objects, so people can filter the catalog easily when using the search bar.
Exemple: Exhibition set - Standing label - MLys
In this exemple, people can find the object by searching the tag words “MLys” or “Exhibition”. Cool! But that title looks long and not really aesthetically pleasing right? Now what if I told you that you can keep those tags hidden?

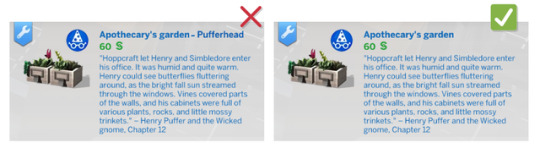
All you have to do with Sims4Studio is: write your actual title, put the “|” caracter right after, add a space, and write all the tag words that you want hidden (separate each tag with a space).
[🔎 Click to enlarge ]
As you can see above, if you look for the the word “Pufferhead”, the result will give you all the objects from the Pufferhead pack, even if their title don’t include that word!! (but we both know that they secretly do *wink*)

The tag possibilities are endless without worrying about the aesthetic! If you are motivated enough, you can use this technique on all the bb CC you own, with the tags that personally suit you. On the picture above, I’ve tagged the item with the name of the CC creator @litttlecakes + a theme tag.
That’s it! I’ve discovered this technique by coincidence, and haven’t found anything written about it even on the S4S forum, so I thought I could share!
2K notes
·
View notes
Photo
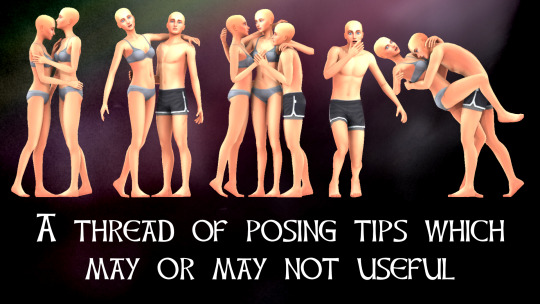
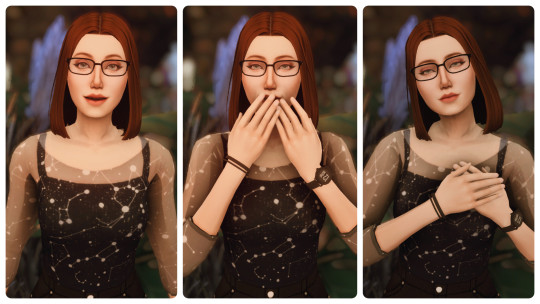
Hello! I made this list of tips for Twitter months ago, chickened out of sharing it because I didn’t want folk to think I was acting like some kind of authority on posing, and then eventually posted it last night.
Anyway, I had a couple of requests to post it here as well, and as Twitter really made a hatchet job of my thread I thought having everything together in one post might be helpful.
I’ve kept the same cover image with the missing word typo because it’s stupid and amuses me. May useful? May not useful!
Keep reading
377 notes
·
View notes
Text
unlocking skintones for occults
(original comment by TheDreamingFirefly on reddit)
Open .package file you wish to edit in Sims 4 Studio
Open the tab labeled WAREHOUSE [if you're editing genetics you should already be in it]
Scroll on the left side until you find something that either says CAS Part or Skintone and click it
Now on the right you want to scroll down until you see TAGS and click on EDIT ITEMS
Go to the left of the panel and click ADD
Category: Occult | Category Number: 109 | Tag Value: Leave this blank | Tag Value Number: 3005
Save and repeat for every CAS Part / Skintone etc.
Save all changes
f you just want the fixed skins you can get them here
0 notes