#tutorial: cc
Explore tagged Tumblr posts
Visit Tumblr Blog
Explore Tumblr blogs with no restrictions, modern design and the best experience.
Last Seen Tumblr Blogs


Fun Fact
Tumblr was acquired by Yahoo for $1.1B in 2013.
Text
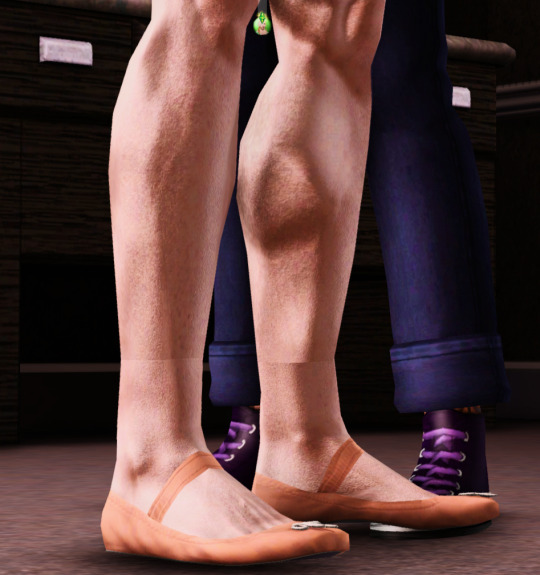
unlocking skintones for occults
(original comment by TheDreamingFirefly on reddit)
Open .package file you wish to edit in Sims 4 Studio
Open the tab labeled WAREHOUSE [if you're editing genetics you should already be in it]
Scroll on the left side until you find something that either says CAS Part or Skintone and click it
Now on the right you want to scroll down until you see TAGS and click on EDIT ITEMS
Go to the left of the panel and click ADD
Category: Occult | Category Number: 109 | Tag Value: Leave this blank | Tag Value Number: 3005
Save and repeat for every CAS Part / Skintone etc.
Save all changes
f you just want the fixed skins you can get them here
0 notes
Text
hey so i've been working on a lot of things (and also second guessing myself a lot because perfectionism) but here's some very random sneak peeks if y'all are interested!!

#and happy black history month!!#how are we already entering into the final week :((#also#i've been inspired to write some 'creating deco cc' tutorials#i saw someone ask where they could find some easy-to-follow ones on x and i thought why not???#i'm far from the best but i can do lil sumn sumn i suppose
1K notes
·
View notes
Text
Since the new eyelash update is here, I'm gonna teach you how to convert old eyelash cc into the new eyelash option!
First of all, we will need the Sims 4 Studio. The download link can be found here: https://sims4studio.com/board/6/download-sims-studio-open-version
Now, head into the app and click the "My Projects" button on the main menu.

Open the eyelash file (.package file) you want to convert. I'll just pick a random one for reference. Once you picked the one you want, hit open.
You will be directed into the studio, which will look like this:

Now on the right side of the screen, find the CATEGORIES button and click on it.

Once there, change the OUTFIT TYPE to MASK DETAIL EYELASHES and APPLY TO ALL SWATCHES. Save the file, and the .package file will be updated in your game. Also, make sure to double check in-game before continuing with your other custom content.

As you can see in my game, It worked! Hopefully it works for all of you, too.

And that's about it. Thanks for reading all the way.
And by the way, If you're going to distribute these publicly without the original creators consent, just don't do it. This is meant for private use only or for content creators who want to convert their eyelashes into the new eyelash section.
EDIT: As trillyke has said, This does not work with eyelashes in the glasses section as they will collide with rings and most of the accessories
#sims-4-custom-content#ts4#thesims4#customcontent#ts4cc#the sims 4 cc#the sims 4 custom content#tutorial#the sims 4#the sims community#the sims cc#sims#sims 4#simblr
4K notes
·
View notes
Text

IF YOU CAN'T ENABLE CC 🌸
Sul sul ^^
After today updates, I wasn't able to enable CC again. It doesn't matter how many times I closed and launched the game.
So I remembered that this had already happened to me before.
If you're going through the same problem, this is how you can fix it:
🌸🌸🌸🌸🌸🌸🌸🌸
HOW TO ENABLE CC AGAIN:
1- On the game home page, in the bottom right corner of the screen, you can see what the current game version is. After today's update, mine was: 1.108.318.1020. Launch the game and check the number that appears for you.
2- In your game folder (Documents>Electronic Arts> The Sims 4) you'll find a file called "GameVersion". There will be a number.
The number in that file has to match the current game version number.
When I opened mine, it was "1.107.151.1020". So I just updated it to "1.108.318.1020" and saved. Then when I launched the game I could enable CC again.
Note 1: There's a "space" before the number in "GameVersion" (as if it were a paragraph). Keep that space. Change the numbers exactly where they are.
Note 2: If you prefer, before changing the number, make a backup copy of "GameVersion" just in case. It won't harm your game, but it's better, just to prevent and make it safer.
💎 If you want a tutorial video, I made one about it some time ago. You can watch it here :)
🌸🌸🌸🌸🌸🌸🌸🌸
ALSO IMPORTANT AFTER UPDATES:
Remember to delete "localthumbcache". You can find the tutorial here.
🌸🌸🌸🌸🌸🌸🌸🌸
I'm currently checking my CC to see if they're still working.
If anything, I'll let you know :)
I hope it helps you if you're having any problems :)
Happy Simming ^^
3K notes
·
View notes
Text

hey guy's i made a quick and easy tutorial on youtube about how you can frame your sims screenshots with any cc frame you want, you don't need photoshop or any other of these overwhelmimg programs and you also don't need any kind of photo editing skills! you can find the video here. i hope it's helping some of you. love, jodie ♡
#tuts*#sims 4 mods#sims 4 cc#sims 4 simblr#sims 4 custom content#the sims 4#the sims#the sims community#sims 4 tutorial#the sims 4 custom content#sims 4 maxis match#sims custom content#sims 4#ts4 simblr#sims community#ts4
444 notes
·
View notes
Text

Quick Guide: Stay Safe While Downloading Sims 4 CC & Mods
I just published a quick guide to help you download Sims 4 CC & mods safely. ⚠️ From trusted sources to spotting red flags. Keep your game clean and secure! 😊
Read it now
#avoid malware in sims 4 mods#how to avoid malware sims 4 mods#how to download mods safely sims 4#patreon sims 4 cc download#safe sims 4 cc creators#safe sims 4 download sites#sims 4 cc best practices#sims 4 cc community guide#sims 4 cc download checklist#sims 4 cc education#sims 4 cc folder structure#sims 4 cc mod manager#sims 4 cc mod security tips#sims 4 cc mods support guide#sims 4 cc protection#sims 4 cc safe download#sims 4 cc safe hosting platforms#sims 4 cc safety guide#sims 4 cc safety tutorial#sims 4 cc virus warning#sims 4 cc zip file tips#sims 4 custom content security#sims 4 custom content tips#sims 4 mod folder organization#sims 4 mod malware prevention#sims 4 mod safety#sims 4 mod safety checklist#sims 4 modding guide#sims 4 mods antivirus#sims 4 script mod warning
281 notes
·
View notes
Text
TUTORIAL
How to FIX CUSTOM EYELASHES after update 1.108.349.1020 The Sims 4
YOU NEED:
Sims 4 Studio @sims4studioofficial
Blender (I use Blender 2.79)
Instruction manual:
Opening the eyelashes that need to be repaired in Sims 4 Studio

2. Go to the "Categories" section - Item "Outfit Type" - "Eyelashes"

3. Click "Apply to All Swatches" - Click "Yes"

4. Now we need to assign the correct color to the Vertex in Blender. Go to the "Mesh" category and export the eyelash mesh

5. Open the Mesh in Blender and switch to the "Vertex Paint" mode

6. Select the display mode "Wireframe" or press the "Z" key

7. If the eyelashes are broken, they will have the wrong color. Now we need to assign the correct color

8. Click on the palette icon

9. Go to the HEX item and enter the color code. Color Number: 007F3F

10. After you entered the color code. Click "Paint" - "Set Vertex Color"

11. After that, the color of the eyelashes will change. Save the file and close the Blender

12. Go back to SIms 4 Studio and import the mesh

13. Saving the package file

14. Checking the result in the game
718 notes
·
View notes
Text


Shop Sign Wall Lights - UPDATED 15 May 2025
I put together a few sets of shop sign wall lights. But there are instructions. I kept some swatches as a default white color so that you could pick which color you want the light to be while in live mode. This saved on the file size of the package file because the more textures a file has, the more bloated the file size is.
I had some fun with some shop names although I mainly included generic titles in both English and Simlish.
DOWNLOAD for FREE: SFS
OR at Patreon*
*You must be over 18 to access my Patreon page.
INSTRUCTIONS ON CHANGING LIGHT COLORS
Once you place the light in build mode, then go to live mode. Click on the light and you will get the following pie menu.

Select SET COLOR AND INTENSITY and then choose THIS LIGHT. The color options will then appear so you can select which color you want.

If you use the name signs along with the Awning Lights, make sure to place the name on top of the awning so when you select the color picker, the correct sign changes colors. The other option is to place the name separate from the awning, go to live mode and change the color, then go back to build mode and add the awning light you want.
Enable the bb.moveobjects on cheat and then you can make adjustments to location and size of objects. You can adjust the position of the light on the wall by depressing the Alt key while placing the sign (on PC). You can adjust the size of the item by depressing the Shift key and either [ (for smaller) or ] (for bigger) (on PC).
CREDITS
Awning Shop Lights - 19 swatches of various awning wall lights. 18 are pre-colored and one is white so you can change the color yourself in game.
Candy Shop Lights - 20 swatches
Pottery Shop Lights - 25 swatches
Tattoo Shop Lights - 21 swatches
Enjoy!
Creations by SexyIrish7
These cc objects are new 3d meshes created using Blender and Sims 4 Studio.
Polygon Count: 6
All CC have:
*Ability to search catalog using search terms: sexyirish7 and si7
*Customized thumbnail
*******
CREDITS:
Software credits:
Sims 4 Studio v. 3.2.4.1 (Star): https://sims4studio.com
Blender 4.0: https://www.blender.org/download/
GIMP v. 2.10.34: https://www.gimp.org/
Inkscape v. 1.2: https://inkscape.org/
Thank you to the creators and moderators producing tutorials and answering questions!
*******
Model and Image credits:
Mesh created by me.
Simlish font credit to Franzilla: https://modthesims.info/
Image credits:
Awning Lights Image credits: Modified image from Adobe Stock
Candy Shop Image credits:
Swatches 1-3: Image by pch.vector on Freepik https://www.freepik.com/free-vector/christmas-candies-symbols-set-neon-style_11241813.htm#fromView=search&page=1&position=26&uuid=8b541325-0e62-4e37-9468-6bacd30f8963&query=neon+lollipop+candy
Swatches 4-8: Image by gstudioimagen on Freepik https://www.freepik.com/free-vector/sweet-candy-neon-seamless-pattern_5595774.htm#fromView=search&page=2&position=30&uuid=e2259de5-014d-4d04-af87-1198ee0f35e2&query=%40gstudioimagen+neon
https://www.freepik.com/free-vector/sweet-candy-neon-seamless-pattern_5595775.htm#fromView=search&page=1&position=27&uuid=e2259de5-014d-4d04-af87-1198ee0f35e2&query=%40gstudioimagen+neon
Swatches 9-10: Image by openclipart.org https://all-free-download.com/free-vector/download/peppermint_candy_clip_art_13182.html
https://all-free-download.com/free-vector/download/round_candy_with_stick_card_on_pink_background_6823183.html
Swatch 11: Image by All-free-download.com https://all-free-download.com/free-vector/download/round_candy_with_stick_card_on_pink_background_6823183.html
Swatches 12: Image by katemangostar on Freepik https://www.freepik.com/free-vector/ice-cream-cart-neon-sign_3238564.htm#fromView=search&page=8&position=42&uuid=2f82b4d1-5ca8-449c-ae22-4573861ebcb0&query=neon+sign+retail
Pottery Shop Image credits:
Swatch 1: Crafting icons created by andinur - Flaticon https://www.flaticon.com/free-icon/pottery_17392031
Swatch 2: Image by katemangostar via Freepik https://www.freepik.com/free-vector/aquarius-neon-sign_5561944.htm#fromView=search&page=2&position=5&uuid=c55e5e21-0550-46f0-b9be-cfa85ff38796&query=Ceramic+Neon
Swatch 3-4: Pottery icons created by Smashicons - Flaticon https://www.flaticon.com/free-icon/vase_3760867
https://www.flaticon.com/free-icon/vase_3760970
Swatch 5: Icon by istar_design_bureau via Freepik https://www.freepik.com/icon/pottery_1958438#fromView=search&page=2&position=20&uuid=096084ae-13fe-429c-a419-e6e13ccd37b9
Swatch 6:Icons by Eucalyp - Flaticon https://www.flaticon.com/free-icon/pottery_6552610
Swatch 7: Icon by berkahicon via Freepik https://www.freepik.com/icon/spin_13785816#fromView=search&page=2&position=0&uuid=096084ae-13fe-429c-a419-e6e13ccd37b9
Swatches 8-11: Icons by Freepik https://www.freepik.com/icon/pottery_8540816#fromView=search&page=3&position=43&uuid=096084ae-13fe-429c-a419-e6e13ccd37b9
https://www.flaticon.com/free-icon/machine_9200546
https://www.flaticon.com/free-icon/vase_8838322
https://www.flaticon.com/free-icon/pottery_3305262
Tattoo Shop Image credits:
Swatch 1: Modified Image by katemangostar on Freepik https://www.freepik.com/free-vector/tattoo-salon-neon-text-with-tattoo-machine-neon-sign-night-bright-advertisement_2438198.htm?log-in=email
Swatch 2: Image by Nippy Custom https://www.nippycustom.com/products/tattoo-neon-sign
Swatches 3-5: Image by bohlam via Vecteezy https://www.vecteezy.com/vector-art/2185717-tattoo-studio-neon-signs-style-text-vector
https://www.vecteezy.com/vector-art/34210463-neon-sign-tattoo-studio-with-brick-wall-background-vector
*******
TOU:
Do not re-upload and claim as your own
Do not re-upload and hide behind a paywall
*******
Changelog:
15.05.2025
*Updated swatches for compatibility with slotted signs.
*Added wall deco slot so that signs can be stacked on slotted signs for Awning Signs
*Added swatches with inverted images for Candy, Pottery, and Tattoo Shop Signs.
#the sims 4 cc#ts4cc#sims 4 cc#the sims 4#wall decor#sims 4#ts4#lights#wall lights#signs#shop signs#retail#pottery#ceramics#tattoo#ink#candy#lollipop#sweets#sugar#light tutorial#sexyirish7#updated cc#featured
305 notes
·
View notes
Text
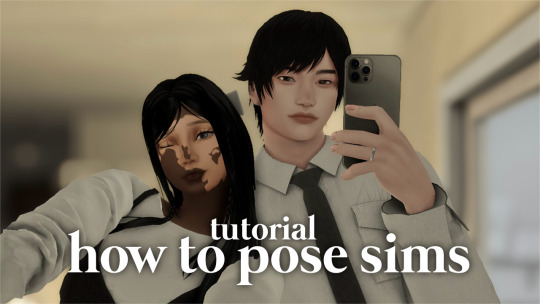
how to pose sims for photoshoots - tutorial
MODS & CC USED:
teleport any sims
pose player
mc command center
iso love photos – full control camera (optional)
photographic memory (optional)
wicked whims | wonderful whims (optional)
backdrops 1 & 2
@ts4-poses
some of my favorite pose creators: ssiat | acha | dearkim
530 notes
·
View notes
Text
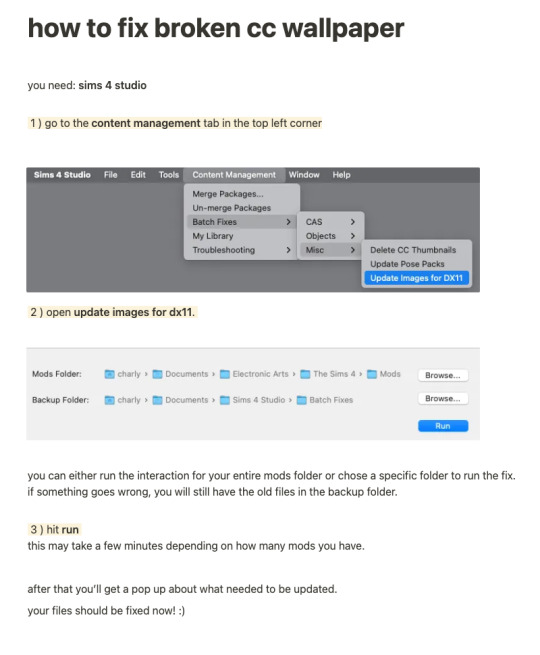
while finally (!!!) fixing my own cc for the dx11 update, i put together a little tutorial on how to fix broken cc by yourself because there might be a lot of cc you can't connect to the og creator anymore, the creator doesn't exist anymore or whatever. there's also a lot of other batch fixes in this menu tab so maybe you can even find some fixes for other cc that's been broken in your game as well :)
there's quite a few things i have to update since i didn't take proper care of some older sets as well as the recent update that stopped custom content tv's from working with the consoles in game since they got a few new interactions. so, i am onto that, too!
i will put out my own updated files asap 💛
306 notes
·
View notes
Text
Fixing bad normals along seams in blender

I struggled. Is it the shoes? The skirt's legs? Lets fix the shoes... Ok it is the legs, shoes are fine with other stuff! Lets redo the legs... Nope didn't work. New WRK project? Nope. Redoing the MTK process ... Nope.
Let's just say i ended up with 3 wrk projects, 8 wso's, and a scrambled brain.
I ended up asking @justmiha97, who had a solution - a while ago he used it and might not work, but it did! So I wrote it down for myself and others.
Tutorial here
You need:
- Obj files/meshes of top/feet/bottom/head (depending on your cc) with all morphs, these should be thoroughly checked to have good normals and preferable unscathed fresh from EA, as they are what the seams of your item have to align with. I used the EA feet (Geom and morphs exported from TSRW) and my edit of JVSmith's torso (for its preg morph) for this skirt.
- Smugtomato geom tools
- Any version of blender that has the data transfer modifier & that works with geom tools (I use 3.6)
101 notes
·
View notes
Text
YOUR VISITOR CONTROLLER MIGHT NEED SURGERY
Hello out there!!! If you use Visitor Controller mod for the Sims 2, it might be broken. I am not sure exactly which version I have ... Midge's that allows togas or the older CrispandKerosene's version with personality options.
The personality settings may be broken because I looked at my file today and sure enough, the BHAVs are not referencing personality properly.
Go into the BHAV "Check Personality Flags" inside Visitor Controller in SimPe.
It should look like this:

The highlighted node should not reference any other value but a number higher than 100.
If you see this:

Then it is broken. Personality has to be referenced in hundreds!
You must change it with the Instruction Wizard which is on the right hand side of Plugin view to make Personality features work, as in banning Lazy Sims from a gym.

The first image shows that Sims with a Neat personality lower than 400, which is 0x0190 in hexadecimal, will be banned from the lot.
Repeat for the other personalities lower in the code.
HAPPY SIMMING!!!!
Also, if anyone is interested in a tutorial for adding custom careers to Visitor Controller, let me know!
#sims 2#sims 2 gameplay#sims 2 simblr#sims 2 mods#sims community#ts2#ts2 mods#ts2 glitch#ts2 visitor controller#visitor controller#sims#Sims mods#Sims 2#sims 2 cc#the sims 2#sims 2 screenshots#Simpe#sims 2 tutorials#sims 2 tutorial
109 notes
·
View notes
Text

It's BIG.
It's BLUE.
It's UPDATED.
Hiya Simblr, it has been a while. I have a big update today- it's one of my oldest guides on MTS, but new and blue! The changelog is in the MTS comments- but the short and sweet is that two years of learning Blender has been squeezed in there for your convenience, complete with graphics and GIF examples.
ModTheSims tutorial Google Docs tutorial Blender Templates

#on a mission to become a human tutorial hub#i follow predominantly ts2 blogs and feel like an infiltrator posting about simcethri#simblr#ts3#the sims 3#ts3 cc#ts3 tutorial#ts3 blender
194 notes
·
View notes
Text
Zam - March 20, 2025
The Return.
123 notes
·
View notes
Text
A small but very useful tutorial
written with the help of chatGPT
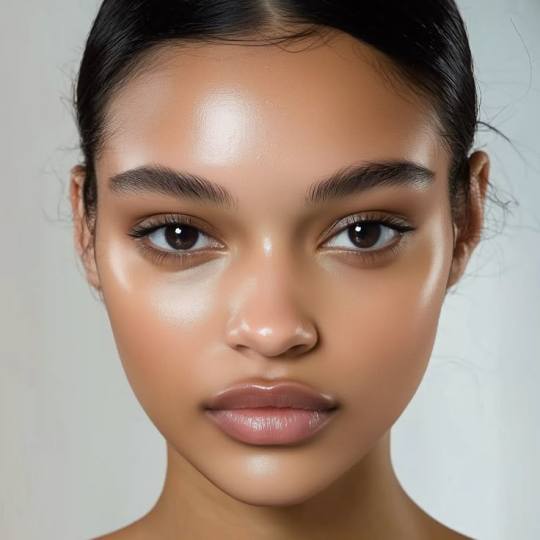
Why Use Upscayl?
Upscayl is a great tool for improving textures and reference images. Whether you are working on character skins, environmental textures, or UI elements, this program helps to:
Increase image resolution without losing quality
Reduce pixelation and enhance details
Improve the clarity of textures for a more realistic look
How I Use Upscayl (look at the photo)
Finding or Creating a Reference Image I start with an image that I want to enhance. This could be a low-resolution texture or a reference image for a new design.
Adding Noise for Testing To demonstrate how Upscayl improves images, I intentionally added noise to a mask texture. This allows me to compare the before and after results more clearly.
Processing the Image in Upscayl I import the noisy texture into Upscayl and choose an appropriate AI model. The program processes the image, enhancing its details and removing unwanted noise.
Examining the Results After running the texture through Upscayl, the difference is clear: the texture appears sharper, more detailed, and free of noise, making it more suitable for in-game use.
Enhancing Existing Game Textures
Apart from improving references, Upscayl is also useful for enhancing in-game textures, such as character skins. If a skin looks too blurry or low-resolution, running it through Upscayl can significantly improve its appearance without having to manually repaint details.


#sims3#sims#ts3#simblr#s3#sourlemonsimblr#sls#sims4#the sims#sims 2#tutorial#not sims#sims tutorial#cc tutorial
113 notes
·
View notes
Text

A child of war, a fallen leader of the nation and a mysterious check-taker. What they gonna do?
(Click for better quality!)
Also version without text cus i still liked it

#dream smp#dsmp#dreamwastaken#tommyinnit#wilbur soot#of course all c! not cc!#artists on tumblr#digital art#wonderful scary lighting#:) hehe#will waited 12 years to came back i waited 3 years to draw this#also please#this is just art of my favorite charasters#lets not bring drama here#pretty please#also! if you see that it have troubles with quality no u not#i just figuring out how to make it look good give me time(and tutorials)
189 notes
·
View notes