Sam - he/they - over 30this is my textile arts sideblogcurrent hobbies: embroidery, cross stitch, crochet, knitting, mendinginterests not yet practiced: handsewing, quilting, weaving, spinningmy icon & header images are both from DMC Pointe De Marque IV, available at the Antique Pattern Libraryi follow from @flourishingghost
Don't wanna be here? Send us removal request.
Statistics
We looked inside some of the posts by aghoststitching and here's what we found interesting.
Average Info
Notes Per Post
9K
Likes Per Post
5K
Reblog Per Post
3K
Reply Per Post
17
Time Between Posts
3 days
Number of Posts By Type
Text
17
Last Seen Tumblr Blogs


Fun Fact
Premium Tumblr themes are available from anywhere between $9 to $49.
Text
The cosmonaut is not only finished, but I also managed to take a few decent pictures!!


(Decent might be relative.)
Took about 10 hours plus the border. The blue yarn is a beautiful shiny cotton that I use very often, and the red is a slightly felted yarn that I rescued from a yarn store that suffered a flood two years ago. I like the contrast between the two yarns and I love how the felting gives it a vintage vibe. The dowels are 3D printed (because why would I buy something I can make.)
I saw the pattern and my hands were itching to try it because I LOVE the inspiration behind it and wanted to get a print of it a while back. (It’s this one.)

Unfortunately, halfway through I realized my dad would love it, so I had to give it away and I am honestly grieving. I will simply HAVE to make a new one for myself, I guess….
Pattern by @interlockingpatches !! Go subscribe to their gumroad and discover your new favorite craft. Like right now. Listen to me. Do yourself this favour
50 notes
·
View notes
Text
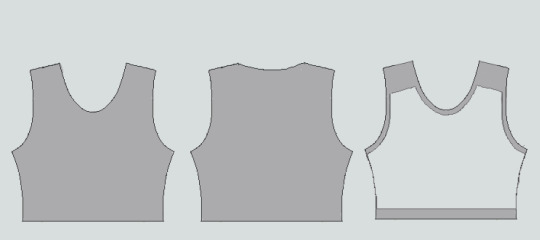
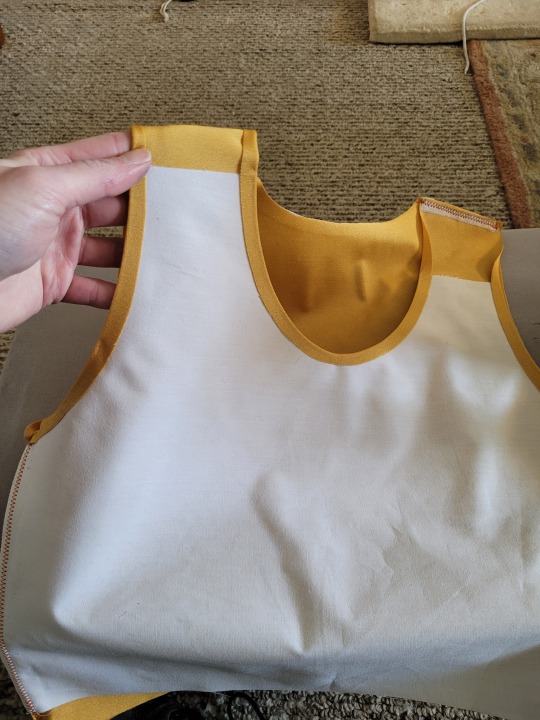
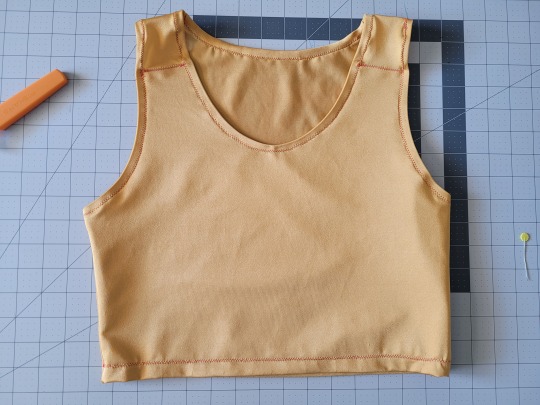
How to Make Your Own Binder that Fits Well and Looks Good
A while back I was in need of some new binders and thought hey, I bet I can make one way cheaper than buying it from somewhere (especially cus some of the ones I’ve bought in the past didn’t really fit right). Except when I started looking for a binder patterns online, I was very surprised that I really… couldn’t find many that looked very nice lol. Most of them had really wrinkled necklines, or didn't bind well, or just overall looked weird. A lot of the patterns also required a serger, which I don't have.
So I just said fuck it and made my own pattern! And it ended up being relatively easy! And the binders fit REALLY WELL and are comfortable to wear, even for long periods. The neckline doesn't show under shirts with loose collars, and the bottom hem doesn't gap or stick out. Here's me wearing one:
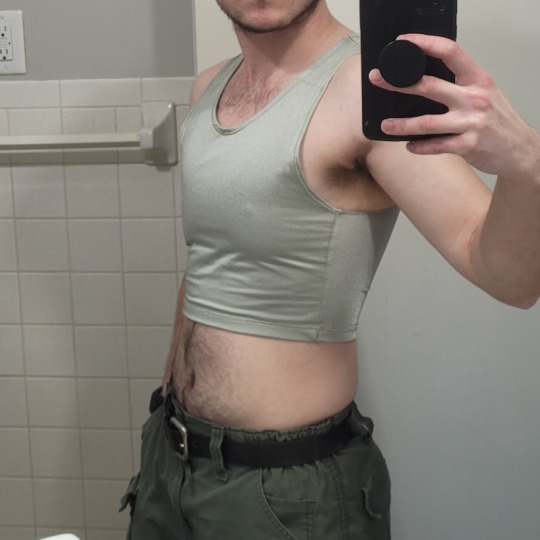
(plus I was able to make myself 5 of them for a total of like ~$50.)
So I figured I could throw together a guide to help out anyone else who wanted to make their own binder but was dissatisfied with the patterns available!
Disclaimer: This tutorial is going to assume a baseline level of sewing experience, and also will require access to a sewing machine. It is not a complicated pattern, but it will most likely require some tweaking and adjustments after you make the first one. Don’t be afraid to make alterations to make it fit better!
This tutorial is for a gc2b-style half-tank binder. It could be altered to be a full-tank binder, but all instructions will be for the half-tank design.
Materials needed:
Stretchy fabric, probably listed as 'athletic fabric' (I use this kind from Joann’s. Most athletic stretch fabrics should work, look for around 80% nylon/20% spandex blends)
Stiff fabric (I use this shirting cotton because I like how lightweight it is. If you want something a little stiffer with more structure, you can use a cotton or cotton/poly blend twill like this. gc2b binders use twill for theirs.)
Lightweight fusible interfacing (I use this kind) (get FUSIBLE not sew-in)
Fusible webbing like Pellon Wonder-Web (this is technically optional but it WILL make your life easier when you’re sewing - just make sure to get the kind with the paper backing!!!)
“But kiwisoap thats 4 whole kinds of materials, surely I don’t need that many!” Ok sure, you can probably get by without the fusible web and interfacing, but consider: they are both dirt cheap (im talking like $1-2/yard), they will make it much easier to sew the final product, and will give you an overall better-looking result. This tutorial is written with the assumption that you’ll use them.
"How much fabric will I need?" Measure the circumference of your chest below your armpits. Add 6 inches just to be safe. This is the yardage of stretch fabric you’ll need, and should give you enough material to make at least 3 binders without much excess left over. You will need around half as much stiff fabric.
Other supplies:
Big Paper (for drawing the pattern)
Flexible measuring tape
Sewing machine
Iron
Pins
Step 1: Measuring
You will need 4 main measurements for this pattern.

A) Measure the circumference of your chest just below your armpits, then divide the number in half. This will be the widest part of the pattern.
B) Measure from the top of your shoulder down to where you want the binder to end. For most folks, this will usually be around the natural waist (narrowest part of the torso), about 3-6 inches above the belly button. This will be the overall height of the pattern.
C) Measure the distance from below your armpit to where you want the binder to end. This will determine where the arm hole starts.
D) Measure the circumference of your waist where you want the binder to end, then divide the number in half.
So for example, after dividing A and D in half, my measurements are 17", 15", 7", and 14.5".
Next:
Subtract one inch from measurement A - This will help provide some compression. You might need to take it in even further depending on how it fits, but one inch is a safe starting point. I take mine in around 1.5 inches.
Subtract half an inch from measurement D. This will help prevent the bottom edge of the binder from gapping. Again, you may need to take it in more or less, depending on your own body.
Add 1.5 inches to measurement B and one inch to measurement C. This is to account for the hems and armhole placement.
This makes my final measurements
A = 16"
B = 16.5"
C = 8"
D = 13.5"
From here on out, we are only going to be working with the measurements that we have added/subtracted to, NOT the ones we initially took.
Step 2: Drawing the Pattern
You will need a piece of paper large enough to accommodate the entire pattern. This may involve taping multiple pieces together, or using a piece of newsprint, etc.
I recommend folding the paper in half to ensure that you get a symmetrical pattern. However, this means you will need to divide measurements A and D in half again, or else you’ll end up with a pattern that’s twice as wide as it should be!
Also note: the pattern is drawn with the seam allowance built in! You don’t need to add any seam allowance.
To draw the pattern:
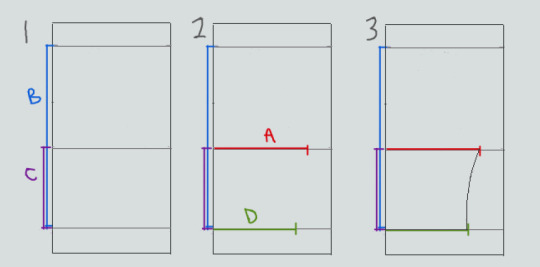

Begin with your folded paper. Measure and mark B and C on the paper, and draw a line extending across the paper. These will be your guidelines.
Measure and mark A and D along the middle and bottom guidelines, respectively. Remember, the paper is folded, so you only use half of the measurement for A and D.
Draw a loose curve connecting the endpoints of A and D. If needed, you can also just draw a straight line between the two.
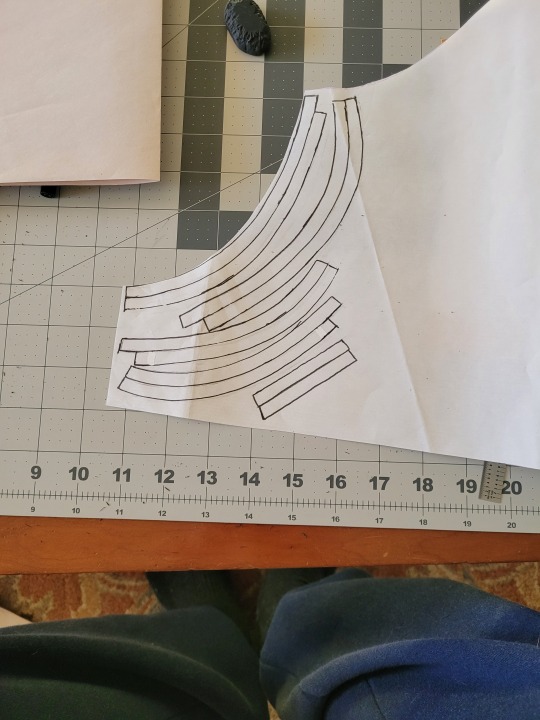
Mark the opening for the neck hole. Depending on your size, it will measure around 6-8 inches across at the top (remember to divide this in half for the folded paper) and about 5-6.5 inches deep. (mine is 6.5" across and 5.5" deep) Draw a curve to connect the two points. This part will take some tweaking and adjusting to get it to look right lol.
Measure the width of the strap - this should be somewhere between 2.5 - 4 inches wide. They will end up about 1/2” to 3/4” narrower once you sew them. Draw the line at a slight angle, as shown.
Connect the endpoint of the strap to the endpoint of line A with a curve like in the diagram.
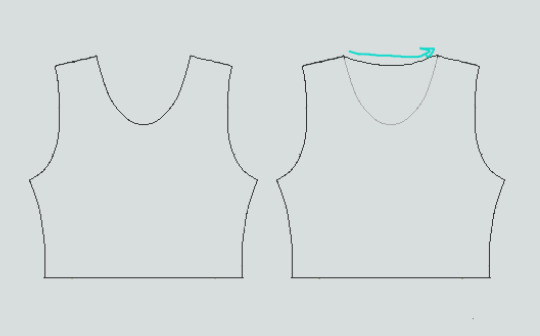
This will be the pattern for the front piece.
To make the back piece, trace the front pattern, but make a very shallow curve for the neckline instead of a steep one, as shown:
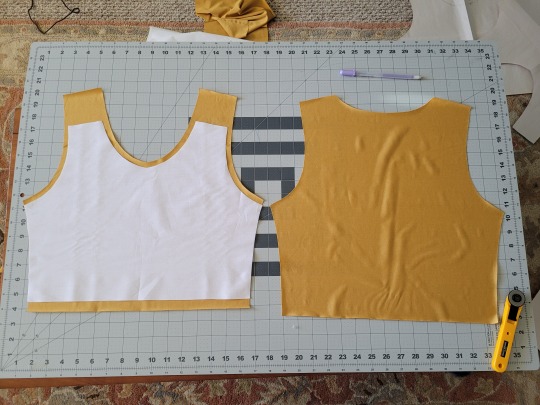
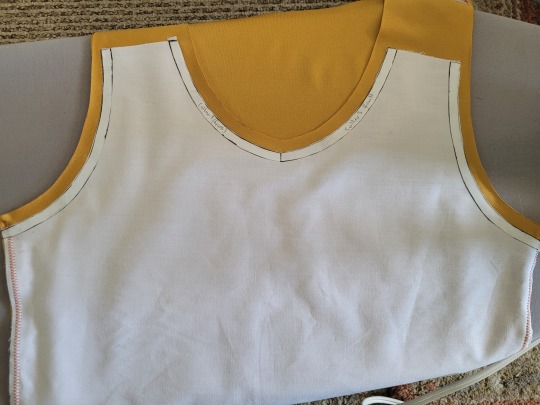
The last piece is the stiff front panel. This is what provides the flattening effect of the binder. To make the pattern, trace the front pattern again. Trim 3/8” in on the sleeves and neckline, and 3/4” to 1” along the bottom. This gives a flatter hem. Then trim the straps shorter by a few inches. This helps the binder lay flatter along the shoulders.
When you're done, you should have 3 pattern pieces that look approximately like this (stiff panel shown overlaid on the stretch fabric to show how it fits together).
NOTE: If you want more compression or just want to make it a bit sturdier, you can add a second panel of stretch fabric to the back piece. Just use the bottom half of the back pattern (from the widest part down to the bottom hem) to cut out another piece of stretch fabric. Attach it to the back piece with a strip of fusible webbing and a zig-zag stitch along the top.
Step 3: Putting It All Together
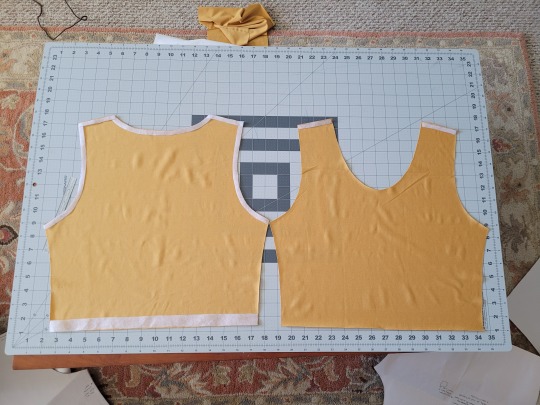
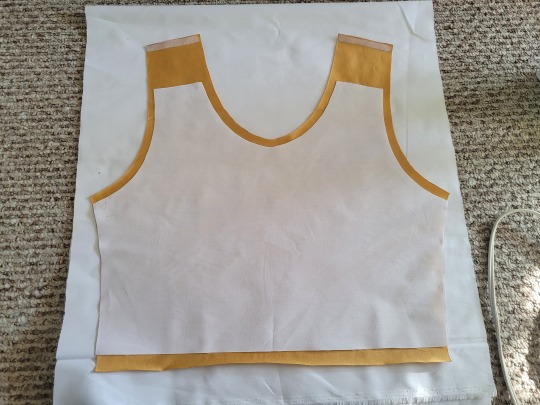
Once you’ve made the patterns and cut out the pieces of fabric, you should have something that looks like this:
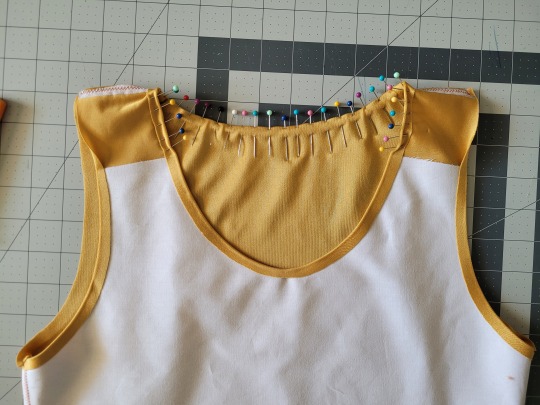
The next step is adding interfacing and fusible webbing. Use your pattern to cut out 3/8" strips to fit on the top of the straps for both pieces, and to the neckline, sleeves, and bottom hem of the back piece, as shown:
If you want to add it to the bottom hem of the front piece, it will help keep that hem flat when sewing it down later, but it's not essential.
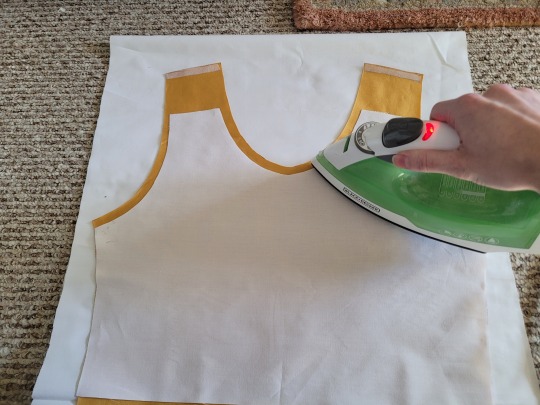
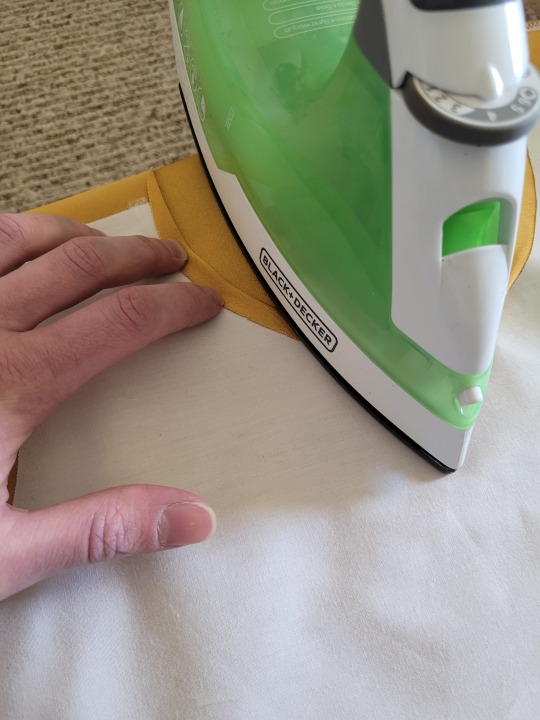
If you choose to also use fusible webbing (WHICH I RECOMMEND), you will apply it to the stiff front panel similarly to how the interfacing was applied, ~3/8” strips along the neckline, sleeves, and top of the straps. Cut out two strips for the neckline and sleeves, because we'll use those later too.
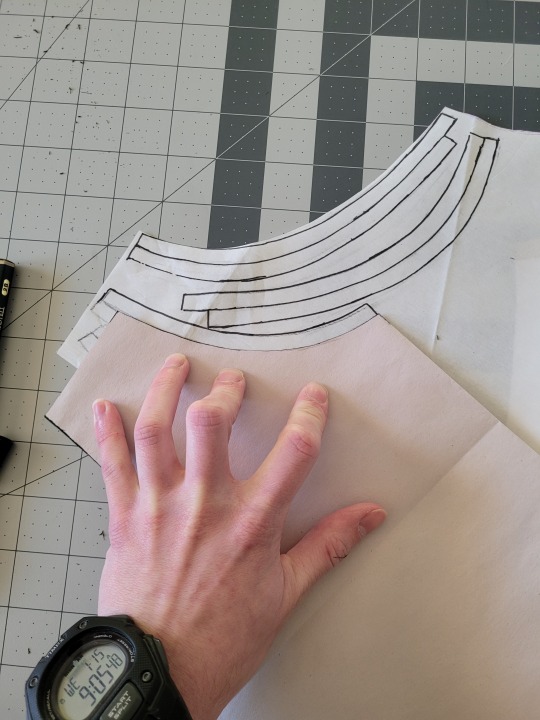
Iron the strips onto the front panel as shown:

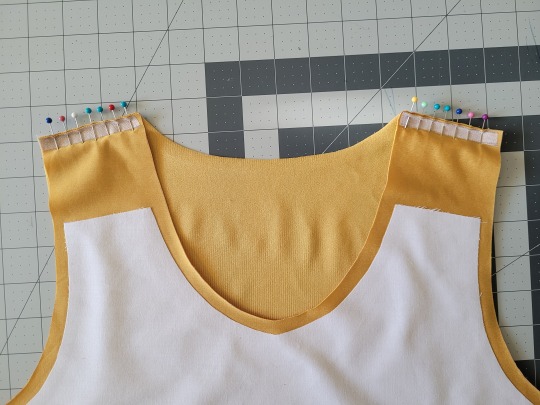
Once it's on, just peel off the paper, position it webbing-side down on the stretch fabric, and iron it to fuse the two pieces together so everything stays in place while you sew. THIS MAKES IT WAY EASIER TO SEW.
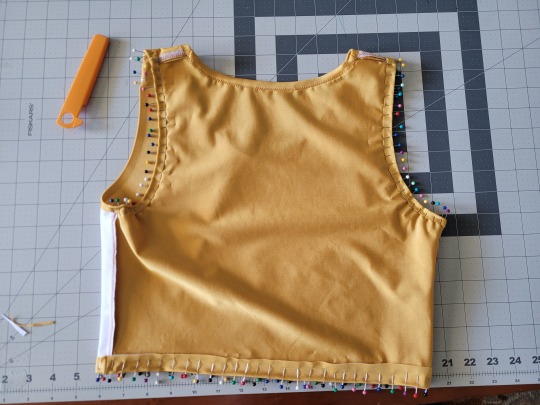
After the stiff front panel is fused to the stretch fabric, you’ll sew the straps of the front and back pieces together, then join the pieces along the sides. Pin the hell out of it to keep everything in place -this type of material is VERY prone to puckering.
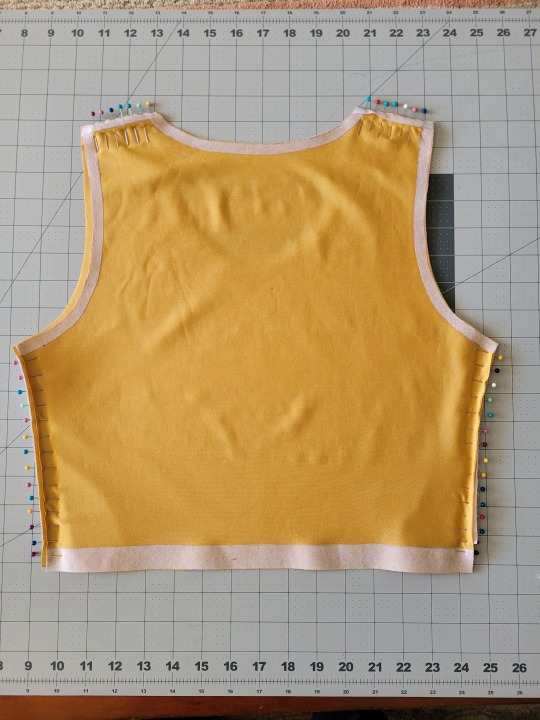
When sewing, USE A ZIGZAG STITCH. A straight stitch will NOT WORK for stretch fabric. I adjust mine to 1.3mm long and 3.5mm wide which has worked well. If your machine doesn’t let you adjust stitch length or width, well. That sucks, I don’t really have any advice.
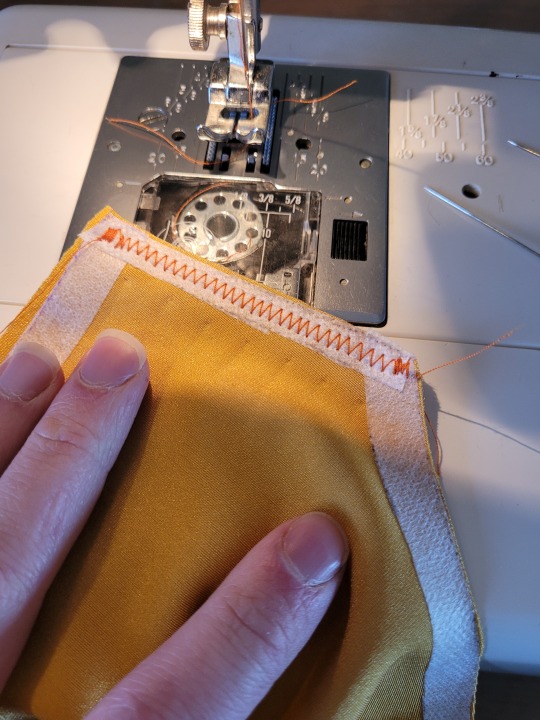
After you sew the front and back pieces together, you can add more fusible webbing to the front panel to help hold the hem down flat and prevent it from puckering while you sew it. Just add the strip, peel the paper off, then fold the hem over and iron it down. This part isn’t really necessary, but it does make the hems look nicer. If nothing else, I would recommend adding it to the neckline.
After that, you just fold & pin all the hems and sew them up with a zigzag stitch, then go over the raw edge at the top of the stiff panel (where we cut the straps shorter).
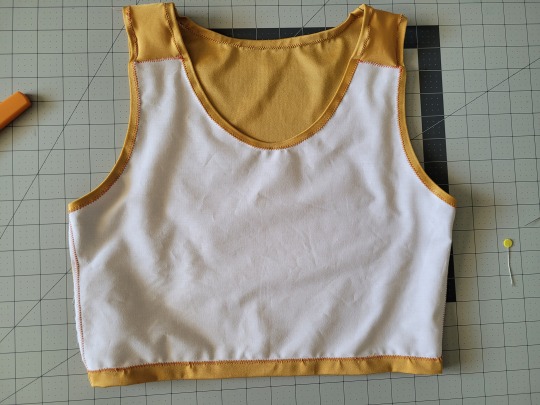
And that’s it! You’re done! And now you can make your own binders whenever you want!
And hey! If you used this tutorial and wanna throw me a dollar or two on ko-fi, I wouldn't complain.
2K notes
·
View notes
Text
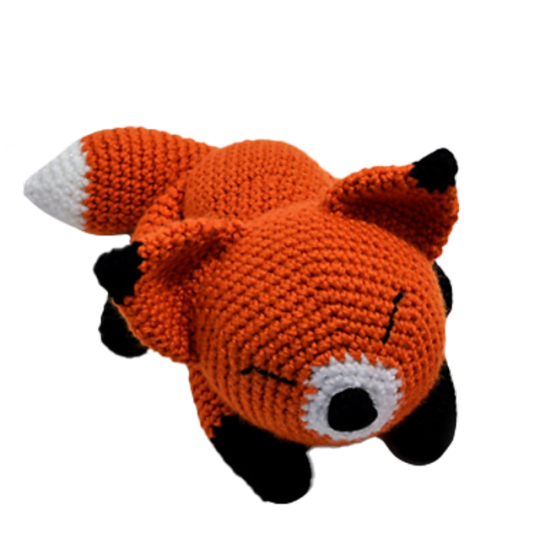
Fox Amigurumi, a free crochet pattern designed by Roxanne Mimeault on Ravelry.
130 notes
·
View notes
Text


manta ray i crocheted for my girlfriend's birthday :) he's a very comfy pillow with a nice weight and squishiness. made from cotton yarn and stuffed with down + cotton fabric.
i made the pattern myself with inspiration from this pattern for the overall structure :)
3K notes
·
View notes


Text
2025 Housekeeping Sale:
I'm in the process of refreshing all of my patterns to include the newest documentation and make other improvements. Until that's finished, all Interlocking Patches Collections are priced at US$1+.
Don't worry, the patterns work fine the way they are, and you'll get the upgraded versions when they're ready! (For access to all of the Patches at once, including New Releases and over 50 exclusive patterns — all for US$12 — head over to the Vault.)
The collections on offer:


50 notes
·
View notes
Text


Samples from recent Dispatches (my crochet pattern zine) subscribe please it's cheap and the technique isn't nearly as hard as you'd think
43 notes
·
View notes
Text

i have a complete mental block on writing tutorials/finished-object patterns, but a pal asked me about wall hangings, bless them, and this is how I do mine. Very drafty instructions under the cut
Basic crocheted dowel hanging mount for Interlocking Patches
For tapestries, I recommend a Blanket Border with square corners. I do not recommend a Badge (aka Classic Pinstripe) border.
With back of work facing, make a slip knot and place loop on hook. yo and, holding yo in place with your thumb, dc around the first Colour A post (front post dc on back of work), ch 1.
front post dc, ch 1 to end of row.
ch 3, turn (so front faces), tr in same st, ch 1
(tr2)tog, ch 1 to end of row.
cut yarn, leaving a tail long enough to serve as hanging thread + several inches, and pull end through loop to finish
Pass dowel through all (tr2)tog sts.
with front facing, wrap the tail around dowel towards you several times to secure (important!); repeat on other side; knot to fasten.
weave in ends
Repeat on bottom edge if desired, skipping step 7.
you can crochet the hanging mount with any yarn or thread, but this pattern assumes you're using the same weight and hook size as the Patch itself. If you're using a thinner yarn and/or a smaller hook; if your dowel is extra chunky, or you prefer a different look, use longer sts — trs and/or (dtr2)togs, for instance — and ch 2+ between posts.
I use this single-edged flush cutting saw to trim dowels.
59 notes
·
View notes
Text

I finished this a while ago but never posted it — my first tapestry crochet! Used a pattern off braceletbook and some secondhand acrylic.
I had some major tension issues at first that required some very aggressive blocking at the end and there’s a lot of little tricks I’ve discovered since that I want to incorporate next time but boy is tapestry crochet satisfying
42 notes
·
View notes
Text


My second foray into needlepoint. Stitched with thrifted & leftover acrylic yarn on plastic canvas, finished with felt backing and a crocheted cord for the hanger. Design is my own.
This one was very experimental and there are definitely some areas that could be improved with more finesse but overall I’m really happy with the result. I learned a lot doing it and I really loved doing the little scotch squares for the background. I did most of this in 5 minute study breaks, so this represents about a quarter and a half of studying time, haha.
101 notes
·
View notes
Text

Apologies for the delay, but the final count is in!
After everything has been counted, the total raised by this fundraiser was €4561.23-- a fantastic amount! Thank you to everyone who donated, contributed, and shared the campaign. You have our deepest gratitude.
We've been in contact with Hadeel, and while the money will not be enough for her to pay for her family to evacuate into Egypt, it will be a huge help to her: it will be used to buy food, clothes, and to pay for lodging over the next few months. Prices for essentials have skyrocketed during the war, so every piece of aid helps!
If you are able, you can donate to help Hadeel and her family (her husband Waseem, and their children Mira, Nadia, and Labeeb) at their GoFundMe here.
Thank you all for all your assistance and support!
11 notes
·
View notes
Text

This has been one of the most intense reconstructions I’ve done.
20 notes
·
View notes
Text


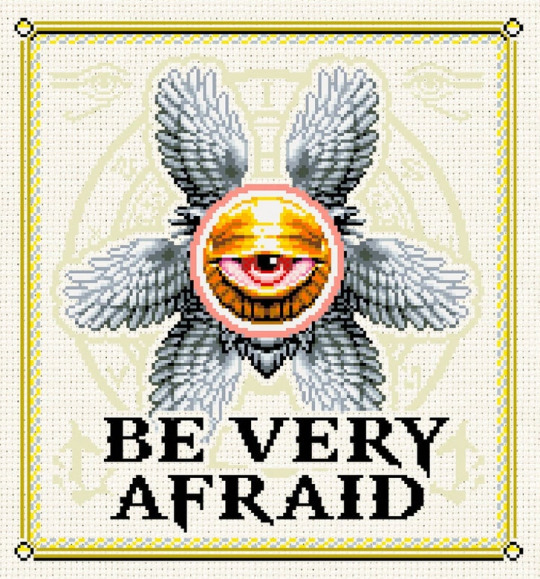


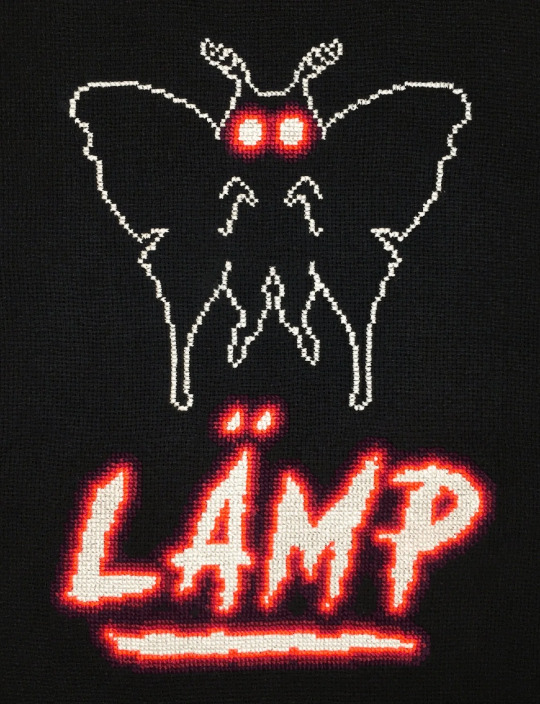


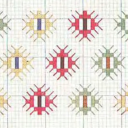
Meet the Patterns of the Cross Stitch for Gaza Pattern Bundle
11 patterns by The Retro Stitcher:
'REPETITION'
'SALVATION' | 'MEDUSA' | 'DAMNATION'
'FUCK'
'EAT ME' | 'EAT ME_COLOR' | 'EATME_ONECOLOR'
'LAMP' | 'EAT ME_EYE' | 'LIGHTS_ON'
10 notes
·
View notes
Text
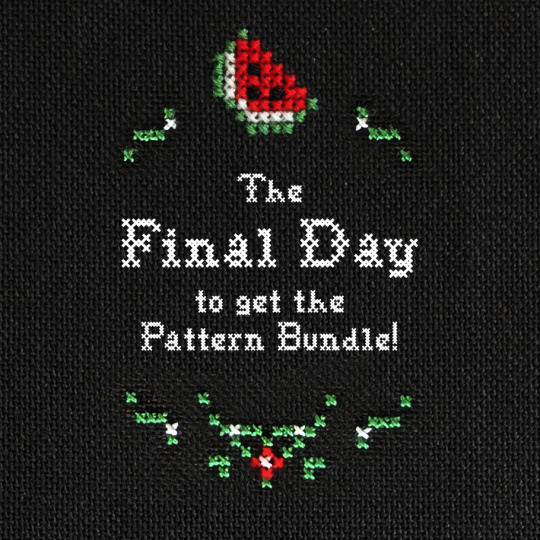
It's the final day to get the Cross Stitch for Gaza pattern bundle! Only a few scant hours left--
Donation receipt submissions will close at April 25ᵗʰ, 11:59pm eastern time. That's tonight!
The bundle has 63 patterns from 35 designers, and is available to anyone who donates €15 to Hadeel Mikki and her family in Gaza.
It's been a wonderful and heartwarming experience running this fundraiser; the kindness and generosity of this community has been great to see!
Once the fundraiser closes, we'll be back with the final tally; it won't be enough to pay for Hadeel and her family to cross over into Egypt, but it is enough to make a real, meaningful difference in their lives. So to everyone who has contributed-- contributed patterns, or money, or time-- thank you. ❤️
[ Browse the Patterns Here ] [ Donate and get the Bundle Here ]
34 notes
·
View notes
Text
I made a knitting pattern with a secret encoded message.
#this is really cool and my knitting skills have actually finally started to improve so#maybe i could actually make this someday#knitting pattern#knitting
98 notes
·
View notes
Text

My pattern Doors of Gaza is available as part of the Cross Stitch for Gaza pattern bundle organized by @mathysphere to raise money for Hadeel's family. Please check it out, there are so many talented designers whose patterns are included!
37 notes
·
View notes
Text

five crocheted patches from Lab Tech(s) (patterns out soon)
43 notes
·
View notes