
Don't wanna be here? Send us removal request.
Statistics
We looked inside some of the posts by answertheworld and here's what we found interesting.
Average Info
Notes Per Post
1
Likes Per Post
1
Reblog Per Post
0
Reply Per Post
0
Time Between Posts
21 hours
Number of Posts By Type
Text
9
Last Seen Tumblr Blogs


Fun Fact
Tumblr.com is the 103rd most visited website in the world.
Text
How do I backup registry in Windows 10?
To create a backup of the current Registry in a Windows 10 system, follow these methods:
Method 1
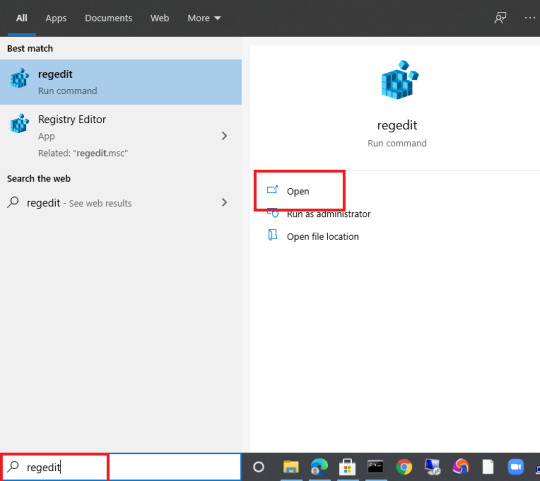
1. Type regedit in the Search box and click Open.
2. Click Yes, if you’re prompted by User Account Control.
3. Click Computer from the left side.

4. Click File and on the dropdown menu, click on Export.

5. Type a name for the backup file when the Export Registry File window popup.
6. Choose All under the Export range section.
7. Select a location where you want to save the backup file.
8. Click Save.

Note: Backup of the Registry files or data are saved with .reg extension.
Method 2
1. Press Windows + R keys together and type regedit in the Run window that appear.

2. Click Yes, if you’re prompted by User Account Control.
3. Click Computer from the left side.
4. Click File and on the dropdown menu, click on Export.
5. Type a name for the backup file when the Export Registry File window popup.
6. Choose All under the Export range section.
7. Select a location where you want to save the backup file.
8. Click Save.
Note: Backup of the Registry files or data are saved with .reg extension.
0 notes
Text
How do you change the display order of boot menu items in Windows 10?
The following are the methods to change the display order of the boot menu in Windows 10.
Method 1: Change the display order of the boot menu in Windows 10 through Settings.
1. Click on the Start button and then click on the Settings Icon.

2. Click on Update & Security.

3. Click on Recovery on the left side of the Update & Security Settings page.

4. Click the Restart now button in the Advanced startup section.

5. Your PC will restart, and you will get Choose an option screen after the restart. Click Use another operating system tile.

6. On the Choose an operating system screen, click Change defaults.

7. Click Choose a default operating system on the Options window.

8. Click on the Operating System entry that you want to set as default to make it the default.
The default one appears at the top of the list and your changes will be affected when you restart your PC.
Method 2: Change the display order of the boot menu in Windows 10 through System Configuration.
1. Type msconfig in the Search box and click Open.

2. Click on the Boot tab.
3. Click on the operating system that you want to set as the default and then click the Set as default button.
4. Click the Apply button. Then click Ok.

5. Restart your PC to effect your change.
0 notes
Text
How do I switch to a different user on Windows 10 easily and quickly?
You can quickly switch users on Windows 10 by following the options listed below.
Option 1: Switch users in Windows 10 from the Start Menu
1. Click on the Start button.
2. Click or tap on the symbol/picture of your user account.

3. Then, select the user account that you want to switch to.

You are taken to the login screen where the selected user is loaded. Enter the appropriate login information, and you are in.
Option 2: Switch users in Windows 10 Using the Alt + F4 Keyboard Shortcut
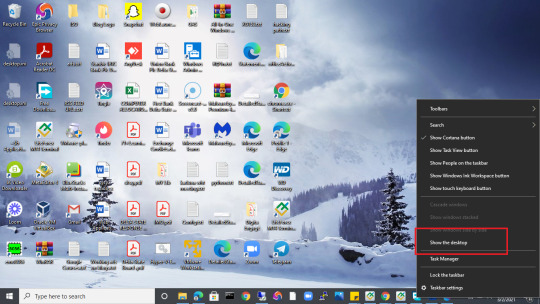
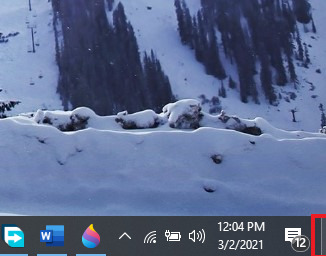
1. Make sure you are on the Desktop of your PC. To be sure, you can right-click on an empty space on your Taskbar and click on Show the desktop or click on Show the desktop tab or press Windows + D keys together.
Or
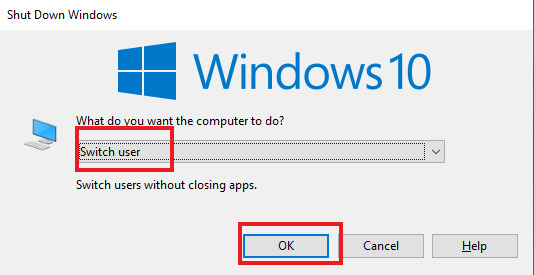
2. Press alt + F4 keys together or alt + fn + F4 together. The Shutdown window will appear, click to choose Switch user. Then click Ok.

You are taken to the login screen where the selected user is loaded. Enter the appropriate login information, and you are in.
Option 3: Switch users in Windows 10 Using the Ctrl + alt + del Keyboard Shortcut
1. Press Ctrl + alt + del keys together. This will bring up the window screen shown below.

2. Click on Switch user.
You are taken to the login screen where the selected user is loaded. Enter the appropriate login information, and you are in.
Option 4: Switch users in Windows 10 Using the Task Manager.
1. Right-click on an empty space on your Taskbar and click on Task Manager.
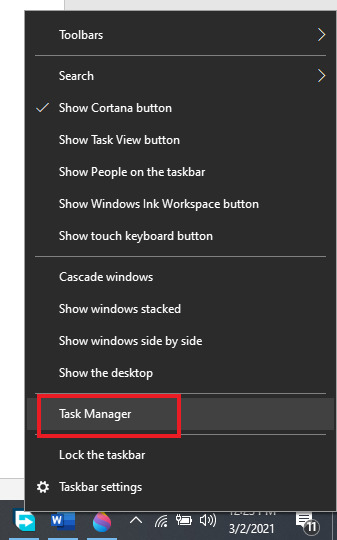
2. Click on detailed view on the task Manager. Click on Users. Now right-click on the target user account and click on Switch user.

You are taken to the login screen where the selected user is loaded. Enter the appropriate login information, and you are in.
Option 5: Switch users in Windows 10 Using the Windows + L Keys.
1. Press Windows + L keys together. This will lock your PC screen.

2. Click anywhere on the lock screen, the login page will display, and on the bottom left corner of the login page, choose the user you want to login with and enter the credential to log in.
Option 6: Switch users in Windows 10 From Command Prompt.
1. Type cmd in the Search box and click Open.

2. Type tsdiscon and press Enter.

This will lock your PC screen.
3. Click anywhere on the lock screen, the login page will display, and on the bottom left corner of the login page, choose the user you want to login with and enter the credential to log in.
Note: This method doesn’t work in Windows 10 Home. You can use it only in Windows 10 Pro or other editions such as Windows 10 Enterprise.
Option 7: Switch users in Windows 10 From PowerShell.
1. Type powershell in the Search box and click Open.
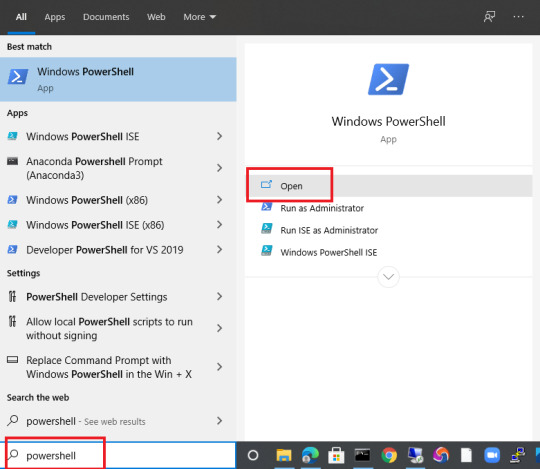
2. Type tsdiscon and press Enter.

This will lock your PC screen.
3. Click anywhere on the lock screen, the login page will display, and on the bottom left corner of the login page, choose the user you want to login with and enter the credential to log in.
Note: This method doesn’t work in Windows 10 Home. You can use it only in Windows 10 Pro or other editions such as Windows 10 Enterprise.
0 notes
Text
How do I hide the taskbar on Windows?
Hiding Taskbar in Windows 10 can be done using the following methods.
Method 1
1. Right-click on an empty space on the Taskbar settings.

2. Toggle on Automatically hide the taskbar in desktop mode.
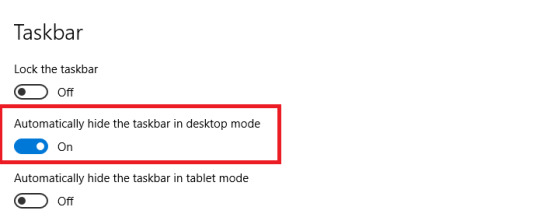
3. Toggle on Automatically hide the taskbar in tablet mode.

Method 2
1. Right-click on an empty space on the Desktop of your PC and click on Personalize.

2. Click on the Taskbar.
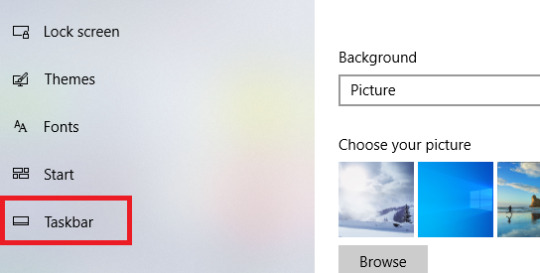
3. Toggle on Automatically hide the taskbar in desktop mode.
4. Toggle on Automatically hide the taskbar in tablet mode.
Method 3
1. Type cmd in the Search box and click on Open.

2. Type the command below and press Enter.
powershell -command "&{$p='HKCU:SOFTWARE\Microsoft\Windows\CurrentVersion\Explorer\StuckRects3';$v=(Get-ItemProperty -Path $p).Settings;$v[8]=3;&Set-ItemProperty -Path $p -Name Settings -Value $v;&Stop-Process -f -ProcessName explorer}"

0 notes
Text
How do I enable IIS on Windows 10?
You can enable IIS (Internet Information Services) using the following options:
Option 1
1. Type Control Panel in the Search box and click Open.

2. Switch the Control Panel view to Category.

3. Click on Programs.

4. Click on Turn Windows features on or off.

5. Locate Internet Information Services and click on the checkbox beside the Internet Information services on the Windows Features dialog box that popup.
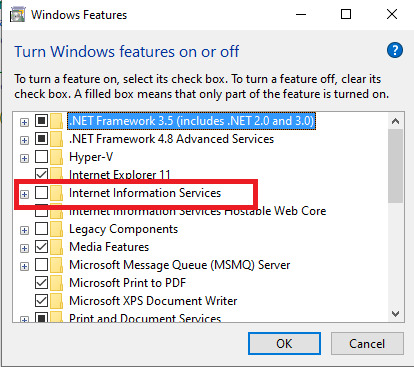

6. Click on OK.
Windows will search for the required files and it will apply the changes and complete the requested changes. Click on Close.


Internet Information Services (IIS) will now be enabled on your Windows 10 PC.
Option 2
1. Type Control Panel in the Search box and click Open.
2. Switch the Control Panel view to Small icons.

3. Click on Programs and Features.

4. Click on Turn Windows features on or off.

5. Locate Internet Information Services and click on the checkbox beside the Internet Information services on the Windows Features dialog box that popup.
6. Click on OK.
Windows will search for the required files and it will apply the changes and complete the requested changes. Click on Close.
Internet Information Services (IIS) will now be enabled on your Windows 10 PC.
Option 3
1. Press Windows and R keys together an type appwiz.cpl. Then click Ok.

2. Click on Turn Windows features on or off.
3. Locate Internet Information Services and click on the checkbox beside the Internet Information services on the Windows Features dialog box that popup.
4. Click on OK.
Windows will search for the required files and it will apply the changes and complete the requested changes. Click on Close.
Internet Information Services (IIS) will now be enabled on your Windows 10 PC.
Option 4
1. Type turn on windows in the Search box and click Open.

2. Locate Internet Information Services and click on the checkbox beside the Internet Information services on the Windows Features dialog box that popup.
3. Click on OK.
Windows will search for the required files and it will apply the changes and complete the requested changes. Click on Close.
Internet Information Services (IIS) will now be enabled on your Windows 10 PC.
0 notes
Text
HOW TO START A PS4 IN SAFE MODE

You can start your PS4 in safe mode following the steps:
· Turn the PS4 off completely.
· Press the power button as usual, and it should blink a few times before your console powers down.
· Press and hold the power button.
· You should hear a beep when pressed and another one seven seconds later. Once you hear both, release the power button.
· Your PS4 should have booted up in Safe Mode.
· Plug your controller into the PS4 and click the PS4 button.
· To control your PS4 from here, you’ll need to make sure that you’ve got a DualShock controller connected to your console via USB.
To exit Safe Mode, turn off your PS4 and turn it back on. Your PlayStation should boot normally.
0 notes
Text

Whitelister is an innovative tool that allows you to control your connectivity by choosing what programs and websites to route via VPN and vice versa.
Whitelister can be used to Bypass VPN: In this case, Whitelister will blocks selected applications and websites from using the VPN connection. These will run through your normal internet connection.
Whitelister can also be used to Route via VPN: This is an alternative, allowing only the chosen applications and websites to connect to the internet using the VPN connection.
The following steps will be taken in order to use Whitelister to Bypass VPN or Route via VPN on our Android.
· Enable Whitelister
· Select applications
· Select websites
Note: You will need an Android device and a Surfshark subscription.
Enable Whitelister
· Open the Surfshark application.
· Tap Features on the bottom bar. If you don't have Surfshark on your Android, we are coming up with an article on “How to set up Surfshark VPN on Android?”
· Tap on Whitelister, which is under VPN features.
· Select which method you are going to use. This guide will go over the Bypass VPN option, which has an identical setup process to Route via VPN. To enable it, tap on the switch bar on the right of the method.
Select applications.
· To select applications that will bypass the VPN, tap on the 0 Apps selected bar.
· You will see a list of all supported applications on your device ready for use with Whitelister. Select the applications that you would like to bypass the VPN connection. You can do that by tapping the box on the right of the application.
· Surfshark will inform you that your application is ready for Whitelister. Now you can return to the previous Whitelister screen.
· You will see the appropriate number of applications displayed.
· Return to the main screen of Surfshark and connect to your preferred location. Surfshark will now make sure that your selected applications will not receive VPN encryption when you connect.
Select websites
· To select websites that will bypass the VPN, tap on 0 websites selected.
· In a new window, tap on Add Website.
· Type in the URL of the website and tap on Save.
· You will see the website appear on the list. You can return to the Whitelister menu now.
· You will see the appropriate number of websites displayed.
· Return to the main screen of Surfshark and connect to your preferred location. Surfshark will now make sure that your selected websites will not receive VPN encryption when you connect.
Route via VPN
· As for Route via VPN, the process is identical.
· Just enable Route via VPN instead of Bypass VPN.
· Add your applications or websites to the list.
Congratulations - you have successfully set up Whitelister with Surfshark on your Adroid.
0 notes
Text

Whitelister is an innovative tool that allows you to control your connectivity by choosing what applications or websites to route via VPN and vice versa.
You use Whitelister to Bypass VPN, that is blocks selected applications and websites from using the VPN connection on Windows devices.
You can also use Whitelister to Route via VPN, which is an alternative, allowing only the chosen applications and websites to use the VPN connection on Windows devices.
We will follow the given steps:
Enable Whitelister.
Select applications.
Select websites or IP addresses
Note: You will need a Windows device and a Surfshark subscription to follow along. If you do not have an active subscription, you can purchase one.
Enable Whitelister
Open the Surfshark application. On the left-hand side panel, click Features.
In the Features tab, click on Whitelister.
Enable the preferred Whitelister option by clicking the switch bar on the right side. In this example, it's Bypass VPN.
Select applications
Once you enable Bypass VPN, click on Select apps to start adding applications that will bypass the VPN coverage.
A list of all applications visible on your device will appear. To add the application to Bypass VPN, leave a checkmark in the square on the application's right.
If you can't find the application on this list, click Add apps and locate an executable file for the application you wish to add.
Now reconnect to any location on Surfshark, and the applications on the Bypass VPN list will bypass the VPN coverage.
In case you wish to route specific applications only via VPN, select Route via VPN and enable it instead of Bypass VPN.
Select websites or IP addresses
If you wish to bypass certain websites instead of apps, enable Bypass VPN below the Websites / IP addresses tab instead.
Click on Select websites or IP addresses to start adding websites or IP addresses.
Click Add websites or IP addresses.
A window will appear with a field where you can input either a website or an IP address. Once you do, click Add.
Now reconnect to any location on Surfshark, and the websites or IP addresses on the Bypass VPN list will bypass the VPN coverage.
Follow the same step for Route via VPN.
0 notes
Text
HOW DO I PROTECT MY OFFICE 365 OR ORGANIZATION MICROSOFT 365 DATA?

You can protect or secure your office 365 data with top security features recommendation.
The following are the top 10 security features recommendation you can adopt to protect or secure your Office 365 data:
1. Raise the level of protection against malware in mail.
To increase the level of malware protection in email, complete the following steps:
Go to the protection page or portal of Office Online and sign in with your admin account credentials.
In the Security & Compliance Center, in the left navigation pane, under Threat management, click Policy.
Click Anti-Malware.
Double-click the default policy to edit this company-wide policy.
Click Settings.
Under Common Attachment Types Filter, Click On.
Note: The file types that are blocked are listed in the window directly below this control. You can add or delete file types later, if needed.
Click Save.
2. Protect against ransomware.
You can protect against ransomware by creating one or more mail flow rules to block file extensions that are commonly used for ransomware.
You can also protect against ransomware by warning users who receive these attachments in email.
The following mail flow rules can be created:
Warn users before opening Office file attachments that include macros.
Block file types that could contain ransomware or other malicious code.
To create a mail transport rule, complete the following steps:
Go to the Exchange admin center.
In the mail flow category, click rules.
Click +, and then Create a new rule.
Click **** at the bottom of the dialog box to see the full set of options.
Apply the settings to warn users before opening Office file attachments that include macros and block file types that could contain ransomware or other malicious code.
Click Save.
3. Stop auto-forwarding for email.
If hackers gain access to a user's mailbox, they can exfiltrate mail by configuring the mailbox to automatically forward email and users may not be aware of this change.
To prevent this from happening you can configure a mail flow or transport rule.
Go to the Exchange admin center.
In the mail flow category, click rules.
Click +, and then Create a new rule.
Click More options at the bottom of the dialog box to see the full set of options.
Apply the settings to reject Auto-Forward emails to external domains.
Click Save.
4. Use Office Message Encryption.
Office 365 Message Encryption works with Outlook, Yahoo!, Gmail, and other email services. Email message encryption helps ensure that only intended recipients can view message content.
Office Message Encryption provides two protection options when sending mail:
Do not forward.
Encrypt.
You might have to configure additional options that apply a label to email, such as Confidential.
To send protected email with encryption in Outlook For PC:
In Outlook for PC, click Options tab.
Then click Permissions.
To send protected email with encryption in Outlook account:
In Outlook account, click Protect tab. The default protection is Do not forward.
To change this to encrypt, click Change Permissions.
Click Encrypt.
To receive encrypted email
The recipient with Outlook 2013 or 2016, or 2019 and a Microsoft email account will see an alert about the item's restricted permissions in the Reading pane. After opening the message, the recipient can view the message just like any other.
The recipient using another email client or email account, such as Gmail or Yahoo will see a link that lets them either sign in to read the email message or request a one-time passcode to view the message in a web browser. If users aren't receiving the email, have them check their Spam or Junk folder.
5. Protect your email from phishing attacks.
Anti-phishing protection, a part of Microsoft Defender for Office 365, can help protect your organization from malicious impersonation-based phishing attacks and other phishing attacks. You need this if you've configured one or more custom domains for your Microsoft 365 environment.
To create an anti-phishing policy in Defender for Office 365, complete the following steps:
Go to the protection page or portal of Office Online.
In the Security & Compliance Center, in the left navigation pane, under Threat management, click Policy.
On the Policy page, click Anti-phishing.
On the Anti-phishing page, click + Create. A wizard launches that guides you through defining your anti-phishing policy.
Specify the name, description, and settings for your policy.
After you have reviewed your settings, click Create this policy or Save.
6. Protect against malicious attachments and files with Safe Attachments.
Microsoft Defender for Office 365 includes Safe Attachment protection, but this protection is not turned on by default. We recommend that you create a new rule to begin using this protection.
To create a Safe attachment policy, complete the following steps:
Go to the protection page or portal of Office Online and sign in with your admin account credentials.
In the Security & Compliance Center, in the left navigation pane, under Threat management, click Policy.
On the Policy page, click Safe Attachments.
On the Safe attachments page, apply this protection broadly by clicking the Turn on ATP for SharePoint, OneDrive, and Microsoft Teams check box.
Click + to create a new policy.
Apply the settings you want.
After you have reviewed your settings, click Create this policy or Save.
7. Protect against phishing attacks with Safe Links.
Safe Links, part of Microsoft Defender for Office 365, can help protect your organization by providing time-of-click verification of web addresses (URLs) in email messages and Office documents.
To get to Safe Links, complete the following steps:
Go to the protection page or portal of Office Online and sign in with your admin account credentials.
In the Security & Compliance Center, in the left navigation pane, under Threat management, click Policy.
On the Policy page, click Safe Links.
To modify the default policy:
On the Safe links page, under Policies that apply to the entire organization, double-click the Default policy.
Under Settings that apply to content across Office 365, enter a URL to be blocked, such as example.com, and click +.
Under Settings that apply to content except email, click Office 365 applications, Do not track when users click safe links, and Do not let users click through safe links to original URL.
Click Save.
To create a new policy targeted to all recipients in your domain:
On the Safe links page, under Policies that apply to specific recipients, click + to create a new policy.
Apply the settings you want.
Click Save.
8. Set up multi-factor authentication.
Using multi-factor authentication is one of the easiest and most effective ways to increase the security of your organization. It's easier than it sounds - when you log in, multi-factor authentication means you'll type a code from your phone to get access to Microsoft 365. This can prevent hackers from taking over if they know your password. Multi-factor authentication is also called 2-step verification.
To set up multi-factor authentication, you turn on Security defaults. You enable or disable security defaults from the Properties pane for Azure Active Directory (Azure AD) in the Azure portal.
Sign in to the Microsoft 365 admin center with your global admin credentials.
In the left navigation pane, click Show All.
Under Admin centers, click Azure Active Directory.
In the Azure Active Directory admin center, click Azure Active Directory.
Click Properties.
At the bottom of the page, click Manage Security defaults.
Click Yes to enable security defaults or No to disable security defaults.
Then click Save.
After you set up multi-factor authentication for your organization, your users will be required to set up two-step verification on their devices.
Note: You can set up multi-factor authentication in both Microsoft 365 Business Standard and Microsoft 365 Business Premium.
9. Train your users.
Microsoft recommends that you train your users on how to take the following actions:
Using strong passwords.
Protecting devices.
Enabling security features on Windows 10 and Mac PCs
10. Use dedicated admin accounts.
The administrative accounts are valuable targets for hackers and cyber criminals and these accounts include elevated privileges.
Admins should have a separate user account for regular, non-administrative use and only use their administrative account when necessary to complete a task associated with their job function.
They must commit to the following recommendations:
Be sure admin accounts are also set up for multi-factor authentication.
Before using admin accounts, close out all unrelated browser sessions and apps, including personal email accounts.
After completing admin tasks, be sure to log out of the browser session.
Expert advice: To start with, you can check your Microsoft 365 Secure Score in the Microsoft 365 security center. From a centralized dashboard, you can monitor and improve the security for your Microsoft 365 identities, data, apps, devices, and infrastructure. You are given points for configuring recommended security features, performing security-related tasks (such as viewing reports), or addressing recommendations with a third-party application or software.
1 note
·
View note