
Free Xcode Project Templates of Published Swift iOS Apps & Games
Don't wanna be here? Send us removal request.
Statistics
We looked inside some of the posts by appsgym and here's what we found interesting.
Average Info
Notes Per Post
1
Likes Per Post
1
Reblog Per Post
0
Reply Per Post
0
Time Between Posts
4 days
Number of Posts By Type
Link
14
Text
2
Last Seen Tumblr Blogs


Fun Fact
Tumblr is used by 21% of adults online aged 18-29 years.
Link
0 notes
Text
Swift Keyboard Control for TextFields and TextViews
Keyboard Control as User Navigates TextFields and TextViews on Table View Form

Scenario
Our app will allow users to tap between TextFields and TextViews and control the keyboard display (hide or show) as required. The code will ensure that the keyboard does not override (hide) the TextField or TextView the user has in focus.
Technique
We shall utilise the Delegate feature so the view, as the delegate to the TextFields and TextViews, can control the keyboard display. Then we shall use GestureRecognizer to detect user gestures and check the TextField or TextView BeginEditing and EndEditing conditions and animate the fields or views to move them up or down, depending on the keyboard display status.
Audience
The article is for Swift developers who seek complete, integrated, proven, code-centric solutions to speed up their development projects.
App Model
We based the article on the AppsGym Books model app, published on Apple’s App Store (as 8Books), and you can download the complete Xcode project on AppsGym.com, for free.
User Interfaces
NewBookTableViewController.swift and EditBookTableViewController.swift control the layout, order, and navigation of the corresponding UITableViewControllers.
Logic
NewBookTableViewController.swift contains keyboard control logic, which monitors and detects user taps on the form fields and reacts accordingly.
There are 7 TextFields on the New Book view: Title, Author, Series, No in Series, Category (Genre), Source, and Format. Each field has a Tag on the Storyboard (e.g., titleTextField.tag = 1) and each behaviour is governed by 3 textField functions, which we shall utilise to control the textField attributes and movement by controlling the becomeFirstResponder() function.
textFieldShouldReturn(..), textFieldDidBeginEditing(..), and textFieldDidEndEditing(..)
There are 2 TextViews on the New Book view: Synopsis and Notes. We shall use 2 textView functions to control their behaviour: textViewDidBeginEditing (..) and textViewDidEndEditing(..).
Code
We shall separate the code of TextFields and TextView to make it easier to focus on each group keyboard control.
TextFields

NewBookTableViewController.swift Initialise Variables
// Tags are used to Auto Jump to next TextField; see func textFieldShouldReturn @IBOutlet weak var titleTextField: UITextField! { didSet { titleTextField.tag = 1 titleTextField.delegate = self } } @IBOutlet weak var authorTextField: UITextField! { didSet { authorTextField.tag = 2 authorTextField.delegate = self } } ... @IBOutlet weak var formatTextField: UITextField! { didSet { formatTextField.tag = 7 formatTextField.delegate = self } } ....
NewBookTableViewController.swift viewDidLoad()
... let tapGestureReconizer = UITapGestureRecognizer(target: self, action: #selector(NewBookTableViewController.tap(_:))) view.addGestureRecognizer(tapGestureReconizer) ... }
NewBookTableViewController.swift Keyboard Control
func textFieldDidBeginEditing(_ textField: UITextField) { textField.layer.borderWidth = 2 textField.layer.borderColor = UIColor.orange.cgColor } func textFieldDidEndEditing(_ textField: UITextField) { textField.layer.borderWidth = 0 textField.layer.borderColor = UIColor.clear.cgColor }
@objc func tap(_ sender: UITapGestureRecognizer) { view.endEditing(true) } view raw
TextViews

NewBookTableViewController.swift Initialise Variables
class NewBookTableViewController: UITableViewController, UITextViewDelegate { ... @IBOutlet weak var synopsisTextView: UITextView! @IBOutlet weak var notesTextView: UITextView! ...
ewBookTableViewController.swift viewDidLoad()
override func viewDidLoad() { super.viewDidLoad() ... self.synopsisTextView.delegate = self // keyboard control self.notesTextView.delegate = self // keyboard control synopsisTextView.text = "" notesTextView.text = "" // stringCurrentDate() + "nn" ... let tapGestureReconizer = UITapGestureRecognizer(target: self, action: #selector(NewBookTableViewController.tap(_:))) view.addGestureRecognizer(tapGestureReconizer) ... } // end viewDidLoad()
NewBookTableViewController.swift** Keyboard Control**
/ 4 funcs To dimiss keyboard and move the textView UP/Down when the keyboard shows @objc func tap(_ sender: UITapGestureRecognizer) { view.endEditing(true) } func textViewDidBeginEditing(_ textView: UITextView) { textView.layer.borderWidth = 2 textView.layer.borderColor = UIColor.orange.cgColor animateViewMoving(true, moveValue: 100) } func textViewDidEndEditing(_ textView: UITextView) { textView.layer.borderWidth = 0 textView.layer.borderColor = UIColor.clear.cgColor animateViewMoving(false, moveValue: 100) } func animateViewMoving (_ up:Bool, moveValue :CGFloat){ let movementDuration:TimeInterval = 0.3 let movement:CGFloat = ( up ? -moveValue : moveValue) UIView.beginAnimations( "animateView", context: nil) UIView.setAnimationBeginsFromCurrentState(true) UIView.setAnimationDuration(movementDuration ) self.view.frame = self.view.frame.offsetBy(dx: 0, dy: movement) UIView.commitAnimations() }
**
**
Keyboard Height
The code snippets above used a simple moveValue of 100, which would suffice for most scenarios. However, a more accurate measure would be the actual keyboard height on the device.
The code snippet below shows how to obtain the Keyboard Height. If you want to use this method, substitute the keyboardHeight for the ‘100’ in the moveValue argument for TextView. You can optionally use keyboardHeight in the TextField functions for more precise controls.
if let keyboardSize = (notification.userInfo?[UIResponder.keyboardFrameEndUserInfoKey] as? NSValue)?.cgRectValue { keyboardHeight = keyboardSize.height print(#function, keyboardHeight)
// The 1st keyboardWillShow gets the keyboard size height then observer removed as no need to get keyboard height every time it shows or hides
NotificationCenter.default.removeObserver(self, name: UIResponder.keyboardWillShowNotification, object: nil) // Store KeyboardHeight in UserDefaults to use when in Edit Mode
UserDefaults.standard.set(keyboardHeight, forKey: "KeyboardHeight") UserDefaults.standard.synchronize() } } // end func keyboardWillShow
The article covered the complete logic and code to control the behaviour of TextFields and TextViews, so the keyboard does not obscure the relevant fields or views behind it. Hope you find it useful in your app. Thanks for reading!
0 notes
Text
Copy Xcode Project in 5 Easy, Safe Steps within 10 Minutes

Scenario
You want to copy an existing Swift Xcode project to be a template for a new project, utilising Xcode built-in referencing algorithms.
Audience
The article is for Swift developers who wish to create new Xcode projects, from a model / template project, easily and safely within a reasonable timeframe.
Prerequisites
The article applies to any Xcode project. However, we based this article on the AppsGym Books model app, as a practical example, which is published on Apple’s App Store (as 8Books). You can review the app and also download the complete Xcode project on AppsGym.com, free (no ads). Once downloaded, you can replicate the steps below to get familiarity with the approach, if needed.
Do NOT Copy Folder!
The first action not to be done is to copy the folder and rename the project. This is prone to so many errors; it’s just not worth it. Follow the guidance below, and your new project will take only 10 minutes to perfection.
YouTube Video
youtube
We recommend viewing this video within the following group sequence, on the AppsGym YouTube Channel, but it’s perfectly fine to view it standalone with reference to this article.
AppsGym Books Model App Tour
AppsGym Books Xcode Project Tour
Copy Xcode Project in 5 Easy, Safe Steps (this video)
Bird’s Eye View

Step 1: Create & Clean Your New Xcode Project
Launch Xcode and Create a New Project.

The new Project Navigator layout will be displayed

Move to Trash every file, so you will end up with a ‘clean’ slate: basically nothing!
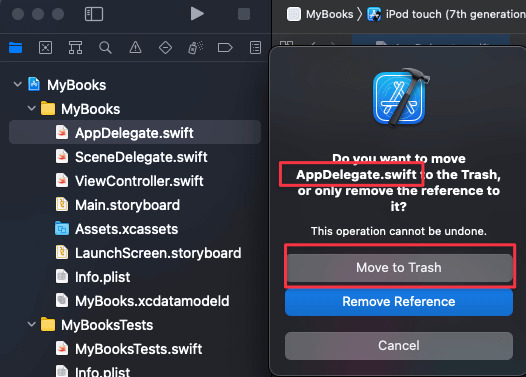
This view is the result of all the ‘trashing’! You can keep the new project *.xcdatamodeld if you want to build it later (optional, as the model project uses a different xcdatamodeld). Now you are ready.

Step 2: Copy Model Project Folders & Files to Your Project
Copy the folders (e.g., Assets.xcassets) and files (*.swift) from the AppsGym Xcode Books project to your new project under the folder of your project name (do not copy the Base.Iproj, *.xcodeproj, *.entitlements or Tests files)

Select the following options for each copy operation

The new Project Navigator layout will be as follows (an exact copy of the AppsGym model project):

Step 3: Add Your Project Bundle Version and Build
Warning: If you leave empty, you will run into the ‘Failed to Install the Requested Application’ error!

Step 4: Remove Info.plist from Build Phases
Navigate to your project Build Phases: Copy Bundle Resources and remove (-) any info.plist file there (usually 2, remove both).
Warning: If you don’t remove the records, you will run into this error:
Multiple commands produce ‘/Users/mazenkilani/Library/Developer/Xcode/DerivedData/MyBooks-dppyqnfxvviffsfjwaiuumpfkaoj/Build/Products/Debug-iphonesimulator/MyBooks.app/Info.plist’:

Step 5: Add Your Project Cloud Capability
(If using iCloud, required for AppsGym Books)
Navigate to your project Signing & Capabilities, click add (+), search for Cloud, then add it. You will need to launch your CloudKit Dashboard later, but not now.

Run the Project
Run the project and the sample books table view will show.

Checks & Verifications
The checks and verifications below are optional, but highly recommended to proactively resolved any issues, without waiting for error messages when you run the project.
Check Your Target Membership
Go through each file and verify the Target Membership is selected (checked) for your project, and, if empty (not selected), then check the box. You will probably only need to do this for Assets.xcassets, so verify this first and randomly selected other files. The reason is Xcode copy may (sometimes) confuse the references. There is no cure or remedy for this. Verify and correct if needed.

Verify Your Storyboards
Xcode may not correctly assign the proper module to some storyboards, so verify and correct if in error. Start with Queries and Settings and correct, if needed, the Queries Table and the Settings App Info and Credits. However, check all the others.
Warning: If any is left in error (pointing to AppsGym module not your project) then you will encounter the Thread 1: “[<UITableViewController 0x7fcded721250> setValue:forUndefinedKey:]: this class is not key value coding-compliant for the key xxxxxxxxxxx.” when you run the app.

Discover & iCloud Setup
When you launch Discover and iCloud, you will see the Alert Message that their CloudKit Containers are not set up (image below). iCloud is covered in the AppsGym.com tutorials.

The article showed the complete 5 easy, safe steps to create a new Xcode project from an existing model/template project. Hope you find it useful for your next project. Thanks for reading!
1 note
·
View note