
Canadian maker experimenting in woodworking, restoration, design and 3D printing.
Don't wanna be here? Send us removal request.
Statistics
We looked inside some of the posts by atelierhosselet and here's what we found interesting.
Average Info
Notes Per Post
16
Likes Per Post
13
Reblog Per Post
2
Reply Per Post
1
Time Between Posts
1 month
Number of Posts By Type
Text
13
Last Seen Tumblr Blogs


Fun Fact
Tumblr’s website traffic is steadily declining.
Text
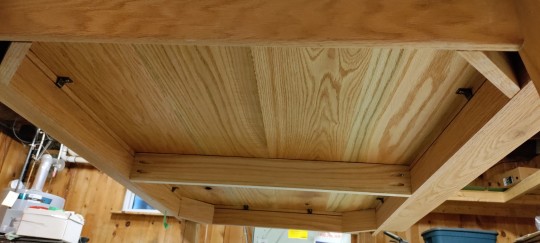
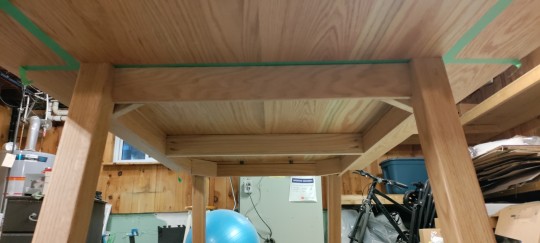
Oak Dining Table
We recently bought our first home, and I wanted to make something special for it. I've been wanting to build a table for a long time, and it was a super fun project.
The table is made entirely from red oak, mostly 3/4" thick, with the exception of the 1 5/8" pieces I used for the legs.
The design is my own: I wanted something clean, simple and modern. The legs, which are 2 1/2" square, are set at a 15° angle. I really wanted to make sure the table was strong and stable, so I built the legs and apron to be very strong.
The top is made from some lengths that were 7 /1/4" wide. The top is doweled at 12" lengths with a 6" offset between each board. I arranged the quarter sawn lengths to alternate the grain to reduce cupping.
The finished dimensions are 6' by 43 1/2" - slightly wider but otherwise a standard 6-person table. The top is affixed with Z-clips to allow for movement with temperature and moisture.
I did a progressive sand up to 240 grit on the legs, apron and underside of the top. The top itself was sanded up to 450. I also made a slurry with the finish and a 600 grit sanding to fill the oak's pores. The top is super smooth as a result.
The finish is Osmo Polyx, a hard wax oil used for high touch furniture as well as flooring. I worked it in by hand with three light coats. It polymerizes with the wood, making a super resistant and clean surface. I got the "raw" version with minimal gloss and imparting almost no colour to the wood. It looks very natural and brings out the grain super well.
The thing I'm most proud of is how level and solid it is. The angles, measurements and cuts all came out perfectly. You can lean hard into it from any angle and there's no wobble - the weight is divided very well by the angled legs.
I'm proud of this piece. It took about 25 hours and $600 in materials, but the result is well worth it.


0 notes
Text


Handmade Wizard Pipe
This was a fun project for a good friend, and a challenge to use multiple new techniques and materials.
The base is made from a block of jatoba - a notoriously hard and difficult wood to work with. I shaped the rough outline by hand on the block and cut it down with my handsaw. I drilled out the bowl with a series of Forstner bits, then smoothing with my Dremel and hands. I then drilled an angled slot for the stem, and another tunnel at the base of that slot to the base of the bowl. This was very tricky: getting a small bit in on the right angle to barely tap the bottom of the bowl was crucial to this working correctly, and luckily I pulled it off.
The stem is made from red oak. I cut two rectangular prisms of equal size, then carved a groove down the middle, smoothing it out with my Dremel. The result was a fairly square block with an airway down the middle. I then made a simple jig to bend the oak, using a metal lid. I steamed the oak on my stove for 30 minutes and then quickly clamped the hot wood into the bending jig. Success! When it dried and cooled with the proper curve, I glued both pieces together with Titebond 3 (a food safe glue), careful not to get any glue in the airway. I then shaped and sanded the stem by hand to 600 grit, making an incredibly smooth length that felt like a polished bone.
I set the stem in the base, and was thrilled that I got the slot and stem within 1/16" inch of each other. The stem slid into the slot and stayed in, strong enough to lift the base. A perfect fit! I glued the stem into the base and let it set. After that, I cut a length of raw suede and smoothed it by hand. After careful testing, I glued and wrapped it to the bottom of the stem to offer a better grip and smoother looking transition from stem to base. It set perfectly.
The stem and base were both finished with a couple coats of Odie's oil. I can't express how smooth they feel. The inside of the bowl is finished with finally powdered charcoal and maple syrup - an accessible blend that makes it safe to smoke from.
The result is a unique and high-quality, functional pipe. I'm proud of this one - steam bending, suede, jatoba and pipe making were all new to me, and the results exceeded my expectations.
0 notes
Text
The Crawfblade
A good friend commissioned me to make groomsman gifts for his wedding, and I was thrilled to make some nice things for our mutual friends.
I used a stainless steel full tang blade blank with a brass hilt. I used brass pins to reinforce that highlight. The scales are made from bloodwood, which was easy to work with despite it being my first experience with it. The scabbard is a Sarge leather one I had available.
I used my laser engraver on a higher setting to carve a deep "Crawfdaddy" into the right scale (a longstanding nickname for the recipient). He's a big outdoorsman so this fixed blade knife will be well-used.


0 notes
Text
Custom Dungeon Master Screen


I made this custom DM screen out of special maple boards that respond well to laser engraving. It that folds down into a 1' x 1' x 5" stack (with 4 panels that are 1′ x 1′ each). It has brass hardware: hinges and corner protectors in an ornate style. The rightmost panel has 25 inward-facing pegs for hanging condition rings, and the other panels magnetic strips for attaching notes to the inside. The front two panels have designs I made with a 20-sided dice and text on a banner: a Nat 20 (The dice giveth) and a Critical Fail (The dice taketh away). It’s engraved with my laser engraver.
It's all sealed with a few coats of Danish oil for a natural look but resistant finish.
1 note
·
View note
Text
3D Printed Ocarina of Time
A friend saw the Gossip Stone I made and confessed she was a big Zelda fan, so I took it as a challenge to make something more complicated. This four-hole ocarina is actually playable! The design is by hockenmaier on Thingiverse.
It was printed in two halves (plus the stand). There was some warping at the edges and it needed to be airtight, so I sealed the halves with waterproof silicone caulking. I patched the warping (which led to gaps on the front and back) with epoxy.
I sanded down the epoxy and z-banding to make it really smooth, but it left the blue satin PLA looking rougher, so I gave it a coat of ultramarine acrylic paint, as well as some detail on the band and triforce.
It was a fun little project to make a playable music instrument. She liked it a lot, and is apparently going to bring it with her to the bar to play Song of Storms when she drinks too much.


1 note
·
View note
Text
Luigi Board
Inspired by this classic Yahoo Answers compilation, I wanted to make something fun for a friend who man who is a big Nintendo fan. It was a fun design and a good chance to get the hang of my laser engraver.
The design is based closely off the “classic” Ouija Board design, substituting Mario/Nintendo images and text. Of course, “Yahoo!”, “Mama Mia!” and “Let’s a-go!” seems more appropriate than the standard “Yes”, “No”, “Goodbye”.
The planchette is Luigi’s hat with the circle cut out, set on some small feet that allow it to slide easily.
The board uses a quarterfold design, and collapses into something that can fit easily on a bookshelf. The hinges were a bit tricky, but work well. Getting the lasering and cuts precise was hard, and I’ve learned how to do it better on future projects.


1 note
·
View note
Text
3D-Printed Gossip Stone
Made this for a friend who speedruns The Legend of Zelda: Ocarina of Time. I really loved the true-to-game polygon look Conceptify did on Thingiverse.
It was a very fast print (about 4 hours on highest detail, 2 hours on medium), and painting was straightforward as well. Makes a great gift for any Zelda fans!

6 notes
·
View notes
Text
Traditional Wooden Tankards
I’m lucky enough to have two great D&D groups, who have collectively kept me sane during the pandemic lockdowns. I wanted to make a token of appreciation for everyone that fit the theme of our games.
I started from this fantastic guide by Goodphysics, but made some changes to suit my style, tools and preferred process.
Aside from the vinyl (fake leather), brass tacks and food-safe wood glue, everything is natural and non-toxic. They're even vegan-friendly.
The most complicated part was learning to make "brewer's pitch", a water-sealing and food-friendly compound being used for many hundreds of years. It uses pine roisin (refined resin) and beeswax, heated to ~200° C and then applied quickly. It hardens to a firm resin and lasts a lifetime.
The wood is red oak, treated with butcher block oil, beeswax and carnauba wax. It brings out the grain, nourishes the wood, and protects it from liquids and general wear.
The sides were carefully made with an 11.25° chamfer, and the handles and bottoms were carefully cut to precise measurements by hand with a scroll saw. I'm proud of the handles - they fit well in big or small hands.
This gave me an appreciation for traditional drinkware. Even something as simple-looking as a wooden mug is a very exact process with delicate, specific and complicated components. Cheers to the tankard-makers and coopers of years gone by!


2 notes
·
View notes
Text
3D-Printed Cat Armour
Having a 3D printer indulges my most ridiculous impulses. When I saw Jwall’s designs for this cat armour, it was immediately bumped up in the project queue.
There was a full tail section as well, but Oliver’s tail is far too rowdy to cooperate. There are also a number of helmet designs, but I think that would be too much to ask of my feline model.
The five segments were printed over a few days. I gave them a coat of black primer and then two coats of hammered dark steel spray paint.
They’re connected by small nuts and bolts, which allow for articulation between the segments.
Like all wearables, Oliver’s initial reaction was paralysis. After a few seconds, he decided he was able to move around freely. The armor does a good job of stay centred correctly, even in motion.


1 note
·
View note
Text
3X Scale D&D Mini
One of the first things I needed to make with my 3D Printer (Anycubic Mega Pro) was a mini of one of my favourite characters: a Dragonborn rogue named Kagramalsnix.
I designed the model in Hero Forge and purchased the STL file. I scaled the model up to three times the regular size because I wanted more of a statue than a tabletop mini. I tried to preserve the front-facing details and minimize the Z-banding. My printer is PLA and not resin, so even the highest settings have room for improvement.
I picked up some acrylic paints and model washes and revisited my teenage hobby of model painting.


1 note
·
View note
Text
Restored Hand Tools
They don’t make hand tools like they used to, and these ones have already held up for more than a lifetime.
The set included a small shoulder plane, a No. 5 plane, a compass plane, a rasp and two different-sized spokeshaves.
Everything was de-rusted, paint stripped, blades cleaned, wood refinished and re-assembled. The compass plane needed a lot more metalworking than I’m comfortable with, so I sent to Eric at Hand Tool Rescue who restored it in this fantastic video.


1 note
·
View note
Text
“Am I not a stinker?”
What if a certain looney rabbit was conceived a few decades earlier, as a contemporary to Beatrix Potter’s “Peter Rabbit”? A question that nobody asked, but I decided to provide a hypothesis.


1 note
·
View note
Text
Roadside Rocking Chair Restoration
A friend found this on the side of the road and wanted it for her home, but it was in rough shape. The finish had worn down severely in most places. I sanded it thoroughly, which was particularly time-consuming on the beautiful engraved details. The wood underneath was in great shape, and the joinery was all still solid. My friend wanted a darker finish for it, so I used a dark mahogany stain. The gloss of the finish with the contrast of the dark colouring really brought out the carved details.


1 note
·
View note