
Don't wanna be here? Send us removal request.
Statistics
We looked inside some of the posts by bahkified-blog and here's what we found interesting.
Average Info
Notes Per Post
0
Likes Per Post
0
Reblog Per Post
0
Reply Per Post
0
Time Between Posts
1 day
Number of Posts By Type
Text
4
Photo
12
Last Seen Tumblr Blogs


Fun Fact
After the announcement of the deal with Yahoo!, there were 170K signatures of unhappy Tumblr users petitioning to prevent the sale in 2013.
Text
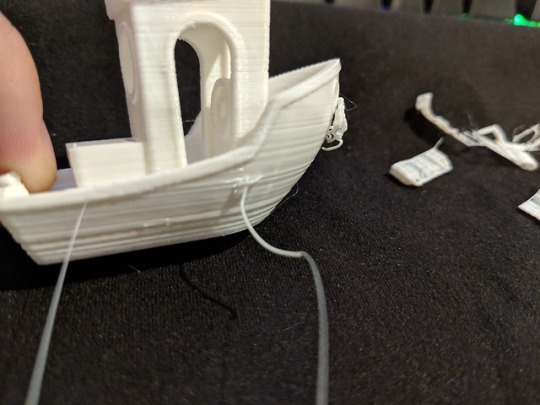
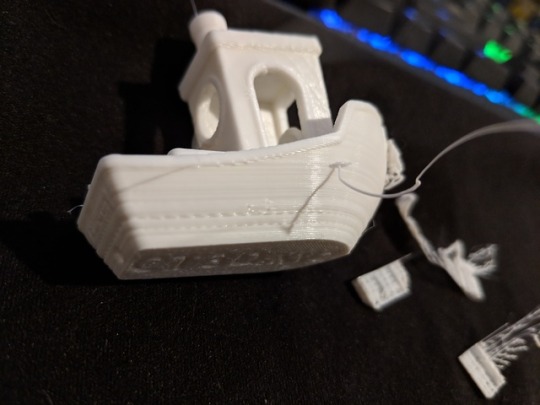
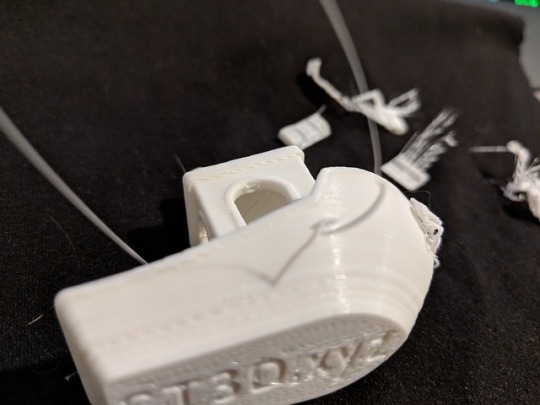
Ender post-mortem
I no longer have the Ender 3 printer. Some prints were simply needed soon enough that there would not be enough time to finish troubleshooting the printer and have the prints ready in time. Now, there is a new printer - one that came fully assembled, as opposed to a kit. First prints with that were very good to my eyes.
There are still some takeaways from my time with the Ender 3, however.
Going back over my pictures of the different prints made since assembling the Ender 3, it is clear that the line anomalies that were the focus of the previous posts also appeared in many other prints. I believe that it was actually an issue ever since I started printing with this machine. The effects may have been less noticeable a few weeks ago, but the features were still there.
Looking back, the first definitive appearance of the problem appeared Sept 7, when I printed a bed leveling pattern. Nine small round pads, a single layer thick, were printed around the bed to help in leveling the print bed. Some pads showed normal or under extrusion as expected, but other pads showed just a thin line of under extrusion, with the rest of the pad appearing to be fine.
You can see the pads at least at the bottom left, bottom center, left center, top center, and top right all show areas that look like normal extrusion and lines that look like under extrusion. These areas that look like under extrusion look just like the problem I was trying to recently troubleshoot.
Even though I did not get the Ender 3 to print very well, I still learned a ton from the process.
0 notes
Text
Ender 3 troubles pt 2
Those lines never went away when printing at (what was previously) normal speed of 50 mm/s. Slowing the speed down to 30 mm/s at first looked like it basically eliminated the lines problem. A day later and a few prints down the line, however, proved different. They were back with a vengence, this time appearing at the slower speed.
This time, I tried hardware tweaks. First thing I thought was that this could be periodic underextrusion. The most obvious thing to me that could cause this would be something up with the extruder. The extruder gear did turn out to be a bit dirty in one spot where it looked like a filament was ground a bit and left plastic in the gear teeth. No obvious wear to the gear was otherwise seen. I cleaned it up, reattached the extruder assembly, and made sure everything was tightened up. New print. Same problem. Cleaning out the extruder has zero effect on the print quality.
It was suggested that the nozzle might be contributing to the bad behavior. Since I had been doing a lot of printing with glow in the dark filament, which tends to be abrasive, I thought that the nozzle might be a bit worn down. Perhaps it wouldn't cause this exact behavior, but it certainly wouldn't help things. So I changed the nozzle with the spare that came with the printer. It helped nothing.
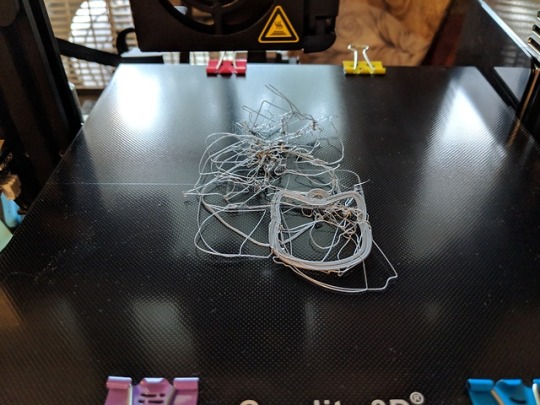
Around this point I was ready to throw in the towel. A couple more minor tweaks and test prints left before I was all out of ideas. I finally noticed through these last prints that there was a noticeable buzzing sound coming from the machine periodically that lasted a few seconds. Carefully placing my fingers on the print head (the housing, not the nozzle), I felt that during these periods of buzzing, there was a substantial vibration that could be felt in the print head. Most importantly, the buzzing did seem to coincide with the places where the line anomalies appeared. Could it be that something in the printer was vibrating violently enough periodically to basically destroy prints? I actually had noticed this noise before before, but I had thought it was the window fan I had running next to the printer.
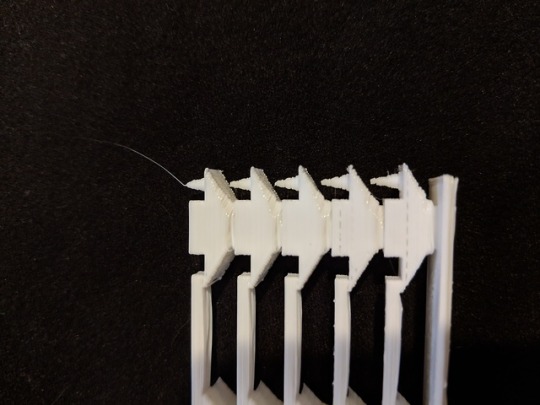
All in all, many test pads were printed. Here you can see a subset of all that was printed during this debugging process.
Besides these, more test pads were printed and chucked out in frustration, along with more key chains using settings that had looked promising.
I am done for now.
0 notes
Text
Ender 3 troubles...
I got the Creality Ender 3 3D printer a few weeks ago. Since then, I have printed almost every day. There have been a two Benchy's, a few temperature towers for a couple of different PLA brands, and lots of key chain type items. I would say that I have a decent understanding of the basics of this machine and 3D printing - I definitely learned a ton over this time. Shout out to YouTubers Tom Sanladerer, 3D Printing Nerd, and Maker's Muse, my go-to channels to learn about all things 3D printing.
There was plenty of fiddling with settings, especially initially because I was using a filament brand and type that I later learned tended to not give good prints anyway. The fan cover seen below was printed with a different filament and I think it turned out pretty well.
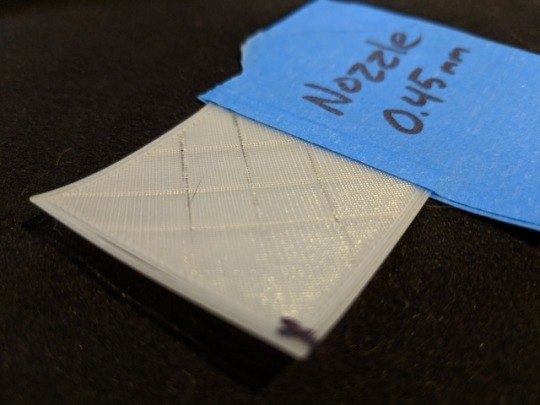
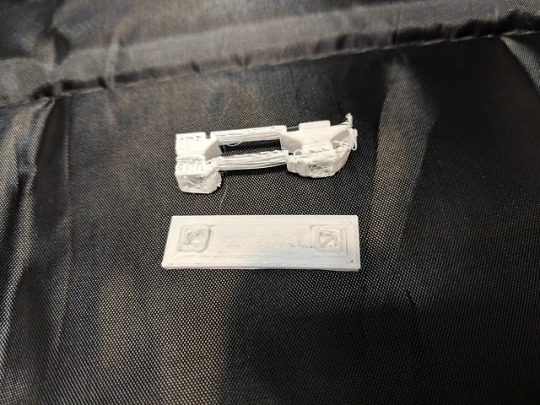
Over the last few days, I started printing a design for a friend. Basically, it was line art on a thin base. The lines were 2mm high, the base 1mm high. The whole model was only about 2.5 inches in diameter. The first print looked OK, however subsequent prints started showing weird lines on the horizontal surfaces. Vertical walls looked good, though there was only a maximum of 3mm high walls to inspect. I found it odd that these lines seemed to appear on every horizontal layer with infill and in the same places, making them very noticeable. Instead of troubleshooting with this model, I started printing small square pads, 40mm x 40mm x 0.3mm. Large enough to show the line features and just tall enough to print two layers. I marked an 'X' at the point where the print head finishes and lifts off. Since this is located at the same place for all of these pads, it is convenient for orientation.
Print settings:
Speed: 50 mm/s
Acceleration: 500 mm/s^2
Temp: 220°C
Bed temp: 60°C

You can see the lines that appear in the horizontal lines infill. If I were to place two pads printed with the same settings on top of each other, these anomalies would line up. So it would seem that these line features happened at basically the same place on all prints. I first tried to lower the print acceleration. The line pattern became a bit more spread out, but they were still very apparent.
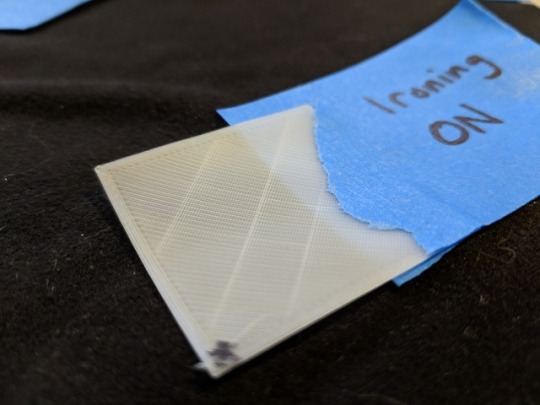
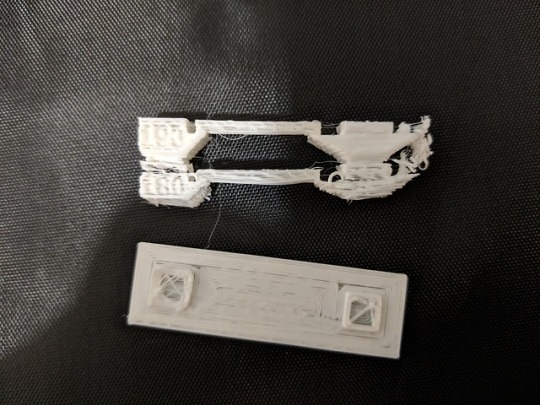
I thought that perhaps turning on ironing would help mask the lines, which would make them irrelevant. While the surface did look cleaner, the lines were still noticeable. The result was not improved enough to be worth the extra print time.
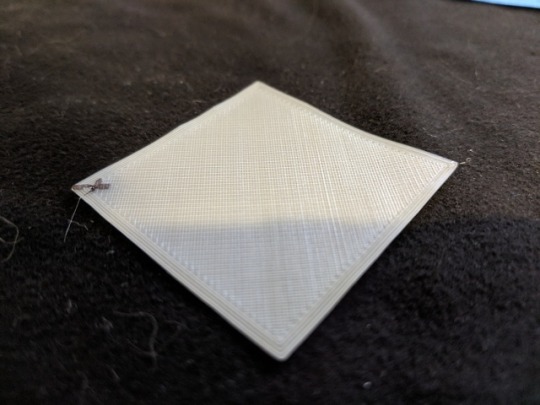
Printing slower always gives you better prints, right? In this case, yes, it seems to do exactly that. This pad was printed at 30 mm/s. Looking closely, however, you might be able to make out a pattern on the surface....
0 notes
Photo
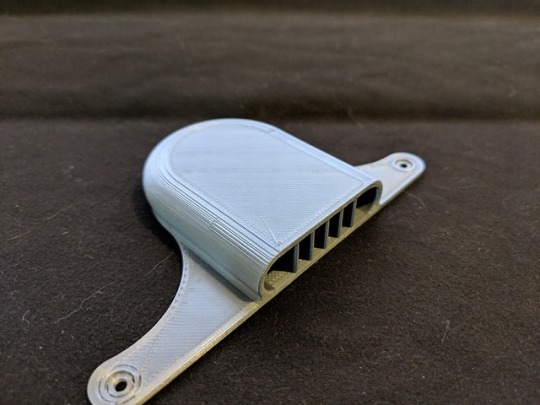
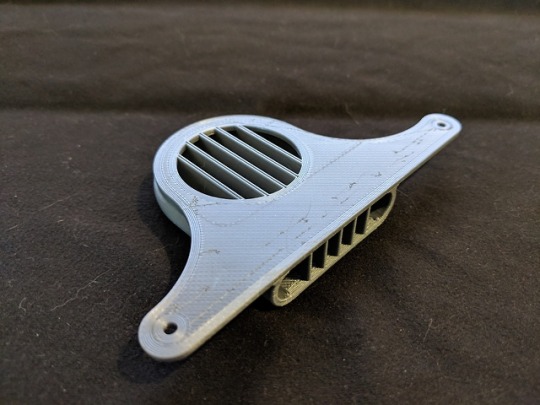

Ender 3 Fan Cover
https://www.thingiverse.com/thing:2935204
This piece covers the open hole in the top of the electronics box so debris is not free to fall onto the main control board. Printed using 3D Solutech Silver Metal PLA.
Print Settings
Temp: 220°C
Bed temp: 60°C
Speed: 45mm/s
Layer: 0.2mm
Line width: 0.4mm
Wall thickness: 1.2mm
Alternate Extra Wall: true
Infill: 20% (cubic)
Print Notes
I think this print turned out fantastic. There is still some stringing and extra drips over a few travel lines, mostly noticeable on the bottom layer. The bottom layer, however, still looked quite good due to the new glass print bed. Top layers are surprisingly smooth.
I have been having similar quality prints with a different brand filament, so I am giving a lot of credit to the glass print bed :)
0 notes
Photo

Playing with new filaments
I got a few new filaments to try out, not all are pictured here. All are 1.75mm diameter.
Inland PLA+ Gold
Inland PLA Light Blue
Inland PLA Luminous (glow in the dark)
3D Solutech PLA Lavender Purple
3D Solutech PLA Silver
Besides new materials, the biggest change for printing has been a new glass print bed. The initial bed level with the glass bed was a bit of a pain, since the adjustment knobs did not have enough play to adjust for the 4mm height of the glass bed, so I had to mess with the z-stop. THe bed made a noticeable difference in print quality, as my original Ender 3 print bed was slightly warped (probably no more than a few tenths of a mm in the center). The new glass bed I bought already had a surface material meant to help print adhesion.
I printed temperature towers for the light blue and silver filaments and they were basically identical to each other, both a bit better looking than the Inland white filament.
In the second image you can see my first catastrophic build failure. Print adhesion actually does seem pretty good with this coated glass, despite this result. I believe that some material had curled up and attached to the nozzle as it was moving into position when the print started. I think this eventually just caught on the print and pulled it off. You can also see that the glass bed is a bit dusty - so a nice cleaning is in order.
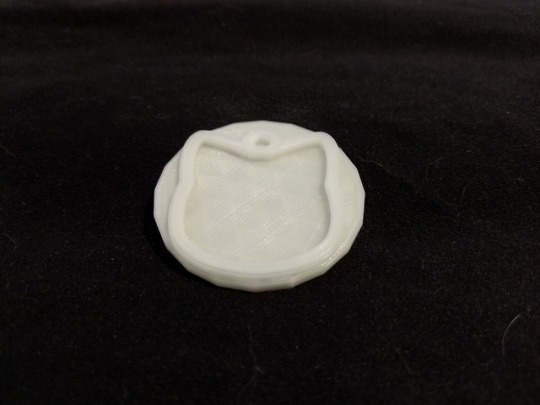
Next, I printed a new cat head puck using the glow in the dark filament as a test to see how the line art looks on top of a glowing substrate. I think this is the best quality print I've had so far. The initial layer is super smooth due to the glass bed and the top layer feels very nice with no gaps. Though hard to see in these pictures, the only flaw I see in the print are some strings on the top layer on travel lines. Perhaps I need to play with the retraction settings?
0 notes
Photo

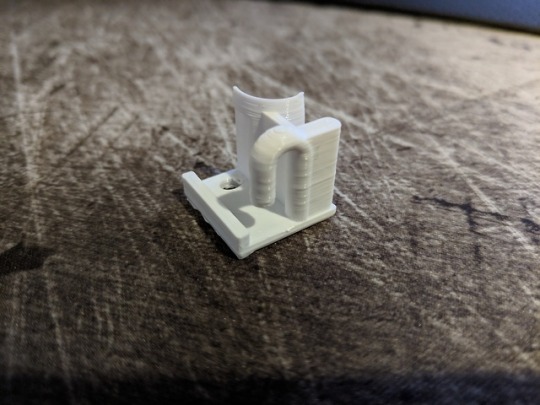
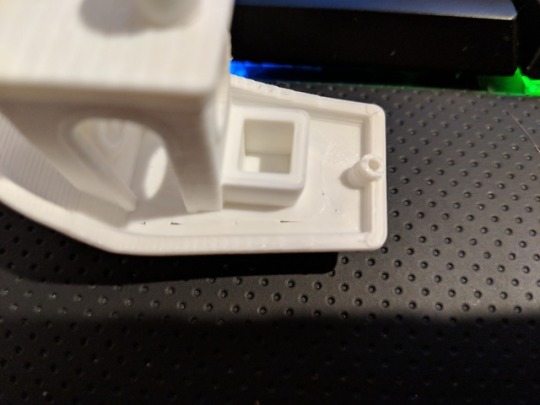
Functional Print
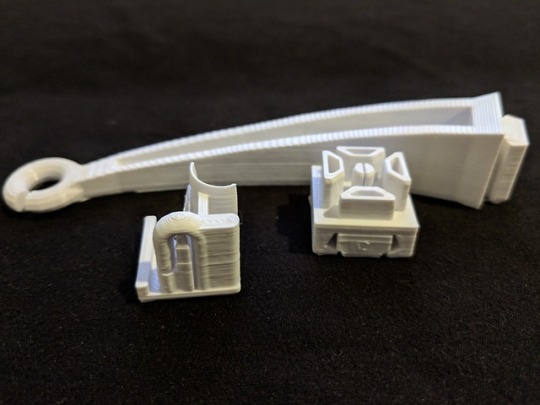
For this print, I grabbed two different models from Thingiverse, both serve as filament guides for my 3D printer.
2020 / Ender 3 Filament Guide - This actually comes with two models. A smaller piece clips into the end of a 2020 aluminum extrusion, which happens to be the cross brace above my 3D printer. A larger piece hooks into the small piece and sticks out from the side, forcing the filament away from the side of the printer to a more manageable angle. My print of this piece turned out OK, however, due to the tight tolerances of the end clip, I can't seem to slide the filament guide all the way in.
Ender 3 Filament Guide easy install - You can see this as the small piece with a hoop on one side. This was designed to be screwed into the base of the 3D printer. The z-axis lead screw is shielded by the curved corner. Filament is guided by the hoop so that it enters the extruder more or less straight on.
Print Settings
Material: Inland PLA+ white 1.75mm
Layer height: 0.2mm
Print speed: 45mm/s
Nozzle temp: 220°C
Bed temp: 55°C
Wall thickness: 3 lines (1.2mm)
Initial layer height: 0.1mm
Top/bottom thickness: 2 layers (0.8mm)
Top/bottom pattern: lines
Retraction distance: 6mm
Print Notes
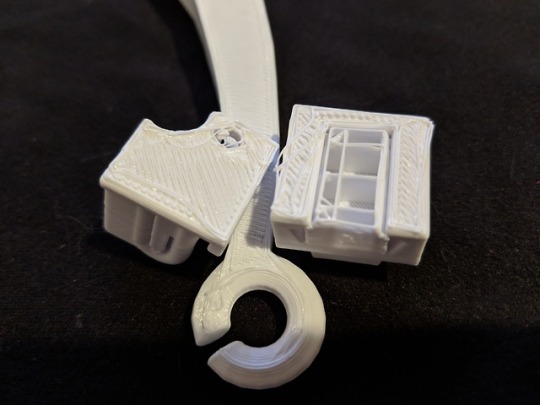
The first and most noticeable thing was the initial layer. I had leveled the print bed right before making this print, but still the print started way too high off the print bed. This made the initialy layer come out very bad, as you can see in the second image. Fortunately, it didn't kill the whole print. The initial layer, despite looking bad, still stuck to the print surface fairly well. This bad first layer did cause part of the filament hoop to curl up, though. You can sort of see it in the first image, but is quite noticeable in person. This does not effect functionality of the part, so it is not a big deal.
The supports were fun to remove, just some work with the nippers.
Overall, the dimensions ended up being a hair too large. The long guide did not quite fit in the end cap, and the end cap didn't quite fit in the 2020 aluminum extrusion on my printer. The round bit in the middle of the end cap piece was the culprit, this time. I actually didn't have anything to sand the piece, so I snapped off the round piece. There won't be much force on this piece, so it should be fine, I hope :)
I need to pick up some sanding tools.
0 notes
Photo
Playing with layer height
The two prints on the left were printed with Layer Height: 0.3mm
These prints all have simple geometry with no overhangs or vertical slopes, so I figured that increasing the layer height would not decrease print quality while drastically decreasing print time. Making this change did indeed decrease print time substantially, but unfortunately, the resulting prints were not good.
The initial layer was fine, looked about as good as the print with the original layer height. However, you can see in this picture, that the top layer shows very noticeable gaps between lines. The newer prints also show much more stringing.
I am now reprinting the cat head with the original 0.2mm layer height to make sure something else hasn't changed - to verify the layer height was the cause of these top-layer gaps. This print only takes about 7 minutes, so no big deal :)
Edit: next print finished with layer height set to 0.2mm and some gaps between lines are still visible, although not quite as much as in the 0.3mm layer height prints. Perhaps I need to dry out my PLA, as I have been leaving the spool on the machine, instead of an air-tight container. Perhaps ambient conditions such as humidity has effected the filament.
0 notes
Photo
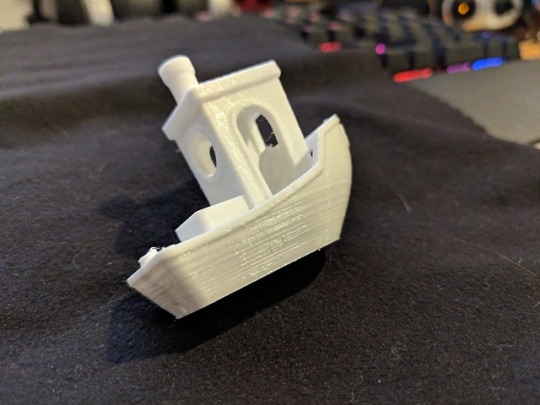
3DBenchy #2
A few steps forward, a few steps backward.
Print Settings
Print speed: 45mm/s
Print temp: 215°C
Top/bottom pattern: lines
Top/bottom thickness: 0.8mm (4 layers)
Wall thickness: 1.2mm (3 lines)
Line width: 0.4mm
Layer height: 0.2mm
Print Notes
Print time: 1h 49m
Let's start with the good parts. You can see in images [1] and [2] that changing the top layer infill pattern from concentric to lines pretty much solved the issue from last Benchy where I was getting holes in the deck infill.
The sagging lines present under the roof of the cabin in the first Benchy is also not present in this print.
Now for the not so good:
The long string from the hull was caused by a pause in the print. When paused, the Ender 3 will home the print head, while at temperature, causing plastic to trail behind.
There is a blob near the bow caused by a support that broke away from the print bed. I ended up sweeping the broken support away from the print, since it was starting to drag and get caught on other parts of the print. This blob is the remaining top of the support that happened to attach to the side of Benchy.
First layer is still not right, looks like the print bed is too far down.
Bad layers near the bottom. Not quite sure what causes this, bad layer adhesion? Should I up the print temp? Slow down print speed?
Lots of z-banding, more than previous Benchy
So much stringing between supports. Stringing not really noticeable in the model itself
0 notes
Photo
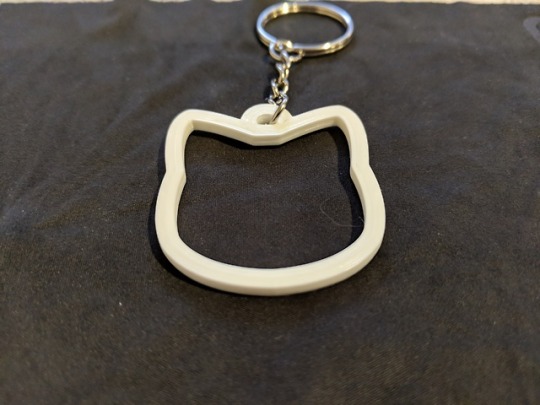
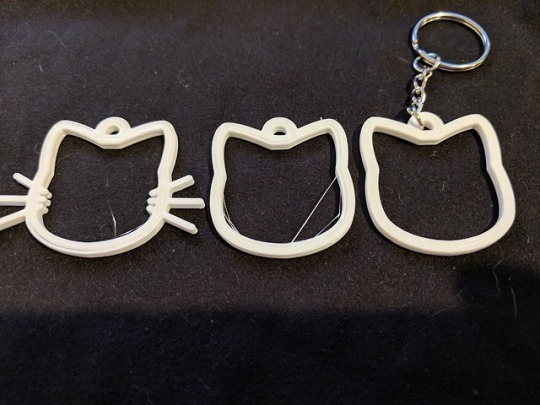
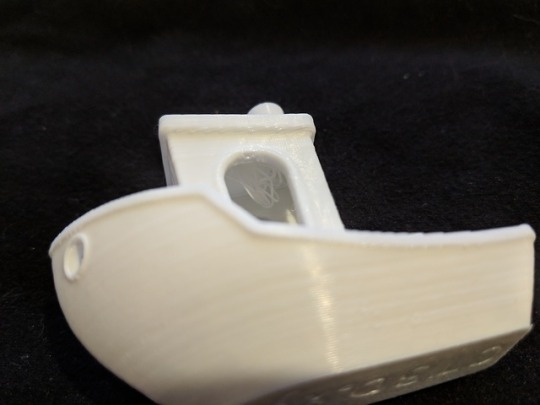
Cat head keychain.
line width: 3.4mm
height: 3mm
(x, y) = (~38.5mm, 42mm)
layer height: 0.2mm
line width: 0.4mm
temp: 220°C
speed: 45mm/s
Next time printing similar items, I should try increasing the layer height. These shapes don't really need the vertical resolution, so inceasing layer height should maintain print quality while speeding up print time.
Cura estimates this print using ~2g of filament.
0 notes
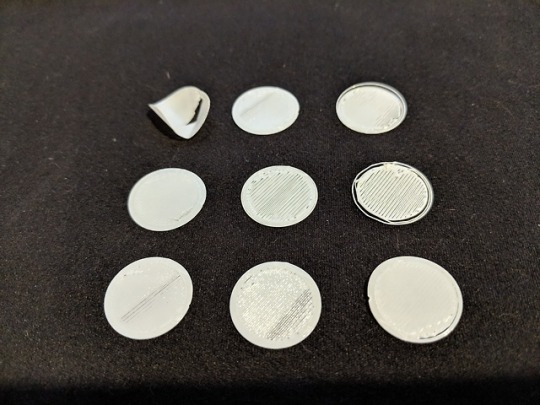
Photo
Bed Leveling Calibration Print
This print consisted of nine small discs, each only one layer thick to show the extrusions on an initial layer throughout the print bed. In the second image, I scraped off the discs and arranged them to be easier to image.
The top left disc printed flat, but adhered a bit too well - the curling is from me prying it off the print bed.
Print Settings
Some of these print settings do not effect this print, but will be carried onto future prints.
Print speed: 45mm/s
Print temp: 215°C
Top/bottom pattern: line
Infill pattern: Cubic
Infill density: 20%
Retraction distance: 6mm
Print Notes
The left and top sides look OKish. Bottom right corner looks like there is not enough space between the bed and nozzle. The bottom right corner also looks OKish, all of which show some gaps between lines. Bottom middle, right middle, and center all show significant gaps between lines, with the right middle looking the worst - looks like at least one line was picked up by the nozzle and redeposited on a different part of the disc.
0 notes
Text
I have been manually leveling the bed before printing using just a sheet of paper: approach z=0mm height near the corners of the print bed and use the bed adjust knobs while moving the paper under the nozzle until you feel the nozzle start to catch the paper. However, up to this point, I have been doing this process while the bed is cold.
Will do the next leveling while the print bed is up to normal print temperature - around 60°C
I also noticed that when homed, the nozzle hangs off the y-axis by 6mm. I will have to move the y-stop by this much to fix this - or I could just avoid printing 6mm or less from the edge :)
0 notes
Photo
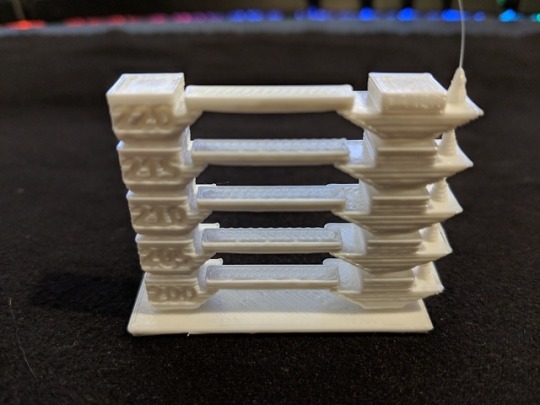
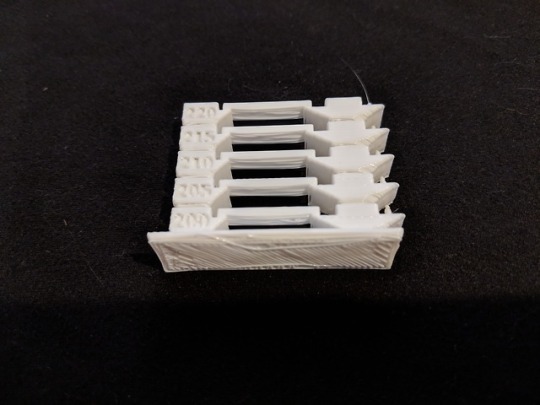
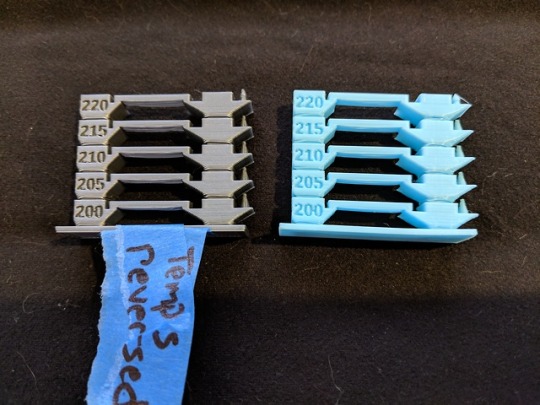
Temperature calibration test #2
This is the same temperature calibration model as last print, however, the temperature range was adjusted to go from 200°C to 220°C in steps of 5°C.
Print Settings
Print speed: 45mm/s
Notes
Initial layer still too high above print bed. Bridges at all temperatures look OK. Gaps present between walls and infill, though this lessens somewhat with higher temperatures. Some gaps between layers at 200, 205, and 210°C Overhangs between tower supports (?) and diagonal overhang above the spikes are pretty droopy on all temperatures. Both 215 and 220°C both look acceptable
0 notes
Photo
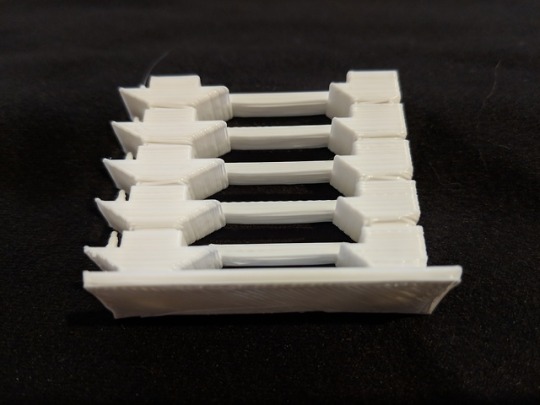
Temperature Tower calibration print
So, looks awful :)
This print tests bridging at different temperatures, in this case, the first bridge was set to 180°C, last bridge would have been 220°C, with 10°C temperature steps. The print delaminated at the base of the first bridge sometime during the 2nd bridge (190°C). Once I noticed this, I stopped the print. This must be why the temperature tower initially ranges from high to low temperatures.
Print Settings
Bed temp: 60°C
Initial layer temp: 200°C
Notes
First and foremost, despite four point bed leveling, the first layer was too far from the print bed - the middle of the bed may be slightly warped?
Of course, this PLA must be printed at temperatures higher than 180. Retrying the print starting at 200°C.
0 notes
Photo
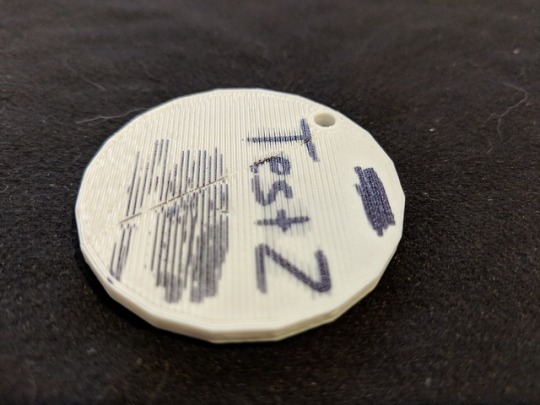
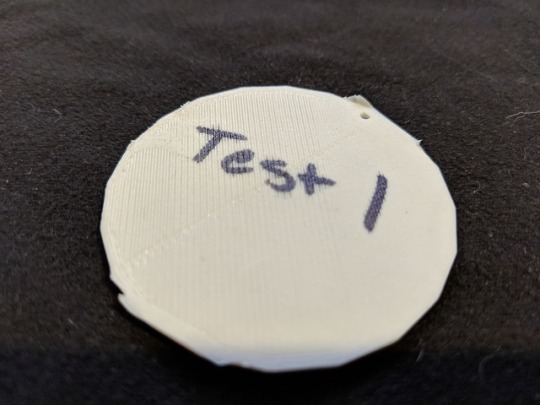
Test key chain #2
Basically the same model was used as the previous key chain, except features were made thicker. The line art on top and places on the bottom were marked with sharpie to add contrast.
Print Settings
Model height: 4mm
Model width: 45mm
Temp: 200 C
Flow: 110%
Retraction Distance: 6mm
Notes
Some gaps around perimeter on top surface, similar amounts compared to Test 1. Smooth top surface. Bottom surface has major gaps, possible worse than Test 1. Noticeable gaps on side walls.
Changing too many variables means it is difficult to pin point what caused the print quality degredation. Should try print a temperature tower next to check how this PLA behaves.
Must re-level bed before doing any more prints.
0 notes
Photo
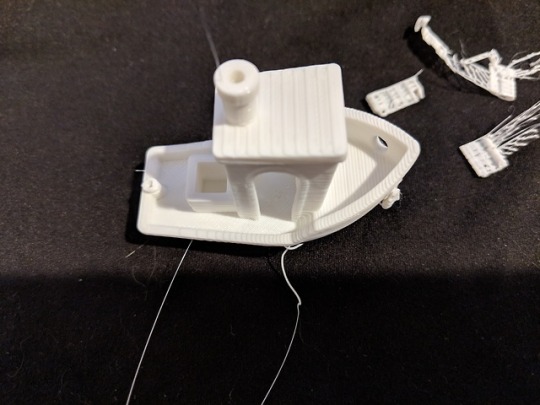
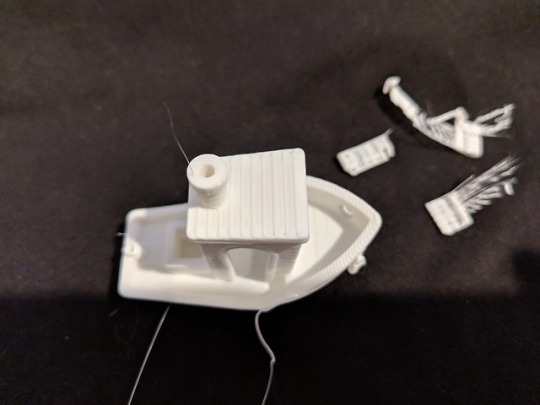
First Print
Standard 3DBenchy.
I used Cura to slice the model from Thingiverseprinted with all default settings, except temperature was set to 215C. Layer height set to 0.2mm. Using Inland white PLA purchased from Microcenter.
[1] Overall, it looks pretty good to me. In this first image, you can see some blobs on the side of the hull.
[2] Z-banding is also noticeable on the side of the hull, possible that z-screw is not perfectly straight?
[3] Top-down view, you can easily see holes in the flat deck. Possible under-extrusion
[4] Under the cabin roof, you can see very bad drooping. Stringing was lightly evident throughout the print. Possible that temperature was set too high (215), or bridging speed too fast.
Reposted to play with formats
0 notes
Photo
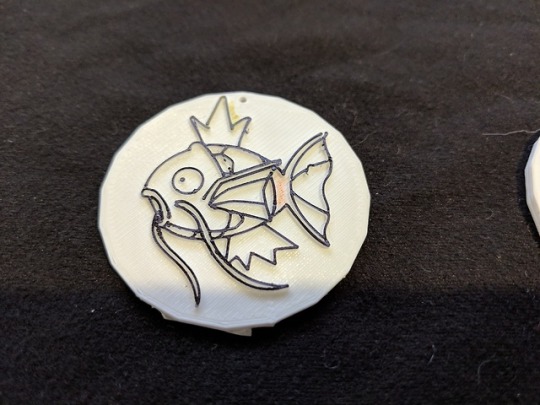
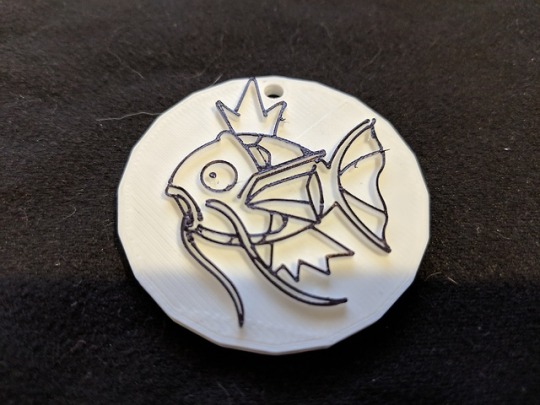
Test key chain
A round puck was printed with Magikarp line art on top. A sharpie was run over the line art on top for contrast.
Extra material hanging off the sides of the puck were from an old print skirt that was stuck to the print bed that had fused to this print.
Puck height: 1.6mm
Total height: 2.5mm
Puck width: 45mm
Line width (magikarp): ~0.6mm
Print Settings
Temp: 215°C
Flow: 100%
Retraction Distance: 5mm
Infill pattern: Line
Notes
Small gaps are still apparent around the perimeter wall on the top surface. Small gaps are also noticeable between in parts of the infill lines on the top surface. Major gaps visible on the bottom surface.
The only change made compared to the print parameters in the first 3DBenchy was to change the infill pattern to line from concentric. I had hoped that this would eliminate the weird holes found on the flat deck of Benchy. Besides some minor gaps, the top surface seems pretty good.
The same cannot be said about the bottom surface. It might be difficult to see pictures, but there are major gaps between print lines, especially towards the left side of the bottom, as seen in the picture above. The right side seen above actually looks fine. Upon typing this, it seems that this is probably due to the print bed not being level.
Some stringing is still present here between several locations on the Magikarp.
0 notes