
Berea College project & research in HCI, tech ethics, and social computing
Don't wanna be here? Send us removal request.
Statistics
We looked inside some of the posts by bereahci and here's what we found interesting.
Average Info
Notes Per Post
0
Likes Per Post
0
Reblog Per Post
0
Reply Per Post
0
Time Between Posts
15 hours
Number of Posts By Type
Text
17
Last Seen Tumblr Blogs


Fun Fact
BuzzFeed published a report claiming that Tumblr was utilized as a distribution channel for Russian agents to influence American voting habits during the 2016 presidential election in Feb 2018.
Text
Creating A guide for the Program
Today was a long and boring day. I spent all of it creating a guide for the ThanatoFenesetra program on Google Colab. Google colab allows for programs to be written in the form of a notebook. The purpose of this guide is to help those who are trying to understand the program. The idea is that by the time someone finishes reviewing this guide, they will have an understanding that will help them manipulate the program as they see fit. Within the program, I had added documentation in the form of comments, but comments are mainly helpful to those familiar with programming. They are not as helpful to non-programmers. A notebook-style program allows me to dive deep into the program and explain every necessary part. I thought this would have been easy to do, but it took me much longer than expected. Throughout the process, I had to think deeply about the details needed in this guide. I did not want to add too many details but did not want to leave out essential information. Even though the program's guide is created through Google colab, it has to be used on Jupyter Notebook because some of the libraries we use are unsupported by Google colab. It is also important to note that the prerequisite for this guide would be a completed circuit that uses a Raspberry pi as the Microcontroller. Also, the required libraries must be installed on the Raspberry Pi. As I wrote this blog, I realized that the information I'm currently writing is vital information that should have been reported in the guide. It is necessary information that the users should know to improve their experience when replicating this altar. Hopefully, I will finish this guide and the circuit tutorial today to move on to other important things like my paper.
0 notes
Text
Work Paid Off
Yesterday was an exciting day. Our team's project was accepted for the International Symposium on Academic Makerspaces 2022(ISAM) conference in Atlanta, Georgia. This acceptance brings me much joy because this is my first research. Coming into this research, I did not know what to expect but still, my teammates and I worked hard to complete our objectives. We faced stepbacks but overcame them. I became nervous when my teammate showed me previous submissions from last year. I thought we did not have a chance because people of all backgrounds were among the participants. As our project progressed, my confidence gradually started to restore daily. Even though this conference is competition-focused, I began to believe that our project had a fighting chance.
When we got our altar to work correctly, I would post snippets of it working on Snapchat. My snaps generated a lot of conversions, mainly questions about what the altar was and how it worked. Other people would just leave messages expressing how cool our altar is. These replies increased my confidence in this project and my belief that the ISAM committee will accept it for the conference. My hope now is that we fulfill all requirements needed so that we can attend the conference. I believe that this admission means that our paper gets to be published. If my belief is true, then I have a reason to celebrate. I have been considering attending grad school after graduation with my bachelor's degree. A publication will give me a good look at my CV and resume.
The program has not yet finished, but I can say that it has had a significant influence on me. One indirect benefit of this program was its schedule. It allowed me personal time, which I used to hone or improve my skills through Udemy. Second, it showed me that there are many opportunities. Thanks to my research advisor Dr. Jones who gave us options for conferences we could submit to. Thankfully, we were admitted to one. Last, it allowed me to apply skills acquired from multiple disciplines to a beautiful and remarkable project.
0 notes
Text
Circuit Tutorial
Today, I continued to work on a circuit tutorial for the ThanatoFenestra. I am using google slides to create this tutorial. I think that using google Slides is a good idea because I do not feel that I have to explain what each component does. After all, those descriptions are found in our paper’s Design and Implementation portion. A slide makes me more precise with my words as it’s picture focused. I set up the tutorial in two sections. I have a condensed section headlined by the schematic and connections. This section is for those that have experience with building circuits. They can look at a schematic and be able to build it without explanations. I have another section that goes step by step. This section is for people who have minimal to no skills with circuit-building.
I finished a rough tutorial draft, but it had to be improved. My advisor left comments on the slides file that I was working on, and one key suggestion was to use the correct colors in the circuit. Red for power and black or grey for ground are the colors generally associated with each term. I used Red for power and Blue for ground in my circuit, so I needed to change the blue wires to black. Making this modification is not much work, but I did not want to take new pictures, so I colored over the blue wires. I think that I did a good job with this tutorial.
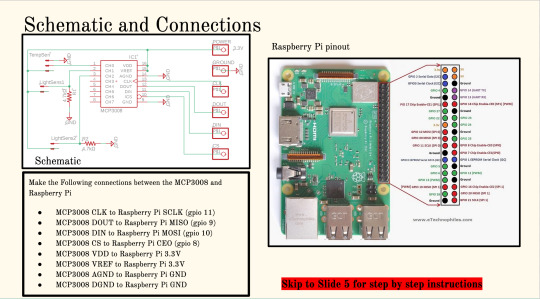
One of my teammates created a detailed tutorial on designing the altar through Autodesk inventor, but it does not include the assembly process. We now need to make two more tutorials. We need a tutorial for the altar assembly and another tutorial for the program. Our advisor also suggested that we port our program to a notebook-style IDE such as Jupyter notebook and Google collab. I like this idea because this style of program documentation allows anyone with programming knowledge to grasp what the program does and how to modify it further.
0 notes
Text
Home Stretch
As we approach the last week of our program, there are objectives we still need to finalize in order to have a proper Open-Source DIY altar. Our goals include: 1) progressing beyond a breadboard circuit, 2) explore paper structures/origami for the altar’s hood, 3) cement a DIY friendly documentation , 4) academic poster revision for future presentations, and 5) staging the altar for a different cultural context. These objectives were defined on Friday, July 29. With this list before us, I began working on the DIY documentation by first taking the dimensional placement of all the inner components. Starting with the projector, I measured the distance from the projector’s side to the inner wall of the component box. I did this around all four sides to define the precise placement of the projector. I repeated these steps with each internal component.

With these measurements my intention was to include the hardware into the altar’s 3D model. As soon as I began drafting these measurements up in Inventor, I realized I also need the measurements of the components themselves, not just the placement dimensions. So, I returned to the physical altar and made note of the hardware’s dimensions. From there, I continued drafting the 3D model in Inventor. This job took up the entirety of the Friday work day with some to spare for next week. I wish to note that the most challenging components to draft was certainly the Mirror and its easel. I had drafted an easel, previously, in a separate file. However, I drafted it specifically for making a cardboard print using the laser machine and not my for the current 3D model. This, combined with my limited 3D modeling experience I couldn’t import the easel file, so I had to remake it inside the current model. Making this 3D overhaul a long session of trial and error.
Despite the time consuming nature of 3D modeling, its benefits are worthwhile. Having access to files containing a visual 3D model with internal component placement will make this project easily shareable and repeatable. If someone wished to bypass the digital rendering and immediately prototype, they could. If the current prototype gets damaged or lost, the next group can construct a new altar with unparalleled precision. These files will provide exact repeatable measurements boosted by a visual understanding at a single location.
0 notes
Text
Baby’s Day Out
July 28, Thursday morning, upon arrival at the MakerSpace I spoke with Dr. Jone’s about our presentation from the previous day. During the conversation, it was suggested that at some point in the day we document the deployment of the altar during the presentation. In this context, Deployment is when the piece of technology that is being worked on is taken out of the laboratory for some “real world” testing and feedback. Outstanding, that even in the technological world, the concept does not stray far from the dictionary explanation of the term. In this post, I will detail the altar’s deployment from my observational lens.
The day was Wednesday, July 27, approximately 30 minutes prior to our URCPP presentation at 4pm. The team was readying the altar for deployment. Considering our upcoming demonstration, we were aware the altar functionality has a tendency to be temperamental if the candle’s flame doesn’t glow just right. With this in mind, we packed two tea candles for self assurance. One gently used candle (the altar’s favorite) and a fresh candle, in case the altar doesn’t fancy leftovers. As we entered room 356/357 of the MAC building, we immediately began the hunt for an electrical outlet. Though the projector was charged, the RaspberryPi requires a steady supply of juice directly from the source. Due to the limited length of the rPi’s power cord, we sought to use the outlets embedded in the desks. Tragedy struck when the rPi’s plug was too bulky for the electrical socket beneath the opening of the table. It was then, when I backtracked to the lab for an extension cord. Upon return, with extension cord in hand, I found the altar glowing, with rPi’s power cord at full stretch and its plug lost into the wired electrical crevice at the desk’s foot.
Just as one problem was solved, another emerged. WiFi connectivity issues kept us from running a headless rPi program initialization. This meant that invasive bluetooth keyboard surgery was required to bring the altar to life. Then we gave the presentation and demoed the altar. At the conclusion of the presentation, Dr. Bouchat reassured us that the altar worked as we had hoped and the altar's functionality was surprisingly visible to the audience, despite its small size.
This concludes the altar’s deployment.
0 notes
Text
Looking Forward
As we enter our last week of research, we are in the stage of finalizing our works. Last week we presented our artifact to the URCPP group and submitted a poster and an abstract for an ISAM conference. The major work is done, and now I think the important thing left to be done creating a tutorial for the project. I would love to continue working on this altar and make necessary changes, but time will not allow me. Therefore, documentation on building this altar from the ground up is essential for future references, in case there is another group that will pick up where we left and improve. In my last blog, I mentioned a couple of things that were needed to improve this altar. The main thing is that this altar needs an easy way of turning it on. I suggested that an on and off button be used to activate the altar. We are using a pico projector, which requires being charged occasionally. Because the Raspberry Pi and projector use different power sources, it was necessary to use two chargers, one for the Raspberry Pi and one for the projector. It is ideal that one cable is used to power the altar, so it would be nice if this were implemented in the future. The program could also be improved. The sensor values could be utilized better with algorithms that better calibrate the sensor values to get faster reactions. Many other things could be improved, but I’ve only stated the obvious. At this point, I have enough information to start writing my capstone paper. I have chosen the topic of slow technology and spirituality. Slow technology interests me, and the altar we created was influenced by spirituality, so I thought it was a good idea to choose this combination.
0 notes
Text
Presentation takeaways
Last week, we presented our altar to the URCPP group. I feel like we gave a great demonstration, and I also like how the audience received our work. Our audience asked not many questions, so I think we covered the main points in our presentation. After every group presented, some professors and students showed great interest in our altar with further questions. Even though this was presented in a small group, the interest in this idea showed me that this growing field of slow technology, HCI, etc has a future.
Although the presentation went great, there were some unseen troubles. The main problem was with controlling the Raspberry Pi remotely. When preparing our presentation, the goal was to use VNC viewer software on a laptop, allowing the Raspberry to be used through another computer. This was needed to run the required commands on the Raspberry Pi and start our program. This was not possible as we could not connect the Raspberry to WIFI but we were able to run the program and give a proper demonstration.
The takeaway from this presentation and demonstration is that this altar needs an easier way to be activated. First, using an external computer to control the Raspberry Pi is a huge step that no consumer would want to go through. Second, it is not ideal for the program to be run from a terminal. There needs to be a simple way, such as pressing an On button. Some feedback that we received from our audience was that, despite the small screen size, the images were visible to those sitting further away from the altar. Therefore, the size of our altar can be kept as is. Currently, we are in the last week of the program and we do not have enough time for any major extensions but, I think we could at least work to make minor improvements.
0 notes
Text
URCPP Presentation
Every two weeks, three groups of URCPP students organize presentations to update other URCPP students and their mentors on the project/ research they have been working on. This Wednesday was the last day of presentations, and we were one of the groups to demonstrate our six-week process on the fabrication and replication of Thanato Fenestra.
A week before our presentation day, we decided to collect our thoughts and brainstorm on how we would present. Questions such as the context of the project, goals, our findings, and future growth were among the information we were working to implement in our presentation. I had the idea of breaking down the points to discuss similarly in a research paper like the introduction, methods, analysis, findings, and conclusion because I’ve been used to creating presentations with that template. However, the first time Dr. Jones gave us feedback on our initial presentation structure, she told us those were great points to discuss. Still, it didn’t have to be in a research paper template format because we fabricated and replicated an artifact. She then advised us to create a presentation surrounding the idea of how the artifact works, its importance, the elements used, and modifications we implemented during the process. After modifying the slides several times to fit all the information we aimed to present, we encountered issues with the order and delivery of the data. We had the idea of bringing in the nearly finalized physical design to give a silent demo so the students could interact with it and receive a vivid vision of how it functions. This addition, along with a short minute video capturing the demo, was done for the audience to visualize it, to begin forming an idea of the TF, and to ensure the whole audience saw the demo. This addition played along well with the intended structure, such as introducing a brief explanation of the fabrication process, mentioning the idea behind the artifact, and later on explaining in more detail the project with technical terms.
0 notes
Text
Research Interests in HCI
Every day I am expanding my mindset with the thought of learning more about research studies practiced in the multidisciplinary HCI field. However, I have found it eye-catching that the intersectionality field Marilyin Iriarte once explained via zoom with our group. This intersectionality field sparked a greater interest in my developing career goals. I initially recognized that in my future academic years, I wanted to work in the Human-Computer Interaction field. Still, I lacked knowledge regarding the range of focuses one can pursue. Since I plan to attend grad school in the future, I found it intriguing to commence my search on fields or studies expressed in academic research papers within the HCI community or the CHI. I wasn’t aware of CHI until I came across it in an article discussing the importance of intersectionality of race, gender, and class in design development. I encountered it for the second time after Dr. Jones explained how CHI, ACM CHI Conference on Human Factors in Computing Systems, is an international conference for the field of HCI and regarded as one of the most prestigious conferences within that field. CHI papers, also known as academic papers or research projects that CHI publishes, are recognized as high-quality, influential, and outstanding publications. Thus, this information guided me to find and utilize a great resource where I can find academic papers to review and develop ideas on studies I can research or uniquely create. Although I have yet to expand my research interests, Dr. Jones also opened up a path on focal points in software creation in addition to intersectionalities such as feminist HCI, post-colonial computing, gender HCI, anti-oppressive design, and design justice. In addition, another essential resource Dr. Jones advised me to look into is the ACM Digital library, which displays articles concerning computing and information technology. This digital library has excellent research papers that helped me select pieces to help me write my Capstone paper on the idea of slow technology and it’s relatedness to the fabrication of ThanatoFenestra.
0 notes
Text
The Presentation Shuffle
We spent the first half of the week preparing for the presentation by reconstructing the altar, making final edits to the altar, and designing and testing our presentation. We rebuilt the altar because each of us have been working on further altar development. As I mentioned in a previous post, we built a new component housing compartment to get closer to finalizing the internal placement of the components. Additionally, we made some adjustments to the image processing program. We refactored the code so that when the altar is initialized, the program will log the ambient temperature and lighting of the room. By taking an environment “snapshot” at initialization, the altar will now be able to react to the condition of the tea candle without regard for ambient variations during the altar’s use. This has proven to be a more stable programmed solution for the altar, ensuring that less bugs will creep up during a presentation scenario.
Simultaneously, we were sketching ideas for the URCPP presentation. Initially, we prepared a slide only presentation. The group was at a bit lost in regard to our approach in speaking about our altar. But after our initial practice session, Dr. Jones provided some much appreciated insight for improving the presentation. Not least of which was performing a live demonstration of how one would use the actual prototype altar. From there, our presentation approach was: introduction, high-level demo and explanation, lower-level sensor explanation, originating background, package explanation, and component comparison of the old and new altar.
To this end, we gave our presentation on Wednesday afternoon. And while we certainly hit all the topics we wanted to convey to the audience, we fell slightly short in terms of our delivery in that we each fell victim to circular speech. Additionally, we ran into some hardware issues minutes before we were to present, as we were not prepared for a WiFi switch that affected the raspberryPi. It seems the fresh setting threw our nerves off just enough. However, it was a practice presentation and as a collective I believe we gave a commendable effort. But without a doubt, the only way to get better at presentations is by doing more presentations.
0 notes
Text
Switching Focus
Today we worked on finalizing our paper and poster for the International Symposium on Academic Makerspaces (ISAM). I worked primarily on the poster. Besides the poster and paper, I also worked on a new schematic. The schematic was much more straightforward than our previous one. I thought we were confusing ourselves using the Raspberry Pi's template in our schematic, It had many pins we were not utilizing, so in our new PCB, I did not use the Raspberry Pi's template. I created a custom schematic with only the needed pins. The PCB board did not take long to route in the Eagle software, so I printed the PCB today. I hoped to connect it and test it today, but that was impossible as our team was busy finalizing the requirements for ISAM before the deadline. Fortunately, we submitted our paper and poster before the deadline. With this out the way, I hope we can also finalize our URCPP presentation by the end of our shift tomorrow. I want to have time to review everything that's within our presentation so that I may prepare myself. In addition to the presentation, I hope we can also decide on a final prototype design that we can use for demonstration purposes during our Wednesday presentation. What we have is what I call an emergency prototype, a last resort prototype that we can exhibit while we fabricate our final artifact. As we approach the end of this program, I want to shift my focus to my CSC 495 paper. As I currently reside on campus, I want to receive as much help as possible from my advisor/supervisor on my paper before I return home. I think working on this paper at home would make it a little challenging to get help. I aim to finish my paper before the fall semester starts so that I only have the poster to worry about.
0 notes
Text
Its Presentation Week
This week our team is going to present to the URCPP group, I’ve been looking forward to showing off our work, but I do have my doubts. This presentation will focus on our current progress, giving me a sense of relief because we will not be required to present our final results. I am happy we have a working model, but it is not within my expectations. Our altar works and does everything it is supposed to, but not in the way we intend. Our current altar can only work in one light setting, its behavior changes when the ambient light setting changes. I took our prototype to a study room in the Marget A. Cargill (MAC) building, and my results were interesting. I chose this area because I could manipulate the lighting as I like. What I found was that our current program was inefficient. The slightest lighting change greatly affected the altar. I noticed that even my movements affected the way the altar functioned. The altar would iterate through images whenever I changed my position, but the iteration would stop when I returned to my position.
Fortunately, working on the algorithm, I found a way to fix the ambient lighting problem. I’ve written the algorithm that utilizes intervals to trigger events in our program but has yet to finish testing it. Previously, I had written a separate algorithm that was supposed to fix the ambient light problems. Still, it did not function the way intended. Even so, it acted as the foundation that led to the new algorithm as I took the working parts and modified them. I hope we’ll have a functional algorithm by Tuesday, which will be a great asset when we present and demonstrate our altar to the URCPP group. I hope we finalize every design-based thing this week so I can complete a layout for my CSC 495 paper. It is a crucial part for me as I need it to graduate.
0 notes
Text
Aesthetic design
The replication and reconstruction process of Thanato Fenestra is a long-term study where our group and I are putting our effort into the techno altar's fabrication and design. In the future, we are thinking of future researchers to contribute their thoughts and ideas so the altar can expand and be used in homes from multiple cultural backgrounds to practice their memory ritual traditional practices. This week, we thought of coming up with different designs for the top part of the expanded compartment housing all the components: the RPI, the computer, projector, mirror, and the breadboard. Our initial design had multiple cardboard rings to provide an enclosed space. Although this design was functional, especially since the rings we not placed parallel to each other but intersected to use more space, Dr. Jones suggested us an alternative design with a geometric shape. This origami geometric paper pattern is aesthetically pleasing and covers more ground. But once we started following the tutorial, we found it complicating following the instructions as they were unclear, and the images were posted in a non-chronological order. Initially, after spending approximately an hour tracing the multiple lines to fold in the 8.5 by 11 inches white paper, and folding the right parts to produce an origami barrel structure, I had to pause and look for another tutorial. One that would indicate the foldable lines easily instead of trying to figure it out by zooming in the pictures and counting the lines. After searching the origami barrel structure, I followed the illustration of a photograph showing the measurements and foldable lines in the paper and its 3D version on the side. I found this picture helpful in replicating the origami but complicated when folding the lines. It took our colleague and I more than enough time to fold it correctly. But our long process was justified because we did not know until a student working besides our MakerSpace room helped us and told us the barrel structure was advanced origami. After completing one, we decided to create an additional one because the form was not enough to cover the open space. It was challenging whether to follow the exact measurements with larger paper sizes only to create one structure instead of multiple ones and join them. But we didn't know if it would produce a different pattern or be more complicated. Therefore, we decided to stick with the regular-sized papers and created two identical ones.


0 notes
Text
Transcending Crisis
Thursday morning, we had the pleasure of speaking with a PhD graduate student. They shared with us their current research endeavors and we had the chance to practice talking about our altar project. What stood out to me was that they are looking into the question of identity and how it is constructed. Moreover, they are using HCI as a vehicle to explore this gray area. The inquiry into the often fractured reality of human existence, or more plainly put, the analysis of people(s) with multiple ethnic identities and the trials and tribulations they are confronted with as a matter of who they are, has a direct connection to my lived experience.

The student shared with us a few stories. One of them was about a German youtuber whose content is centered around them living life in Columbia. And though they are German through and through, they identify as Columbian. Surprisingly, no Columbian in their videos will contest this Germans adopted identity. This is because of the Germans commitment to living an “authentic” Columbian existence. It is through this daily commitment of “walking the walk” and “talking the talk,” that this person is able to transcend their birth place and birthright, and forge a new ethinc identity, AND be welcomed by the local community.
Conversely, they also shared stories of individuals whose multiracial identity can become a point of tension. For example, when they find themselves in a group of one of their ethinic identities, they are often labeled an outsider due to their multiethnic nature.Thus bringing into question the “purity” of cultural roots. In these instances, one is often peer pressured into amplifying one of their identities by suppressing the pieces of themselves. It is easy to see how this social dynamic cultivates fertile ground for an identity crisis.
This conversation helped me understand that the technological field may be the most receptive to new and innovative research approaches into the inquiry of human phenomena. And that is an exciting and affirming revelation.
0 notes
Text
HCI design and Self-Identity
As we are approaching our final weeks of the research program, yet continuing to learn additional topics researched within the Human-Computer Interaction field, Dr. Jones allowed us to learn about the research of a colleague working towards her Ph.D. in the HCI field. Marilyn Iriarte is a graduate student focusing on her studies in self-identity in the Latino community. She is currently interviewing young adolescents and looking forward to receiving factual data that will allow her to understand societal or cultural factors influencing the identity of young adolescents who may encounter an issue of identity between two homes, one from the United States and the other from their family’s heritage culture. When Marilyn Iriarte explained her work, she also reflected on some parts of her work in progress. For example, she made us aware of the importance of establishing a connection with her participants. I didn't say interviewees because she doesn't like categorizing the conversation she makes with her participants as an interview. In order to get data, she reflected that forming a close relationship with the people will increase the possibility of receiving genuine data rather than biased information to appeal to her satisfaction. This information made me reflect on points mentioned in a psychology course involving interview biases. Interviewers narrow their questions with an objective that does not disclose an interviewee's thoughts but rather their anticipating expectations. I found the concept of her work-study appalling because it is not mentioned enough, and it highly resonated with me. As a Hispanic born in the United States and with Spanish-speaking Mexican parents, there was a point where I struggled to recognize my identity when I felt I didn't necessarily "fit" as an American because of my language or as a Mexican because I didn't practice the customs. There was a constant back and forth where my true identity was lost between my Mexican culture and American life. Therefore, I believe Iriarte's studies considerably raise awareness and support for kids who are defining their self-identity between their American life and their family heritage.
0 notes
Text
Wedge Mechanics
The internal component organization of the altar has been riding in the back seat until this week. Earlier in the week a team member handled the cable management of the computer and circuit, along with implementing some innovative solutions for the projector tilt and its power button. This concise internal editing made room for some potential design changes as we may now be able to have the projector, computer, and circuit, directly under the circular frame. This means that almost nothing will be placed behind the paper screen, with the exception of the mirror. If that is the case, then the only thing that will require accommodation post-screen is the mirror and the projected image. This leaves a lot of dead space for us to whittle down. And this inquiry into the altar redesign is what I investigated on Friday of Week 6.

I made cardboard cutouts with the laser cutter to make another electronic compartment box so that I could take measurements of the angles for the projector and mirror. Gluing the last prototype made it difficult to gather angle information, so this time I made sure to precisely attach the box components with the blue painters tape and leave out the front wall to make maneuvering the projector and mirror easier. Securing each component in a way that allows for reconstruction and deconstruction makes gathering iterative prototype information more feasible, especially when trying to conserve materials. Because there is always something new to measure or a step that was overlooked and increased editability allows one to backtrack in the prototype process.
With this taped box without a front wall, I placed the projector with ease under where the circular frame would go, and the mirror at the back. I should note that a team member was running some tests with the full prototype elsewhere so I was without the laser cut circular frame, so I made due with the octagonal frame. With the octagonal frame now set on the box, I turned on the projector and angled the mirror upward and the image displayed as desired. I recorded some measurements and started experimenting with the placement of components. Once the team member returned with the Circular frame, I ran the same adjustments as I did with the octagonal frame. Of course the circular frame lent itself to different measurements.

In the end, it seems progressing beyond the original design may not be feasible. We’ll have to test the mirror angles I recorded in the next week.
0 notes
Text
Structural Origami
On Thursday, we were looking into further design solutions for our altar. In particular we were trying to find a more attractive “hood” for the altar. Our current hood cover resembles a ribcage and when it is wrapped in paper the overall aesthetic of the altar resembles a 19th-century prairie schooner. While it is possible to make more laser cutouts of the arches, this route does not lend itself well to material conservation as using the laser cutter to make circle and semi-circle cutouts leads to the majority of the cardboard being wasted. Perhaps, one way to reduce the waste from our circle problem would be to divide the circle into fourths and stack the arches one on top of the other.
In the meantime, a colleague and I investigated an origami technique suggested by Dr. Jones. This architectural design can turn a sheet of paper into a structure capable of bearing a load greater than itself. A plus is its geometric pattern is rather visually appealing and reminds me of Ikea lamp shades.
To make the paper structure, take out an 8.5 by 11 inch paper and fold it lengthwise into eighths or eight equal columns. Then draw diagonal lines from the tip of the first fold to the tip of its opposite. Do this in both directions so that it produces diamonds. If done properly, the edges of the diamonds should intersect at the creases only. Then fold the paper along those freshly drawn lines. You should now have a piece of paper with creased diamonds throughout. Now all there is left to do is to crease, pinch, and fold it until it forms a barrel-like structure. However, this is far more challenging than we gave it credit for. So if you find yourself struggling, remember the phrase, “mountain peaks and valley sweeps.” This is a trick we learned from a peer next door where the idea is to bring the peaks of the diamonds together while making sure the valleys remain “sweeping.” In the end you should be left with a geometric paper tunnel.

While the origami paper barrel did add visual interest it did not have the lamp shade effect that we were hoping for. The light from the projector only shone through where it is directly reflected. For us to have a glowing altar we are going to have to include lights just for this purpose.

0 notes