
bestpiceditor-blog
Get all kinds of photo Editing Services
Best Pic Editor is the best place to get high-quality clipping path services including clipping path, background removal, photo retouching, shadow creation, image masking, image manipulation, color correction, and real estate photo editing service. We offer services to the photographers, e-commerce business, online store, handmade business, small business owners, and the graphics designer. We take a little price for providing our services. For further information visit on Clipping Expert Asia. Our website Link >>> https://clippingexpertasia.com Email: info@clippingexpertasia
13 posts
Don't wanna be here? Send us removal request.
Last Seen Blogs

ijarrie
Jhoan (Taylor's Version) 💜

grab-it-by-the-balls
Gold Dust Women
heartofagirlkingb
King B

schwartzdrachmann29
The Journey of Rubin 441

sassytheoristchaos
life is dumb
Text
Fuzzi Selection tool- How to use it to remove image background in GIMP

We all know how to remove image background in Photoshop. Even a child can easily remove the background from an image by using Photoshop.
What should you do if your client will tell to remove the image background using GIMP?
To get rid of you from this problem, I have come with a helpful guide which outlines the problem to remove the background from an image in GIMP.
Hope, you will find this step by step guideline helpful. Let start from the beginning to the end!
How to remove background from an image by using the GIMP Fuzi Selection tool
The fuzzy selection tool works like the Photoshop magic wand tool. In below I let you know how to use this tool to remove image background.
Step 1
First, you need to open an image in GIMP in order to remove the background. You can open an image file by going to File > Open. Also, you can use the shortcut form Ctrl + O to run an image in GIMP.
Step 2
Then, you should go to the main image layer and right-click on the mouse. Next, a dialogue box will appear. From the box, you should select the Add Alpha Channel. If you select this option, you can get a transparent background at the final result.
Step 3
Now, you need to select the Fuzzi Selection Tool and start clicking on the image background. Then, tap on the delete button to eliminate image background.
Step 4
In this way, you can easily remove the background from an image using GIMP. When you remove the background, you can see some parts of the image are not deleted. To delete those parts, simply grab the eraser tool and erase them to get a transparent background.
Step 5
If you want to add or change the background color, you need to create a new layer. Then, choose the color you wish to replace with the help of the bucket fill tool. Next, place the newly created layer down to the original image layer.
In conclusion
It is very easy to remove image background in GIMP. Follow the above guideline to remove image background. You can also follow other processes to remove the background including Free Selection tool, Quick Mask, and Alpha Channel Mask.
If you need background remove service, visit on Clipping Expert Asia.
0 notes

Text
7 tips on photo poses for boy.
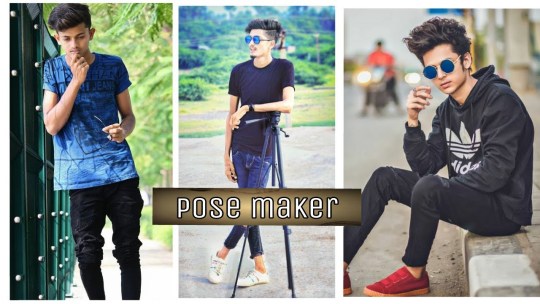
Do you want to take better pictures of your kid or a man? Today's post helps you out by providing precise guidance on photo poses for the boy.
Photo posing is a crucial part of photography to take an appealing and eye-catching photo. If the boy whom you want to photograph doesn't feel comfortable, it is difficult for you taking good shots of your subject.
You can also try to use photo editing services like background remove, photo retouching, and image manipulation to make the photo poses eye-catching.
In this article, I am going to cover up how to photo poses for the boy.
1. Basic standing poses with the hand in pockets
Standing pose with hands in the pocket is a common but crucial photo pose to get an eye-catching photo. We can capture photos anywhere as in this pose don't need any props. You need to remember two things about this photo pose-
The subject you want to shot need to be relaxed and seems to be natural while one leg will remain straight.
The hands of the subject don't need to hang on the body side.
2. Basic standing poses with props
Standing pose with props helps to make the photo-absorbing. Props like a jacket thrown over the shoulders, or holding things that express his hobby.
3. Standing poses with a wall
Standing with a wall is another great photo pose to get a professional look of the photo.
4. Sitting on a chair
Sitting on a chair is another photo pose which makes the subject relaxed and comfortable.
5. Sitting on a stair
You can suggest the man sit on a stair to be ready for the photo shoot.
6. Sitting against wall
7. Laying down on grass
You can try any of the photo poses for the boy to make the photo alluring and attention-grabbing. Remember, the more your subject feels comfortable, the more you take high-quality photos.
0 notes
Photo

Background removal service for restaurant
The restaurant now uses recipe photos to grab the attention of the audiences. High-quality and attention-grabbing photos can easily make consumers inspire to buy from the restaurant. Photo editing services like background remove, color correction, product photo editing service helps to make the photo eye-catching.
Follow this link to get a high-quality background removal service.
https://clippingexpertasia.com/background-removal-service
0 notes

Text
Weeding photo retouching service at Clipping Expert Asia
Weeding photo retouching service at Clipping Expert Asia
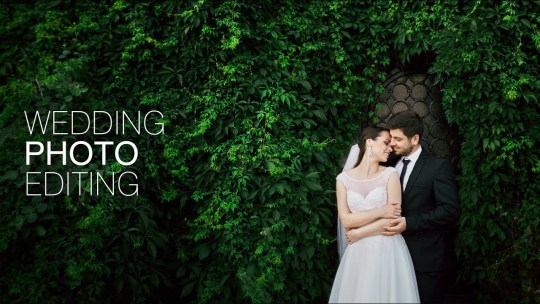
A wedding is the most important and memorable part of every human life’s. It is a special life event to everybody life and that’s why everyone wants to save this emotional and happy moment for granted in their photo album.
Clipping Expert Asia is the most popular photo editing company well-known for its photo editing services they provide. Wedding photo retouching service is one of the elegant images editing service which has been provided by Clipping Expert Asia. High-quality, low price, quick turn-around service, and client satisfaction are guaranteed.
Wedding photo editing service is very crucial for making the wedding photo pop up. A photographer’s experiences in a photo shoot, as well as the expensive camera, never ensure the quality of the photo. You can’t remove the blemishes, spots, and dust through photographing by the camera. Photography post-production method is the only way to eliminate any imperfection from your photo shoot.
So, it is crucial to take online wedding photo enhancement service to bring your photo from basic to the pro level.
Types of wedding photo retouch service
Beautiful bridal portrait
Light and airy wedding photo editing
Natural wedding photo editing
Background enhancement
Stylish color correction
Magazine Look
Professional wedding photo editing process
Color correction service
Color correction is simple to apply on the image but doesn’t so easy as you thought. Make the color balance right, keep the exposure of the image right, and make the vibrancy of the color perfect are some typical works we need to do.
Photo retouching service
To make the wedding portrait image sophisticated, we remove every imperfection from the bride skin. To do this, we follow the advance photo editing process and use Adobe Photoshop as this editing tool has featured with many useful tools. Photo retouching is really a time-consuming task, so you need to pay the extra cost. But we ensure that the price we take is very low comparing other photo editing company.
Background removal service
We also remove the background for eliminating the imperfection from the image. We have a skilled photo editing team which provide you high-quality background removal service.
Conclusion
Wedding photo retouching service is very crucial for making the most important life event’s photo pop up. You can send your wedding photo without any confusion as we ensure the best quality.
0 notes
Link
Clipping Expert Asia is the best place to get high-quality photo retouching service.
0 notes
Text
Best product photography tips you need to know
Creative and innovative product photography is worth for your online shop that helps to generate sales and conversation.
A great and sophisticated product photo which photograph in a creative way can easily catch the attention of the viewers and inspire them to buy. Using the product photo effectively can make a great change and increase traffic to your business.
But all the efforts you take will go underwater if you don’t know how to take product photo. In this article, I am going to discuss the best product photography tips that need to know every business even the photographers for making the product photo interesting.
Use a white background
Every online market place such as Amazon, eBay etc recommends using a white background in the photo. White Background can easily remove distracting objects and bring the subject in front of the viewer’s eye.
Create a white background is simple in the studio. You can use white paper surrounding your subjects.
You can also create a pure white background using the photo editing software.
If you need white background removal service, visit on Clipping Expert Asia.
Image manipulation
Image Manipulation is quite effective to tell a story about your product when the image comes visually. Of course, image manipulation is a creative work which has been done with the help of photo editing software.
As a photographer, you need to have enough skills to use photo editing software. You can also outsource image manipulation service for making your product photo appealing.
Standalone product
Using the products only in the photo would be a great way to promote a product. The viewers can easily be attracted by the photo which included the subject only they are seeking for.
360-degree photo
If you ever make a purchase from Amazon, you can see some businesses use a product photo that offers to view from a different perspective with zooming feature. This kind of photos is called 360-degree photo. The viewers can easily show every detail of the product and they can estimate the quality of the product. In fact, 360-degree photos make the buying decision easy. So, capture a photo with 360-degree features that allow viewers to see every detail of the product.
People with product
Only using the product photo can’t help you to increase sales and conversation. Make the product photo humanize. That means take a product photo with people. This type of photo helps the viewers to understand how the product could help them using their real life.
Conclusion
Product photography is very crucial in this e-commerce business world where the necessity of taking the quality photo is most important. Without abiding by proper guideline, it is difficult to get a great shot. We provided the best product photography tips to help the photographer as well as the business owner equally to take a creative and sophisticated photo shot.
0 notes
Video
youtube
Bulk photo editing and retouching service provider- start pricing at 25 cents per image.
0 notes
Text
How to create shade in Photoshop
How to create shade in Photoshop
With the help of Photoshop, you can create or enhance your own image for using in your business. In modern business, photo related to business increase sales and conversation to your business. Shading is an image editing process in which you can add a shadow effect to your photos. From the layer selected in the layer panel, you can add shade with Photoshop to your image using the brush tool. Depending on the brush and the requirement of your image, you can create soft, hard or blurry shadows.
Shadow creation to your image will make your image appealing and eye-catching. If you want to get, realistic shadow creation service, you can visit our website. We provide high-quality image editing services including shadow creation, photo retouching, and clipping path.
Let see the below guideline step by step for creating shade to your photo.
1. Open your image in Photoshop
2. Go to Window > Layer to see the layer in the layer panel.
3. Create a layer by clicking on the new layer button in the layer panel.
4. Then, choose Multiply from the layer menu. This option will help you to draw over the image with a dark color while you can see the change on the original image, making a shadow effect on your image.
5. Choose a color from the color picker for your shadow. It depends on your need how dark shadow you wish to create. A grey color will create a soft shadow while a black color creates a dark shadow.
6. Select the brush style. The shadow effect will create depends on the brush you choose. If you want to get a soft shadow, select a soft edge brush. In contrast, creating a hard shadow, you need to take a hard edge brush. You can also adjust the opacity of your brush to get dimmed and soft shadow.
7. Keep drawing on the layer until you get the best-shaded area to your image. You can pick a color or change the brush set at any time.
8. To blend the shadow layer with your original image, you need to merge the layer you working on. To merge layer, go to Layer > Merge Layer.
9. At last, save the image to get the shadow you create.
Conclusion
A shadow will make your image real and natural. More people attract to your image to see the realistic shadow on your image. So, shade with Photoshop to your image is very crucial. You can add a shadow any time to your image by following the above guideline step by step.
1 note
·
View note
Text
8 Tips To Master The Art of Architecture Photography
Architecture is art — however, a deception that photographing a building is straightforward can solely lead to lackluster subject field shots. From sloped lines that ought to be straight to finding the correct lightweight, photographing design are often difficult — in spite of your capturing fashionable buildings or older buildings. To make pictures with enough awe to comprise art, subject field photography needs pre-planning, though, and some tried-and-true tricks. Here are some design photography tips to push your photos from snapshots to art buildings.
Pre-plan for the most effective natural lightweight
Light is crucial to each photograph, in any subcategory. In design photography, lightweight will add drama, obscure details or produce adulatory lines. Obtaining the shot means that finding the correct lightweight, whether or not you would like a moody silhouette, a nighttime long exposure or associate degree recent building against a sky-blue sky.
Time of day makes an enormous distinction in however the image is lit — understanding wherever the sun is going to be once you head to the building permits you to decide on the most effective sort of light for the shot. If the sun is behind the building otherwise you have low-light conditions, you’ll either get a silhouette or overexpose the sky. With the sun within the front or towards the aspect, the building is often photographed with associate degree evener exposure and close light. Of course, this directional light needs the sun to be lower within the sky, which implies heading get in the morning or evening, not within the middle of the day.
If you're traveling and have restricted time to photograph the building, realize the building’s orientation therefore you recognize whether or not to go to within the morning or evening. For buildings that you just have longer to explore, attempt visiting throughout entirely different times of day to search out the most effective lightweight.
Explore completely different angles
One of the simplest ways in which to differentiate your design photography from a shot is to prevent taking pictures like everybody else takes pictures — which means that stop defaulting to taking each image from eye level. The peak you're taking associate degree subject field image from matters. Taller heights can facilitate minimize distortion; wanting down on a building will emphasize shapes, whereas wanting up a building will create that structure look even additional dominating.
Along with considering the angle you're taking the shot from, explore all angles of the building similarly. Shop around each aspect, not simply the highly-Instagrammed front of the building. Search for attention-grabbing ceilings, down for inventive staircases and around for any price that embodies the feel of the design.
Look for lines and shapes
Architects understand the importance of lines and shapes — then benefit subject field photographers. Keep a watch out for horizontal, diagonal or vertical lines to maneuver the attention through the image. Leading lines will purpose to a structure to draw attention to the topic. Lines even have emotional associations similarly — diagonal creates a sense of movement, horizontal a way of calm, vertical a way of power or growth. actuate lines aren’t as common in design, however, produce an additional natural feel since these styles of lines are additional usually found in nature than semi-synthetic structures.
Going hand-in-hand with lines, shapes additionally add interest to subject field pictures. Once you notice a form during a structure, use angle, and composition to emphasize that form. For instance, minimize the distractions and fill the frame with the form.
Use a polarizing filter for exterior subject field photography
A polarizing filter is a cheap accent that may create a far larger impact on your pictures than your pocketbook. Polarizer’s management mirrored lightweight, which implies simply dominant reflections off windows or water in design. Even while not the apparent reflective lightweight effects, polarizer’s also will facilitate create the sky seem bluer. Merely keep in mind to require the polarizer off if you ought not to management the mirrored lightweight, notably inside or in the dead of night — these filters can scale back the quantity of natural lightweight returning into your photos.
Keep it sharp — and take a look at a rack
In design photography, detail is crucial — which implies keeping the shot sharp. Use a narrower aperture to stay the main points of the building focused, like f/8 or maybe a better f-stop.
With that narrower aperture, motion blur will begin to cause a retardant (yours, not the building’s, of course). Employing a rack can facilitate keep the shot sharp, particularly once shooting towards the tip of the day or once photographing a building’s lights in the dead of night. A camera lens may also be helpful for your subject field photography, notably if you’re operating with fairly tall buildings.
Don’t forget to go inside
Exterior subject field photography is commonly the primary issue that involves mind once considering a structure, however, a building’s interior offers even as a lot of inventive fodder. publicly buildings or with permission to photograph an enclosed, several similar tips apply. out there lightweight, however, is completely different from interior shots as a result of a combination of window lightweight and overhead lights. HDR or associate degree off-camera flash will facilitate forestall windows from being exposed in interior subject field photography.
Prevent or correct convergence lines.
Optics don’t capture everything precisely the method it exists in the real world. Convergences lines are once a line seems to curve — it’s a perspective distortion that’s usually exaggerated with low-cost lenses. to stop the buildings from wanting like it’s close to tip over, design photographers will either forestall it with tilt-shift lenses or correct the distortion in post-production with Photoshop.
Tilt-shift lenses can save avid design photographers heaps of your time, however, the lenses are price preventative for photographers that simply need to experiment with design whereas traveling. Fixing perspective distortion in Photoshop needs longer, however less investment exploitation the attitude warp tool.
Perfect with post-processing
Photoshop isn’t simply sensible for fixing the perspective distortion. Use the RAW file format and retouch pictures in Lightroom or another image editor for the most effective results. With computer code, correcting white balance is not any drawback. Frequent edits for design photography additionally embody adding distinction, jazzing up the sky, or sewing HDR photos along.
Taking a shot of a building is as simple as birth control a smartphone — however, to really move from a fast shot to art subject field photography, you've got to capture the essence of the building. Which need some pre-planning, the correct lighting, the correct tools, integrative ways, and written material technique?
0 notes
Photo

Get image masking service. You can contact us by following our official page.
1 note
·
View note