bookiebeaga
Beanie Books
Hyello! Feel free to say hi :>
17 posts
Don't wanna be here? Send us removal request.
Last Seen Blogs

nareshgarg-blog
One Step Closer

trogonbeauty
TrogonBeauty

whim-prone-pirate
parker.jmj

mephone-3gs
3GS

craftycashprofessornickel
Untitled
Text
Crochet Prawn
For Christmas my (marine biologist) dad wanted some prawns and I could not find any free patterns anywhere so I ended up drafting my own pattern. It has since been approved by my dad despite having no rostrum or antennae (I found these too hard to look good - if anyone has any tips please let me know!).

Also this pattern is NOT made in the round and so does require sewing and has a few fiddly bits. In order to make the legs smaller than the rest of the body without changing the colour, I separated out smaller sections of the ply, much like when using embroidery floss. I'm not sure if proper crochet-ers do this but I've found it works for me as long as it is 2-ply or greater.
Full Pattern under the cut:
INGREDIENTS:
3.5mm and 2mm Crochet Hooks
6mm Safety Eyes
Pinky Yarn (Colour A)
Darker Yarn (Colour B)
METHOD:
Note: ch1 and turn between each row. inc= 2 sc in same stitch. sc2tog= sc 2 together. blo= back loops only
Changes in colour will be denoted using A! (change to colour A) and B! (change to colour B)
MAIN BODY
Using colour A and a 3.5mm hook:
Ch4
sc 3
sc 1, inc 1, sc 1
sc 1, inc 2, sc 1
sc 2, inc 2, sc 2
sc 2, inc 4, sc 2 (eyes will be inserted between row 6 & 7)
sc 12
sc 5, sc2tog, sc 5
sc 11
sc 11
sc 11
sc 11
sc 11
sc 11 in blo (this ridge separates the head from the body)
sc 11
sc 2, B! sc 7, A! sc 2
sc 5, inc, sc 5
sc2tog, sc 8, sc2tog
sc 2, B! sc 6, A! sc 2
sc2tog, sc 2, inc 2, sc 2, sc2tog
sc 10
sc 2, B! sc 6, A! sc 2
sc2tog, sc 6, sc2tog
sc 8
sc 2, B! sc 4, A! sc2
sc 8
sc2tog, sc 4, sc2tog
sc 2, B! sc 2, A! sc 2
sc2tog 3 and finish off
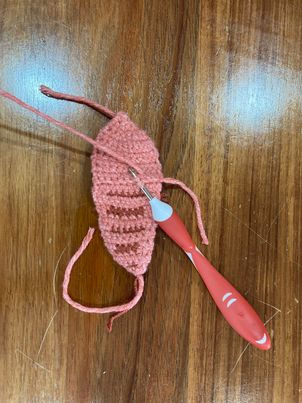
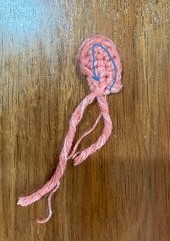
Now using the ridge created by the blo row (shown in picture above), slip stitch across the surface of the prawn to enhance the ridge and accentuate the difference between the head and the body. Your prawn should now look like this (folded):

TAIL x2
Note: all stitches within [] belong in same stitch
The tail might be a bit tricky as it goes up and around the foundation chain like this:
Using colour A and 3.5 mm hook:
ch 6
from 2nd chain - slst, sc, hdc, hdc, [dc, hdc, dc], hdc, hdc, sc, slst then finish off
PLEOPODS (Back Legs) x10
Separating colour A to create a 3-ply yarn and using a 2mm hook:
ch 11
from 2nd chain - sl st 10 then finish off
PEREOPODS (Front Legs) x10
Separating colour A to create a 2-ply yarn and using a 2mm hook:
ch 15 then finish off
ASSEMBLY
Secure eyes between rows 6 & 7 and weave in ends to the inside of the prawn (don't bother clipping the yarn as this can be used as extra stuffing!).
Attach tail at a slight angle at the end of prawn to get the positioning to look more realistic.
Start attaching the pleopods approx. one row back from the head ridge and one stitch in from the side, continuing attaching them ~1 row each until five are attached per side.
Attach the pereopods approx. one row forward from the head ridge and one stitch from the side, continuing to attach them every 1/2 row until five are attached per side.
Whip stitch the prawn together using colour A until you reach the end, stuffing as you go.
Congratulations, you now have your very own prawn!!
Please reblog with pictures if you make your own! And any tips and tricks to make them look even better :))))
290 notes
·
View notes
Text
My first ever attempt at crocheting doilies!
I think it went really well, I was a wee bit nervous about doin lacy stuff but I’m happy with the results!


These are probably the worst pictures that I’ve ever taken of a project, but I’m leaving them with my granny tomorrow so yea!
(Patterns I used are in replies)
5 notes
·
View notes
Photo

My faith by Fereshte Tarband
Free Crochet Pattern Here (May need to make an account)
114 notes
·
View notes
Text
Sorry this is from the Annoying app but I do enjoy I can do cool time lapse things of my crochet
14K notes
·
View notes
Text

i achieved my wildest little creature dreams this weekend and turned my regular bed into a mossbed and it’s everything i’ve ever wanted in a snooze spot
59K notes
·
View notes
Photo
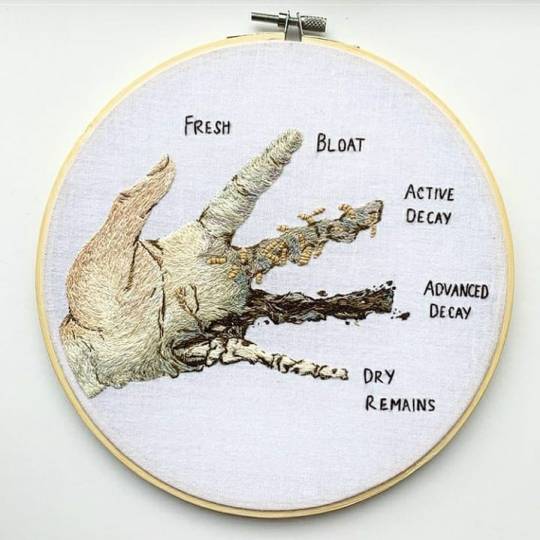
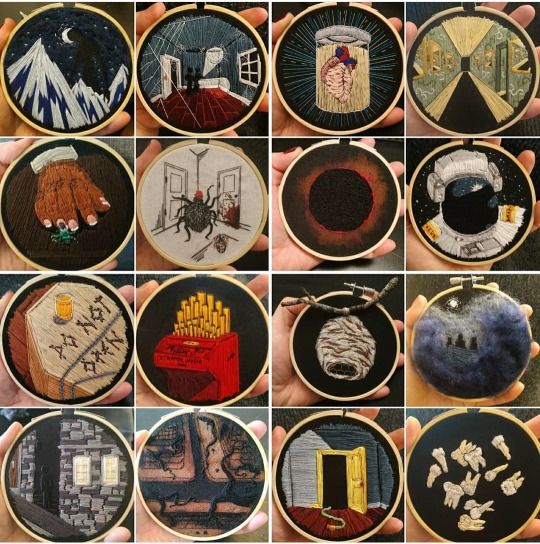
Stages of Decomposition, Embroidery by calicoranger
91K notes
·
View notes
Text
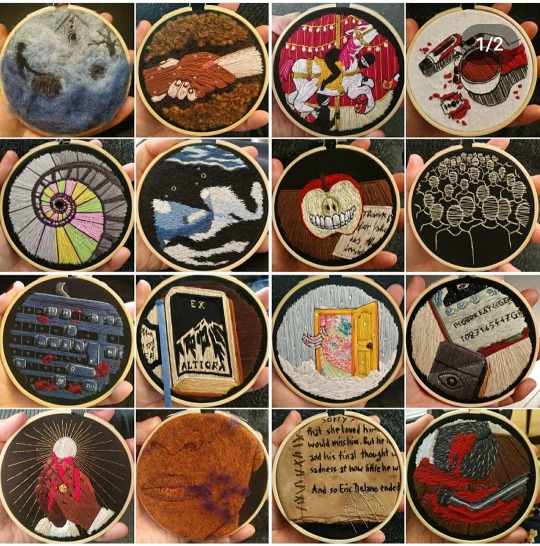
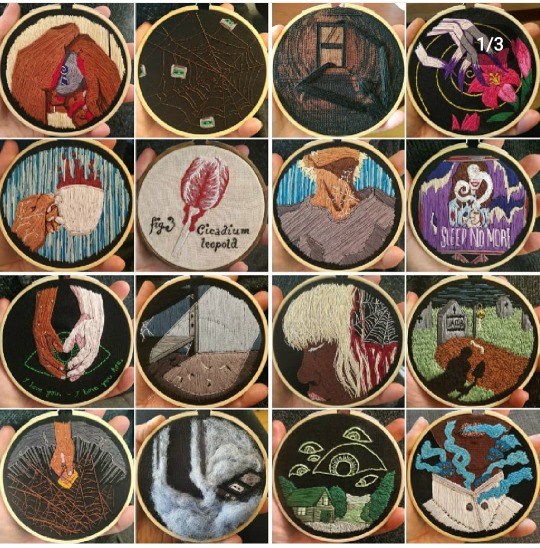
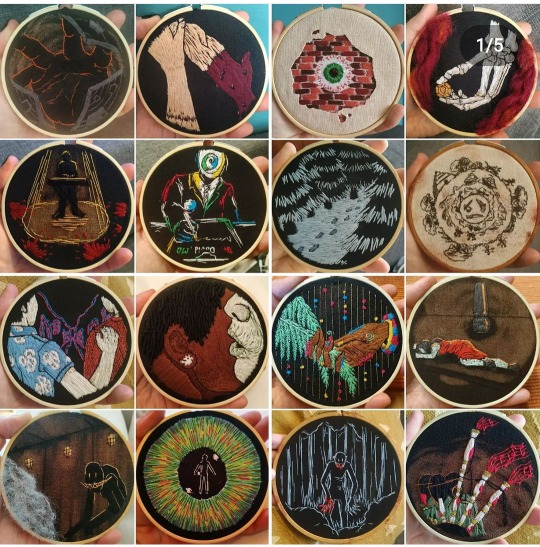
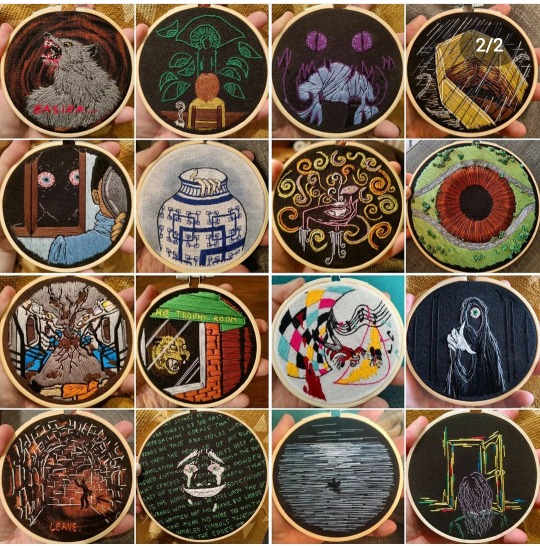
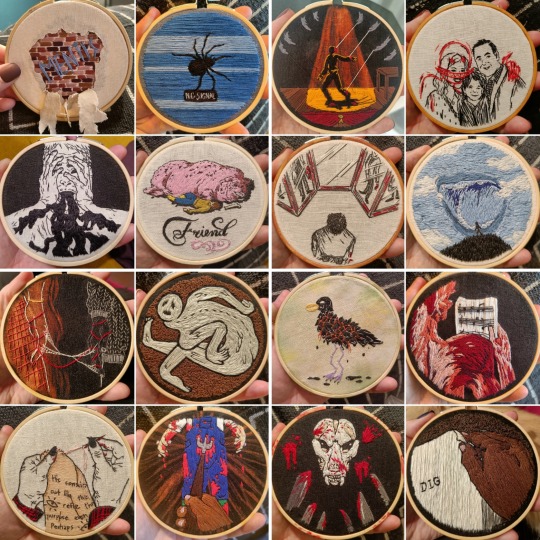
Dear Rusty Quill. Listen. I've been at this for just under two years (22 months to be exact) and I've not even finished four seasons' worth of hoops. I can't do another whole show. Mercy. I'm only human. But these have raised 10k dollars to charity, so that's awesome at least.


12K notes
·
View notes
Photo
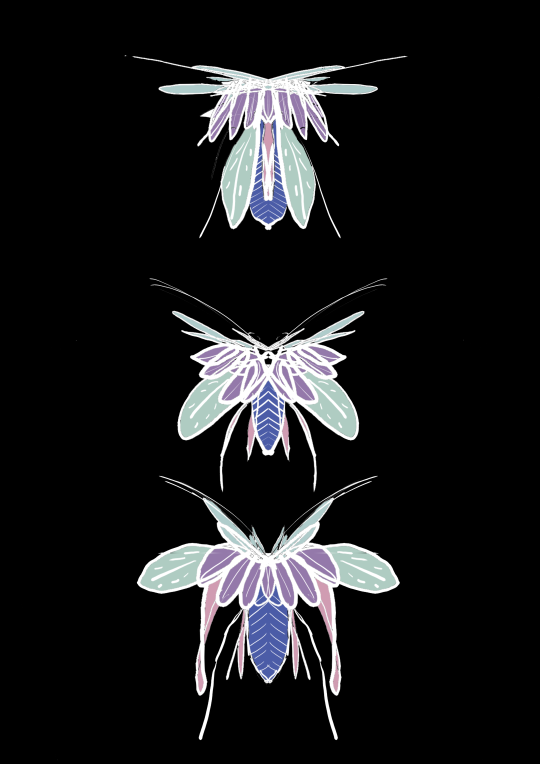
This looks kinds like shit because its literally just me being bored, starting to sctibble, saying “Oh hey! BUG” and then making it look more like a bug and doing 2 more
They are coloured with the fill bucket only
but still, I think they look kinda cool, i might re-draw them with more effort at some point, but yea
#my art#scribbles#you know?#im not gonna tag this as anything else bc like#i dont wanna annoy ppl in the main tags with my fuckin scribble bugs
1 note
·
View note
Text
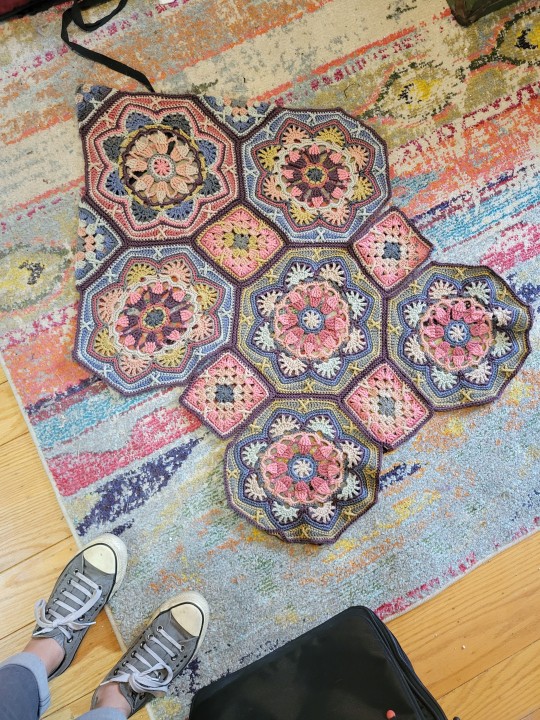
Join-a-palooza has begun!!
#AAAAA#THIS IS GORGEOUS#THE SHAPES AND THE COLOURS!!!!#crochet#sewing in the ends must have been a nightmare though
350 notes
·
View notes
Text
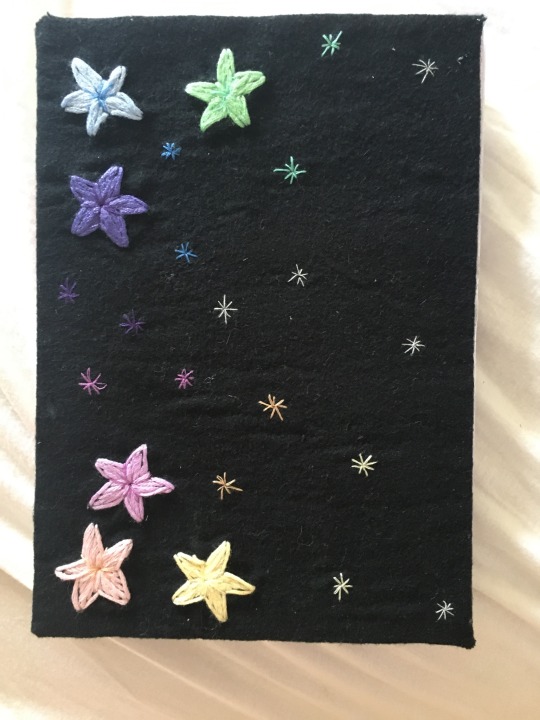
It’s done! It’s done it’s done it’s done!!!
I’m so happy with how this sketchbook turned out, it’s not the neatest binding I’ve ever done, but I think it looks really good!
Front cover
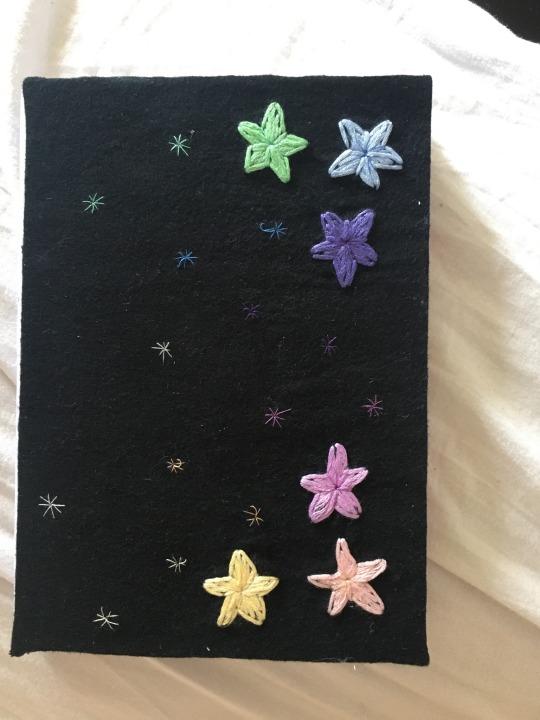
Back cover
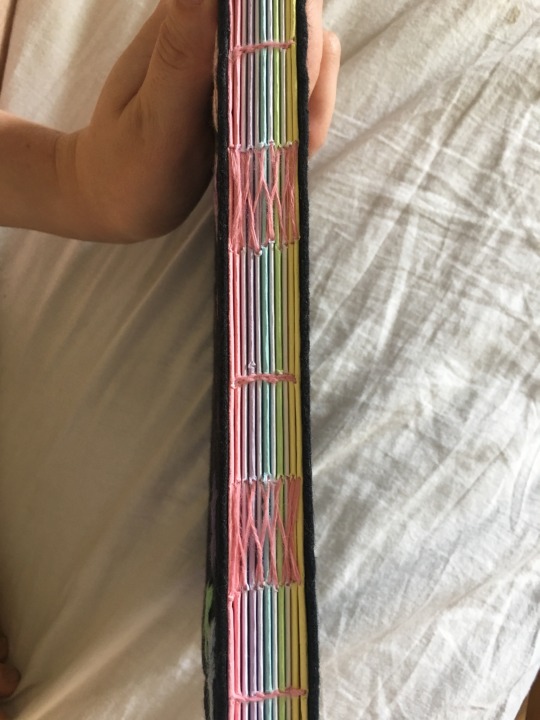
And the spine!
This is my first time doing both open spine and embroidery, so yea I’m proud of it
I do with id used a darker colour thread for the binding though, it would have made it pop more
3 notes
·
View notes
Text
It’s been so long since I’ve worked on my bookbinding project at all, I had my leaving cert this year then applying for college and all that had been hectic,but yesterday I knuckled down and finished the front cover!!!
Here it is!
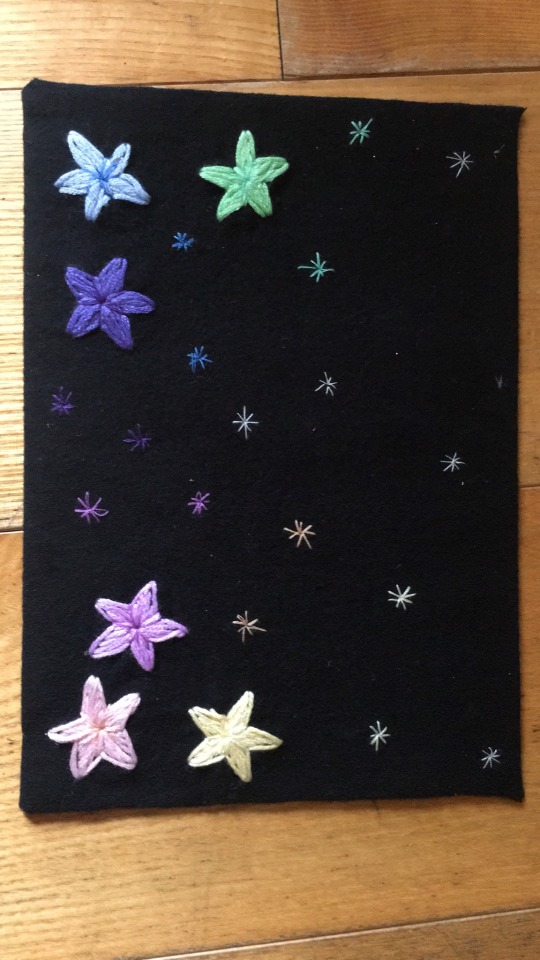
The big stars are a bit chunkier than I wanted them to be, and some of the black is peeking through, but I’m really proud of myself!!! I love how it turned out
I’m especially happy that it doesn’t like like complete shit, bc I literally have never done any embroidery before this , besides figuring out how to do the stars
I’ve been working on a few crochet projects throughout the year aswell, so I might post abt them at some point too.
2 notes
·
View notes
Photo

Crunch Stitch Section by Marie Segares
Free Crochet Pattern Here
15 notes
·
View notes


Text
I’m kinda late, and I don’t have pictures, but I have the signatures folded, cover board cut, and all binding holes punched!
I was on autopilot and put everything in a press once I was done to get it all nice and flat, but I forgot to take the pictures...
I might take the bits and bobs out of the press tomorrow for some pics
I’m gonna start my first bookbinding project in a while tomorrow!
It’s gonna be a sketchbook for my best friends 18th birthday! She likes cute things and stars and stuff, so I’m gonna try and make it all pastel
It’s gonna have a french link stitch, and open binding so you can see the stitching and ends on the signatures. Each signature is gonna have a page of pastel coloured paper on the outside, and the binding and the covers are gonna be black, for contrast or smt
I’ve got this rlly lovely black cotton, which is kinda felted? Idk how to describe it, it’s rlly soft but it’s still strong enough for embroidery, which is great, because I’m gonna embroider little pastel stars on the upper left corner! Ive never done embroider before, but I’m just gonna see how it goes and hope I don’t fuck it up too badly....
I think it’s gonna be really cute when it’s done! I’m gonna hopefully get all the signatures made and the board cut for the cover tomorrow, so I’ll post and update w pictures then!
#bookbinding#I’m really happy with what I’ve gotten done today#I think it looks good :3#I’m still nervous about the embroidery tho
2 notes
·
View notes
Text


E-book reader case! For me!
Finally got around to making a case for my e-reader, as the previous one was falling apart. I got really sick of shoving it out of sight with embarassment every time I mentioned that my hobby was bookbinding.
I am absolutely fucking obsessed with this black and white chevron paper. The paper itself just *feels* so good, and it looks stylish as hell.
31 notes
·
View notes
Text
I’m gonna start my first bookbinding project in a while tomorrow!
It’s gonna be a sketchbook for my best friends 18th birthday! She likes cute things and stars and stuff, so I’m gonna try and make it all pastel
It’s gonna have a french link stitch, and open binding so you can see the stitching and ends on the signatures. Each signature is gonna have a page of pastel coloured paper on the outside, and the binding and the covers are gonna be black, for contrast or smt
I’ve got this rlly lovely black cotton, which is kinda felted? Idk how to describe it, it’s rlly soft but it’s still strong enough for embroidery, which is great, because I’m gonna embroider little pastel stars on the upper left corner! Ive never done embroider before, but I’m just gonna see how it goes and hope I don’t fuck it up too badly....
I think it’s gonna be really cute when it’s done! I’m gonna hopefully get all the signatures made and the board cut for the cover tomorrow, so I’ll post and update w pictures then!
#bookbinding plans#chatting to the void#future project#I’m not too good at actually making shit#but I’m trying my best#bookbinding
2 notes
·
View notes
Text
welcome to my blog!
Hi I’m Beanie!
She/her
I’m gonna put stuff here!
If you like...
bookbinding
cuddlies/plushies
Crochet/sewing
minecraft? (idk how much minecraft stuff I’ll be posting, but still)
...then feel free to follow! :3
I honestly dont know what I’m doing when it comes to posting stuff, I’ve never had a blog where I’ve done that before :p usually just reblog
I’m gonna try to not be akward and shit tho!
1 note
·
View note