
Though data loss issues are annoying, Bitwar Data Recovery solve them easily!
Don't wanna be here? Send us removal request.
Statistics
We looked inside some of the posts by cheayoldatarecovery and here's what we found interesting.
Average Info
Notes Per Post
18
Likes Per Post
18
Reblog Per Post
0
Reply Per Post
0
Time Between Posts
6 days
Number of Posts By Type
Text
17
Last Seen Tumblr Blogs


Fun Fact
The most popular pages on Tumblr are about Minecraft, GIFs, and David J. Peterson.
Text
How to Map The Network Drive?
You maybe not so familiar with the network drive, but it is the storage device of computer files, and it is rather vital. So please keep reading to learn insight about what network drive is and how to map it.
The network drive is a computer drive, usually a local area network (LAN), that is installed and operated in a computer network. It is shared across selected or all users on the network and offers the same access services and data storage as standard disk drives.
In short, a network drive is any drive that is only accessible over the network. Unless mapped, the network drive is only accessible by entering the network path.
Advantages & Disadvantages
Advantages
A network drive is a central storage location, making it easier to back up and mirror.
NAS and SAN solutions make it easier to add storage.
Permissions can specify who you want to view or edit the files.
Users can share a network drive and its files with many people.
Disadvantages
Network drives need a network. If the network goes down, users cannot access all files on the network drive.
Being a central location for multiple users increases the likelihood of accidental modification, deletion, hacking, or infection.
Anyone who can access the drive could copy or move all its data to an alternate location.
Applications
Network drives are more useful in home and business environments, which makes it more competitive than shared software and cloud file storage.
For Home User
Network drives work well on network drives as large media libraries. Users can regard the network drives as cloud storage that is included in a single network.
At home, if you have stored files on your laptop and want to access them on another desktop or tablet, you can save them to a network drive so that all devices on the network with the correct access credentials can access them.
For Business User
The same principle could be applied to enterprises, especially small and medium-sized enterprises. Networked storage can play an essential role in small and medium-sized businesses tending to use only one network in one location.
The drawback of a network drive is that the drive may fail. It will waste local files if a drive failure has little to do with cloud storage, on-premises files may be wasted. So, you can prepare a backup if the primary drive fails.
How to Map The Network Drive?
Step 1: Type File Explorer in the Start Search box to open it.
Step 2: Select This PC.
Step 3: Select Map network drive under the Computer tab.

Step 4: Select a drive letter in the Drive list.
Step 5: Type the path of the folder or computer in the Folder box, or select Browse to find them. Select the Reconnect at sign-in if you want to connect every time you log on to your computer.

Step 6: Finally, select Finish.
Read More!
Please visit this Technology Inn for more about the network drive.
1 note
·
View note
Text
Compress Files in Windows
File compression is an easy way to reduce the size of a file and save the storage space. This post will offer practical ways to enable NTFS Compression to compress files & folders in Windows 10.
Sometimes, we need to free up some storage space on the Windows 10 drive, when the drive is running out of disk space. There are many ways can free up the disk space on Windows 10, such as uninstalling unnecessary programs and Apps, deleting the files you don’t need, using disk cleanup programs, saving files to the cloud storage tools, etc.
In addition to the methods mentioned above, Windows 10 OS Compression and NTFS Compression are also feasible and straightforward ways to free up disk space. Let’s go through several ways to compress Windows 10 files and folders.
Tip: Though file compression is safe, you’d better back up the essential files in case that data loss occurs.
Practical Ways to Compress Windows 10 Files to Free Up Disk Space
Compress Windows 10 Operating System to Make More Disk Space
Step 1: Type CMD in the Start menu search field and choose Run as administrator and click Yes to run Command Prompt.

Step 2: Before starting to compress Windows 10 OS, you’d better check the compact state to see whether the system is already using this feature. Just type the command: Compact /CompactOS:query in the Command Prompt and press Enter.

Step 3: The system will now notify you if the feature is active. If it shows that Windows 10 is not in the Compact state feature, the system can be easily enabled.
Step 4: Type the command: Compact /CompactOS:always and then press Enter. It will start to compress the Windows 10 OS.

The system will show you the current status when compressing OS binaries. When the compression is finished, the system will display the results, including the number of compressed files and the compression ratio.
Windows OS compression will gain up to 2 GB of free space on the drive. If you need to know the exact free space, you can check the properties of the drive.
Extra tip: Uncompress Windows 10 OS
● To undo the Compact State feature and Uncompress Windows 10 OS, type in the command: Compact /CompactOS:never and press Enter.

The system will begin to uncompress the files to restore the changes and shift the operating system back to their normal state.
The system will inform you once the changes have been reverted to the original state successfully.
Compress Windows 10 Files using the NTFS compression
The NTFS file compression is built into the file system so that this feature can only available in NTFS drive. You can click the property of the drive to check the type of its file system.
NTFS File Compression
NTFS file compression is the easiest way to reduce the size of files without compressing the whole drive.
Step 1: Open File Explorer. And then move to the folder where you want to store compressed files.
Step 2: Click on the Home button and then click the New folder, Or you can also try the quick way by pressing Ctrl + Shift + N.
Step 3: Type a name for this folder and press Enter.
Step 4: Right-click this folder and select the Properties.
Step 5: Click the Advanced in the General

Step 6: Choose “Compress contents to save disk space” under “Compress or Encrypt attributes” section. Then click OK and Apply button.

Step 7: Select the box “Apply changes to this folder, subfolders, and files” in “Confirm Attribute Changes” and click OK.
NTFS Drive Compression
Step 1: Open File Explorer and move to This PC, then right-click the drive you want to compress and select Properties.
Step 2: Choose the option Compress this drive to save disk space under the General tab, and then click Apply.

Step 3: Check Apply changes to drive (drive letter), subfolders and files and click OK when confirmation dialogue occurs.
By doing the above steps, NTFS Compression is enabled so that there is more free space on the drive.
Try It Now!
Please visit this Technology Inn for more ways to compress files.
#Compress Files in Windows#Compress Files in Windows 10#Enable NTFS Compression to Compress Files & Folders#Compress Windows 10 Files to Free Up Disk Space
2 notes
·
View notes
Text
Fix Windows Was Unable To Complete The Format
If your USB drive cannot be formatted and is informed with a prompt “Window was unable to complete the format” error, it indicates that windows can’t format USB drive, and the USB flash drive is inaccessible. This post will give solutions to this issue.
USB drives are very portable, and they can be connected to a computer easily via USB drive to backup or transfer data, which have become an essential component in various digital products such as digital cameras, cell phones, MP3 players, etc. Since they are often carried by users and might be used on various computers, USB drives are more likely to get many problems.
For example, you plugged your USB drive into the port of a PC, right-click the disk icon and select “Format”, but it popped up an error saying “Windows was unable to complete the format”. So, does that mean your USB drive is broken? NO! This error may happen as a result of the following reasons:
The Main Cause that Windows can’t Format USB Drive
Cause 1: Virus infection If you plug USB drives into a public computer, you’ll take the risk of damaging the files and even the drive will stop working due to Virus attacks. Cause 2: USB device has bad sectors As we all know, storage devices consist of sectors; the Bad sector means the sector is damaged and can’t be read or written. Thus bad sectors can disrupt the formatting operation as well as file recovery. There are quite a few causes of bad sectors, like bad quality, excessive defragmentation, unplug USB drive directly while it is working, etc. Cause 3: USB drive suffers physical damage Physical damage is another reason that makes storage device inaccessible. The computer won’t be able to format the device if it can’t use the device. Cause 4: USB Disk is write-protected Windows can’t format a drive when it is in the write-protected state. As formatting is a kind of writing operation, so you need to remove the write-protection before formatting it.
How to fix “Windows couldn’t complete format” on the USB drive
If you are not capable of formatting your USB drive (USB flash drive, external hard drive, SD card, pen drive, etc.) in the usual process, then try to format that drive with the following methods. Please connect the USB drive to the computer and follow the guide below to fix the error: Note: if the USB drive gets badly physical damage, these solutions won’t help you.
Important: You should make sure that important data and files of the drive to be formatted have been backed up, as files will be erased once the drive is formatted. If the USB drive is inaccessible before you back up the data, then you need to perform file recovery first before formatting.
Steps of file recovery from a damaged USB drive will be talked in the next section of this post.
Fix Windows Couldn’t Complete Format on USB Drive
Solution 1: Format via Disk Management
Disk Management is provided by Windows, and it helps to manage partitions and disks for computers. Disk Management can create a new volume, extend or shrink partition, change drive letter, delete or format partition, etc. the error flash drives can be repaired with the Disk Management tool. Following the steps below, you can make a USB formatting procedure performed successfully. Step 1: Open Disk Management. Right-click on My Computer and select item “Manage”, and then click Disk Management on the left side. In the center section, you can see local hard drive and partitions and the USB drive, which can be recognized by capacity.

Step 2: Right-click the flash drive and select “Format” option and select the file system format to perform a quick format.

Step 3: Right-click on the USB drive and select “New Simple Volume” item. You’ll get the New Simple Volume Wizard which guides you to recreate new partition for the flash drive. Operations are following the onscreen instructions, setting options, and click the “Next” button. When the process is done, you’ll find the USB drive has been formatted and is properly recognized by the system.

Solution 2: Format with Command Prompt
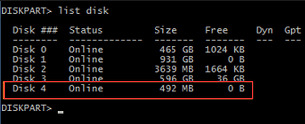
Disk Management is not almighty, and it is not helpful in many cases. Thus, we need to switch to a command-line based formatting solution. Step 1: For Windows 7 users click Start button and type cmd in the search both and press Enter. If UAC is enabled, you need to find Command Prompt from the Start menu and run it as administrator. Step 2: Type command diskpart on the black window and press Enter key. Then you can see the partition and disk list of the current computer. All drives are listed with numbers, and Disk 4 is the flash drive in question.
Step 3: Continue typing disk 4, which is the problem drive and clean and press Enter. The drive will be scanned, and its damaged file structure will be erased during scanning. Once the process is done, it reports a confirmation message telling that it has successfully cleaned the drive, and a new partition needs to be created. Step 4: Type create primary partition and hit Enter; next type in Command prompt format /FS: FAT32 J: (you can copy and paste it.) and press Enter. Here J is the drive letter of the USB drive, and you can change it in line with specific cases. The drive will be formatted to FAT file system, and the formatting is very fast.
The need to recover data promptly
Since the USB drive cannot be accessed or formatted, you need to perform file recovery as soon as possible. Otherwise, it will be overwritten with new data. To recover lost data from the USB drive cannot be accessed or formatted, you should try Bitwar Data Recovery software. It is the best file recovery software since it is compatible with any devices such as digital cameras, hard drives, SD cards, Memory cards, phones, media players and portable drives. From these devices, you can recover audios, videos, pictures, archives, emails, and documents. Whether you deleted these files or lost them due to the virus, or due to the disk inaccessible, or formatting you can still have them back using this software. Moreover, this program lets you preview files that have been recovered. Now you can free download Bitwar Data Recovery here and install it on your computer. Then make sure that your USB drive is connected to this computer very well.

Fix It Now!
Please refer here for more about unable to complete the format.
#Windows Was Unable To Complete The Format#Windows Can't Format USB Drive Error#Recover Data From USB That Cannot Be Formatted#Windows Was Unable To Complete The Format On USB
1 note
·
View note
Text
Recover Lost Files From Corrupted USB
This article offers several methods to fix the corrupted USB drive. And Bitwar Data Recovery software comes handy to recover the data when data loss happens to the USB.
Reasons for USB corruption or inaccessible:
1. Logical Issues 2. Physical Issues Some common physical corruption issues are connecting interruption. The USB port may be damaged because of no power supply. Thus, you should confirm the power supply and try to connect your USB drive to another PC, then replace the USB port. However, if the USB drive is damaged caused by other reasons, you have to take it to a professional repair facility. While if there are some logical software issues with the USB drive, you can quickly fix it. In such a situation, you need to change the USB drive’s file structure to make it usable again.
Recovering files from logical issues
Reinstall the drivers
There are times when the drivers that run your USB drive get corrupted and your PC is not able to detect the storage media. If so, you can reinstall drivers by following these simple steps:
1. Right-click “My Computer/ This PC”. Click “Manage” and click “Device Manager” on the left side.
2. Double-click “Disk Drives” in the list. Right-click on the name of your pen drive.
3. Click “Uninstall”. Click “OK”.
4. Disconnect your storage media and restart your PC.
5. Connect your pen drive again. Your PC will detect it and prompt you to reinstall the driver before use.
Repair USB drive by using CMD
CMD is your best choice for damaged USB flash drive recovery. It allows you to fix a corrupted USB drive without formatting and can avoid data loss. In addition, it can also be used to correct the SD card.
1. Plug your USB flash drive or pen drive to your computer.
2. Go to the start menu, type in “cmd” in the search bar, hit “Enter” and then you can see something named “cmd. Exe” in a list of programs.
3. Right-click “cmd. exe” and type in “chkdsk /X /f USB drive letter:” or “chkdsk USB drive letter: /f “, for example, “chkdsk /X /f G:” or “chkdsk h: /f” in the following command windows to start repairing a damaged USB pen drive. This operation will make Windows check and fix the file system on the /flash drive. If the repair process works well, the description “Windows has made corrections to the file system” will appear in the command window. It suggests that the corrupted USB pen drive is successfully fixed and can be reaccessed. However, If the USB drive has bad sectors, your data may be lost during the process of repairing. Therefore, you need to back up or restore essential data from the USB drive before using the CHKDSK command.
Fix USB drive file system errors
If you are using Windows 10 or a lower version, you can carry out the following steps to repair the USB Flash Drive:
1. Insert the USB drive into the USB port of your system
2. Go to My Computer>Removable Disk icon.
3. Right-click the Removable Disk Icon and open its Properties.
4. Click on the Tools tab.
5. Click the Rebuild button
6. Let the scan process get completed. Close the scan window once it’s completed.
7. Right-click the icon of the USB flash drive and Eject. Then remove the drive from the USB port. Hope this way can help you solve the problem, and you can try to restore your precious data by using a professional data recovery tool.
Recover data from the USB drive
If all the above solutions are unavailable, you could try the “recover data first then format the USB drive” way to repair USB flash drive without losing data. This way is available for all data loss cases. So I recommend you to use Bitwar Data Recovery software to retrieve data from the USB drive. Bitwar Data Recovery is a fast, reliable and free data recovery software with powerful functions. So, please try it without hesitation when you suffer from data loss from the USB drive. Free download and install Bitwar Data Recovery software and then make sure your USB drive is connected to the PC. Follow the below steps to get back all data.

Fix And Recover!
Please refer here for more about corrupt USB data recovery.
#Fix Corrupted USB#Corrupted USB Data Recovery#Recover Lost Files From Corrupted USB#Fix Corrupted USB and Recover Lost Data
1 note
·
View note
Text
Storage Devices Data Recovery
This article introduces a reliable data recovery software for you to recover files from the storage device.
What is a storage device?
A storage device may also be known as a storage medium or storage media that is used for storing, porting and extracting data files and objects. There are two types of storage devices that can be used on computers: primary storage devices, such as RAM, and secondary storage devices, like a hard drive.
Primary storage device
A primary storage device is quite smaller in size and it is designed to capture or hold data for a temporary period. Most primary storage devices are found inside the computer, and they have the fastest access to data. Example:
RAM
ROM
Cache
Secondary storage device
A secondary storage device has a larger storage capacity than the primary storage device and can store data permanently. It includes the hard disk, optical disk drive and external storage device.
Common problems encountered with storage devices
● Hardware failure - Hardware failure is one of the most problematic issues affecting most users. Appropriate handling and regular maintenance can prolong the durability of storage devices.
● Data Loss - Intentional and accidental file deletion can make one lose precious data.
● Virus attack -Virus attacks can destroy your system and delete important files
Storage device recovery software
Bitwar Data Recovery offers a reliable solution to avoid data loss scenarios on storage devices. It can restore lost data caused by deleting, formatting, virus attacking, system crash or other unknown reasons under both Mac and Windows PC platforms. You can restore lost or deleted a document, photos, audio, video, compressed files from any storage device such as hard drive, memory card, flash drive, digital camera, and camcorders. Most importantly, it is free to use.
Recover files with Bitwar Data Recovery
Free download and install Bitwar Data Recovery. If you want to recover data from an external device, please connect your device to the computer first.
Step 1: Launch the Bitwar Data Recovery program and choose the partition/devices where your files lost and click Next.
Step 2: Select a scan mode on this step and click on the button Next.

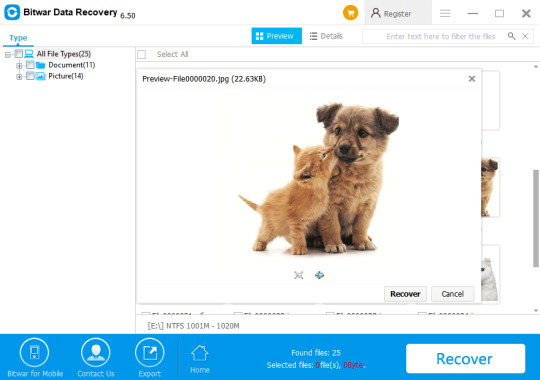
Step 3: Select the types of files you want and press the Next button to start scanning. If you have no idea about what type of file you want to recover, you can Select All Types.
Step 4: After the scan, you can select the file you want from the scan results and preview them separately. Bitwar Data Recovery supports previewing more than 300 different file types. Then select and click the "Recover" button to save it to another partition or other external devices.
Tip: Do not save the recovered file back to the partition or external device directly, or the file will be overwritten.

Why not have a try?
Please refer here for more about storage devices data recovery.
1 note
·
View note
Text
Windows 10 Stuck on Loading Screen
Windows 10 stuck on the loading screen is a very common issue nowadays, this post introduces several solutions to deal with this issue effectively.
One day you boot your Windows 10 PC and see that Windows 10 Stuck on Loading Screen. Actually, many Windows 10 users have encountered such an issue.
If Windows 10 is stuck on restarting, loading some screen with the spinning dots animation moving endlessly, welcome mode, login screen, starting Windows or not boot, you need to fix it to access and edit your files.
Usually, it's not a big problem and users can simply force the computer to reboot and get Windows 10 start normally. If it cannot be solved, you can get into Safe mode or Advanced Startup mode to fix it. Here, we will share how to access Safe Mode or Advanced Startup Options when the issue appeared.
Safe Mode or Advanced Startup Options let you repair your Windows 10 PC by restoring it to previous working condition. In safe mode, it offers you all system tools like the CMD, System Restore, etc. and you can uninstall software or drivers which might have caused the issue. Advanced Startup option offers you System Restore, System Image Recovery, Startup Settings, Startup Repair, and several such recovery or repair options. So when your computer doesn't boot normally, it is stuck in an endless reboot loop or stuck on some screen. In such a condition, you should focus on getting into Safe Mode or boot to the Advanced Startup Options screen.
Solutions to fix the Windows 10 stuck on loading screen issue
Solution 1: Boot Windows 10 in Safe Mode
Step 1. Press Power button to restart Windows 10 > continuously press the F8 key at Login to bring up Safe Mode;
Step 2. If you encountered this issue when you were trying to update Nvidia Drivers, then after entered into the Safe Mode, you can make a rollback of the Nvidia drivers and remove the video card driver in Device Manager. Then try to restart your computer in normal mode.
Step 3. Virus or malware may cause "Windows stuck on loading screen" issue and the installed antivirus software conflicts with the current Windows OS. So you can scan and remove virus, and uninstall anti-virus software later;
Step 4. Check and fix system drive bad sectors that cause Windows 10 boot stuck or failure error. If bad sectors exist in system partition, the computer may not be able to load or get stuck at the loading screen. Then you can repair bad sectors with the chkdsk command.
Solution 2: Boot to the Advanced Startup Options screen.
When you access the boot menu, press F11 to open the Choose an option screen, from here, press Troubleshoot and then Advanced Options to reach the following screen.

Once you can go here, try any of these options:
1. System Restore: Please follow these operations: press "Start" button > select "Control Panel" > search for "Recovery" > click "Open System Restore" > press "Next" > choose the restore point you want to use > select "Next" > choose "Finish".
2. System Image Recovery: Lets you recover your Windows using a system image file.Similar to "Startup Repair."
3. Startup Repair: Since you can't boot Windows 10 normally, you need to use a Windows 10 installation CD or enter the Safe Mode to open command prompt window and type "bootrec.exe /fix" to do a system repair.
4. Command Prompt: Using the CMD you can access the more advanced built-in Windows tools
5. Startup Settings: It lets you change Windows startup options
6. Go back to the previous build.
Solution 3: Clear CMOS Memory
Misconfiguration of BIOS may be the cause of Windows 10 freezing on the loading screen. So you can clear the BIOS memory on the computer motherboard which can return the BIOS settings to the factory settings.
Solution 4: Replace CMOS Battery
If your computer has been used for more than three years, you should consider replacing the CMOS battery. "Windows 10 hangs at loading screen" issue may happen if the CMOS battery ran out.
Solution 5: Check Computer RAM
"Windows 10 stuck on loading screen" issue may also happen if the computer RAM is loose. You should cut off the power of your computer. Open the computer case and reinstall the RAM. After that, you can restart your computer to check whether it can boot normally.
Tip: If you have important data on your Windows 10, you'd better recover your files with the best free data recovery software before fixing Windows 10 stuck on the loading screen issue.
If you have more than two systems installed on your computer, you can use another system to log in to backup or recover. Or you can remove the hard drive and connect it to another computer.
The best data recovery software
Bitwar Data Recovery software is completely free to download and can recover lost or deleted files, photos, audio, music, emails from any storage device effectively, safely and completely.
Download Bitwar Data Recovery from its official website and install it.
Note: please don't install the software or store any data on the partition that contains lost files.

Let's try it now!
Please refer here for more about Windows data recovery.
1 note
·
View note
Text
Stellar Phoenix Mac Data Recovery Alternative
This article introduces the best Stellar Phoenix Mac Data Recovery Alternative data recovery software. You can download to recover lost files from Mac hard disk and all other storage media devices like USB, Flash drive, removable media, etc.
Losing files on Mac OS X can never be a pleasant experience, especially when the lost files are significant to our work, study or business. However, after accidental deletion or missing data from the formatted, deleted or inaccessible drive on Mac, we still can get those lost files back. The way is to find a reliable Mac data recovery software.
An alternative for the Stellar Phoenix Mac Data Recovery
Stellar Phoenix Mac Data Recovery is one of the most recognizable Mac data recovery software and has attracted a lot of customers. But is Stellar Phoenix Mac Data Recovery useful?
Here are two of the most significant shortcomings of Stellar Phoenix Mac Data Recovery. Firstly, Stellar Phoenix Mac Data Recovery doesn't offer free edition. We have to pay at least $99 to recover lost files with it. It is a relatively high price. Secondly, Stellar Phoenix Mac Data Recovery doesn't perform very well, and its interface can be a little confusing when choosing the recovery mode.
Due to the above two reasons and the User's experience, many users want to find the Stellar Phoenix Mac Data Recovery alternative. Here are the best Stellar Phoenix Mac Data Recovery alternative - Bitwar Data Recovery for Mac.
And as an alternative, Bitwar Data Recovery for Mac can help you recover your lost files in several simple steps from all complicated data loss situations. It acts precisely what Stellar Phoenix Mac Data Recovery can do.
Bitwar Data Recovery can deal with various complicated data loss situations. It performs well to recover deleted, formatted, inaccessible or lost data from PC, Mac, hard disk, and all other storage media devices. It comes with an intuitive, user-friendly interface and a better user experience. Then, you can recover lost or deleted files, photos, audio, music, emails from any storage device effectively, safely, and completely.
How to Recover Lost Files with Bitwar Data Recovery for Mac
Download Bitwar Data Recovery for Mac and install it on your Mac OS X, and then launch it. The software is compatible with OS X 10.11 and later.
Tips: For the latest macOS 10.13 (High Sierra) system requirements, Mac users are not allowed access to system disk from apps. If you want to recover data from the system disk, please disable the system feature "System Integrity Protection (SIP)," see the guide on How to Disable System Integrity Protection (SIP) in macOS High Sierra (macOS 10.13)?
Step 1: Select the Partition or Device
Launch the program and select the partition/devices where your data lost and then click "Next."
Step 2: Select the Scan Mode
You can select a scan mode based on the exact data loss reasons. Then click "Next".
● The quick Scan mode can recover deleted files on a partition or device, such as files deleted by Command + Delete, emptied from the trash or removed by other software, etc. If additional data have not overwritten files, it can be retrieved entirely in the condition of the files or directory structures.
● Formatted Recovery: Recover formatted files after performed a quick format on a partition or hard drive in the condition of the capacity of partition or drive hasn't been changed before or after formatting.
● Deep Scan: If the previous scan couldn't work to find lost files, try Deep Scan this time. Deep Scan will search every sector of the hard drive to find all existing data, but the scanning process will spend more time than Quick Scan and will not have the original file name in the scanning results.

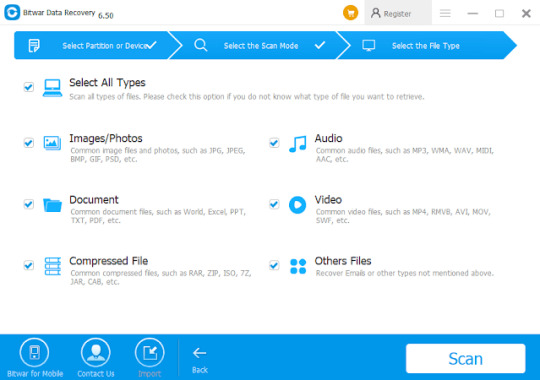
Step3: Select the file type
Choose a file type that you want and click "Next." You can select a specific model of files, or you can also choose all kinds if you do not know which type you want to select.
Step 4: Preview, recover and save files
After scanning, by file name and Type, you can quickly filter the lost data. You can preview them one by one to make a selective recovery. Then select the ones you want and press the recover button to have them saved to your Mac.
Tips: Please DO NOT save the data into the Partition or device where you deleted it.

Get It Now!
Please refer here for more about Mac data recovery.
#Stellar Phoenix Mac Data Recovery#Mac Data Recovery#Phoenix Mac Data Recovery#Recover Lost Files with Bitwar Data Recovery for Mac
1 note
·
View note
Text
Recover Messages From iPhone XS
If you accidentally deleted messages or other important data like photos, videos, etc. on your new iPhone XS, XS Max, XR, relax! This article will teach you to recover data from your iPhone XS.
Recently, Apple released a new iPhone called iPhone XS, which is said to be the model of phone in the future. It supports wireless charging, full screen, dual camera, and larger battery and A12 processor. Besides, more and more consumers are pursuing and buying. However, users have a question, when you delete a text message from your iPhone, can you recover it?
No matter how powerful functions your iPhone XS has, data losing still happens to them here or there. So when you found some important messages are lost one day, don't worry about it. And find a method for you to retrieve deleted text messages from iPhone 9, iPhone X Plus, or iPhone XS easily.
Here we'll introduce three available ways of how to restore deleted messages and other data on iPhone XS. These three methods fully support data recovery on both old and new iPhones.
Method 1. Restore lost data from iTunes backup
Method 2. Restore lost files from iCloud backup
Method 3. Restore lost text message from iPhone
Both Method 1 and Method 2 require you have previously created backup files before you deleted the data. However, the security from iCloud recovery is weak, and if iCloud backup exceeds a certain amount of storage space, then it will ask for extra charges. Recovery from iTunes requires all backed up data back, and you don't have a choice to make a selective recovery, even worse than it will rewrite your existing data.
Relax, if you didn't create a backup on your new iPhone XS. Here we will show you how to directly restore data, for example, text messages, on iPhone XS with Method 3.
Preparing the environment to recover data from iPhone XS
To restore deleted messages on iPhone XS, you'll need a third-party iOS data recovery software for help. Here I recommend you try Bitwar iPhone Data Recovery for help. It allows you to recover lost data from iPhone XS within just three simple steps.
Install Bitwar iPhone Data Recovery
Bitwar iPhone Data Recovery software supports two operating systems: Mac OS and Windows OS. You can download and install Bitwar iPhone Data Recovery for Windows or Mac version according to your computer system.
Tip before recovery:
Bitwar iPhone Data Recovery can directly detect whether iTunes is installed on the computer. If iTunes isn't installed, it will download the installation components directly without installation. If there is an installation or a computer that has backed up Apple data using iTunes, it can directly select the feature to scan from the backup.
The first time to access the iPhone needs to install the necessary fruit and devices, with a time of 3-5 minutes, please be patient.

Steps to recover lost data from iPhone XS:
1. Recover from iOS Device
If you want to recover data from iOS Device, you do not need to back up the iPhone XS in advance.
Step1: Launch Bitwar iPhone Data Recovery and Connect iPhone XS to the Computer
Launch Bitwar iPhone Data Recovery and connect your iPhone XS to the computer through the dedicated USB cable. Make sure iTunes is installed previously. Select the default recover mode "Recover from iOS Device."

Step2: Select the file type
After the program has identified your iPhone XS, the program will ask you to select File Types. Select the "Messages" types and click "Start Scan".
Then the software will quickly scan the device to find all the existing and lost data. You should keep the device connection during the scanning operation.

Step3: Preview and recover data from iPhone XS
When the scan finished, you can click the messages types on the left side, then preview the full contents of the text messages to find your target data. After seeing it, Mark them and then click "Recover" button to save them on your computer.

Let's try it now!
Please refer here for more about iPhone data recovery.
#iPhone XS Messages Recovery#Recover Deleted Data From iPhone XS#Recover Deleted Messages From iPhone XS
1 note
·
View note
Text
Blank SD Card or Has the Unsupported Filesystem
In daily life, the sudden Blank SD Card or Has the Unsupported Filesystem may make you be at a loss. In this article, you'll find free and effective methods to fix the "Blank SD card or Has the Unsupported Filesystem" error. And if they don't work, you can also download Bitwar Data Recovery here to recover data from the SD card, and then format the card to reuse.
Sometimes, the smartphones fail to read the SD Card and displays the following notification:
Blank SD Card or Has the Unsupported FilesystemThis device doesn't support this SD card. Tap to set up in a supported format.The "The SD card is Blank, and it keeps asking format" problem mostly happens to Android phone SD cards, Camera SD cards, memory cards or other USB drives, etc. The major causes are the SD card gets corrupted, unreadable, undetectable, damaged, or there exist some unknown/unwanted files or folders.
When it occurs, do you know how to fix? Sure, you know formatting would be the most direct method to fix blank SD card. But this will wipe out all the existing data and finally lead to serious data loss problem. Fortunately, full and safe solutions for the "SD card is blank or has some unsupported file system" error are offered here to help.
Solutions to fix Blank SD Card or Has the Unsupported Filesystem
Before you carry out any rescue, please make sure that the SD card itself is in sound condition and can be detected by your computer. Only in this way, there is a necessity and possibility to fix this Unsupported SD card.
Solution 1: Try rebooting the phone
Although the operating system requires you to format the blank SD card, DON'T format it at once, try rebooting the phone at first. Then check if the SD card is normal.
Solution 2: Repeatedly insert and pull out the SD card
Try inserting and taking out the blank SD card several times, by these attempts your phone may finally read the SD card.
Solution 3: Run Chkdsk to fix errors
Some users had fixed this error by using CHKDSK, and maybe this way is also helpful to you.
Step 1: Connect Unsupported SD card with PC via card reader and make sure it is detected by the machine.
Step 2: Run CMD as administrator, and input chkdsk n: /f(n is the drive letter of the blank SD card) to fix errors.
Step 3: Put the SD card back to the phone and check whether the card works fine after that.
Solution 4: Connect the SD Card to Any other Machine
It is probable that there may be some issue with the USB port or the card reader device, so try to connect the SD Card to some other device to check if it works or not. Alternatively, try connecting the card using another card reader.
Solution 5: Check hidden files on SD card
Sometimes SD card is carried with some "specialty files" that need to be deleted.
Step 1: Connect blank SD card with PC via card reader and make sure it is detected by the machine.
Step 2: Run control folders to bring out the File Explorer Options.
Step 3: Turn to the View tab.
Step 4: Check Show hidden files, folders, and drives and save the changes.
Step 5: Delete the "specialty files" in the blank SD card if there is any.
Solution 6: format the SD card
If all the solutions fail, unfortunately, you might need to format it finally.
Warning: Recover data from blank SD card before formatting!
How to recover data from the blank SD Card?
You cannot find anything original without the help of some professional SD card data recovery software. We recommend you Bitwar Data Recovery to recover your blank SD Card. It is a professional, powerful, reliable and easiest free SD card data recovery software which supports you recover data from all data loss problems, for example, restoring data from accidental deletion, recovering data from formatting hard drive or retrieving data from lost, missing, or raw hard drive partitions/volumes.
Guides to recover lost data from unsupported SD Card
Download and install Bitwar Data Recovery on your computer. Make sure the unsupported SD Card is connected to your computer and be recognized. Then follow the guides to recover data.

Format RAW Partition to FAT32
1. Open This PC/Computer > Find the RAW partition;
2. Right-click it by choosing Format > Select the file system FAT32 and rename it;
3. Click Start > OK.
After this, your SD card has been converted to fat32, then, you can reuse it again, such as save files to this new disk.
Let's try it now!
Please refer here for more about blank SD card data recovery.
#Recover Data From Blank SD Card#Blank SD Card or Has the Unsupported Filesystem#Fix Blank SD Card or Has the Unsupported Filesystem#SD card data recovery
1 note
·
View note
Text
Data Error Cyclic Redundancy Check(CRC) Drive Recovery
When an error "Cyclic Redundancy Check" occurs, you can fix it by referring to this page. Afterward, you can use Bitwar Data Recovery to restore any data loss.

What is Cyclic Redundancy Check (CRC) Error?
A cyclic redundancy check (CRC) is an error-detecting technology commonly used in digital networks and storage devices to detect accidental changes to raw data which is stored on your disks (hard disks like your hard drive and optical disks like CDs and DVDs). When there's a bad spot on the media of your hard disk, CRC errors occurs.
Registry corruption, a cluttered hard disk, an unsuccessful program installation, or misconfigured files can lead to data Cyclic Redundancy Check error. Regardless of the specific cause, the cyclic redundancy check error is a serious one and must be addressed to avoid potential data loss or even a total system failure. Luckily, there are a few simple ways to address this problem by using (free) disk utility software.
Well, when you got the “data error cyclic redundancy check” error on your drive, you must backup the data first. Bitwar Data Recovery which works extremely well in recovering files from corrupted hard drive or raw disk in Windows is an excellent choice for you.
How to restore data from the error drive?
Download and install Bitwar Data Recovery on your PC.

Fix "Cyclic Redundancy Check Data" error
1.Using CHKDSK Utility
To solve CRC error, you must repair the hard drive by running CHKDSK utility via command prompt. CHKDSK checks the integrity of your hard drive and fixes logical file system errors, bad sectors & file system metadata. You can follow these steps:
1. Connect the storage device to your PC. Press "Windows+Q" and type CMD in the search bar.
2. Right-click on the "Command Prompt" and select "Run as Administrator".
3. A command prompt window appears. Type chkdsk X: /f where X is the hard drive or any other media storage device letter connected to your system. Alternatively, you can type chkdsk X: /F /X /R for the rigorous scanning and repairing.
4. Hit the "Enter" button and wait until "CHKDSK" utility repairs the disk errors.
Once finished the CHKDSK command, restart your computer to see if it works. If you are able to access the data without any error; immediately copy data from it to a safe location on your system and format the drive via Disk Management tool or DiskPart.
NOTE: If the problem persists, you need to format your storage drive. The format will erase all the data from the storage device. If you don’t want to lose data, you must restore the data first with Bitwar Data Recovery, which is more effective and optimal.
2.Reformat the drive
If you have restore the data on the drive data recently, you can reformat the disk to eliminate the error. You can format the Partition to NTFS as below:
1. Open This PC/Computer > Find the RAW partition;
2. Right-click it by choosing Format > Select the file system - NTFS and rename it;
3. Click Start > OK.
After this, your corrupt partition has been converted to NTFS, then, you can reuse it again, such as save files to this new disk.
You Get It!
Please refer here for more about CRC error drive data recovery.
#Solve Cyclic Redundancy Check (CRC)#Fix Data Error Cyclic Redundancy Check (CRC)#Recover Data From CRC Error Drive#Fix Cyclic Redundancy Check (CRC) Error#Data Error Cyclic Redundancy Check (CRC)
1 note
·
View note
Text
Outlook/Outlook Express Deleted Emails Recovery
If you're using a desktop program like Outlook Express, Windows Live Mail, or Mozilla Thunderbird, you can effectively recover deleted emails in Windows 10/8/7, etc. with ease. This guide is about how to recover deleted emails from Outlook or Outlook Express effectively.
Microsoft Outlook and Outlook Express are the most famous email clients that have ever been developed worldwide. If you're using a desktop program like Outlook Express, and you delete an email in an email program, it's moved to the deleted item folder, which allows you to get it back when you have a need. However, if you emptied the deleted item folder, you can't recover a deleted email that way again. In this condition, what should you do? Fortunately, you can recover the deleted email back. Because a deleted email is not really erased forever. It's only marked as deleted and the email program won't display it. You can easily recover deleted email before it's overwritten. To make sure your deleted Outlook Emails can be recovered successfully, a reliable and useful data recovery program is very important. I strongly recommend Bitwar Data Recovery. Bitwar Data Recovery is a fast, reliable and powerful data recovery software. You can recover audios, videos, pictures, archives, emails, and documents. With friendly user experience and wizard operation, you can recover the data with only three steps and easily find the lost data even if you are not familiar with computer operations.
Steps to recover deleted email from Outlook/Outlook Express
Free download and install Bitwar Data Recovery Software on your computer. Please remember don't save any data to the partition which the Auto-archive location of Outlook/Outlook Express.
Note: You can view the auto-archive location of the email from the Outlook/Outlook Express program "programs-options-advanced".
Step 1: Launch Bitwar Data Recovery and select the system partition then click "Next".
Step 2. Select the "Quick Scan" mode and then hit "Next". ● Select "Quick Scan" if you deleted data by shift +delete on the partition you selected or emptied from the recycle bin. If files are not overridden by other data, files can be fully recovered. ● If the partition were formatted and the size of this partition will not be changed after the formatting, you can recover data try "Formatted Recovery". ● If files are not found under Quick Scan or Formatted Recovery, you can try "Deep Scan". The deep scan can find all the files with a detailed scanning algorithm, but will not display the file names and may take longer time.
Step 3. Choose the exact file types and then click on "Scan" to start scan the eligible data. You can select "other files" if you want to recover email files.
Step 4. After a scan, click type and find out the email file type, such as pst.,eml., click to expand these types and you can see all scanned data are left in the middle area. Choose the name you want and then click the "Recover" button to save them to other partitions.
Note: DO NOT save the files into the original partition to avoid data overwriting.
Please Have A Try!
Please refer here for more about Outlook data recovery.
#Outlook/Outlook Express Deleted Emails Recovery#Recover Emails from Outlook/Outlook Express#Recover Deleted Emails from Outlook#Outlook Deleted Emails Recovery
1 note
·
View note
Text
Recover Excel Files from Windows
Don't worry if you accidentally deleted important files such as Excel files from windows, this article will guide you step by step to recover Excel files.
Microsoft Excel is a popular software application as part of MS office. It is used by people all over the world for data manipulation, data analysis, and sorting. However, people often lose their excel files because of a wrong deletion, system crash, virus attack, or any other reasons. And they always forget to make backups. Once the critical excel files are lost, they might think that they have no chance to retrieve it.
We know that when files are accidentally deleted, the first thing you may do is to select the file and right-click on the mouse to press the delete button. Congratulations, if you're doing it like this, you can find it in the recycle bin and right click on the mouse to restore it. And you can find it on the original folder where it deleted. But sometimes you permanently delete the file by pressing shift + delete at the same time on the keyboard, the deleted data is not found in the recycle bin. Where do the lost files go?
When we permanently deleted data from the disk, in its storage space, the operating system only mark a "deleted" sign on the data, and also marks the data occupied disk space as "idle." At this time, although we can't see this file, it still stays there. As long as no new files are created or new data is written within the storage space, the deleted data will remain there.
Therefore, you should not save data or write new data to the partition or device where the excel file is deleted. Use the powerful data recovery software - Bitwar Data Recovery to rescue the accidentally deleted excel file as soon as possible.
How to recover deleted Excel files
Bitwar Data Recovery software is a totally clean, safe, and user-friendly tool. It doesn't require any data recovery knowledge or experience to operate the software. More importantly, it is mighty, and effectively, it supports to recover data for sudden deletion, formatting, hard drive corruption, virus attack, system crash under different situations.
Free download Bitwar Data Recovery software and install it on your Windows. Mac users should download and install Bitwar Data Recovery for Mac version. Then follow the steps guide to recover deleted excel files.
Step 1. After installing the Bitwar Data Recovery program, launch it and select the partition or device where you deleted excel files and click "Next."
Step 2: Select "Quick Scan" if you lost them by accidental deletion, and then click on the "Next" button. If Quick Scan couldn't work to find lost photos, try Deep scan.
Tips: "Formatted Recovery" is using to recover data that formatted improper internal hard drives or external devices. If you lost pictures by formatted your disk, you should choose "Formatted Recovery."

Select the "Document" type when you want to recover excel files, then click "Next" to start scanning.

Step 3: During the scanning procedure, the scanned excel file will be listed out one by one. After the scan, find the excel file you lost and preview before the recovery operation. Then choose the ones and click the "Recover" button to get everyone you want back.
Caution: DO NOT directly save the files you recovered into the partition or device where you have recently lost them.
Easy Recovery!
Please refer here for more about Excel data recovery.
#Windows Excel Files Recovery#Deleted Excel Files Recovery#Recover Deleted Excel Files#Recover Excel Files from Windows
1 note
·
View note
Text
Recover Deleted Photos from SD Card
SD card is an external storage device. Usually, it is used in Windows 10/ 7/8 PC, mac, cameras, camcorder, dash cam, or other portable devices. Unexpected losing essential photos beat us because we don't know how to recover deleted pictures from SD card.
Just relax! As soon as you find the right method for data recovery, you can recover deleted photos from SD Card for free quickly, effectively and safely.
1. Where are the deleted photos going?
The deleted photos are still on the SD card. When pictures are removed from the SD card, their directories disappeared for the moment. However, their contents weren't immediately destroyed. Because the drive space in which the data stay available for use so that the file entry won't show up in My Computer or a command line DIR command.
Hence, if your photos have been accidentally deleted, don't panic. There is still a chance to do a recuperation from deletion with a photo recovery tool.
2. How to recover deleted photos from the SD card?
Free SD Card recovery software helps to restore photos, documents, email, files, video, audio, etc.
If you are not a professional IT worker, don't worry. Bitwar Data Recovery for Windows and Mac OS may be a better choice for you. It is the best file recovery software since it is compatible with any devices such as SD cards, digital cameras, hard drives, Memory cards, media players and portable drives. Whether you deleted files or lost them due to a virus or formatting, or due to a lost partition you can still have them back using this software.
Guides to using the data recovery software:
Free download and install Bitwar Data Recovery Software on your computer. Then insert your SD card into the slot provided in your computer or by using an external card reader. Make sure the computer recognizes it.
Step 1. Launch Bitwar Data Recovery software on your Windows and select the SD card and then click "Next."
Step 2. Choose "Quick Scan" mode to scan first; If you cannot find files on this mode, you can try Deep Scan again. The deep scan will search every sector of SD card to see all existing partitions.

Step 3. Select the "Images/Photos" type if you want to recover photos, and then click "Next" to start scanning.

Step 4. After the scan, you can pick the lost photos you need at a direct preview screen. Finally press the recover button to take back your photos, files, document.

Try It Now!
Please refer here for more about SD card data recovery.
#SD Card Data Recovery Software#Free SD Card Photo Recovery Software#SD Card Deleted Photos Recovery#Recover Deleted Photos from SD Card
1 note
·
View note
Text
Recover Data From Windows 10
Have you met the issue of "System Restore Failed"? Here are some steps that can help to fix such a problem, and you can apply Bitwar to restore your losing data.
System Restore is a handy feature in Windows which allows you to revert the computer's state (system files, Windows Registry, settings, installed applications) to a previous point in case of malfunctions or other problems. But sometimes, System Restore might fail or stuck with error message 'System Restore did not complete successfully. Your computer's system files and settings were not changed'. In this case, you will not be able to restore the system or data. Don't worry! Here are a few troubleshooting steps that can help you to fix the issue of "System Restore did not complete successfully."
How to fix system restore failed in Windows 10?
Here are some useful solutions to fix system restore failed in Windows 10. Just try them one by one.
Fix 1. Perform System Restore in Safe Mode
If Windows 10 System Restore is stuck for more than 1 hour, then you will have to force it to shut down and restart your computer. And then enter the Safe mode.
Fix 2. Run Startup Repair
If you still can't perform the system restore in safe mode, you can fix it via Startup Repair. To do this, you should enter to WinRE. Then, go to Choose an option > Troubleshoot > Advanced Options > Startup Repair.

Fix 3. Run SFC
System File Check (SFC.exe) is a Windows utility that helps you to scan for corruption in Windows system files. If it finds corrupted files, it will help to restore those files. Here, run System File Check to browse Windows and check if it helps. 1. Enter WinRE by using an installation media, and then navigate to Choose an option > Troubleshoot > Advanced Options > Command Prompt. 2. Type SFC /scannow in the pop-out window and press Enter to troubleshoot missing or corrupted system files on Windows 10. 3. Please wait patiently until the verification reaches 100%.

Sometimes you may meet a problem that you files lost after finishing System Restore. To restore data on Windows 10, we would like to recommend you Bitwar Data Recovery. It is a professional data recovery software which can retrieve lost/deleted/corrupted/RAW data from hard disk, USB drives, memory cards, external hard disk, etc.
Recover data from window 10
Free download Bitwar Data Recovery software and install it on your PC. Mac users should download and install Bitwar Data Recovery for Mac version. Then follow the steps to recover lost data.
Step 1: After installing the Bitwar Data Recovery program, launch it, and select the partition where the data lost and click "Next."
Step 2: Select "Quick Scan" and click "Next." If Quick Scan doesn't work, please turn to the deep scan.

Select the file type you want and click "Next" to start scanning.
Step 3: After the scan, all the data will be listed in the middle area. You can filter them by the file name, type, path, and time. You can also preview them to determine the files you want to recover. Then you can click the "Recover" button to get them back.
Tip: DO not directly save the recovered files into the partition or device where you have recently lost the data.
Try It Now!
Please refer here for more about Windows 10 data recovery.
#Recover Data From Windows 10#Fix System Restore Failed Data Recovery#Fix System Restore Failed in Windows 10#Recover Data From Windows 10 When System Restore Failed
1 note
·
View note
Text
Fix Destination Folder Access Denied
Nowadays, the computer is an important tool for people keeping files and folders such as pictures, audios or videos. But we may happen to meet some problems with the computer operation such as Destination Folder Access Denied, what should we do then? In this writing, we will talk about how to resolve it with some effective ways, check it and find how.
What is Destination Folder Access Denied?
Destination Folder Access Denied problem happens because of the unavailability of the administrator or trusted installer on Windows 7/8/10/XP, and it offers certain permissions from the network share to perform this action. The administrator means that the document or the file is situated in another user account and not useful for modifications, even though it appears in your account. In this situation transferring the ownership resolves the issue.
This problem is often prevalent in a multi-user account system. Once the ownership is changed to the selected file or folder becomes easily accessible to modify or perform tasks based on the requirement.
Anyways, let us move towards solutions on "How to fix Destination Folder Access Denied error?".
How to fix Destination Folder Access Denied Error?
There are multiple solutions to correct this error. Follow our step by step guide to fix this error.
Solution 1: Disable Certain Services
1. Click Start option, find msconfig.
2. Select System Configuration from the list search results. At the Services tab of the System Configuration dialog box, press or click to pick the checkbox which called Hide all Microsoft services, and then presses or click at the Disable all button.

3. At the Startup menu of the System Configuration dialog box, click or tap on Open Task Manager.
4. On the Startup tab in Task Manager, select the item for each startup item.
5. Then tap on Disable.
6. Close the Task Manager.
7. Save the changes and restart your Computer.
Solution 2: Change Ownership of the Folder
1. Choose the folder which you want to take ownership of, right-click and then choose Properties.
2. Press the Security tab, click Advanced, and then click the Owner tab.

3. Select Change. If you are requested for an administrator password or confirmation, type the password or provide confirmation.
4. Tick the name of the person you want to give ownership to.
5. If you want somebody to be the owner of files and subfolders in this document, choose the new owner.
6. Click OK.
Solution 3: Recover Files Using Recovery Tools
Tip 1. Recovering data from an inaccessible hard drive.
1. Start Bitwar Data Recovery. Select the drive which the unavailable files are located.
2. Choose a quick scan mode or a deep scan to rescue all lost plus present files from that particular drive.
3. Tick the data that you want to restore then click on Recover.

Easily Solved!
Please refer here for more about Access Denied Folder data recovery.
#Access Denied Folder Files Recovery#Recover Data From An Inaccessible Hard Drive#Inaccessible Hard Drive Data Recovery#Destination Folder Access Denied#Fix Destination Folder Access Denied
1 note
·
View note
Text
Solutions to Recover Data After CHKDSK
The utility of CHKDSK is a component of all Windows versions, including10, 8, 7, and XP. But the operation may end up in causing the loss of important data from the system. How to recover data after CHKDSK? Check it and find how.
"Each time I opened a file or folder on my computer, it told me it wasn't there, but I could see the icon. It also kept asking me to run CHKDSK. I tried to change file extensions on the excel files, I could open them, but it didn't work. So CHKDSK ran the next time I rebooted, and now the files have gone. Does anyone know how to get a list of the files if CHKDSK is removed?
Last day the editor received the question for help from the forums. It seems that it is a problem with recovering data after CHKDSK. Before we talk about the solutions, we may need to check something about the "CHKDSK."
What is "CHKDSK"?
CHKDSK is a basic Windows operation that scans hard disk, USB / external drive to find errors, then fix these errors for free without using any external tools. It is usually used when the system shows various boot errors and for repairing the drive.
The utility of CHKDSK is a component of all Windows versions, including 10, 8, 7 and XP. It can also be got from a Windows installation disc. So, if you are a Windows user, you might have come across CHKDSK command.
Although the CHKDSK functionality rectifies the errors on the computer hard disk, it may come to an error. It is because in the process of solving errors, sometimes the operation may end up in causing the loss of useful data from the system. So, before performing the CHKDSK, the top priority of users must be taking the backup of the essential files.
Most of the people may forget to do a copy sometimes or just mistakenly deleted files before doing a CHKDSK command. Then it is anxious to worry about the data will be got back or not. So is there any solution to recover data after CHKDSK? The answer is yes. The data is still on the hard disk, but if you overwrite it, it will be extremely difficult or impossible to get it back. So remember to do nothing further on the drive after a false operation.
How to Recover Data After CHKDSK?
Solution 1: Retrieve CHKDSK Deleted Data from Found.xxx Folder
You may receive a confirmation message before CHKDSK is going to delete files which is “10 lost allocation units found in 2 chains” or “ Convert lost chains to folders&rdquo, etc.
If you choose Y, Windows will save each lost chain in the root directory of your disk as a file with a name in the format Filennnn.chk. When the disk check ends, you can find these files whether they contain data you want. If you press N, Windows will check the disk, but it does not leave the contents of the lost allocation units.
So, you can open the root directory of your drive to see if there is a Found.XXX (XXX refers to the number, usually is 000)folder that is hidden by default when find files missing after the CHKDSK command.
Firstly, you should find hidden folders in Windows 10.
File Explorer>View>Options>Change folder and search options from the submenu.>View
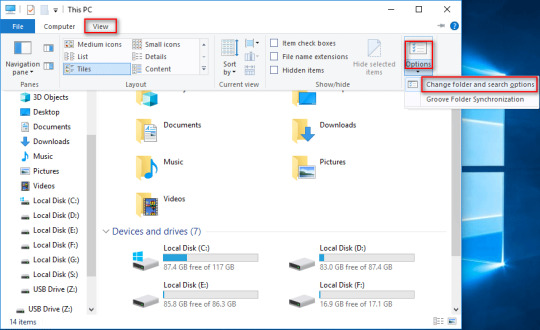
Choose Show hidden files, folders, and drives.
Press the OK button to confirm changes.

Secondly, you will see the FOUND.XXX folder and turn on it. Not 100% of your data might be there. But most of it should be there.

Thirdly, you can find lots of data with .chk extensions.
Now you have to drag and drop all these files into their correct destinations. You will find these files are unavailable because of their extensions have been changed. If you know the exact extension of each file, changing .chk of every file to the correct extension may get them back.
For example, if the first file is an Excel document, to change .chk to .xlsx may make the document available again.
But in fact, few people can remember extensions of every file, especially when there are lots of lost data. So you need a third-party tool to recover data after CHKDSK.
Solution 2: Retrieve CHKDSK Deleted Data by a Recovery Tool
A free data recovery tool with today's technological advancements can restore data from your computer's hard drive. Here we recommend to you is Bitwar Data Recovery, the true companion for your data recovery.
It is a reliable, formidable file recovery programs that effective on Windows X/7/8/10 and other operating systems, Mac, and even on mobile (Android, iPhone). Whether files are deleted after the CHKDSK command or emptied from Recycle Bin, you can rely on this data recovery program.
Tips: Please DO-NOT installs the data recovery software in the same drive that you have operated the CHKDSK command.
Let's try it now!
Please refer here for more about CHKDSK deleted data recovery.
#CHKDSK deleted data recovery#Retrieve CHKDSK Deleted Data by Recovery Tool#Solutions to Recover Data After CHKDSK#Retrieve CHKDSK Deleted Data#Recover Data After CHKDSK
1 note
·
View note
Text
Recover Data From Hard Disk
Have you ever formatted your hard Disk and lost files you need? Easy and free hard disk recovery software — Bitwar Data Recovery supports you to restore your data quickly.
Data loss is a common issue, not only at the individual level but also in professional environments. We may lose flies on the hard disk due to different reasons. So what should we do after data loss? How to retrieve them? Bitwar Data Recovery allows you to get back your data even without an acceptable backup solution.
How Does Data Lose?
1. Physical Damage: Physical damage happening to your hard disk is irreversible and may require professional recovery service.
2. Logical Data Loss: Logical data loss including files lost due to accidental deletion or formatted hard disk may be more effortless to restore.
The most common mistake most people make is to clean or empty the recycle bin, which will thoroughly remove the computer’s reference to the file storage location. According to the hard drive file system or the type of device that stores the missing files, Bitwar Data Recovery hard disk data recovery software can find the file as long as it has not been overwritten.
Why Choose Bitwar Data Recovery?
1. It is easy, and safe to use.
2. It is fast, reliable and 100% clean with powerful functions.
3. It offers a 30-days free trial for users.
4. It provides a unique user-friendly wizard interface.
How to Restore Files from Formatted Hard Disk?
Step 1: Free download Hard Disk Data Recovery Software.
Download it on the official website: https://www.bitwar.net.

It supports Windows 10, 8, 7 as well as Mac OS. After downloading it, install the data recovery program on your computer or laptop. Tip: Install Bitwar Data Recovery software on different drives to prevent overwriting any data on the file.
Step 2: Launch Bitwar Data Recovery and choose recovery mode.
Choose Formatted Disk Recovery on Standard Mode. Bitwar Data Recovery supports 6 recovery mode: Deleted Files Recovery, Formatted Disk Recovery, External Devices Recovery, Recycle Bin Recovery, Lost Partition Recovery, and Deep Recovery.

Step 3: Choose Disk Partitions and Devices.
Select the disk you want to retrieve, then click “Next” into the file scan status. Tip: In the progress of data recovery of the hard disk, the data should be written in the source disk, and the disk is not allowed to be defragmented.

Step 4: Select the file type
You can select all type to restore or choose a specific file type to recover, such as Images/Photos, Audio, Document, Videos, etc. Then click “Scan”.

Step 5: Preview and recovery
After scanning, files are listed with the file name, type path, time and so on. You can Preview them, then choose those you want to restore and click “Recover“.

Free Download!
Please refer here for more about hard disk data recovery.
#Recover Data From Hard Disk#Recover Files From Hard Disk#Hard Disk Data Recovery#Hard Disk Data Recovery Software#Free Hard Disk Data Recovery Software
1 note
·
View note