#Recover Data From USB That Cannot Be Formatted
Explore tagged Tumblr posts
Visit Tumblr Blog
Explore Tumblr blogs with no restrictions, modern design and the best experience.
Last Seen Tumblr Blogs


Fun Fact
The total number of visits Tumblr.com received during January 2021 is 327 million.
Text
Professional Data Recovery Services Guaranteed
In an era where digital data governs everything from business operations to personal memories, losing that data can be a stressful and often catastrophic experience. Whether you're dealing with a crashed hard drive, corrupted memory card, or an accidentally formatted USB, one thing is certain—you need a solution that works, and fast. That’s where professional data recovery services come in. Backed by experience, technology, and proven methods, these services guarantee a higher chance of successful recovery compared to DIY attempts.
Why Go Professional?
Data recovery can be complex. While software solutions might help in minor cases, they are limited and often risky. Professional recovery services offer several advantages that make them the gold standard in the industry:
1. High Success Rate
Professional data recovery companies use advanced hardware and software tools that aren’t available to the general public. They also operate in specialized environments, like cleanrooms, that are essential for safely handling damaged hardware. These capabilities translate to much higher recovery success rates.
2. Expertise in Complex Scenarios
Professionals are trained to handle all types of data loss—mechanical failure, fire/water damage, RAID array corruption, SSD or NAND flash issues, accidental deletion, and more. They follow strict protocols to diagnose the issue and apply the most appropriate recovery techniques.
3. No Further Damage
Attempting recovery yourself, especially in the case of physically damaged devices, can actually make things worse. A professional service prevents that risk, preserving the data in its current state while recovering what’s lost.
4. Data Confidentiality and Security
Reputable providers take data privacy seriously. Your recovered data is treated with complete confidentiality, often under strict non-disclosure agreements (NDAs) and data handling policies.
What ���Guaranteed” Really Means in Data Recovery
No data recovery company can truthfully promise 100% recovery in all situations—because some data loss can be permanent, depending on the severity of damage. However, professional providers typically offer guarantees that include:
1. No Data, No Charge Policy
If the company cannot recover your data, you don’t pay. This shows confidence in their abilities and offers peace of mind to clients.
2. Transparent Evaluation
Most companies begin with a free or low-cost diagnosis of your device and provide a quote upfront. You’ll know exactly what to expect in terms of cost and turnaround time.
3. Success Rate Guarantee
Professional services often advertise success rates of 85–95% depending on the damage type. They back up this claim with documented case studies and testimonials.
4. Service Level Agreements (SLAs)
For business clients, professional data recovery often comes with service-level agreements that guarantee timelines and delivery dates.
What Devices Can Be Recovered?
Professional data recovery services are not limited to just desktop computers or laptops. They work with a wide range of storage devices, including:
Internal and external hard drives (HDD and SSD)
USB flash drives
SD and microSD cards
RAID systems (0, 1, 5, 10, etc.)
NAS and SAN devices
Mobile phones and tablets
Servers and enterprise storage systems
Regardless of the file system (FAT, NTFS, HFS+, EXT, APFS, etc.), professionals are trained to extract data efficiently.
The Process: How Professional Recovery Works
Let’s walk through a typical recovery process when you hire a professional:
Step 1: Consultation and Diagnosis
You’ll send or bring in your device. Experts will run diagnostics to assess the damage and determine the potential for recovery.
Step 2: Quote and Approval
After the evaluation, you’ll receive a recovery quote. At this point, you can approve or decline the service.
Step 3: Recovery Process
Using advanced techniques, including sector-by-sector imaging, chip-off methods, and cleanroom disassembly, specialists attempt to retrieve your data.
Step 4: Verification and Delivery
Once the data is recovered, you’re provided with a list or preview of recoverable files. The final data is then delivered to you on a new storage device.
How to Choose the Right Data Recovery Provider
Not all data recovery companies are created equal. To make sure you’re getting the best service, consider these factors:
Reputation
Check online reviews, ratings, and testimonials. Look for businesses with positive feedback and a strong track record.
Certification
Choose providers with ISO-certified cleanrooms and certified data recovery technicians.
Data Privacy Policy
Ask about their confidentiality procedures and whether they follow data protection regulations like GDPR or HIPAA.
Pricing Transparency
Avoid providers who won’t quote prices until after recovery. Good companies are upfront about their fees and policies.
Turnaround Options
If time is critical, ask about expedited service tiers. Some companies offer 24–48 hour emergency recovery.
Cost of Professional Recovery
The cost of professional data recovery can range from $100 to several thousand dollars, depending on the complexity of the case:
Simple software recovery: $100–$300
Mechanical failures: $500–$1,000
RAID or server recovery: $1,000–$5,000+
While this may seem expensive, it is often a fraction of what it would cost to recreate lost data, especially in business scenarios.
When it comes to data loss, you only get one shot. Choosing a professional data recovery service gives you the best possible chance of getting your files back safely, securely, and quickly. While no provider can guarantee recovery of every byte, the right company will offer a results-driven guarantee: no recovery, no charge.
In a world where every click, transaction, and memory depends on digital storage, don’t gamble with your data. Trust the experts. With professional data recovery services guaranteed, your lost data may not be lost for long.
#MacBook data recovery Calgary service#Transfer files Mac to Mac#Mac liquid spill damage repair#Repair water damaged Mac Calgary#Logic board repair for Mac
0 notes
Text
Data Recovery,
Data Recovery,
In today’s digital age, data plays a crucial role in personal and professional contexts. However, data loss remains a prevalent issue, often leading to significant challenges. Whether caused by accidental deletion, hardware failure, software corruption, or cyberattacks, losing critical information can be distressing. Fortunately, data recovery offers a lifeline in such situations. This guide explores the fundamentals of data recovery, its methods, and best practices to safeguard your valuable information.
What is Data Recovery?
Data recovery refers to the process of retrieving inaccessible, lost, corrupted, or formatted data from storage devices such as hard drives, solid-state drives (SSDs), USB drives, memory cards, and smartphones. Specialized software and tools are often employed to recover data, depending on the nature and extent of the loss.
Common Causes of Data Loss
Understanding the causes of data loss can help mitigate risks:
Human Error: Accidental deletion or overwriting of files is a leading cause.
Hardware Failure: Physical damage to storage devices, such as a crashed hard drive or worn-out SSD, can render data inaccessible.
Software Corruption: Operating system errors, corrupted file systems, or malicious software can result in data loss.
Power Outages: Sudden power interruptions can disrupt the saving process, corrupting files.
Natural Disasters: Events like floods, fires, and earthquakes can physically damage storage devices.
Cyberattacks: Malware, ransomware, and hacking incidents can compromise or delete data.
Data Recovery Methods
Software-Based Recovery:
Usage: Ideal for scenarios like accidental deletion, formatting, or minor file corruption.
Tools: Popular tools include EaseUS Data Recovery Wizard, Recuva, and Stellar Data Recovery.
Advantages: Cost-effective and user-friendly, suitable for non-technical users.
Professional Data Recovery Services:
Usage: Required for severe cases involving physical damage or complex data corruption.
Process: Experts use clean rooms and advanced techniques to repair devices and recover data.
Advantages: High success rates in recovering critical data from severely damaged storage.
Backup Restoration:
Usage: The easiest and most effective recovery method if recent backups exist.
Tools: Cloud services like Google Drive, OneDrive, or local backup solutions.
Best Practices to Prevent Data Loss
Regular Backups:
Maintain frequent backups on external drives or cloud storage.
Implement automated backup systems to reduce human oversight.
Use Reliable Storage Devices:
Invest in high-quality hardware to minimize the risk of failure.
Implement Security Measures:
Use antivirus software and firewalls to protect against malware and ransomware.
Handle Devices Carefully:
Avoid physical damage by keeping devices in safe environments.
Prevent overheating and exposure to moisture or dust.
Educate Users:
Train employees and individuals on safe data handling practices to reduce human error.
When to Seek Professional Help
While many data recovery tasks can be handled using software, certain situations necessitate professional assistance:
When the storage device emits unusual noises, indicating mechanical failure.
If the data is highly sensitive or critical and you cannot risk further damage.
When multiple recovery attempts using software fail.
The Importance of Proactive Data Management
Data recovery is often the last resort. Proactive measures, such as regular backups and secure storage practices, can minimize the likelihood of data loss. Additionally, staying informed about emerging threats and leveraging modern tools can further protect your digital assets.
Conclusion
Data recovery is an invaluable process in our data-driven world, offering hope and solutions during challenging times. By understanding the methods and implementing preventive measures, individuals and organizations can safeguard their information and mitigate the impact of potential losses. Remember, while recovery is possible, prevention is always better than cure.
0 notes
Text
What is Data Destruction and Methods of Destruction
In today's digital world, data security is paramount. We entrust our personal information, financial records, and even confidential business documents to electronic devices. But what happens to this data when you no longer need it? Simply deleting files isn't enough. Deleted data can often be recovered by sophisticated software, leaving you vulnerable to a data breach.
This is where secure data destruction comes in. Data destruction is the process of permanently removing data from a storage device so that it cannot be retrieved. This is crucial for ensuring the privacy and security of your information, especially when dealing with sensitive data.
Understanding Data Destruction
Data destruction refers to the process of permanently deleting data from all storage mediums, ensuring that it cannot be retrieved or reconstructed. This process is essential for protecting confidential information from unauthorized access, particularly when disposing of old hardware or upgrading to new systems. Effective data destruction not only safeguards privacy but also complies with various regulatory requirements.
Why Data Destruction is Essential
Several reasons underscore the importance of data destruction:
Protecting Sensitive Information: Personal data, financial records, and proprietary business information must be protected from unauthorized access.
Regulatory Compliance: Many industries are subject to strict data protection regulations, such as GDPR, HIPAA, and FACTA, which mandate secure data disposal.
Preventing Data Breaches: Improperly disposed of data can lead to data breaches, which can have severe financial and reputational repercussions.
Environmental Responsibility: Proper data destruction prevents harmful e-waste and ensures environmentally friendly disposal practices.
Methods of Data Destruction
There are various methods of data destruction, each with its own advantages and use cases. Here, we explore the most commonly used techniques:

1. Physical Destruction
Physical destruction involves physically damaging the storage medium to make data recovery impossible. This method is highly effective for hardware such as hard drives, CDs, DVDs, and USB drives. Common techniques include:
Shredding: Devices are fed into a shredder that cuts them into tiny pieces.
Crushing: Hydraulic or pneumatic crushers physically deform and destroy the hardware.
Degaussing: This technique uses strong magnetic fields to disrupt the magnetic properties of storage devices, rendering the data unreadable.
2. Overwriting
Overwriting is a software-based method where existing data is replaced with random data, typically multiple times, to ensure it cannot be recovered. This method is often used for hard drives and other rewritable storage media. Key points include:
Single-pass Overwrite: Data is overwritten once, making basic recovery difficult.
Multi-pass Overwrite: Data is overwritten multiple times (e.g., the DoD 5220.22-M standard uses a three-pass overwrite), providing higher security.
3. Data Wiping
Data wiping is similar to overwriting but is designed specifically for securely erasing data on SSDs and other solid-state storage devices. This method takes into account the unique properties of solid-state storage to ensure complete data removal.
4. Encryption
Encryption is a preventive method that involves encrypting data before it is stored. When it comes time to destroy the data, the encryption keys are destroyed, rendering the encrypted data useless. This method is highly effective for cloud storage and other digital environments.
5. File Shredding
File shredding is a software-based method that targets specific files or folders. The selected files are overwritten multiple times and then deleted, ensuring they cannot be recovered. This method is useful for selectively deleting sensitive files without affecting the entire storage medium.
6. Disk Formatting
Disk formatting involves reformatting the storage device, which removes the pointers to the data, making it inaccessible. However, this method does not guarantee that the data is unrecoverable unless combined with overwriting techniques.
Choosing the Right Method
Selecting the appropriate data destruction method depends on several factors:
Type of Storage Device: Different methods are suited for different types of storage media, such as HDDs, SSDs, optical media, and tapes.
Level of Security Required: More sensitive data requires more secure destruction methods, such as multi-pass overwriting or physical destruction.
Regulatory Requirements: Compliance with industry regulations may dictate specific destruction methods.
Cost and Resources: Some methods, like physical destruction, may be more costly and require specialized equipment, while software-based methods may be more economical.
Best Practices for Data Destruction
To ensure effective data destruction, follow these best practices:
Conduct Regular Audits: Regularly audit data and storage devices to identify what needs to be destroyed.
Use Certified Services: Consider using certified data destruction services that comply with industry standards.
Document the Process: Maintain detailed records of the data destruction process for compliance and verification purposes.
Verify Destruction: Use verification tools or third-party services to confirm that data has been irrecoverably destroyed.
3R Technology
8002 S 208th St E105, Kent, WA 98032, United States
(206) 582-7100
#e-waste recycling#e-waste#datadestruction#data destruction#secure data destruction#data sanitization#certified data destruction#data destruction service#asset data destruction#kent washington#kent
0 notes
Text
Understanding iPhone Data Recovery: A Lifesaver for Your Lost Data
our smartphones, particularly iPhones, hold vast amounts of personal and professional data. From cherished photos and videos to important contacts and emails, the data stored on our iPhones is invaluable. But what happens when this data is lost due to accidental deletion, software malfunction, or hardware failure? This is where data recovery comes into play, providing a solution to retrieve lost information. In this article, we will explore the intricacies of iPhone data recovery, the methods involved, and the expertise of professional recovery services like Apple Expert.
Introduction to Data Recovery
Data recovery refers to the process of salvaging inaccessible, lost, corrupted, or formatted data from storage devices. This can include hard drives, solid-state drives, USB flash drives, and, notably, smartphones. The process of data recovery can range from simple software solutions to complex hardware repairs, depending on the nature and extent of the data loss.
iPhone Data Recovery
iPhone data recovery specifically addresses the challenges associated with retrieving lost data from Apple's mobile devices. Given the sophisticated technology and security features integrated into iPhones, the recovery process can be more intricate compared to other devices. Common scenarios requiring iPhone data recovery include accidental deletion of files, iOS update failures, water damage, and system crashes.
The Mechanism of iPhone Data Recovery
The mechanism of iPhone data recovery involves several steps, each tailored to address different types of data loss. Here's a detailed look at the process:
Initial Assessment: The first step involves diagnosing the iPhone to determine the cause of data loss and assess the extent of the damage. This can include checking for physical damage, software issues, and ensuring the device is recognized by recovery tools.
Data Extraction: Depending on the diagnosis, data extraction can be performed using specialized software or hardware tools. For software-related issues, recovery software can scan the device’s storage to locate and retrieve lost files. In cases of hardware failure, more advanced techniques may be required, such as accessing the phone's internal memory directly.
Data Repair and Reconstruction: Sometimes, recovered data might be corrupted or incomplete. Data recovery professionals use specialized tools to repair and reconstruct the data to make it usable again.
Data Restoration: The final step involves restoring the recovered data to the device or transferring it to a secure backup location. This ensures that the data is safely stored and easily accessible to the user.
Methods of iPhone Data Recovery
Several methods can be employed for iPhone data recovery, each suited to different types of data loss scenarios:
Using iTunes Backup: If regular backups have been made via iTunes, data can be restored from the latest backup. This method is straightforward but requires that backups have been made prior to data loss.
Using iCloud Backup: Similar to iTunes, data can be restored from iCloud backups. This method is convenient as it does not require a physical connection to a computer but relies on having recent backups.
Third-Party Recovery Software: Various third-party applications are designed to recover data from iPhones. These tools can scan the device for lost data and allow users to selectively restore files.
Professional Data Recovery Services: For more severe cases, professional data recovery services, such as those provided by Apple Expert, offer advanced solutions. These services can handle complex recovery scenarios that standard software cannot address.
Beneficial Software for iPhone Data Recovery
Several software solutions are beneficial for iPhone data recovery:
Dr.Fone - Data Recovery (iOS): A popular tool that can recover data directly from the iPhone, iTunes backup, or iCloud backup. It supports a wide range of data types including photos, messages, contacts, and more.
EaseUS MobiSaver: Known for its user-friendly interface, EaseUS MobiSaver can recover lost data from iPhones, iTunes, and iCloud backups efficiently.
iMobie PhoneRescue: This software specializes in retrieving lost data and fixing iOS issues that may cause data loss. It supports a variety of data types and recovery scenarios.
Professional iPhone Data Recovery at Apple Expert
The professional crew at Apple Expert excels in providing comprehensive iPhone data recovery services. Here’s what sets them apart:
Expertise and Experience: Apple Expert's team comprises skilled professionals with extensive experience in data recovery. Their expertise ensures a high success rate in recovering lost data.
Advanced Tools and Techniques: The team utilizes state-of-the-art tools and techniques to handle both simple and complex recovery tasks. This includes sophisticated software for logical recovery and specialized hardware for physical recovery.
Personalized Service: Apple Expert offers personalized service tailored to each client's specific needs. They conduct a thorough assessment to determine the best approach for recovery, ensuring that clients receive the best possible outcome.
Confidentiality and Security: Data privacy is a top priority at Apple Expert. The team follows strict protocols to ensure that all recovered data is handled securely and confidentially.
Comprehensive Support: From the initial consultation to post-recovery support, Apple Expert provides comprehensive assistance to ensure clients are fully satisfied with the service.
Losing data from your iPhone can be a distressing experience, but with the right tools and professional help, it is often possible to recover lost information. Understanding the mechanisms and methods of iPhone data recovery can empower users to take the right steps in case of data loss. For those in Calgary, Apple Expert offers reliable and professional iPhone data recovery services, ensuring your valuable data is in safe hands.
Tags: iPhone Data Recovery, Data Recovery Services, iPhone Backup, Data Retrieval, Apple Expert Calgary
0 notes
Text
How to Retrieve Lost Videos from SD Card Easily
It is understandable to fear losing priceless videos, whether they got accidentally deleted from the gallery or misplaced when you moved to a different device! However, only some of the apps you come across will genuinely assist you in recovering your erased videos. With the help of the video recovery app, you may quickly recover files that got inadvertently erased, lost because of system failures, or damaged by hardware problems. This video restore software solution supports documents, images, movies, and other file types. With the help of a video recovery tool, you may quickly recover various data types.
Part 1: Can You Recover Deleted Videos from SD Card on Your Own?
Videos you remove from your computer's SD card or any other device, such as a camera or smartphone, are outside the trash or recycle bin. That's why you cannot simply restore them using your recycle bin. Then, you might wonder if recovering a deleted video on your SD card is possible.
Yes, you can get back deleted videos from your SD card using reputable video restore software, even though it might appear hard initially. Rapid technological advancement has given us many recovery possibilities while resolving our problems. As a result, you can proceed with your memory card video recovery without expert support. Contact a data recovery agency in certain situations to find out if you can retrieve your priceless data. For instance, you might need assistance recovering them if your SD card is seriously damaged.
But as soon as you notice the video loss, stop using the SD card to ensure data recovery.
Please note that recovery is possible only when the data isn't overwritten.
Part 2: How To Recover Lost Videos from SD Cards Without Software
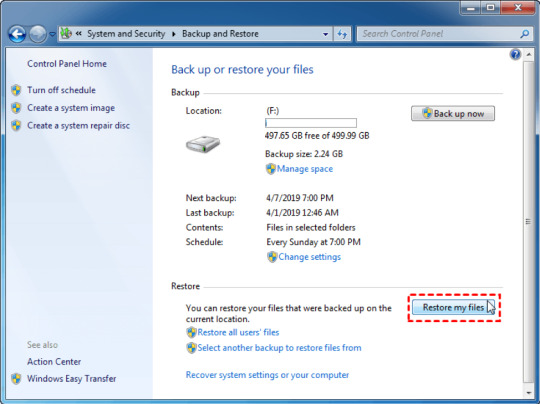
Recover deleted videos from SD card for free via Backup and Restore
One of the most effective ways to recover data from an SD card without using a third-party software recovery tool is through backups. If you've backed up your deleted video files, you're in luck, as restoring them becomes straightforward, helping you avoid data loss entirely.
Here are the steps to restore deleted videos from an SD card using backups:
Step 1: Connect the external SD card to a computer and press the Win + I keys to open Settings.
Step 2: Click "Update & Security" and then access the "Backup" option.
Step 3: Within the Backup & Restore tab, select "Restore My Files."
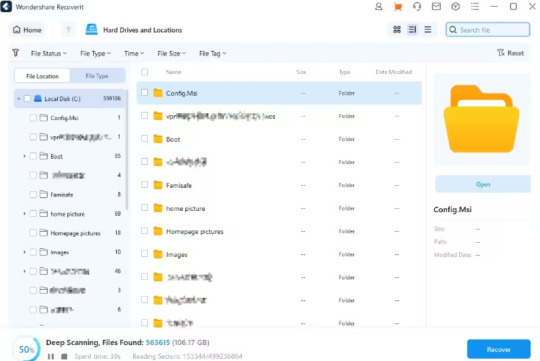
2. Easily get back permanently deleted or lost videos from SD card for free with Wondershare Recoverit Enhanced Video Recovery.
Wondershare Recoverit stands out as a comprehensive video recovery solution. Its Enhanced Video Recovery feature takes file retrieval to a new level. With support for over 2000 storage devices and 1000 file formats, it boasts an impressive success rate in handling 500+ real-life data loss scenarios, including formatting, system crashes, and virus attacks.
Key Features:
All-in-One Data Recovery: It offers a broad spectrum of file format compatibility. Its success extends to various data loss scenarios, ensuring a comprehensive recovery experience.
Enhanced Photo & Video Recovery: Specialized in rescuing lost or hidden videos and photos, Recoverit can restore Ultra HD, 4K, and 8K content while maintaining their integrity. It supports multiple formats and works seamlessly with popular camera brands.
Video Scenario Expansion: It supports retrieving surveillance and car camera videos, addressing a more comprehensive range of user needs.
Corrupted Video Repair: Offering both quick and advanced repair modes, Recoverit mends corrupted, truncated, and broken videos, enhancing the quality of the repair process.
System Crashed Computer Recovery: It creates a bootable USB drive to access data on a crashed computer. This feature prioritizes user convenience, speed, and security.
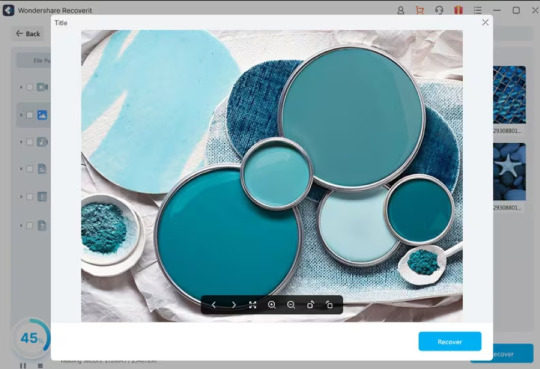
Here's a step-by-step guide on recovering removed files from your SD card using Wondershare Recoverit Data Recovery Software on a Windows computer:

Step 1: Download the Wondershare Recoverit Data Recovery Software.
Select Your SD card to ensure it is connected to your computer. Select your SD memory card from the disk list displayed in the software and click the "Start" button to initiate the process.

Step 2: Scan the SD Memory Card on Recoverit.
SD Card Recovery Software will commence scanning your SD card. The scanning process might take several minutes to complete.

Step 3: Preview and Recover Deleted Data
Once the scan is over, you can review all the recovered data and files. Preview the recovered files, such as images, videos, etc. Pick the files you want to retrieve and click the "Recover" button to restore them.

Tips: Avoid saving recovered files onto the same SD card where you previously stored the lost data. Doing so could result in data loss or overwrite the existing data. A safe external storage device is advisable to keep the recovered files securely.
Part 3: Tips for Preventing Video Loss on SD Cards
While SD cards are reliable for file storage, they are not immune to potential problems like physical damage or corruption. Thus, you must take proactive measures to safeguard your files and be prepared in case of any unexpected data loss. Here are some tips:
Back-Up Important Media Files: Instead of relying solely on your SD card, create copies of your media files and store them on alternative mediums like an external hard drive or cloud-based services such as Google Drive or Dropbox.
Appropriate Storage for SD Cards: If you own multiple SD cards, consider investing in a case to organize and protect them. Ensure your SD cards are stored safely, without excessive heat or moisture.
Safely Eject from Your Computer: Always use the proper procedure to eject your SD card from your computer. Removing it without proper ejection can disrupt the read/write process, potentially leading to file corruption.
Stop Using the Card if Errors Appear: If you encounter errors or issues with your SD card, cease using it immediately. Retrieve any essential files from the card promptly. Errors signal potential card failure, and continued use may result in significant data loss.
Conclusion
So, we saw, losing valuable videos can be distressing, but with the right approach, recovery is possible. Utilizing backups or advanced tools like Wondershare Recoverit can effectively retrieve deleted videos from SD cards. Its Enhanced Video Recovery feature and comprehensive data retrieval capabilities make it a standout choice. Also, safeguarding your files by implementing preventive measures, such as regular backups and safe storage practices, is crucial. For a reliable and hassle-free recovery tool, consider using Wondershare Recoverit—a powerful solution worth recommending.
0 notes
Text
How to Retrieve Lost Videos from SD Card Easily
It is understandable to fear losing priceless videos, whether they got accidentally deleted from the gallery or misplaced when you moved to a different device! However, only some of the apps you come across will genuinely assist you in recovering your erased videos. With the help of the video recovery app, you may quickly recover files that got inadvertently erased, lost because of system failures, or damaged by hardware problems. This video restore softwaresolution supports documents, images, movies, and other file types. With the help of a video recovery tool, you may quickly recover various data types.
Part 1: Can You Recover Deleted Videos from SD Card on Your Own?
Videos you remove from your computer's SD card or any other device, such as a camera or smartphone, are outside the trash or recycle bin. That's why you cannot simply restore them using your recycle bin. Then, you might wonder if recovering a deleted video on your SD card is possible.
Yes, you can get back deleted videos from your SD card using reputable video restore software, even though it might appear hard initially. Rapid technological advancement has given us many recovery possibilities while resolving our problems. As a result, you can proceed with your memory card video recovery without expert support. Contact a data recovery agency in certain situations to find out if you can retrieve your priceless data. For instance, you might need assistance recovering them if your SD card is seriously damaged.
But as soon as you notice the video loss, stop using the SD card to ensure data recovery.
Please note that recovery is possible only when the data isn't overwritten.
Part 2: How To Recover Lost Videos from SD Cards Without Software
Recover deleted videos from SD card for free via Backup and Restore
One of the most effective ways to recover data from an SD card without using a third-party software recovery tool is through backups. If you've backed up your deleted video files, you're in luck, as restoring them becomes straightforward, helping you avoid data loss entirely.
Here are the steps to restore deleted videos from an SD card using backups:
Step 1: Connect the external SD card to a computer and press the Win + I keys to open Settings.
Step 2: Click "Update & Security" and then access the "Backup" option.
Step 3: Within the Backup & Restore tab, select "Restore My Files."

Easily get back permanently deleted or lost videos from SD card for free with Wondershare Recoverit Enhanced Video Recovery.
Wondershare Recoverit stands out as a comprehensive video recovery solution. Its Enhanced Video Recovery feature takes file retrieval to a new level. With support for over 2000 storage devices and 1000 file formats, it boasts an impressive success rate in handling 500+ real-life data loss scenarios, including formatting, system crashes, and virus attacks.
Key Features:
All-in-One Data Recovery: It offers a broad spectrum of file format compatibility. Its success extends to various data loss scenarios, ensuring a comprehensive recovery experience.
Enhanced Photo & Video Recovery: Specialized in rescuing lost or hidden videos and photos, Recoverit can restore Ultra HD, 4K, and 8K content while maintaining their integrity. It supports multiple formats and works seamlessly with popular camera brands.
Video Scenario Expansion: It supports retrieving surveillance and car camera videos, addressing a more comprehensive range of user needs.
Corrupted Video Repair: Offering both quick and advanced repair modes, Recoverit mends corrupted, truncated, and broken videos, enhancing the quality of the repair process.
System Crashed Computer Recovery: It creates a bootable USB drive to access data on a crashed computer. This feature prioritizes user convenience, speed, and security.
Here's a step-by-step guide on recovering removed files from your SD card using Wondershare Recoverit Data Recovery Software on a Windows computer:

Step 1: Download the Wondershare Recoverit Data Recovery Software.
Select Your SD card to ensure it is connected to your computer. Select your SD memory card from the disk list displayed in the software and click the "Start" button to initiate the process.

Step 2: Scan the SD Memory Card on Recoverit.
SD Card Recovery Software will commence scanning your SD card. The scanning process might take several minutes to complete.
Step 3: Preview and Recover Deleted Data
Once the scan is over, you can review all the recovered data and files. Preview the recovered files, such as images, videos, etc. Pick the files you want to retrieve and click the "Recover" button to restore them.
Tips: Avoid saving recovered files onto the same SD card where you previously stored the lost data. Doing so could result in data loss or overwrite the existing data. A safe external storage device is advisable to keep the recovered files securely.
Part 3: Tips for Preventing Video Loss on SD Cards
While SD cards are reliable for file storage, they are not immune to potential problems like physical damage or corruption. Thus, you must take proactive measures to safeguard your files and be prepared in case of any unexpected data loss. Here are some tips:
Back-Up Important Media Files: Instead of relying solely on your SD card, create copies of your media files and store them on alternative mediums like an external hard drive or cloud-based services such as Google Drive or Dropbox.
Appropriate Storage for SD Cards: If you own multiple SD cards, consider investing in a case to organize and protect them. Ensure your SD cards are stored safely, without excessive heat or moisture.
Safely Eject from Your Computer: Always use the proper procedure to eject your SD card from your computer. Removing it without proper ejection can disrupt the read/write process, potentially leading to file corruption.
Stop Using the Card if Errors Appear: If you encounter errors or issues with your SD card, cease using it immediately. Retrieve any essential files from the card promptly. Errors signal potential card failure, and continued use may result in significant data loss.
Conclusion
So, we saw, losing valuable videos can be distressing, but with the right approach, recovery is possible. Utilizing backups or advanced tools like Wondershare Recoverit can effectively retrieve deleted videos from SD cards. Its Enhanced Video Recovery feature and comprehensive data retrieval capabilities make it a standout choice. Also, safeguarding your files by implementing preventive measures, such as regular backups and safe storage practices, is crucial. For a reliable and hassle-free recovery tool, consider using Wondershare Recoverit—a powerful solution worth recommending.
0 notes
Text
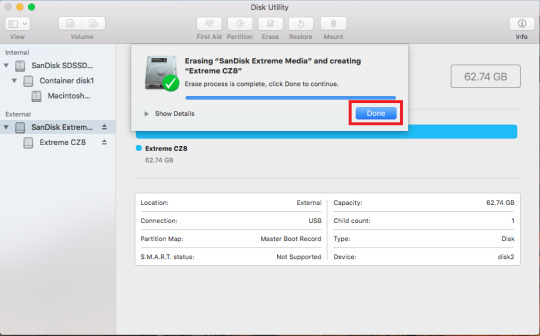
Fix Windows Was Unable To Complete The Format
If your USB drive cannot be formatted and is informed with a prompt “Window was unable to complete the format” error, it indicates that windows can’t format USB drive, and the USB flash drive is inaccessible. This post will give solutions to this issue.
USB drives are very portable, and they can be connected to a computer easily via USB drive to backup or transfer data, which have become an essential component in various digital products such as digital cameras, cell phones, MP3 players, etc. Since they are often carried by users and might be used on various computers, USB drives are more likely to get many problems.
For example, you plugged your USB drive into the port of a PC, right-click the disk icon and select “Format”, but it popped up an error saying “Windows was unable to complete the format”. So, does that mean your USB drive is broken? NO! This error may happen as a result of the following reasons:
The Main Cause that Windows can’t Format USB Drive
Cause 1: Virus infection If you plug USB drives into a public computer, you’ll take the risk of damaging the files and even the drive will stop working due to Virus attacks. Cause 2: USB device has bad sectors As we all know, storage devices consist of sectors; the Bad sector means the sector is damaged and can’t be read or written. Thus bad sectors can disrupt the formatting operation as well as file recovery. There are quite a few causes of bad sectors, like bad quality, excessive defragmentation, unplug USB drive directly while it is working, etc. Cause 3: USB drive suffers physical damage Physical damage is another reason that makes storage device inaccessible. The computer won’t be able to format the device if it can’t use the device. Cause 4: USB Disk is write-protected Windows can’t format a drive when it is in the write-protected state. As formatting is a kind of writing operation, so you need to remove the write-protection before formatting it.
How to fix “Windows couldn’t complete format” on the USB drive
If you are not capable of formatting your USB drive (USB flash drive, external hard drive, SD card, pen drive, etc.) in the usual process, then try to format that drive with the following methods. Please connect the USB drive to the computer and follow the guide below to fix the error: Note: if the USB drive gets badly physical damage, these solutions won’t help you.
Important: You should make sure that important data and files of the drive to be formatted have been backed up, as files will be erased once the drive is formatted. If the USB drive is inaccessible before you back up the data, then you need to perform file recovery first before formatting.
Steps of file recovery from a damaged USB drive will be talked in the next section of this post.
Fix Windows Couldn’t Complete Format on USB Drive
Solution 1: Format via Disk Management
Disk Management is provided by Windows, and it helps to manage partitions and disks for computers. Disk Management can create a new volume, extend or shrink partition, change drive letter, delete or format partition, etc. the error flash drives can be repaired with the Disk Management tool. Following the steps below, you can make a USB formatting procedure performed successfully. Step 1: Open Disk Management. Right-click on My Computer and select item “Manage”, and then click Disk Management on the left side. In the center section, you can see local hard drive and partitions and the USB drive, which can be recognized by capacity.

Step 2: Right-click the flash drive and select “Format” option and select the file system format to perform a quick format.

Step 3: Right-click on the USB drive and select “New Simple Volume” item. You’ll get the New Simple Volume Wizard which guides you to recreate new partition for the flash drive. Operations are following the onscreen instructions, setting options, and click the “Next” button. When the process is done, you’ll find the USB drive has been formatted and is properly recognized by the system.

Solution 2: Format with Command Prompt
Disk Management is not almighty, and it is not helpful in many cases. Thus, we need to switch to a command-line based formatting solution. Step 1: For Windows 7 users click Start button and type cmd in the search both and press Enter. If UAC is enabled, you need to find Command Prompt from the Start menu and run it as administrator. Step 2: Type command diskpart on the black window and press Enter key. Then you can see the partition and disk list of the current computer. All drives are listed with numbers, and Disk 4 is the flash drive in question.
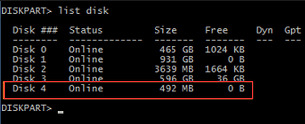
Step 3: Continue typing disk 4, which is the problem drive and clean and press Enter. The drive will be scanned, and its damaged file structure will be erased during scanning. Once the process is done, it reports a confirmation message telling that it has successfully cleaned the drive, and a new partition needs to be created. Step 4: Type create primary partition and hit Enter; next type in Command prompt format /FS: FAT32 J: (you can copy and paste it.) and press Enter. Here J is the drive letter of the USB drive, and you can change it in line with specific cases. The drive will be formatted to FAT file system, and the formatting is very fast.
The need to recover data promptly
Since the USB drive cannot be accessed or formatted, you need to perform file recovery as soon as possible. Otherwise, it will be overwritten with new data. To recover lost data from the USB drive cannot be accessed or formatted, you should try Bitwar Data Recovery software. It is the best file recovery software since it is compatible with any devices such as digital cameras, hard drives, SD cards, Memory cards, phones, media players and portable drives. From these devices, you can recover audios, videos, pictures, archives, emails, and documents. Whether you deleted these files or lost them due to the virus, or due to the disk inaccessible, or formatting you can still have them back using this software. Moreover, this program lets you preview files that have been recovered. Now you can free download Bitwar Data Recovery here and install it on your computer. Then make sure that your USB drive is connected to this computer very well.

Fix It Now!
Please refer here for more about unable to complete the format.
#Windows Was Unable To Complete The Format#Windows Can't Format USB Drive Error#Recover Data From USB That Cannot Be Formatted#Windows Was Unable To Complete The Format On USB
1 note
·
View note
Text
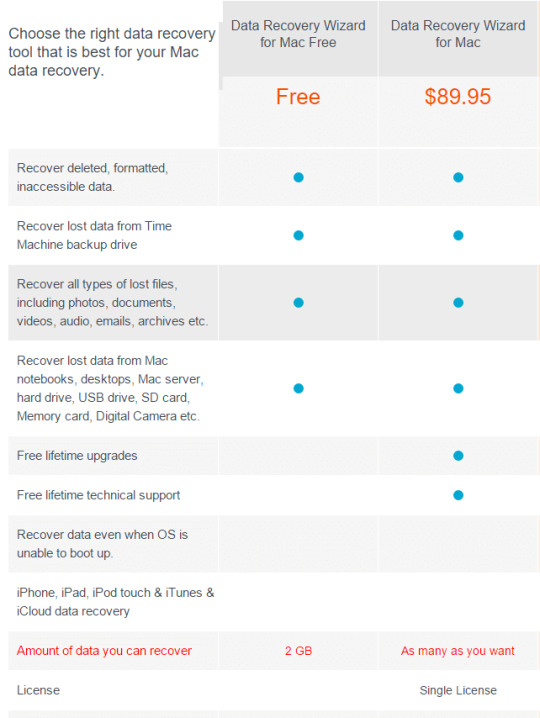
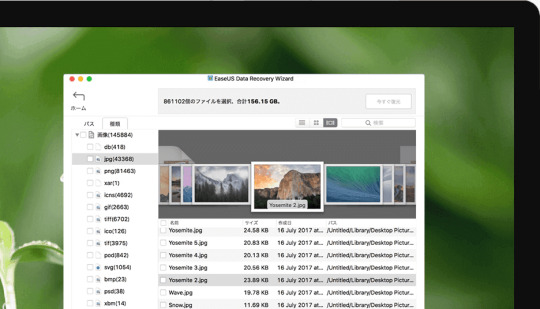
Easeus Data Recovery Wizard For Mac Free Pour Mac Os
EaseUS Data Recovery Wizard. The Most Comprehensive and Reliable Mac Undelete Data Recovery freeware. Quickly & completely recover deleted, formatted, inaccessible and lost data. Recover videos, photos, music, documents, emails, archives etc. From Mac hard drives and most storage devices. Preview lets you enjoy data recovery. EaseUS Mac data recovery software can be applied to restore Mac hard drive data, deleted files in SD or external storage devices volumes on Mac OS X and macOS (10.13/10.14) in simple steps. Its free version - EaseUS Data Recovery Wizard for Mac Free assists users in restoring lost Mac data from Mac OS X or macOS effortlessly.
Frequently Asked Questions
Can you recover permanently deleted photos on Mac?

Here's how to perform photo recovery for Mac.
Step 1. Download, install, and launch EaseUS Data Recovery Wizard for Mac.
Step 2. Select the location where you deleted photos. Click the Scan button.
Step 3. Preview the pictures that were found. Select the ones you want to restore.
Step 4. Click the Recover Now button to restore your lost photos.
What is the best photo recovery software for Mac?
Top 5 completely free data recovery software for Mac:
1. EaseUS Data Recovery Wizard for Mac Free
2. Disk Drill
3. PhotoRec
4. TestDisk
5. Exif Untrasher
How can I recover permanently deleted photos from my Mac for free?
To recover permanently deleted Mac photos, follow these methods:
Easeus Data Recovery Wizard Crack


Method 1. Recover permanently deleted pictures on Mac with EaseUS
Method 2. Restore deleted Mac pictures using the Photos app (Within 30 days)
Method 3. Retrieve deleted files from Mac Trash
Method 4. Recover deleted photos on Mac with Time Machine (Don't empty it)
Method 5. Recover deleted Mac picture or images from iCloud
How do I recover photos from a formatted USB drive on Mac?
You can easily get back your photos from a formatted flash drive by using EaseUS photo recovery software for Mac. Follow these simple steps to recovering deleted photos on Mac:
Easeus Data Recovery Wizard Technician
Step 1. Connect your USB/flash drive to the Mac device.
Step 2. Download, install, and run EaseUS photo recovery software for Mac.
Step 3. Select your USB drive and click Scan.
Step 4. Preview the pictures that were found. Select the ones you want to restore.
Step 5. Click the Recover Now button to restore your lost photos from the USB drive.
How to retrieve deleted music files from my SD card?
Accidentally deleted songs or music can be recovered with the following steps.
Step 1. Connect your SD card or SF card to your Mac.
Step 2. Install and run the software - EaseUS Mac data recovery software on your system.
Step 3. Select the SD card and click Scan. The software will scan the connected SD card.
Step 4. Click Recover Now to recover the lost or deleted music files to the desired location.
Frequently Asked Questions
Can I recover data if the drive shows as unmounted?
The drive cannot be accessed if it's not mounted. Please try to mount it in Disk Utility, then run EaseUS Data Recovery Wizard and scan the disk to recover lost data.
How can I find the lost data from the scan result?
EaseUS Data Recovery Wizard offers data filtering and search functions. You can filter the files by size and type, or search them by file/folder name or file extension.
Why cannot I recover 2GB data for free?
It is recommended to check the version installed is Free or Trial because they are different versions. The Trial has data preview function but cannot save any files, while the Free version enables to recover 2 GB files. The default free space is 500 MB and you may share the product on social media to get another 1.5GB.
Why cannot the recovered files be opened?
A file is saved as 2 parts on the storage device: directory information (which contains a file name, timestamp and size info, etc.) and data content. If the files with original file names and folder structures cannot be opened, one possible reason is the corrupted directory information. There is still a chance to recover the data content with the RAW Recovery method in our software.
How long does it take to scan the drive?
It strongly depends on the capacity of your hard drive and the performance of your computer. As a reference, hard drive recoveries can be completed in around 10 to 12 hours for a 1-TB healthy hard drive in general conditions.
1 note
·
View note
Text
Mac Disk Utility Sd Card Waiting For Partitions To Activate

“Can’t format SD card” is a mysteriously annoying error. Most of the time it is quite difficult to deduce the reason for the error; the SD card can be damaged or corrupted. How to tackle such an issue, if you cannot format it, SD card is of no use. Hence, we bring you this comprehensive content on how to fix the error “Can’t format SD Card” on Mac and Windows.
Mac Disk Utility Waiting For Partitions To Activate
Mac Disk Utility Sd Card Waiting For Partitions To Activate Sd Card
Mac Waiting for partitions to activate for disk utility. 5 months ago Mac Waiting for partitions to activate for disk utility. Put a new hard drive into my mac and im booting with a usb, boot is fine but its not letting me erase the drive to GUID without 'waiting for partitions to activate'. Mac Waiting for partitions to activate for disk utility put a new hard drive into my mac and im booting with a usb, boot is fine but its not letting me erase the drive to GUID without 'waiting for partitions to activate'.
Note: With deeper investigation, this format error was found to be more prevalent in SanDisk SD cards. Even SanDisk users can make perfect use of this article to fix the error.

Why Can’t I Format My SD card?
“Why can’t I format my SD card on my computer, camera, or phone?”
When you experience this specific error you won’t be able to format your SD card not only on your computer but also on any other device. It is because.
Memory card is write protected
Memory card is severely damaged
For example, if you clone SD card with multiple partitions, the disk layout on the target disk will be the same as the SD card. Align partitions to 1MB: this feature is checked by default. If you choose an SSD or advanced format disk on your PC as the target disk, check the option for better performance. Nov 11, 2007 MacRumors attracts a broad audience of both consumers and professionals interested in the latest technologies and products. We also boast an active community focused on purchasing decisions and technical aspects of the iPhone, iPod, iPad, and Mac platforms. While these cards may come formatted in a Windows-specific or universal format for Macs and PCs, you can reformat to “Mac OS X Extended” (HFS+) in Disk Utility, and use them just like any.
If your SD card is write-protected, you cannot make any changes to your SD card. That includes formatting the SD card. However, you can disable write protection and fix the error
But, if the error is because your SD card is severely damaged your first priority must be recovering data from the SD card. When your SD is severely damaged, it will reach to an extent where it can’t even mount a file system. When you format an SD card it means mounting a new file system that tracks the storage on your SD card. So damage or corruption is the reason why your SD card is not formatting.
When your SD card is experiencing such an error, you cannot even access the drive and restore the data from it.
“Considering the fact that SD cards are majorly used on cameras, and they store the most important memories, not just the data. This is all the more reason why recover the files from corrupted SD cards becomes a priority before fixing it.”
Now to the actual question, what is the best possible way to recover data from an SD card that is not supported to format. Remo data recovery software, the best software to recover photos from SD cards, with more than 10 million downloads can be the key. More than data recovery Remo has an impressive and unique feature that will enable users to create an identical image of any severely damaged storage drive. By creating an identical image, you are creating an exact copy of all the files existing on your severely damaged SD card.
Why Should I Create an Image of My SD card?
With the help of Remo, you can also directly recover data from a damaged SD without creating an image. But considering the factors (bad sectors, virus infections) and the severity of the damage, creating an image of SD will yield exceptional results.
This means no matter how severely your SD card is damaged, you can still recover the data from it. You can find a detailed explanation of how to create an exact image of the SD card which is unable to format.
How to Create an Image of an SD card that Won’t Format?
Download and install Remo data recovery Software. Launch the application and follow the steps that are mentioned below.
From the home screen, select the recover partition option where you can see your SD card listed with other drives that are existing on your computer.
Select the SD card and from the top right corner click on options (one with 3 horizontal lines) and select the save image option. This will prompt a save as a window, select the desired location, file name, and click on save to create an exact image of your SD card.
Since you are creating an image of an entire SD card, make sure the location you are saving your image has enough storage space.
After creating the image file, you can extract files, photos, or videos that are existing on your SD card from that image file. This is the most convenient method to recover the data from severely damaged SD card.
How to Fix “Micro SD Card Cannot format” Error?
As previously mentioned, two main reasons for this error are write-protected SD card and Severely damaged SD card. The following are instructions on how to fix this error.
Unlock the Micro SD card
Micro SD card is locked is one of the terminology used for a write-protected SD Card. As discussed earlier, when a micro SD card is locked or write-protected you cannot make any changes since it works in read-only mode. You can disable the write protection on the SD card to fix the error.
An SD card can be severely damaged due to

High-level bad sectors (Here you can know more about uncorrectable sectors)
Severe virus infection
The best method to fix an SD card that won’t format is by force formatting the SD card using CMD.
How to Force Format an SD Card?
Open Command Prompt by right-clicking Start >Command Prompt (Admin)or search cmd from Start
Type: diskpart to bring up DiskPart utility
Type: list disk and hit Enter
Type: select disk 1 and hit Enter (Replace 1 with the drive number of your SD card)
Type: clean and hit Enter
Type: create partition primary and hit Enter
Type: select disk 1 and hit Enter (Replace 1 with the drive number of SD card)
Type: active to make the SD card partition activate
Type: format fs = NTFS or format fs = fat32 and hit Enter
Type: assign letter = F
After this, type exit to finish the process
Mac Disk Utility Waiting For Partitions To Activate
After force formatting the SD you need to fix the Bad sectors using the CHKDSK on SD card.
CHKDSK format SD card
CHKDSK is one of the most prominent utilities on windows that will help you fix all the bad sectors that exist on your SD card. The following are the instructions on how to do it.
Right-click on Start to select Command Prompt (Admin) or click Start and type: cmd > click exe to bring up Command Prompt
Sign in as an administrator and type: chkdsk E: /f /r and hit Enter; (Replace E: with the drive letter of your SanDisk SD card)
Wait for the process to complete (Process time might vary based on the size of SD card)
Exit CMD and enter Disk Management tool, find SD card, right-click on it, and select Format volume
Reset file system and drive letter of the SD card, click OK to confirm the format action
Both the aforementioned methods can be used on all brands of SD card such as SanDisk, Sony, Kingston, Transcend, etc. It also works on all formats of SD cards such as Micro SD, SD, SDHC, SDXC.
How to Fix if SD card Won’t Format on Camera
Generally, when you insert an SD card into a camera sometimes it will prompt to format the SD card. This will fix any errors in incompatible file system errors. However, in this particular case, even that won’t fix the error.
Even to fix the error that the SD card will not format on camera you need to use the methods mentioned above. Make sure you use the perfectly working SD card adapter or card reader while connecting it to a computer or laptop.

How to Fix if SD Card Can’t Format on Mac or Android
You can use the same methods mentioned above to fix SD card not readable or format error on Android. However, in the case of Mac, there is no specific fix other than unlocking the SD card or disabling the write protection on Mac. Nevertheless, the most crucial aspect to remember is to recover the data from the SD before fixing it. Remo Recover is also available on Mac. Hence, you can even download Remo on your Mac and successfully recover the data from it.
Finally, if you are unable to fix the error, it means that your SD card is unfixable. If your SD card is still under warranty time, better contact the brand, and claim to exchange the memory card. But, don’t forget to recover your most precious data from the SD card before exchanging it.
Mac Disk Utility Sd Card Waiting For Partitions To Activate Sd Card
P.S most SD card brands won’t recover data for you.
1 note
·
View note
Text
hard drive recovery dubai
hard drive recovery dubai,
In today’s digital age, data is one of the most valuable assets for both individuals and businesses. Hard drives, as primary storage devices, are responsible for holding vast amounts of critical information. However, these devices are not immune to failure, and data loss can occur due to various factors such as hardware malfunctions, human errors, or software issues. When this happens, hard drive recovery services become essential in retrieving valuable data.
Why Hard Drive Recovery is Crucial
Whether it's important work documents, cherished memories in the form of photos, or business data that cannot be replaced, losing data can be catastrophic. Hard drives can fail for numerous reasons, including:
Mechanical failure: This occurs when the internal components of the hard drive, like the motor or the read/write head, fail.
Electrical failure: A power surge, or a malfunctioning power supply unit can cause severe damage to the drive's circuits.
Logical errors: Accidental deletion, file corruption, or formatting issues that result in data being inaccessible.
Physical damage: Accidents like dropping the hard drive or exposure to extreme temperatures or liquids can cause irreversible damage.
Hard Drive Recovery in Dubai
Dubai is a hub for technological advancements, and as data loss incidents continue to rise, hard drive recovery services have become more critical than ever. Fortunately, there are many specialized data recovery centers in the city that offer state-of-the-art solutions to retrieve lost data from hard drives, SSDs, and other storage devices.
Services Offered by Hard Drive Recovery Experts in Dubai
Professional data recovery services in Dubai cater to a wide range of needs, including:
Data Recovery from Damaged Hard Drives Whether the damage is physical or logical, experienced technicians can diagnose the issue and perform the necessary steps to recover data.
Recovery from Failed RAID Arrays Businesses that rely on RAID systems for their servers or NAS devices can face data loss if an array fails. Recovery experts can restore RAID configurations and recover data from damaged arrays.
Solid-State Drive (SSD) Recovery Unlike traditional hard drives, SSDs have no moving parts, making them more durable. However, they are still prone to failure. Data recovery specialists use advanced tools to retrieve data from damaged SSDs.
Recovery from External Drives and USB Flash Drives Data loss is not limited to internal hard drives. External drives, USB flash drives, and memory cards can also become corrupted. Professionals can recover files from these devices as well.
Data Backup and Prevention To minimize the risk of data loss in the future, many data recovery companies offer backup solutions and advice on how to set up proper data redundancy systems.
Why Choose Professional Hard Drive Recovery Services in Dubai?
While there are DIY solutions available online, they can often lead to further damage or permanent data loss if not handled correctly. It’s crucial to rely on professional hard drive recovery services for several reasons:
Expertise and Tools: Recovery experts are equipped with the knowledge and technology to handle all types of storage devices, ensuring a higher success rate.
Clean Room Environment: Physical damage can often require disassembling the hard drive in a clean room environment, which protects the delicate components from dust and static damage.
Data Security: Professional recovery companies prioritize data security, ensuring your information remains confidential and protected during the recovery process.
Recovery Success: Specialists can often recover data that may seem beyond reach, using proprietary software and techniques.
Choosing the Right Hard Drive Recovery Service in Dubai
When selecting a hard drive recovery service in Dubai, consider the following factors:
Reputation: Look for companies with a proven track record of successful data recovery.
Certification: Check if the service provider is certified by recognized industry bodies for data recovery.
Turnaround Time: Depending on the urgency of your case, you may need a service that offers fast recovery.
Cost: While data recovery can be an expensive service, compare costs and make sure you are getting value for your money.
Conclusion
Hard drive failure can be a stressful and costly experience, especially when it leads to data loss. However, professional data recovery services in Dubai can offer peace of mind and provide the expertise necessary to retrieve lost information. Whether you’re dealing with a personal hard drive or an enterprise storage system, don’t risk further damage—reach out to a trusted recovery service to ensure your valuable data is safely restored.
4o mini
0 notes
Text
Recovering Files From SSD Drives
There is a lot of controversial information circulating regarding the recovery of SSD drives. The purpose of this article is an attempt to clarify what, when and how can be recovered in the very specific case of SSD drives.
Why SSD Drives Are Different
There is no slightest doubt that solid-state (SSD) drives are very different compared to traditional hard disk drives (HDD). The obvious part, of course, is the use of flash chips to keep information instead of rotating plates and moving heads as in traditional disks. But that's not what makes them so alien to modern data recovery tools.
Your familiar USB flash drives and memory cards such as those used in smartphones, digital cameras, MP3 players and e-book readers are also using flash chips to keep information - but recovering deleted files from memory cards and USB drives is no different from recovering files from hard drives. So what sets SSD's apart is not the underlying technology but something that runs on top of it.
SSD Data Recovery - The reason why SSD drives are so unpredictable when it comes to data recovery are their background garbage collection and write leveling mechanisms combined with the existence (and operation) of the TRIM command. Not going into much technical detail (hundreds of publications are available on those mechanisms), SSD's continuously clean up space marked as "available" via the TRIM command which is issued by the operating system every time you, the operating system or an application deletes a file or formats the disk. Space marked as available will be sooner or later physically cleaned by the garbage collection mechanism that runs in background. You can never predict when exactly space occupied by a particular deleted file will be cleaned up. And the worst part is you really cannot stop this to happen. Even if you remove the disk and place it into another computer, and even if you use a sophisticated "write blocker" device, garbage collection will still commence no matter what the moment you power up the drive.

The Hope
As you see, the culprit here is the TRIM command being issued at the time you delete a file. However, the TRIM command will not be issued if at least one of the following is true.
1. The operating system does not support TRIM. Windows Vista, XP and older don't! Only Windows 7 and up support and issue the TRIM command. So if your disk was used with Windows XP, Vista or older system, you can forget about TRIM and just recover your files as if your SSD was a hard disk.
2. The file system is not NTFS. At this time, TRIM is only supported on NTFS drives. This is a limitation of the Windows operating system, but you can use it to your benefit. If the disk is formatted with FAT, you can safely recover deleted files.
3. The disk was not connected directly via SATA. TRIM is an ATA command, meaning that if your disk was connected to your PC via a USB cord, or if it was used in a network attached storage (NAS) device, or if it was part of a RAID array, the TRIM command will not be issued.
4. TRIM was disabled in Windows settings. Yes, you can disable TRIM. This will significantly shorten the lifespan of your SSD drive, and bring you very sluggish write speeds very soon, but sometimes you may have good reasons to disable TRIM.
Tools to Recover Files from SSD Drives
In order to recover files from SSD drives, you use the same file ssd drive recovery(RS File Recovery) or data recovery (RS Partition Recovery, RS NTFS Recovery or RS FAT Recovery) tools as you do with hard drives. The only thing that is different: there is much less of a success guarantee.
1 note
·
View note
Text
Comprehensive Guide to Data Sanitization Methods for Different Storage Devices
Understanding Data Sanitization
Data sanitization involves the removal of sensitive information from storage devices, such as hard drives, solid-state drives (SSDs), USB drives, and memory cards, to prevent unauthorized access or misuse. This process overcomes simple deletion or formatting, as it aims to make the data completely unrecoverable, even through advanced forensic techniques.
Importance of Data Sanitization
Data sanitization is essential for several reasons:
Protection of Confidential Information: By securely erasing data, organizations can prevent sensitive information from falling into the wrong hands, thereby safeguarding their reputation and avoiding legal repercussions.
Compliance Requirements: Many industries, such as healthcare and finance, are subject to strict regulatory standards regarding data protection. Proper data sanitization helps organizations comply with these regulations and avoid hefty fines.
Prevention of Data Breaches: Failure to adequately sanitize storage devices can lead to data breaches, which can have severe consequences, including financial losses and damage to brand reputation.
Data Sanitization Methods
1. Physical Destruction
Physical destruction involves rendering the storage device unusable through methods such as shredding, crushing, or incineration. This ensures that the data stored on the device is completely irrecoverable.
2. Overwriting
Overwriting, also known as data wiping, involves replacing existing data with random patterns of binary code multiple times. This process effectively removes traces of the original data, making it virtually impossible to recover.
3. Degaussing
Degaussing is a method used specifically for magnetic storage devices, such as hard drives and magnetic tapes. It involves exposing the device to a strong magnetic field to disrupt the magnetic domains, effectively erasing the data stored on the device.
4. Cryptographic Erasure
Cryptographic erasure involves encrypting the data stored on the device and then securely deleting the encryption key. The data becomes unreadable and inaccessible without the key, providing a secure data sanitization method.
5. Secure Erase
Secure erase is a feature available on some storage devices, such as SSDs, that allows for the secure deletion of data by resetting the memory cells to their default state. This method ensures that the data cannot be recovered using conventional means.
Choosing the Right Method
When selecting a data sanitization method, it's essential to consider factors such as the type of storage device, the level of security required, and regulatory compliance requirements. Additionally, organizations should follow best practices and guidelines provided by industry experts to ensure effective data sanitization.
3R Technology
8002 S 208th St E105, Kent, WA 98032, United States
(206) 582-7100
#e-waste recycling#datadestruction#data sanitization#data destruction#electronicrecycling#secure data destruction#e-waste
0 notes
Text
Windows 10 Uefi Iso

Windows 10 Uefi Iso File Download
Windows 10 Uefi Iso Usb
PAGE CONTENT:
What Can You Do with a UEFI Bootable Disk
How to Create a UEFI Bootable USB Drive in 3 Ways
How to Boot Windows 10 Computer from UEFI Bootable USB Drive
Bonus Tip: How to Repair Hard Drive and Recover Data with a WinPE Bootable Disk
The windows 10 ISO supports booting both UEFI and Legacy Mode. Mount the ISO and Copy the contents of the ISO to your DVD Burner (a USB Stick is the preferred method of choice) Then use the F12 BootMenu to select the UEFI DVD Device as the Bootable device. After creating the UEFI boot USB drive of Windows 10 from ISO using CMD utility, you can insert the USB to the computer that you need to install operating system and boot from the USB drive to launch the 'Windows Setup' wizard and continue with the installation process.
What Can You Do with a UEFI Bootable Disk
A UEFI bootable USB drive can be used to complete an in-place Windows upgrade or clean install of Windows 10. It's also needed to start the system when your computer cannot be booted due to a virus attack, MBR damage, bad sectors, corrupted system files, etc. Once you can start your computer from the USB bootable drive, you can perform a disk check and repair. These are the two most important reasons to use a bootable USB disk. Other purposes include backing up systems, using portal operating systems on a foreign computer, and protecting computer data security.
But how to create a Windows 10 UEFI bootable USB drive?
We all know that there are two boot modes for computers: BIOS VS UEFI. If you have a computer with a Unified Extensible Firmware Interface (UEFI), instead of the legacy Basic Input/Output System (BIOS), you should know how to create a UEFI bootable USB drive on Windows 10.
There are several different ways to make a bootable disk in UEFI mode. Let's learn together.
How to Create a UEFI Bootable USB Drive in 3 Ways
In this part, we will introduce three common ways to create a bootable USB drive by using Windows 10 Midea Creation tool, Diskpart, and third-party software - Refus.
1. Create a UEFI Bootable USB with Windows 10 Media Creation Tool
If you want to create a UEFI bootable USB media for an in-place upgrade or clean install of Windows 10, you can use the Microsoft Media Creation Tool.
To create a Windows 10 UEFI bootable USB, prepare a USB flash drive with at least 8GB of capacity. Then use these steps:
Step 1. Download Windows 10 installation media from the official website of Microsoft.
Step 2. Run the exe file of MediaCreationTool. Click 'Accept' to agree to the license terms.
Step 3. On the Windows 10 Setup screen, select 'Create installation media (USB flash drive, DVD, or ISO file) for another PC'. Click the 'Next' button.
Step 4. Click 'Next' on the language, edition, and architecture screen. Select the 'USB flash drive' option, and click 'Next'.
Step 5. Select your connected USB flash drive from the list. And click 'Next > Finish' to complete the process. Wait for the Media Creation Tool to download the files and create a bootable USB flash drive that you can use to install Windows 10 on devices with support for UEFI and BIOS.
2. Create a UEFI Bootable USB on Windows 10 with Diskpart
With the built-in Diskpart utility, you can also create a Windows 10 UEFI bootable USB drive. Note that this solution requires command-line operations, so if you're not confident, you’d better choose a simpler graphical solution.
The process of making a USB bootable drive will erase all data on it. Remember to back up important files and data in advance.
Step 1. Connect your USB flash drive to the computer.
Step 2. Type CMD in the Search box, and right-click on the Command Prompt, and select Run as Administrator.
Step 3. In Command Prompt, type Diskpart and press Enter.
Step 4. Type the following commands in order, and press Enter after each one.
list disk select disk # clean create partition primary select partition 1 active format fs=fat32 (it means you format the drive with fat32 file system) assign exit
Step 5. Copy the Windows installation files to the USB flash drive. You can do this by simply using copy-and-paste. Then, the process of creating a bootable UEFI flash drive with Windows 10 finishes.
3. Create UEFI Bootable USB Drive with Rufus
If you have difficulty in creating Windows 10 UEFI bootable USB with Diskpart, you can use Rufus, an open-source program that allows you to create a UEFI bootable disk on Windows 10/8/7.
Step 1. Download Rufus from the official website: https://rufus.ie/en/.
Step 2. Connect your USB flash drive to the computer.
Step 3. Run this program and make the following main settings:
Device: Select your USB flash drive.
Boot selection: Select DISK or ISO image. And click the SELECT button to choose the Windows 10 ISO file from the folder location.
Partition scheme: Select GPT for UEFI.
Target system: Select UEFI (non CSM).
File system: Select NTFS.
On other options and settings, choose based on the actual situation. Then, click the START button to let Rufus create a UEFI USB flash drive.
How to Boot Windows 10 Computer from UEFI Bootable USB Drive
You can create a UEFI bootable USB drive on Windows 10 by taking any of the methods above. After successfully creating the boot disk, you also need to know how to boot your computer from the bootable USB.
Follow the steps below to start your computer from Windows 10 UEFI bootable USB drive.
Step 1. Connect the UEFI bootable USB disk to a dead, unbootable, inaccessible Windows computer.
Step 2. Restart your computer, hold F2/F11/Del to enter BIOS.
Step 3. Go to the Boot Drive section and set the UEFI bootable USB as the boot drive.
Step 4. Save the changes and exit BIOS. Wait for your computer to boot up from the UEFI bootable USB disk.
Bonus Tip: How to Repair Hard Drive and Recover Data with a WinPE Bootable Disk
When your computer cannot start, besides using the BIOS or UEFI USB bootable drive, is there another way to access the computer to fix errors and manage hard drives? Yes, you can resort to a disk management WinPE bootable disk by using partitioning software - EaseUS Partition Master.
With simple clicks, you can create an EaseUS Partition Master WinPE bootable disk and run it on your computer without system boot partitions. Then, you can repair and manage your hard drives with advanced solutions, or restore data by cloning the hard drive.
EaseUS Partition Master
Resize, merge, delete, create, and format partitions
Repair corrupted MBR that causes the hard drive to fail to boot
Clone hard drives to rescue data
Steps for creating a WinPE bootable USB drive with EaseUS partitioning software.
Step 1. To create a bootable disk of EaseUS Partition Master, you should prepare a storage media, like a USB drive, flash drive or a CD/DVD disc. Then, correctly connect the drive to your computer.

Windows 10 Uefi Iso File Download
Step 2. Launch EaseUS Partition Master, find the 'WinPE Creator' feature on the top. Click on it.
Step 3. You can choose the USB or CD/DVD when the drive is available. However, if you do not have a storage device at hand, you can also save the ISO file to a local drive, and later burn it to a storage media. Once made the option, click the 'Proceed' button to begin.
When the process finishes, you have successfully created an EaseUS Partition Master WinPE bootable disk. Now, you can manage your hard disks and partitions through the bootable drive whenever the computer fails to boot normally.
If you have RAID drives, load the RAID driver first by clicking Add Driver from the menu bar, which can help you add the driver of your device under WinPE environment, as some specific device cannot be recognized under WinPE environment without drivers installed, such as RAID or some specific hard disk.
Once the Easeus Partition Master bootable disk has been created, you can access your computer and the disk from this USB bootable drive for subsequent disk repair and data recovery operations.

Windows 10 Uefi Iso Usb
Wrapping Up
How to create a UEFI bootable USB on Windows 10? If you are still struggling with this question, you can find the answer here. You can create a UEFI bootable disk in four ways by using Windows 10 installation media, Diskpart, and Refus.
If you need to boot your computer from a USB bootable disk and manage or repair your disk in a WinPE environment, we strongly recommend you use EaseUS Partition Master, which enables you to clone failing hard drive to a new HDD/SSD.
1 note
·
View note
Text
Wd My Passport Ultra Software Download Mac

I have eventually got my personal mac, the problem is I have a WD My Passport portable HD, with all my art, photos, and data I had done with the PC. I wish to copy files from my mac to the drive, it wont allow me. But when I open and copy files from the drive to the mac it works. How do I fix this without formatting the drive?
Summary: Have you received the error: 'The disk you inserted was not readable by this computer' on Mac? Don't worry, this article will focus on how to fix WD My Passport is corrupted or unreadable on Mac. To avoid the loss of important data, you'd better recover lost data from the unreadable WD My Passport with iBoysoft Data Recovery for Mac.
WD My Passport external hard drive is able to work on Mac and Windows for data transferring or backup. It is popular for its auto backup and passport protection features, keeping your files and folders safe. However, there are times that the WD My Passport becomes unreadable or corrupted on Mac. You may be greeted with errors like 'The disk you inserted was not readable by this computer', which prevents you from accessing all data stored on the drive.
Dec 04, 2018 Another difference is My Passport Ultra is USB-C ready, USB 3.0 compatible and formatted for Windows 10 to with plug-and-play storage out of the box. It also includes with NTFS driver for macOS so you can work on macOS operating system without reformatting. While you have to reformat My Passport into compatible file format in order to use it on.
My Passport; My Cloud Home; My Cloud; My Book; Internal Drives / SSDs; WD Elements / WD easystore; Embedded & Removable Flash; WD ReadyView; Legacy & Other Products; Downloads WD Software; Product Firmware; Product Downloads; Warranty & Returns Warranty Services; Warranty Policy; Data Recovery; Shipping Addresses.
List of all WD firmware and software available for download.
It's so frustrating when you meet this issue. If you are struggling to solve this issue, you will find a collection of verified troubleshooting steps.
Table of contents
1. Causes of WD My Passport not readable on Mac error
2. How to fix 'WD My Passport unreadable' on Mac error?
3. Conclusion
Note: If you received the disk not readable error with three options: Initialize, Ignore and Eject, please don't select 'Initialize'. Initializing the drive will erase all of the data that is currently sitting on the drive, which makes it difficult to recover lost data.
Causes of WD My Passport not readable on Mac error
Let's at first take a look at the complaint from community.wd.com:
'My WD My Passport 2TB Portable External Hard Drive has suddenly become unreadable on my laptop (MacBook Pro Server with macOS 10.12 Sierra) and I have tried on a MacBook Pro 2011 running 10.13 High Sierra with the same results. Any suggestions to fix my unreadable WD drive?'
The good news is, even though you have been prompted with an error message, at least your WD My Passport drive is recognized. There are many reasons that can lead to a drive not being readable, but essentially this is because the internal file system is damaged. Some of the possible reasons for this error are described as follow:
Mac malfunctions
Outdated drivers
Faulty connections
Write-protected drive
The WD My Passport is not formatted
An internal file system error or bad sectors
Virus/malware infection to your WD My Passport
Incompatibility issue between your WD My Passport and Mac machine
Accidental interruption or removal of your WD My Passport during transferring data
How to fix 'WD My Passport unreadable' on Mac error?
In most cases, the issue can be repaired with a simple initialize. But this operation will remove all data stored on this drive. Are there any other ways to fix WD My Passport unreadable issue on Mac? Of course, just try these solutions one by one:
Solution 1: Re-insert the WD My Passport
The first and foremost thing is to remove the WD My Passport safely from Mac and then re-plug it into the USB port properly. If the external hard drive mounts and appears on the left sidebar of Finder, then you can access the drive. However, if the WD drive still won't mount or the error persists, continue with the next method below.
Solution 2: Check the Mac computer
The next step is to check whether your Mac machine has a problem or not. Just connect a different storage device to your Mac. If this error still pops up, the problem may refer to your Mac machine, you can restart your Mac to see if everything works well. Otherwise, if you can see the other drive in Finder, the problem is associated with the previous WD My Passport.
Solution 3: Check if the WD My Passport is encrypted
The WD My Passport for Mac corrupted or readable issue can also happen if the drive is encrypted by BitLocker. By default, the Mac computers cannot recognize a BitLocker encrypted drive, which means you are unable to read or write BitLocker encrypted drive on Mac.
You can insert the drive in a PC and then turn off the BitLocker encryption so that it can be read on Mac. In addition, you can access a BitLocker encrypted drive with the help of a third party tool.
Solution 4: Update Mac drivers
Drivers enable one or more hardware devices to communicate with the computer's operating system. If drivers are out-of-date, a variety of issues will happen such as the disk not readable error. Apple handles all system and driver updates for your system. To check if any updates are available, please do the following:
Step 1: Go to Apple menu and select 'App Store'.
Step 2: Click on the 'Updates' button located on the top pane.
Step 3: Check available updates for your system and applications.
Solution 5: Repair the WD My Passport in Disk utility
Disk Utility is a built-in used to erase, format or manage internal disks and external storage devices. The most important feature of Disk Utility is First Aid, which helps detect and repair any issue with your disk. Here is how to run First Aid on your Mac to repair the unreadable WD My Passport:
Step 1: Open Disk Utility from your /Applications/Utilities folder.
Step 2: Select the unreadable WD My Passport in the left side bar.
Step 3: Select the 'First Aid' tab.
If Disk Utility tells you the disk is about to fail, back up your data and replace the disk. You can't repair the disk. Otherwise, continue to step 4.
Step 4: Click Run.
If Disk Utility reports that the disk appears to be OK or has been repaired, you're done. Otherwise, you have to back up as much of your data as possible.
Solution 6: Recover lost data and erase the WD My Passport
If the error still exists, you have no choice but erase the WD My Passport. But keep in mind that you will lose all data store on this disk. If you didn't back up important data, you should get lost data back with free Online data recovery software at first.
Step 1: Recover lost data from the unreadable WD My Password on Mac
If you are not sure which data recovery tool you can trust, iBoysoft Data Recovery for Mac is highly recommended to recover lost data from the unreadable or corrupted WD My Passport. This free Mac data recovery can scan and recover lost data from unreadable SD cards, internal Macintosh hard drives, external hard drives, USB flash drives, etc. iBoysoft Data Recovery for Mac provides a complete Mac data recovery solution even if your Mac won't boot/turn on, your device is failing, inaccessible or has lost a partition.
Moreover, iBoysoft Data Recovery for Mac can also recover recently or permanently deleted files, recover lost data from formatted hard drives, recover lost data from unmountable hard drives, and recover lost data from inaccessible drives, etc. This software supports recovering documents, photos, videos, emails, and music files. It's fully compatible with macOS Big Sur 11/Catalina 10.15/Mojave 10.14/High Sierra 10.13/Sierra 10.12 and Mac OS X 10.11/10.10/10.9/10.8/10.7.
1. Download and install iBoysoft Data Recovery for Mac on Mac.
2. Launch iBoysoft Data Recovery for Mac.
3. Select the unreadable WD My Passport and click 'Next' to search for lost files.
4. Preview the searching results, choose those you want and click 'Recover' to get them back.
5. Go over to ensure all lost files have been successfully restored.
Step 2: Erase the unreadable WD My Password in Disk Utility
After you get files off the WD My passport hard drive, you are safe to erase this external hard drive to make it work again. Reformatting will fix the unreadable error and the drive can be ready to use. Then you can copy the recovered data back.
• How to format external hard drive on Mac?
Solution 7: Ask data recovery service for help
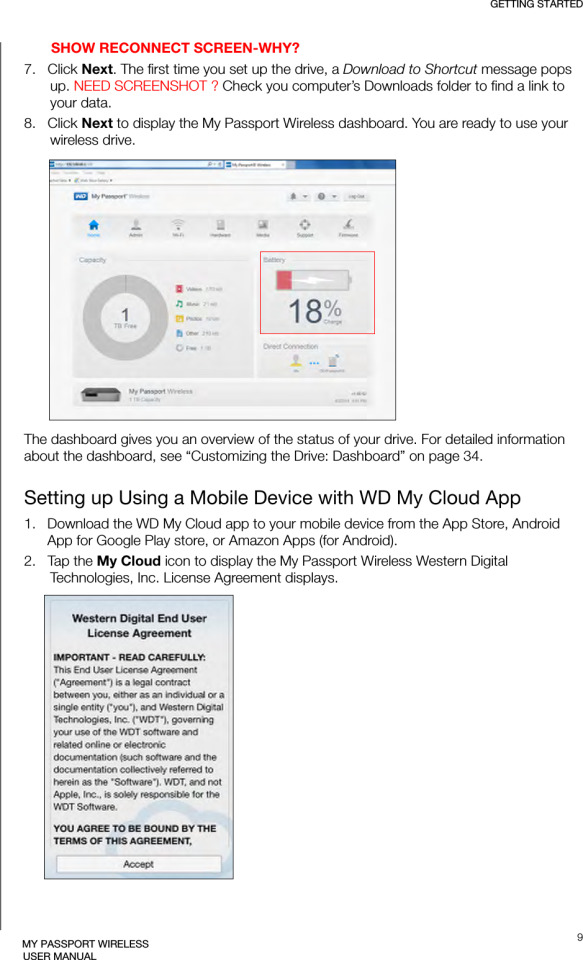
However, if the solutions above don't fix the WD My Passport unreadable issue for you, or your WD My Passport even won't show up on Mac, it's probably the drive has been physically damaged. In that case, you should send it to a local data recovery service or replace it with a new one.
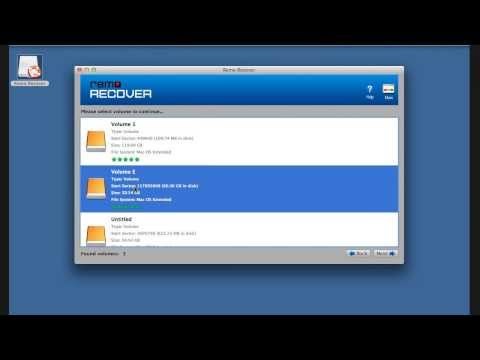
Wd My Passport Ultra Software
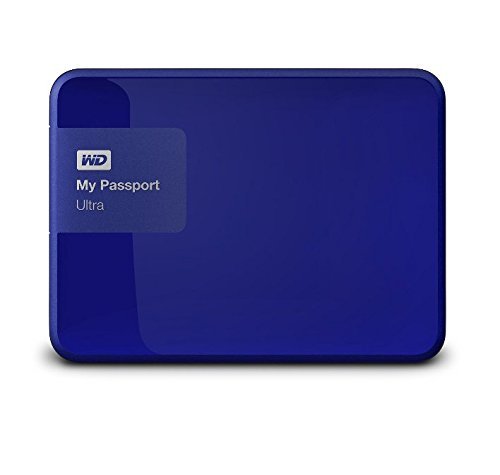
Wd My Passport Ultra Software Download Mac Version
Conclusion
Wd Passport Ultra Software Download
Hope these solutions have helped you fix the WD My Passport corrupted or unreadable issue. If you have any question about this article, stay in touch with us for further assistance. Specifically, we'd love to hear if you have other solutions for this issue.
1 note
·
View note
Text
Data Transfer For Mac

Mac Transfer To New Mac
Samsung Data Transfer For Mac
Mac To Mac Transfer Cable
Data Transfer For Mac
All-in-one Mac Phone to Phone Data Transfer
Data Transfer For Mac. One Click Phone to Phone Transfer on Mac. Full contents transfer contacts, messages, music, photos, videos, apps and more. Data backup and retrieve in lossless quality at any time. Recover iTunes/iCloud backup to iOS or Android devices. Sync iTunes Library and iTunes Music to device. Fully compatible with latest Android.
Android Transfer - TunesGo stands out from the flood of so-called Android File Transfer software, which claims to be perfect with your Mac. However, most are apt to lead to some troubles like 'not working on Mac', 'no Android Device found' or others.If you intend to transfer data between Android and Mac or Androids, here is an alternative to Android File Transfer.
WhatsApp Transfer. You can transfer WhatsApp data from old phone to another with simple clicks on MobileTrans for Mac. By using this tool, you can back up your chat history to your Mac safely, and restore the WhatsApp Backup to your mobile devices according your needs.
Now insert the drive into your Mac and drag the data onto your Mac’s hard drive using Finder. Note: For data transfer purposes, make sure your USB drive is formatted using Windows FAT32 filesystem. This will make the drive compatible to both the operating systems. Also, once you have copied all items to your Mac, do format it with Mac’s.
Switching to a new Phone but concerning about data loss? Have question about how to sync or transfer files easily from your Android phones to your PC or Mac computers? Do not worry, with Mac Syncios Data Transfer, the data that you cannot afford to lose will land to your new phone safe and sound. Just one click for all mac users.
Transfer almost all files, including contacts, video, SMS, photos, call logs, WhatsApp, music, Ebook, Calendars and apps between phone to phone!
Selectively transfer data between Android or iOS devices.
The data transfer cable supports a wide range of operating systems, working with Windows and Mac. The USB 3.0 transfer cable lets you transfer files between two computers including Windows to Windows, Windows to Mac, Mac to Windows, and even Mac to Mac. The data transfer cable is compatible with Windows Easy Transfer software for migrating to.

Directly Copy Content Between Different Platforms
ContactsMessagesVideoDCIMPhotosAudioCall logsAppsSafari HistoryBookmarksEbooksNotesWhatsAppVoicemailCalendarsAndroid to AndroidAndroid to iOSiOS to AndroidiOS to iOSiTunes/iCloud Backup to AndroidiTunes/iCloud Backup to iOS

Please Note: Syncios Data Transfer only supports to backup or transfer Apps on iOS 5 - 8 devices or Android devices, transfer apps between iOS and Android is currently not available. Resotre calendars from iCloud to devices is not supported.


Backup your Phone to Mac and Restore.
To avoid losing important data, it is very necessary to backup all important files to your Mac so that you can easily get them back whenever you lost them. With Syncios Data Transfer for Mac, you can choose all file types you need, including SMS, contacts and music, even make backup in just one click. You can recover these files easily whenever you need.
Backup all phone contents to computer in 1 Click, including contacts, sms, call logs, photos, videos, music, bookmarks, calendar and apps.
Mac Transfer To New Mac

Samsung Data Transfer For Mac
Easily back up data on you iPhone, Android or other mobile to Mac and then retrieve them at any time you would like to.
Mac To Mac Transfer Cable
View and access existing iTunes/iCloud backups of iPhone, iPad and iPod and retrieve data to device with ease.
Data Transfer For Mac
Extract iTunes Library for iDevice/Android Phone
Sync collected songs & playlists from your iTunes backup. Moreover, you can also transfer iTunes backup contacts, SMS, videos, photos to your other new Android or iOS device with ease!
It works perfectly with almost all Apple and Android devices: iPad, iPhone, iPod, Samsung, HTC, Sony, MOTOROLA, LG and more.
1 note
·
View note
Text
Blank SD Card or Has the Unsupported Filesystem
In daily life, the sudden Blank SD Card or Has the Unsupported Filesystem may make you be at a loss. In this article, you'll find free and effective methods to fix the "Blank SD card or Has the Unsupported Filesystem" error. And if they don't work, you can also download Bitwar Data Recovery here to recover data from the SD card, and then format the card to reuse.
Sometimes, the smartphones fail to read the SD Card and displays the following notification:
Blank SD Card or Has the Unsupported FilesystemThis device doesn't support this SD card. Tap to set up in a supported format.The "The SD card is Blank, and it keeps asking format" problem mostly happens to Android phone SD cards, Camera SD cards, memory cards or other USB drives, etc. The major causes are the SD card gets corrupted, unreadable, undetectable, damaged, or there exist some unknown/unwanted files or folders.
When it occurs, do you know how to fix? Sure, you know formatting would be the most direct method to fix blank SD card. But this will wipe out all the existing data and finally lead to serious data loss problem. Fortunately, full and safe solutions for the "SD card is blank or has some unsupported file system" error are offered here to help.
Solutions to fix Blank SD Card or Has the Unsupported Filesystem
Before you carry out any rescue, please make sure that the SD card itself is in sound condition and can be detected by your computer. Only in this way, there is a necessity and possibility to fix this Unsupported SD card.
Solution 1: Try rebooting the phone
Although the operating system requires you to format the blank SD card, DON'T format it at once, try rebooting the phone at first. Then check if the SD card is normal.
Solution 2: Repeatedly insert and pull out the SD card
Try inserting and taking out the blank SD card several times, by these attempts your phone may finally read the SD card.
Solution 3: Run Chkdsk to fix errors
Some users had fixed this error by using CHKDSK, and maybe this way is also helpful to you.
Step 1: Connect Unsupported SD card with PC via card reader and make sure it is detected by the machine.
Step 2: Run CMD as administrator, and input chkdsk n: /f(n is the drive letter of the blank SD card) to fix errors.
Step 3: Put the SD card back to the phone and check whether the card works fine after that.
Solution 4: Connect the SD Card to Any other Machine
It is probable that there may be some issue with the USB port or the card reader device, so try to connect the SD Card to some other device to check if it works or not. Alternatively, try connecting the card using another card reader.
Solution 5: Check hidden files on SD card
Sometimes SD card is carried with some "specialty files" that need to be deleted.
Step 1: Connect blank SD card with PC via card reader and make sure it is detected by the machine.
Step 2: Run control folders to bring out the File Explorer Options.
Step 3: Turn to the View tab.
Step 4: Check Show hidden files, folders, and drives and save the changes.
Step 5: Delete the "specialty files" in the blank SD card if there is any.
Solution 6: format the SD card
If all the solutions fail, unfortunately, you might need to format it finally.
Warning: Recover data from blank SD card before formatting!
How to recover data from the blank SD Card?
You cannot find anything original without the help of some professional SD card data recovery software. We recommend you Bitwar Data Recovery to recover your blank SD Card. It is a professional, powerful, reliable and easiest free SD card data recovery software which supports you recover data from all data loss problems, for example, restoring data from accidental deletion, recovering data from formatting hard drive or retrieving data from lost, missing, or raw hard drive partitions/volumes.
Guides to recover lost data from unsupported SD Card
Download and install Bitwar Data Recovery on your computer. Make sure the unsupported SD Card is connected to your computer and be recognized. Then follow the guides to recover data.

Format RAW Partition to FAT32
1. Open This PC/Computer > Find the RAW partition;
2. Right-click it by choosing Format > Select the file system FAT32 and rename it;
3. Click Start > OK.
After this, your SD card has been converted to fat32, then, you can reuse it again, such as save files to this new disk.
Let's try it now!
Please refer here for more about blank SD card data recovery.
#Recover Data From Blank SD Card#Blank SD Card or Has the Unsupported Filesystem#Fix Blank SD Card or Has the Unsupported Filesystem#SD card data recovery
1 note
·
View note