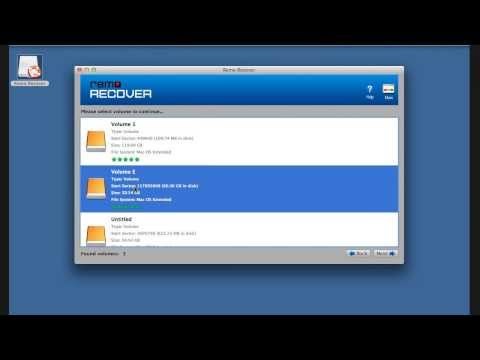
#Windows Was Unable To Complete The Format On USB
Explore tagged Tumblr posts
Visit Tumblr Blog
Explore Tumblr blogs with no restrictions, modern design and the best experience.
Last Seen Tumblr Blogs


Fun Fact
Tumblr Inc. has $15.1M in annual revenue.
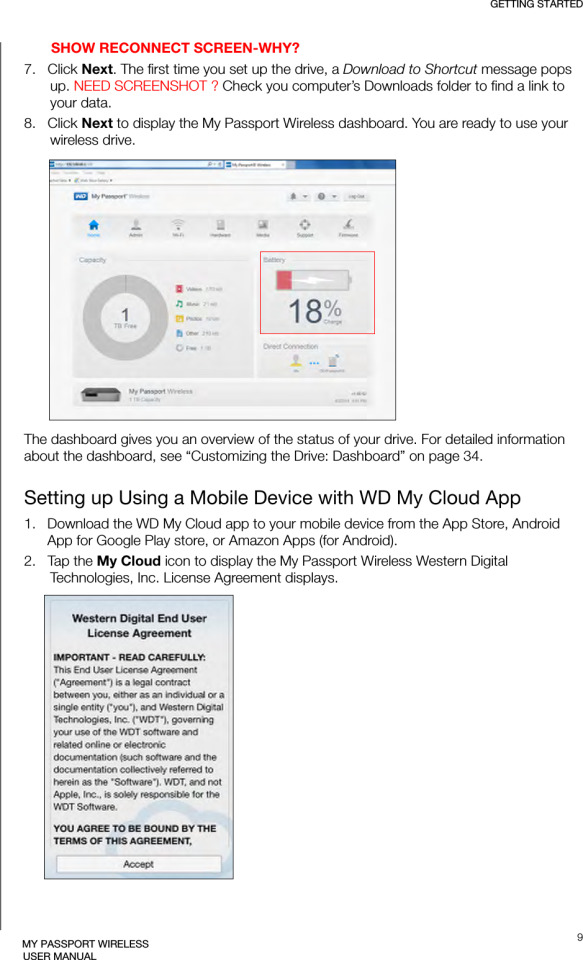
Video
youtube
How To Fix Windows Was Unable To Complete The Format Hard Drive/USB/SD Card [2024]
0 notes
Text
Fix Windows Was Unable To Complete The Format
If your USB drive cannot be formatted and is informed with a prompt “Window was unable to complete the format” error, it indicates that windows can’t format USB drive, and the USB flash drive is inaccessible. This post will give solutions to this issue.
USB drives are very portable, and they can be connected to a computer easily via USB drive to backup or transfer data, which have become an essential component in various digital products such as digital cameras, cell phones, MP3 players, etc. Since they are often carried by users and might be used on various computers, USB drives are more likely to get many problems.
For example, you plugged your USB drive into the port of a PC, right-click the disk icon and select “Format”, but it popped up an error saying “Windows was unable to complete the format”. So, does that mean your USB drive is broken? NO! This error may happen as a result of the following reasons:
The Main Cause that Windows can’t Format USB Drive
Cause 1: Virus infection If you plug USB drives into a public computer, you’ll take the risk of damaging the files and even the drive will stop working due to Virus attacks. Cause 2: USB device has bad sectors As we all know, storage devices consist of sectors; the Bad sector means the sector is damaged and can’t be read or written. Thus bad sectors can disrupt the formatting operation as well as file recovery. There are quite a few causes of bad sectors, like bad quality, excessive defragmentation, unplug USB drive directly while it is working, etc. Cause 3: USB drive suffers physical damage Physical damage is another reason that makes storage device inaccessible. The computer won’t be able to format the device if it can’t use the device. Cause 4: USB Disk is write-protected Windows can’t format a drive when it is in the write-protected state. As formatting is a kind of writing operation, so you need to remove the write-protection before formatting it.
How to fix “Windows couldn’t complete format” on the USB drive
If you are not capable of formatting your USB drive (USB flash drive, external hard drive, SD card, pen drive, etc.) in the usual process, then try to format that drive with the following methods. Please connect the USB drive to the computer and follow the guide below to fix the error: Note: if the USB drive gets badly physical damage, these solutions won’t help you.
Important: You should make sure that important data and files of the drive to be formatted have been backed up, as files will be erased once the drive is formatted. If the USB drive is inaccessible before you back up the data, then you need to perform file recovery first before formatting.
Steps of file recovery from a damaged USB drive will be talked in the next section of this post.
Fix Windows Couldn’t Complete Format on USB Drive
Solution 1: Format via Disk Management
Disk Management is provided by Windows, and it helps to manage partitions and disks for computers. Disk Management can create a new volume, extend or shrink partition, change drive letter, delete or format partition, etc. the error flash drives can be repaired with the Disk Management tool. Following the steps below, you can make a USB formatting procedure performed successfully. Step 1: Open Disk Management. Right-click on My Computer and select item “Manage”, and then click Disk Management on the left side. In the center section, you can see local hard drive and partitions and the USB drive, which can be recognized by capacity.

Step 2: Right-click the flash drive and select “Format” option and select the file system format to perform a quick format.

Step 3: Right-click on the USB drive and select “New Simple Volume” item. You’ll get the New Simple Volume Wizard which guides you to recreate new partition for the flash drive. Operations are following the onscreen instructions, setting options, and click the “Next” button. When the process is done, you’ll find the USB drive has been formatted and is properly recognized by the system.

Solution 2: Format with Command Prompt
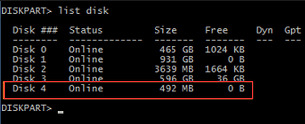
Disk Management is not almighty, and it is not helpful in many cases. Thus, we need to switch to a command-line based formatting solution. Step 1: For Windows 7 users click Start button and type cmd in the search both and press Enter. If UAC is enabled, you need to find Command Prompt from the Start menu and run it as administrator. Step 2: Type command diskpart on the black window and press Enter key. Then you can see the partition and disk list of the current computer. All drives are listed with numbers, and Disk 4 is the flash drive in question.
Step 3: Continue typing disk 4, which is the problem drive and clean and press Enter. The drive will be scanned, and its damaged file structure will be erased during scanning. Once the process is done, it reports a confirmation message telling that it has successfully cleaned the drive, and a new partition needs to be created. Step 4: Type create primary partition and hit Enter; next type in Command prompt format /FS: FAT32 J: (you can copy and paste it.) and press Enter. Here J is the drive letter of the USB drive, and you can change it in line with specific cases. The drive will be formatted to FAT file system, and the formatting is very fast.
The need to recover data promptly
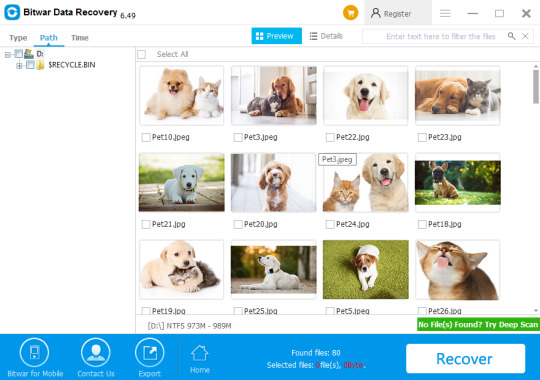
Since the USB drive cannot be accessed or formatted, you need to perform file recovery as soon as possible. Otherwise, it will be overwritten with new data. To recover lost data from the USB drive cannot be accessed or formatted, you should try Bitwar Data Recovery software. It is the best file recovery software since it is compatible with any devices such as digital cameras, hard drives, SD cards, Memory cards, phones, media players and portable drives. From these devices, you can recover audios, videos, pictures, archives, emails, and documents. Whether you deleted these files or lost them due to the virus, or due to the disk inaccessible, or formatting you can still have them back using this software. Moreover, this program lets you preview files that have been recovered. Now you can free download Bitwar Data Recovery here and install it on your computer. Then make sure that your USB drive is connected to this computer very well.

Fix It Now!
Please refer here for more about unable to complete the format.
#Windows Was Unable To Complete The Format#Windows Can't Format USB Drive Error#Recover Data From USB That Cannot Be Formatted#Windows Was Unable To Complete The Format On USB
1 note
·
View note
Text
Recover Data From Formatted Flash Drive
Can't boot into your laptop? It is possible that you are unable to access your laptop and the information stored therein due to the hard drive could be damaged or defective. What can you do to recover your data? This article will demonstrate how to recover the data from a laptop that will not turn on. Data Recovery Professional is an extremely powerful tool that allows you to recover data from non-bootable laptops and computers.
A lot of people have had questions like "laptop won't turn on because of faulty hard drive" on different platforms of technology. The hard drive could be damaged or defective when your laptop doesn't start. The hard drive might be logically corrupted, having bad sectors, or even drive corruption. This can lead to BSOD errors, or completely crash your system. If your hard drive is physically damaged, it may result in system failure, and eventually data loss. Whatever the reason you may have to lose your access information.
Here are some DIY methods that enable you to retrieve data from a damaged or non-bootable laptop or computer
Method 1: Use Backup
Even when your laptop isn't on, your data can be recovered if there is backup. It is possible to recover data regardless of whether or not you have an archived backup or use Windows built-in recovery and backup tools such as File History, Backup and Restore, and previous Versions. Data recovery is straightforward in the event of an existing backup.
However, if users have not yet backed up then follow the steps
Method 2: Use a Powerful Data Recovery Software
Data Recovery Software for Windows can be used to recover deleted or corrupted data from laptops and computers. This tool can aid in retrieving the data of a damaged laptop or computer. To create an bootable media drive you can utilize the utility "Create Recovery Drive'. This allows you to restore your data back to non-bootable devices. These steps can help to prevent your data from being disabled by Windows.
Connect to a USB drive with a laptop that's fresh or has been formatted. Download the Data Recovery software, install it, and then run it.
The screen with the title "Select What To Recover" will be displayed. Select the 'Waffle' icon and choose 'Create a Recovery Drive'.
Then, select the USB you've linked to the laptop, and Click Make the Recovery Drive > > OK.
The USB removable media device with your crashed or non-bootable laptop.
Switch on your laptop then press the F12 button to open the USB media that is connected to it.
Choose to boot your system using the bootable device.
When the laptop is booted from USB you'll see"Select What to Repair" screen "Select What to Repair" screen.
Choose the type of data and click "All">Next.
Select the drive/location from which you want to locate the information, and then click Scan.
The scanning process will start. The scan's results processes will display on the monitor when they have been completed.
To perform an enhanced scan simply click"Click Here" link above Deep Scan.
Choose the files you want to restore.
Click Recover once you are happy you are satisfied.
Select Browse to choose the location you would like to save your documents.
Important: To keep the information you've found, you must make use of an external storage drive.
Click "Start Saving" to save your information.
Method 3: Remove the hard drive from the laptop, and then connect it to another laptop
Windows people have submitted problems like "my laptop won't turn on" or "how can I recover my data from a laptop that won't start up?" You might be able to retrieve data in a short time when the drive is already functioning on a different laptop.
Be aware that unplugging the hard drive may make your warranty cancelled. Do not attempt this feat with a laptop that's not intended to be used for this task. Instead, you should contact an experienced data recovery service to assist you with recovering your data. This option is available when your laptop is worn out and not under warranty. When your drive ceases working, it's defective and needs to be fixed or replaced.
Method 4: Choose Hard Drive Recovery Services
If your laptop isn't starting It could be because the hard drive has been physically damaged. can assist you in recovering the data on your laptop. data recovery services allow you to access the drives and then open the drives in an environment that is clean and in the class of 100 to eliminate dust particles and improve the chances of recovering data. They can help you with connecting to a computer that's not operating and can ensure 100 percent data recovery.
Conclusion
The issue in your hard drive might cause the laptop to fail to start. Data can be recovered regardless of whether the laptop's hard drive has been damaged or defective, or even physically damaged. For retrieving your data, you can make use of your backup. You can utilize tools for data recovery to retrieve data on hard disks that aren't capable booting windows even if you do not have one. Data Recovery Services, an expert in hard drive recovery company, can help you get your data back even though the hard drive might become physically damaged or damaged.
4 notes
·
View notes
Text
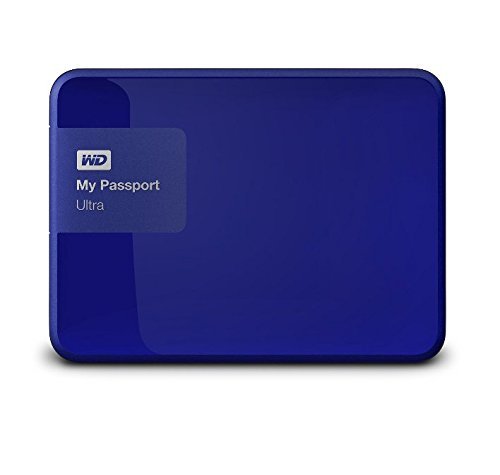
Wd My Passport Ultra Software Download Mac

I have eventually got my personal mac, the problem is I have a WD My Passport portable HD, with all my art, photos, and data I had done with the PC. I wish to copy files from my mac to the drive, it wont allow me. But when I open and copy files from the drive to the mac it works. How do I fix this without formatting the drive?
Summary: Have you received the error: 'The disk you inserted was not readable by this computer' on Mac? Don't worry, this article will focus on how to fix WD My Passport is corrupted or unreadable on Mac. To avoid the loss of important data, you'd better recover lost data from the unreadable WD My Passport with iBoysoft Data Recovery for Mac.
WD My Passport external hard drive is able to work on Mac and Windows for data transferring or backup. It is popular for its auto backup and passport protection features, keeping your files and folders safe. However, there are times that the WD My Passport becomes unreadable or corrupted on Mac. You may be greeted with errors like 'The disk you inserted was not readable by this computer', which prevents you from accessing all data stored on the drive.
Dec 04, 2018 Another difference is My Passport Ultra is USB-C ready, USB 3.0 compatible and formatted for Windows 10 to with plug-and-play storage out of the box. It also includes with NTFS driver for macOS so you can work on macOS operating system without reformatting. While you have to reformat My Passport into compatible file format in order to use it on.
My Passport; My Cloud Home; My Cloud; My Book; Internal Drives / SSDs; WD Elements / WD easystore; Embedded & Removable Flash; WD ReadyView; Legacy & Other Products; Downloads WD Software; Product Firmware; Product Downloads; Warranty & Returns Warranty Services; Warranty Policy; Data Recovery; Shipping Addresses.
List of all WD firmware and software available for download.
It's so frustrating when you meet this issue. If you are struggling to solve this issue, you will find a collection of verified troubleshooting steps.
Table of contents
1. Causes of WD My Passport not readable on Mac error
2. How to fix 'WD My Passport unreadable' on Mac error?
3. Conclusion
Note: If you received the disk not readable error with three options: Initialize, Ignore and Eject, please don't select 'Initialize'. Initializing the drive will erase all of the data that is currently sitting on the drive, which makes it difficult to recover lost data.
Causes of WD My Passport not readable on Mac error
Let's at first take a look at the complaint from community.wd.com:
'My WD My Passport 2TB Portable External Hard Drive has suddenly become unreadable on my laptop (MacBook Pro Server with macOS 10.12 Sierra) and I have tried on a MacBook Pro 2011 running 10.13 High Sierra with the same results. Any suggestions to fix my unreadable WD drive?'
The good news is, even though you have been prompted with an error message, at least your WD My Passport drive is recognized. There are many reasons that can lead to a drive not being readable, but essentially this is because the internal file system is damaged. Some of the possible reasons for this error are described as follow:
Mac malfunctions
Outdated drivers
Faulty connections
Write-protected drive
The WD My Passport is not formatted
An internal file system error or bad sectors
Virus/malware infection to your WD My Passport
Incompatibility issue between your WD My Passport and Mac machine
Accidental interruption or removal of your WD My Passport during transferring data
How to fix 'WD My Passport unreadable' on Mac error?
In most cases, the issue can be repaired with a simple initialize. But this operation will remove all data stored on this drive. Are there any other ways to fix WD My Passport unreadable issue on Mac? Of course, just try these solutions one by one:
Solution 1: Re-insert the WD My Passport
The first and foremost thing is to remove the WD My Passport safely from Mac and then re-plug it into the USB port properly. If the external hard drive mounts and appears on the left sidebar of Finder, then you can access the drive. However, if the WD drive still won't mount or the error persists, continue with the next method below.
Solution 2: Check the Mac computer
The next step is to check whether your Mac machine has a problem or not. Just connect a different storage device to your Mac. If this error still pops up, the problem may refer to your Mac machine, you can restart your Mac to see if everything works well. Otherwise, if you can see the other drive in Finder, the problem is associated with the previous WD My Passport.
Solution 3: Check if the WD My Passport is encrypted
The WD My Passport for Mac corrupted or readable issue can also happen if the drive is encrypted by BitLocker. By default, the Mac computers cannot recognize a BitLocker encrypted drive, which means you are unable to read or write BitLocker encrypted drive on Mac.
You can insert the drive in a PC and then turn off the BitLocker encryption so that it can be read on Mac. In addition, you can access a BitLocker encrypted drive with the help of a third party tool.
Solution 4: Update Mac drivers
Drivers enable one or more hardware devices to communicate with the computer's operating system. If drivers are out-of-date, a variety of issues will happen such as the disk not readable error. Apple handles all system and driver updates for your system. To check if any updates are available, please do the following:
Step 1: Go to Apple menu and select 'App Store'.
Step 2: Click on the 'Updates' button located on the top pane.
Step 3: Check available updates for your system and applications.
Solution 5: Repair the WD My Passport in Disk utility
Disk Utility is a built-in used to erase, format or manage internal disks and external storage devices. The most important feature of Disk Utility is First Aid, which helps detect and repair any issue with your disk. Here is how to run First Aid on your Mac to repair the unreadable WD My Passport:
Step 1: Open Disk Utility from your /Applications/Utilities folder.
Step 2: Select the unreadable WD My Passport in the left side bar.
Step 3: Select the 'First Aid' tab.
If Disk Utility tells you the disk is about to fail, back up your data and replace the disk. You can't repair the disk. Otherwise, continue to step 4.
Step 4: Click Run.
If Disk Utility reports that the disk appears to be OK or has been repaired, you're done. Otherwise, you have to back up as much of your data as possible.
Solution 6: Recover lost data and erase the WD My Passport
If the error still exists, you have no choice but erase the WD My Passport. But keep in mind that you will lose all data store on this disk. If you didn't back up important data, you should get lost data back with free Online data recovery software at first.
Step 1: Recover lost data from the unreadable WD My Password on Mac
If you are not sure which data recovery tool you can trust, iBoysoft Data Recovery for Mac is highly recommended to recover lost data from the unreadable or corrupted WD My Passport. This free Mac data recovery can scan and recover lost data from unreadable SD cards, internal Macintosh hard drives, external hard drives, USB flash drives, etc. iBoysoft Data Recovery for Mac provides a complete Mac data recovery solution even if your Mac won't boot/turn on, your device is failing, inaccessible or has lost a partition.
Moreover, iBoysoft Data Recovery for Mac can also recover recently or permanently deleted files, recover lost data from formatted hard drives, recover lost data from unmountable hard drives, and recover lost data from inaccessible drives, etc. This software supports recovering documents, photos, videos, emails, and music files. It's fully compatible with macOS Big Sur 11/Catalina 10.15/Mojave 10.14/High Sierra 10.13/Sierra 10.12 and Mac OS X 10.11/10.10/10.9/10.8/10.7.
1. Download and install iBoysoft Data Recovery for Mac on Mac.
2. Launch iBoysoft Data Recovery for Mac.
3. Select the unreadable WD My Passport and click 'Next' to search for lost files.
4. Preview the searching results, choose those you want and click 'Recover' to get them back.
5. Go over to ensure all lost files have been successfully restored.
Step 2: Erase the unreadable WD My Password in Disk Utility
After you get files off the WD My passport hard drive, you are safe to erase this external hard drive to make it work again. Reformatting will fix the unreadable error and the drive can be ready to use. Then you can copy the recovered data back.
• How to format external hard drive on Mac?
Solution 7: Ask data recovery service for help
However, if the solutions above don't fix the WD My Passport unreadable issue for you, or your WD My Passport even won't show up on Mac, it's probably the drive has been physically damaged. In that case, you should send it to a local data recovery service or replace it with a new one.
Wd My Passport Ultra Software
Wd My Passport Ultra Software Download Mac Version
Conclusion
Wd Passport Ultra Software Download
Hope these solutions have helped you fix the WD My Passport corrupted or unreadable issue. If you have any question about this article, stay in touch with us for further assistance. Specifically, we'd love to hear if you have other solutions for this issue.
1 note
·
View note
Text
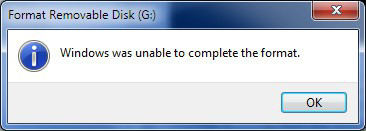
How to Fix Windows Was Unable to Format SD Card?
There are two situations when formatting SD card or USB drive: active or passive. For example, you may just want to free up the space, or Windows forces you to format the card for normal use.
In either case, the question now is that Windows was unable to complete the format. There is no doubt that your SD card or USB drive is in trouble. There are many cases when people are unable to format SD card or even get the storage device detected by the computer.
What may cause SD card/USB drive not formatting? Below are some common cases:
SD card or USB drive is infected by virus, leading to unfinished formatting.
SD card or USB drive is damaged/corrupted and Windows can’t format corrupted SD card.
Disk is write protected and you don’t have permission to make any changes to it.
Then what can we do to solve “Windows was unable to complete the format”? Here we list 6 methods to fix this problem.
1. Fix SD Card Not Formatting Using CMD
The full name of chkdsk is check disk. This tool creates and displays a disk status report based on the file system used by the detected partition. It also lists and corrects errors on disk.
Try these steps to solve Windows was unable to format SD card.
Step 1. Insert the SD card to a card reader and connect it to computer USB. When Windows prompts formatting, click “Cancel” and check the “Properties”. Use the tools in the Properties directly – Start checking. You will find it fails to check disk error.
Step 2. Click “Start” – “Run”, and enter “cmd” – “chkdsk E:/F” (E is the drive of SD card, and /F is the repair parameter).
Step 3. The DOS window closes automatically when the repair is completed. And the properties of the SD card show normally. (Note: It is not recommended to interrupt the CHKDSK process when using /f switch. The disk integrity after interruption is not guaranteed.)
This way will not lose any data, just repair the corrupted SD card.
2. Fix SD Card That Won’t Format Using SD Card Formatter Tool
General SD card repair tools and formatter tools belong to a type, which is forced formatting. This way is likely to repair your SD card, but it can damage the data.
If your SD card is certified product, the repair success rate is very high. This sort of software is more, mainly developed by SD card manufacturer, such as the famous SD card formatter tool.
If it still fails to access your SD card, then you might as well consider a new one. Download SD formatter and check step-by-step tutorial guide to format your SD card on Mac and Windows.
3. Update the Driver of Undetected SD Card
In case the computer system fails to detect your SD card in File Explorer, you may need to update the driver to get the device recognized again.
The problem usually happens on Windows 10, so we will learn how to fix it in a Windows 10 PC. Nevertheless, you can also find similar steps on Windows 7.
Step 1. Right-click on the Start menu of your PC and choose “Device Manager”.
Step 2. Look for your SD card under Disk drives or Universal Serial Bus controllers. You may find the name or brand of your SD card marked with yellow exclamation.
Step 3. Right-click on it and choose “Update driver”, then Search automatically for updated driver software.
Step 4. Check your SD card and access it. If necessary, restart your PC.
3. Assign a New Drive Letter to the Unreadable SD Card
When a removable disk, like an SD card or pen drive, is connected to a PC, then system usually assigns a drive letter to the disk automatically.
However, if the computer system doesn’t assign a unique drive letter to your SD card, then the memory card will not be readable.
In this case, we need to assign a new drive letter to the unreadable SD card to make it visible again.
Step 1. Right-click on the Start menu of your PC and choose “Disk Management”.
Step 2. In Disk Management, right-click on the SD card and choose “Change Drive Letter and Paths…”
Step 3. On the pop-up window, click “Change”, then select a unique letter for the SD card.
Step 4. Click OK to apply the change.
1 note
·
View note
Text
Fix "Please Insert a Disk into Removable Disk"
Here's a solution guide you on how to fix Please insert a disk into removable disk error from pen drive, USB flash drive or memory card which is unreadable or inaccessible, you can follow the step-by-step tutorial to fix this error by using free disk data recovery software.
5 common causes of please insert a disk into removable disk error.
There are many error prompts while using a pen drive, USB flash drive or memory card. Please insert a disk into the removable disk is one of the common errors in Windows or Mac system. Actually, there are 5 common faults may cause this error:
1. Poor Quality flash drive, the flash drive maker may use poor quality chip which might contain bad sectors.
2. Improper operation, such as remove the memory card, USB flash drive while it's still reading & writing.
3. Drive letter conflict. While some other drive or partition has the same drive letter as the USB drive.
4. USB in safe mode. The USB firmware didn't load by the controller.
5. Bad sectors or physically damaged.
What's happening while having Please insert a disk into removable disk error?
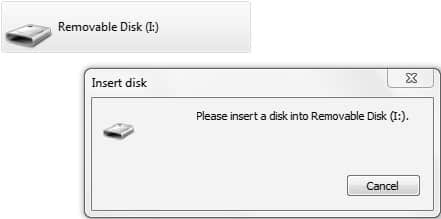
If you right-click the drive letter and check the properties, USB drive shows 0 bytes, which means the Windows system cannot detect its real storage capacity. Besides, by checking Device Manager, the USB drive was assigned with a different name, if you are trying to format this USB drive, you'll receive a prompt Windows was unable to complete the format error.
That's too bad to realize that we may lose the data, such as photos, documents, video, audio, archive files forever, the good news is you can still have the chance by fixing Please insert a disk into removable disk error and then recover data with free disk data recovery software to retrieve them back.
Step-by-step to fix Please insert a disk into removable disk error.
Solution 1: Assign the drive letter
1. Start the computer and log in as Administrator account in Windows.
2. Insert your flash drive into the USB port. Right-click Computer and select Manage, and then click Disk Management.
3. Find and right-click on the USB disk and select "Change Drive Letter and Path" in Disk Management.
4. Select a drive letter that hasn't been occupied by other partitions.
Solution 2: Create a new volume
1. Plug the USB disk to the computer and open Disk Management > Right-click on Computer or This PC icon from the desktop and select Manage > Click Disk Management on the left side.
2. On the right part, you can see disks and partitions in your computer, find out the plugged USB disk which might be shown as Unallocated.
3. Right-click the disk and select New Simple Volume, and the New Simple Volume Wizard appears.
How to recover data with Free disk data recovery software?
1. Download Bitwar Data Recovery, install the software on your computer. Launch the software after installation.
Tips: Make sure do not install the software on the USB drive, otherwise, it may cause permanent data loss.
Easily solved!
Please refer here for more solutions to fix Please Insert a Disk into Removable Disk.
#Fix Please Insert a Disk into Removable Disk#Please Insert a Disk into Removable Disk#Fix Please Insert a Disk into Removable Disk Error#Recover Data with Free Disk Data Recovery Software#Recover Data from Error Disk
1 note
·
View note
Text
DOWNLOAD CD7220 OPOS DRIVER
File Version: 115171625 File Size: 23 Mb Downloads: 3993 Operating Systems: Windows NT/2000/XP/2003/2003/7/8/10 MacOS 10/X Date Added: 25 October, 2019 File Format: exe Download Type: http File Name: cd7220 opos driver Price: Free Uploader: Dove

What's New: - Fixed ACPI S4 resume can found "USB Device not Recognized" message. - Supports Windows 10(cd7220 opos driver 10) Drivers (x86 and x64) - Fixed Issues:- Final(cd7220 opos driver Final) Fantasy XV may experience minor stutter during some particle effects. - Fixed the Safari browser cannot show ”Image Setup" page information. 34. - Fixes(cd7220 opos driver Fixes) sometimes system time will be set to default value. - Fixed an issue that is unable to update firmware on RTL1 modules. - Fixes that AC PWR Auto Recovery(cd7220 opos driver Recovery) malfunction. - Fixed the problem "CPU Fan Fail Shutdown" fails to function. - Fixed USB storage information issue. - Fixes ADM(cd7220 opos driver ADM) recognition problem of DMI slot_number & DIMM data. Users content: Radeon Overlay may not show all available features when some games are run in borderless fullscreen mode. FIX USB mass storage configured fails. GraphicsIntegrated Graphics ProcessorMulti-VGA output support : HDMI/DisplayPort ports- Supports HDMI with max. It effectively started supplementing the older PCI and AGP bus and has become the prevailing interconnect standard. - Update dGPU vbios It is highly recommended to always use the most recent driver version available. This is a driver software that allows your computer to interface with a Canon printer. Implemented onboard VGA compatibility. Do not connect the device to the PC until the software installation is complete. Don't run DHCP in Unify/PPPoE environment. Double-click the new icon on the desktop labeled R231338.exe. Open the link if you need the DOWNLOAD GIGAWARE 25234 DRIVER. Supported OS: Microsoft Windows 8 Pro (32-bit) Windows 8 Microsoft Windows 8.1 (32-bit) Windows 2000 Windows 8.1 Microsoft Windows 8 (64-bit) Windows Server 2008 Windows 7 32-bit Windows Server 2003 32-bit Microsoft Windows 8.1 (64-bit) Microsoft Windows 8.1 Enterprise (64-bit) Microsoft Windows 8.1 Pro (64-bit) Windows Server 2003 64-bit Windows 7 64-bit Windows 10 Windows 8.1/8/7/Vista 64-bit Microsoft Windows 8.1 Pro (32-bit) Windows XP 32-bit Windows XP 64-bit Notebook 8.1/8/7 64-bit Microsoft Windows 10 (64-bit) Windows Server 2012 Microsoft Windows 8 Enterprise (32-bit) Microsoft Windows 10 (32-bit) Microsoft Windows 8 (32-bit) Windows Server 2016 Windows Server 2012 R2 Microsoft Windows 8.1 Enterprise (32-bit) Windows Vista 64-bit Windows 7 Windows Vista 32-bit Notebook 8.1/8/7 32-bit Microsoft Windows 8 Pro (64-bit) Microsoft Windows 8 Enterprise (64-bit) Windows Server 2008 R2 Windows 8.1/8/7/Vista 32-bit Searches: cd7220 opos TLABG2149; cd7220 opos Tzc214-zce; cd7220 opos TL2149; cd7220 opos driver for Microsoft Windows 8 Pro (32-bit); cd7220 opos driver for Microsoft Windows 8.1 Pro (32-bit); opos cd7220 driver; cd7220 opos T TL214-2; cd7220 opos driver for Microsoft Windows 8 (64-bit); cd7220 opos driver for Notebook 8.1/8/7 64-bit; cd7220 opos driver for Microsoft Windows 8.1 Enterprise (32-bit); cd7220 opos T21z Compatible Devices: Computer Cable Adapters; Videocard; Macbook; Ipad; Scanner; USB Hubs To ensure the integrity of your download, please verify the checksum value. MD5: be76d72e5959b6ecf78caf6a05e4741b SHA1: 460d30bc27324f8bfd5da53f0a20f76717c9ce1a SHA-256: 49c3192bea2fccf7bddea617eb77bd7bc6db3f641cb8698657426bc72d77c1d0
1 note
·
View note
Text
DOWNLOAD DELL E2213H DRIVER
Price: Free Download Type: http Uploader: Sky Downloads: 9476 Date Added: 01 November, 2019 File Format: exe Operating Systems: Windows NT/2000/XP/2003/2003/7/8/10 MacOS 10/X File Name: dell e2213h driver File Size: 23 Mb File Version: 615161644

Fixed Issues: - Web Services:(dell e2213h driver Services:) Fixed a bug where about 1.5 GB or larger size files could not be downloaded from the Dropbox folder. - Fixes failure to(dell e2213h driver to) copy to LS120 from FAT32 HDD.# Stops Doctor Voice timer with 'Pause' key pressed. - Fixed the tag(dell e2213h driver tag) ordering error of OGG files in genre. - Fixes BIOS can crisis at DC(dell e2213h driver DC) mode. - Fixed an issue where certain wireless clients may cause WRV200 to flood the LAN(dell e2213h driver LAN) with ICMP Echo requests. - Fixed a bug where a working hard drive was detected as a failed drive in rare occasions. - Fixed a bug which may run out the RX buffer descriptors. - ATi Source BIOS Version: 012.020.000.001- ECLK/MCLK is 800/1000 MHz- Release for HYNIX memory- Fixed display noise when playing movie. - Fixed a bug where sleep timer did not run. - Fixed the issue that the system sometimes may not be able to boot when install the CPU "ADA3800IAA5CU". Users content: Set-up 5 (Yellow)”, and then press the <SET> button. This saved data can be loaded into the camcorder and the settings can be changed after the update has been completed. - A few game titles may fail to launch or crash if the AMD Gaming Evolved overlay is enabled. Even though other OSes might be compatible as well, wewe do not recommend applying this release on platforms other than the ones specified. BIOS Update: Modified EIST code. BIOS compile date: 08/17/2004Specifications:The AI7 is the first motherboard with intelligent hardware monitoring: Guru. Officially supports Windows 7. Failover: Improved the security level. PXX output signal bug fixed. Unable to Remote firmware upgrade through PPPoE WAN https://zq3recentprogramsnetwork.blog.hu/2020/03/23/download_motorola_qc_diag_port_driver Supported OS: Microsoft Windows 8.1 (32-bit) Microsoft Windows 10 (64-bit) Microsoft Windows 8 Pro (64-bit) Windows Server 2003 32-bit Microsoft Windows 8 (64-bit) Windows 7 Microsoft Windows 8.1 Pro (64-bit) Windows Server 2012 Notebook 8.1/8/7 32-bit Windows Server 2012 R2 Windows Vista 64-bit Microsoft Windows 8.1 Pro (32-bit) Windows 7 32-bit Notebook 8.1/8/7 64-bit Windows Server 2008 Windows XP 64-bit Microsoft Windows 8.1 (64-bit) Microsoft Windows 8.1 Enterprise (32-bit) Microsoft Windows 10 (32-bit) Windows 7 64-bit Microsoft Windows 8 Enterprise (32-bit) Windows 8.1/8/7/Vista 64-bit Windows 8 Windows XP 32-bit Windows Vista 32-bit Windows 8.1 Windows 10 Windows Server 2016 Microsoft Windows 8 Pro (32-bit) Windows Server 2008 R2 Windows 2000 Windows 8.1/8/7/Vista 32-bit Microsoft Windows 8 (32-bit) Microsoft Windows 8.1 Enterprise (64-bit) Windows Server 2003 64-bit Microsoft Windows 8 Enterprise (64-bit) Searches: dell e2213h driver for Microsoft Windows 8 Enterprise (32-bit); dell e2213h driver for Windows XP 32-bit; dell e2213h Vbe308-beh; dell e2213h V30b; dell e2213h driver; dell e2213h driver for Microsoft Windows 8 Enterprise (64-bit); dell e2213h V VB308-3; dell e2213h VB3086; dell e2213h driver for Notebook 8.1/8/7 64-bit; dell e2213h driver for Windows 7 64-bit; dell e2213h VBMXR3086 Compatible Devices: Computer Cable Adapters; Videocard; Android; Laptop; Apple; Usb Cables To ensure the integrity of your download, please verify the checksum value. MD5: c30ab84716e15dc5d8d8a9fc7b7b9103 SHA1: 68253e9c57ebbba30c6f64d5646079c0e76b7699 SHA-256: 9653734aa77deae530388fe9ff262e883e17b7324507229914f7c9eb5876b3e8
1 note
·
View note
Text
A Secret Weapon for Tv Serial Update

The Pirate Bay is also among the very best torrent sites for the newest tv series and episodes. Movie villa has all types of videos and TV indicates that you may be searching for. If you're unable to peek supporting the TV then you might need to take out the TV from the mount to get what you're after.
The B7 series isn't any different. The System Info page will provide you plenty of info about your TV. This is an enormous issue for me. Read our review below to learn why.
SO don't be worried about switching devices. This system software update improves the caliber of the system performance. Pricing on those models isn't yet offered. If you wish to update to the most current Sony drivers, click the Latest driver'' at the base of the software to find the most recent ones.
Monroe explains there are many different Grimm creatures and not all them are villainous. You won't ever be bored again. This isn't how it's supposed to be.
As stated by the woman's complaint, the incident happened in October 2018. A couple of days later I got another e-mail saying an exchange request was submitted and approved. It was not a particularly advanced model. however, it still did a superb job for the cost. Many others are arrested in relation to the crimes, simply to be released while the killer struck again utilizing the exact same gun and modus operandi.
Finally, he finds a solution and obviously, Gobindo appears to be the greatest solution Ishaaron Ishaaron mein Spoiler. We ask for everybody's understanding. I'm told they need to appear into my issues and that I will be reached later with a solution. Get your head off your lethargy and it may well disappear.
So just choose the format you need and get started downloading as easy as that. In case you have any other Windows driver-related problems, see Windows Driver Solutions section on this website. If you're a Dish TV user, you'll certainly love it. For instance, you can delete cookies for a certain site. Attempt to open it and it's going request password.
It's an enormous database and collection of Serials which you have to watch. Nothing was confirmed, however. There's also an exhaustive collection of filters, so it's possible to restrict your search to find precisely what you're searching for. Look out for a few of her million-dollor expressions!
Presumably Adnan want to await the next roundand there'll be a lot next roundsoutside of prison. It is linked to an upstream port that employs a removable cable like a printer. Though there are many kinds of USB connectors, a lot of USB cables are among two types, type A and type B. A couple of the stations definitely seem to be of a more adult nature (how you decide to use that info is all up to you).
I really like that sort of drama. The only drawback is that there are many ads shown per episode. To watch the whole episode the viewers will need to visit voot.vom. This is among the most well-known shows recently. Check back each Tuesday for a completely new batch of totally free episodes.
1 note
·
View note
Text
Convert Aiff To Mp3
Now that you know the way to export your GarageBand songs to iTunes and find out how to use your custom music with the other iLife purposes, let's look at the way to convert your AIFF files to MP3 in iTunes. A MIDI file comprises no actual audio data (the digital representation of analog sound), however somewhat numeric instructions that set off a sequence of notes (with directions on every notice's length and volume). These notes are played by a MIDI player using the available "instrument" sounds on a computer's sound card. The operate is similar to the way a player piano roll creates a song when run by on the player piano. Whereas writing my Mac Cover Your Desktop" application , I am unable to work with sure sound file formats yet, so I have been digging around trying to determine easy methods to convert Apple's CAF" file format into a format I can deal with, and I really want files to be in an AIF, MP3, WAV, or AU format. Click on Convert tab in the principle window to open the "Audio Conversion" window. As for Windows customers, http://www.audio-transcoder.com/how-to-convert-aiff-files-to-mp3 whether or not you are utilizing PC, Windows tablets or telephone, you can too use Windows Media Player to convert AIFF recordsdata into MP3. Windows Media Player is a default media player for Windows operation system. As for the case, you shouldn't have to put in other program for converting AIFF information. Simply study more detailed information about easy methods to convert AIFF to MP3 with the following course of. Though the QuickTime system extension is required to play amov file, it's broadly distributed and available for both Windows and Macintosh methods. In addition, latest versions of both Netscape Navigator and Internet Explorer come with the QuickTime plug-in, so a QuickTime audio participant could be embedded proper on the page. It's a reliable format since you may assume most users have the suitable plug-in or player.
Hamster Free Audio Converter is said to work with Home windows 7, Vista, XP, and 2000. Convert your audio files without spending a dime after assigning an email tackle of the place you need the download link to be sent from Zamzar and not using a subscription plan. Right now I introduce you all-in-one audio conversion software program, Bigasoft Audio Converter. Bigasoft Audio Converter is an easy-to-use audio conversion instrument supplies a speedy method to convert AIFF file to almost all codecs including MP3, WMA, M4A, AAC, AC3, WAV, Aiff to Mp3 converter free Youtube OGG, AIFF, ALAC, FLAC, CAF, etc.Every is completely different by way of creating lossy codecs. Some are better than others, however most use the usual LAME encoder. Considerably surprisingly not all DAWs provide MP3 export, so check your user handbook. Pro Tools has first rate MP3 options as do many different standard DAWs (ex. Logic, Cubase, Reaper, GarageBand, Wavelab, Soundforge, and many others.).Open Video Converter, and drag & drop youraiff file onto it. Or click the "Add File" on the left side of high toolbar, browse and select the AIFF audio file. Upload the AIFF file you want to convert by clicking Add File on the program. You'll be able to add a singleaiff file or a wholeaiff folder to transform two or extra AIFF information on the identical time.Immediately convert to common cell system formats after which transfer transformed or edited video to them simply with USB cable. Step 1: Choose AIFF files or paste URL to add. Click "Profile" drop-down button to pick "MP3 MPEG Layer-3 Audio (.mp3) from "General Audio" class as the output format. Besides, MP3 to AIFF Converter could be considered a video downloader to download your favourite movies from many standard video websites like Dailymotion, YouTube, Yahoo, Vimeo, and many others.It is vital for audio converter software to work shortly and efficiently in addition to to have all kinds of file format choices, including lossy and lossless formats. Every music streaming service has a most well-liked format for streaming and archiving music - unfortunately, not each service uses the identical format. WAV is an acceptable lossless format for most services. Nonetheless, depending on the service, that file might be converted and compressed to a special format. MP3 recordsdata might be uploaded to all the popular streaming services, but there isn't any purpose to transform a lossless file format, resembling WAV, to MP3 if you don't have to.Next, click on on Configure Encoder to vary the settings for the LAME MP3 encoder. By default, it is going to be set to Commonplace, Quick, which does not offer you a really top quality MP3 file. Switch MP3 recordsdata to iPhone, iPad, Android and different devices easily. A superb MP3 converter for becoming a member of audio recordsdata. works pretty quick, without errors.
1 note
·
View note
Text
How To Download And Convert Spotify Music To FLAC Format?
Free Audio Converter from DVDVideoSoft allows you to convert audio files to completely different output formats so to play them by way of varied gadgets and packages. You'll be able to convert one supply FLAC file into several formats concurrently for various utilization. Third, click on Setting icon to set FLAC as the output format and output path earlier than the conversion as your need. The audio converter app works completely-i lastly found a freeware to convert Flac to mp3 конвертер скачать to Apple lossless and maintain the tags. FreeRIP is a top quality CD to MP3 converter: it allows you to positive grain set compression parameters. Anyway if you are not a digital audio expert, simply leave FreeRIP MP3 encoder settings on their default and you'll get top quality MP3 information with nice compression fee. This gets us to why FLAC is awesome. It is all about preservation and archiving! FLAC uses much less space than WAV, and permits extra exact tagging, making it splendid as a long-term digital storage medium for audio. Many audiophiles - rightly - love FLAC because of this. Unable to transform my WAV files. Upon discovering this, figuring out how one can uninstall this was not simple. As a chrome extension, customers do not need to put in every other software program on their extra gadgets. And this Spotify to mp3 converter online free software is wonderful. Using FLAC to compress an audio file to approximately 50% of its authentic dimension. The principle advantages of a FLAC file in addition to it being lossless is that it may be used for streaming, and decoding is fast, allowing for actual time decoding to happen. A FLAC file additionally incorporates a number of data integrity checks within the header file. The metadata associated with the audio has been future proofed additionally to permit new fields to be defined without impacting current decoders. Consider setting this value to 1 for uploads to verify the converted MP3 information are named correctly (the tradeback in this case is that you will be unable to convert untaggedflac recordsdata although). MediaHuman Audio Converter là ứng dụng chạy trên các thiết bị sử dụng hệ điều hành Mac OS X và Home windows, hỗ trợ người dùng chuyển đổi các tập tin âm nhạc hoàn toàn miễn phí sang các định dạng MP3, AAC, WMA, FLAC, WAV, OGG hay AIFF hay Apple Lossless, cùng nhiều định dạng khác. Let's turn a disc into some FLAC files. On the principle interface, click on the blue CD icon with the purple plus on the highest bar to pull in information about your disc - all being nicely, it's going to discover the album identify, cowl art and the like, though if the disc has been released a number of instances you may wish to choose the proper model for accuracy. To avoid that some passages can sound loud, whereas others have a very low quantity. clarity of music online normalize album. methods to enhance music volume with out distortion mp4 volume increaser download freeware raise quantity. sound code to make nokia volume louder achieve improve. No, there may be not. FLAC is considered to be a lossless format, and no audio data shall be misplaced within the conversion. You can see on your self by comparing a file that has been compressed to FLAC then decompressed with the original WAV file. In my humble opinion, you can't go flawed with good outdated MP3 information at the next bitrate, because you'll be able to play them on just about any system and system around. In response to , a file transformed in CD quality" (256 kbps) that takes up 2.2 MB will be 1.7 MB in FM high quality" (192 kbps) and 1.1 MB at honest high quality" (128 kbps). I'd warning against utilizing anything lower than 192 kbps when changing your music. Anything decrease than this flattens the sound and reduces much of the readability—and to be honest, laborious disk house is fairly low cost nowadays. First, whereas Apple did create the ALAC format, it is now open supply, so there's no monopoly. They do not reluctantly" acknowledge the existence of MP3 and MP4; iTunes first launched supporting solely MP3. Then it added AAC, which is MP4, which scads of people thought was a proprietary Apple format, and received all crazy about. AAC is superior to MP3, however they received accused of the same thing you wrote here, as a result of not many other apps or gadgets supported it initially. They all do now. Kind of like after they introduced USB on the primary iMac; now USB is the usual.
Wondershare is a pioneer within the making of impressive utilitarian applications to be used in all circles of life. From video enhancing to media file conversion, comes the Video Converter Free, from this advanced expertise company that can assist you to with all FLAC to MP3 Home windows and Mac conversions. It is a free FLAC to MP3 converter with interesting options that includes adding watermark, subtitles, trimming particular effects and many others. With this converter, one can convert recordsdata and share to all devices. It additionally comes with editing options and the conversion speed is terrific.Whether or not it is Bach, the Beatles or Beyoncé, you first have to get your music right into a format that works for each you and your devices. When you're listening to sincere-to-goodness CDs using an honest-to-goodness CD player, that is typically an easy proposition. But in the event you'll be using any other sort of music player—an iPod, Android cellphone, or Control4 dwelling automation system—you must convert your music into a playable format. It helps to know just a bit bit about digital music formats and what they imply.Since it is a FLAC to MP3 converter only, anticipate the conversion process to happen as it's automated. Now that you simply understand the distinction between each format, what must you use for ripping or downloading music? Typically, we advocate using MP3 or AAC. They're suitable with nearly each player on the market, and each are indistinguishable from the original source if encoded at a high bitrate. Unless you may have particular wants that suggest otherwise, MP3 and AAC are clear selections.
1 note
·
View note
Text
Repair flash drive
Can a corrupted/broken, damaged USB drive be fixed and retrieve data back? A USB drive, just like any other data storage device, has the possibility of corruption or inaccessibility can be because of physical and logical issues. In the next following guide, we will show you how to repair the corrupted USB drive and get your data back. We introduce Recoverit Data Recovery which is a professional USB data recovery tool to help you retrieve USB data back.
How to Repair Corrupted/Broken/Inaccessible USB Flash Drive
How to Recover Files from Corrupted USB Drive ?
Repair flash drive
What Caused the USB Drive Got Broken?
When your USB drive gets corrupted or damaged, you will get an error message like "Please Insert Disk into Removable Disk". The other common errors: "USB Device Not Recognized or Malfunctioned", "you need to format the disk before using it". The error is a clear indicator of a corrupt flash drive controller software. The drive got virus-infected and the files got corrupted. It also indicates there is a problem with the NAND memory. If it is a relatively new USB drive, it can be caused by low-quality NAND chips usually a feature in cheap drives. Not being able the access the controller software has caused the drive to be unreadable by the operating system.
Flash drive repair for computers is still a lot easier to use with a better recovery rate compared to ones for SD cards. However, the software you use to recover data from damaged USB drive needs first to be able to detect the drive especially since corrupted drives will not mount as easily. Then the software will need to recover data in one of the many strange formats that are used.
How to Repair Inaccessible USB Flash Drive
1. How to fix Undetectable USB Flash Drive
The first step to repair a USB drive is getting the Windows operating system to recognize it. The steps below will help force the Windows operating system to recognize it, the steps to fix USB flash drive not recognized error.
Start by clicking on 'Control Panel' and then 'Drive Manager'.
Click on the '+' symbol to expand on the 'Disk Drives' list.
You will see an arrow that faces down across the 'USB drive' Just double-click on it and choose the 'Enable Device' option.
Then you click 'next' and then 'next' again, and finally, it's done.
Once the drive recognition steps have been completed, you then have to assign drive letters. This can be done by following the steps below:
Click on 'Start' then 'control panel' and then go to 'Security' and choose 'Administrative Tools' and click on 'Computer Management'.
Right-click on your USB drive. You then choose the 'Change Drive Letter and Paths'.
Click on the 'Add' button and then 'OK'
You can now assign any one of the available drive letters to the USB drive by simply clicking on it.
You then right-click on the drive and give it the 'online' designation.
2. How to Fix USB Drive Logical Issues in Windows
The first step is to insert your USB thumb drive into the computer's USB drive.
Click on 'My Computer' and choose the USB drive that appears.
Right-click on the drive and go to 'Properties'.
Then choose the 'Tools' tab.
Click on the 'Check Now' button.
You should be now presented with two repair options, i.e. "Scan for and attempt to recover bad sectors" and "Automatically fix file system errors".
Check both the boxes and click 'start' to commence the scanning process.
Once the scan is complete click 'close.'
3. For Windows 7 Users as Following Steps:
Start by inserting the USB drive into the port of your computer
Right-click on the USB drive in 'My Computer' and then go to 'Properties'.
Click the 'Tools' tab.
Then click on the 'Rebuild' button.
The scan takes a while to complete after it completes close the 'scan' window.
Then just right click on the USB drive and then 'Eject' before removing the USB drive from the computer.
4. Windows is Unable to Format the Drive Error:
Step 1. The USB drive should be inserted into the port and then right-click My Computer icon. Select the "Manage" option
Step 2. Click the Disk Management option.
Step 3. Select the faulty drive and make sure that it is checked for health and the other factors that are being presented by the system
Step 4. Right-click and select "Format" option to format it
Recover Files from Damaged USB Drive
Hope those solutions can help you fix or repair the corrupted USB flash drive, what if all cannot solve the problems, you should buy a new one to replace or follow the next steps to recover your data from the corrupted flash drive with Recoverit Data Recovery program. It is the professional USB data recovery software to recover lost data from corrupted/broken/damaged/inaccessible USB flash drives.
The USB data recovery program can easily recover deleted files from USB flash drives on Windows and Mac. Undeleted files from a formatted USB device, restore files after virus-infected USB, or any other data loss issue from USB flash drive.
Download | Win Download | Mac
Steps to Recover Data from Corrupted USB Flash Drive
Download and install Recoverit Data Recovery on your computer. Connect your USB drive to the computer and follow the next steps to perform flash drive recovery on Windows computer. If you are working on Mac, you should download Recoverit Data Recovery for Mac.
Step 1 Select the USB Flash Drive
Make sure your USB drive is detected by the computer, select it, and click the "Start" button to process.
Step 2 Scan USB Flash Drive to Search Data
Recoverit Flash Drive Data Recovery will start a quick scan to search for data. If you cannot find your data after the first scan, you can go to scan again with "All-around Recovery". It will search for more files but will take more time.
Step 3 Preview and recover data from a USB drive
After the scan, you can preview some recoverable files like photos and images. Select your data and click the "Recover" button to get your data back.
Note: Please do not save any recovered data to the damaged or corrupted USB drive, get a safe storage device to save all recovered data to avoid data loss again.
This powerful data recovery software can easily help you retrieve lost files from corrupted flash drives, otherwise, it also can help you recover deleted or lost files from other external devices like SD memory cards, digital cameras, mobile phones, external hard disk drive, etc. Download Recoverit Data Recovery software as below and get your data back.
0 notes
Text
Rufus usb tool windows 7 ubuntu

#Rufus usb tool windows 7 ubuntu how to#
#Rufus usb tool windows 7 ubuntu install#
#Rufus usb tool windows 7 ubuntu 64 Bit#
#Rufus usb tool windows 7 ubuntu how to#
For how to use it, you can refer to the complete guide to Windows 10 Media Creation Tool.
#Rufus usb tool windows 7 ubuntu install#
I downloaded the Rufus open source writing tool from File Hippo website, and I downloaded Ubuntu 16.04.2 Desktop amd64.iso 1.4gb from I used Rufus to install Ubuntu to a Kingston Data Traveler 3.0 USB 60gb Device. It also enables users to create installation media such as a USB flash drive to perform a clean install and repair a problematic computer. Thanks for getting me on the road to creating a bootable USB device with Rufus. A lot of users use it to upgrade Windows 10 to the latest version. The app is just over 1MB in size and is notably faster than similar competitor apps such as the Windows 7 USB utility, Universal USB Installer, and UNetbootin. Rufus is a standalone app designed to format and create a bootable USB drive for a large variety of ISOs. Media Creation Tool is a free program developed by Microsoft. Utility to create bootable USB flash drives. You can even create a bootable USB drive that includes more than 2 operating systems. It allows users to create a bootable USB drive with Windows Setup, live Linux, offline antivirus, and other programs. Novicorp WinToFlash should be one of the best Rufus alternatives for Widows. It runs on Windows 7/8.0/10, but you can use it to create a bootable USB hard drive with standard Ubuntu if you have an ISO file of Ubuntu. It is designed to a raw disk image to a removable device. Win32 Disk Imager is another alternative to Rufus. This tool is compatible with Microsoft Windows, Linux, and macOS. It loads distributions either by downloading an ISO file or using an ISO file you’ve already had. You can also use UNetbootin, a cross-platform utility, to create live USB systems and load or install a variety of systems without burning a CD. Don’t download any programs from unreliable websites. To get these tools, you can visit the official website of them. They are similar to Rufus in features but they are different from Rufus at the same time. If you are unable to get Rufus or you don’t like this tool, you can try the following Rufus alternatives. It should recognise the installation media automatically during startup but you may need to hold down a specific key (usually F12) to bring up the boot menu and choose to boot from USB. To use it you need to insert the stick into your target PC or laptop and reboot the device.
#Rufus usb tool windows 7 ubuntu 64 Bit#
However, it is supported on Windows 7 or any later versions of 32 or 64 bit only, which means you cannot run Rufus on Mac or Linux.ĭon’t worry. You now have Ubuntu on a USB stick, bootable and ready to go. For example, if your PC runs into a problem and you want to reinstall the operating system, you can download an ISO file of the operating system and use it to create a bootable USB drive via Rufus, and then boot your PC from the USB drive to reinstall OS. It’s totally free and it doesn’t require any installation. Rufus is a tool that enables users to create bootable USB drives with ISO files.
0 notes
Text
I need a mac os x boot disk

I NEED A MAC OS X BOOT DISK MAC OS X
I NEED A MAC OS X BOOT DISK INSTALL
I NEED A MAC OS X BOOT DISK UPDATE
I NEED A MAC OS X BOOT DISK SOFTWARE
Edit /Volumes/YourExternalDisk/System/Library/Extensions/AppleFileSystemDriver.kext/Contents/istĢ. NOTE: Perform these steps with a command line text editor (as Pico, VI) or with TextWrangler. Delete /Volumes/YourExternalDisk/System/Library/Extensions.mkext and Extensions.kextcache if they exist Delete the Nvidia kexts (all begining with NVD, there are 5) from /Volumes/YourExternalDisk/System/Library/ExtensionsĢ. Sudo bless -folder=/Volumes/YourExternalDisk/System/Library/CoreServices -file=/Volumes/YourExternalDisk/System/Library/CoreServices/boot.efi -setBootġ. To do the above, you may have to do a "Get Info" on the boot.efi file on your external drive and uncheck the "Locked" checkbox.ģ. Replace /System/Library/CoreServices/boot.efi with the boot.efi file from the AppleTV boot drive (it is in the same path)Ģ. Copy the unzipped kernel you downloaded in step 2 to /Volumes/YourExternalDiskġ. Be careful here NOT to delete the kernel on your Internal Boot disk!ħ. Delete this file (may have to sudo rm /Volumes/YourExternalDisk/mach_kernel). You will see a file called mach_kernel there.Ħ. From a Terminal window, do this: ls -la /Volumes/YourExternalDiskĥ. Download the kernel from one of the mirrors listed here: For AppleTV (to run OSX)Ĥ. Boot back up to your internal hard driveĢ. This doesn't break Ethernet support for an Intel Core Duo iMac - not sure about others.)ġ. (Note: This is needed to get either the built-in Ethernet to work or the Airport. Get ethernet working with PCGenRTL8139Ethernet 1.2.0Ģ.
I NEED A MAC OS X BOOT DISK UPDATE
Do any other customization you desire, except update to a newer version of Tiger This will let you remote control your AppleTV after you boot it with this installation.ĩ. Click "Access Privileges", check the "VNC viewers" box, and put in a password here. Check Remote Login here (this enables SSH)Ĩ.
I NEED A MAC OS X BOOT DISK SOFTWARE
Go to software update and get all the updates EXCEPT 10.4.9Ħ. Run through the normal 1st boot stuff (Add user, etc.)Ĥ. Run through the complete installation process, selecting your USB drive as the destination.ġ.
I NEED A MAC OS X BOOT DISK INSTALL
Select the CD icon to boot from your install CDĤ. Reboot, holding down the Option key on your keyboard if you want to choose Boot Disk or hold "C" key to boot from DVD disk directlyģ.
I NEED A MAC OS X BOOT DISK MAC OS X
You will probably need Mac OS X Tiger (Intel) purchased separately or install on SATA drive using USB adapter from original disks.Ģ. NOTE: I was unable to install Mac OS X on IDE drive from original MacBook OS X installation disks. Pop in your install disk with the external drive attached When done, you should be able to mount the drive.ġ. (One big, two, whatever) and format them with Mac OS Extended (Journaled)Ħ. Lay out your partitions the way you want. This is required to be able to install Mac OS X.ĥ. On the resultant screen, select GUID Partition Table. Hit the Options button at the bottom of the screen.Ĥ. In the left pane of Disk Utility, select the USB drive, choose "Partition" on the top barģ. Portions of this guide taken from semthex's "Mac OS X running on Apple TV" howtoĪ boot.efi file from an AppleTV (get all bundle of required files here)Ģ. Partitioning portions taken from Turbo's "Creating a disk to boot from USB" notes Install Mac OS X on AppleTV without opening the box This article taken from and refined with appropriate files and notes that will help avoiding lengthy install and errors.
0 notes
Text
Better ds3 tool not recognizing controller

#Better ds3 tool not recognizing controller how to#
#Better ds3 tool not recognizing controller Pc#
#Better ds3 tool not recognizing controller mac#
#Better ds3 tool not recognizing controller windows#
You can further troubleshoot the issues or use any third-party element to fix them. This will scan and show you the results for any issues with your USB device. Step 3 – Open the Tool tab and click Check Now
#Better ds3 tool not recognizing controller Pc#
Step 2 – Go to This PC (My computer for earlier versions) and right-click on the flash drive and go to Properties Step 1 – Plug the USB drive on the computer You can use this method to fix any minor errors present within your USB pen drive.
#Better ds3 tool not recognizing controller windows#
Read through the below procedure: Method 1: Scan the Flash Drive for IssuesĮvery Windows computer has an inbuilt utility to scan and fix minor USB flash drive errors.
#Better ds3 tool not recognizing controller mac#
As said earlier, both Windows and Mac will have different methods. Once, your data from the flash drive is securely stored, you can now proceed with the troubleshooting methods. 3 Methods to Fix USB Not Recognized on Windows So, you can just unplug all the USB devices connected and then connect the USB flash drive to check if the issue is solved. Sometimes, the presence of too many USB devices on the same computer can create conflicts and prevent other USB devices from working. Method 3: Unplug all the USB Devices connected to the PC You can also try and repair the USB flash drive by formatting but that will result in data loss. If the USB flash drive is not recognized on the second PC also, then the USB drive could be corrupt or damaged. Try to connect your USB flash drive to a different PC. Check to see if it's recognized and you can access the drive through File Explorer. You can now connect the power supply, boot the system, and plug in the USB drive. Disconnect your USB drive, shut down your computer, and then remove the power cord from the power supply because modern computers do not shut down completely, so the motherboard is still getting power. Usually, a simple reboot can fix a lot of issues including the USB flash drive not being recognized. Step 3: Now, the USB drive might be visible in a RAW state or as unallocated space or without a drive letter or the USB drive is not visible in the Disk Management. Step 1: Right-click on This PC and choose the Manage option.
#Better ds3 tool not recognizing controller how to#
Here’s how to check the status of the USB flash drive on your PC using the Disk Management tool. What are the Reasons for USB Device Not Recognized Error? Hence, before proceeding with this process, recover your data and save it on a secure drive using Remo Recover. Yes, in the process of fixing the USB error there are chances of losing or corrupting your data. Note: But, before going ahead with the troubleshooting process, you need to secure your data. Here, you will find a few methods to fix such not recognizing USB errors. Hence, try to fix the issue as soon as possible. It may be an initial indication of your flash drive corruption and losing access to data in it. However, such issues can arise in both Windows and Mac systems. Recover data from not recognized USB flash drive – Remo Recover How to Check Causes of USB Flash Drive Not Recognized?ģ Ways to fix USB not recognized on Windows It’s time we dig deep and fix the flash drive not recognizing the problem. It’s just one of the common issues associated with connecting an external device to your computer. It doesn’t mean that the drive is corrupt. These errors when you connect the USB drive are really scary!! These errors generally appear when an external device is connected to the computer and the operating system is unable to recognize it or read it.
"The device you connected to this computer malfunctioned, and Windows does not recognize it.".
For assistance in solving this problem, click this message."
“One of the USB devices attached to this computer has malfunctioned and Windows does not recognize it.
0 notes