
Statistics
We looked inside some of the posts by codeadventure1997 and here's what we found interesting.
Average Info
Notes Per Post
0
Likes Per Post
0
Reblog Per Post
0
Reply Per Post
0
Time Between Posts
2 days
Number of Posts By Type
Text
17
Last Seen Tumblr Blogs


Fun Fact
Tumblr has a low social media market share in South America.
Text
Tips for self taught coders!
Learning to code can be tough, especially when you start making projects! Here I will give you all the advice I can think of that I learned from my time in the Flatiron fullstack software engineering program.
Tip #1: READ YOUR ERROR MESSAGES!
I've had a few friends from the program ask me for help, and the conversation usually goes something like this:
They show that their app isnt working. They go between the browser and vscode erratically telling me that it isnt working. I tell them to open the console in the browser. They see the errors and just say that they dont understand why the code isnt working. I end up going through the error messages and read it with them. They usually havent read any of them.
If "map isn't defined" that probably means that your data changed types or your data isnt updating when you think it is. I then go through the flow of data with them to see when it is supposed to update and we console.log and use debugger until we can see where the data is causing issues.
The error codes can seem overwhelming but they usually give you a very good idea of what is going wrong with your code and are necessary for efficiently writing your code.
Tip #2: Don't be afraid to refactor!
Sometimes you're hours into a project and you have an idea of how you think it should work. Everything has been good until, uh oh, you can't figure out for the life of you how you are supposed to make this next feature work! You spend hours trying different things and end up with over 100 new lines of code trying to keep as much of your app the same as you can. I'm here to tell you, its ok to change your code!
Make that component you know you need, create that serializer, adjust your app's main component! I promise you that the "tedious" refactoring you know you must do is going to work a lot faster than the spaghetti you're making to try and work around your problems (I am speaking from experience, wasting your time is much more frustrating than refactoring I promise.)
Tip #3: Learn how to Google!
Some people are of the opinion that the only good code is code made without any reference, please listen to me when I say that they are wrong. If you're having an issue, chances are that hundreds if not thousands of others have ran into the same issue. The best way to find answers to your questions is knowing how to ask them. If you're having an issue with state in react, start with the error code! If that doesn't help, something like "State not updating after async call in functional component react js" will help you a lot more than "State won't update. Be sure to include the language you are having issues with as well! Many languages are similar in execution but the way you fix issues can be wildly different. Make sure that the answer deals with the version of the language you are using as well. There can be major differences between the different versions and this will affect how you must approach the problem.
Hopefully these tips can help you! I learned a lot of this by running into my own issues and being stubborn with how I code. Don't make my mistakes and happy coding!
0 notes
Text
Dawn of the final week.
I've been a part of the flatiron school fullstack software engineering program since early february. It's hard to believe how far I've come, from barely knowing how to program a calculator that works in the console with python to writing fullstack applications in react and rails with full crud functionality and front to backend communication.
As I work on my final project, I'd like to reminisce on the program as a whole and give my thoughts on each phase.
Phase 1, we were learning vanilla javascript and would simulate a backend with JSON server. This phase was me putting my feet in the water and learning what I would have to later in the program. This was the only phase I had to retake the coding challenge, and at the time it was almost overwhelming. The constant cycle of learn, code, learn, code, was very new to me. I passed the retake of the code challenge and completed my first project. This phase was probably the second hardest, because I was acclimating to the program and needed time to get used to the fast and constant pace of it.
Phase 2, we had finished with vanilla JS and immediately threw ourselves headfirst into react JS. Although it was just as fast paced as phase 1, I found that react was a lot easier to grasp than vanilla JS because of how much more efficient and organized it was. The second code challenge was by far the easiest, I had felt unstoppable. My project had been developed with no major hitches, in my head I had crushed react and would continue to crush the rest of the program. Little did I knew i was due for a humbling in phase 3.
Phase 3 had us switch gears completely. We were no longer working on the frontend, we were learning Ruby, SQL, and Sinatra. Pivoting from the now familiar land of javascript and frontend to the completely new backend world with new languages was the hardest transition by far. Up until the code challenge I had to continue studying. I remember the panic attacks from the stress I was putting myself under. I was worried I wouldn't do well on the code challenge and that I would waste the money I spent getting into the program. Literally the night before the code challenge, something clicked in my head. It all started to make sense and I ended up doing great on the code challenge. The project went well too, I got even more experience with the way the backend and the frontend communicate. I worked on the backend as much as I could on that project because I knew how much it would help me in phase 4.
Phase 4, we piggy-backed off of sinatra into Rails. As far as the learning and code challenge went, This was a close #2 for the easiest of the phases. Rails just makes a backend so simple yet it is so robust, I don't feel like I am trading simplicity with configuration control at all with it, sort of a best of both worlds relationship with Rails. As I said, this phase would have been the easiest if not for, the project. During this project I ended up having to do a lot of troubleshooting between the front and backend. While it was stressful at the time, it was a great learning experience. All of that troubleshooting helped tremendously in phase 5.
Phase 5 is just 3 weeks of project basically. Working on my first project completely on my own has been an absolute treat. I feel like all the stress I've been through has well prepared me for this. I've been experimenting with new things in this project, and I feel comfortable enough with the frontend and the backend to do so confidently. My troubleshooting skills have gotten much better now, I'm not scared to write code anymore. I am still working on my final project but I am super proud of what I've done. I've gone from a man who couldn't do more than basic math and console logs to a man that I feel would be a genuine asset to a team.
As I complete my final project I have been looking forward to the opportunities I've worked to get. I can't wait to see my hard work pay off and I'll be sure to keep yall in the loop!
Till next time,
A software engineer
0 notes

Text
Configure a Rails API to use cookies
Since cookies are such an important part of most web applications, Rails has excellent support for cookies and sessions baked in. Unfortunately for us, when you create a new application in API mode with rails new appname --api, the code needed for working with sessions and cookies in the controller is excluded by default.
To add session and cookie support back in, we need to update our application's configuration in the config/application.rb file:

This will add in the necessary middleware for working with sessions and cookies in our application.
The last line adds some additional security to our cookies by also configuring the SameSite policy for our cookies as strict, which means that the browser will only send these cookies in requests to websites that are on the same domain. This is a relatively new feature, but an important one for security!
To access the cookies hash in our controllers, we also need to include the ActionController::Cookies module in our ApplicationController:

Since all of our controllers inherit from ApplicationController, adding this module here means all of our controllers will be able to work with cookies.
this material was taken from learnco curriculum, I didnt write this page
0 notes
Text
Cleaning the controller code
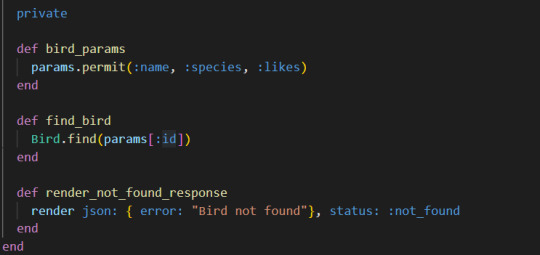
you should start with private methods for throwing an error, finding a specific instance, and keeping your strong params private as well

ActiveRecord exception handling is also cleaner and more efficient than conditional logic so it should be implemented as well
with all this a function can go from

to
much cleaner.
0 notes
Text
Handling errors / exceptions
currently in our examples, we are using find_by to return nil and aid in our conditional logic. if we update our logic to use find instead, though

this will create an ActiveRecord exception instead of turning nil when it doesnt find a match, and we can use that to our advantage.
example of the ActiveRecord exception that gets raised:

we could either handle this exception directly inside the function like so:
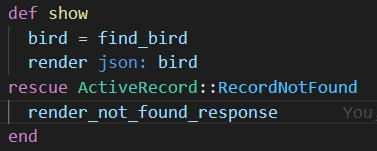
if you anticipate a general error like this, though. it would be beneficial to put the error handling in a higher scope, to check all the functions in the controller you are working with.

using rescue_from allows us to apply our error handling to the entire function. keep in mind you must be specific about the exception you are looking for.
by the way this is what the render_not_found_response looks like, it is a private function in birds_controller

if you want to throw specific errors instead of a general error message like "bird not found" you can use
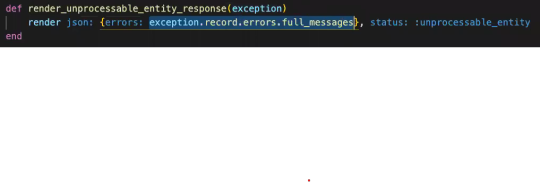
this will show an array of actual error messages instead of a predefined string
0 notes
Text
Custom routes
Why would you want to define a custom route?
Say, you have a like button on the front-end and you want to simply send a request and have all the logic in the back-end. Defining a custom route is an easy way to implement this.
In the routes file, here we have restful routes defined with resources, and one custom route

patch => the http verb this specific route is using
"/birds/:id/like" => the endpoint that this route is monitoring
to: => tells route where it will look
"birds#increment_likes" => says to look in the "birds_controller" and execute the "increment_likes" function inside of that controller
after your custom route is defined, you can go to your specified controller and define your function

now your custom endpoint can step outside of RESTful conventions for added functionality
0 notes
Text
GET / :index / :show
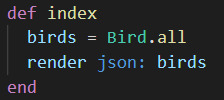

this is an example of an index and a show function in the proper controller
0 notes
Text
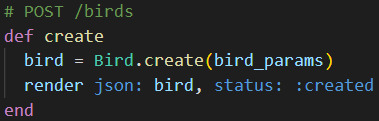
POST / :create
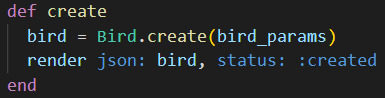
this is an example of a create function in the proper controller
go to strong params to see where bird_params come from
0 notes
Text
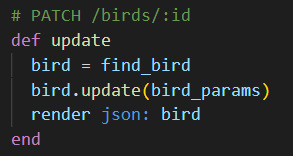
PATCH / PUT / :update

this is an example of an update function in the proper controller
go to strong params to see where bird_params come from
0 notes
Text
DELETE / :destroy

this is an example of a destroy function in the proper controller
head :no_content will give a 204 status code, signaling a successful delete. Doing this means you do not have to send any data in the body of the response.
0 notes
Text
My steps for rails success!
When you're using rails to make an api backend there is a general set of steps you will always end up using or adapting. I will take you step by step along the way to create a CRUD capable api that uses RESTful routing conventions. This post is mostly an accumulation of my handwritten notes and there is varying amounts of detail given. There is at least a lot of reference code if you are just looking for quick code snippets
Step 1: Generate files to set up the sql database
Step 2: open models and establish relationships
Step 3: run migrations (seed if needed)
Step 4: set up needed validations
Step 5: set up routes! (also intro to serializers)
Step 6: Set up the controllers! (many sections)
Step 7: Configure a Rails API to use cookies
0 notes
Text
Strong params
When you are accepting data to your API, such as when you are using :create or :update, strong params limit what can be passed in to your database. Define the strong params in a private function in your controller.
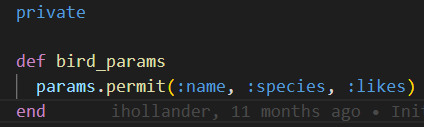
Then you can use your strong params like so:
Now your requests will only use the permitted params when writing to the database
0 notes
Text
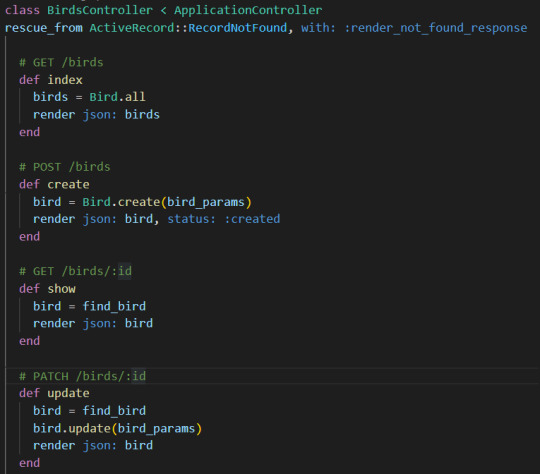
Step 6: Set up the controllers!
This section will be divided into smaller subsections to aid in organization
The clean code will include the complete controller code with strong params and error handling, but the individual examples will not use either since they are standalone examples. Check cleanup section if you just want to look at completed code.
We are deviating from camper examples and will now be using bird api examples from here on out
GET / :index / :show
POST / :create
PATCH / PUT / :update
DELETE / :destroy
Custom routes
Strong params
Handling errors / exceptions
Cleaning the controller code
Final controller code
0 notes
Text
Step 5: set up routes!
routes start in config/routes.rb you should see inside there:

The resources in the file were generated at step 1. This is where the endpoints are defined. By default, our resources expect restful conventions to be used. So, for example, a GET request will look in the controller for an index action. We will touch on controllers briefly in this step to also briefly cover serializers, we will then go more in depth with controllers in the next step.
extra introductory info on route actions and serializers ahead, both will be covered in more detail later
After you define a route in the routes file and a request is made to that route, it will look at the route file to point to the controller with the specified function and go there to execute that function. so if you have a default generated resource like we have in this example, and a get request is sent to /campers, then we need to have an index function in the campers controller.

If you need to render something that deviates from restful practices, you may want to make a new serializer. In this example, we want a new serializer so we can render both a camper AND its associated activities when we do a get request for a specific camper. Generate the serializer with
rails g serializer CamperWithActivities

then in this specific serializer, you can specify what you want to be rendered while using this specific serializer. your serializer will start like this

add attributes you want and relationships as you please, like:

you then connect the serializer in the controller action

now, when you go to the endpoint and make a get request that triggers the show method, it will find the specific camper and then render the camper with ID, name, and age PLUS all associated activities. It does that because we put has_many :activities in our serializer.
0 notes
Text
Step 4: set up needed validations
note: validations are set inside the model
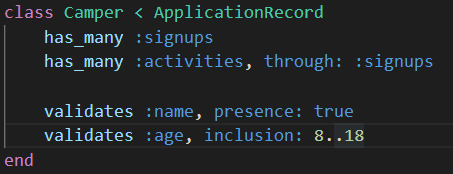

good validation reference
0 notes
Text
Step 3: run migrations (seed if needed)

rails db:migrate

rails db:seed
0 notes